The dxgmms2.sys file is a system driver file in Windows that is associated with the Graphics Rendering capabilities of a computer. However, this file is known to cause various Blue Screen of Death errors. Some of the culprits for these errors include issues with RAM, hard disk issues, corrupted drivers, and incompatible firmware. Despite its many causes, fixing this issue is quite straightforward so it should be easier for you to fix it.
Here are some of the Blue Screen errors related to the dxgmms2.sys file:
- SYSTEM_THREAD_EXCEPTION_NOT_HANDLED
- SYSTEM_SERVICE_EXCEPTION
- KMODE EXCEPTION NOT HANDLED
- PAGE FAULT IN A NONPAGED AREA
- IRQL NOT LESS OR EQUAL
If you have recently created a System Restore point prior to getting the dxgmms2.sys Blue Screen error, then you need to perform System Restore first before you further troubleshoot the problem as it might help in resolving the Blue Screen error. Refer to the steps below to perform System Restore.
- First, press the Win + R keys to open the Run dialog box.
- After that, type in “sysdm.cpl” in the field and tap Enter.
- Next, go to the System Protection tab then click the System Restore button. This will open a new window where you have to select your preferred System Restore point.
- After that, follow the on-screen instructions to finish the process and then restart your computer and check if the problem is fixed or not.
If System Restore didn’t help in fixing the Blue Screen error, now’s the time for you to resort to the troubleshooting tips provided below but before you get started, make sure that you create a System Restore point first.
Option 1 – Reinstall the Graphics Card drivers
- Tap the Win + R keys to launch Run.
- Type in devmgmt.msc into the box and tap Enter or click OK to open the Device Manager.
- After that, a list of device drivers will be displayed. From there, look for the Graphics Card drivers listed under Display Adapters.
- Right-click on each one of the Graphics Card drivers and select Uninstall device and then follow the next on-screen instructions given to uninstall the driver.
- Now reboot your computer. During this time, your system will automatically reinstall the Graphics card drivers.
Note: You also have the option to go directly to the website of your graphics card manufacturer and check if there’s a new update – if there is, download it. After that, you could also check if there’s a new update of the game you’re getting the issue of the black bar.
Option 2 – Try running the DirectX Diagnostic Tool
Since the dxgmms2.sys Stop error has something to do with the DirectX Graphics APIs, you can run the DirectX Diagnostic tool to resolve the problem.
Option 3 – Try updating or re-installing DirectX
If the DirectX Diagnostic tool didn’t work, you can try to update or reinstall DirectX instead. This can help in fixing the problem because when you reinstall or update DirectX, it will replace the incompatible or corrupted components of DirectX from your computer.
Option 4 – Try to update the BIOS
Updating the BIOS can help you fix the Blue Screen error related to the dxgmms2.sys file but as you know, BIOS is a sensitive part of a computer. Even though it is a software component, the functioning of the hardware depends on it largely. Thus, you must be careful when modifying something in the BIOS. So if you don’t know much about it, it’s best if you skip on this option and try the other ones instead. However, if you are well-versed in navigating the BIOS, then follow the steps below.
- Tap the Win + R keys to open the Run dialog box.
- Next, type “msinfo32” in the field and press Enter to open System Information.
- From there, you should find a search field on the bottom where you have to search for the BIOS version and then press Enter.
- After that, you should see the developer and version of the BIOS installed on your PC.
- Go to your manufacturer’s website and then download the latest version of BIOS on your computer.
- If you are using a laptop, make sure that you keep it plugged in until you have updated the BIOS.
- Now double click on the downloaded file and install the new BIOS version on your computer.
- Now restart your computer to apply the changes made.
Option 5 – Use some registry tweaks
- Tap the Win + R keys to launch the Run utility.
- Then type “Regedit” in the field and hit Enter to open the Registry Editor.
- Next, navigate to this registry key: HKEY_LOCAL_MACHINESYSTEMCurrentControlSetControlGraphicsDrivers
- From there, right-click on the right-side panel and click on New > DWORD (32-bit) Value.
- Then set the name of the new DWORD to “TdrDelay”.
- After that, use the next set of instructions and select the one for the Windows version you are using.
32-bit Windows:
- Choose the DWORD (32-bit) value.
- Then type in “TdrDelay” as the name and hit Enter.
- After that, double click on TdrDelay and add “10” as its value and click OK. This will set the response time for your GPU to be 10 seconds.
64-bit Windows:
- Select the QWORD (64-bit) value.
- Next, type in “TdrDelay” as the name and hit Enter.
- Double click on TdrDelay and type in “10” as its value data and click OK.
- Restart your computer to apply the changes made.
Option 6 – Disable the Sleep Functionality
You might also want to disable the Sleep Functionality as it could be the reason why you’re getting the Blue Screen error. There are times when the graphics card’s drivers are being used in the background and if the display goes to sleep and is awakened, it may cause a Blue Screen error. To fix it, you can prevent your computer from going into Sleep mode.
Option 7 – Try to run the Blue Screen Troubleshooter
The Blue Screen troubleshooter is a built-in tool in Windows 10 that might help you fix any Blue Screen errors related to the dxgmms2.sys file. It can be found on the Settings Troubleshooters page. To use it, refer to these steps:
- Tap the Win + I keys to open the Settings panel.
- Then go to Update & Security > Troubleshoot.
- From there, look for the option called “Blue Screen” on your right-hand side and then click the “Run the troubleshooter” button to run the Blue Screen Troubleshooter and then follow the next on-screen options. Note that you might have to boot your PC into Safe Mode.


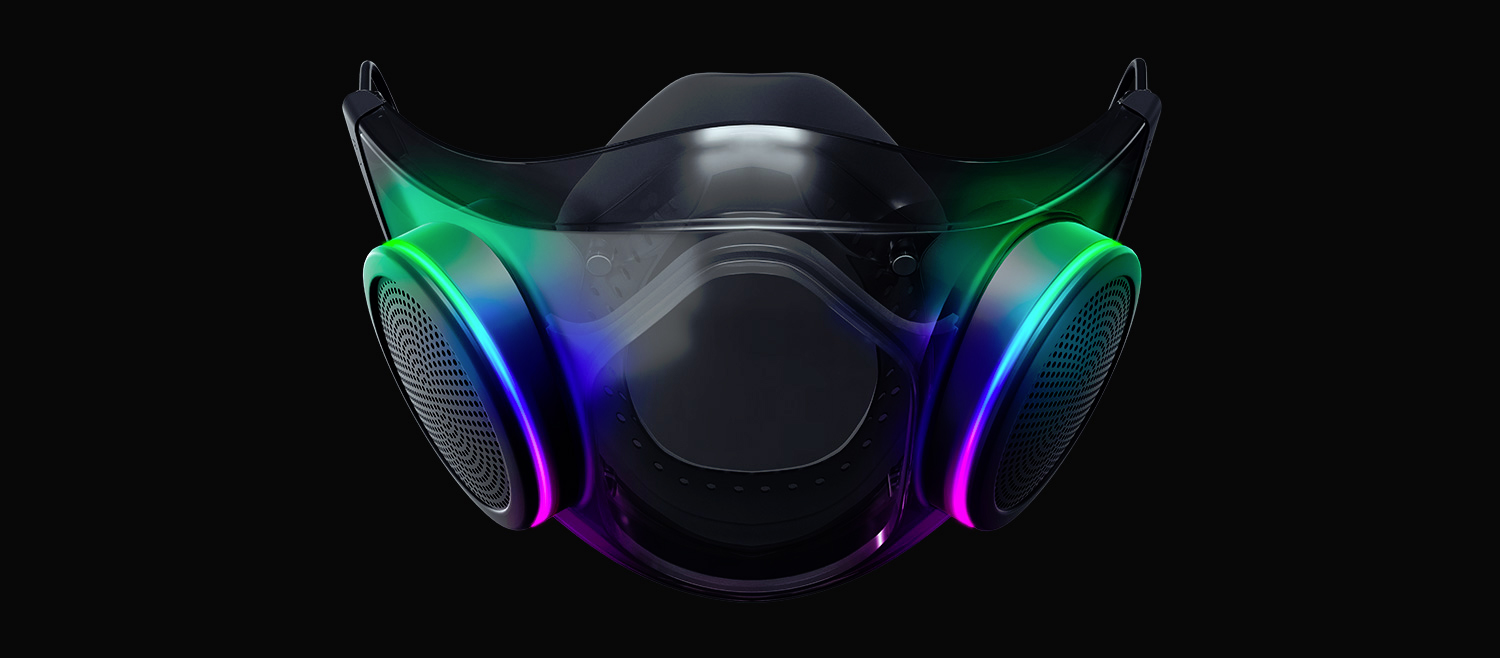 The world today is still sadly under pandemic and by the looks of it, COVID-19 is here to stay, well at least for some time in the near future. Razer seems to think so as well since their upcoming gear is not really what you would expect.
Enter Hazel, a new and upcoming Razer smart mask.
The world today is still sadly under pandemic and by the looks of it, COVID-19 is here to stay, well at least for some time in the near future. Razer seems to think so as well since their upcoming gear is not really what you would expect.
Enter Hazel, a new and upcoming Razer smart mask.