Still sitting on the fence about upgrading to Windows 11 because you don’t know what to expect? Interestingly, the new edition somehow manages to be both a total revamp and still very similar to its predecessor in many ways. It’s really something to experience for yourself.
We do want to give you a sneak peek, though. So here’s an overview of the biggest changes Windows 11 brings to the table.
What’s different in Windows 11?
1. Visual changes
The first thing anyone will notice after switching to Windows 11 is the striking visual difference. The entire interface is smoother, cleaner and more minimalistic than on Windows 10, even resembling the macOS in some instances. Perhaps the most obvious change in appearance is the Start menu and Taskbar location, which is now at the bottom center. It’s actually very neat, but if you’re someone who loves familiarity, don’t worry, you can move it back to the left.
Centralized Taskbar and Start menu
Moreover, you’ll notice that the Taskbar includes a Microsoft Teams icon by default (which you can, of course, remove) and that Live Tiles are gone. The News and Interests section has also been removed - or, shall we say, replaced. As opposed to Windows 10, news, weather forecasts and other information are now displayed as widgets.
To add to the cleanliness of the UI, Microsoft also enhanced the ‘Snap Layouts’ feature to help you better organize your windows and maximize screen real estate. It’s similar to app grouping on your smartphone. In Windows 10 this feature is slightly restricted, as it requires some manual resizing and dragging. In Windows 11, you can just hover over the minimize/maximize option on a window, select a layout and throw the windows in there.
Snap Layouts
2. New accessibility features
Microsoft has certainly paid attention to accessibility with Windows 10, but Windows 11 takes this to a whole new level.
One of the ways Windows 11 has taken things up a notch is by adding the long-awaited ‘Live Captions’ feature and advanced Narrator options.
Live Captions apply both to media played on your PC as well as your own speech when you’re using the microphone. Keep in mind that, as with almost all kinds of subtitles, you have to be prepared for a potential delay. However, it’s barely noticeable and doesn’t take away from the usefulness of this awesome new feature whatsoever.
As for the Narrator, there are three new voice packs to choose from. Microsoft has tried to put emphasis on a more natural voice than we are used to. So, now you can choose between Aria, Jenny and Guy, who will read pretty much anything off your screen out loud. Aside from this, Microsoft has also expanded the list of braille displays supported by the Narrator feature. For users with anxiety or trouble concentrating, a welcomed addition is the Focus app, which is no longer part of the Clock app. It’s now separate and called ‘Focus Sessions’, automatically triggering the Do Not Disturb mode when activated. It blocks all pop-ups and flashes and lets you work in peace until you’re ready to switch it off.
3. Android apps
Android users may rejoice! Windows 11 supports the use of your favorite applications now.
Microsoft has done this by integrating the Amazon Appstore to the Windows 11 Microsoft Store. From there, you can download your favorite Android apps and use them on your PC in a smartphone-like window.
Unfortunately not too many apps are supported at this time, but Microsoft is working on making the emulation possible for many more. Also, the option is only available in specific regions at this moment - check out if you’re one of the lucky ones.
4. Improved gaming performance
Avid gamers will be happy to hear that Microsoft has put some effort into streamlining Windows 11 for their gaming needs.
To give gamers a supreme visual experience, Windows 11 offers the ‘Auto HDR’ feature. As long as your monitor is HDR-compatible, this feature will automatically adjust the colors, brightness and contrast of games without any input from you.
Another update is DirectStorage, which we were introduced to in Windows 10 already. In Windows 11, it’s been improved to tweak loading times and overall gaming performance efficiency even better. The predisposition for it to work optimally is that your device has an NVMe SSD.
The Xbox Game Bar also helps gamers towards a smoother experience. It allows in-game screenshots, viewing processes that are running (similar to the Task Manager), monitoring the CPU and GPU performance and frame rate, integrating the Xbox App and more. There’s also a number of widgets you can now use with the Game Bar, for example the Spotify widget.
Xbox Game Bar
Another cool addition is the Xbox Game Pass, which unlocks hundreds of games to play on your Xbox App, with new additions coming in every month.
5. Smart App Control
Aside from a sleek new look and better accessibility for all users, Windows 11 also comes with a security power-up. Bear in mind that this feature is only available on clean Windows 11 installs.
Smart App Control (SAC) is an AI-powered new feature designed to protect your PC from potential threats. It blocks untrustworthy apps and adware and helps detect potentially unwanted apps, maintaining your PC’s performance and keeping your system safe.
It comes with an ‘Evaluation’ mode, which you should definitely select when running SAC for the first time. That way, the app monitors your usage and assesses whether you’re a candidate for SAC. Some users need it to be on all the time, for others it might be too distracting. Evaluation mode will turn SAC on or off based on your usage.
Don’t disable SAC again unless you’re absolutely sure you don’t need it, since reenabling it will require a fresh install. We recommend you don’t turn it off, as it is a neat feature protecting your data and files from malware at all times.
Summary
Have we piqued your interest in trying Microsoft’s latest OS? It’s a pretty exciting new iteration, but we’ll let you find out for yourself. We hope you like it!
Code 22 is a type of Device Manager Error code. Device manager errors are reported by the drivers causing the problem. It indicates that the devices are disabled in the Device Manager.
This error code is displayed in the following format:
This device is disabled. (Code 22)
It looks like a very simple matter to enable a device from the Device Manager interface but if the device fails to load then there are likely greater underlying problems with the drivers.
Drivers allow hardware devices to communicate with other hardware devices and the operating system.
Drivers contain instructions and operating procedures for devices. Without a driver, a hardware device will not function and may not even appear in the Device Manager.
Solution
Error Causes
Common causes of error code 22 are:
Device is disabled
Driver is outdated
The driver is missing or corrupt
The previous attempt to update the driver failed
Device is damaged
The device is not configured as the default device
This means that though the error code 22 typically indicates that the device reporting the error is disabled but other causes can also be associated with the error occurrence.
Further Information and Manual Repair
Here are some of the best and easy do-it-yourself methods to resolve error 22 on your PC. Try these methods to repair the issue.
Method 1
If the error code 22 is triggered due to a disabled device, then all you need to do to resolve the issue is enable the device.
To enable the disabled device, follow these steps. Simply go to the start menu and type Device Manager in the search bar. Now click on the Device Manager and then click Actions.
After you Click Actions, double click Enable Device. The Enable Device Wizard will pop up. Follow all the prompts from the Enable Device Wizard. This will hopefully resolve the issue.
Method 2
If method 1 doesn’t work then this means the problem is deeper than you think. The problem can be triggered by the missing, corrupted, or outdated driver for the device reporting the error.
In such a situation it is advisable to reinstall the driver for the device. To do this first uninstall the driver for the device reporting error code 22 then reinstall the driver.
For this simply click the Start menu, go to the control panel and then click Performance and Maintenance, and then System.
In the new window, you will then see a tab called Hardware and the Device Manager.
Double click on the device whose driver you need to uninstall.
Click on the properties window with a tab marked driver. Then click on the driver you want to uninstall.
To activate changes reboot your PC. Now reinstall the latest and updated version of the driver uninstalled using the Plug and Play feature.
Method 3
Sometimes devices can also get damaged due to registry issues. In such an event, install Restoro.
It is a PC Fixer deployed with a registry cleaner. The registry cleaner wipes out all the unnecessary and obsolete files damaging the registry and repairs them in a few minutes.
Click here to download Restoro.
As you know, the Microsoft store is a built-in tool in Windows 10 where you can find a variety of applications. It helps users in downloading or updating apps in the system. However, there are instances when you could encounter issues while using it. One of the issues that you could face when using the Microsoft Store app is when it keeps on offering apps you have just updated or when you are not able to update any apps at all.
This kind of issue in the Microsoft Store app might be caused by other issues like a damaged Windows Store cache. There are several options you can check out to resolve the problem. You can try to check the registry setting or run the Windows Store apps troubleshooter or clear the Windows Store cache manually or reset its settings. You could also try to re-register the Microsoft Store app. For more details, refer to each one of the options provided below but before you troubleshoot the problem, make sure that you create a System Restore point.
Option 1 – Run the Windows Store App troubleshooter
The Windows 10 Store Apps Troubleshooter will help you in fixing the problem in Microsoft Store. This is a great built-in tool from Microsoft that helps users fix any app issues. To use the Windows Store Apps Troubleshooter, follow the steps below.
Tap Win + I keys again to open the Windows Settings panel.
Go to Update & Security and then go to Troubleshoot.
Under the Troubleshoot section, on your left-hand side, scroll down to find Window Store Apps.
Then click on the Run the troubleshooter option and follow the on-screen instructions and then see if it fixes the problem.
Option 2 – Try checking the settings in the Windows Registry
The next thing you can do to fix the problem is to check the Registry settings for the Windows Store.
Tap the Win + R keys to open the Run utility and type “Regedit” in the field and then hit Enter to open the Registry Editor.
Next, navigate to this registry path: HKEY_LOCAL_MACHINESOFTWAREMicrosoftWindows NTCurrentVersionCurrentVersion
From there, look for the DWORD named “CurrentVersion” and make sure that its value data is set to 6.3, but if it’s not then change its value data to 6.3
Exit the Registry Editor and restart your computer and then see if it fixed the problem with the Microsoft Store app.
Option 3 – Try to reset the Microsoft Store cache
Just like browsers, Microsoft Store also caches as you view apps and games so it is most likely that the cache is no longer valid and must be removed. To do so, follow the steps below.
Right-click on the start button and click on Command Prompt (administrator).
Next, type in the command, “exe” and tap Enter. Once you do, the command will clear the cache for the Windows Store app.
Now restart your PC and afterward, try opening Microsoft Store again and then try to install your app or update your computer again.
Option 4 – Try to re-register the Microsoft Store app via Windows PowerShell
Tap the Win + X key combination or right-click on the Start button and click on the Windows PowerShell (Admin) option.
If a User Account Control or UAC prompt appears, just click on Yes to proceed and open the Windows PowerShell window.
Next, type in or copy-paste the following command to re-register the Microsoft Store app and tap Enter:
Same as Windows 10, Windows 11 also keeps track of date and time using an internet time server. But in a case that you need to change the date or time for any kind of reason here is a guide for that process:
Press ⊞ WINDOWS + I to open settings
Click on Time & Language in Taskbar
Inside Time & Language click on Date & Time
Turn off Set Time Automatically by clicking on the switch next to it
Below find Set the date and time manually and click on Change
Inside, Change Date and Time window use the drop-down menu to set desired date and time
You might be trying to play music files using the Windows Media Player, but were unable to do so since you encountered an error saying, “Windows Media Player Error – Server Execution Failed” error. If you encountered this error, worry not for this post will guide you on how to fix it using some potential fixes.
In the error message, the “Server execution failed” indicates that the “wmplayer.exe” is still running or shutting down at that point and it is possible that it is stuck which is not able to close properly. To fix this error, there are several potential fixes you can try. The first one is to run the Video Playback troubleshooter. While you could also try to disable the WMP Network Sharing Service or register both the jscript.dll and vbscript.dll files. For more information, refer to the options provided below.
Option 1 – Try to run the Video Playback troubleshooter
The first thing you can do to fix the problem, you can try to run the Video Playback troubleshooter instead. To run it, simply go to Settings > Update & security > Troubleshoot. From there, scroll down until you see the Video Playback option and then click on the “Run the troubleshooter” button to get started. This troubleshooter will detect and automatically fix any problems related to video playback so it should help fix the error.
Option 2 – Try to disable the WMP Network Sharing Service
If the Video Playback troubleshooter didn’t work in fixing the problem, the next thing you need to do is disable the Windows Media Player Network Sharing Service. The WMP Network Sharing Service is used to share the libraries of the Windows Media Player to other users on the network as well as media devices using the Universal Plug and Play. And since you are not using any network here, then you can disable this service to fix the problem. How? Refer to the given steps below.
Tap the Win + R keys to open the Run dialog box and type “services.msc” in the field and tap Enter to open the Services Manager.
Next, look for the Windows Media Player Network Sharing Service from the list of Services and right-click on it.
After that, click on the Stop option and see if it fixes the Windows Media Player error.
Option 3 – Try to register the jscript.dll and vbscript.dll files
Tap the Win + X keys and from the menu select the Windows PowerShell (Admin) option to open an elevated Command Prompt.
Next, type this command to register the jscript.dll file and click on the confirmation box: regsvr32 jscript.dll
After that, execute the regsvr32 vbscript.dll command to register the vbscript.dll file.
Once you’re done, these DLL files will be re-registered and should fix the Windows Media Player error.
A lot of Windows 10 users prefer the black theme on their computers and when you see anything but black it can get quite annoying. Such as is the case of the Taskbar which, as you know, is usually dark, however, when you take a look at the Cortana search bar, instead of seeing black, you’ll see that it has turned white. To fix this issue, read on as we will provide you some options you can try to set the Cortana search bar back to black. Before you proceed, take note that the options provided below will change all white search boxes to black and that one of these options needs administrative privileges.
Option 1 – Try changing the default App mode
As you know, Windows 10 has two modes, namely the Light and the Dark. Thus, you can switch to the Dark mode so that your Cortana search bar will be black as well. However, remember that it will completely change everything into dark mode so there will be no more Light mode elsewhere.
First, you need to click on the Start button and then click on the cog icon to open the Windows 10 Settings.
Next, from the Settings Menu, select Personalization and then select Colours from the left pane.
Then scroll down until you see the “Choose your default app mode” option and select “Dark”.
After you apply the changes, it will change the Cortana search bar into black instantly. Aside from that, you will also see the User Interface changing into dark mode.
Option 2 – Try changing the Registry value
If you are well-versed in editing registry keys, then you need to try this option. But before you go over the steps below, make sure that you create a System Restore point first so that if anything goes wrong, you can always go back to how it was before the changes were applied.
Tap the Win + R keys to open the Run prompt.
Then in the field, type in “regedit” and hit Enter to open the Registry Editor. If a User Account Control prompt appears, just click Yes.
Now that you’ve opened the Registry Editor, navigate to the following key:
After that, double-click on the “Value” key located on the right pane and set the value to “0” instead of “1” and then click Ok to save the changes made. You should now see a black or grey text box color instead of white.
Option 3 – Try changing the Region
In some forums, a lot of users stated that changing the Region also worked out for them in changing the white Cortana search bar to white. Thus, you need to change the region settings of your computer temporarily. To do so, follow the steps below.
Type in “Regional Settings” in the box and then click it as soon as it appears from the search results.
Next, make sure to select a region where Cortana is not available.
Then select apply to that region. After that, it will change the Cortana search bar color to black.
Now sign out and sign back in and revert to the original settings. But the changes you made earlier in Cortana will still remain.
One of themost common errors encountered by Microsoft users upgrading from Windows 7 or Windows 8/8.1 to Windows 10 is the Error Code 0xc1900106. Microsoft users experience a failure in the installation process. Either they will be notified that the installation process was ended but failed or that Windows is not able to install the update.
Solution
Error Causes
More and more Windows users are having trouble upgrading their operating system to Windows 10. There are a lot of errors being encountered by users and one of them is the Error Code 0xc1900106. This error is normally due to the misconfigured system files. If a Windows user encounters this error, most likely their device has some registry problems.
Further Information and Manual Repair
Fixing error code-related issues could be best resolved to do manual repair methods. Applying repair methods manually can help Windows users address the root causes of the errors they encounter, as well as apply definite solutions to rectify the issue.
Most Windows users can be able to implement manual repair methods themselves but there are some cases where help from a Windows professional is needed. If you’re not a very tech-savvy person and not confident performing the manual repair methods yourself, it would be advisable to seek help from a professional Windows technician who is knowledgeable enough to address the errors or problems you are encountering. However, if you don’t want to resort to seeking help from a professional, you can also consider using a powerful automated tool.
In trying to fix Error Code 0xc1900106, here are the following manual repair methods you can take:
Method One: Custom Installation
Make a backup of your personal files
Users of Windows 8/8.1 should Refresh first then proceed to upgrade.
If the Refresh process does not work, reset your device then try again.
If resetting your device still does not work, you can proceed with a custom installation.
When your Windows installation media is ready, you need to choose to boot from CD, DVD, or USB drive to begin setup. (For example purposes, this article will discuss booting from DVD).
When your device is all set to boot from DVD, you will be prompted to Press any key to boot from CD or DVD…
Once you’ve pressed any key, the screen will show the Windows logo which might take a while. No need to worry though, as long as you can see the indicator, you’re good.
Choose your Language, Time, and Keyboard method from the drop-down menu then hit Next.
Click on the Install Now button then wait until Setup begins.
Tick on the I accept the license terms check box then select Next.
Choose Custom: Install Windows only (advanced)
Choose the Primary partition then select Next. You will be prompted by the following warning: The partition you selected might contain files from a previous Windows Installation. If it does, these files and folders will be moved to a folder named Windows.old. You will be able to access the information in Windows.old, but you will be able to use your previous version of Windows. Just click the OK button then wait as the Windows continue to install. Windows will restart once this phase of the setup completes and will reboot into setup once again.
At this point, Windows will detect and install your hardware. Once this finishes, Windows will restart again.
Method Two: Reset Windows Update Components
From your device’s desktop, hit Windows key + X to open the command prompt as admin.
Once the command prompt window appears, you can type or copy and paste the following commands (all at once):
net stop wuauserv
net stop cryptSvc
net stop bits
net stop msiserver
ren C:WindowsSoftwareDistribution SoftwareDistribution.old
ren C:WindowsSystem32catroot2 catroot2.old
net start wuauserv
net start cryptSvc
net start bits
net start msiserver
pause
Exit the command prompt.
After you reset the Windows Update components, see if you receive Windows Updates which includes the firmware updates for your computer.
Method Three: Ensure Windows is Updated
If you have an antivirus, make sure to disable it during the upgrade process.
Run Windows Update to check if the system is updated.
Ensure that the latest firmware and drivers are installed. To be able to do this, go to the computer manufacturer’s website or you can also try contacting company support.
As you know, one of the useful and efficient utilities in Windows 10 is the DISM tool. It can be used with the Command Prompt command line which allows users to carry out various tasks. However, there are instances when the DISM tool could encounter some errors when you try to execute a command. One of these errors is the one that states, “The component store has been corrupted”. This kind of DISM error is due to an error in the image file.
When you encounter the DISM Error 14098 when running the DISM tool, you will see the following content in the command line:
“C:>Dism /Online /Cleanup-Image /RestoreHealth /Source:c:testmountwindows /LimitAccessDeployment Image Servicing and Management toolVersion: 10.0.10586.0Image Version: 10.0.10586.0[==========================100.0%Error: 14098The component store has been corrupted.The DISM log file can be found at C:WINDOWSLogsDISMdism.logC:>”
There are several fixes you can check out to fix the DISM Error 14098, “The component store has been corrupted”. You can try to run the Restore Health command or reset the Windows Update components, or whitelist the dism.exe in your antivirus program, as well as try to uninstall any recently installed updates. Follow the options provided below for more details.
Option 1 – Run the Restore Health command in a Clean Boot State
First, you need to put your computer in a Clean Boot State.
Type in MSConfig in the Start Search to open the System Configuration utility.
From there, go to the General tab and click “Selective startup”.
Clear the “Load Startup items” check box and make sure that the “Load System Services” and “Use Original boot configuration” options are checked.
Next, click the Services tab and select the “Hide All Microsoft Services” check box.
Click Disable all.
Click on Apply/OK and restart your PC. (This will put your PC into a Clean Boot State. And configure Windows to use the usual startup, just simply undo the changes.)
Now open Command Prompt with admin privileges.
Then type and enter this command to execute it: Dism /Online /Cleanup-Image /RestoreHealth
Wait until the process is completed and restart your computer.
Note: If the Restore Health command fails, you can use the “/StartComponentCleanup parameter” by executing this command: Dism /Online /Cleanup-Image /StartComponentCleanup
Option 2 – Try to reset the Windows Update components
If by any chance that the second option didn’t work, resetting the Windows Update components could also help you resolve the problem. How? Refer to the following steps:
Open Command Prompt with admin privileges.
After that, type each one of the following commands and hit Enter after you key in one after the other.
net stop wuauserv
net stop cryptsvc
net stop bits
net stop msiserver
Note: The commands you entered will stop the Windows Update components such as Windows Update service, Cryptographic services, BITS, and MSI Installer.
After disabling WU components, you need to rename both the SoftwareDistribution and Catroot2 folders. To do that, type each one of the following commands below, and don’t forget to hit Enter after you type one command after the other.
Next, restart the services you’ve stopped by entering another series of commands. Don’t forget to hit Enter after you key in one command after the other.
net start wuauserv
net start cryptsvc
net start bits
net start msiserver
Close Command Prompt and reboot your PC.
Option 3 – Whitelist the “dism.exe” in your antivirus program
The DISM error 14098 might also be caused by your antivirus program which could be interfering it from running. To fix this, you have to whitelist dism.exe. How? Refer to these steps:
Open the Windows Defender Security Center from the system tray area.
Next, click the “Virus & threat protection” option and then open the “Virus and threat protection settings”.
After that, scroll down until you find the “Exclusions” and click on the “Add or remove exclusions” option.
Then click the plus button and select the type of exclusion you want to add and from the drop-down list, select Folder.
Next, navigate to this path and select the WinSxS folder: C:/Windows/WinSxS
When a User Account Control or UAC prompt, just click on Yes to proceed.
Option 4 – Try to uninstall recently installed updates
There are times when some Windows Updates affect some mechanism internally when you update your Windows 10 computer. As a result, it causes issues with other components of the operating system which could be the reason why you’re getting the DISM error 14098.
Go to Settings and select Update and Security > Windows Update.
From there, click on the “View update history” option and then click on the “Uninstall Updates” option.
This will open a new window that contains the list of installed Windows Updates.
Now right click on the Windows Update you wish to uninstall and click Uninstall.
Blue Yeti has gained popularity among streamers and users that want a high-quality mic for their setup. Without going into details of the hardware itself I will say it is a pretty good mic. Now the issues that have been reported with it are that Windows 11 can have issues with it resulting in the microphone not being recognized by the operating system. If you are one of the unfortunate Blue Yeti users and have this issue, do not despair because we have a solution for you, several to be more precise so you can easily fix the issue and get back to talking.
Check cables
Sometimes it is not a software problem at all. First thing is to check if by any chance cable of the mic is disconnected, damaged, or similar. If the cable seems fine next step is to plug in the mic into another port in order to eliminate faulty jack on the computer. If nothing happened the last thing to try is to connect the mic to another computer so we can be sure that the mic itself is in working order so we can focus on software. If by any chance mic is not working on another computer that some hardware inspection of it will be required.
Set Blue Yeti as a default device
There is a chance that Windows 11 has not set Blue Yeti as a default audio device for recording and therefore you can not use it. In order to eliminate and fix this issue, right-click on the speaker icon on the taskbar in the far-right part of it and choose sound settings. Go down to the input section and pick Blue Yeti beside Choose device for speaking or recording.
Update driver
More often than not device not working is tied to malfunctioning or a bad driver. In order to eliminate and resolve this issue right click on the Start icon and choose device manager. Inside device manager expand the Sound, video and game controllers section. Right-click on each device in the section and choose update driver. Wait for the update to complete and restart your system.
Run the troubleshooter
Press ⊞ WINDOWS + I to open Windows settings. Go to System in the left pane and click on it. In the right panel choose and click on troubleshoot. Inside troubleshoot click on Other. Scroll down and locate the Recording Audio troubleshooter and then click on Run next to it. Wait for the troubleshooter to finish and follow on-screen instructions to resolve the issue.
Check Blue Yeti microphone privacy setting
Not very often, but sometimes privacy settings can be the issue even when everything else is working perfectly. In order to check privacy settings press ⊞ WINDOWS + I to open Windows settings and go to Privacy & Security on the left panel and click on it. On the right panel click on the microphone. Make sure that toggle next to Let apps access your microphone is ON.
Blue Screen of Death or Stop errors are definitely one of the most difficult issues to face in your Windows computer. One of them is the UNEXPECTED STORE EXCEPTION BSOD error. When you encounter this Stop error on your Windows 10 computer, this means that the store component has caught an unexpected exception. There are many potential causes for this error, but we’ve narrowed it down to a few specific causes – for one, this error could be caused by your antivirus program installed on your computer, two, it could also be caused by outdated hardware drivers on your computer, it could also be an error in the file system as well as some issue with the lock screen app, or even output to an unexpected port. Whichever the cause may be, you can use a couple of fixes laid out below. Make sure to carefully follow them.
Option 1 – Try to update your Display driver
First, boot your computer into Safe Mode.
After that, tap the Win + R keys to launch Run.
Type in devmgmt.msc into the box and tap Enter or click OK to open the Device Manager.
After that, a list of device drivers will be displayed. From there, look for the Display Adapters and click on them.
After that, right-click on each entry under the Display Adapters and select the “Uninstall Device” option from the menu.
Now restart your computer.
After restarting your computer, go to the Settings app and Check for Updates in the Windows Update section.
Note: You also have the option to go directly to the website of your graphics card manufacturers like NVIDIA, Intel, or AMD and go to the section called Drivers then check if there’s a new available update – if there is, download and install it.
Option 2 – Run both the System File Checker scan and DISM tool
If the problem is caused by corrupted system files, then you can use both the System File Checker and the DISM tool. To use them, follow the instructions below.
Tap the Win + X keys or right-click on the Start button and click the “Command Prompt (Admin)” option. Alternatively, you can also search for “cmd” in the Cortana search box and right-click on Command Prompt from the search results, and select the “Run as administrator” option.
After that, if a User Account Control prompt pops up, click on Yes to proceed.
Once the Command Prompt window is pulled up, type the following command and hit Enter:
DISM.exe /Online /Cleanup-image /Restorehealth
Wait for the process to be completed. Once it’s done, type the following command and hit Enter:
sfc /scannow
The command will start a system scan which will take a few whiles before it finishes. Once it’s done, you could get the following results:
Windows Resource Protection did not find any integrity violations.
Windows Resource Protection found corrupt files and successfully repaired them.
Windows Resource Protection found corrupt files but was unable to fix some of them.
Restart your PC.
Note: You should see the “Windows Resource Protection found corrupt files and successfully repaired them. Details are included in the CBS.Log %WinDir%LogsCBSCBS.log” message on your screen.
On the other hand, if you see the “Windows Resource Protection found corrupt files but was unable to fix some of them. Details are included in the CBS.Log %WinDir%LogsCBSCBS.log” message instead, then you should run the following command in Command Prompt:
The command you entered will open up the logs on your Desktop where you can look for files that are causing the error on your computer manually.
Option 3 – Disable Fast Start-up
If you want your computer to boot faster, then you might have enabled Fast Start-up. This feature is ideal for computers that are using a hard disk drive. However, turning on this feature also means that when the computer boots, it might lag some drivers that are loaded when it initially boots up. Thus, it might be the potential cause of the UNEXPECTED STORE EXCEPTION BSOD error. Thus, you need to disable Fast Start-up. To do that, follow these steps:
Boot your PC into Safe Mode.
Then tap the Win + R keys to open the Run dialog box.
Next, type in “control” to open Control Panel.
After that, select Hardware and Sound and click on Power Options.
Select “Choose what the power buttons do” from the left side menu pane and click on Change settings that are currently unavailable.
Afterward, uncheck the “Turn on fast startup (Recommended)” entry and click on Save Changes.
Now restart your PC for the changes to take effect and then check if the problem’s fixed afterward.
Option 4 – Try to run the Chkdsk utility
You can also run the Chkdsk utility to resolve the UNEXPECTED STORE EXCEPTION BSOD error. If your hard drive has issues with integrity, the update will really fail as the system will think that it’s not healthy and that’s where the Chkdsk utility comes in. The Chkdsk utility repairs hard drive errors that might be causing the problem.
Open Command Prompt with admin privileges.
After opening Command Prompt, execute the following command and hit Enter:
chkdsk /f /r
Wait for the process to be completed and then restart your computer.
PrintNightmare vulnerability has been a struggling issue for Microsoft in the past weeks, each time it seems to be addressed and fixed something new popped up and it still had issues.
Microsoft finally addressed the issue but with a price. The default behavior of Point and Print is changed. From this fix onward, the Point and Print driver installation and update behavior will require administrator privileges, which should prevent the exploit to the Windows Print Spooler that could be used by malicious individuals to gain administrative privileges in Windows.
The drawback of this fix from Microsoft is that non-elevated users may have difficulty adding or updating printers. Microsoft feels that the security risks caused by PrintNightmare are worth the tradeoff, though.
If you really want to let non-elevated users add printers, you can follow the instructions in this Microsoft Support article to disable this mitigation with a registry key. However, doing so will expose you to this known vulnerability and isn’t recommend.


 Error Causes
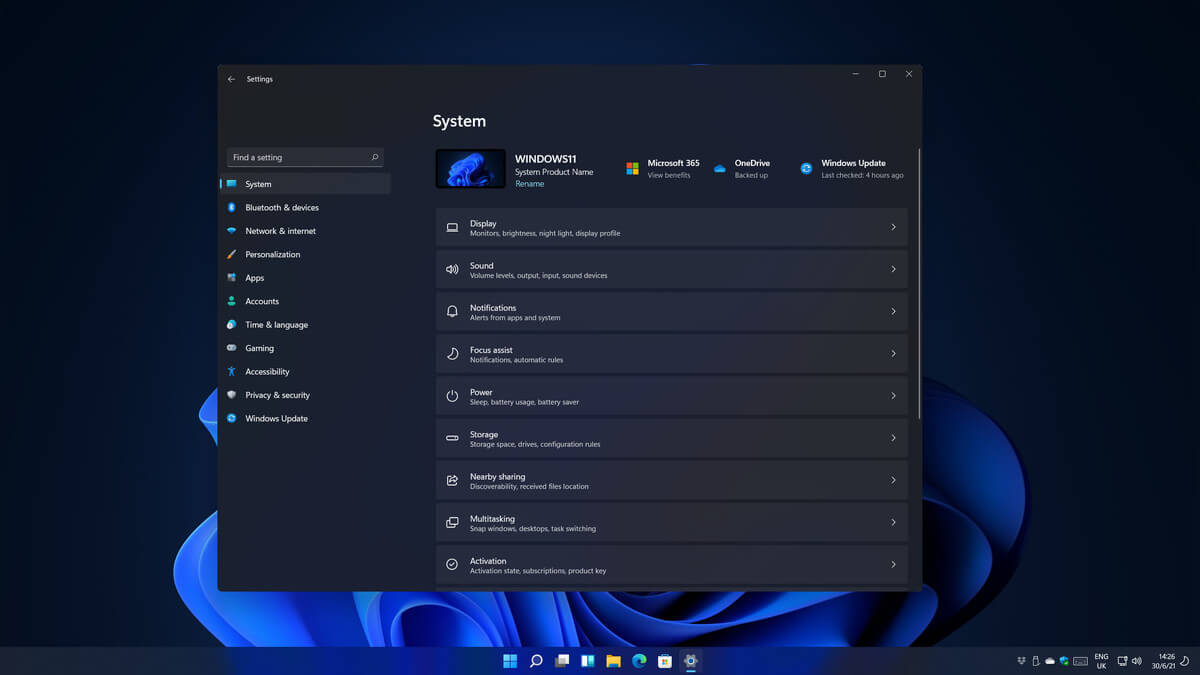 Same as Windows 10, Windows 11 also keeps track of date and time using an internet time server. But in a case that you need to change the date or time for any kind of reason here is a guide for that process:

 Check cables