Still sitting on the fence about upgrading to Windows 11 because you don’t know what to expect? Interestingly, the new edition somehow manages to be both a total revamp and still very similar to its predecessor in many ways. It’s really something to experience for yourself.
We do want to give you a sneak peek, though. So here’s an overview of the biggest changes Windows 11 brings to the table.
What’s different in Windows 11?
1. Visual changes
The first thing anyone will notice after switching to Windows 11 is the striking visual difference. The entire interface is smoother, cleaner and more minimalistic than on Windows 10, even resembling the macOS in some instances. Perhaps the most obvious change in appearance is the Start menu and Taskbar location, which is now at the bottom center. It’s actually very neat, but if you’re someone who loves familiarity, don’t worry, you can move it back to the left.
Centralized Taskbar and Start menu
Moreover, you’ll notice that the Taskbar includes a Microsoft Teams icon by default (which you can, of course, remove) and that Live Tiles are gone. The News and Interests section has also been removed - or, shall we say, replaced. As opposed to Windows 10, news, weather forecasts and other information are now displayed as widgets.
To add to the cleanliness of the UI, Microsoft also enhanced the ‘Snap Layouts’ feature to help you better organize your windows and maximize screen real estate. It’s similar to app grouping on your smartphone. In Windows 10 this feature is slightly restricted, as it requires some manual resizing and dragging. In Windows 11, you can just hover over the minimize/maximize option on a window, select a layout and throw the windows in there.
Snap Layouts
2. New accessibility features
Microsoft has certainly paid attention to accessibility with Windows 10, but Windows 11 takes this to a whole new level.
One of the ways Windows 11 has taken things up a notch is by adding the long-awaited ‘Live Captions’ feature and advanced Narrator options.
Live Captions apply both to media played on your PC as well as your own speech when you’re using the microphone. Keep in mind that, as with almost all kinds of subtitles, you have to be prepared for a potential delay. However, it’s barely noticeable and doesn’t take away from the usefulness of this awesome new feature whatsoever.
As for the Narrator, there are three new voice packs to choose from. Microsoft has tried to put emphasis on a more natural voice than we are used to. So, now you can choose between Aria, Jenny and Guy, who will read pretty much anything off your screen out loud. Aside from this, Microsoft has also expanded the list of braille displays supported by the Narrator feature. For users with anxiety or trouble concentrating, a welcomed addition is the Focus app, which is no longer part of the Clock app. It’s now separate and called ‘Focus Sessions’, automatically triggering the Do Not Disturb mode when activated. It blocks all pop-ups and flashes and lets you work in peace until you’re ready to switch it off.
3. Android apps
Android users may rejoice! Windows 11 supports the use of your favorite applications now.
Microsoft has done this by integrating the Amazon Appstore to the Windows 11 Microsoft Store. From there, you can download your favorite Android apps and use them on your PC in a smartphone-like window.
Unfortunately not too many apps are supported at this time, but Microsoft is working on making the emulation possible for many more. Also, the option is only available in specific regions at this moment - check out if you’re one of the lucky ones.
4. Improved gaming performance
Avid gamers will be happy to hear that Microsoft has put some effort into streamlining Windows 11 for their gaming needs.
To give gamers a supreme visual experience, Windows 11 offers the ‘Auto HDR’ feature. As long as your monitor is HDR-compatible, this feature will automatically adjust the colors, brightness and contrast of games without any input from you.
Another update is DirectStorage, which we were introduced to in Windows 10 already. In Windows 11, it’s been improved to tweak loading times and overall gaming performance efficiency even better. The predisposition for it to work optimally is that your device has an NVMe SSD.
The Xbox Game Bar also helps gamers towards a smoother experience. It allows in-game screenshots, viewing processes that are running (similar to the Task Manager), monitoring the CPU and GPU performance and frame rate, integrating the Xbox App and more. There’s also a number of widgets you can now use with the Game Bar, for example the Spotify widget.
Xbox Game Bar
Another cool addition is the Xbox Game Pass, which unlocks hundreds of games to play on your Xbox App, with new additions coming in every month.
5. Smart App Control
Aside from a sleek new look and better accessibility for all users, Windows 11 also comes with a security power-up. Bear in mind that this feature is only available on clean Windows 11 installs.
Smart App Control (SAC) is an AI-powered new feature designed to protect your PC from potential threats. It blocks untrustworthy apps and adware and helps detect potentially unwanted apps, maintaining your PC’s performance and keeping your system safe.
It comes with an ‘Evaluation’ mode, which you should definitely select when running SAC for the first time. That way, the app monitors your usage and assesses whether you’re a candidate for SAC. Some users need it to be on all the time, for others it might be too distracting. Evaluation mode will turn SAC on or off based on your usage.
Don’t disable SAC again unless you’re absolutely sure you don’t need it, since reenabling it will require a fresh install. We recommend you don’t turn it off, as it is a neat feature protecting your data and files from malware at all times.
Summary
Have we piqued your interest in trying Microsoft’s latest OS? It’s a pretty exciting new iteration, but we’ll let you find out for yourself. We hope you like it!
0x80004001 is an error code that Windows users encounter quite commonly.
This error usually occurs when users try to update an old Windows application or attempt to run a certain application. When this error appears on the screen, the system automatically restarts to stop further processing. The error results in a blue screen after the system boots.
This blue screen is known as the Blue Screen of Death.
Error Causes
There are different files in the Windows operating system responsible for its smooth functioning. Sometimes problems like viruses or incorrect register entries corrupt or damage these files. This is when this 0x80004001 error appears.
Simply put, some of the most common causes that trigger 0x80004001 error are listed below as follows.
Irrespective of what causes this error, it is of utmost importance to troubleshoot it as soon as possible.
Further Information and Manual Repair
While there are several ways of troubleshooting this error, the two most useful approaches have been listed below as follows.
This solution is for advanced users. Start your system and log on to it as the administrator. Click on the Start button. Now select All Programs->Accessories->System Tools. Finally, click on System Restore. In a new window, select the option “Restore My Computer to an Earlier Time”. Now click on Next. A list of restore points will be displayed. Choose the most recent restore point from this list and click “Next”. Now click next on the confirmation Window again. Once the restoration is finished, the computer will restart itself and you will observe that the error no longer appears.
This solution is for beginner or novice users. Download a 0x80004001 error repair utility available online. Install this program on your computer and use it to scan for the error in your system. When the scan completes, find if any feature allows you to fix errors. If yes, click on it. Now restart your computer again. You will notice that the virus has disappeared. It is a good idea to use error repair utilities because they scan the system, diagnose the error and then perform the repair.
Use any of the methods listed above to get rid of the 0x80004001 error once and for all.
Error Code 0x8000ffff is an error that is often experienced while attempting to install updates on a Windows machine. It has been found in Windows 10, although the error has been present in the Windows operating systems dating back to Windows Vista.
Common symptoms include:
Inability to download updates for the operating system
Inability to successfully run updates for the operating system through to completion
There are several basic Windows tools that can be used to attempt to resolve Error Code 0x8000ffff on your machine. While some of these tools may be familiar for basic users, others may require advanced competency in order to be used correctly. If you are unsure of your ability to complete the methods listed below in order to resolve this error code on your system, you may need to get in touch with a computer repair technician who is competent in dealing with Windows Update repairs.
Solution
Error Causes
The most common cause of Error Code 0x8000ffff is that there is a problem within one of the system files or the registry entries on the computer. There are a number of reasons why a device could have an error in these places, from conflicting software commands to updates that were not installed correctly, to bugs within the system, to viruses or malware that have corrupted the necessary files.
Further Information and Manual Repair
There are several common ways that users can attempt to resolve the appearance of Error Code 0x8000ffff on their Windows devices. If you are not sure that you can follow these steps through to completion, you would be well advised to get in touch with a qualified computer repair technician to help you to finish out the repair process.
Here are the best methods to resolve Error Code 0x8000ffff on your Windows machine:
Method One: Restart Your Computer
It may sound obvious, but one of the most effective ways to resolve Error Code 0x8000ffff on your machine is to simply reboot your computer. In some cases, the error shows up because there are processes that the system believes are still running when they really aren’t. Restarting your machine also allows your system to apply any previous changes that have been made and to mark any installations that have been undertaken as being complete.
Reattempt your update installations after you have restarted your computer to see if you are able to finish them out successfully.
Method Two: Run the Windows Registry Repair Tool
The Windows Registry Repair tool is an asset that can make it easy for your system to scan for potential problems in the registry and notify you as to their status. In many cases, the Registry Repair tool can fix the problems that it finds all on its own, although in some cases, you may receive a message that states an error was found that could not be resolved through the program.
The simplest way to access the Windows Registry Repair tool is to do a search for it within the search bar in the Start menu. Once you begin to run the Registry Repair tool, it can take a while to complete its scan, so be prepared to wait for some time once you start it.
Once the tool has completed its scan of your system, it’s always a good idea to reboot your computer so that all of the changes that have been made to the system can be applied successfully to the operating system.
Method Three: Run the Windows Fix It Tool
Another great tool to help in the resolution is the Windows Fix It tool. You can download it directly from the Microsoft website. Once you run it, it will complete a scan of your system to find any potential hang-ups and to attempt to resolve them. After you run the scan, it is a good idea to reboot your computer to allow all changes to be recognized and applied properly.
Method Four: Use An Automated Tool
If you wish to always have at your disposal a utility tool to fix these Windows 10 and other related issues when they do arise, download and install a powerful automated tool.
Instaling and removing applications from your Windows can sometimes leave some traces that are unpleasant and can cause annoyances. One of these annoyances is the program in the startup section of the task manager.
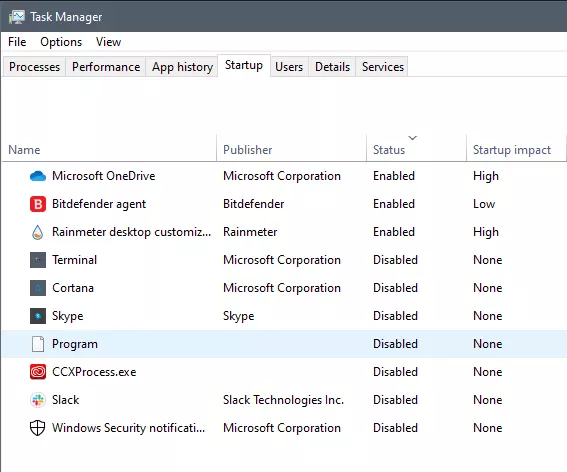
If you ever opened task manager and went into the startup section trying to disable some of the startup items on your Windows boot there might be a chance that you have experienced and seen a program without any icon or information about it just sitting there.
This is due to some applications being removed from the system but for some reason, it still shows itself in startup and it is quite annoying. So here we will show you how to get rid of this annoyance so your startup is clean again without junk in it.
Removing a program from startup
Locating the source of the issue
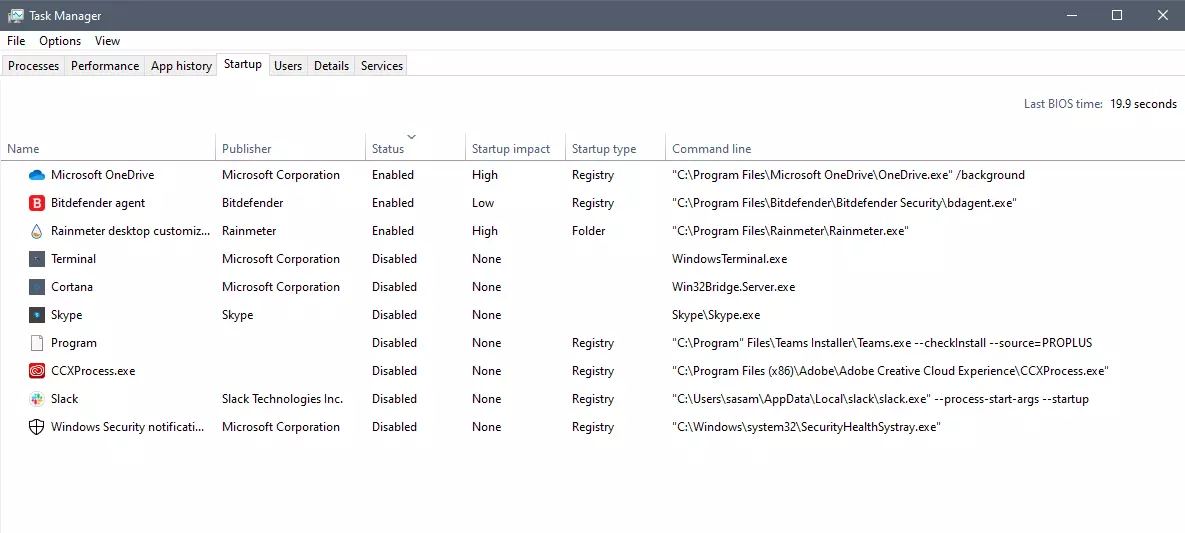
The first thing of course is to open the task manager itself and navigate to the startup tab. Inside the startup tab right-click on the column header and tick or enable Startup type and command line. Now you will see the location of the supposed file (that is missing or you could just go there by right-clicking on the item, but here it is greyed).
99% of the time startup type will be registry since the file is missing, if it was a file fix would be just to simply delete the file in the folder but since it was installed and not properly removed registry key is still present but the file cannot be found. After confirmation that the file is indeed missing and that the startup type is registry open the registry editor by typing Regedit in search and pressing enter.
Removing the key from registry
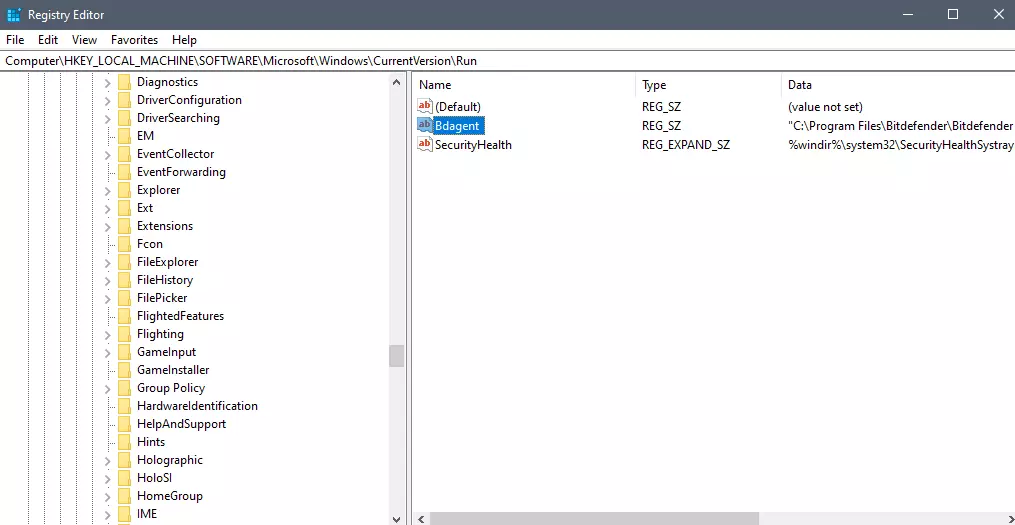
Inside Registry editor navigate to: HKEY_CURRENT_USER\SOFTWARE\Microsoft\Windows\CurrentVersion\Run. Inside on right part, you will see all auto-start entries added by installed applications.
Locate one that is causing issues by comparing its path with the path inside the task manager command line and delete the key. Once the key is deleted right-click on RUN on the left part and choose HKEY_LOCAL_MACHINE to quickly jump on that key location and repeat the process of key deletion if needed. HKEY_LOCAL_MACHINE will delete startup entry for all users and sometimes entry will not be present here since the application is not installed for all users or there are no other users on the machine.
After the procedure is finished, reboot your systems in order to apply changes.
When you get the error information, "The Software Can Not Begin Because MSVCR100.Dll Is Missing", what this implies is that the Computer will be lacking the MS Visual C++ 2010 libraries.
The malfunction is rather frequent throughout installations. It doesn't matter the number of times you try to reinstall the program.
The malfunction can happen whether you've been utilizing your pc for many years, or it's really a recent one.
Solution
Error Causes
a) Missing MSVCR100.DLL: As the problem message indicates, you get this information mainly because MSVCR100.DLL is completely missing.
b) Broken MSVCR100.DLL: When the msvcr100.dll is broken, you will also get the same error, suggesting the software won't start.
The thing you need to understand is the fact that MSVCR100.DLL is playing an important role in the application referred to as MS Visual C++ 2010 Redistributable Package.
Without the MS Visual C++ 2010 Redistributable Package, any software that you simply make an effort to install won't start. You could possibly complete installing it by pursuing proper installation procedures, and then end up getting the "The Software Can Not Begin Because MSVCR100.Dll Is Missing" error.
Further Information and Manual Repair
If you get the "The Software Can Not Begin Because MSVCR100.Dll Is Missing" error information on an effective setup of any software, you shouldn't worry. You can really repair the issue and commence your recently installed software without any more hassle.
Start by checking whether you presently use 64-bit or 32-bit Windows. Visit the start button, in case you use Winxp. Type winver. On the window that appears, click Run, subsequently push enter. Head to Start, in case you use both Win7 or Vista.
Subsequently, click on the search box and type “Computer”. Right-click windows and subsequently click on Properties. Under Windows Edition, you'll find whether your Windows is 64-bit or 32-bit.
Search for the correct variation of MS Visual C++ 2010 Redistributable Package, as soon as you discover whether your Windows is 64-bit or 32-bit. Down load the x86 variant of MS Visual C++ Redistributable Package if your version is 32-bit and you must obtain the x64 variant of MS Visual C++, for those who own a-64-bit version of Windows Operating System.
You must never obtain MS Visual C++ 2010 Redistributable Package from third-party websites.
This is because Microsoft doesn't charge a cent for the files. The files are openly and easily available on Microsoft. These files come in many different variants. Consequently, select what's suitable for your own Computer with regards to the version of Windows which you operate.
Never pick the edition of MS Visual C++ 2010 Redistributable Package that's not compatible or appropriate to your Windows Operating System.
Make use of the release date, when installing MS Visual C++ 2010 Redistributable Package. You might also look out for Service Pack 1 and obtain it for your Windows. Service Pack 1 only ensures that you simply obtain the latest edition.
As soon as you end installing the most up-to-date version of MS Visual C++ 2010 Redistributable Package as demonstrated above, reboot your computer and you'll not have to worry about getting the annoying"The Software Can Not Begin Because MSVCR100.Dll Is Missing" error message anymore.
If you encounter a Recovery Error code 0xc000000e, “Your PC needs to be repaired” error on your Windows 10 computer, then it means that there is some hardware failure or an incorrect drive configuration. Apart from the error, it may be accompanied by different error message such as:
A required device is inaccessible
The selected entry could not be loaded
A required device isn’t connected or cannot be accessed
The selected entry could not be loaded because the application is missing or corrupt
The boot selection failed because a required device is inaccessible.
As mentioned, the error code 0xc000000e or STATUS_NO_SUCH_DEVICE error indicates that there is a hardware failure or an incorrect drive configuration and to fix it, you have to check your cables as well as check the drive with the diagnostic utility available from the manufacturer of the drive. And if you are using older PATA (IDE) drives, then this kind of error also indicates an incorrect master/subordinate drive configuration.
There could be different causes for this error. It could be that the winload.exe file is not accessible or is corrupted or that the boot location for the operating system cannot be found. Thus, for you to boot into and access the operating system, you can try the suggestions given below.
Option 1 – Try rebuilding the Boot Configuration Data (BCD) file
Once you get to the Welcome Screen part, click on Next.
Afterward, click on the Repair your computer option located on the bottom-left part of the window.
Then click on Troubleshoot.
Next, select the Advanced Options and then Command Prompt.
Once Command Prompt has been pulled up, the following command to rebuild BCD files.
bootrec /rebuildbcd
Once the command line is successful in finding out a Windows installation, hit Y to let it boot from the list which will successfully rebuild BCD.
Now type “exit” to close Command Prompt and then restart your computer to successfully apply the changes made.
Option 2 – Try to run the Automatic Repair Utility
You might also want to use Automatic Repair in fixing the error code 0xC000000E. To do so, follow the steps below.
You can start by creating and booting from a bootable Windows 10 USB Stick.
After that, click on Repair your computer located in the bottom left corner when you are on the initial Windows Startup screen.
Next, click on Troubleshoot, and then on the other screen, click the Startup Repair option.
Now select the operating system you want to repair. Once you do that, it will start to repair your operating system. Wait until the process is completed and then check if the problem’s now fixed.
Option 3 – Try checking the physical device connections
You might also want to try checking if there are other devices that are connected to your PC. This is because of the configuration of the BIOS or UEFI might be configured in a way that any external device connected to the computer has a higher boot priority compared to the hard disk. And if it’s really the case, the externally attached disk might be the drive your computer is trying to boot into and not the hard disk. In such cases, Pen Drives, USB storage devices, CDs, DVDs, and so on, are included in this category of physical device connections.
Option 4 – Try updating the BIOS
As you know, the BIOS is a sensitive part of a computer. Even though it is a software component, the functioning of the hardware depends on it largely. Thus, you must be careful when modifying something in the BIOS. So if you don’t know much about it, it’s best if you skip on this option and try the other ones instead. However, if you are well-versed in navigating the BIOS, then follow the steps below.
Tap the Win + R keys to open the Run dialog box.
Next, type “msinfo32” in the field and press Enter to open System Information.
From there, you should find a search field on the bottom where you have to search for the BIOS version and then press Enter.
After that, you should see the developer and version of the BIOS installed on your PC.
Go to your manufacturer’s website and then download the latest version of BIOS on your computer.
If you are using a laptop, make sure that you keep it plugged in until you have updated the BIOS.
Now double click on the downloaded file and install the new BIOS version on your computer.
Now restart your computer to apply the changes made.
Option 5 – Try resetting the BIOS/UEFI configuration
You might also want to reset the BIOS configuration which will lead to arranging the boot configuration since it is intended by the manufacturer. Note that this will get rid of any blockage in the boot process.
Option 6 – Try marking your Disk as Online
Marking your Disk as Online can also help in resolving the error code 0xC000000E. To do so, follow the steps below.
You need to first create a bootable Windows 10 Media and then boot from it.
After that, click on Repair your computer on the first window of the Windows 10 installation setup.
Now, choose the operating system partition from the options and click on Next.
Then select Command Prompt from the System Recovery Options box.
Next, type in “diskpart” and hit Enter to initiate the Diskpart utility inside the Command Prompt.
Now type in either “list disk” or “list volume” and hit Enter. Either of these commands will help you in listing all the Disk connects or all the partitions on those disks formed. So you have to select one command depending on the list command you entered.
Afterward, type in “select disk #” or “select volume #” and hit Enter to select the Disk or Partition you want to select.
Now type in “online disk #” or “online volume #” and press Enter to mark the disk you selected as Online.
In case you don’t know, new support has been added by Microsoft to Windows 10 that now allows users to turn off or on the Mobile Hotspot remotely. The Mobile Hotspot feature, known earlier as “Virtual Networks”, was first introduced with the initial release of Windows 10. With this new feature to remotely turn on or off the Mobile Hotspot in Windows 10, users can just use the Bluetooth on their mobile phones to turn off or on the Mobile Hotspot even when their Windows 10 computers are out of their reach.
To turn off or on the Mobile Hotspot feature in your Windows 10 computer remotely, there are two options you can try. First, you can do it using the Windows 10 settings app or using the Registry Editor. To get started, refer to the following options.
Option 1 – Turn off or on the Mobile Hotspot remotely via Windows 10 Settings app
First, you need to open the Windows 10 Settings app and from there go to Network & Internet and then go to the Mobile Hotspot section.
After that, scroll down to the “Turn on remotely” section.
Once done, make sure that the toggle button is set to ON and that the Bluetooth of both devices is turned on and paired as well. This should enable the feature to turn on or off the mobile hotspot remotely.
Option 2 – Turn off or on the Mobile Hotspot remotely via Registry Editor
Before you get started with the second option, make sure that you create a System Restore point first. Once done, proceed to the following steps:
Tap the Win + R keys to open the Run dialog box and type “Regedit” in the field and then hit Enter to open the Registry Editor.
Next, navigate to this registry path: ComputerHKEY_LOCAL_MACHINESOFTWAREMicrosoftWcmSvcTethering
From there, look for the DWORD named “RemoteStartupDisabled” and set its Value data to be “0”. This will enable the feature that will allow you to remotely turn on or off the mobile hotspot in your Windows 10 computer. To disable it, just set its Value data to “1”.
If you’re having some problem browsing multiple websites on the Firefox browser on your Windows 10 computer, then this post might be of help. One of the most common problems you could encounter in Firefox is mostly related to HTTPS and one of them is the MOZILLA PKIX ERROR MITM DETECTED or ERROR SELF SIGNED CERT or SEC ERROR UNKNOWN ISSUER error which means that Firefox was unable to trust certificates issued on secured websites.
If you encounter the MOZILLA_PKIX_ERROR_MITM_DETECTED error in Firefox, this indicates that something in your network or system is interrupting your connection and injecting certificates and when that happens, Firefox won’t trust it. In such cases, one of the culprits is malware. Malware will try to replace a legitimate certificate with its certificate. Another cause is security software where it keeps a tab on a secure connection and creates a false positive, for instance:
“In Microsoft Windows accounts protected by Family Safety settings, secure connections on popular websites like Google, Facebook and YouTube might be intercepted and their certificates replaced by a certificate issued by Microsoft in order to filter and record search activity.”
And if you are connected to a corporate network, there might be a monitoring/filtering product that could be replacing certificates. Moreover, there are also users who reported getting this issue when they use the Nightly version of Firefox. And if that’s the case, you have to try accessing secure websites using only the stable build especially when it comes to payments. However, if you are not doing that, then here are some options you need to check out.
Option 1 – Try turning off HTTPS Scanning on your security and antivirus programs
Each security-based software has a security option that allows you to turn off the HTTPS scanning functionality. They may be available under different names such as HTTPS Scanning, Scan SSL, Show safe result, Do not scan encrypted connections, etc. Find what is applicable for your security or antivirus software and then try turning it off temporarily and see if it helps in fixing the MOZILLA_PKIX_ERROR_MITM_DETECTED error in Firefox.
Option 2 – Try to disable security.enterprise_roots.enabled
The next thing you can do if the first option didn’t work is to disable security.enterprise_roots.enabled which is an HTTPS certificate check on Firefox. Note that this is not recommended but you have to at least try in order to fix the error.
Open Firefox and then type “about: config” in the Firefox address bar and hit Enter.
After that, if an info message appears, confirm it.
Next, search for the security.enterprise_roots.enabled preference and once you found it, double click on it.
Then change its value to true and restart the Firefox browser once. This will import all the custom certificates from the other security software into Firefox. As a result, it will make sure to mark those sources as trusted and you won’t get the MOZILLA_PKIX_ERROR_MITM_DETECTED error.
When you have to connect to a drive that’s on a different computer or on external storage, that’s where the mapped network drives come in. Mapped network drives make accessing files a lot easier. However, there are times when it won’t work for some reason.
Windows will notify you about the unavailability of mapped network drives in several ways. For one, Windows might display a red X on the network drives or it could be that its status will be unavailable when you try to use it from the Command Prompt or via a notification.
It is recommended that you run a few scripts when you log in to your PC as it may so happen that the network drive takes more than usual to connect. Before you start troubleshooting the problem using the given options below, keep in mind that some workouts might only work under certain scenarios. You might need some network access at logon or you might need access to the Group Policy settings. So you need to choose what you prefer more.
You can try the given workarounds below if the mapped network drives are not showing or connecting or working on your Windows 10 computer. These workarounds use scripts to make sure that you are connected to them as soon as you start to use your PC.
As mentioned, before you can troubleshoot, you need to create scripts first. There are two scripts here namely MapDrives.ps1 which is executed by the second script named MapDrives.cmd and is done at a regular and non-elevated Command Prompt. Follow the steps below to get started.
You have to create a script file named “MapDrives.cmd” first and then save it on a place where the files are safe. To do that, open a text editor like Notepad and then copy and paste the following script:
After that, save the file and name it “MapDrives.cmd”.
Next, create a script file named “MapDrives.ps1” and then copy and paste the following content. Just make sure to save both scripts in the same folder.
$i=3while($True){ $error.clear() $MappedDrives = Get-SmbMapping |where -property Status -Value Unavailable -EQ | select LocalPath,RemotePath foreach( $MappedDrive in $MappedDrives) { try { New-SmbMapping -LocalPath $MappedDrive.LocalPath -RemotePath $MappedDrive.RemotePath -Persistent $True } catch { Write-Host "There was an error mapping $MappedDrive.RemotePath to $MappedDrive.LocalPath" } } $i = $i - 1 if($error.Count -eq 0 -Or $i -eq 0) {break} Start-Sleep -Seconds 30}Note: Now that you’ve created the script files, it’s time for you to proceed to the options given below.
Option 1 – Try creating a startup item
Note that this option only works on devices that have network access at login. So if it’s not there, the script will fail to reconnect the network drivers automatically. To create a startup item, here’s what you have to do:
Open the Startup folder located at %ProgramData%MicrosoftWindowsStart MenuProgramsStartUp.
From there, copy and paste the MapDrives.cmd.
After that, open the Scripts folder located at %SystemDrive%Scripts copy-paste MapDrives.ps1 and then copy and paste MapDrives.ps1 in there.
Note: After you complete the steps above, a log file named “StartupLog.txt” will be created in the %TEMP% folder. Now all that’s left for you to do is to log out of your computer and then log back in. This will ensure that the mapped drives are open.
Option 2 – Create a scheduled task
It is possible to create a scheduled task that runs as soon as you log in to your computer. To create a scheduled task, follow the steps below.
You have to copy the MapDrives.ps1 script file to the scripts folder of Windows located at %SystemDrive%Scripts.
After that, open the Task Scheduler and select Action > Create Task.
Next, type a name and description of the task in the General tab.
Then click on the Change User or Group button and select a local user group and click OK.
Now check the box labeled “Run with highest privileges” and switch to the Triggers tab.
From there, create a new trigger with the “At Logon” option in the Begin the task drop-down menu and then click OK.
After that, switch to the Actions tab and create a new action then choose to Start a program.
Next, type “Powershell.exe” in the Program/Script field, and in the Add arguments (optional) field, type the following:
And in the Start in the (optional) field, type “%SystemDrive%Scripts” as the location of the script file.
Now under the Conditions tab, select the “Start only if the following network connection is available” option and then select Any connection and click OK.
Restart your computer or log off from your account and then log back in so that the task will be executed.
Option 3 – Use the Group Policy settings
You need this option if the mapped network drives are defined via Group Policy settings. You have to update the action of the drive maps to Replace. As a result, it will delete the existing mapped drive and create the mapping on each logon again. However, any settings on the mapped drive that are changed from the Group Policy settings will be gone on each logon. So if the changes don’t work, you need to run the gpupdate command together with the /force parameter in order to refresh the Group Policy setting quickly.
Screen flickering when you’re using Windows 10 is quite a common problem. It is often caused by apps that are not compatible with the operating system, or faulty display drivers.
There are a lot of possibilities for why this issue occurs. If you are one of the many users that encounter this kind of problem, you might want to check on your task manager to see if everything is working fine. One common sign that something wrong has happened is if the task manager flickers, as well. To fix this, you will need to update an app, uninstall an app, or update your display driver.
Solution
Error Causes
Common causes of the screen flickering when running on Windows 10 are software issues. This is most likely caused by the following:
Faulty display driver
You have an application installed that is not compatible with your operating system
Further Information and Manual Repair
In order to fix the issue of your screen flickering when you have Windows 10 as your operating system, follow these simple steps.
Note: It is very important to consult with an authorized computer technician if you are not highly confident in solving this issue by yourself. Furthermore, you can also use software to fix this problem.
The first method is by checking if your task manager is flickering. To open the task manager, all you have to do is right-click or press and hold the start button, then select task manager.
If you have confirmed that the task manager is the one causing the screen flickers, the display driver can possibly be your problem. To fix it, all you have to do is update your display driver.
How to update the display driver
You have to reset your computer and boot it on Safe Mode.
-In order to do this, you have to hold the Shift key while selecting Power>Restart. When your computer boots up, you will be greeted by a Choose an option screen. From there, you have to select Troubleshoot, then Advanced Options, then Startup Settings, and then Restart. When your computer restarts, select 4 or hit the F4 key to enter into Safe Mode.
When your computer finally boots up in Safe Mode, right-click or press and hold the Start button. From there, click Device Manager.
From the Device Manager screen, you have to expand the Display Drivers section, right-click on the driver that might be causing the problem then select Uninstall. Don’t forget to tick the Delete the driver software for this device box, press the OK button, and then restart your computer.
- When you have two, or more, drivers installed on your computer, all you have to do is disable the other drivers. You can do this by right-clicking on the driver in the Device Manager and click the Yes box next to disable. Shut down your PC after this, disconnect the installation, and boot your computer back on.
When your PC boots up after the restart, click on the Start button then click on Settings.
You need to go to Update & Security, then Windows Update, and then check for updates.
- If you are using multiple drivers and this technique doesn’t work, repeat the process in Step 3 and try to disable a different driver.
Remove an incompatible app
There are two ways to remove an incompatible app to fix the issue of a screen flicker on Windows 10. Apps like Norton AV, iCloud, and IDT Audio are usually the ones causing the problem. Uninstalling these apps could solve the problem. Uninstall the apps by using the methods below:
First Solution: Uninstall an app in Settings
Click Start, and then click Settings.
Click on System, and then click on Apps & Features.
A window will pop up and from there you will need to select the application you wish to uninstall. Click the app, and then click uninstall. Follow the screen prompt to fully uninstall the program.
Second Solution: Uninstall an app in the Start Menu
Click Start, and then click All Apps.
Look for the application you will need to uninstall, right-click the said app, and then click Uninstall. Follow the screen prompt to fully uninstall the program.
Microsoft has been bringing new lock-screen features with every iterative feature release of Windows 10 in order to improve user experience. However, Windows 10 users have different opinions regarding it. Some users are pleased with it while some users simply do not like it. So if you are one of the users who seem to not approve of this feature, read on as this post will be about enabling or disabling the Console Mode sign-in feature in Windows 10.
Before you proceed, take note that you will not be able to use your mouse pointer in this Consol Mode login screen and you can only use your keyboard to navigate around various options. You might also want to create a System Restore point just in case.
To enable or disable the Console Mode sign-in in your Windows 10 computer, refer to the given steps below.
Step 1: Tap the Win + R keys to open the Run dialog box.
Step 2: Then type in “Regedit” in the field and tap Enter to open the Registry Editor.
Step 3: Next, navigate to the following registry path:
Step 4: From there, look for a DWORD named “ConsoleMode”. If you don’t see this DWORD, you can just create a new DWORD and name it as “ConsoleMode” and make sure that its base is set to Hexadecimal.
Step 5: After that, double click on ConsoleMode and change its value to “0” to disable it and “1” to enable it.
Step 6: Now restart your computer to apply the changes made.
Like pointed out, you can only use your keyboard when you’re in the Console Mode login window or screen. You can just use the ESC button to go back to the menu while you can utilize the arrow keys so you can go through the options that are mostly vertically arranged and the Enter key to select an option. In the Console Mode, sign-in using the Passwords and PINs worked efficiently.