Microsoft just released Windows 11 Insider build 22000.71. Let’s dive in and see what it brings with you.
Changes and features
New entertainment widget. The entertainment widget allows you to see new and featured movie titles available in the Microsoft Store. Selecting a movie will direct you to the Microsoft Store to see more information about that title. Just open widgets and click or tap on the “Add widgets” button and choose the entertainment widget. For now, the entertainment widget is available for Insiders in the following countries: US, UK, CA, DE, FR, AU, JP.
The new context menus and other right-click menus have been updated to use acrylic material.
We are testing the usability of a SplitButton for making new folders and files in the File Explorer command bar.
The Taskbar previews (when you mouse-over open apps on the Taskbar) have been updated to reflect the new visual design of Windows 11.
Fixes
Taskbar:
We fixed an issue where if you drag app icons on the Taskbar to rearrange them, it was making the apps launch or minimize when you released the icon.
Using a long press with a touch on an app icon in the Taskbar to open the jump list should now work.
After right-clicking the Start icon in the Taskbar, clicking somewhere else should now dismiss the menu more reliably.
Shift + Right-click on an app icon in the Taskbar will now bring up the window menu like it used to and not the jump list.
We’ve addressed an issue that was making your mouse move slowly when hovering over the Taskbar previews.
We’ve included the fix for an issue when using multiple Desktops where an app icon in the taskbar might give the appearance of multiple windows being open when that wasn’t the case on that Desktop.
When using the Amharic IME you should no longer see an unexpected X next to the IME icon in the taskbar.
The issue where if you click on the input indicator on the Taskbar and it would unexpectedly highlight Quick Settings has been fixed.
When you hover over Task View, the preview flyout for your Desktops will no longer pop back up after using Esc to dismiss them.
We made a fix to address an issue where explorer.exe might crash after hovering over the Task View icon in the Taskbar.
We fixed an issue where the selected date in the calendar flyout was out of sync with the date in the Taskbar.
We made an update to address a scenario resulting in some Insiders not seeing the lunar calendar text in the calendar flyout when enabled in Settings.
This flight addressed an issue that could unexpectedly make the Taskbar background transparent.
Right-clicking the focus assist icon in the taskbar should now show a context menu.
The issue from the previous flight where icons in the taskbar corner were getting crushed against the top of the Taskbar has been addressed.
The tooltip for the location in use icon in the Taskbar should no longer appear blank sometimes.
Settings:
We fixed an issue making Settings crash on launch periodically.
Using the volume mixer sliders in Sound Settings should be more responsive now, as well as the page responsiveness as a whole.
We fixed an issue resulting in Disk and Volumes Settings’ change size option being clipped.
There was a non-functional verify link under Backup Settings – this has been fixed.
The Power and Battery Settings page should no longer be reporting that the battery saver is engaged if it’s not.
The Power and Battery Settings page should also now not crash when launched from Quick Settings.
We fixed a grammatical error in the Sign-in Settings text.
The “I forgot my PIN” link was unexpectedly missing in Sign-in Settings when a PIN was set up and has now been returned.
The issue where the Move option under Apps & Features in Settings wasn’t working reliably should be addressed in this build.
We’ve mitigated a problem where some of the colors in Settings weren’t updating after switching between dark and light mode, leaving the unreadable text.
We’ve done some work to help improve the performance of Settings when switching between light and dark mode.
We addressed an issue where some of the elements of the Themes page in Settings would end up crowded together when the window size was small.
We resolved an issue where the Pen menu toggle under Taskbar Settings was not in sync with the actual state of the feature.
Changes made to “Dismiss notification after this amount of time” in Accessibility Settings should now persist.
Some of the icons you could enable in Taskbar Settings were erroneously labeled Windows Explorer even though that’s not what they were – this should now be fixed.
The Connect text in Quick Settings has been updated to say Cast.
File Explorer:
Clicking the command bar button twice should now close any dropdown that appeared.
The new command bar should now appear when “Open folders in a separate process” is enabled under File Explorer Options > View.
This build addresses an issue where right-clicking a file and selecting Open With > Choose another app might launch the file in the default app rather than opening the Open With dialog.
Fixed an issue the desktop and File Explorer context menu would stop launching.
Search:
We fixed an issue where the option to verify your account in Search wasn’t working.
Hovering over the Search icon on a secondary monitor will now show the flyout on the correct monitor.
Search should now work if you open Start and start typing after having gone to the apps list and back.
Widgets:
When using the Outlook client with a Microsoft account, Calendar, and To-Do updates should sync faster down to the widgets.
We addressed an issue where if you added multiple widgets quickly from the widget's settings, it could result in some of the widgets not being visible on the board.
We fixed a bug where widgets could all become stuck in a loading state (blank squares in the window).
The traffic widget should now follow the Windows mode (light or dark).
The title of the sports widget should no longer mismatch with the content of the widget.
Other:
This build addresses an issue where ALT + Tab was getting stuck open sometimes after you released the keys and had to be manually dismissed.
We made a fix for an issue where Narrator's focus wasn’t ending up on the emoji panel after using the keyboard shortcut to open it.
Magnifier’s lens view has been updated so the lens now has rounded corners.
We found an issue that was noticeably impacting Start launch reliability for some Insiders, and have addressed it with this flight.
We’ve updated the “Most Used” text in the Start menu’s app list so it should no longer be getting clipped.
Using the semantic zoom in Start’s app list should no longer result in the list being pushed down and to the right off the edge of the window.
We fixed an issue where if you pressed ⊞ WIN + Z you would need to press Tab before you could use the arrow key to navigate through the snap layouts.
We addressed an issue where an acrylic area could get left on the screen after repeatedly snapping and unsnapping a window with touch.
We’ve done some work to mitigate an unexpected flash when moving a snapped window with touch.
We made a change to help window borders have a little more contrast when “Show accent color on title bars and windows borders” was turned off.
Known issues in Windows 11 repaired
Start:
In some cases, you might be unable to enter text when using Search from Start or the Taskbar. If you experience the issue, press ⊞ WIN + R on the keyboard to launch the Run dialog box, then close it.
Based on feedback, we are working on adding access keys to ⊞ WIN + X so that you can do things like “⊞ WIN + XM” to launch Device Manager. Insiders may see this functionality in this build, however, we are currently investigating an issue in which sometimes the option is unexpectedly unavailable.
Taskbar:
There is an issue in this build where Explorer.exe will crash when the date and time button on the Taskbar is clicked to access new notifications with Focus Assist turned off. The workaround for this is to enable Focus assist to priority or alarms mode. Note that when focus assist is turned on, notification popups won’t appear, but they will be in the notification center when opened.
The Taskbar will sometimes flicker when switching input methods.
Taskbar previews may draw partially offscreen.
Settings:
When launching the Settings app, a brief green flash may appear.
When using Quick Settings to modify Accessibility settings, the settings UI may not save the selected state.
The button to rename your PC doesn’t work in this build. If needed, this can be done using sysdm.cpl.
Settings will crash when clicking “Facial recognition (Windows Hello)” under Sign-in Settings if Windows Hello is already set up.
Reset this PC and Go back buttons in Settings > System > Recovery does not function. Reset and rollback can be accessed from the Windows Recovery Environment by selecting System > Recovery > Advanced startup, and pressing Restart now. Once in Windows Recovery, choose Troubleshoot.
Choose Reset this PC to perform a reset.
Choose Advanced options > Uninstall Updates > Uninstall latest feature update to perform a rollback.
File Explorer:
exe crashes in a loop for Insiders using the Turkish display language when the battery charge is at 100%.
When right-clicking the desktop or File Explorer, the resulting context menu and submenus may appear partially off-screen.
Clicking a desktop icon or context menu entry may result in the wrong item being selected.
Search:
After clicking the Search icon on the Taskbar, the Search panel may not open. If this occurs, restart the “Windows Explorer” process, and open the search panel again.
When you hover your mouse over the Search icon on the Taskbar, recent searches may not be displayed. To work around the issue, restart your PC.
The search panel might appear black and not display any content below the search box.
Widgets:
Widgets board may appear empty. To work around the issue, you can sign out and then sign back in again.
Launching links from the widgets board may not invoke apps to the foreground.
Widgets may be displayed in the wrong size on external monitors. If you encounter this, you can launch the widgets via touch or WIN + W shortcut on your actual PC display first and then launch on your secondary monitors.
Store:
The install button might not be functional yet in some limited scenarios.
Rating and reviews are not available for some apps.
Windows Security:
Device Security is unexpectedly saying “Standard hardware security not supported” for Insiders with supported hardware.
“Automatic sample submission” is unexpectedly turned off when you restart your PC.
Localization:
There is an issue where some Insiders may be missing some translations from their user experience for a small subset of languages running the latest Insider Preview builds. To confirm if you have been impacted, please visit this Answers forum post and follow the steps for remediation.
That's is so far, the latest update information on Windows 11 insider build. Stay tuned for more information when it comes as it comes.
Location services is a built-in tool in Windows 10 is a useful tool that offers users location information even when your laptop or desktop computer does not have a GPS since it uses Wi-Fi positioning as well as your device’s IP address. However, there are instances when you might encounter some problems when using this service. One instance is when you suddenly find the toggle button for Location service greyed out.
This kind of program could be due to some glitch in the system or some third-party application on your computer. Because of this problem, you won’t be able to toggle the Location service on or off and you won’t be able to make any changes in its settings. Worry not, for this post will guide you on what you can do to fix the greyed-out toggle button of Location services in Windows 10.
Before you perform some troubleshooting steps, you might want to restart your computer and see if it fixes the problem. If it didn’t, then this problem is not just some minor glitch. Thus, you have to follow the potential fixes provided below to fix the problem but before you do that, make sure that you create a System Restore point first. After that, follow each one of the following options.
Option 1 – Put your PC in a Clean Boot State
The first thing you can do to resolve the problem is to put your computer in a Clean Boot State. It could be that there is a third-party program that’s preventing the toggle button from functioning. To isolate this possibility, you need to put your computer in a Clean Boot State.
Log onto your PC as an administrator.
Type in MSConfig in the Start Search to open the System Configuration utility.
From there, go to the General tab and click “Selective startup”.
Clear the “Load Startup items” check box and make sure that the “Load System Services” and “Use Original boot configuration” options are checked.
Next, click the Services tab and select the “Hide All Microsoft Services” check box.
Click Disable all.
Click on Apply/OK and restart your PC. (This will put your PC into a Clean Boot State. And configure Windows to use the usual startup, just simply undo the changes.)
Now check if you can now use the toggle button of the Location service or not.
Option 2 – Try to use the Registry Editor
If putting your computer in a Clean Boot state didn’t fix the problem, you might want to make some adjustments in the Windows Registry via Registry Editor.
Tap the Win + R keys to open the Run utility and type “regedit” in the field and then tap Enter to open the Registry Editor.
After that, navigate to this registry path: HKEY_LOCAL_MACHINESYSTEMCurrentControlSetServiceslfsvcTriggerInfo
From there, select the Key (folder) named as “3” and right-click on it, and then delete it.
Once done, exit the Registry Editor and restart your computer.
Option 3 – Try to use the Windows Services Manager
Tap the Win + R keys to open the Run dialog box and type “services.msc” in the field and hit Enter to open the Services Manager.
Next, look for the “Geolocation Service” entry from the list of services.
Once you find it, right-click on it and select Properties. This will open a new mini window.
From there, make sure that it is “Running” and its Startup Type is set to “Automatic”.
After that, close the Services Manager and check if the problem is now resolved.
Option 4 – Try to use the Group Policy Editor
Tap the Win + R keys to launch Run and type “gpedit.msc” in the field and click OK to open the Group Policy Editor.
After that, navigate to this path: Administrative TemplatesWindows ComponentsLocation and Sensors
Next, double click on each one of the following settings and select the “Not configured” or “Disabled” option.
Turn off location scripting
Turn off location
Turn off sensors
Once done, navigate to this path: Administrative TemplatesWindows ComponentsLocation and SensorsWindows Location Provider
From there, double click on the “Turn off Windows Location Provider” policy setting and set its configuration to either “Disabled” or “Not configured”. You should see the following description of the policy setting in the window:
“This policy setting turns off the Windows Location Provider feature for this computer. If you enable this policy setting, the Windows Location Provider feature will be turned off, and all programs on this computer will not be able to use the Windows Location Provider feature. If you disable or do not configure this policy setting, all programs on this computer can use the Windows Location Provider feature.”
Google Docs has cemented itself as a great free alternative to Microsoft Office Word. Most of the time people just share links to google Docs among themselves but sometimes you need to save and download files.
Luckily Google docs let you download easily files in various formats including PDF as well. In this short tutorial we will explain how can you download your Google document as a PDF file.
Saving Google Docs as a PDF
Open the Google document inside the browser and click on the File drop-down menu. In the file drop-down menu go to Download and choose PDF document. Next, choose the location where you would like your file to be saved and click on SAVE.
And that's all that needs to be done. Also, you can edit PDF files as well in google docs if you need to.
Microsoft Designer, a new application developed by Microsoft will bring design backed with DALL-E 2, an AI image creation open-source software. The new app is shown as a dedicated graphic design tool that will help you in the creation of stunning social media posts, invitations, digital postcards, graphics, and more, all in a flash.
Use of the application will be by typing headings and then typing text into the prompt to generate a background image. Since Microsoft uses DALL-E 2 for image creation output should be fairly good but if you wish you will be able to use your own images instead of using AI to generate one.
The designer will be a free application once it is ready and it already has a web preview version, also free but with a waitlist. There will be premium features inside the app once it is released that will be available to Microsoft 365 Personal and Family subscribers. Microsoft also wants to add a version of a designer directly to the Edge browser as well.
When trying to run Computer Management, or when running mmc.exe or compmgmt.msc from a command prompt you get the error that the application has been blocked for your protection then keep reading in order to solve the issue. This is a permission issue where if a regular user tries to run such system tools will result in saying that it has been blocked. Along with this, you may have a Group Policy issue. This can be fixed, but you will need admin permission to achieve it. It’s because when they are run from the command prompt with elevated privileges, it works.
Change Group Policy Settings
If your account is an admin account, and you are still facing the issue, then change the group policy settings:
Open Group Policy Settings by typing gpedit.msc in the run prompt followed by pressing ENTER
Navigate to User Configuration > Administrative Templates > Windows Components > Microsoft Management Console > Restricted/Permitted snap-ins
Locate Computer Management policy, and double click to open it
Enable it, exit Group Policy.
When Enabled: The snap-in is permitted and can be added into the Microsoft Management Console or run from the command line as a standalone console.
When Disabled: The snap-in is prohibited and cannot be added into the Microsoft Management Console or run from the command line as a standalone console. An error message is displayed stating that the policy is prohibiting the use of this snap-in.
Temporarily disable UAC
UAC is the user access control panel, and if you need to run the command right away, you can choose to disable it for some time. Click on the Start button, and then type UAC to find the User Account Control Settings.
Click to open, and then slide down the notification setting at the bottom. It will temporarily allow launching the application as there is no check. However, make sure to switch to default once you are done.
The 0xc000001d error is a common yet critical error that can occur when Windows is damaged or fails to work as a result of either missing system files or corrupt system components.
This error can be extremely dangerous to Windows as it can inflict major damage to data and component files.
Error Causes
A 0xc000001d error code can occur because of a number of reasons, of which corrupt registry files are the most common, and about 94% of the time, this results in the error. However, virus infection or an adware or spyware invasion can also result in this error.
Outdated drivers and missing DLL files can also be critical and will lead to this error causing major damage to computer files. Contrary to popular belief, incomplete installation and unfinished uninstalls can also because of this error.
Other causes include improper shutting down of computers and improper hardware or software deletion.
Solution
Further Information and Manual Repair
Because of this 0xc000001d error code, Windows can fail in starting some processes and the system’s performance can significantly slow down. In some cases, Windows has problems starting up and the system can freeze.
Lastly, this error code can even result in the Blue screen of death error message, just like other critical Windows errors. If any of the above problems and symptoms occur in your PC, then you should immediately seek to resolve this problem.
In order to resolve this 0xc000001d error code or repair the corrupted and damaged Windows files, you will need a 0xc000001d repair tool. There is more than one method of treating this kind of error code, and here is how you can manually do it:
Start the computer and log in as administrator
Go to the start button and select All Programs. Go to Accessories, System Tools, and then System Restore
Click on System Restore and in a new window, select the ‘Restore my computer to an earlier time’ option and click Next
On the new confirmation window that appears, click Next
Restart your computer after the restoration has been completed
Another way to manually repair this 0xc000001d error code is to:
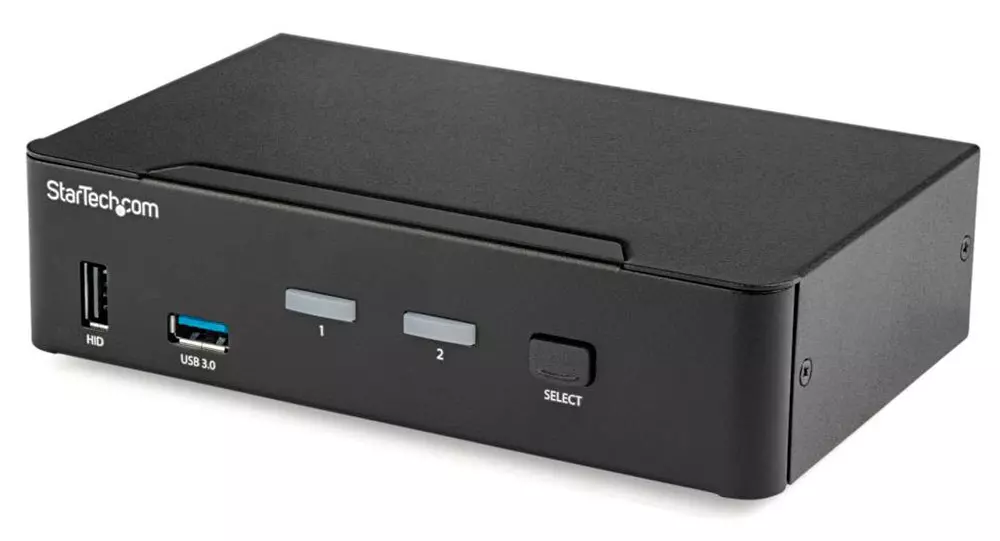
You probably heard about switches for LAN but not a lot of people heard about KVM switches. So what exactly is KVM switch?
If we look at the name, it is a shortcut for Keyboard, Video & Mouse and the original idea was to have multiple computers but one keyboard, mouse, and monitor. These peripherals would be connected to the KVM switch and other computers could all use one set of these on the fly when needed.
The technology behind the switch is a little interesting since it will actively fake signals to other computers that are not using peripherals. Once they are switched to them the transition is smooth and not noticeable. In old days these switches were more important than today since on every mouse or keyboard disconnection you had to reboot the computer, and although today that is not the case CPU will still detect disconnection and on the next connection it will run through the ID of the device and try to use the existing driver and if peripheral was connected in other USB port, it will install the same driver but connect it to the new USB port.
This type of reconnection can slow down work and place unnecessary load on the CPU so that is why KVM will fake connection in order to make switching externals on the computer smooth and in nick of a time.
Modern KVM switch
These days modern KVM switches will offer you more options than just being able to switch between keyboard, mouse, and monitor. Modern switches now offer Lan, audio, and many more various options.
There are also different kinds of switches offering you only one option, like for example just a Video switch that will let you use one monitor on three computers and many more other specialized options.
Software switches
So far we talked about Hardware switches, a real device being able to take peripherals into it and switch computers on the fly. On the other line, we have software switch solutions that will have specific software installed on all computers and have it run at all times, and switching between them will be through specific software.
There are two very good and main advantages of using software solutions instead of a hardware one. First, of course, is the price, since the most popular Synergy is an open-source solution, completely free of charge. The second big advantage is that software switch is not limited to how many computers can you use. Hardware switches tend to go to a large number like 16 but if you have a large cluster of computers over a LAN, let's say 30 then the box solution might be difficult.
On the other hand software solution will switch only keyboard and mouse since each other computer will have to have some screen on it in order to work. Both solutions have their strong advantages and disadvantages and it is up to you to choose one that best suits you.
Conclusion
If you are multitasking with a lot of computers or just need your peripherals from time to time to connect to another machine then the KVM switch is something that you might find the use of. Just be aware that if you go for some cheap switch you might experience some lag on your peripherals, but if that is not a concern you can get hardware one for as low as $50 USD.
You have probably heard a lot of good things about gaming mice, how they are better feeling, better in any way possible and it is all true, everything you heard is actually true, they are superior in any way to a regular mouse but with one big disadvantage, and that would be the price. While you can find a regular mouse for pocket change, a gaming mouse is in comparison very expensive even for entry-level ones.
In this article we will explore all advantages and compare it with the regular one so you can come up with your own conclusion about do you really need one for yourself or if you are fine with regular.
Price
As stated price is one factor that does not favor gaming mice. Regular mouse for a personal computer goes around 10 or 20 USD, while entry-level in gaming one will be 40 USD and can go up to 250 USD, this large gap in price is usually determining factor why people pick up regular one. If you are on a really tight budget go for the regular one, but if you can afford a gaming one get it without second thoughts.
Software
This is where you will see the big difference between mice. Regular ones when connected are recognized and the driver is automatically installed and you can use it, same goes with gaming ones but with one big difference, you have an option to install additional manufacturers' software specially tailored for your mouse. In the application, you will be able to access some features that are specific to the mouse model that you could not set in typical Windows mouse properties. Beside more options software can also have features like setting your profiles and saving them to be recalled when you need them on the fly.
Sensitivity of mouse
The sensitivity of the mouse is measured in dots per one inch or short DPI, this is directly shown on your screen by how fast your mouse can move, higher sensitivity means your mouse will move faster across the screen and lower means it will move slower. All gaming mice come with buttons and settings that will allow you to change DPI on the fly and you can choose precise DPI settings in the software.
The regular mouse comes with DPI around 800 and goes to 1200 typically and does not have usually the option to change this while gaming mice start at 400 and can go as high as 26000 with the option to change it. Some regular mice can have only 1 option of DPI, usually very cheap ones.
Polling rates in mice
Pooling rate is the measurement of how often your mouse reports where it is positioned on the computer. The higher the pooling rate, the more responsive your mouse will be and vice versa. It is measured in hertz (Hz) and regular mice have them around 125Hz that is enough if you are using a computer for office, internet, and mail work.
If you are working in design or gaming you will need more than 125Hz polling rate, luckily gaming mice come with a minimum of 500Hz as an entry point and some hi-end models are going as far as 8000Hz. This very high pooling rate will get some extra load on your CPU but the mouse itself will be maximally responsive and will respond even to the smallest moves.
Ergonomics
Regular mice are well just mice, they are typical shape and size, gaming mice are made with ergonomics in mind. How they are made for extensive daily use of several hours per day they are constructed in a way to offer a pleasant and pain-free experience.
If you work on a computer for long periods of time consider gaming an ergonomic mouse since it will take the strain from hands and place them in a more natural position.
Macro keys
Gaming mice most of the time come with more keys compared with regular ones and good thing is that via its software you can tie certain actions to these extra keys making work or gaming more pleasant and quicker.
Components and material quality
In order to make regular mice more affordable and cheaper materials and quality of components had to suffer. Gaming mice have millions of guaranteed clicks by companies that make them before they break and regular ones usually do not guarantee a single one. This is due of course quality of materials that have been used in constructing these devices.
In the long term, if you use a gaming mouse for typical daily tasks it will outlive your regular one and on the side offer you more pleasant and responsive use along the way.
DOTA2 involves teams of five players each, where each player chooses a “hero” character. Each game has two teams pitted against each other, on opposite sides of a map. Once you start, you and your teammates try to level up by fighting and defeating heroes from other teams as well as non-player characters who exist within the game universe. Once you have a strong enough team, you would then try to attack an opposing team’s base. If you destroy their “ancient,” your team wins.
The teamwork and interactivity required to play the game are some of its biggest attractions. You can text and voice chat as part of the Dota 2 gameplay, enabling you and your team to come up with strategies to take over your opponents’ base and fortifications. For this reason, a properly working microphone and headset are important if you are to get the most out of this exciting online game. However, there are many times when you find that there are audio dropouts when you try to speak into your microphone. The question “How do I get my mic to work on Dota 2?” is one of the most commonly asked on gaming forums related to this game.
Here are solutions for why this can happen:
You are logged in to another computer that is running the STEAM client
While entirely rare, there are cases where the microphone in Steam is disabled because the same account is active and in use on a different computer. It may not notify you that your account is in use elsewhere. If this is the error, try to log out on other devices and then test it on only one system. If you cannot access the other computer that has access to your account, then change your password. This will automatically disconnect your Steam account from the other computer and let you enjoy voice chat in Dota 2 and other Steam games.
Your microphone is not properly set up in Dota 2
From the main Dota 2 menu, before you start a match, you can set up your microphone for voice chat.
At the top, left-hand corner, click the gear icon to open Settings
Select the AUDIO tab and ensure that the Sound Device and Speaker Configuration are set to default.
On the same tab, activate Voice (Party) and set your Push to Talk shortcut key for your team.
Select the appropriate Open Mic Threshold using the slider at the bottom of this tab to get your microphone recorded at a comfortable level.
The Windows Audio Enhancements setting is turned on
If you still cannot get your microphone to work properly, then your problem could be Windows Audio Enhancement. It is possible to get your microphone to work with Dota 2 by disabling these features.
Right-click your volume icon on the system tray and select Recording Devices.
Choose your active microphone then click its Properties button.
On the Microphone Enhancements tab, make sure the checkboxes marked Voice enhancements and Acoustic Echo cancellation is unchecked
Reboot your PC and retry using your microphone to chat.
Your audio drivers need to be updated
If you try all of the steps above and still have Dota 2 not recognizing your mic input update mic drivers by going in device manager and choosing update driver.
When it comes to booting an operating system on a computer, one of the most essential pieces of software you can use is the UEFI. In fact, a lot of users now prefer to use UEFI instead of BIOS. It also depends on whether the UEFI or the BIOS is supported on the motherboard. Recently, a number of users reported an issue with UEFI where they were unable to find it under the Advanced Options screen where it’s supposed to be located.
The missing UEFI Firmware settings in the Advanced Options could be caused by several reasons. It is possible that the access to the UEFI menu is blocked or it could also be due to the Extra Fast Startup feature being enabled. It is also possible that the operating system is installed in Legacy mode.
There are several options to try to fix this issue. You need to check if your computer supports UEFI or you could also try to disable Fast Startup or bypass the Extra Fast Startup feature. You can also use a boot to UEFI shortcut as well as check the CMOS battery.
Option 1 – Try checking if your computer supports UEFI
The first thing you have to do is to verify if your computer supports UEFI. If your computer does not support UEFI, then it’s no wonder why you don’t see the UEFI Firmware settings in the Advanced Options.
Option 2 – Try turning off Fast Startup
First, boot your computer in Safe Mode.
Once your computer is booted in Safe Mode, tap the Win + R keys to open the Run dialog box and type in “control” to open the Control Panel.
Next, click on the Hardware and Sound section and click on Power Options.
Afterward, select the “Choose what the power buttons do” option from the left side menu pane.
Now click on Change settings that are currently unavailable and uncheck the entry that says, “Turn on fast startup (Recommended)”.
Then click on Save Changes and restart your computer and see if it has fixed the problem or not.
Option 3 – Try bypassing the Extra Fast Startup feature
As mentioned, the missing UEFI Firmware settings could be due to the Extra Fast Startup feature. To fix it, you have to disable this feature. All you have to do is tap and hold the Shift key and click on the Shutdown button from the Start button. This will boot your PC with the UEFI booting from the beginning and then use the hotkey for your motherboard to boot into the UEFI setup.
Option 4 – Try using a boot to UEFI shortcut
Right-click on any empty space on your Desktop and select New > Shortcut.
This will open a new mini window. And here, you have to type this in the text field: shutdown /r /fw
After that, click on Next and name the desktop shortcut and then click on Finish.
Next, right-click on the newly created shortcut and select Properties.
Click on the Advanced button and select the “Run as administrator” option.
Now click OK to save the changes made. Each time you execute this shortcut, your computer will automatically be booted to the UEFI Firmware Settings.
Option 5 – Try to check the CMOS battery
Another thing you can do is check the CMOS battery physically on the motherboard and see if it has to be replaced since a damaged CMOS battery can also cause the issue with the missing UEFI Firmware settings.
Option 6 – Set your computer from Legacy to UEFI
If applicable, you can try to set your computer from Legacy to UEFI to resolve the problem.
In the Windows Search box, type “command prompt” and from the search results that appear, right-click on Command Prompt and select the “Run as administrator” option.
After that, execute this command: mbr2gpt.exe /convert /allowfullOS
Now, wait until the process is completed since you can track its process on your screen.
Once it’s done, go to Settings > Update & Security > Advanced Startup options and from there, click on Restart Now. This will restart your computer and give you advanced options.
Next, select Troubleshoot > Advanced Options where you will see further options including System Restore, Startup Repair, Go back to the previous version, Command Prompt, System Image Recovery, and UEFI Firmware Settings.
Now select the UEFI Firmware Settings. This will take you to the BIOS. Boot Mode is typically available under Boot > Boot Configuration. Once you’re there, set it to UEFI and then save the changes you’ve made. After that, your computer will restart.
As you know, Microsoft Office Word is a program that’s widely used all over the web and it’s because it’s the best program there is when it comes to editing and processing words. However, even when it is the best there is, it is not without its faults and so on as it can still encounter some errors every now and then. One of these errors is the Template_fields errors. When you encounter such an error, you will see a pop-up window. This strange error randomly appears on documents but you need not worry as this post will provide you with possible solutions to resolve the problem. But before you proceed with these solutions, you have to create a backup for all your Word documents to Microsoft OneDrive preferably.
To fix the problem, you can try to disable the add-ins or try to start Word in Safe Mode or repair Office. For more details, refer to the options given below.
Option 1 – Disable the Add-ins
Although add-ins enhance Microsoft Word, there are times when they can also cause problems that end up breaking Microsoft Word instead of improving it which is why you have to disable them. Refer to the following steps to do so:
Open Microsoft Word and then click on File.
After that, select Options from the menu and then click on Add-ins.
From there, you’ll see Manage: Com Add-ins as well as a button that says Go.
Now click on the Go button and wait for a couple of seconds for a new window to appear.
In the newly opened window, uncheck all the Add-ins and click on OK.
Restart Microsoft Word and check if the “Template_fields” error is now fixed or not.
Option 2 – Try starting Word in Safe Mode
You might also want to try rebooting Microsoft Office in Safe Mode as it is one of your best shots in finding out whether the problem is internal or external. However, if the problem does not appear after you reboot Microsoft Word in Safe Mode, then there is a possibility that the problem is with Microsoft Office itself. On the other hand, if the problem persists, then it could be a deeper issue.
First, start Microsoft Word in Safe Mode.
Next, tap and hold the Ctrl key on your keyboard and open the Word document.
After that, you should see a dialog box. Click on Yes and see if Microsoft Word opens in Safe Mode.
Alternatively, you can open the search box and then type “winword.exe /safe” and hit Enter.
Option 3 – Try repairing Microsoft Office
If the first two options didn’t work, then you might want to try repairing Microsoft Office without getting rid of it. In most cases, this usually works in fixing any problems and returns the program back to its default state. To repair Microsoft Office, follow the steps below.
Right-click on the Start Menu button and select Apps and Features.
Next, scroll until you see the Microsoft Office program you want to repair and then select the Modify option.
After that, follow the options to repair Microsoft Office and then restart your PC and see if the “Template_fields” error is no longer present.
 Changes and features