If you suddenly get a message telling you that “Your Windows license will expire soon, You need to activate Windows in Settings” on your Windows 10 computer but you know that your Windows 10 is already activated. Worry not for this post will help you get rid of that error message right away. Before you get started, make sure that you have the Windows product key with you. If you don’t, you can get it by running the following command in an elevated Command Prompt:
wmic path SoftwareLicensingService get OA3xOriginalProductKey
Take note of the product key and then proceed to the options given below.
Option 1 – Try activating Windows 10 again or use another product key
If you’re sure that you have the correct product key, click the Go to the Settings button.
After that, click the Activate button once again.
If you have another license key, you can also use that as well, just simply click on the Change product key.
Then enter the new product key and click on Activate. That should fix the problem, if it doesn’t, refer to the next option below.
Option 2 – Try to reset the licensing status
Click the Start button and then type “cmd” in the Search box and then tap Ctrl + Shift + Enter to open an elevated Command Prompt.
Next, type the “slmgr –rearm” and hit Enter to reset the licensing status.
Restart your computer and check if the error is now gone or not.
Option 3 – Try uninstalling the product key and re-enter it once more.
The first thing you have to do to uninstall the product key is to know the Activation ID of your Windows installation. To do so, open an elevated Command Prompt and type this command, and hit Enter – vbs /dlv
After you enter the command, you should see the licensing status and Activation ID. And to get all the Activation IDs of all the installed Windows versions, key in this command and hit Enter – vbs /dlv all
Note: The “/dlv” parameter will give you the license information for the installed operating system.
After you enter the second command, you should see a Windows Script Host window with all the Windows licensing and activation status. Take note of the Activation ID.
Next, in the same elevated Command Prompt, type this command – slmgr /upk <Activation ID>
Note: In the third given command, “/upk” stands for “uninstall product key”. This parameter uninstalls the product key of the current Windows edition.
Restart your PC. After that, your computer will be in an unlicensed state so you need to re-enter the product key again.
Option 4 – Try rebuilding the Tokens.dat file.
The issue might be caused by a corrupted Tokens.dat file. The Tokens.dat file is a digitally signed file that stores most of the Windows Activation files so if it is corrupted then no wonder you’re having activation issues. To rebuild the Tokens.dat file, refer to these steps:
From the WinX Menu, open an elevated Command Prompt.
After opening Command Prompt, you need to type each one of the following commands and after you type each command, hit Enter.
net stop sppsvc
cd %windir%ServiceProfilesLocalServiceAppDataLocalMicrosoftWSLicense
ren tokens.dat tokens.bar
net start sppsvc
exe %windir%system32slmgr.vbs /rilc
Now restart your computer.
Option 5 – Try running the Windows 10 Activation Troubleshooter
Go to Settings and then select Activation.
After that, click on the Windows Activation and then troubleshoot. This will help you address most of the commonly found activation issues in Windows devices.
Option 6 – Try activating Windows 10 via mobile phone
Activating Windows 10 can also be done using your phone. Just note that you have to call Microsoft to do so.
In the Start Search box, type in “Slui 4” and tap Enter.
Next, select your country and click on Next.
Keep the window open and call the toll-free number of the country you’re from.
Afterward, a confirmation ID should be given by the automated system which you must take a note of.
Finally, in the box on the window, type in the confirmation ID and click on the Activate button. That should do it.
If you encounter an error saying, “Invalid file handle” when you try to rename, copy, delete a file or other operations in your Windows 10 computer, then read on as this post will guide you in what you can do to fix it. This kind of error pops up when the operating system tries to carry out an operation on a folder or file using the following words:
When you rename or create a folder or file using the reserved words given above, you could encounter an error that says, “The specified device name is invalid”. This occurs since these words are Windows system reserved words that you can’t use, unlike any other words. Thus, if you have a folder or file which contains any of the reserved words on another computer that runs a non-Windows operating system and you try to copy or rename it Windows, then it’s no wonder why you’re getting this error message.
In such cases, you can always click on the Skip button to stop the operation. However, if there are various folders or files, you can just use the Command Prompt to carry out the task. All it takes is a simple command that will get rid of the folder as well as the files in it. How? Refer to the instructions given below.
Step 1: Tap the Win + R keys to open the Run utility.
Step 2: Next, type “cmd” in the field and then tap Enter to open Command Prompt.
Step 3: After opening Command Prompt, execute the following command:
rd \.file-folder-path /S /Q
Note: The “rd” command will remove the directory or the folder while the “\.” command will select the current computer. The “/S” command, on the other hand, helps you in removing all the sub-directories and the files that are in the CON folder. The “/Q” command is not really mandatory since it helps you remove everything silently without any confirmation message. For example, if you have a folder named “CON” located on your Desktop, the path will be like this “C:/Users/<username>/Desktop/CON”. In this case, the command should be like this:
rd \.C:Users<username>DesktopCON /S /Q
However, if the error pops up for a whole different reason, you could use the following command instead to remove the reparse point extended functionality. Once you’ve entered the given command below, you should now be able to delete the file.
Default applications in previous Windows versions were a pretty straightforward process. The user went to the settings application and picked for each category which application he would like to choose from the list of installed ones.
In Windows 11 things are little changed. In this article, we will show you how to choose the default internet browser inside Windows 11, and sadly it is a more tedious task than in previous versions.
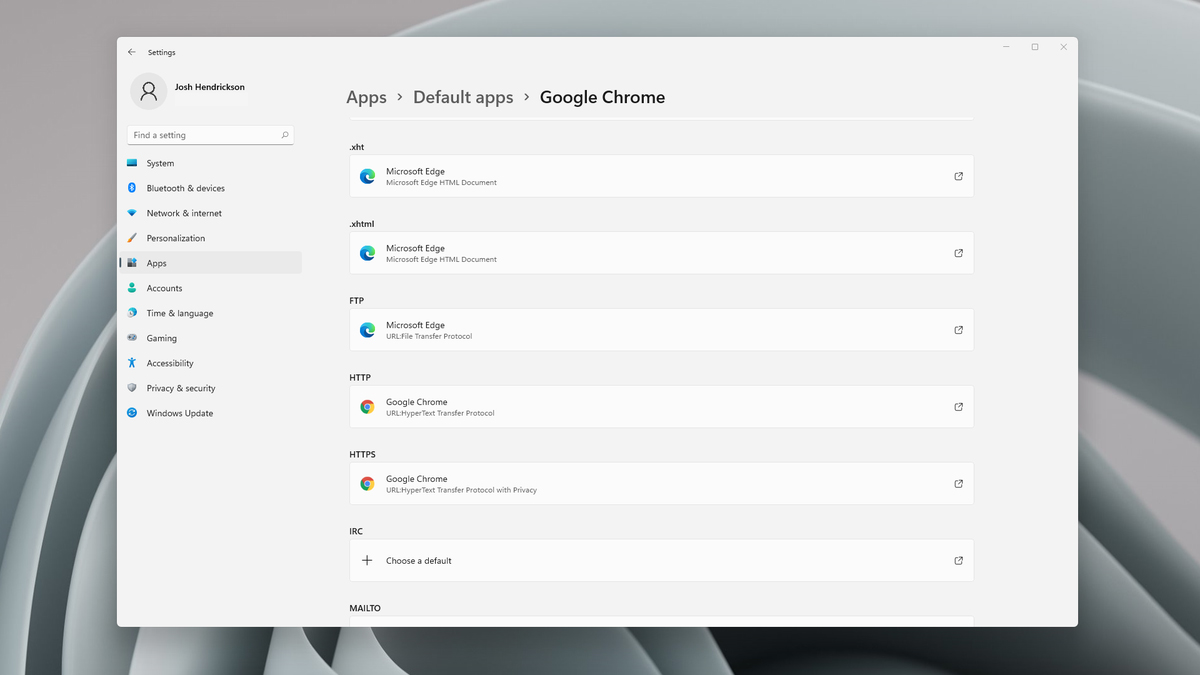
Choosing default browser in settings
As in previous versions of the Windows operating system you will need to use the settings application in order to change your default Internet browser. Previously, in Windows 10, a variety of general categories like email, web browser, and photo viewer were all listed under the Default Apps section of the Settings panel. It was easy to click on one of those categories and click on the option you like best from the small pop-up suggestion window.
In the Windows 11 Insider Build, you’ll see a gauche list of an individual file or link types that you’ll need to specify your preferred browser for. The types include: HTM, HTML, PDF, SHTML, SVG, WEBP, SHT, FTP, HTTP, and HTTPS. There are additional optional types you can specify your preferred browser for as well.
The issue here is in order to use a single browser which most users do you will have to go through each file type and set your preferred one. I am really not sure why this was introduced or why it has to be this way, all I can do is hope that in the final release of Windows 11 this feature will be rolled back as it used to be and that you could set your default browser in just one simple click.
There are some new generation motherboards for laptops and PCs that bring in support for both the Unified Extensible Firmware Interface or UEFI as well as the Basic Input Output System or BIOS. The main advantage of UEFI over the traditional BIOS is the fact that UEFI supports a hard drive that has a capacity of more than 2 terabytes. However, the disadvantage of UEFI is that it only supports the x64 Windows operating system versions and that the hard drive is supposed to use the GPT structure. So if your PC is compatible with and supports UEFI and you want to change from Legacy to UEFI, then you’ve come to the right place as this post will guide you on how you can exactly do that without having to reinstall it.
There are two ways to change Legacy to UEFI. You can convert MBR to GPT using either the built-in utilities in Windows or using the Recovery Environment. Before you proceed, make sure that your computer fulfills the following prerequisites:
Your PC’s motherboard should support both Legacy and UEFI.
Your PC should be running at least the 1703 Windows 10 version or newer on an MBR partition.
Once you’ve made sure that your computer covers the aforementioned prerequisites, refer to the given options below.
Option 1 – Convert MBR to GPT via Windows built-in utilities
In the Windows Search box, type “command prompt” and from the search results that appear, right-click on Command Prompt and select the “Run as administrator” option.
After that, execute this command: exe /convert /allowfullOS
Now, wait until the process is completed since you can track its process on your screen.
Once it’s done, go to Settings > Update & Security > Advanced Startup options and from there, click on Restart Now. This will restart your computer and give you advanced options.
Next, select Troubleshoot > Advanced Options where you will see further options including System Restore, Startup Repair, Go back to the previous version, Command Prompt, System Image Recovery, and UEFI Firmware Settings.
Now select the UEFI Firmware Settings. This will take you to the BIOS. Boot Mode is typically available under Boot > Boot Configuration. Once you’re there, set it to UEFI and then save the changes you’ve made. After that, your computer will restart.
Option 2 – Convert MBR to GPT via the Recovery Environment
When the message appears on your screen while running Windows Setup, you need to tap the Shift + F10 keys to open Command Prompt.
Make sure to run Command Prompt as admin and then execute this command: exe /convert
After that, wait until the process is completed. When it’s done, you have to go to the BIOS just like in the first given option above.
As mentioned, you can usually find the Boot Mode under Boot > Boot Configuration. Once you’re there, set it to UEFI.
Now save the changes made and exit as your computer will restart.
If you encounter an error code of 0xa0000400 while trying to upgrade your Windows 10 computer using the Windows 10 Upgrade Assistant or the Windows 10 Media Creation Tool, then you might find this post useful as it will guide you in resolving this problem. When you get this error, you will see the following error message:
“Something went wrongYou can contact Microsoft support for help with this error. Here is the error code 0xa0000400.”
As you know, keeping your computer up to date with all the Windows Updates is important and is imperative especially if you are experiencing a couple of issues like the Windows Upgrade error 0xa0000400. At the time of writing, there is no specific cause that has been found for this error. However, there are some potential fixes that might help you. You can try to recreate the Windows 10 installation USB and get the ISO files or you could also get a newer version of the Windows Media Creation Tool, or turn off your internet connection at a specific time or run the Windows Update troubleshooter. For more details, refer to the options given below.
Option 1 – Try to recreate the Windows 10 installation USB
Recreating the Windows 10 installation USB might help in fixing the problem. You can use a USB drive to do so but make sure that it has a great read-write speed. Follow the steps below to recreate Windows 10 installation USB”
Click this link and then click the Download Tool Now button.
Next, click the “Use the tool to create installation media (USB flash drive, DVD, or ISO file)…” option and follow the next given instructions on the screen.
Now select the ISO file option in step 5.
After that, you should now have an ISO file.
Next, go to the location where you’ve downloaded the ISO file.
Then right-click on the Windows 10 ISO file and select the Open with option and then select File Explorer.
Now click on “setup.exe” and follow the next instructions that appear on the screen. When asked, you have to select either Nothing (clean install) or Keep personal files only option. Take note that you must not select the “Keep personal files, apps, and Windows settings since it doesn’t really work.
Option 2 – Try turning off the Internet connection at a specific time
You might want to turn off your internet connection at a specific time. This option can be quite tricky so what you need to do is to disconnect the internet connection when the update is downloaded using the Windows Upgrade tool. It’s actually okay since all the files you need would be downloaded safely and the Windows Upgrade tool will be the one to install the newer updates using those files.
Option 3 – Try to get a newer version of the Windows Media Creation tool
You can also fix the Windows Upgrade error 0xa0000400 by using the latest version of the Windows Media Creation tool. And so if what you have is an older version, you need to update it in order to resolve the error and upgrade your Windows 10 computer.
Option 4 – Run the Windows Update Troubleshooter
Running the built-in Windows Update troubleshooter is one of the things you can first check out as it is known to automatically resolve any Windows Update or upgrade errors like error code 0x800701E3. To run it, go to Settings and then select Troubleshoot from the options. From there, click on Windows Update and then click the “Run the troubleshooter” button. After that, follow the next on-screen instructions and you should be good to go.
Option 5 – Try running Disk Cleanup
You might want to run the Disk Cleanup utility as it is a useful tool that could delete temporary and useless files in your computer.
Tap the Win + R keys to open the Run dialog box and then type “cleanmgr” in the field and hit Enter to open the Disk Cleanup window.
After that, select the drive you want to clean.
Now click OK to clean the disk and restart your computer.
From the various report, it is now clear that no one is prone to Ransomware attacks. Cyber-criminals never target any specific field of the user workgroup for this Ransomware attack. But in past few years, it has hugely affected home users, businesses, organizations.
We can say, Ransomware victims come in all shapes & sizes. Many business owners think that they will never be attacked by Ransomware crooks because their business is not so big. But that’s not true.
A huge proportion of Ransomware attacks happened in small sector businesses because of their weak security resistances.
Some leading negative consequences of Ransomware attacks faced by almost every victim are:
Permanent or temporary loss of proprietary or sensitive information.
Lots of trouble in performing regular operations.
Huge financial losses sustain for restoring up your files and systems.
Latent harm to the reputation of an organization.
Even making the Ransom payment doesn’t guarantee the safe releasing of your encrypted files.
Attackers get the victim’s money along with their banking details.
Getting the decrypting files doesn’t mean malware infection has completely been removed.
Ransomware put a tremendous impact on disturbing business operations and in the end, leads to data loss situations.
Here are some huge impacts of Ransomware attacks on business are:
Damage or loss of all the crucial information
In the Ransomware post-attack period Business disrupts a lot.
Destruction of hostage data, file, and system.
Business downtime
Victimized company’s reputation dropdown
Productivity loss
Apart from the ransom, the cost of downtime because of restricted system access will bring major concerns.
It’s a fact that due to downtime victims may has to pay a cost of ten thousand dollars daily.
As, Ransomware is becoming more and more widespread, so all companies require to brush up on their annual cyber-security goals. Moreover, approach for some appropriate implementations of Ransomware recovery plans and commit sufficient funds in their IT budgets for cyber-security resources.
Among the most effective impact of Ransomware, “data encryption” is very hard to deal with.
Meanwhile, this victim is completely restricted to access any of their encrypted data.
The only way for unlocking these encrypted files is through the decryption key which only belongs to hackers.
Many times, the decryption key is given to the organization, after the payment of the ransom. But there are also some cases when data is not handover to the victim, even after the ransom payment.
The main risk that generates with “operational impact of Ransomware” is on the businesses. Can you just imagine, what will happen if all of a sudden entire services or processes of your business halt down?
Well, this dreadful Ransomware threat is so impactful that it can:
Close down the entire plant
Freeze manufacturing control system
Make other backlogs
All the damages that occur due to downtime can be a major one and can have so many consequences.
A well-organized strategy of backup and recovery will not certainly make the Ransomware attack painless.
As this takes an extensive amount of money and time for data restoration.
Apart from that, the decision of recovering your system using the backup moreover depends on three things:
First the amount of data loss that is considered acceptable by your business or organization.
Up to how extent, the impact of Ransomware has spread
How fast the Ransomware attack was spotted.
However, in many cases, data gets so encrypted that you can’t revert back to the restore point. At that time external backup is considered the best option.
Among the wide-reaching impact of Ransomware “Data loss” is the most effective one. As it starts from little disruption and leads to permanent business failure.
Sometimes data loss in a Ransomware attack leads to disclosure of all your confidential information which ends up in fines and lawsuits.
Attackers always look for backup files and folders after encrypting your system data. So that user can’t retrieve their corrupted file from the backup. Such dreadful activities make this Ransomware threat so profitable and effective.
Victims don’t have any choice left either they have to pay the ransom or they have to face their risk of data loss.
As you know, all the web browsers come with the support of auto-updates which include both Google Chrome and Mozilla Firefox. However, with these updates, the browser comes with the support of a new web APIs and better rendering. Although there could be a lot of problems that may arise due to these updates. These problems consist of depreciation of features, incompatibility with some websites, to name a few.
It includes incompatibility with some websites, depreciation of features, and more. This might push someone to stop the auto-updates of these web browsers. So, in this guide, we will be checking out how to stop auto-update in Google Chrome and Mozilla Firefox on Windows 10. Thus, if you want to be rid of these issues, then you can disable the Chrome & Firefox auto-update and you can do that by either using the Windows Services Manager and the System Configuration utility.
Option 1 – Disable Chrome & Firefox auto-update via Windows Services Manager
The first thing you can do to disable the Chrome auto-update is through the Windows Services Manager. To do so, follow these steps:
First, tap the Win + R keys to open the Run dialog box.
Next, type “services.msc” in the field and hit Enter to open the Windows Services Manager.
After that, you will see a list of services and from there, look for the Google Update Services (gupdate) and Google Update Service (gupdatem).
Once you find these services, right-click on each one of them and select Properties and then make sure that the Service Status is set to be Stopped.
You should also select the Startup Type to Disabled and click on the Apply and OK buttons.
Now restart your computer. This should stop the automatic update of the Chrome browser.
Option 2 – Disable Chrome & Firefox auto-update via System Configuration utility or MSConfig
Tap the Win + R keys to open the Run utility and type “msconfig” in the field and tap Enter to open the System Configuration.
After that, go to the Services tab and uncheck the two entries, namely Google Update Service (gupdate) and Google Update Service (gupdatem).
Next, click on the Apply and OK buttons to save the changes made.
Restart your computer.
Note: Now that you’ve stopped the auto-update in Firefox, it’s time for you to stop the auto-update in Mozilla Firefox. To get started, follow the steps below.
Open the Mozilla Firefox browser and click on the hamburger menu located on the top-right portion of the screen.
After that, select Options and under the General panel and then go to the Firefox Updates section.
Next, click on the radio button for updates but select the option to let you install them.
You also have to uncheck the options named “Use a background service to install updates” and “Automatically update search engines”.
Once done, restart the Firefox browser. This should stop the automatic update.
Spying via some malicious app on the target phone is not a new thing but it can be very uncomfortable and even against the law in some countries.
Infecting the target phone can be done in various ways, another person can intentionally download and install applications on it, and you can install them via some phishing attacks or by an online scam. Once installed this piece of software presents a very serious invasion of privacy since it can track text messages, track phone location in real-time, record calls in real-time, eavesdrop on calls, take control of the camera and microphone, and many other applications.
Here are some common symptoms of mobile phones infected with spyware.
Symptoms of spyware
Random reboots Slow performance Strange text messages Overheating Unusual high data usage Non-familiar apps in the app list The fast drain of the battery Long shutdown time Strange interference and sounds during calls Signs of activity during standby mode
If your phone exhibits any of these symptoms you might have a spyware app installed and running on it.
Common spy apps
There are many apps that have been designed to spy on people that can be downloaded in the app store or on Google Play today. Most of these spyware apps are aimed at parents wanting to keep an eye on and protect their children. However, these can be used by anyone in order to spy on a target person via their phone.
Below is a list of common apps that can be used to spy on you. Many spyware apps require a phone to be ‘jailbroken’ or ‘rooted’ before being installed, this is when the phone’s operating system is changed to allow the phone to become unlocked and customizable.
mSpy : An undetectable spying app for iOS devices. It can be used to read your chats, see your location, view your email, check your call history, record your keystrokes, and more.
Spyera : This app requires rooted and jail-broken iPhones to work. It can go undetected and monitors phone calls and your call history. It even allows call recording and eavesdropping on live calls.
Flexispy : Flexispy prides itself as the #1 phone monitor for parents and can monitor everything from calls to social texts.
Umobix : This powerful spyware app has a dashboard that allows users to easily monitor someone’s location, calls, texts, keystrokes, all major social media, and more. You can detect Umobix because it heats up the infected phone and greatly affects the battery life of the infected device.
Ikey Monitor : Although it requires the device to be rooted for Android or jailbroken for iPhones, this spy app captures keystrokes, passwords, and screenshots, allows for call recording and supports multiple languages.
Clevguard : Available for both iOS and Android, Clevguard allows users to track GPS and Wi-Fi locations, capture screenshots remotely, and more. Due to a recent update, the spy app drains the target phone’s battery significantly.
Remove spyware from your phone
If any of the beforementioned apps are present on your phone you need to remove them right away.
Go to your phone settings and remove the malicious applications, then download some protection suite and scan the whole phone for any other trace of software remains or other malware apps.
As you know the Windows 10 operating system is has a lot of features and some of them are related to turning off your computer in different ways in order to save power at different levels. These particular features are Shut down, Restart, Hibernate, and Sleep. However, there are times when you might encounter some issues when using any of the aforementioned features. One of these issues is when your computer shuts down instead of going to Sleep.
This issue could be caused by several factors including a bug related to the Intel Management Engine Interface or IMEI driver as well as any misconfiguration in the power settings of the BIOS or UEFI. If your computer is going through this problem, read on as this post will guide you in fixing it.
There are several potential fixes you can try to fix the problem. You can try to check the Sleep Advanced Settings or run the built-in Power troubleshooter or run the Power Efficiency Diagnostic Report. In addition, you can also try to troubleshoot the problem in a Clean Boot State or reset or update the BIOS.
Option 1 – Check the Sleep Advanced Settings
Click on the Windows key and type “control panel” in the field and select the related search result.
Next, select the Security and Maintenance option and click on the Power Options.
After that, you have to select the Change Plan Settings but keep in mind that this option is barely readable so you need to read each option carefully.
Now click on the Change advanced power settings button and a new window will appear.
Then look for the “Sleep” option and expand it. Make sure that the “Allow hybrid sleep” option is on.
Reboot your computer and check if your computer now functions properly. If it still didn’t work, you may have to reverse the changes you’ve made.
Option 2 – Try to run the Power troubleshooter
The next thing you can do is to run the Power troubleshooter. To do so, follow these steps:
Go to Settings and navigate to Update & Security > Troubleshoot.
After that, look for the “Power” option from the given list of built-in troubleshooters and click on it.
Next, click on the “Run the troubleshooter” button to run the Power troubleshooter.
Once the troubleshooter is done identifying the problems, follow the next on-screen instructions to resolve the problem.
Option 3 – Troubleshoot Sleep Mode issue in a Clean Boot State
The issue with Sleep Mode might be caused by some third-party programs installed on your computer. This program might be the one that puts your computer to sleep and so to isolate this possibility, you have to put your PC in a Clean Boot State using the steps below.
Log onto your PC as an administrator.
Type in MSConfig in the Start Search to open the System Configuration utility.
From there, go to the General tab and click “Selective startup”.
Clear the “Load Startup items” check box and make sure that the “Load System Services” and “Use Original boot configuration” options are checked.
Next, click the Services tab and select the “Hide All Microsoft Services” check box.
Click Disable all.
Click on Apply/OK and restart your PC. (This will put your PC into a Clean Boot State. And configure Windows to use the usual startup, just simply undo the changes.)
After that, try to put your computer to sleep again.
Option 4 – Try to run the Power Efficiency Diagnostics Report
You could also try to run the Power Efficiency Diagnostics Report to fix the problem. This tool is helpful and will help you analyze the status of the battery but note that this can be quite overwhelming especially if you’re not well-versed in this matter.
Option 5 – Try to update the BIOS
Updating the BIOS can help you fix the ATTEMPTED_WRITE_TO_READONLY_MEMORY BSOD error but as you know, BIOS is a sensitive part of a computer. Even though it is a software component, the functioning of the hardware depends on it largely. Thus, you must be careful when modifying something in the BIOS. So if you don’t know much about it, it’s best if you skip on this option and try the other ones instead. However, if you are well-versed in navigating the BIOS, then follow the steps below.
Tap the Win + R keys to open the Run dialog box.
Next, type “msinfo32” in the field and press Enter to open System Information.
From there, you should find a search field on the bottom where you have to search for the BIOS version and then press Enter.
After that, you should see the developer and version of the BIOS installed on your PC.
Go to your manufacturer’s website and then download the latest version of BIOS on your computer.
If you are using a laptop, make sure that you keep it plugged in until you have updated the BIOS.
Now double click on the downloaded file and install the new BIOS version on your computer.
Now restart your computer to apply the changes made.
Note: If updating the BIOS didn’t help, you might want to consider resetting it instead.
Error 0x8007005 is a typical Windows Error Code.
This error occurs during installation or Windows update. The error 0x8007005 is prompted as an ‘Access Denied’ message. It is typically generated when you either lack file or registry permission to perform the installation.
Solution
Error Causes
Narrowing down the ultimate reason for the error 0x8007005 can be difficult because there are multiple causes for this error occurrence.
However, some of the common causes include:
Administrative issues
Viral Infection
To perform a successful Windows update, it is vital to resolve this error on your system. Furthermore, you must also hurry in fixing this issue on your PC especially if the underlying cause of this error is malware or viruses.
Malware can damage your PC badly. It can expose your computer to serious threats like privacy issues, data breaches, cyber crimes and identity thefts.
Further Information and Manual Repair
To fix the error 0x8007005 on your PC, you don’t have to hire a professional and pay hundreds of dollars. In fact, you can resolve it all by yourself even if you are not technically sound.
Here are some easy DIY methods for you to try:
Solution 1: The error may occur if you don’t have administrator’s permission and there are many user accounts to access the PC. The easiest way to fix the error and perform a successful Windows update is to log on from the administrators account.
Once you log on as the administrator, then try installing the updates again.
Solution 2: Sometimes the file and registry permissions may get changed by malware. Therefore, to fix the error, it is advisable to download an antivirus and perform an entire PC scan.
The antivirus will help remove all sorts of viruses infecting your system and fix the issue.
However, please note anti-viruses are known for slowing down PC performance so you might have to compromise on your system’s speed once to install this software.
Solution 3: Download Restoro.
Downloading Restoro is perhaps the best and the fastest way to resolve error 0x8007005 without compromising on your PC’s speed. Plus this software also resolves all registry issues too.
Restoro is an advanced and multi-functional PC Fixer.
It is deployed with powerful utilities including an antivirus that detects and removes all kinds of malicious software including viruses, Trojans, spyware and malware. To ensure your PC speed is not affected, it also features a system optimizer. The system optimizer boosts the speed of your PC significantly.
Other Restoro Features
In addition to this, it also includes a registry cleaner.
The registry cleaner simultaneously detects all registry-related issues and resolves them instantly. It cleans the registry, fixes the damaged files, and restores the registry back to normal.
It is safe, bug-free, and efficient. You can install it on any Windows version. It has a user-friendly interface and simple navigation making it easy for all levels of users to operate.
Click here to download Restoro on your PC and resolve error 0x8007005 now!
Microsoft has implemented a number of small features in Windows 10 to enhance user productivity. These features make a difference in the overall experience and productivity of users. However, there are times that instead of helping users, these small feature causes some issues instead which causes the computer to function in an unusual way. One of the issues caused by these features is where the Mouse automatically scrolls up or down even without any user intervention. This can get really annoying especially when you’re doing an important task on your computer. So if this bug takes place repeatedly, it can make your computer unusable. If you are currently facing this problem, worry not for this post will guide you on what to do to fix the mouse auto-scrolling issue in your Windows 10 computer.
Use the options provided below to fix the mouse auto-scrolling issue.
Option 1 – Try to toggle the appropriate Mouse 10 setting
Tap the Win + I keys to open the Settings app.
After that, navigate to Devices > Mouse.
From there, toggle the “Scroll inactive windows when I hover over them” setting to off.
Now restart your computer and see if the issue is resolved.
Option 2 – Try to uninstall the installed Windows Updates recently
The mouse issue might have something to do with a recent update you have installed on your computer. It is possible that there are some recently installed updates that have messed up some settings in your computer. Thus, you can try to uninstall this recent Windows Update to try and fix the problem. Not that the best way to do this is in Safe Mode.
Boot your computer into Safe Mode first.
Once your computer has restarted, tap the Win + I keys to open the Settings app.
Next, click on Update and Security, and from the left side menu column, select Windows Update.
After that, select the “View installed update history” option on the right-side column.
Then click on Uninstall Updates. This will open a window where you’ll see the list of all the installed updates on your computer.
Select the update you want to uninstall and click on the Uninstall button located in the lower-right corner of the window.
Option 3 – Try to run System Restore
You might have made some adjustments in your computer’s settings that caused the issue with the mouse. You can undo those changes using System Restore.
Tap the Win + R keys to open the Run dialog box.
After that, type in “sysdm.cpl” in the field and tap Enter.
Next, go to the System Protection tab then click the System Restore button. This will open a new window where you have to select your preferred System Restore point.
After that, follow the on-screen instructions to finish the process and then restart your computer and then check if your mouse is now back to its normal state.

 Choosing default browser in settings
