Recently, a number of users reported that they weren’t able to download anything from the internet after they’ve updated their Windows 10 computers. This kind of problem occurs because of some Internet options settings located in the Control Panel. Based on the reports, this issue has been known to occur in all kinds of browsers and not only on Microsoft Edge.
Not being able to download anything from the internet is a huge problem since almost everything is wrapped around the internet. To resolve this problem, here are some suggestions that you can try.
Option 1 – Temporarily disable Firewall and third-party antivirus
Firewall and antivirus programs are known to block files the instant it detects a threat to the system. However, there are some cases when it can also block a file even when it’s a safe one. Thus, your antivirus or firewall programs might be the reason why you can’t download anything on your Windows 10 computer. To isolate the issue, you need to temporarily disable both the Firewall and antivirus programs and then check if you can now download anything from the internet. Do not forget to enable them again as disabling them can leave your computer vulnerable to cyber threats.
Option 2 – Try changing the Internet Options settings
According to users, changing the Internet Options settings helped them resolve the problem. There are times when the drive location in your Internet Options settings is not the system drive, chances are, it will cause the error to pop up which is why you need to make sure that it’s correct.
Go to Control Panel and search for Internet Options and open it.
Next, go to the General tab and click on Settings.
From there, check if the drive location is “C:”. If it is, close the window, otherwise, click on the “Move folder…” option, and then select your preferred folder under drive C: and click OK.
Now restart your computer and check if changing the Internet Options settings helped in fixing the problem.
Option 3 – Try clearing browser data
There are instances when browser data can cause issues in downloading files online. And so you can try to clear your browser’s data. This might be a very basic solution but oftentimes it works in fixing this kind of error. Follow the steps below to clear the data in your browser.
Open your Google Chrome browser.
After that, tap the Ctrl + H keys. Doing so will open a new panel that allows you to delete the browsing history and other data in your browser.
Now select every checkbox that you see and click on the Clear browsing data button.
Then restart your Chrome browser and check if you can now open any website or not.
Option 4 – Get rid of any conflicting browser extensions
Open Chrome and press Alt + F keys.
Go to More tools and click Extensions to look for any suspicious browser extensions or toolbars.
Click the Recycle bin and select Remove.
Restart Chrome and press Alt + F keys again.
Proceed to On Startup and mark Open a specific page or set of pages.
To check if the browser hijacker is still active, click Set pages, if it is active, overwrite the URL.
Option 5 – Try to remove Proxy
Removing the Proxy might also help you in fixing the connection issue in Cortana. Here’s how you can do it:
Tap the Win + R keys to open the Run dialog box.
Then type “inetcpl.cpl” in the field and hit Enter to pull up the Internet Properties.
After that, go to the Connections tab and select the LAN settings.
From there. Uncheck the “Use a Proxy Server” option for your LAN and then make sure that the “Automatically detect settings” option is checked.
Now click the OK and the Apply buttons.
Restart your PC.
Note: If you are using a third-party proxy service, you have to disable it.
Option 6 – Try reinstalling your browser
If none of the options given above worked in fixing the problem, you can try to reinstall your browser. There are times when the browser wasn’t installed properly which can cause several issues like not being able to download anything from the web. Thus, reinstall your browser and see if that helps.
Have you ever come across 0x8007043c error message pop up on your PC? If yes, then you should know that this error message is generated when any corresponding process or operation cannot be completed successfully by the application.
This is a critical Windows OS Error message that should be fixed immediately.
Solution
Error Causes
The 0x8007043c error code is usually triggered by the following reasons:
Missing or corrupt registry files
Failure to update Windows Installer
Viruses and Spyware
Common signs of this error code are pop-up messages, program lock-ups, problems with opening documents, and screen freeze.
Further Information and Manual Repair
As soon as you experience this error on your PC, it is advisable to repair it immediately because this error poses high-security risks. Malwares and viruses are notorious for data theft.
To fix the 0x8007043c error on your PC, you don’t need to take on the services of an IT professional. This error code is rated as easy to repair.
By following the instruction and repair solutions given below, you can easily fix this Window error 0x8007043c in a couple of minutes by yourself.
Here’s what you need to do:
Step 1: Scan for Viruses and Spyware
To stop hackers from sneaking into your PC and stealing your confidential data, you must first scan your computer for viruses and spyware on your PC. It is advisable to use a powerful antivirus to ensure your computer is totally virus and spyware clean.
Step 2: Download and Install a Registry Cleaner
After you scan for viruses, you should now download and install a registry cleaner. This is needed because an antivirus does not detect corrupt registry entries. To detect such entries, the registry cleaner tool is the best. After you download a registry cleaner on your system, click the scan button.
You will have to wait for a few seconds for the scanning to finish. Once the scanning is complete, click on the ‘Repair’ button to fix the errors.
After fixing all the errors, restart your computer. This is important because the registry changes will only come into effect after the system restarts.
By following these 2 simple steps, you can easily resolve the 0x8007043c error on your system. However, to prevent this error from occurring again, it is recommended to run the antivirus every time you use your PC.
As you know, the Mobile Hotspot feature is used to share the internet connection with other devices using Wi-Fi signals. These Wi-Fi signals are later caught by other devices using their Wi-Fi and then the internet connection is shared once they are connected. However, recently, some users reported that their devices weren’t able to see the Wi-Fi network even if their Wi-Fi is on.
This kind of problem could be caused by several factors but one of the main ones include the frequency at which the Wi-Fi network is being broadcasted. If you are one of the users who are currently facing this problem, read on as this post will guide you on what you can do if the Mobile Hotspot or Wi-Fi connection does not show up or is not detected on your Windows 10 device.
In most cases, there are only two frequencies at which a Wi-Fi network is broadcasted. They are broadcasted either at 2.4 GHz and 5 GHz. The ones that are broadcasted at 5 GHz need specific hardware since it is a newer technology compared to the ones at 2.4 GHz. There are several other pieces of equipment as well as electrical appliances that operate at 2.4 GHz that includes microwaves as well which causes disruption in the signal strength of the Wi-Fi network.
Moreover, aside from signal interruption, this issue with the mobile hotspot might also have something to do with the network-related drivers in your computer. Thus, to fix the problem, here are some suggestions you should follow.
Option 1 – Try toggling the Network band or the frequency at which the Wi-Fi network is broadcasted
First, open the Windows 10 Settings app and then navigate to Network & Internet > Mobile hotspot.
From there, click on the Edit button located under the Network name, Network password, and Network band.
After that, set the Network band to be at 2.4 GHz and then click on the Save button.
Once done, restart the Mobile hotspot in your Windows 10 device as well as the Wi-Fi connection of the device that’s trying to connect to the hotspot.
Option 2 – Try running the Network Adapter Troubleshooter
If the first option didn’t work, you might also want to run the Network Adapter Troubleshooter. You can use it to troubleshoot the problem with the Mobile hotspot, to run it, follow these steps:
Open the Search bar on your computer and type in “troubleshoot” to open the Troubleshoot settings.
Next, scroll down and select the “Network Adapter” option from the right pane.
Then click on the Run Troubleshooter” button.
After that, your computer will check for any possible errors and will pinpoint the root cause of the problem if possible.
Option 3 – Try updating the Network adapter driver
As mentioned, the problem could also be due to the network-related drivers. So it probably might be the reason why you’re mobile hotspot did not appear or was not detected. That’s why it is recommended that you update the Network adapter driver and to do it, refer to these instructions:
Follow the steps below to update your Network Adapter Driver:
Tap the Win + R keys to launch the Run window and then type in the “MSC” command and hit Enter to open the Device Manager window.
From there, expand the list of all the network drives and update each one of them.
Restart your PC and see if it helped in fixing the issue with the mobile hotspot.
Note: If updating the network drivers didn’t help in fixing the problem, you can also try to uninstall the very same drivers and restart your Windows 10 PC. After that, the system itself will reinstall the drivers you just uninstalled. Alternatively, you can also download and install the drivers from the manufacturer’s website directly.
As a digital creation of Blueis, the DownloadAdmin application peruses your computer system for programs/applications that are outdated. This program then makes the necessary updates/installation on your computer, as if it were the Administrator. While most people might consider this application harmful, scrutinizing the Digital Publisher/Creator of the application should be reason enough to remove DownloadAdmin (and any other associated program) from your computer. Why? Blueis is infamous for producing/distributing “adware type software”, according to herdProtect Anti-Malware. Is that not a plausible reason for you to remove applications associated with that publisher? Additionally, DownloadAdmin not only updates your outdated applications, but it installs additional programs - usually utility tools and search toolbars. This is a sly way to promote third-party software and to get ads loaded onto your computer system.
Technical details about DownloadAdmin include:
Digital Publisher: Blueis
Product Version: 4.0.0.1
Original File Name: DownloadAdmin
Entry Point: 0x0000234A
Assessment of DownloadAdmin
For this assessment, the DownloadAdmin file was obtained and installed on a test computer. After the DownloadAdmin/Updateadmin application was installed, it made several modifications to the computer system. These modifications may class the newly installed file as a PUP (potentially unwanted program). Outlined below is what took place after the file was installed.
Updated an outdated application installed on the computer
Subsequent to the update made by Updateadmin, I thought the PUP had run its course. However, it was not quite finished. It was after scanning the contents/programs of my Local Drive, I stumbled on an additional program, one that I did not download or install, at least not intentionally. As predicted, the DownloadAdmin application scanned through the computer system (in the blink of an eye), during installation and made adjustments to an application already installed. This program was the Mozilla Firefox. Since Mozilla Firefox was rarely used on the PC in question, the DownloadAdmin application thought it quite appropriate to revive the Mozilla Firefox browser, by replacing it with the latest or more contemporary version.
Installed a search toolbar
While DownloadAdmin did request permission to install an updated version of my Browser, it provided no warning about installing a search toolbar. This is quite shady and deceptive. In addition to updating the Internet Browser, DownloadAmin also installed the SearchProtect toolbar (Conduit). This toolbar is no stranger to the market as I’ve encountered it on several occasions during my assessment of malware.
Should you remove DownloadAmin?
That decision is totally yours to make. However, here are some reasons why most people would consider that program unwanted
It updates your outdated programs
In most cases, at least those I’ve seen, if a user has a program installed, they don’t necessarily want a new version of that program. In fact, this PUP could spell trouble since some programs, especially paid, require a license to use the software. When that program is updated/ upgraded, you might have to acquire a new license to get it to work.
Unnecessary program
If you’re totally lackadaisical and loathe the idea of doing work yourself, this program might come in handy. Many users will update their computers manually by using Microsoft’s preinstalled/pre-programmed updater in their computer’s Control Panel. This option searches for and installs all the necessary programs to keep your computer safe and secure. The DownloadAdmin program only occupies needed space and resources on your computer. However, what’s good about this program is that it doesn’t operate at the start time so it doesn’t necessarily cause unnecessary lags on your computer.
Modifies your search experience
By installing a search toolbar called SearchProtect, Updateadmin modifies or changes the browsing experience you’re accustomed to. SearchProtect hijacks your browser and changes your homepage to their choice while removing yours. This is often hard to reverse since the publisher created this software to remain once installed.
To completely remove DownloadAdmin from your computer, click here to download and install Spyhunter
Finally upgraded to Microsoft’s newest OS, but the performance is a bit sluggish? Here are a few useful tips you may not have thought about that could significantly transform your experience!
How to speed up Windows 11?
1. Disable startup programs
There are many programs that launch right on startup that really aren’t essential. This, in turn, causes your PC to launch and run more slowly.
To check which programs are enabled on startup, go into the Task Manager and select the Startup tab. Find every program that doesn’t need to launch immediately, right-click on it and press ‘Disable’.
This will not shut down the program in that instant. It’ll just prevent it from running automatically as you turn on your PC. You can always launch it manually when you need it.
2. Expand your memory and storage
If you want your PC to run super smoothly, you need to have enough memory to support that. This is especially significant for those of you who love to multitask. Upgrading your RAM gives your PC more space to store the temporary data it needs to complete processing tasks. In other words, processing takes a lot less time.
Your long-term storage is equally important. Hopefully at this point you’re already using SSD over HDD, since this type of storage offers a faster boot time.
Credit: Marc Pezin on Unsplash
In any case, we recommend expanding your storage capacity. The more files and data you store, the more there is to load, significantly influencing your PC’s speed. Larger storage capacity means new data and essential updates can be stored comfortably, preventing any strain on your PC’s performance.
3. Clean up disk space
If you aren’t willing to upgrade your storage just yet, the least you can do is clean up your storage right now.
Aside from manually deleting stuff you no longer need, you can also get rid of temporary files that clutter up your storage and eat up performance for no reason. To get to them, click Windows + X and select ‘Run’ (or just type it in the search bar).
A small window will pop up, where you need to type %temp%. This will take you to a whole folder full of all the temporary files you can remove without thinking twice.
For those who upgraded from Windows 10, there’s a neat trick to get rid of potential leftover files you don’t need on your brand new iteration. Only do this if you’re 100% sticking with Windows 11, though. Go to System > Storage > Temporary files. Make sure to only leave ‘Previous Windows Installation’ and ‘Windows Update Clean-up’ checked and click on ‘Remove files’.
Lastly, make use of Windows 11’s fantastic Storage Sense feature. Turning it on will enable your PC to constantly watch out for junk or unused files to optimize your PC’s performance to the maximum.
4. Install pending updates
This one should go without saying, but pending updates can be detrimental to your Windows 11 performance. The longer you leave them untouched, the more bugs the outdated programs and patches can cause. So, make sure to regularly check for updates and install them as soon as they’re available.
5. Disable visual effects
As cool as visual effects, animations, shadows and transparency are, they can also put quite a toll on your computer’s speed. On a newer setup this generally shouldn’t be a problem, but if you do notice a drop in performance, definitely consider turning off some of these settings.
To do this you can go to the Control Panel, System Properties and click the ‘Advanced’ tab. In the Performance section, choose Settings. If you’d like a quicker way to get to the dialog (Performance Options) with Visual Effects, you can also type sysdm.cpl in the search bar.
Once there, you can either have your PC choose what’s best, choose the best appearance or the best performance. The other option is to manually toggle the effects off and on. The biggest obstacles to speed are taskbar animations, window shadows, control/element animations and animations upon minimizing/maximizing.
Credit: Windows on Unsplash
In the same vein, you should go to Settings > Personalization > Colors and disable Transparency, to prevent your computer from doing overtime just to hit the aesthetic appeal.
6. Get rid of bloatware
Bloatware is one of the biggest culprits of slow computer speed.
Pre-installed software that’s pretty much useless but takes up valuable system resources has been around since day one. No matter which device or platform you’re talking about. Luckily, a lot of it is removable, making it easy to lighten the load on your device.
To boost your Windows 11 computer, go to Settings > Apps > Installed apps.You’ll probably see a bunch of apps you don’t want or need. Click on the three dots next to each one you want to remove and press ‘Uninstall’.
Aside from helping optimize performance, removing bloatware has another great benefit. Unfortunately, often this pre-installed software is quite vulnerable, exposing you to great risk of cyberattacks. So, removing it definitely improves your device’s security and gives you at least some peace of mind.
Summary
These are a few of our fastest tips for boosting performance. There are other, more complex and time-consuming ways, of course. If you’ve tried these quick ones and still need advice on how to improve your PC’s speed, feel free to reach out!
There are cases when you want to undo some changes you’ve made to your computer and to do that you have to perform the System Restore task. However, if you encounter an error that states “To use System Restore you must specify which Windows installation to restore”, when doing so, read on as this post will help you fix the problem.
This kind of error in System Restore could be due to corrupted files in the system. There are also situations where you are not able to boot up once you encounter this error which could be a big problem. On the other hand, this error might have something to do with corrupted BCD files. Whatever the cause is, here are some potential fixes you have to try.
Option 1 – Try to run System File Checker offline
Like pointed out, since the error might be due to corrupted system files, you can try to run System File Checker offline. How? Refer to these steps:
You need to go to the Advanced Startup Options and from there select Troubleshoot.
Next, select the Advanced Options and then Command Prompt.
After opening Command Prompt, type the commands given below and tap Enter right after you type each one of them.
Cd /
Dir
If you can see the “Users” folder, that is your system’s drive. However, if you can’t see it, you can just change the drive-by assigning “D” as its alphabet volume.
Then execute this command where “C” is the system drive: sfc /scannow /offbootdir=C: /offwindir=C:Windows
Now repeat the given steps sequentially.
Option 2 – Try to run DISM tool
You can also run the DISM tool to repair the potentially corrupted system image. First, you have to check the health of the system like checking the integrity of the system files and Windows services. To run DISM, follow the given steps below sequentially.
Open Command Prompt from the Advanced Startup options.
After that, execute this command where “C:” is the system volume: DISM /Image:C:Windows /Cleanup-Image /RestoreHealth /Source:C:WindowsWinSxS
If you encounter an error after executing the given command, insert the Windows USB or DVD and then execute this next command where “E:” is the USB or DVD drive: DISM /Image:C:Windows /Cleanup-Image /RestoreHealth /Source:esd:E:SourcesInstall.esd:1 /limitaccess
In some cases, “install.esd” would be “install.wim” and in such case, you have to modify and execute this command: DISM /Image:C:Windows /Cleanup-Image /RestoreHealth /Source:wim:E:SourcesInstall.wim /limitaccess
Option 3 – Try to repair corrupted BCD
As mentioned, the error could also be due to corruption in BCD, and to fix it, you can use Bootrec.exe – a built-in command-line tool used to troubleshot issues related to boot up and Windows Startup. Before you run this tool, make sure that you have inserted a bootable USB or DVD into your computer. Once you have that covered, follow these steps:
You need to go to the Advanced Startup Options.
Then click on Troubleshoot.
Next, select the Advanced Options and then Command Prompt.
Once Command Prompt has been pulled up, enter each one of the following commands and in the sequence that they are given to rebuild BCD files and repair MBR files:
Bootrec /Fixmbr
Bootrec /FixBoot
After you execute the commands given above, you should see a confirmation message that says, “The operation completed successfully”.
Now type the “Bootrec /RebuildBCD” command to rebuild BCD.
Finally, close Command Prompt and then restart your computer to successfully apply the changes made.
Option 4 – Try to run the Automatic Repair Utility
You might also want to use Automatic Repair in fixing the error. To do so, follow the steps below.
You can start by creating and booting from a bootable Windows 10 USB Stick.
After that, click on Repair your computer located in the bottom left corner when you are on the initial Windows Startup screen.
Next, click on Troubleshoot, and then on the other screen, click the Startup Repair option.
Now select the operating system you want to repair. Once you do that, it will start to repair your operating system. Wait until the process is completed and then check if the problem’s now fixed.
Option 5 – Try to use the Windows Recovery Environment
If the four options given above didn’t help fix the problem, you could try running Windows Repair and a Windows bootable USB or DVD.
First, insert the bootable USB or DVD and boot into it, and select the “Repair your computer” option.
Next, once you see the manufacturer logo on your computer, tap the key to enter into Windows Recovery Environment.
After that, change the Boot sequence to DVD drive under the UEFI Firmware settings and restart your computer.
Once your computer has restarted, select the boot order and make changes accordingly as displayed in the BIOS.
Option 6 – Try running System Restore in Advanced Startup Options
Since you probably can’t boot into your Windows 10 computer, you can try to run System Restore again in the Advanced Startup Options.
Boot your computer into the Advanced Startup Options screen.
From there, you will see some options to troubleshoot when you can’t log in to Windows in the usual way.
Now select Troubleshoot > Advanced Options > Command Prompt.
After that, type “exe /OFFLINE:C:Windows” and hit Enter to execute the command which will start the System Restore process.
Note: You need to replace “C” with the drive where Windows Installation is located.
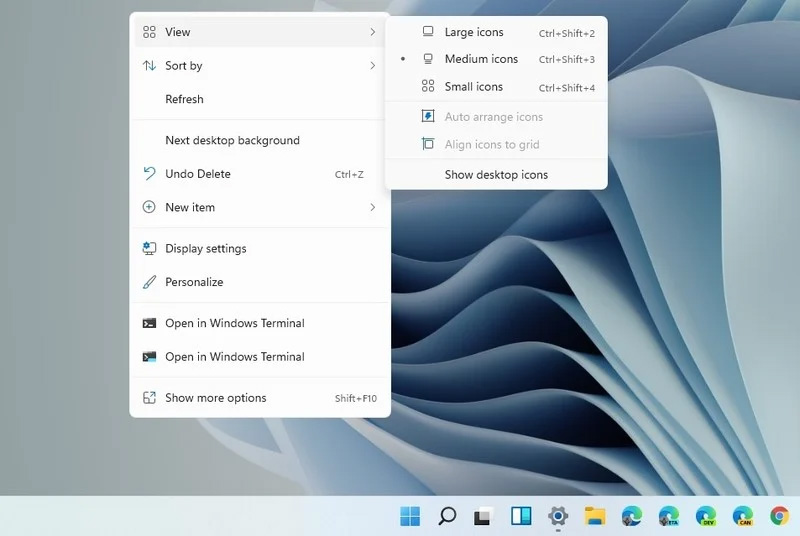
Windows 11 brought with it a simplified right-click menu that has limited options. If you would like to bring the old Windows 10 right-click menu you will have to do some registry tweaking but it is doable.
Since this requires registry tweak, please follow given solution step by step
Press Start and type RegEdit
Click on Registry Editor
Inside registry editor find next key:
Computer\H_KEY_CURRENT_USER\SOFTWARE\CLASSES\CLSID\
Right click in the right part of editor window and select New > Key
Type in as a name: {86ca1aa0-34aa-4e8b-a509-50c905bae2a2}
Right click on {86ca1aa0-34aa-4e8b-a509-50c905bae2a2} key and select New > Key again to create new key inside this one
Name inside key InprocServer32
Double click the “(Default)” key in InprocServer32 to open it
When the Default key opens close it without making any changes by clicking on OK. This will make its value property Blank instead of value not set
Close Registry Editor
Restart your PC
Once the system is up if the followed solution is applied you will now have an old school menu once right-click is used.
When you update or upgrade your computer to Windows 10, the setup will look for the compatibility of both the hardware and software. And in this process, if suddenly got an error message saying, “Some apps need to be uninstalled” or “You need to uninstall a program in order to continue”, you have to look for the program(s) that might be causing the compatibility issues. But worry not as this post will help you resolve the issue. Simply follow the given suggestions below.
Option 1 – Look for the incompatible programs
There are times when Windows 10 will point out the programs that are incompatible with Windows 10. In this situation, just click on the Uninstall and continue button and then wait for the process to be completed.
For more information, you can check out the official site Ready for Windows by Microsoft. This site can help you determine which software versions are compatible with Windows 10 and which ones are not. All you have to do is select the Windows 10 version and type your App name, after that, you will see the results about its compatibility. Thus, it’s now easier for you to figure out which software is causing an issue and if there is a new updated version available that you can install instead.
Option 2 – Try to install the Windows Update in a Clean Boot State
Putting your PC in a Clean Boot state can also help you install Windows Updates or Upgrades without any trouble because, during this state, you can start the system with a minimum number of drivers and startup programs that will surely help you in isolating the root cause of the issue.
Log onto your PC as an administrator.
Type in MSConfig in the Start Search to open the System Configuration utility.
From there, go to the General tab and click “Selective startup”.
Clear the “Load Startup items” checkbox and make sure that the “Load System Services” and “Use Original boot configuration” options are checked.
Next, click the Services tab and select the “Hide All Microsoft Services” check box.
Click Disable all.
Click on Apply/OK and restart your PC. (This will put your PC into a Clean Boot State. And configure Windows to use the usual startup, just simply undo the changes.)
After that, try to install the Windows Updates or upgrade again.
Option 3 – Try creating a new user account
Creating a new user account can resolve the “Some apps need to be uninstalled” error when upgrading or updating your Windows 10 PC. All you have to do is create a new admin account and initiate the setup. And this is a new user account, there will be no third-party applications installed on your computer. Thus, the installation should go through without any trouble. And in case you’ve already installed programs for that user, you just have to uninstall them all and then re-run the setup.
Option 4 – Perform a clean install
If none of the options worked, you can try to clean install Windows 10. Just make sure that you have the ISO from the official Microsoft Website and then a bootable USB drive to install Windows 10 again. Take note that this will delete all the data from your drive where Windows 10 was installed previously.
A number of users have recently reported that they were going through an issue with their Bluetooth devices on their Windows 10 computers. This issue involves an error saying,
“Windows cannot verify the digital signature for the drivers required for this device. A recent hardware or software change might have installed a file that is signed incorrectly or damaged, or that might be malicious software from an unknown source. (Code 52).”
If you are one of the users who encountered this kind of error on your Windows 10 computer, read on as this post will guide you on how you can fix this Bluetooth error. According to security experts, the key to fixing this error is to sign the Bluetooth A2DP files with the built-in tool, System File Checker. Apart from that, you could also run the Hardware and Devices troubleshooter or perform System Restore, as well as update or reinstall the concerned drivers. For more details, refer to each one of the options provided below.
Option 1 – Try to check Bluetooth-related services
In Services, there is a Bluetooth-related service that helps users use Bluetooth so if that particular service suddenly malfunctions for some reason, you will most likely get the “Windows was unable to connect with your Bluetooth network device” error message. That’s why you need to check Services and to do that, refer to these steps:
Tap Win + R keys to open Run prompt and type in “services.msc” then tap Enter to open Services.
Next, look for the Bluetooth Support Service and double click on it to open Properties.
From there, verify if the Service status is showing “Running” or “Stopped”. If it’s the latter, you have to click the Start button.
Lastly, check if the Startup type is set to Manual.
Option 2 – Try running System File Checker or SFC scan
You could also run System File Checker or SFC scan to fix the Bluetooth error. It is a built-in command utility that helps in restoring corrupted files as well as missing files. It replaces bad and corrupted system files with good system files. To run the SFC command, follow the steps given below.
Tap Win + R to launch Run.
Type in cmd in the field and tap Enter.
After opening Command Prompt, type in sfc /scannow
The command will start a system scan which will take a few whiles before it finishes. Once it’s done, you could get the following results:
Windows Resource Protection did not find any integrity violations.
Windows Resource Protection found corrupt files and successfully repaired them.
Windows Resource Protection found corrupt files but was unable to fix some of them.
Reboot your PC.
Option 3 – Try to perform System Restore
You might also want to perform System Restore as the error might be caused by system modifications. Thus, to undo them, you can use System Restore. Run it using these steps:
First, tap the Win + R keys to open the Run dialog box.
After that, type in “sysdm.cpl” in the field and tap Enter.
Next, go to the System Protection tab then click the System Restore button. This will open a new window where you have to select your preferred System Restore point.
After that, follow the on-screen instructions to finish the process and then restart your computer and check if the problem is fixed or not.
Option 4 – Try running the Hardware and Devices Troubleshooter
The next thing you can do to fix the problem is to run the Hardware and Devices troubleshooter. Although it won’t make much of a difference, there’s still a possibility that it could automatically fix the Bluetooth error. To use it, refer to these steps:
The first thing you need to do is click on Start and then on the gear-like icon to pull up the window for Settings.
After opening Settings, look for the Update and Security option and select it.
From there, go to the Troubleshoot option located on the left-hand side of the list.
Next, select Hardware and Devices from the list and open the Troubleshooter and run it. Once it is doing its job, wait for it to complete the process and then restart the system.
After the system restarts, check if the problem’s now fixed. If not, refer to the next option given below.
Option 5 – Try to reinstall or update the Bluetooth driver
The issue might have something to do with the Bluetooth drivers. It could be that it is outdated and needs to be updated or that you recently updated it and since then you have trouble removing the Bluetooth devices and so to fix the issue, you can update, roll back or uninstall the Bluetooth drivers. How? Follow the steps below.
Tap the Win + X keys to open the Device Manager.
Next, look for the Bluetooth device and right-click on it.
Select the option “Update driver”.
After that, a new popup window will appear. In there, select the option, “Search automatically for updated driver software”.
Note: Checking the update may take a few minutes so you’ll have to wait until it finishes. If it is able to find an update, you must install it. And if you want to reinstall the Bluetooth driver, just select the “Uninstall driver” option and follow the next on-screen instructions that follow.
The newest piece of hardware for PC or console users is not really what anyone has expected and for sure not from a company like Cooler Master.
I going to admit right here that I am a big fan of Cooler Master PC cases, I like them and they are always one of the things that I consider when building a new PC, overall I like their ideas and quality so personal for me it was quite a surprise to see that they are one that is making a new generation gaming chair.
Now truth to be told Orb X is not your typical gaming chair as you can clearly see from the pictures. The chair itself will come in two colors: white or black and RGB lighting looks to be prominently featured throughout.
The chair itself is advertised as both meant and aimed for professional and gaming crowds but I believe the gaming crowd is in general more interested in this hardware piece.
Hardware is enclosed in a fully motorized shuttle dome which aims to maximize your privacy, it supports a single 49inch display or three 27inch monitors along with surround speakers if you do not wish to use headphones.
It offers an adjustable headrest, lumbar support, and footrest so you can spend some time in it and be comfortable. Controls on the chair itself allow you to raise or lower the dome for easier getting in and out of it.
Orb X also has a compartment in its backside, it folds out and has a sliding tray designed to hold your PC or console. Everything is enclosed so wiring is not the issue.
Overall Orb X seems really like the computer chair of the future, Cooler Master expects to release the Orb X by December 2021, priced around $12,000-$14,000.
Booting Windows 10 in safe mode can solve many issues with your computer since Windows will boot just in its basic core and you can safely maintain it, find a solution for issues, etc.
Before, entering safe mode was easy and pretty straightforward, during Windows evolution, entering safe mode was somewhat complicated and not being made so directly like once it was but do not worry. Starting Windows in safe mode today is even maybe easier than it was before, it is just not so obvious as it once was.
In this article, we will go through several ways how you can boot up Windows in safe mode in order to solve whatever issue is troubling you.
Start safe mode from settings
Open Settings by pressing the ⊞ WINDOWS + I or by just clicking on the Start button and clicking Settings.
Go to Update & Security, then Recovery.
In Advanced startup, click Restart now.
Once your PC reboots, click Troubleshoot, then Advanced options. Select Startup Settings then Restart.
Go to safe screen from Sign-in screen
Click the Shift on your keyboard while clicking on the Power button on the bottom right corner of the screen.
Once your PC restarts, click on Troubleshoot, then Advanced options.
Select Startup Settings then Restart.
After the reboot, select 4 or the F4 on your keyboard to run in Safe Mode. If you choose to use Safe Mode with Networking, select 5 or F5.
Start Windows recovery Environment
Go to the Windows Recovery Environment by doing the following steps:
Press on the power button to turn off your device.
Press on the button again to turn it on.
Once Windows starts, press the power button again for 10 seconds to turn it off. Then press it on again.
Upon the reboot, hold on to the power button for 10 seconds to turn it off, then turn it on again.
Because you've repeatedly turned on and off your PC, you will be redirected to Windows Recovery Environment.
On the pop-up window, click on Troubleshoot, then Advanced options. Select Startup Settings, then Restart.
After the reboot, select 4 or the F4 on your keyboard to run in Safe Mode. If you choose to use Safe Mode with Networking, select 5 or F5.
Hold SHIFT while pressing RESTART on the start menu
On the Windows 10 sign-in screen, hold on the SHIFT on your keyboard.
While pressing on the key, click on the Power button, then choose Restart on the pop-up menu.
Once your PC restarts, click on Troubleshoot, then Advanced options.
Select Startup Settings then Restart.
After the reboot, select 4 or the F4 on your keyboard to run in Safe Mode. If you choose to use Safe Mode with Networking, select 5 or F5
Boot from installation media and choose it in the command prompt
Create a Windows 10 bootable installation media on any external storage media.
Once you do this step, wait for the installation to load.
Select your preferred language and click on Next.
Click on Repair your computer at the bottom left of the menu.
Click on Troubleshoot, then Advanced options.
Select Command Prompt - Use the Command Prompt for advanced troubleshooting options.
Type in the following command on the prompt: bcdedit /set {default} safeboot minimal
Hit Enter and wait for it to tell you that "The operation completed successfully".
Exit Command Prompt and click on Continue.
Use system configuration tool
In the Search bar, type in msconfig.
Select the Boot tab and under the Boot options, put a check beside Safe boot.
Click OK.
Reboot PC
Press SHIFT + F8
Press SHIFT + F8 when turning on Windows.
This redirects you to Advanced Boot Options Window, then choose to run Windows on Safe Mode
There you have it, 7 different ways to enter safe mode in Windows 10, we hope that any of these tips proved helpful and that you managed to enter the safe mode and fix your Windows issues.

 Error Causes

 Since this requires registry tweak, please follow given solution step by step
 I going to admit right here that I am a big fan of Cooler Master PC cases, I like them and they are always one of the things that I consider when building a new PC, overall I like their ideas and quality so personal for me it was quite a surprise to see that they are one that is making a new generation gaming chair.
Now truth to be told Orb X is not your typical gaming chair as you can clearly see from the pictures. The chair itself will come in two colors: white or black and RGB lighting looks to be prominently featured throughout.
I going to admit right here that I am a big fan of Cooler Master PC cases, I like them and they are always one of the things that I consider when building a new PC, overall I like their ideas and quality so personal for me it was quite a surprise to see that they are one that is making a new generation gaming chair.
Now truth to be told Orb X is not your typical gaming chair as you can clearly see from the pictures. The chair itself will come in two colors: white or black and RGB lighting looks to be prominently featured throughout.
 The chair itself is advertised as both meant and aimed for professional and gaming crowds but I believe the gaming crowd is in general more interested in this hardware piece.
Hardware is enclosed in a fully motorized shuttle dome which aims to maximize your privacy, it supports a single 49inch display or three 27inch monitors along with surround speakers if you do not wish to use headphones.
The chair itself is advertised as both meant and aimed for professional and gaming crowds but I believe the gaming crowd is in general more interested in this hardware piece.
Hardware is enclosed in a fully motorized shuttle dome which aims to maximize your privacy, it supports a single 49inch display or three 27inch monitors along with surround speakers if you do not wish to use headphones.
 It offers an adjustable headrest, lumbar support, and footrest so you can spend some time in it and be comfortable. Controls on the chair itself allow you to raise or lower the dome for easier getting in and out of it.
Orb X also has a compartment in its backside, it folds out and has a sliding tray designed to hold your PC or console. Everything is enclosed so wiring is not the issue.
Overall Orb X seems really like the computer chair of the future, Cooler Master expects to release the Orb X by December 2021, priced around $12,000-$14,000.
It offers an adjustable headrest, lumbar support, and footrest so you can spend some time in it and be comfortable. Controls on the chair itself allow you to raise or lower the dome for easier getting in and out of it.
Orb X also has a compartment in its backside, it folds out and has a sliding tray designed to hold your PC or console. Everything is enclosed so wiring is not the issue.
Overall Orb X seems really like the computer chair of the future, Cooler Master expects to release the Orb X by December 2021, priced around $12,000-$14,000.