Recently, a number of users reported that they weren’t able to download anything from the internet after they’ve updated their Windows 10 computers. This kind of problem occurs because of some Internet options settings located in the Control Panel. Based on the reports, this issue has been known to occur in all kinds of browsers and not only on Microsoft Edge.
Not being able to download anything from the internet is a huge problem since almost everything is wrapped around the internet. To resolve this problem, here are some suggestions that you can try.
Firewall and antivirus programs are known to block files the instant it detects a threat to the system. However, there are some cases when it can also block a file even when it’s a safe one. Thus, your antivirus or firewall programs might be the reason why you can’t download anything on your Windows 10 computer. To isolate the issue, you need to temporarily disable both the Firewall and antivirus programs and then check if you can now download anything from the internet. Do not forget to enable them again as disabling them can leave your computer vulnerable to cyber threats.
According to users, changing the Internet Options settings helped them resolve the problem. There are times when the drive location in your Internet Options settings is not the system drive, chances are, it will cause the error to pop up which is why you need to make sure that it’s correct.
There are instances when browser data can cause issues in downloading files online. And so you can try to clear your browser’s data. This might be a very basic solution but oftentimes it works in fixing this kind of error. Follow the steps below to clear the data in your browser.
Removing the Proxy might also help you in fixing the connection issue in Cortana. Here’s how you can do it:
Note: If you are using a third-party proxy service, you have to disable it.
If none of the options given above worked in fixing the problem, you can try to reinstall your browser. There are times when the browser wasn’t installed properly which can cause several issues like not being able to download anything from the web. Thus, reinstall your browser and see if that helps.

 Despite popular belief, there are a lot of users running Linux OS. Linux offers great security and working environment and 96.3% of the world's top 1 million servers run on Linux. 90% of all cloud infrastructure operates on Linux and practically all the best cloud hosts use it. But gaming on Linux is limited, enter Steam proton a Valve’s gaming solution.
“An error occurred while checking for updates: Unable to connect to the Internet. If you use a firewall, please whitelist GoogleUpdate.exe. (error code 7: 0x80072EE7 — system level).”Whatever the cause of this error is, you need to use the options prepared below to fix it.
Control Panel/All Control Panel Items/Windows Defender Firewall/Allowed apps
“Device requires further installation”Aside from corrupted or outdated drivers, the error could also be caused by pending updates, an incorrect version of the Intel PROSet Wireless driver, or checking the wrong event. Whatever the cause is, this post will provide you with some potential fixes that can help you resolve the problem. But before you troubleshoot the problem, ensure that your Windows 10 computer is updated to its latest version and you must also not forget to check that you’re checking the correct event on the Event Viewer. Once you have these things covered, proceed to the instructions below.
KMODE_EXCEPTION_NOT_HANDLED – win32kbase.sys
PAGE_FAULT_IN_NONPAGED_AREA – win32kbase.sysThe win32kbase.sys file is a Windows operating system Base Win32 Kernel Driver file located in the System32 folder so if it ends up getting corrupted or if it went missing, your computer will throw up Blue Screen error. To fix BSOD errors that have something to do with the win32kbase.sys file, here are some possible fixes that could help. Worry not for these possible fixes are not complicated.
chkdsk /f C:
 Fear not because we had this issue and tried several things in order to overcome the problem and after some time here is a list of what can you do if you are facing this exact issue. The list is written from most simple solutions to more complex ones and it is advisable to follow it as presented. That being said, let's dive into solving the problem.
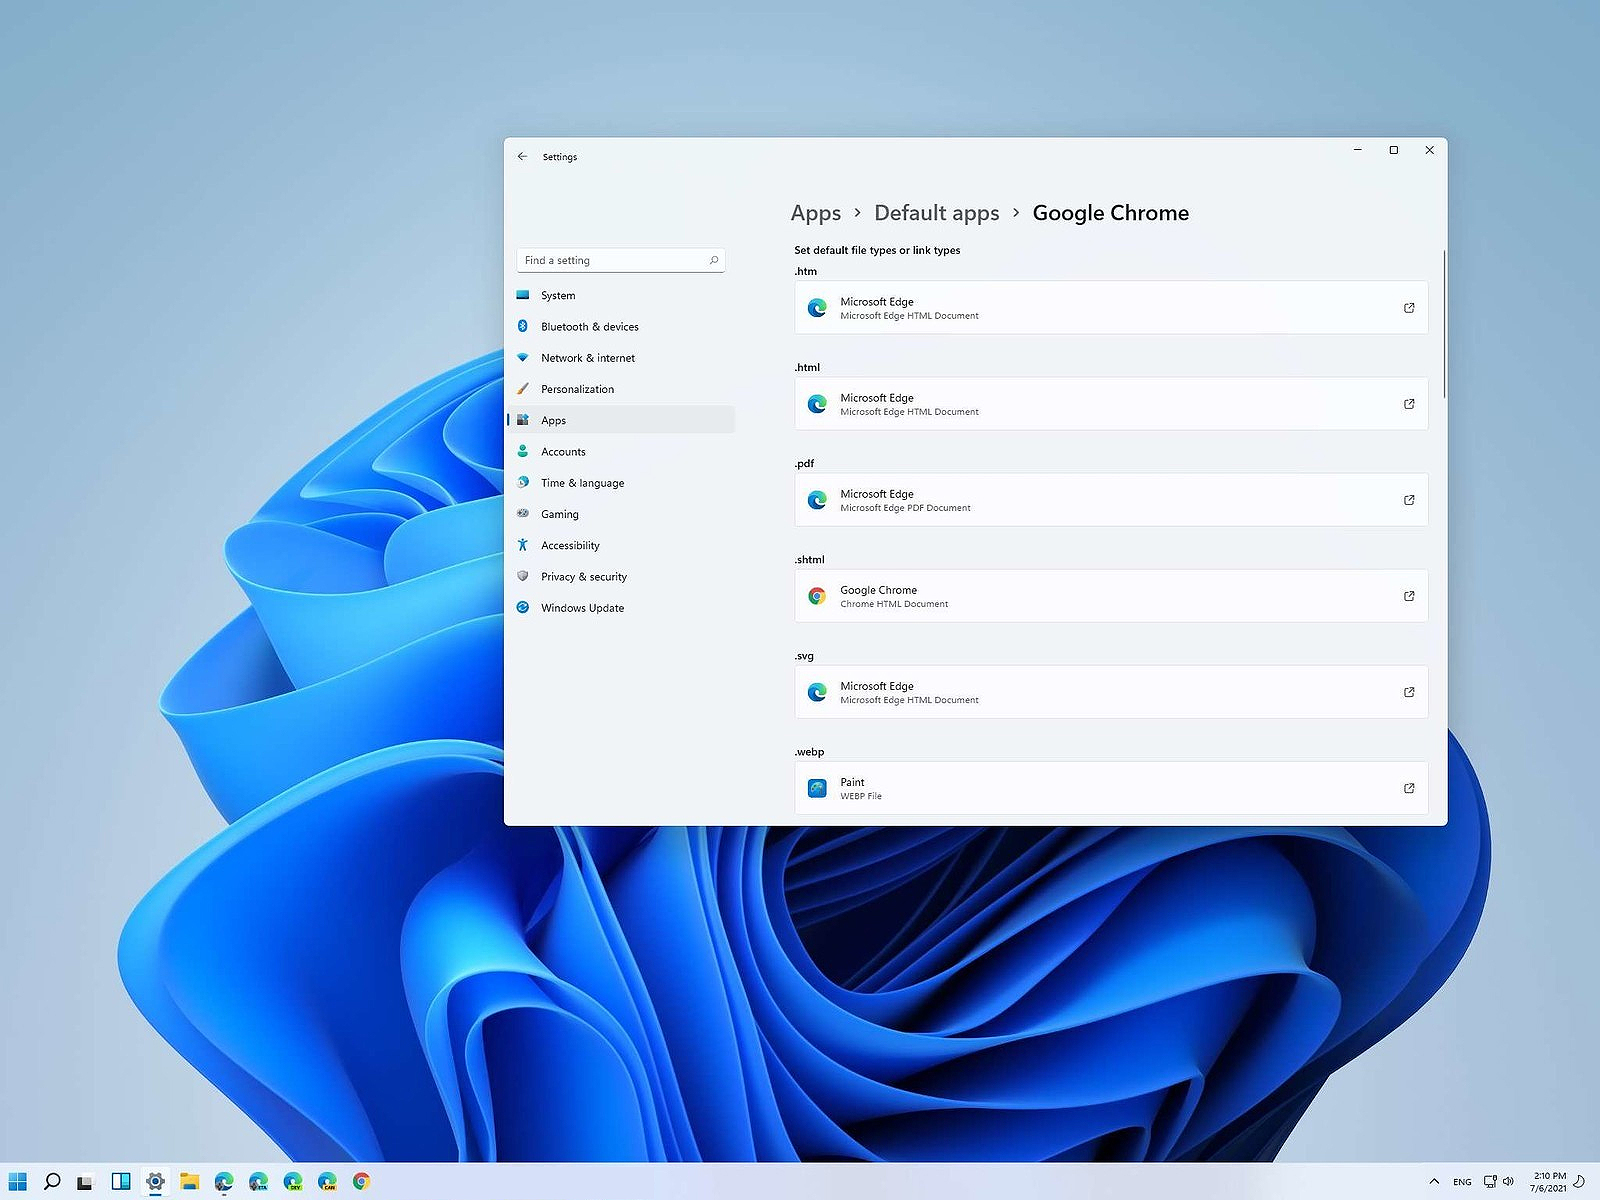 Same as in previous Windows versions, Windows 11 will also use certain applications as default ones for opening certain file types and file extensions. And yes, same as in previous versions it will come preconfigured for certain file types and associated applications like for example photos for pictures.
Of course, users usually have their own favorite applications for certain file types and much more prefer to open them inside the application of their choice instead of the default one.
We can change the default application like in previous Windows versions but this time there are two ways and overall more control of this process. Windows 11 has settings for choosing default file type applications and default file extension applications giving you more control of this process.
Same as in previous Windows versions, Windows 11 will also use certain applications as default ones for opening certain file types and file extensions. And yes, same as in previous versions it will come preconfigured for certain file types and associated applications like for example photos for pictures.
Of course, users usually have their own favorite applications for certain file types and much more prefer to open them inside the application of their choice instead of the default one.
We can change the default application like in previous Windows versions but this time there are two ways and overall more control of this process. Windows 11 has settings for choosing default file type applications and default file extension applications giving you more control of this process.