Logo

Windows could not find a driver for adapter

Device drivers serve as a connection between the hardware in your computer and the operating system. So if any of the device drivers fail, the concerned hardware will stop communicating with Windows. And when you encounter some network-related issues, you can run the Network Adapter troubleshooter to fix them. However, this built-in troubleshooter does not work all the time as there are still problems that it can’t fix on its own and you’ll see the following error message:

“Windows could not find a driver for your network adapter.”

If you encounter this kind of error, read on as this post will help you in fixing the problem but before you get started in troubleshooting the problem, try running the Network Adapter Troubleshooter again.

  • Open the Search bar on your computer and type in “troubleshoot” to open the Troubleshoot settings.
  • Next, scroll down and select the “Network Adapter” option from the right pane.
  • Then click on the Run Troubleshooter” button.
  • After that, your computer will check for any possible errors and will pinpoint the root cause of the problem if possible.

Refer to each one of the solutions given below to get started:

Option 1 – Update the Network Adapter drivers

Of course, the first thing you can try to do is to update the Network Adapter drivers to resolve the error.

  • Tap the Win + R keys to launch the Run window and then type in the “devmgmt.msc” command and hit Enter to open the Device Manager window.
  • Under the Device Manager, you will see a list of drivers. From there, look for the Network Adapters and expand it.
  • Then right-click on each one of the Network drivers and update them all.
  • Restart your PC and see if it helped in fixing the BSOD error.

Note: If updating the network drivers didn’t help in fixing the “Windows could not find a driver for your network adapter” error, you can also try to uninstall the very same drivers and restart your Windows 10 PC. After that, the system itself will reinstall the drivers you just uninstalled. Alternatively, you can also download and install the drivers from the manufacturer’s website directly.

To reinstall the network adapter driver, refer to these steps:

  • Open the Devices Manager from the Win X Menu.
  • Then locate the device drivers and right-click on them to open the Properties.
  • After that, switch to the Driver tab and click on the Uninstall Device button.
  • Follow the screen option to completely uninstall it.
  • Finally, restart your computer. It will just reinstall the device drivers automatically.

Option 2 – Try running the Hardware and Devices Troubleshooter

Apart from the Network Adapter Troubleshooter, you can also run another built-in troubleshooter in Windows, the Hardware and Devices Troubleshooter, as it can also help you in resolving the “Windows could not find a driver for your network adapter” error.

  • The first thing you need to do is click on Start and then on the gear-like icon to pull up the window for Settings.
  • After opening Settings, look for the Update and Security option and select it.
  • From there, go to the Troubleshoot option located on the left-hand side of the list.
  • Next, select Hardware and Devices from the list and open the Troubleshooter and run it. Once it is doing its job, wait for it to complete the process and then restart the system.
  • After the system restarts, check if the problem’s now fixed. If not, refer to the next option given below.

Option 3 – Try performing a System Restore

You might also want to perform a System Restore that might help you in fixing the error. You can do this option either by booting into Safe Mode or in System Restore. If you are already in the Advanced Startup Options, just directly select System Restore and proceed with the next steps. And if you have just booted your PC into Safe Mode, refer to the steps below.

  • Tap the Win + R keys to open the Run dialog box.
  • After that, type in “sysdm.cpl” in the field and tap Enter.
  • Next, go to the System Protection tab then click the System Restore button. This will open a new window where you have to select your preferred System Restore point.
  • After that, follow the on-screen instructions to finish the process and then restart your computer and check if the problem is fixed or not.

Do You Need Help with Your Device?

Our Team of Experts May Help
Troubleshoot.Tech Experts are There for You!
Replace damaged files
Restore performance
Free disk space
Remove Malware
Protects WEB browser
Remove Viruses
Stop PC freezing
GET HELP
Troubleshoot.Tech experts work with all versions of Microsoft Windows including Windows 11, with Android, Mac, and more.

Share this article:

You might also like

Computer makes a beeping noise when you turn it on
Recently, a few users reported that they were unable to turn on their computers for some reason and at the same time their computers Computer makes a beeping noise couple of times or continuously whenever they try to turn them on. The sounds the computers are making can be quite annoying and it also signifies that there is something wrong with them. The problem might have something to do with the hardware inside of the computer system rather than Windows 10 itself. As you know, a computer is designed to deliver audible error sounds every time some part of the hardware is not properly working. For instance, if you hear a single beep, this indicates that your GPU is having some issues and if you’re hearing two beeps, it indicates that your RAM is not working properly, whereas three beeps that repeat after a pause when you turn on your computer means that there is something wrong with the system memory. On the other hand, if your computer is beeping continuously, this means that the problem lies with the processor. To fix this issue, here are some suggestions that might help but before you proceed, make sure that you know how to manage your computer’s hardware, if not, better have some expert do it for you.

Option 1 – Try checking the RAM

One of the basic things you can do in this kind of case is to check the RAM. Prepare some screwdrivers and dig into your PC and then look for the RAM slots and ensure that they are attached firmly. There are times when moving around your computer daily can cause certain components in your computer to become loose. Worst case scenario is that the RAM might be broken so really have to replace it.

Option 2 – Try checking the graphics card

After digging into your computer, check the graphics card and give it some good cleaning. As you know, you have to remove certain components like the graphics card regularly and clean them to help increase their lifespan and avoid errors in a startup. And if it turns out that the graphics card is broken, you have to replace it with a new one to fix the problem.

Option 3 – Try checking the processor

The processor is the brain of every computer so if it ends up not working, everything else is useless. Thus, you need to check it to see if it’s firmly attached and see if it needs some cleaning of dust and other debris. After that, try turning on your computer again. If it doesn’t work, then you might have to take your system to a technician to resolve the problem for you.
Read More
Calibrating Windows 10 display for HDR video
High Dynamic Range or HDR is a technique that’s used to create lifelike videos which have improved and better dynamic range, especially when it comes to details. And as you know, Windows 10 supports the steaming of HDR videos as long as the display supports it and it comes with the option to enable the HDR Playback for Windows 10 Video Streaming apps. However, before you can get the best viewing experience, you need to calibrate the display further for HDR video on your Windows 10 PC. Take note that even when you have the HDR Playback feature enabled on your computer, you still need a display that supports it. To make sure that your display supports this feature, you can use the DirectX Diagnostic Tool to have the display correctly wired and have the latest WDDM 2.4 drivers installed as well as set the other settings properly. Once you’ve made sure that your computer’s display really supports HDR and you’ve already enabled the HDR Playback feature, now it’s time for you to calibrate. Remember that when you calibrate the display, you should make an external monitor your primary display if you are using it for HDR and then adjust the settings to your liking. And if you are calibrating for primary display, you need to disconnect all other displays.

Follow the given steps below to calibrate the display of your PC.

  • Step 1: You need to open the Video Playback first. To do so, navigate to Settings > Apps > Video Playback.
  • Step 2: Under the Video Playback settings, uncheck the “Don’t increase display brightness when watching HDR video on battery” checkbox or plug in your PC.
  • Step 3: Next, click the “Change calibration settings for HDR video on my built-in display” link located on the right side.
  • Step 4: After that, click on the Play button located on the left side to play the video. Then move the sliders to the left or right so you can start to calibrate. Once you see that the quality of the image is to your preference, stop.
Note: Just a tip when calibrating – you just have to find the right balance between the details in the darker parts of a scene. For instance, you have Mountains in the background and buildings in the front – you need to drag the slider to the right to add more details to the snow on the mountain or drag the slider to the left to add more details to the buildings. After that, you can pause the video and exit the full-screen mode. Keep in mind that the quality of HDR depends on you as it is a personal choice. Some users might like a brighter shade while other ones want the darker shade so it really depends on your taste. If you are not satisfied with how your HDR turned out, you can just try calibrating the display again. Simply go back to the default HDR video calibration and click or tap the Reset calibration button. Another thing to remember. First, you can only see HDR content on the full screen and if you’re using a laptop, you need to make sure to watch videos when plugged in and check that the battery settings won't’ lower the brightness.
Read More
Should you use the Faraday bag

Faraday bag is a new take on security and privacy for people using a lot of electronic devices and credit cards. So what is exactly a Faraday bag?

faraday bag

Faraday bag explained

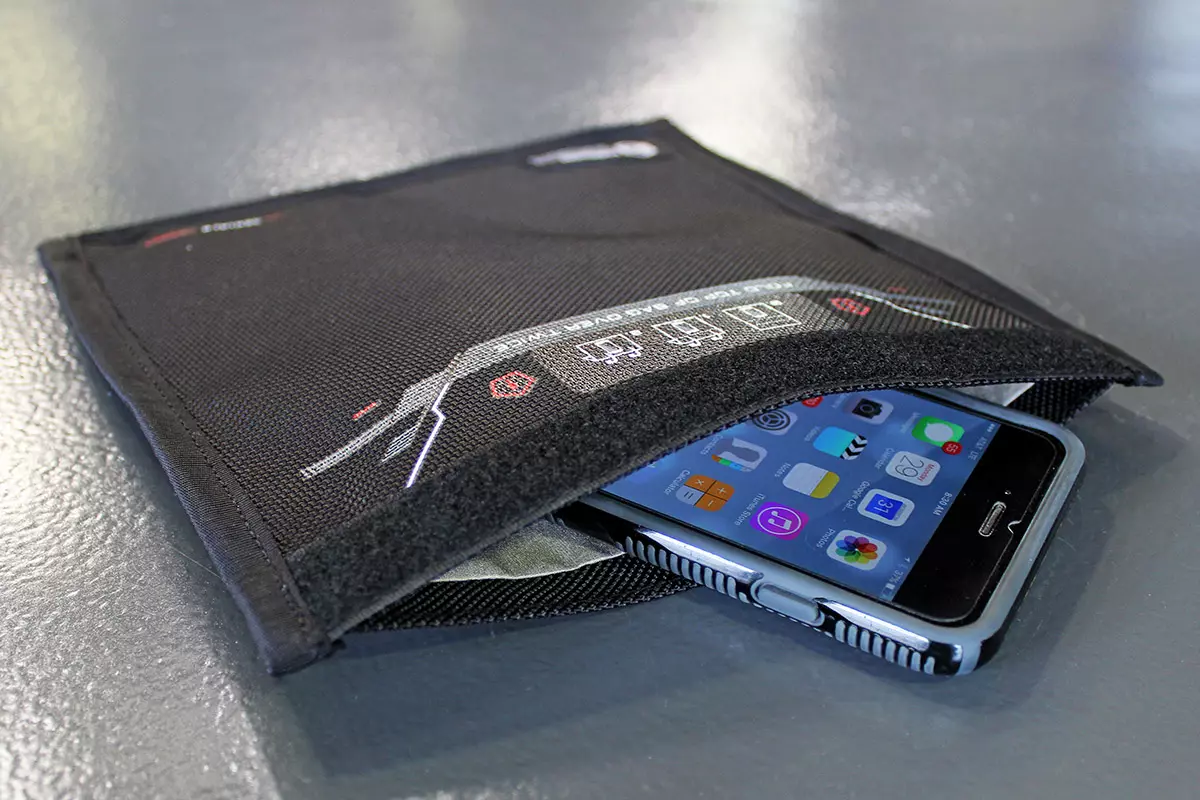
Faraday bag is designed in the same manner as the Faraday cage which was invented by Michael Faraday, who was an English scientist who contributed to the study of electromagnetism and electrochemistry. His main discoveries include the principles underlying electromagnetic induction, diamagnetism, and electrolysis.

The idea of the Faraday cage is that anything inside a cage that is made of specific grid size is completely isolated from outside current and magnetic fields since the cage itself will pick up everything upon itself. This means that for example, a human could be inside a cage that is struck by lightning and be perfectly safe and fine.

This idea led to the Faraday bag design, which takes this concept and places a wiring pattern inside clothing in order to isolate all magnetic fields from the outside so your devices and cards are completely cut off from any kind of influence and electromagnetic waves. If the pattern and quality of material for the bag are good, you have a fully safe placeholder for your stuff.

Advantages of Faraday bag

The main advantages, of course, are the privacy and safety of mobile phones and credit cards from outside influences and this is why this bag has been designed in the first place. If the bag is designed properly your phone would not be able to be hacked nor accessed from any outside source, GPS tracking will also be disabled and your phone location will not be visible. Credit cards will also be completely safe from any malicious attack via wi-fi signals.

Disadvantages of bag

Well, the disadvantage of using this bag is a very simple one, since your phone is isolated from outside influence that will also mean that you will not be able to take messages or calls on it while it is in the bag. Notifications from the internet would also be disabled so it is security vs usability deal.

Read More
Clipboard history in Windows 10
Copy & Paste is an essential part of Operating and working on a computer. We copy and paste a lot of different stuff through our workday, moving stuff from application to application. In an earlier article today we have explored troubleshooting and how to repair copy-paste stopped responses, this time we are going to focus on a little feature of Windows 10 called Clipboard history. Clipboard history is a built-in feature in Windows 10 which lets you store multiple copies of different types and then selectively pasting them into another application. Let's say you have multiple copies of different text from different websites and you then paste everything or just some into a Word processor. If this feature sounds interesting to you then let's turn it on. Press the start button and then on settings. Windows 10 Start menu with marked settings iconIn settings window click on System Windows settings with System section selectedin system dialog click on the clipboard and on the right screen turn ON CLipboard history. Windows settings for Clipboard
Read More
Fix PAGE_FAULT_IN_NONPAGED_AREA 0x00000050
If you suddenly encounter the PAGE_FAULT_IN_NONPAGED_AREA Blue Screen error then it means that your computer is under a heavy load. And if you look closely, you’ll see that it has a bug check value of 0x00000050. This kind of Blue Screen error also indicates that invalid system memory has been referenced. It could be that the memory address is wrong, or that it is pointing at freed memory. The PAGE_FAULT_IN_NONPAGED_AREA Blue Screen error occurs when the requested data is not found in the memory. As a result, the system generates a fault which normally indicates that the system is looking for data in the paging file. However, in this case, the missing data is identified as being located within an area of memory that cannot be paged out to the disk. This Stop error might be caused by a buggy system service, antivirus program, a corrupted NTFS volume, or faulty hardware. So if you’ve recently added hardware, you can try removing it and then check. If the problem still persists, refer to the suggestions given below to fix the problem.

Option 1 – Run Memory Check to test your memory

  • Tap the Win + R keys to open Run and type exe and hit Enter to open the Windows Memory Diagnostic Tool.
  • After that, it will give two options such as:
    • Restart now and check for problems (Recommended)
    • Check for problems the next time I start my computer
  • Select the option you prefer and afterward, check if the Blue Screen error is now fixed.

Option 2 – Run a System File Checker scan

You can also try to run a System File Checker or SFC scan in order to scan your computer for corrupted files that might be the cause behind the PAGE_FAULT_IN_NONPAGED_AREA Blue Screen error. Once it finds any corrupted system files, it will automatically fix them. To run System File Checker, here’s what you have to do:
  • Tap Win + R to launch Run.
  • Type in cmd in the field and tap Enter.
  • After opening Command Prompt, type in sfc /scannow
The command will start a system scan which will take a few whiles before it finishes. Once it’s done, you could get the following results:
  1. Windows Resource Protection did not find any integrity violations.
  2. Windows Resource Protection found corrupt files and successfully repaired them.
  3. Windows Resource Protection found corrupt files but was unable to fix some of them.
  • Restart your computer after the scan is completed.

Option 3 – Disable Automatic Paging File Size Management

  • Right-click on This PC located on your desktop.
  • Next, click on Properties and then click on the Advanced System Settings.
  • Go to the Advanced tab and then click on the Settings button under the Performance section.
  • Afterward, a new mini window will appear and from there, go to the Advanced tab.
  • Then click the Change button under the Virtual Memory section. Once you do, another mini window will appear.
  • Now uncheck the “Automatically manage paging file size for all drives” option.
  • After that, you have to increase the Page File size by doubling the amount of memory allocated by default in the text field. For instance, the paging size given is a minimum of 16MB and so you have to change it to 32MB. And since the recommended value is 1907MB, you can make its maximum size around 4000MB. By doing so, it will allocate more space for paging into individual drivers.
  • Now click OK, close all the open windows and then restart your PC.

Option 4 – Update the Device Drivers

Updating the Device drivers can also help you fix the PAGE_FAULT_IN_NONPAGED_AREA Blue Screen error. To do so, follow the steps below.
  • Tap the Win + R keys to launch Run.
  • Type in devmgmt.msc into the box and tap Enter or click OK to open the Device Manager.
  • After that, a list of device drivers will be displayed. If you see a red or yellow sign that shows up against the driver, right-click on the driver and select “Update Driver Software”.
  • Select the “Search automatically for updated driver software” option and then follow the instructions to complete the process.
  • Restart your PC and then check if the Blue Screen error is now fixed or not.

Option 5 – Perform a System Restore

Performing System Restore might help you in fixing the PAGE_FAULT_IN_NONPAGED_AREA error. You can do this option either by booting into Safe Mode or in System Restore. If you are already in the Advanced Startup Options, just directly select System Restore and proceed with the next steps. And if you have just booted your PC into Safe Mode, refer to the steps below.
  • Tap the Win + R keys to open the Run dialog box.
  • After that, type in “sysdm.cpl” in the field and tap Enter.
  • Next, go to the System Protection tab then click the System Restore button. This will open a new window where you have to select your preferred System Restore point.
  • After that, follow the on-screen instructions to finish the process and then restart your computer and check if the problem is fixed or not.

Option 6 – Try disabling your antivirus programs

There are instances when antivirus programs trigger Stop errors like PAGE_FAULT_IN_NONPAGED_AREA. Thus, you can try disabling your antivirus programs like Windows Defender or other third-party programs if you’re using one.

Option 7 – Use the Blue Screen Troubleshooter

The Blue Screen troubleshooter is a built-in tool in Windows 10 that helps users in fixing BSOD errors like PAGE_FAULT_IN_NONPAGED_AREA error. It can be found on the Settings Troubleshooters page. To use it, refer to these steps:
  • Tap the Win + I keys to open the Settings panel.
  • Then go to Update & Security > Troubleshoot.
  • From there, look for the option called “Blue Screen” on your right-hand side and then click the “Run the troubleshooter” button to run the Blue Screen Troubleshooter and then follow the next on-screen options. Note that you might have to boot your PC into Safe Mode.

Option 8 – Disable Memory caching in the BIOS

You can also disable memory caching in the BIOS to fix the PAGE_FAULT_IN_NONPAGED_AREA error.
  • Open the BIOS Setup screen.
  • Next, go to Advanced > Cache Memory and then disable it.
  • Tap the F10 key to save the changes made and restart your computer.
Read More
How to Fix Error Code 0x80070002 in Windows 10

Error Code 0x80070002 – What is it?

Error code 0x80070002 is a Windows Update error code. It occurs due to corruption errors which result when missing files in Windows Update prevent users from accessing updates on their system. It affects Windows 10 users and presents similar symptoms as error code 0x80070003, another Windows Update error. These symptoms include the following:

  • Presence of message box highlighting the name of the Windows Update error code
  • The inability of users to complete updates on their system

Error Causes

If certain files are missing in Windows Update on your system, you will most likely experience error code 0x80070002. These missing files prevent Windows Update from functioning properly even in cases where an update is downloaded on your PC.

Further Information and Manual Repair

Manual repair methods are necessary to resolve issues related to many Windows error codes. To fix Windows Update error codes like error code 0x80070002 in Windows 10, users will need to apply several procedures that include stopping and restarting the Windows Update service. Note that the methods listed below must be done in the order they are listed. This is because they work in conjunction with each other to repair and replace corrupted update files that may be preventing your Windows Update service from functioning correctly.

Method One: Stop Windows Update Service

Stopping the Windows Update service will enable users to begin the manual repair process. It’s crucial, to begin with, this step, as it prepares users to delete temporary update files when the Window Update service is no longer functioning correctly. These temporary files may be the source of the corruption errors resulting in error code 0x80070002. Follow the steps below to stop Windows Update and resolve the error code.
  • Step one: Type Control Panel in the Search box near the Start button
  • Step two: Select Control Panel
  • Step three: Type Administrative Tools in the search box
  • Stop four: Select Administrative Tools
  • Step five: Click Services, then search for Windows Update
  • Step six: Right-click Windows Update service, then select Stop
After you have successfully stopped the service, proceed by deleting temporary update files in the SoftwareDistribution folder.

Method Two: Delete Temporary Update Files in SoftwareDistribution Folder

Error code 0x80070002 is unlikely to be resolved without addressing the problems related to missing or corrupted update files. By deleting temporary update files within the SoftwareDistribution folder, you will most likely be able to fix the error code and access updates within the Windows Update service.
  • Step one: Open File Explorer, then open Windows folder in drive C
  • Step two: Double-click SoftwareDistribution folder
  • Step three: Open the DataStore folder and delete all files within this folder
  • Step four: Click Back to access the SoftwareDistribution folder
  • Step five: Open the Download folder to delete all files from this folder as well
While attempting to delete these files, you may be asked to enter a password as an administrator. If this occurs, enter the required password to proceed.

Method Three: Restart Windows Update Service

Once you have logged on as an administrator and deleted appropriate update files in the SoftwareDistribution folder, follow the steps below to restart the Windows Update service.
  • Step one: Type Control Panel in the Search box near the Start button.
  • Step two: Select Control Panel
  • Step three: Type Administrative Tools in the search box, then select Administrative Tools
  • Step four: Double-click Services
  • Step five: Search for the Windows Update service
  • Step six: Right-click the Windows Update service, then select Start.
Once you’ve selected Start, you’ll be able to access the Windows Update service. Verify these manual methods have proven successful by restarting your PC, then check if you can access updates. If error code 0x80070002 has been resolved, you will be able to complete the download process when you attempt to access updates within Windows 10. You will also no longer see the error code 0x80070002 message box.
Read More
How to Fix Unable to contact your DHCP Server
If your IP address expires, you will most likely experience interruptions when browsing the web. In such cases, you have to release and renew the IP address by executing the following commands:
  • ipconfig /release
  • ipconfig /renew
So if you are trying to renew the IP address of your Windows 10 computer using the commands given above but you encounter an error message instead that says, “Unable to contact your DHCP Server”, then you’ve come to the right place as this post will guide you in fixing this error. This kind of error indicates that the NIC can’t communicate with the DHCP server which is why it’s not able to release new IP addresses. It could be due to many reasons. To fix this error, you can try to roll back, update or reinstall the Network Adapter drivers. You could also run the built-in Network Adapter troubleshooter, as well as start or restart the DHCP client service.

Option 1 – Try to rollback your Network driver

If you have updated the driver software as of late and you suddenly got this error, you might have to roll back the device driver – in other words, switch back to the previous working version. To do that, follow these steps:
  • Tap the Win + R keys to launch the Run window and then type in the “devmgmt.msc” command and hit Enter to open the Device Manager window.
  • Under the Device Manager, you will see a list of drivers. From there, look for the Network Adapters and expand it.
  • Next, select the driver entries that are labeled appropriately other than anything in the context of the WAN Miniport.
  • Then select each one of them and double click to open a new mini window.
  • After that, make sure that you’re on the Driver tab and if you are not, just navigate to it then click the Roll Back Driver button to switch back to the previous version of your Network adapters.
  • Now restart your computer to successfully apply the changes made.

Option 2 – Try to update the Network drivers

If rolling back to the previous version of the Network adapter drivers didn’t help, then you need to update them instead. To do so, here’s what you have to do:
  • Tap the Win + R keys to launch the Run window and then type in the “devmgmt.msc” command and hit Enter to open the Device Manager window.
  • Under the Device Manager, you will see a list of drivers. From there, look for the Network Adapters and expand them.
  • Then right-click on each one of the Network drivers and update them all.
  • Restart your PC and see if it helped in fixing the BSOD error.
Note: If updating the network drivers didn’t help in fixing the problem, you can also try to uninstall the very same drivers and restart your Windows 10 PC. After that, the system itself will reinstall the drivers you just uninstalled. Alternatively, you can also download and install the drivers from the manufacturer’s website directly.

Option 3 – Run the Network Adapter troubleshooter

Running the built-in Network Adapter troubleshooter can also help in fixing the “Unable to contact your DHCP Server” error. To run the Network Adapter Troubleshooter, refer to these steps:
  • Open the Search bar on your computer and type in “troubleshoot” to open the Troubleshoot settings.
  • Next, scroll down and select the “Network Adapter” option from the right pane.
  • Then click on the Run Troubleshooter” button.
  • After that, your computer will check for any possible errors and will pinpoint the root cause of the problem if possible.
  • Restart your computer.

Option 4 – Try disabling the IPv6 in the Network Center

  • Tap the Win + X key combination and click on Network Connections.
  • This will open the Settings app on a specific page. Now on the right-side panel, click on the Network and Sharing Center link.
  • After that, it will open the Control Panel and from there, click on the network that your computer is connected to and then click on Properties.
  • Next, uncheck the entry that says, “Internet Protocol Version 6 (TCP/IPv6)” in the list that populates.
  • Now click on OK and close all other windows.
  • Restart your computer and see if the error is now fixed.

Option 5 – Start or restart the DHCP client service

If the DHCP client service is either inactive or stopped, you can try to start or restart it to resolve the error. You can do this via the Services Manager.
  • Tap the Win + R keys to open the Run utility.
  • Then type “services.msc” in the field and tap Enter or click OK to open the Services Manager.
  • After that, look for the DHCP client service from the list of services displayed.
  • Once you found it, right-click on it and select the Start or Restart option.
Read More
Fix nVIDIA driver issues in Windows 10
nVIDIA is one of the behemoths of the GPU world, but that not means that they are perfect and that they do not make mistakes, throw WIndows in the mix, and sometimes you have issues with your nVIDIA display drivers for various reasons which could get very unpleasant. But do not worry, we have your back and in this article, we will focus and help you to resolve common nVIDIA driver issues. So sit back and let's start with the repairs.
  1. Rollback to the previous driver and stop automatic updates.

    nVIDIA sometimes publishes really messy drivers which can really cause some serious issues, if by any chance you managed to be unlucky enough to get this kind of driver, do not despair, roll back to the previous working version and wait for the fix. To stop Windows from doing automatic driver updates, navigate to Control Panel > System & Security > System > Advanced System Settings > Hardware > Device Installation Settings. Then choose "No (your device might not work as expected)". Once you have turned off automatic driver updates, uninstall your current driver and install the previous version from the official nVIDIA website. Reboot your system
  2. Reinstall nVIDIA driver

    Reinstalling the driver might fix the issue if by any chance driver files got corrupted during download for example. First, you will need to delete some files in order to perform a clean installation. Log in as administrator if you are not one and delete following files and folders: C:\Windows\System32\DriverStore\FileRepository\nvdsp.inf fileC:\Windows\System32\DriverStore\FileRepository\nv_lh fileC:\Windows\System32\DriverStore\FileRepository\nvoclock fileC:\Program Files\NVIDIA Corporation\C:\Program Files (x86)\NVIDIA Corporation\Reboot your system Start driver installation again, choose custom installation, then clean install.
  3. Update driver in the Device Manager

    If driver updates for any reason can not work via the official install package from nVDIDA, try updating the driver in the Device Manager Navigate to Device Manager, expand graphic adapters, right-click on your nVIDIA device and click on update driver. Reboot your system
That's it, 3 solutions on how to remove, reinstall and update your nVIDIA driver, thank you for reading and I hope to see you again.
Read More
New focus sessions in Windows 11
focus sessionWindows and Devices chief Panos Panay has revealed new focus sessions feature that will be in Windows 11 on his Twitter account today. He himself is referring to it as a game-changer especially with Spotify integration.

So what is a focus session?

From the video clip provided on Twitter, we can see that focus session users will be able to choose a specific task from the previously made task list, choose songs that will play in the background while the task is active, and set a timer for the chosen task with breaks. Maybe the best comparison and explanation would be a desktop google calendar task with music, basically, that’s it. A neat and good organizer inside your Windows 11 operating system. I think that this is generally a good idea and for sure it will find its audience.
Read More
How to Resolve Dsound.dll Error Code

Dsound.dll Error Code - What is it?

Dsound.dll is a type of Dynamic Link Library. This is one of the many files that are associated with DirectX software. And DirectX software is used by most Windows-based games. Dsound.dll contains small programs that help run and load Windows-based games on your system. The Dsound.dll error pops when Windows-based games are unable to load and run on the computer. The error code appears on the screen in one of the following formats:
  • "The file dsound.dll is missing"
  • "File dsound.dll not found"
  • "Dsound.dll not found. Reinstalling might help fix this."
  • "Dsound.DLL Not Found"

Solution

Restoro box imageError Causes

Dsound.dll error is generated due to multiple reasons. These include:
  • Corrupt, damaged, or missing Dsound.dll file
  • Malware infection
  • Outdated drivers
To play the games on your computer, it is important to fix the Dsound.dll error immediately.

Further Information and Manual Repair

To resolve Dsound.dll error at home on your own without hiring a professional and spending hundreds of dollars in repair, here are some methods you can try:

Method 1 - Restart Your PC to Resolve

Sometimes the error may be a fluke and can be resolved by simply restarting your PC. So, before you try other methods, it is recommended that you restart your system first. If it resolves the issue, then that’s great. If it doesn’t, then try other methods given below!

Method 2 - Reinstall the Deleted Dsound.dll File

Since DLL files are shared files, there is a possibility that while uninstalling a game on your PC, you might have accidentally deleted this file too. If so, check your recycle bin and search for the deleted file. If you locate it, simply restore it. But if you can’t, then download the Dsound.dll file from a reliable DLL website. Make sure that the site is authentic because the last thing you want is to download malware instead of a DLL file.

Method 3 - Update Driver for Your Video Card

If Dsound.dll error occurs because of outdated drivers, then update them to resolve. You can do this by using a driver update wizard from within Device Manager. The wizard will guide you through the process, making updates simple.

Method 4 - Remove Malware

Download a powerful antivirus to scan and remove malware from your system. A malware infection can trigger a Dsound.dll error too.

Method 5 - Uninstall the Game and then reinstall it again

Try uninstalling the game during which you experienced this error. Sometimes the error may pop because of improper game installation. Uninstall it and then reinstall it. Once you’ve reinstalled it, try accessing it again. If it is accessible, the error is resolved.

Method 6 - Repair the Registry

DLL errors are also related to the registry. These files can get damaged if the registry gets loaded with junk files and cookies. In such as situation clean and repair the registry. You can do this manually but it can be time-consuming and tricky if you are not technically sound. Therefore download Restoro. It is a powerful and user-friendly PC Fixer embedded with a registry cleaner. The registry cleaner scans and removes all junk files clean the registry and repairs damaged DLL files immediately. Click here to download Restoro and resolve error Dsound.dll today!
Read More
1 2 3 171
Logo
Copyright © 2023, ErrorTools. All Rights Reserved
Trademark: Microsoft Windows logos are registered trademarks of Microsoft. Disclaimer: ErrorTools.com is not affiliated with Microsoft, nor claims direct affiliation.
The information on this page is provided for information purposes only.
DMCA.com Protection Status