Windows 10 is undeniably one of the great operating systems and the same thing can be said about a lot of computers that are running it. However, there are instances when things don’t go as you expect them to be. One of the many issues you might face when using Windows 10 is the inability to upload any pictures over the web. If you are facing this issue right now, you are not alone for a lot of users have suffered from the same problem at least once. Even though it might seem like a minor problem, some users find it inconvenient especially the ones who often upload pictures online. Worry not though for this post will guide you on what you can do if you aren’t able to upload any images to websites on your Windows 10 computer.
To get started in troubleshooting the problem, here are some suggestions that might help:
There are times when some data in the browser is conflicting with the loading of the website and triggers some problems like not being able to upload pictures to websites. And so you can try to clear your browser’s data. This might be a very basic solution but oftentimes it works in fixing this kind of odd problem in your browser.
The next thing you can do to fix the problem is to try opening the web page in Incognito Mode. When your browser is in this mode, it will work without extensions. This would help in fixing the problem especially if it was caused by some extension or toolbar in your browser. All you have to do is open any web page in Chrome and tap the Ctrl + Shift + N key combination to open a window in Incognito Mode.
The next thing you can do after trying the Incognito mode in your browser is to see if a browser extension is the one that’s causing the problem. And if you have installed a lot of browser extensions, then identifying which one is the culprit may take a while but not too long. Once you’ve identified the culprit, you can get rid of that browser extension and see if you can now upload pictures on websites.
You might also want to reset your browser as it could also help in resolving the issue. To reset your browser, here’s what you have to do:
The last option you can try is to update your browser. You can do it by checking for any available updates from its official site and then install it. However, if updating the browser did not help, you might want to consider switching to another browser.

 New Microsoft store
“We’ve set your PC back to the way it was right before you started installing Windows 10. 0x8007002C-0x400D The installation failed in the SECOND_BOOT phase with an error during MIGRATE-DATA operation”This kind of Windows upgrade error indicates that some of the files needed for the installation are locked out for some reason and that Windows was not able to migrate them to a new version. It could be that your computer does not have sufficient space for those files. Thus, no matter how many times you try to upgrade your computer, you always end up going back to the previous version of Windows. To fix the “0x8007002C – 0x400D, The installation failed in the SECOND_BOOT phase with an error during MIGRATE-DATA operation” error, here are some suggestions that might help:
net stop wuauserv net stop bits rename c:windowsSoftwareDistribution SoftwareDistribution.bak
net start wuauserv net start bitsSince the folder has already been flushed, it will be populated afresh the instant your restart your computer and open Windows Update.
 Error Causes
“Windows cannot start new hardware devices because the system hive is too large (exceeds the Registry Size Limit), (Code 49)”There are instances when it may so happen that the device or devices are no longer attached to the computer but they are still listed in the system hive of the registry. For instance, if you were removing hardware and application for years but they weren’t removed from the registry then the size of the system hive keeps on growing until it hits the maximum limit. As you know, making changes in the registry manually, no matter how knowledgeable you are on such things is not sage since the registry is not only important but also complex. In addition, the System Hive is also a permanent part of the Registry associated with a set of files that contain information related to the configuration of the computer on which the OS is installed. To resolve this error, you must remove or uninstall any hardware devices that are no longer in the system. In fact, the Device Manager hides them by default so you need to enable hidden or non-present devices. Follow the instructions given below to set the Devices Manager to display devices that are no longer connected to the computer. Step 1: Tap the Win + R keys to open the Run dialog box. Step 2: After that type in “cmd” and hit Enter to open the Command Prompt. Step 3: Type “set devmgr_show_nonpresent_devices=1” in the Command Prompt and hit Enter to enable the hidden devices option. Step 4: After that, exit Command Prompt and tap Win + X + M to open the Devices Manager. Step 5: After opening the Devices Manager, click on View and then select the “Show hidden devices” option. This will show you all the devices that are not connected to the computer but are still mentioned. Step 6: Next, select a non-present device and click Uninstall from the Driver tab. Step 7: After that, repeat what you’ve done on step 5 for any other device that you no longer use. Step 8: Restart your computer. You can check the device Properties dialog box in the Device Manager after you’re done removing all the useless devices, to check if the error is now fixed or not. Moreover, you can also try running the Hardware and Devices Troubleshooter as it can also help resolve hardware-related problems. To use it, refer to the steps below.
Error Causes“The site can’t be reached, This site on the company, organization, or school intranet has the same URL as an external website. Try contacting your system administrator. ERR ICAN NAME COLLISION.”This kind of error is caused by an error in a private namespace or a random redirection to an incorrect proxy server. There are several ways to fix this error. You can try to check the integrity of the Hosts file or check the proxy. You could also try to use the Registry Editor and apply some tweaks or remove any conflicting browser extensions or flush the DNS cache, as well as run a malware scan.
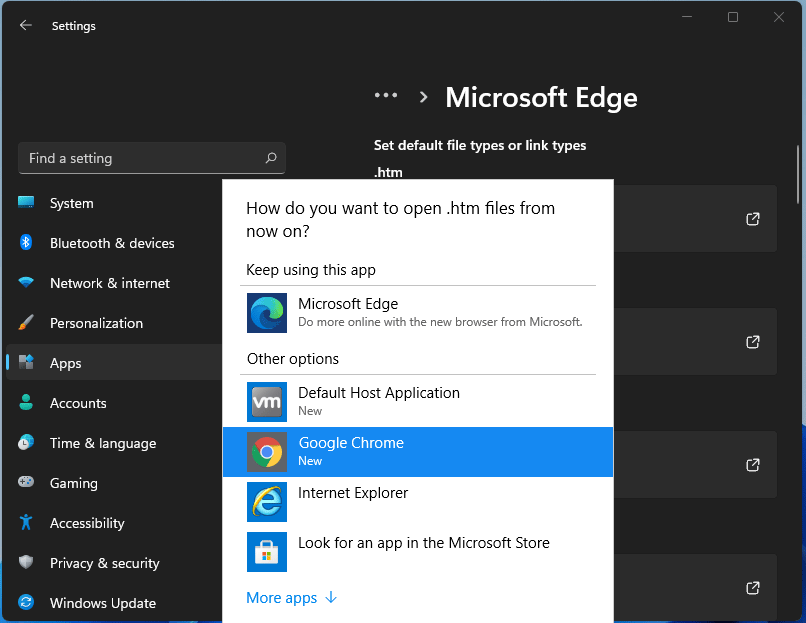 For anyone who is not aware, when Windows 11 was released if you wanted to switch to another browser you had to go into the settings app and choose the default browser for different types of file extensions like HTML, HTM, PDF for opening on the web, etc. Of course, this was completely unnecessary and it was not well received by users. So after some time, Microsoft backpedaled to standard one click, choose your default browser solution that existed in the previous version of Windows OS.
Altho sometimes Microsoft knows how to irritate its users base, it is good to know that they can also listen and fix things that are required.
For anyone who is not aware, when Windows 11 was released if you wanted to switch to another browser you had to go into the settings app and choose the default browser for different types of file extensions like HTML, HTM, PDF for opening on the web, etc. Of course, this was completely unnecessary and it was not well received by users. So after some time, Microsoft backpedaled to standard one click, choose your default browser solution that existed in the previous version of Windows OS.
Altho sometimes Microsoft knows how to irritate its users base, it is good to know that they can also listen and fix things that are required. ‘Word cannot start the converter mswrd632.wpc’The error message mswrd632.wpc may pop up when computer users try to open certain MS Word documents using the .doc extension.
Error Causes