Error Code 48 – What is it?
Error Code 48 is a device driver error code that users can encounter on any Windows 2000 operating system and later versions.
It occurs when the connected peripheral device cannot be run as the Windows operating system’s driver required to install the programs for peripheral devices has either been corrupted or is incompatible with the system.
It prompts the user with the following message on the screen:
The software for this device has been blocked from starting because it is known to have problems with Windows. Contact the hardware vendor for a new driver. (Code 48)
Solution
 Error Causes
Like most other Windows error codes, error code 48 is triggered by the following factors.
- Corrupted system registry files
- Presence of viruses in the device
- The device driver is out-of-date
If this error code is not rectified, it could give birth to other driver device errors such as
error code 52.
Further Information and Manual Repair
Method 1 – Run a complete scan for malware and spyware
Identifying and removing the viruses in the system registry and in the connected devices is the easiest method to fix the corrupted registry files.
Viruses such as spyware and malware infect the registry entries and eat up the files that lead to incomplete or missing data. This creates problems for installing external devices as the driver required to install them is not complete.
Method 2 – Use System Restore
You can also use system restore to eliminate the problem. Here is how you can use it:
- Log in using an Administrator account
- Click ‘Start’ button and select All Programs > Accessories > System Tools > System Restore
- Click ‘Restore my computer to an earlier time’ and click ‘Next’
- Select the last Windows to restore point from the ‘On this list, click a restore point’ list, and click ‘Next’
- Click ‘Next’ on the confirmation window to proceed
- Restart your PC after restoration is complete
By restoring the system via the last saved system checkpoint, you can obtain undamaged Windows system registry files that can help resolve the error code.
Method 3 – Manually uninstall and reinstall the device driver
Since Error Code 48 is due to a missing or an out-of-date device driver, uninstalling and then reinstalling the device driver can help solve the error.
You can do this by firstly logging in as Administrator and opening Device Manager. Select the device that is causing the problem and double click it; make sure that the peripheral is connected properly to the PC.
Upon opening, click on the ‘Driver’ tab and then select ‘Update Driver’. Make sure to refer to the system documentation that you received with your PC or computer to check for the motherboard details and driver specifics.
Method 4 – Use software to automatically download the driver
Manually uninstalling and reinstalling the driver will do the trick; however, it may be time-consuming especially when you would have to resort to your hardware user manual.
Therefore, using a program such as Driver
FIX can save you a lot of time and frustration in having your device work properly on your computer.
Driver
FIX, with its user-friendly approach to help you fix your PC issues, comes with an integrated database that detects which drivers you need to reconfigure within just a few seconds and downloads it automatically.
It further ensures that your drivers are installed in their entirety leaving no room for any incomplete files to remain that create Error Code 48.
It also has the added advantage of being able to backup and restores your files should there be the slightest possibility of system file damage. Driver
FIX is the answer to fixing your PC error codes accurately and quickly.
Click here to download Driver
FIX to fix Error Code 48 quickly and effectively!

 History of Commodore
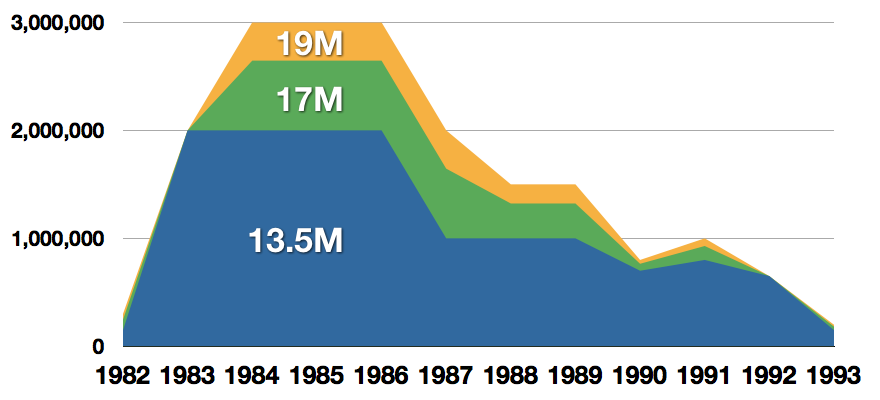
 With sales booming and the early reliability issues with the hardware addressed, software for the C64 began to grow in size and ambition during 1984. This growth shifted to the primary focus of most US game developers. The two holdouts were Sierra, who largely skipped over the C64 in favor of Apple and PC compatible machines, and Broderbund, who was heavily invested in educational software and developed primarily around the Apple II. In the North American market, the disk format had become nearly universal while cassette and cartridge-based software all but disappeared. So most US-developed games by this point grew large enough to require multi-loading.
At a mid-1984 conference of game developers and experts at Origins Game Fair, Dan Bunten, Sid Meier, and a representative of Avalon Hill said that they were developing games for the C64 first as the most promising market. By 1985, games were an estimated 60 to 70% of Commodore 64 software. Over 35% of SSI's 1986 sales were for the C64, ten points higher than for the Apple II.
Everything was great for Commodore but the industry was moving forward and by the year 1988, PC compatible computers were stated to be the largest and fastest-growing home entertainment systems pushing C64 on to second place. Also, Nintendo’s gaming system has started to take hold in the world with amazing 7 million systems sold in 1988 only.
By the year 1991, many developers exited the gaming market for Commodore 64 home computer system and its popularity started to fall due to lack of software and not so many hardware changes.
With sales booming and the early reliability issues with the hardware addressed, software for the C64 began to grow in size and ambition during 1984. This growth shifted to the primary focus of most US game developers. The two holdouts were Sierra, who largely skipped over the C64 in favor of Apple and PC compatible machines, and Broderbund, who was heavily invested in educational software and developed primarily around the Apple II. In the North American market, the disk format had become nearly universal while cassette and cartridge-based software all but disappeared. So most US-developed games by this point grew large enough to require multi-loading.
At a mid-1984 conference of game developers and experts at Origins Game Fair, Dan Bunten, Sid Meier, and a representative of Avalon Hill said that they were developing games for the C64 first as the most promising market. By 1985, games were an estimated 60 to 70% of Commodore 64 software. Over 35% of SSI's 1986 sales were for the C64, ten points higher than for the Apple II.
Everything was great for Commodore but the industry was moving forward and by the year 1988, PC compatible computers were stated to be the largest and fastest-growing home entertainment systems pushing C64 on to second place. Also, Nintendo’s gaming system has started to take hold in the world with amazing 7 million systems sold in 1988 only.
By the year 1991, many developers exited the gaming market for Commodore 64 home computer system and its popularity started to fall due to lack of software and not so many hardware changes.
 Commodore announced that the C64 would be finally discontinued in 1995.
However, only one month later in April 1994, the company filed for bankruptcy. When Commodore went bankrupt, all production on their inventory, including the C64, was discontinued, thus ending the C64's 11 and a half year production.
Commodore announced that the C64 would be finally discontinued in 1995.
However, only one month later in April 1994, the company filed for bankruptcy. When Commodore went bankrupt, all production on their inventory, including the C64, was discontinued, thus ending the C64's 11 and a half year production.
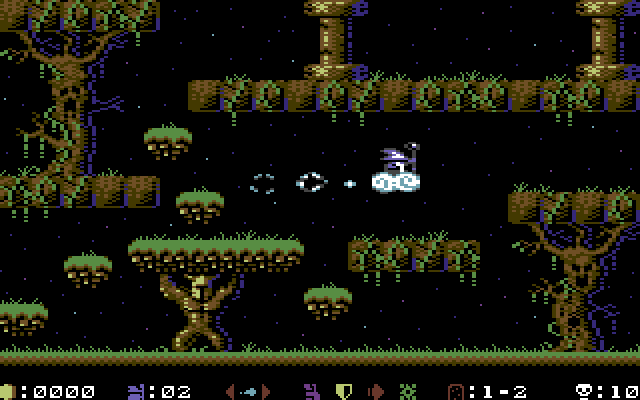 Zak McKracken and the Alien Mindbenders
 If you are not keen on spending money for reliving and checking games or software of C64 here are some links to help you to at least experience part of it completely free.
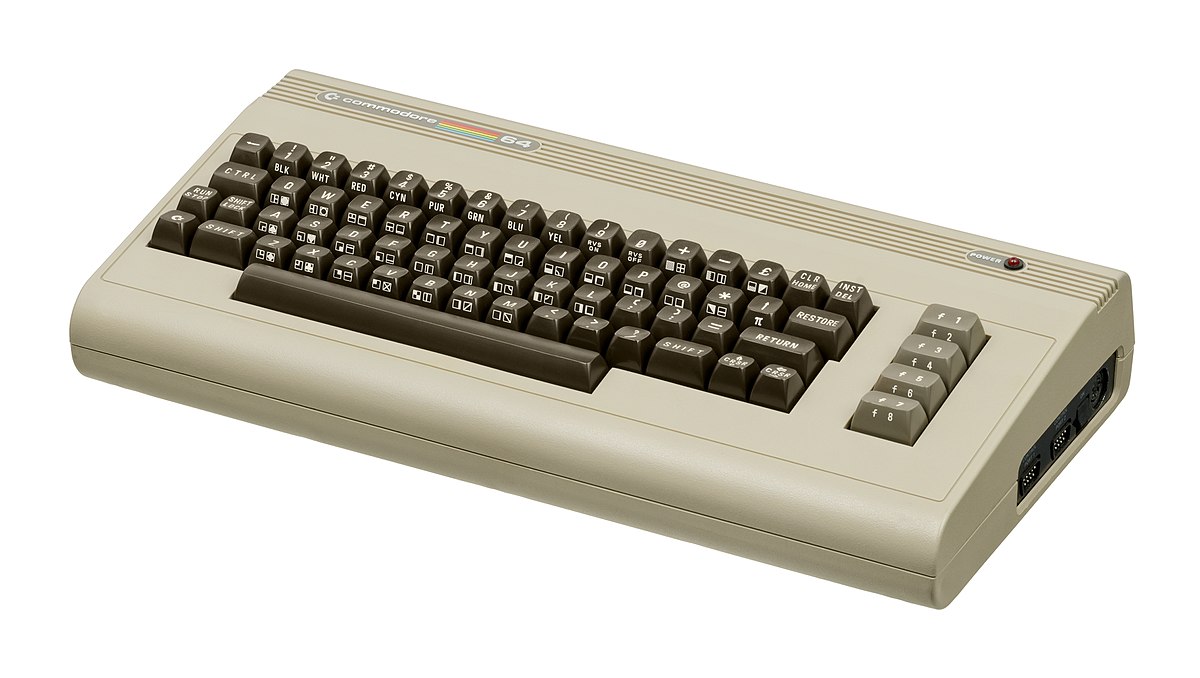
Commodore 64
If you are not keen on spending money for reliving and checking games or software of C64 here are some links to help you to at least experience part of it completely free.
Commodore 64  BigTech platforms Google and Facebook were hit with a series of antitrust lawsuits by the US federal government and states on charges they are operating monopolies and abusing their power.
Below is the status of the cases, as well as government probes of Apple and Amazon in their current states
BigTech platforms Google and Facebook were hit with a series of antitrust lawsuits by the US federal government and states on charges they are operating monopolies and abusing their power.
Below is the status of the cases, as well as government probes of Apple and Amazon in their current states
 in the command prompt you need to type the next command:
