nslookup is a command-line tool that helps in finding the DNS records of a website. It sends a name server query to the DNS and obtains the corresponding IP address. Aside from that, it can also perform some complex functionality such as finding details about FTP server, Mail server and many more but most of them are used by administrators. The best thing about nslookup is that it queries the DNS server directly and it does not rely on the cache.
On the other hand, there is another tool called PING that is used to verify connectivity. PING sends a packet of information to the IP address or Domain and gets back a response in the form of packets. So if everything goes well, all packets are received but if not, it will help you find out where the delay in the network exactly is. However, the ping command does not always attempt a DNS lookup which means that it might be using the DNS cache and use the IP address available in that table.
Although both nslookup and PING help you in identifying the host or IP address, however, they don’t always work and sometimes fail. So if your nslookup works but ping fails on your Windows 10 PC when querying the IP address of a website then it could be caused by many reasons. It could be that the nslookup queries work for you but when you try to use PING, it fails. For instance, if you open the abc.com website, here’s how it will look like:
nslookup xyz.com
Server: dns.company.com
Address: 192.168.1.38
C:> ping xyz.com
Ping request could not find host xyz.com. Please check the name and try again.
The domain is converted into an IP address and then data is sent to that IP address when you use PING. So when a reply comes back it means that the data is going back and forth to that domain without any problem. However, if the DNS fails to resolve the IP address of the website or if your PC does not attempt a DNS lookup, you will receive a similar error message that says, “Could not find host” and so on. To resolve this issue, here are some options that might help.
Option 1 – Reset Winsock, TCP/IP & Flush DNS
Resetting Winsock, TCP/IP, and flushing DNS might help you resolve the issue with nslookup and PING. To do so, follow these steps:
Right-click on the Start button and click on Command Prompt (administrator) so you can pull up an elevated Command Prompt.
After that, execute each one of the commands listed below. And after you typed in one after the other, you have to hit Enter.
netsh winsock reset – type in this command to reset Winsock
netsh int ip reset resettcpip.txt – type in this command to reset TCP/IP
ipconfig /flushdns – type in this command to flush the DNS cache
Next, restart your PC and check if the problem’s fixed.
Option 2 – Force Windows to do a DNS lookup using FQDN
Go to Settings > Network & Internet > Status > Change adapter options.
From there, right-click on the network and select Properties.
Next, in case you’re using IPv6, from the list of connections available in the list, select Internet Protocol Version 4.
Then click on Properties and click Advanced.
After that, switch to the DNS tab and select “Append these DNS suffixes (in order)” and click on the Add button and then add “.” as a suffix so that each time you query using PING and another tool, it will add a “.” at the end and will force the lookup.
Option 3 – Make sure that there is only one default gateway
If your computer has more than one NIC connected and there are multiple default gateways, then it will most likely create confusion which is why you need to remove the default gateway from the configuration of all NICs and make sure that there is only one default gateway.
Option 4 – Use the Google Public DNS
You might want to change your DNS to Google Public DNS as it could also help you in fixing the nslookup and PING issues. To do so, follow the steps below.
The first thing you have to do is right-click on the network icon in the Taskbar and select Network and Sharing Center.
Next, click on the “Change Adapter Settings” option.
After that, search for the network connection that you are using to connect to the internet. Note that the option might be “Wireless Connection” or “Local Area Connection”.
Right-click on your network connection and click on Properties.
Then select the new window to choose the “Internet Protocol 4 (TCP/IPv4)” option.
After that, click on the Properties button and click the checkbox in the new window for the option “Use the following DNS server addresses”.
Type in “8.8.8.8” and “8.8.4.4” and click OK and exit.
Option 5 – Check the Windows Host file
You can also try to cross-check the Windows Hosts file to find out if the website you are trying to open has been blocked, because if it is, then it’s no wonder why PING fails even when nslookup works. There are instances when some third-party application modifies the file and adds some websites to the blocklists. So if the website is indeed blocked, you need to remove it from the list.
Option 6 – Delete the WLAN Profiles
Deleting the WLAN Profiles might be a good idea if you are not able to connect to the internet on your computer and if you’re using Wi-Fi. It could be that the networks that were connected previously have gone rogue which is why it is not connecting properly. And so deleting the WLAN profiles might help you in fixing the issue with nslookup and PING.
Option 7 – Reinstall the Network Adapter Drivers
Tap the Win + R keys to launch the Run window and then type in the “msc” command and hit Enter to open the Device Manager window.
Under the Device Manager, you will see a list of drivers. From there, look for the Network Adapters and expand it.
Then right-click on each one of the Network drivers and select “Uninstall device”.
What is Out of Memory error while copying files? As you know, both the hard drive and RAM play a major role in performing any operation on a computer since every process or task that takes place in the system requires some RAM storage as well as hard drive storage to be executed. However, there are times when you may receive the following error messages when you try to copy files from one location to another:
“Out of memory or system resources, Close some windows or programs and try again.”“There is not enough memory to complete this operation – copying files.”
These errors are caused by the Desktop Heap limitation when there is no longer enough memory to complete the operation while copying the files. If you encounter any of these errors, you will be guided in this post with the help of some potential fixes that can increase its limit and will hopefully fix this error on your Windows 10 computer.
You may try to close all the open windows and programs and then try copying the file again and see if that helps. If not, then proceed to the instructions given below. But before you do that, make sure that you create a System Restore point first. This way, you can undo the changes you’ve made any time in case there are some unwanted changes you want to reverse. After you create a System Restore point, refer to the steps provided below.
Step 1: Tap the Win + R keys to open the Run utility and type “Regedit” in the field and tap Enter to open the Registry Editor.
Step 2: Next, navigate to this registry key: ComputerHKEY_LOCAL_MACHINESYSTEMCurrentControlSetControlSession ManagerSubSystems
Step 3: Now double click on the DWORD named Windows to modify it.
Step 4: Change the values for SharedSection in the Value Data field. It should be in the format of “SharedSection=aaaa,bbbb,cccc”. Note that you have to change the value of “bbbb” and “cccc”. So in case you are using an x86 operating system, set the value of bbbb to 12288 and then set the value for cccc to 1024. On the other hand, if you are using an x64 operating system, set the bbbb value to 20480 and the cccc value to 1024.
Step 5: Exit the Registry Editor and restart your computer to successfully apply the changes made.
Note: The bbbb value in the SharedSection registry is the size of the desktop heap for each interactive window station while the cccc section of the SharedSection value is the size of the desktop heap for each non-interactive window station. In addition, you must keep in mind that setting the value of bbbb to more than 20480 KB is not really recommended.
On the other hand, there is another tool that could help in resolving the Out of Memory error. This tool is called the Memory Diagnostic tool in windows can help resolve the Out of Memory error by checking and automatically fixing any memory-based issues. To run it, refer to these steps:
Tap the Win + R keys to open Run and type mdsched.exe and hit Enter to open the Windows Memory Diagnostic Tool.
After that, it will give two options such as:
Restart now and check for problems (Recommended)
Check for problems the next time I start my computer
Once your computer has restarted, perform a basic scan or you could also go for the “Advanced” options such as “Test mix” or “Pass count”. Simply tap the F10 key to start the test.
Note: After you select your preferred option, your computer will restart and check for memory-based issues. If it finds any issues, it will automatically fix them.
If you encounter error 0x8024500C after a Windows Update or when you were trying to update Windows Store apps, read on as this post will guide you in fixing the problem. This kind of Windows Update error indicates that the Windows Update service has been blocked.
Here are some suggestions you could check out to resolve the Windows Update error 0x8024500C on your Windows 10 computer.
Option 1 – Try checking the status of all the Windows Update Services
You need to check if all the Windows Update Services are up and running or not. To do so, follow the steps below.
Tap the Win + R keys to open the Run dialog box.
Next, type “services.msc” in the field and hit Enter to open Windows Services.
From the list of Services, look for the following services that support Windows Update:
Background Intelligent Transfer Service (BITS)
Delivery Optimization
Windows Update
Windows Update Medic Service
Once you’ve found them, check if they are running just fine or not. if not, you can right-click on each entry and click on Start.
Option 2 – Run the Windows Update Troubleshooter
You might also want to run the Windows Update Troubleshooter as it could also help in fixing Windows Update Error 0x8024500C. To run it, go to Settings and then select Troubleshoot from the options. From there, click on Windows Update and then click the “Run the troubleshooter” button. After that, follow the next on-screen instructions and you should be good to go.
Option 3 – Try downloading and installing the Windows Updates manually
Error 0x8024500C might be due to a Windows Update that has failed. So if it is not a feature update and only a cumulative update, you can download the Windows Update and install it manually. But first, you need to find out which update has failed, and to do so, refer to the following steps:
Go to Settings and from there go to Update and Security > View Update History.
Next, check which particular update has failed. Note that Updates that have failed to install will be displayed under the Status column which has a label of “Failed”.
After that, go to the Microsoft Download Center and look for that update using its KB number and once you find it, download and then install it manually.
Note: You can also use the Microsoft Update Catalog, a service from Microsoft that provides a list of software updates that can be distributed over a corporate network. With the help of this service, it can be easier for you to find Microsoft software updates, drivers as well as fixes.
Option 4 – Try checking the Registry settings
Tap the Win + R keys to open the Run dialog box.
Then type “Regedit” in the field and hit Enter to open the Registry Editor.
After that, navigate to this registry path: HKEY_LOCAL_MACHINESoftwarePoliciesMicrosoftWindowsWindowsUpdate
Then double click on “DisableWindowsUpdateAccess” located at the right side of the panel and make sure that its value is set to “0”. If not, you have to change it to “0”.
Now restart your computer and check if error 0x8024500C is now fixed or not
Option 5 – Disable the Proxy server
Tap the Win + R keys to open the Run dialog box.
Then type “inetcpl.cpl” in the field and hit Enter to pull up the Internet Properties.
After that, go to the Connections tab and select the LAN settings.
From there. Uncheck the “Use a Proxy Server” option for your LAN and then make sure that the “Automatically detect settings” option is checked.
Now click the OK and the Apply buttons.
Restart your PC.
Note: If you are using a third-party proxy service, you have to disable it.
Option 6 – Try to reset the Microsoft Store cache
Just like browsers, Microsoft Store also caches as you view apps and games so it is most likely that the cache is no longer valid and must be removed. To do so, follow the steps below.
Right-click on the start button and click on Command Prompt (administrator).
Next, type in the command, “exe” and tap Enter. Once you do, the command will clear the cache for the Windows Store app.
Now restart your PC and afterward, try opening Microsoft Store again.
Option 7 – Perform a System Restore
Performing System Restore might help you in fixing the Windows Update error 0x8024500C. You can do this option either by booting into Safe Mode or in System Restore. If you are already in the Advanced Startup Options, just directly select System Restore and proceed with the next steps. And if you have just booted your PC into Safe Mode, refer to the steps below.
Tap the Win + R keys to open the Run dialog box.
After that, type in “sysdm.cpl” in the field and tap Enter.
Next, go to the System Protection tab then click the System Restore button. This will open a new window where you have to select your preferred System Restore point.
After that, follow the on-screen instructions to finish the process and then restart your computer and check if the problem is fixed or not.
Entry.Dll is a type of Dynamic Link Library file. This file consists of small programs that are called to load and run desired applications.
Just like any other dll file, the entry.dll file is also a shared file. It supports and is compatible with multiple applications.
You may experience entry.dll error message on your PC, when the Windows cannot properly load the entry.dll file. This error most often occurs during PC startup, application startup or while trying to use a specific function in your program.
The enrty.dll error message is often displayed in either of the following formats:
“Entry.dll not found.”
“The file Entry.dll is missing."
“Cannot register Entry.dll."
“Cannot find C:WindowsSystem32\Entry.dll."
“Cannot start YAPC: Europe. A required component is missing: Entry.dll. Please install YAPC: Europe again."
“Entry.dll Access Violation."
Solution
Error Causes
The entry.dll file error may occur due to multiple reasons including but not limited to:
Corrupt entry.dll registry entry
Entry Dll file is not registered properly
Open source hardware failure for example a bad hard drive
Virus or malware infection
No matter what the underlying reason may be, it is advisable to repair and resolve the dll file error on your PC to ensure the program is accessible without any inconvenience.
Further Information and Manual Repair
Here are different ways to fix and resolve the Entry.dll error on your PC:
1. Re-Register Entry.dll File
When you install software that uses the Entry.dll, the software automatically registers that file for you.
However, in some cases the dill file may not register properly and as a result you may experience the error Entry.dll not registered. In such situations it is advisable to use ‘Microsoft Register Server’ built-in utility to re-register the entry.dll file.
This utility can be accessible in Windows XP, Vista, 7 and 8 through the command prompt.
To get started, here’s what you need to do:-
Go to the start menu and type command in the search box.
Now press Ctrl and Shift together and hit the Enter key.
After that you will be prompted with a permission dialog box; click yes to continue.
Now type the following command: regsvr32 /u Entry.dll. Press enter to un-register the file.
Type the following command: regsvr32 /i Entry.dll and press enter again. This will re-register the file.
Close the command prompt window and try accessing the desired program supported my entry.dll file. If the program is accessible and you don’t encounter the error message, this means the error is resolved.
2. Update Outdated and Corrupt Device Drivers
Another method to fix this error is to update the device drivers that are incompatible, corrupt or outdated. Download the latest versions of the corrupt drivers and re-install them on your PC.
3. Clean the Registry to Remove Invalid Entry Files
The entry.dll file error can be related to problems in the Windows registry. The registry gets damaged when it gets overloaded with too many unnecessary and obsolete files such as junk files, bad registry keys, invalid entries and cookies.
These files not only take up great deal of disk space but also damage the registry, system and dll files.
You can clean the registry manually but it is time consuming and needs technical expertise. However, to repair the error right away in seconds download Restoro.
This is a powerful Registry Cleaner integrated with an intuitive algorithm that detects and removes all types of registry issues on your entire PC in no time. It wipes out the unnecessary files and invalid entries, repairs dll files including the entry.dll file and restores the registry.
4. Scan for Malware and Viruses
Another cause of the entry.dll error can be malware and viruses. These malicious programs can also corrupt dll files.
It is important to remove all of them from your PC to resolve the issue. For this you need to scan your PC with an antivirus. If you download Restoro, you don’t need to download an antivirus program.
This is because Restoro includes multiple utilities including an antivirus too.
You can run it to scan and remove all types of malicious programs like malware, viruses, spyware and Trojans on your system.
Restoro also features a system optimizer. This utility boosts your system’s speed significantly ensuring your PC performs at its optimum level.
It is safe, user-friendly and can be installed on any Windows versions. It has easy navigations making it quite simple to use by all levels of users. It is bug free and efficient. In just a few clicks you can resolve practically all PC related issues.
To resolve entry.dll error on your PC, click here to download Restoro today!
Bandoo application, specifically product version 5.0.2.4762, is a bundled program. What does this mean? Simply, Bandoo, upon installation, installs additional programs, extensions, and add-ons to a computer and computer’s browser, without the knowledge of the user. This version of Bandoo concentrates on providing features for entertainment and also functionality/tools for backing up your computer files. Once executed, the file installs the iLivid Download Manager Software.
Additional tools installed within the bundle include a Movie Toolbar and the thriving search engine ‘Ask.com.’
Technical details about Bandoo include:
Digital Signature/Publisher: Bandoo Media, Inc.
Product Version: 5.0.2.4762
Entry Point: 0x000038AF
Assessment of Bandoo Potentially Unwanted Program
Interestingly, before the installation of Bandoo product version 5.0.2.4762 was complete, Spyhunter detected that the software was a PUP. After the installation was complete, product version 5.0.2.4762 of Bandoo added add-ons and extensions to both Internet Explorer and Chrome Browsers (these were the only 2 browsers used within the assessment). These appeared in the form of a Movie toolbar, providing quick access to movie trailers, reviews, ratings, and other video functionality, and ‘Ask’ (Ask.com) search engine.
Areas of Infiltration by Bandoo
Bandoo product version 5.0.2.4762 infiltrated several areas of the computer system. After installation, folders were neatly placed as files within all programs. Within “All Programs” there were 3 newly added programs. These included:
iLivid
Movies Search App for Chrome
Movies Search App for Internet Explorer
The iLiVid application seems to be the main offer while the others, namely Movies App for Internet Explorer by Ask was featured as promotions or advertisements. Additionally, just below the 'END USER LICENSE AGREEMENT AND PRIVACY POLICY' a request was made that the user set Ask.com as both their homepage, new tab, and default search engine. This is just another well-concocted plan to get Internet users onto the 'Ask.com' search engine.
Along with the 3 programs installed as a bundle, a new folder was found within the computer's local drive. This program was termed OLBPre.
What is OLBPre?
OLBPre.exe is reputed as dangerous adware that weakens the security settings of a computer system. It's also covertly used for dropping files on a targeted computer, often without the user's consent or knowledge.
Manual Steps for Removal of Movie Search Apps
I found this removal pretty simple. Depending on your Operating System, there will be slight discrepancies in the manual removal steps. Using the Windows 8 (8.1) OS on your computer:
Step 1: from your desktop, right-click on the ‘Start Button’. A menu box will then appear.
Step 2: from the menu box, click ‘Search’.
Step 3: enter “Programs and Features” within the Input Box.
Step 4: locate the installed apps. You should be able to see “Movies Search App for Chrome” & “Movies Search App for Internet Explorer”.
Step 5: right-click on the names of the Apps (the ones you want to remove) when you’ve located them.
Note: you will have to remove the apps one after the other.
Step 6: after right-clicking the app, click the uninstall option (probably the only option available anyway).
Note: If a box appears asking If you wish to ‘block’ or ‘allow’, select the allow option. That’s just the Publisher’s way to annoy you out of uninstalling the app.
Step 7: follow instructions until the app is fully removed.
Step 8: Repeat steps for the other app.
Since Bandoo also changed your search engine, you’ll have to reset that manually for Internet Explorer and Chrome. Follow the steps below:
Step 1: Open your Internet Explorer browser.
Step 2: Click the tool option located in the top right-hand corner of the page.
Step 3: Click the “Internet Options” option.
Step 4: Under the “General” tab, you’ll be able to see approximately 3 buttons. Click the button labeled ‘Use Default”.
Step 5: At the bottom right-hand corner of the pop-up menu, select the “Apply” button and “OK”. That should do the trick.
Removal for Chrome Extension
This removal is simple.
Step 1: Open your Chrome browser.
Step 2: A pop-up box will be visible.
Step 3: Click the “Remove from Chrome” option.
After removing the extensions/add-ons, perform another scan with Spyhunter. You’ll pick up a few threats. The second scan should clear up everything.
To completely remove Bandoo from your computer, click here to download and install Spyhunter.
When you get the error information, "The Software Can Not Begin Because MSVCR100.Dll Is Missing", what this implies is that the Computer will be lacking the MS Visual C++ 2010 libraries.
The malfunction is rather frequent throughout installations. It doesn't matter the number of times you try to reinstall the program.
The malfunction can happen whether you've been utilizing your pc for many years, or it's really a recent one.
Solution
Error Causes
a) Missing MSVCR100.DLL: As the problem message indicates, you get this information mainly because MSVCR100.DLL is completely missing.
b) Broken MSVCR100.DLL: When the msvcr100.dll is broken, you will also get the same error, suggesting the software won't start.
The thing you need to understand is the fact that MSVCR100.DLL is playing an important role in the application referred to as MS Visual C++ 2010 Redistributable Package.
Without the MS Visual C++ 2010 Redistributable Package, any software that you simply make an effort to install won't start. You could possibly complete installing it by pursuing proper installation procedures, and then end up getting the "The Software Can Not Begin Because MSVCR100.Dll Is Missing" error.
Further Information and Manual Repair
If you get the "The Software Can Not Begin Because MSVCR100.Dll Is Missing" error information on an effective setup of any software, you shouldn't worry. You can really repair the issue and commence your recently installed software without any more hassle.
Start by checking whether you presently use 64-bit or 32-bit Windows. Visit the start button, in case you use Winxp. Type winver. On the window that appears, click Run, subsequently push enter. Head to Start, in case you use both Win7 or Vista.
Subsequently, click on the search box and type “Computer”. Right-click windows and subsequently click on Properties. Under Windows Edition, you'll find whether your Windows is 64-bit or 32-bit.
Search for the correct variation of MS Visual C++ 2010 Redistributable Package, as soon as you discover whether your Windows is 64-bit or 32-bit. Down load the x86 variant of MS Visual C++ Redistributable Package if your version is 32-bit and you must obtain the x64 variant of MS Visual C++, for those who own a-64-bit version of Windows Operating System.
You must never obtain MS Visual C++ 2010 Redistributable Package from third-party websites.
This is because Microsoft doesn't charge a cent for the files. The files are openly and easily available on Microsoft. These files come in many different variants. Consequently, select what's suitable for your own Computer with regards to the version of Windows which you operate.
Never pick the edition of MS Visual C++ 2010 Redistributable Package that's not compatible or appropriate to your Windows Operating System.
Make use of the release date, when installing MS Visual C++ 2010 Redistributable Package. You might also look out for Service Pack 1 and obtain it for your Windows. Service Pack 1 only ensures that you simply obtain the latest edition.
As soon as you end installing the most up-to-date version of MS Visual C++ 2010 Redistributable Package as demonstrated above, reboot your computer and you'll not have to worry about getting the annoying"The Software Can Not Begin Because MSVCR100.Dll Is Missing" error message anymore.
If you’ve been experiencing a 0x0000007E error code pop message on your PC frequently then you need to get it fixed before it causes serious damage to your system. 0x0000007E is a Stop error or Blue Screen of Death error code.
This error message turns your computer screen blue and locks you out of the program running on your computer. It freezes your system and hampers your ability to perform any type of task on your PC.
Solution
Error Causes
Error 0x0000007E, a blue screen of death error triggers registry issues. It’s not easy to narrow down the cause of 0x0000007E as it results due to many reasons like memory overload, cluttered disk space, viral infection, malware attack, and if the hardware malfunctions.
Ignoring 0x0000007E error pop up is not wise. It is more like a warning of the serious damage that can happen to your PC if it is not fixed timely. It also leads to slowing down the system and increases boot time.
This error message exposes you to dangerous Windows PC threats like registry corruption and damage. Registry corruption can lead to system crash and failure and you may also lose all your important data saved on your PC.
Further Information and Manual Repair
Install Restoro
You don’t always have to spend hundreds of dollars to hire a technician to fix error pop-ups on your PC try using Restoro
Restoro is an advanced and multi-functional PC repair tool with a comprehensive suite of powerful features designed to resolve almost all types of PC errors in seconds including 0x0000007E error code.
It is a next-generation PC repair tool that serves as a system optimizer, anti-virus, and quality registry cleaner. Its built-in intuitive technology enables Restoro to scan, identify and repair the ultimate cause of the error code 0x0000007E in just a few seconds.
Eventually, it spares you from the hassle of finding the root cause of the 0x0000007E error message and then selecting a tool specifically designed to resolve only that particular cause with limited features. This highly functional PC error tool is the answer for all your registry issues.
By running Restoro on your PC, you can fix the 0x0000007E BSOD error code and avoid registry corruption.
Why Restoro?
The smart registry cleaner utility embedded in this tool enables it to scan for registry errors and clear up disk space accumulated by junk files, internet temporary files, invalid entries, and other types of unnecessary files taking up a good chunk of your disk space.
This clutter also slows down your PC performance as it requires more power than it has to run the system because of the excess load on the RAM.
However, by wiping out the clutter with this helper, you can optimize the speed of your PC and see a significant difference in its performance.
Restoro backup feature enables you to create backup files for safety purposes. Furthermore, it has several other built-in value-adding features like privacy error utility and system stability utility for enhanced functionality.
To resolve the error code 0x0000007E in seconds, all you need to do is download and install Restoro on your system and run it to scan for errors. In a few seconds, you will see a scanning report with comprehensive details of the types of PC damages.
To fix the issue right away, create backups and click ‘fix’ to resolve. In just a few clicks you can repair your PC.
Download Restoro Today!
Anxiety from all these digital threats lurking everywhere? An antivirus program can help put your mind at ease.
What can a virus do to your device?
A virus is malicious software that can affect pretty much any device and does so in a variety of ways. Be it your computer, your phone or your smart lightbulb - as long as there’s access to the internet, malware can get to it.
How exactly does this kind of attack manifest itself? Well, there’s a wide variety of effects ranging from mild to severe. Among other things, they depend on which type of malware attacks your device - a virus, spyware, ransomware, adware or something else.
These are some of the things you can expect to happen:
Slow performance
System crashes
Theft of data and sensitive information
Connectivity issues
Constant browser redirects
Strange messages sent to your contacts
Interference with files
It really can be the stuff of nightmares. So, if you want to sleep peacefully knowing that your devices are completely safe, you should definitely consider getting an antivirus.
P.S. don’t let its name fool you - an antivirus does indeed protect your devices against more than just viruses.
What is antivirus software exactly?
Antivirus software is designed to help you battle and ward off malware. Basically, it scans your device to detect any suspicious activity and offers tools to get rid of the culprit.
At first, antiviruses were developed to fight against viruses only, but nowadays they cover a lot more ground. Here are some of the biggest benefits of getting yourself a powerful defender.
Advantages of antivirus software
1. It fights those pesky ads
Look, constant ads that pop up everywhere aren’t the absolute worst thing that can happen on your computer. If anything, they are annoying, like when you’re trying to sleep but that one fly in your room just won’t stop buzzing.
Now, there’s a free, well-established solution for that - installing an ad blocker. And we’re about a hundred and ten percent sure you’ve already done that on each and every browser you use.
However, “if I can’t see it, it doesn’t exist” isn’t the most ideal approach for your online safety. Ad blockers can’t block everything and they won’t protect you from potential adware. An antivirus on the other hand offers that layer of protection against malware snuck into pop-ups and spammy websites.
2. It protects you from hackers
Hackers don’t target government institutions only. They’ll target regular people too if they have something to gain.
Credit: Clint Patteron (Unsplash)
There are different types of hacking, such as phishing e-mails, transmission of malicious programs, credential reuse, denial of service and more. In any case, they take control of your device and hijack your data.
The good thing is that, as threats evolve, antiviruses evolve too and there are tons of quality programs on the market that can keep you secure for an affordable price.
3. It keeps your files and data safe
When malware enters your device, it can target pretty much any file and get access to any and all data.
Installing an antivirus program will make sure that every single file, new or old, is monitored at all times, warning you against threats immediately. That way, you can make sure to react before your other files become infected and data is lost or stolen.
Another great thing for data protection is that the best antivirus software normally comes with a password manager, so no one can use malware to steal your passwords.
4. It blocks all kinds of malware
As we already stated, malicious attacks can be performed in many ways and malware comes in in different shapes an sizes, such as:
Trojan horse
Spyware
Ransomware
Adware
Rootkit
RAT (remote access Trojan)
Keyloggers
Worms
Botnets
Credit: Growtika (Unsplash)
Nowadays, antivirus software is designed to fight against all of these types. That’s why more often than not we hear the term 'antivirus' used interchangeably with 'anti-malware,' like in this article.
5. It keeps your children protected
You can’t keep your eyes on your kid every second of the day and you can’t protect them from everything. But at least you can limit their exposure to the threats they can encounter at every corner of the digital world.
An antivirus program will block harmful or suspicious websites and ads, which is great both for you and your children. To take it a step further, though, many such programs come with special parental controls and offer monitoring as well. It’s a great solution for keeping your kids safe online without sounding like the irritating, overbearing, controlling parent who “just doesn’t get it!”
How to pick one
There are definitely lots of different antivirus programs out there, both free and paid. We recommend you look for a paid option, since free ones are unfortunately a lot more susceptible to being compromised through malicious attacks.
Now, there are a few factors to consider when choosing the right software. If you use your PC for basic things then a basic antivirus will suffice. However, the more complex your use and the more sensitive the data you deal with, the stronger it needs to be.
It’s also crucial that you take into account the features it includes. As we already mentioned, some programs have additional security options. For example, depending on the package you select, Bitdefender provides:
Some are included in plans and some are separate products, so make sure to check out all the offers.
And don’t worry if you have multiple PCs or you’re looking for protection for your smartphone or tablet as well; Bitdefender has suitable solutions for your needs. Of course, you can also just pick their classic antivirus software if you’re not in need of advanced protection.
Another important point is how regularly the software is updated and enhanced. The more frequent the updates the better, as bugs can make the program more vulnerable. Other things we advise you consider are user-friendliness, impact on performance, reputation (user reviews especially) and, of course, price.
The bottom line
Fact is: anyone can be a malware victim. Don’t let it be you.
You can’t put a price on peace and security, so don’t be reluctant to pay for yours - especially since a lot of options out there are extremely affordable. Is $159.00 a year really too much to pay for cross-platform protection for up to 10 devices? We don’t think so.
Explore your options and protect your files and data before it’s too late.
Hello and welcome everyone, just a few years ago we had FLASH video content on the internet, we had FLASH games, full FLASH website experiences, and more, but then flash was shut down mostly due to security reasons meaning that in just a few months we have lost most of FLASH web content.
However, there is still FLASH content on the internet even today, there are still FLASH videos and flash games, but we can not play any of that content since browsers do not support FLASH and you can not get the FLASH plugin for browsers. So what might be the solution for this situation?
Ruffle and FLASH emulation
Emulation of course. We will not be able to get the flash player working, well at least not the original and official one, but we can make flash content playable again inside our browsers.
The first thing is first, we need to get an emulator package from the internet in order for this trick to work, one we will be using is RUFFLE. It is lightweight, it is free, it is open source and it is reliable, everything we need.
Download RUFFLE from its official website here.
For Chrome and Edge download the ZIP package, for Firefox, go to the Firefox section of the tutorial.
There is also a desktop version of RUFFLE there so if you are keen on playing your flash content on your desktop computer you might well grab that as well, but for the sake of this tutorial where we are enabling flash in our browsers, we will not focus on that part since it is pretty straightforward.
Now once you have downloaded the RUFFLE emulator, please extract it to the desired folder somewhere on your computer.
Once it is extracted, start your browser of choice and follow instructions.
FOR CHROME:
Navigate to: chrome://extensions/
Turn ON developer mode in the top right corner
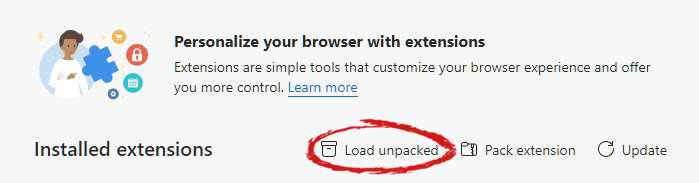
Click on Load unpacked
Navigate to the folder where you have extracted RUFFLE
FOR EDGE:
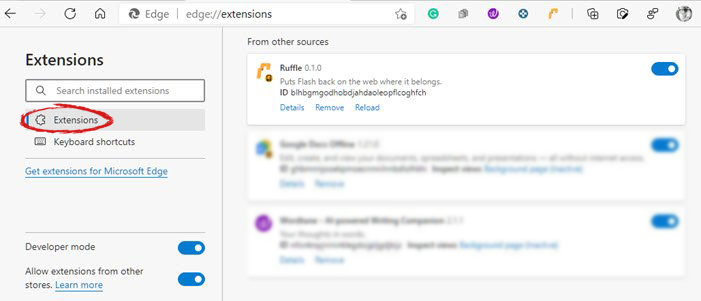
Navigate to: edge://extensions/
Turn ON developer mode on the bottom left corner
Navigate to the folder where you have extracted RUFFLE
Turn RUFFLE ON
FOR FIREFOX:
Go to the RUFFLEdownload page, we can not use the zip package we were using for Chrome and Edge
Right-click on the Firefox download link
Save link by clicking on Save link as...
Navigate to about: debugging
Click on this Firefox
Click Load Temporary Add-on
Select the .xpi that you have downloaded
BONUS:
If you want to enable FLASH content live on your website use: <script src="path_to_ruffle/ruffle.js"></script>
If you are trying to run or starting a program on your Windows 10 computer and you suddenly get an error message saying, “Error 1061 The service cannot accept control messages at this time”, read on as this post will show you what you can do to fix the problem.
This kind of error pops up since the Application Information Service does not respond to the requests to raise applications to Administrator in Windows 10 like the Task Manager, Service updates, and so on. Thus, you won’t be able to run or open apps and will only get stuck with this error.
The “Error 1061 The service cannot accept control messages at this time” message is a type of network error that typically occurs when there is a temporary mismatch between the requested control and the state of the service to be controlled. It’s most likely that the service is in a state of start-pending, stop-pending, stopped or it may already be used by another user which explains why this error message suddenly appears.
You can encounter this error message on any Windows operation. Here are some of the most common occurrences:
Debugging a Windows service
Starting Task Manager
Starting Registry Editor
Starting Firewall
Starting services.msc
Starting dsm.exe
Updating services
Asking for file permissions, etc.
According to Microsoft MSDN, the error occurs because:
“There is a temporary mismatch between the requested control and the state of the service to be controlled. The service may be in a state of start-pending, stop-pending, or stopped. Wait a few minutes, then retry your operation.”
If after a few minutes, the error still appears, then you may have to follow the options prepared below.
Option 1 – Try to restart the Credential Manager Service
Go to the Start menu.
Then type in “services” in the search box.
From the search results, right-click on “Services” and select the “Run as Administrator” option.
Next, look for the Credential Manager Service in the Services window.
Once you found it, double-click on it to open its Properties. From there, you need to click on the Stop button.
After that, set the Credential Manager Service to “Automatic” and click on the Start button to restart it.
Option 2 – Try to start the Application Information Service
You can also try starting the Application Information Service to fix the “Error 1061 The service cannot accept control messages at this time”. Just open the Windows Services Manager and make sure that Application Information Service is Started. And if you find that it’s already started, you need to restart it.
Option 3 – Try killing the IIS Worker Process via Task Manager
Tap the Ctrl + Alt + Del keys and select the Task Manager.
Next, click on More details to expand the Task Manager and then look for the IIS Worker Process entry which should be displayed in the list under the Processes tab. From there, you can see it in the Background processes. Once you find it, kill its process.
You can also try to look for the “w3wp.exe” entries and end its process. if you find many entries, right-click on some of them and select the End task option from the context menu.
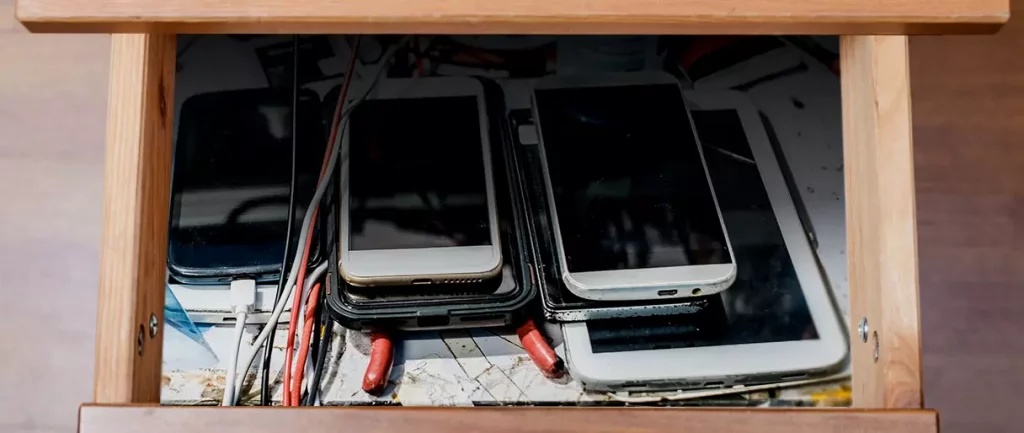
Hello all the wonderful people and welcome to our new article where we take a little different turn than usual and discuss why keeping old electronics around the house is not such a good idea. We all have some drawer or in some bag around the house and in the end of the day if that electronic has battery inside it is probably not the smart thing to keep it.
So naturally, the question comes why it is a bad idea to have old electronics with batteries in them? Well unlike a battery failure with, say, some AA batteries jammed in the back of an old toy, the risk with a lithium-ion battery failing isn’t just some leaking and corrosion in the battery compartment, it’s a potential fire as the battery swells up and the gases (combined with the stored energy) turn the battery into a potential fire hazard.
Good thing is that the battery will not explode just like that, it will swallow over time and get bigger and bigger until the breaking point is reached and all the fire breaks lose. So if by any chance you have some old gadgets lying around you can check up on them and see if has swelling process started, if yes, dispose properly of that piece of the old device immediately.
How to keep old electronics
If you’re not ready to get rid of the gadget then it’s best to charge it properly for storage. Proper charging keeps the battery cells and circuits in optimum health.
While recommendations vary by manufacturer and application, the general consensus is that lithium-ion batteries should be charged to approximately 40%. (Some manufacturers recommend charging 50% or 60% instead.)
Really, the important part here isn’t the exact percentage. What’s important is ensuring that the battery is charged to roughly half capacity and not stored with a completely discharged or completely full battery.
Discharge rates on lithium-ion batteries in completely powered-off devices are very slow, but you should still plan to top off the charge every 12-18 months or so to keep it around 50%.
If you wanted to go above and beyond, a metal storage container with a snug lid on a basement shelf with a desiccant pack inside to control the moisture would offer optimum conditions.