 Windows 11 comes with glass and transparency effects by default once it is installed. The transparency effect looks really good but if in any case, you do not like them, you can easily turn them off very easily
Windows will automatically save settings and apply changes right away. Just close your settings application and continue with work. You can always turn it back ON if you change your mind.

Error code 0x80070422 is a Windows-based error code occurring in various versions of Windows including Windows 7, Windows 8 and Windows 8.1, and Windows 10. It usually occurs when users attempt to update Windows. A message box will appear stating that the error code has occurred. Users will notice the following common symptoms:
The error code, if left unresolved, can cause serious problems for PC users as they will be unable to access the latest updates to the Windows operating system. Such a situation can expose their system to vulnerabilities. Thus, fixing Windows 10 error code is of utmost importance.
 Error Causes
Among the many reasons Error code 0x80070422 is encountered includes:
Fixing Windows-based error codes can be a simple process. However, in some cases, it requires specialized skills. In the case of Windows 10 error code 0x80070422 consider the two (2) main solutions available through manual repair. You may also need to consider help from a certified Windows repair technician or the use of an automated tool if you are not confident you have the skills to perform the solutions below.
One of the main reasons for error code 0x80070422 is a Windows Update service that is not running on the right settings. To verify if an issue with your Windows Update service is the source of the problem applies the following steps:
Once these settings are in place Windows will be able to download updates automatically. This enables your machine to run more smoothly. However, if after applying the steps above, Windows 10 error code 0x80070422 is not resolved, you may proceed to solution two (2).
IPv6 is the latest or most current version of Internet Protocol (IP). This provides your machine with an IP address, a crucial aspect of all communications related to the Internet. By disabling this IP some users have been able to successfully resolve Windows 10 error code 0x80070422.
Like many tasks involving Windows, there are more than one ways in which you can attempt to disable IPv6. These require different types of skills and must be approached with care, as mistakes can lead to serious issues with your machine. Methods include using Command Prompt, Registry Editor, or Control Panel.
If your experience with Windows 10 is quite limited and you are not certain of your skills choose the simplest approach as listed below.
If the issue persists despite following the solutions above, the best step to take is to use an automated tool. This may not be your preferred course of action, especially since it can be difficult to ascertain the safety of certain tools found online. For this reason, choose a reputable source offering automated tools which are designed to specifically fix Windows 10 error code including error code 0x80070422.
Download and install a powerful automated tool to access the best Windows 10 error code solutions. The process is simple and includes clear instructions which enable even average Windows users to completely resolve complicated errors on their machine.
Though it is hard to predict when an error code will occur, each Windows 10 user can take precautionary steps to prevent other errors from occurring. This includes the following:
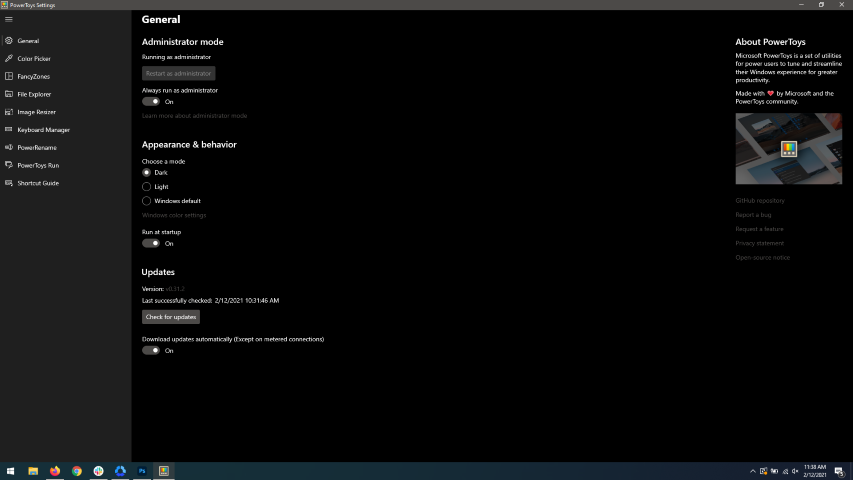 When opened you will be greeted with general settings window. These are settings for power toys themselves, Here you can check for updates, change the looks of power toys, run it on system startup and run them as administrator. Set them up so they best suit your needs.
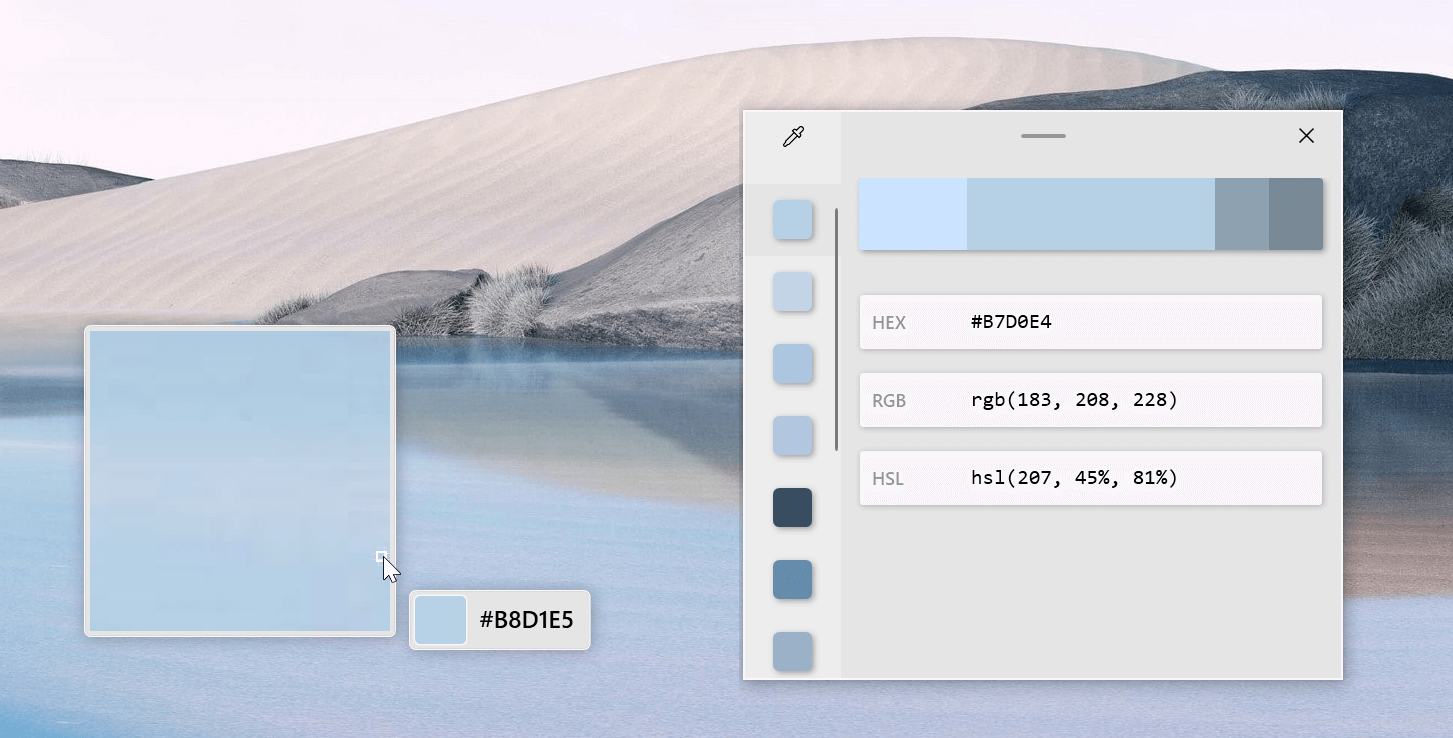 The color picker will let you as the name suggests pick colors, it will sample colors from running applications and windows, snap their values, and place them in the clipboard. A useful application if you are working as a graphic designer, want to create some cool word document, or just want to compare the difference between colors.
After the Color Picker is activated, hover your mouse cursor over the color you would like to copy and left-click the mouse button to select a color. If you want to see the area around your cursor in more detail, scroll up to zoom in. The copied color will be stored in your clipboard in the format that is configured in the settings (HEX by default). The editor lets you see the history of picked colors (up to 20) and copy their representation in any predefined string format. You can configure what color formats are visible in the editor, along with the order that they appear. This configuration can be found in PowerToys settings. The editor also allows you to fine-tune any picked color or get a new similar color. Editor previews different shades of currently selected color - 2 lighter and 2 darker ones. Clicking on any of those alternative color shades will add the selection to the history of picked colors (appears on the top of the colors history list). Color in the middle represents your currently selected color from the history of the colors. By clicking on it, the fine-tuning configuration control will appear, which will let you change the HUE or RGB values of the current color. Pressing OK will add newly configured color into the history of the colors.
The color picker will let you as the name suggests pick colors, it will sample colors from running applications and windows, snap their values, and place them in the clipboard. A useful application if you are working as a graphic designer, want to create some cool word document, or just want to compare the difference between colors.
After the Color Picker is activated, hover your mouse cursor over the color you would like to copy and left-click the mouse button to select a color. If you want to see the area around your cursor in more detail, scroll up to zoom in. The copied color will be stored in your clipboard in the format that is configured in the settings (HEX by default). The editor lets you see the history of picked colors (up to 20) and copy their representation in any predefined string format. You can configure what color formats are visible in the editor, along with the order that they appear. This configuration can be found in PowerToys settings. The editor also allows you to fine-tune any picked color or get a new similar color. Editor previews different shades of currently selected color - 2 lighter and 2 darker ones. Clicking on any of those alternative color shades will add the selection to the history of picked colors (appears on the top of the colors history list). Color in the middle represents your currently selected color from the history of the colors. By clicking on it, the fine-tuning configuration control will appear, which will let you change the HUE or RGB values of the current color. Pressing OK will add newly configured color into the history of the colors.
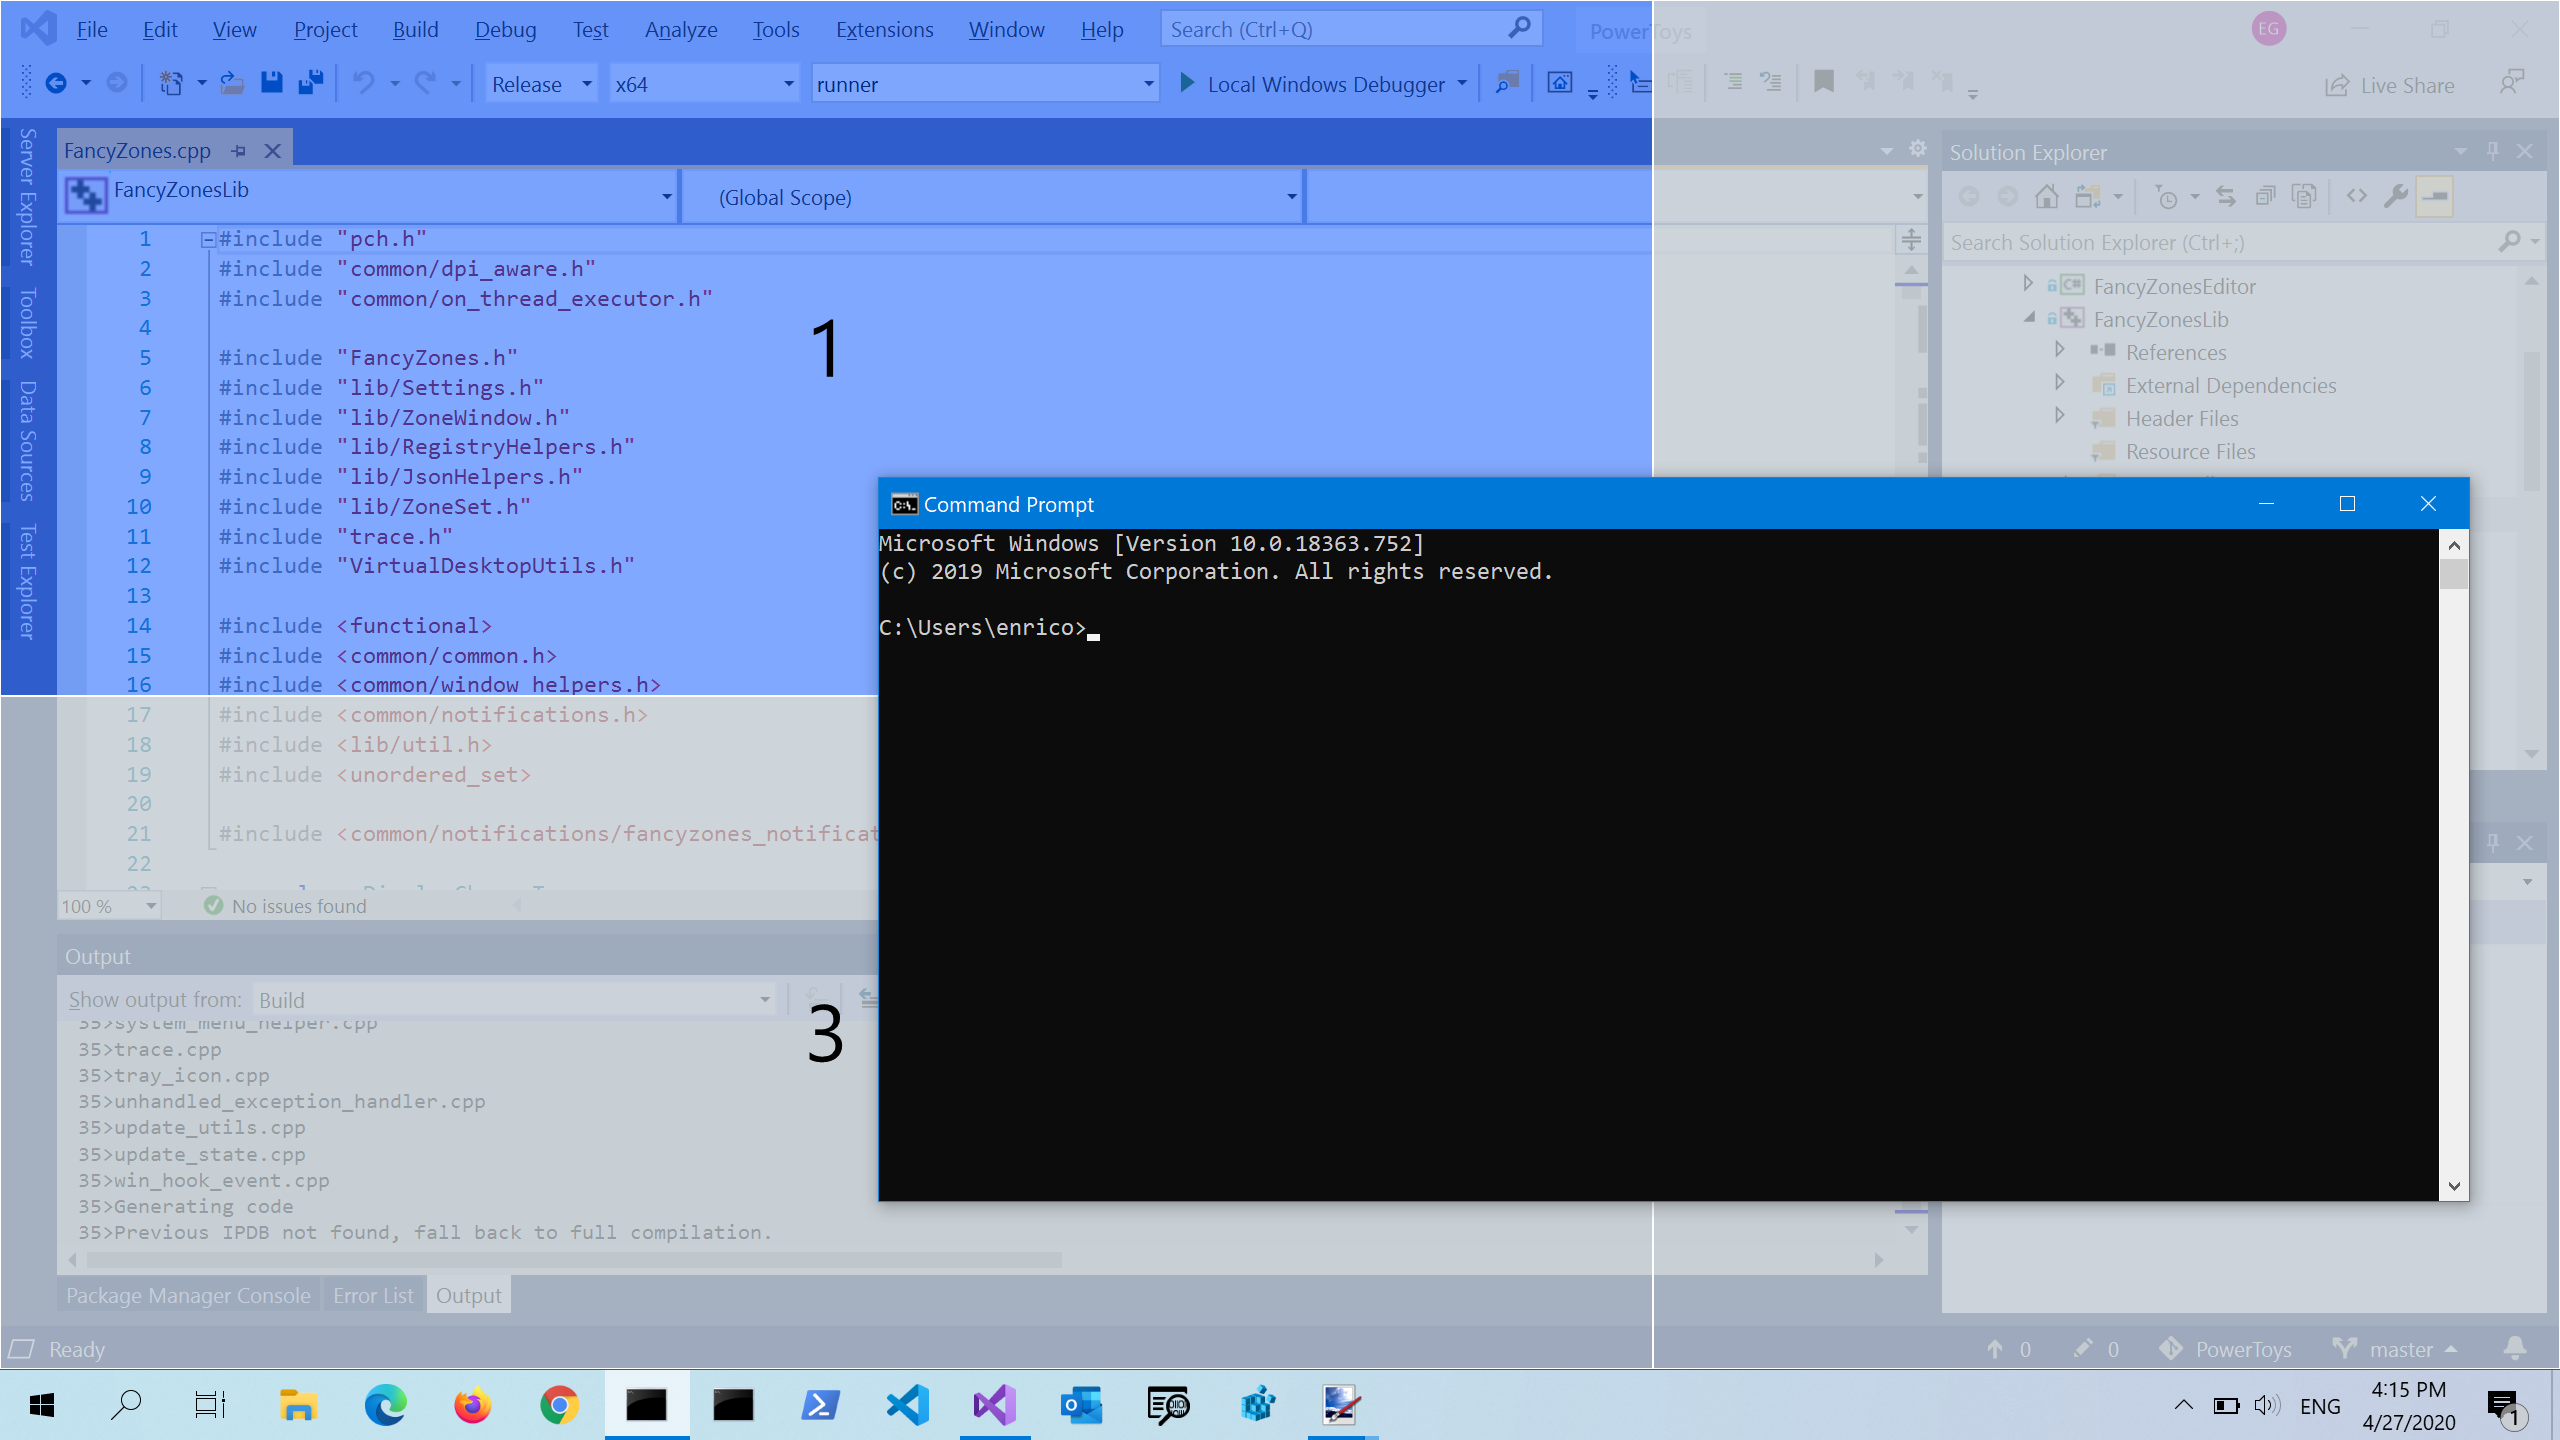 FancyZones is a window manager utility for arranging and snapping windows into efficient layouts to improve the speed of your workflow and restore layouts quickly. FancyZones allows the user to define a set of window locations for a desktop that are drag targets for windows. When the user drags a window into a zone, the window is resized and repositioned to fill that zone. When first launched, the zones editor presents a list of layouts that can be adjusted by how many windows are on the monitor. Choosing a layout shows a preview of that layout on the monitor. The selected layout is applied automatically.
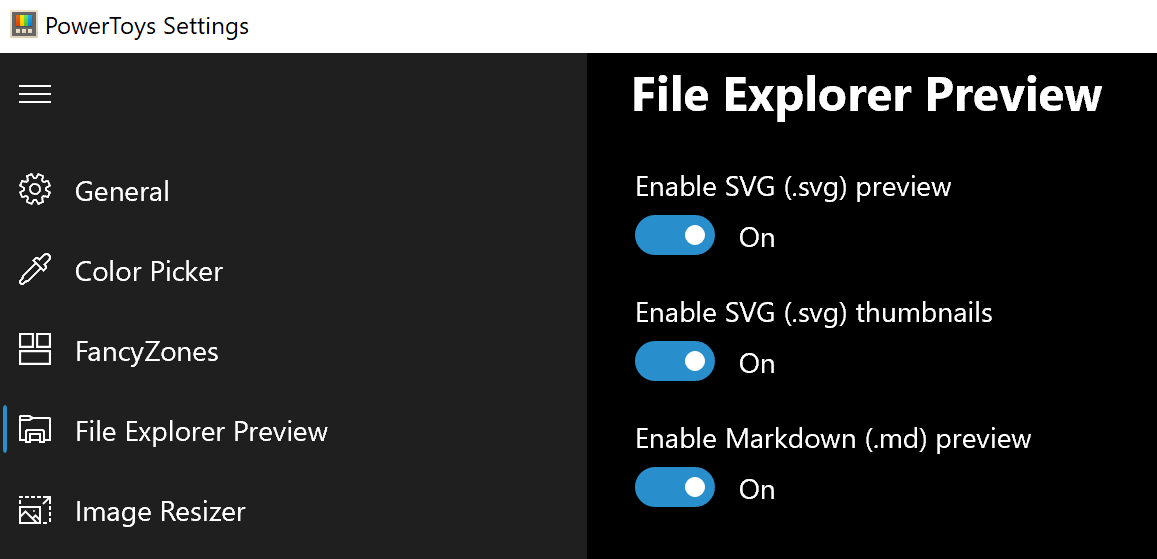 Only 3 options here but maybe some are important to you. This extension lets you enable SVG file preview in File Explorer, enable Markdown preview, and enable SVG thumbnails. Turn on each one you might need.
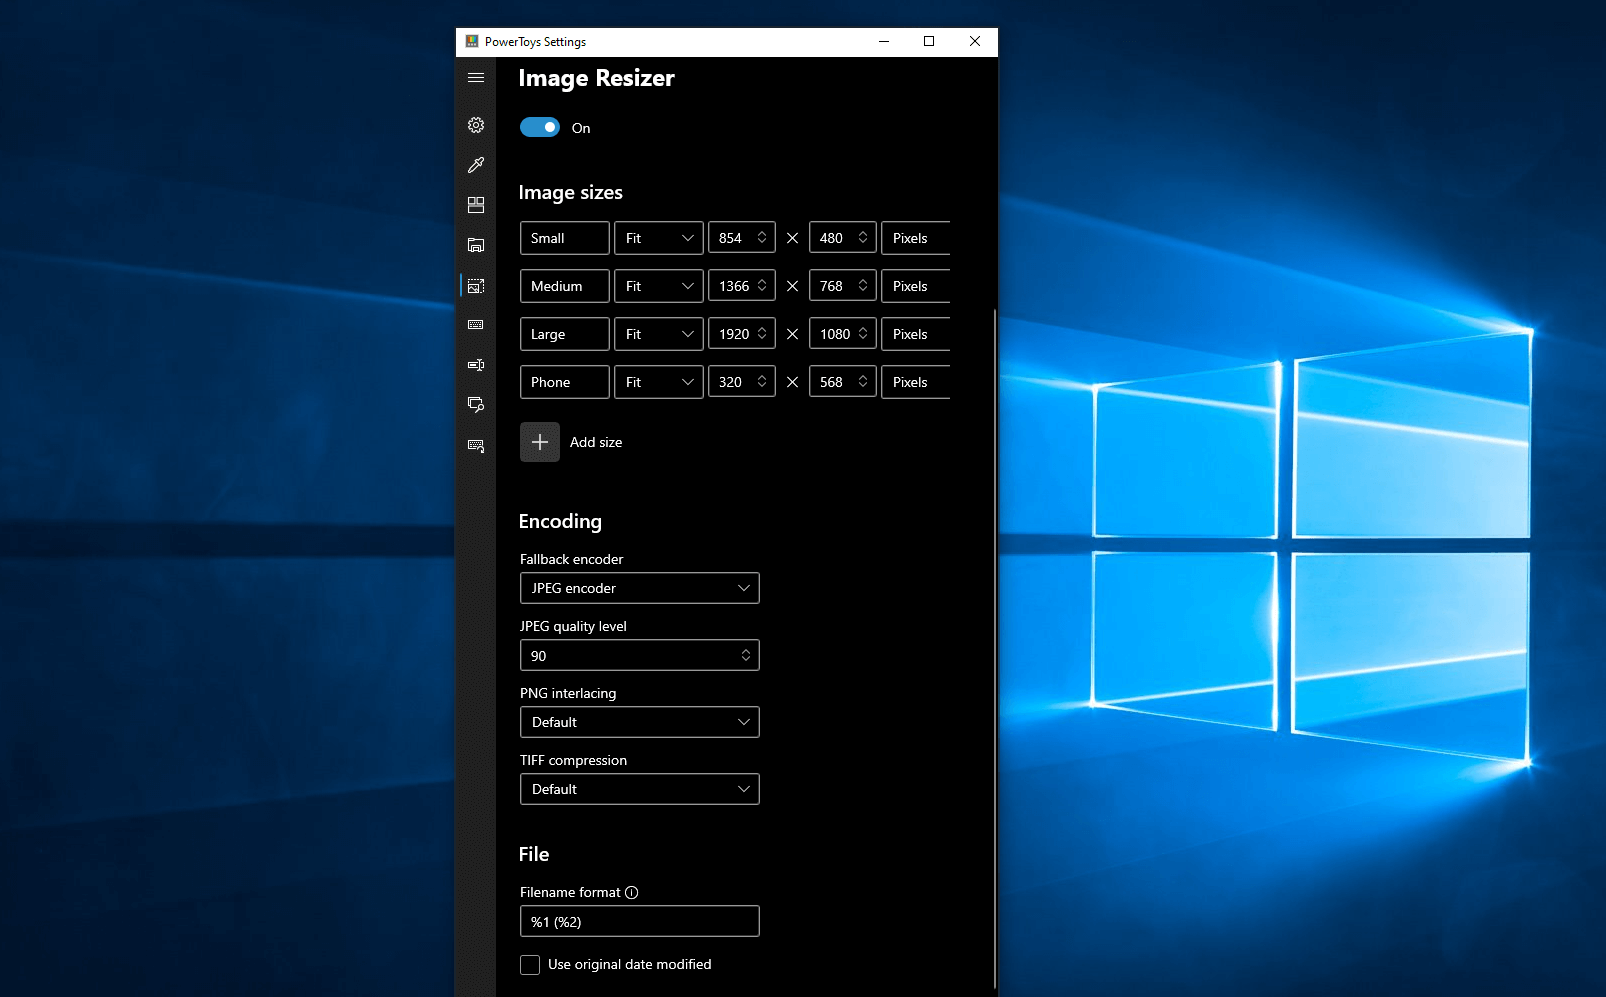 Image Resizer is a Windows shell extension for bulk image-resizing. After installing PowerToys, right-click on one or more selected image files in File Explorer, and then select Resize pictures from the menu. You can specify your own sizes if you want, you can resize when dragging files, you can overwrite files or make new copies of new sizes, and many more options. A very useful tool I am sure plenty of users can use since this eliminates the need for pictures or any other image application for common resizing tasks.
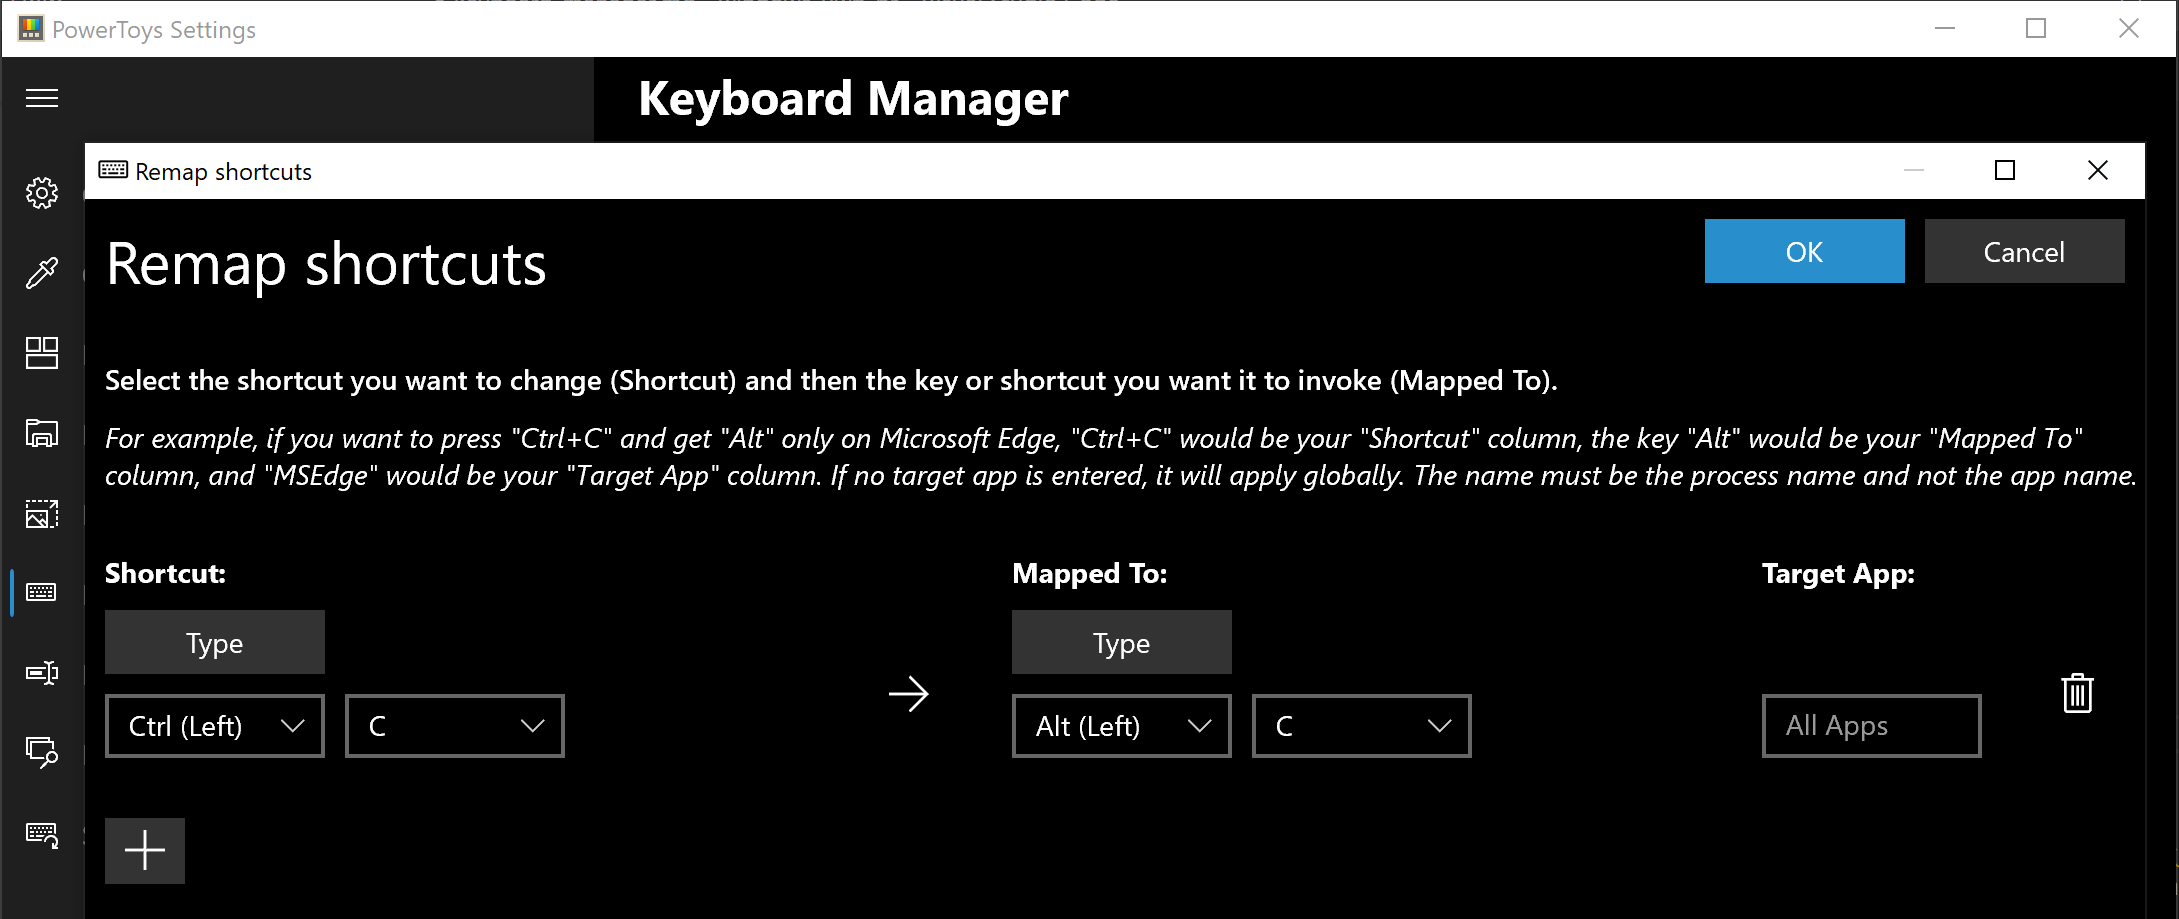 The PowerToys Keyboard Manager enables you to redefine keys on your keyboard. For example, you can exchange the letter A for the letter D on your keyboard. When you select the A key, a D will display. You can also exchange shortcut key combinations. For example, the shortcut key, Ctrl+C, will copy the text in Microsoft Word. With the PowerToys Keyboard Manager utility, you can exchange that shortcut for ⊞ Win+C). Now, ⊞ Win+C) will copy text. If you do not specify a targeted application in PowerToys Keyboard Manager, the shortcut exchange will be applied globally across Windows. PowerToys Keyboard Manager must be enabled (with PowerToys running in the background) for remapped keys and shortcuts to be applied. If PowerToys is not running, key remapping will no longer be applied.
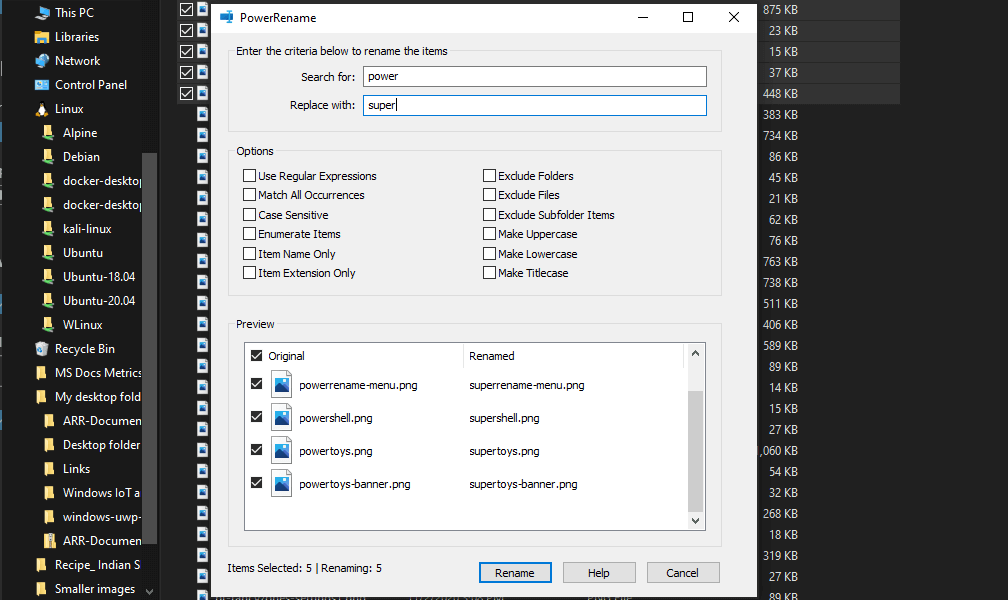 PowerRename is a bulk renaming tool that enables you to:
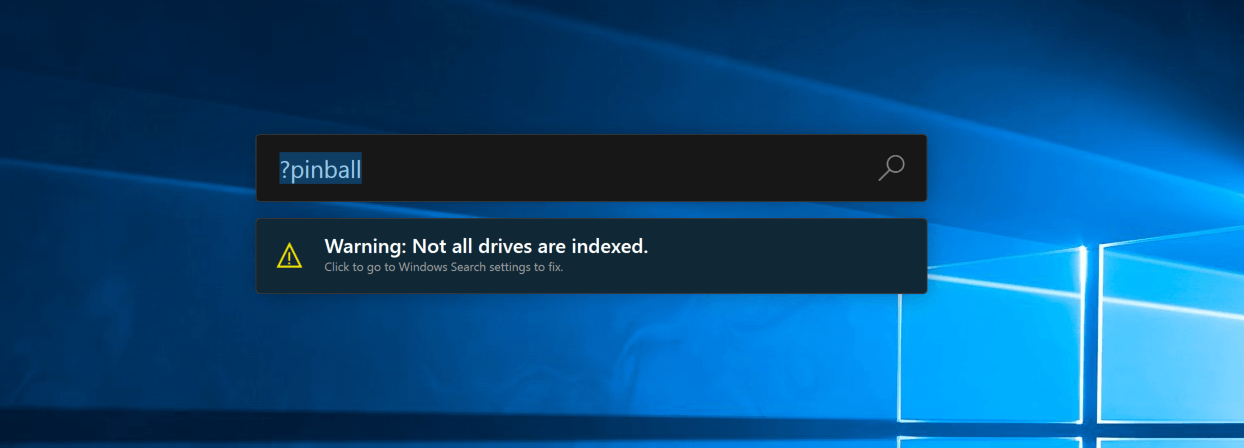 PowerToys Run is a quick launcher for power users that contains some additional features without sacrificing performance.
PowerToys Run features include:
PowerToys Run is a quick launcher for power users that contains some additional features without sacrificing performance.
PowerToys Run features include:
> (for example, > Shell:startup will open the Windows startup folder)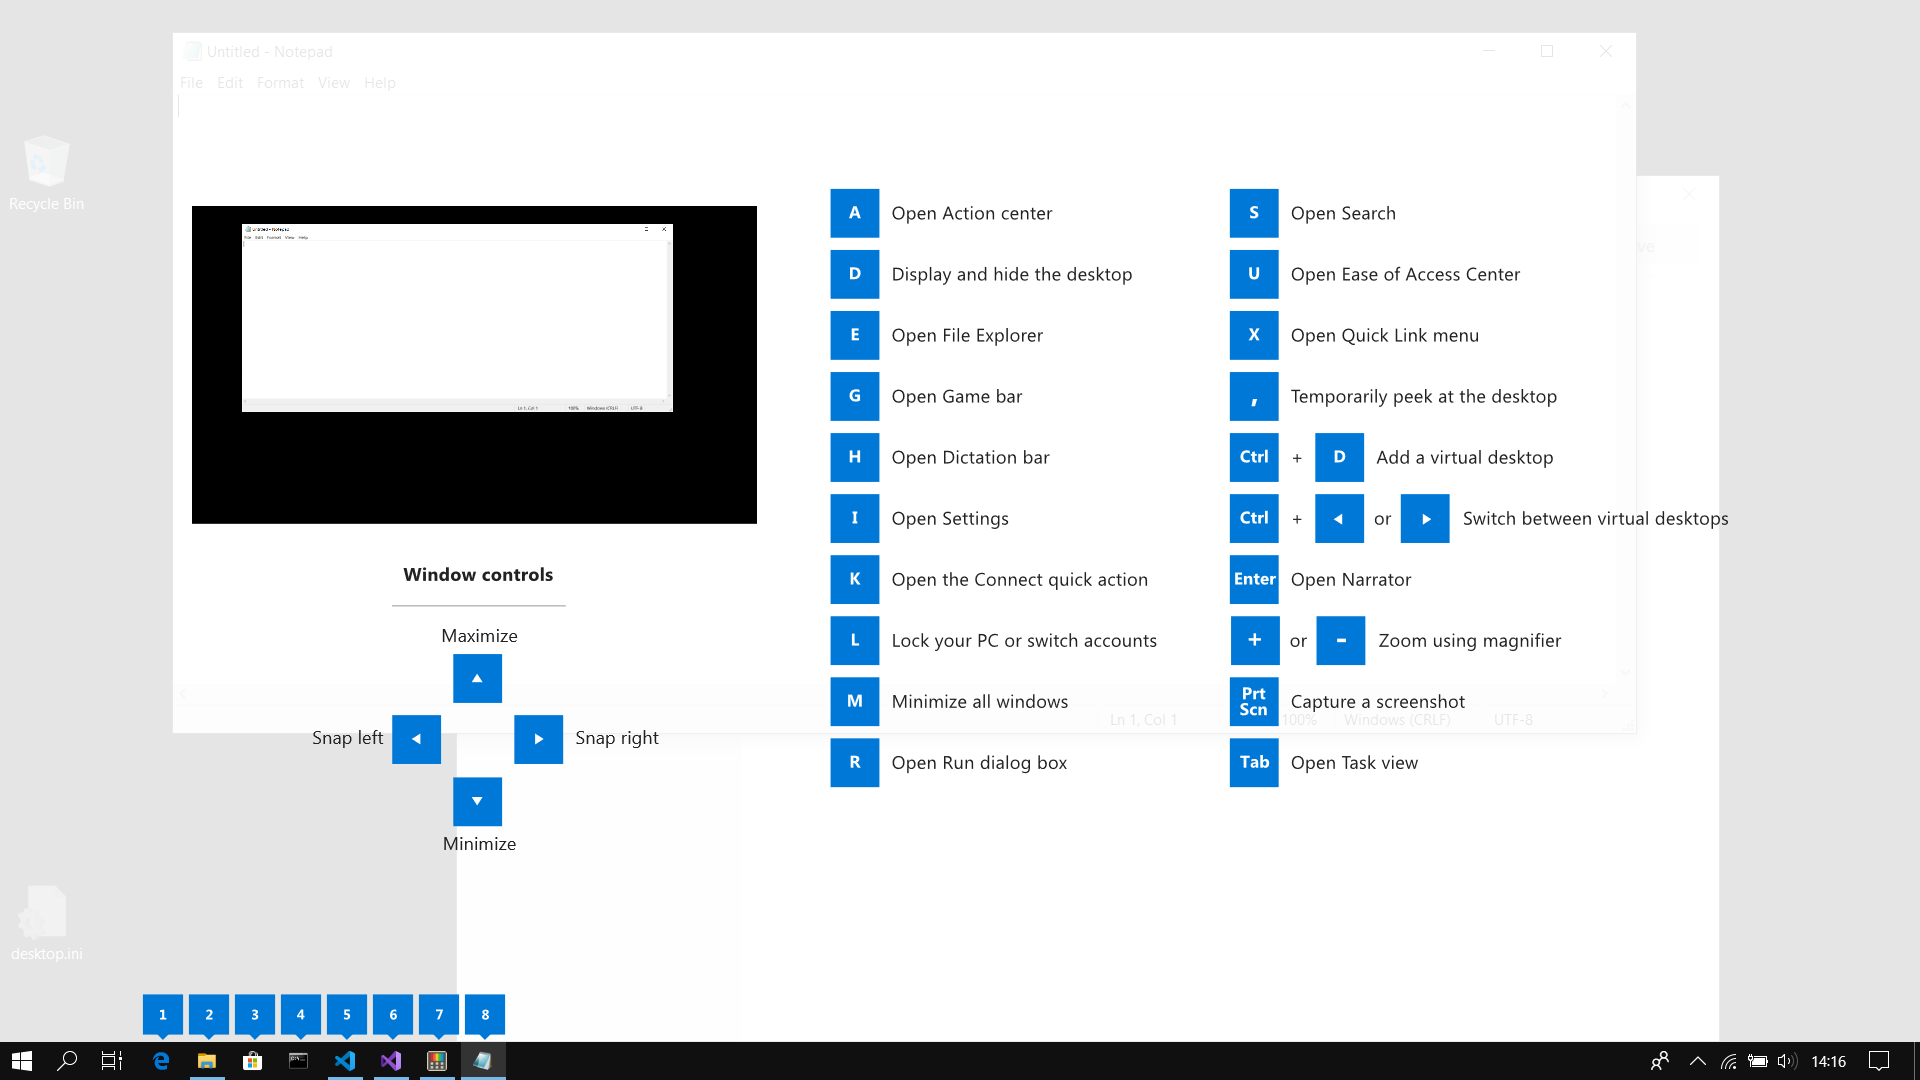 This guide uses PowerToys to display common keyboard shortcuts that use the Windows ⊞ key. Windows key keyboard shortcuts can be used while the guide is being shown and the result of those shortcuts (active window moved, arrow shortcut behavior changes, etc) will be displayed in the guide. Releasing the Windows ⊞ key will make the overlay disappear. Tapping the Windows ⊞ key will display the Windows Start menu.
Hey, you made it till the end, thank you for reading and I hope to see you soon.
This guide uses PowerToys to display common keyboard shortcuts that use the Windows ⊞ key. Windows key keyboard shortcuts can be used while the guide is being shown and the result of those shortcuts (active window moved, arrow shortcut behavior changes, etc) will be displayed in the guide. Releasing the Windows ⊞ key will make the overlay disappear. Tapping the Windows ⊞ key will display the Windows Start menu.
Hey, you made it till the end, thank you for reading and I hope to see you soon. KMODE_EXCEPTION_NOT_HANDLED
PAGE_FAULT_IN_NONPAGED_AREATo fix the dxgkrnl.sys Blue Screen error, here are some suggestions you have to check out.
A slow PC startup can be pretty annoying. This usually results from various computer issues. If your computer is acting sluggishly, here are four ways to speed up your PC startup.

 Windows will then go to the accounts settings page. Within that page, click on the Family & other users to open the setting for the chosen section on right. On the right settings, screen navigate to the lower section and click once with the left button on add someone else to this PC
 When add someone else to this PC is clicked, pop up window will appear which will ask you to provide the persons email address and later on the password of his/her Microsoft account, after the required information is provided you are done, a new user has been added and he can use his Microsoft credentials on the login screen to use this computer.
 This will open yet another pop-up giving you the option to create a Microsoft account for this person, to use a phone number instead of a Microsoft account, or to create a new email address for the user. Any of these options will create a new user for this computer with provided credentials but there is the last option at bottom of the pop-up which will allow you to create a local user only without a Microsoft account. This user will be able to use this computer, will not be able to transfer his document through various devices like he/she would if using a valid Microsoft account but it could use the computer and personalize it fully to his/her liking.
 Once the link is clicked, you will be presented with a floating window requiring you to input needed information in order for the account to be created. You will need to provide username, password, and answers to 3 security questions.
 Once all information has been provided, click on next and your new non-Microsoft local user has been created. Now when you click on Family & other users you will see that Windows has added a new user with the provided name to this computer. If you wish, you can add another user in the same manner, following the previous steps. Microsoft Windows does not have a limit for how many users can be on one computer so feel free to create as many as you like.
 Click on Change account type.
 Under account type, you will have the option to promote this user to an administrator if you wish or you can leave it as a standard user.
 "Error 1723- There is a problem with this Windows Installer package. A DLL required for this install could not be run. Contact your support personnel or package vendor...”You are most likely to come across the error code 1723 if the Java installation is not completed successfully. In other words, the error indicates that the installation process has failed.
Error Causes