Logo

The Ins and Outs of Windows 11’s Gaming Performance

Wondering if upgrading to Windows 11 will boost your gaming experience? We can’t give you a straightforward answer, sadly. But we can take you through the tweaks you can expect if you have all the right requirements and help you make a final decision.

Is Windows 11 good for gaming?

Essentially, the answer to this question is yes. Microsoft has definitely added a bunch of enhancements and features to its latest OS to give gamers the best possible experience. However, you have to keep in mind that this may not work out smoothly for every single user.

Whether you’ll be able to fully take advantage of the Windows 11 gaming features really depends on your setup. As expected, Windows 11 has more demanding system requirements than its predecessor.

So, unless your hardware can run the new OS comfortably, you might not be able to make the most of all these gaming perks. In that case, we recommend you first upgrade your hardware and then make the switch. Be prepared to be a little surprised by a few other interesting changes in comparison to Windows 10, though!

For some of the new gaming features to work, it’ll also be necessary for you to have an NVMe SSD and an HDR-compatible monitor. So let’s take a look at 4 big improvements you can expect if your setup is compatible.

Gaming enhancements on Windows 11

1. Enjoy faster loading speed with DirectStorage

For this powerful feature to work, you need a compatible graphics card and, as stated before, an NVMe SSD. It’s also important for your GPU to support the DirectX 12 graphics API at least. And since we’re on that subject, you’ll be happy to know that Windows 11 has also introduced a new version of the API called DirectX 12 Ultimate. 

Now, what does DirectStorage do? It’s a new feature designed to make full use of the speedy storage of NVMe SSDs. It also transfers game data directly onto the graphics card, lightening the load on your CPU. Normally the CPU would have to decompress the data first, but DirectStorage helps bypass this. That’s how loading times are reduced and games run more smoothly.

2. Fully immerse yourself through Game Mode

Windows 11’s Game Mode is certainly a welcomed addition. When you turn on Game Mode, usage of background apps that aren’t essential to your game is reduced. This results in the game you’re running becoming a priority process. This way, it uses your hardware and system resources to the max. Ultimately, the Game Mode means less lag and higher frame rates so you can play undisturbed and fully enjoy your gaming session.

3. Vibrant visual experience thanks to AutoHDR

For this one you’ll absolutely need an HDR-compatible monitor. Basically, HDR (High Dynamic Range) means a wider range of contrasts and colors that can be displayed on a monitor.

Windows 10 has an HDR feature, but you have to turn it on and off manually (“Use HDR”). Plus, users have reported that, if left on, it results in an unappealing appearance of content other than movies and games. 

Windows 11 fixes that problem with its AutoHDR feature. Toggling it results in the system automatically adjusting the color contrast, balance and brightness based on what you’re currently looking at. For gamers, this means vivid imagery in every single game, resulting in a supreme visual experience. You can check out Microsoft’s own video showcasing the power of AutoHDR.

Aside from AutoHDR, another way Windows 11 improves the visual aspect is through its support for refresh rates of up to 360Hz.

4. Xbox Game Pass & Game Bar

It’s no secret that Microsoft wants to integrate Windows and Xbox. We’ve seen some attempts with Windows 10, but they’re pretty wonky compared to the new OS.

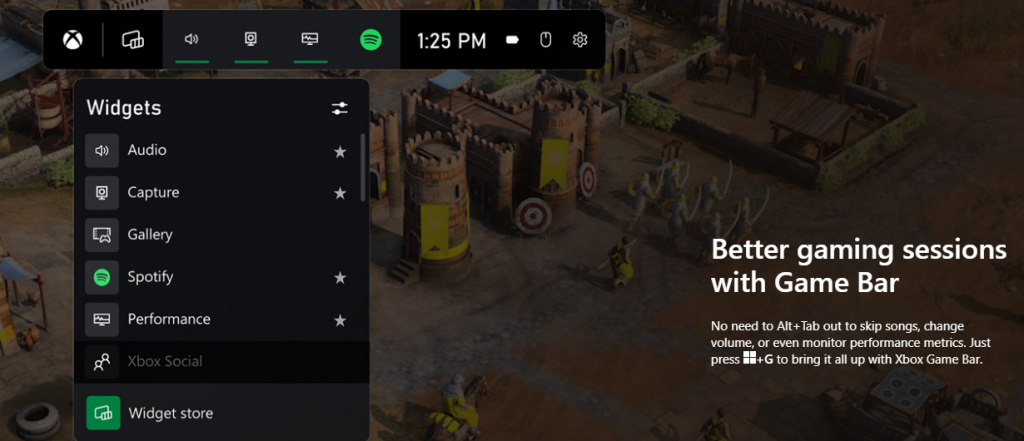
Windows 11’s built-in Xbox Game Bar enables quite a few options all gamers desire. You can take screenshots and videos of your game and send them, for starters. Furthermore, you can use it to see audio settings and monitor your PC’s performance without having to leave the game or open the Task Manager.

Microsoft Windows 11's Game Bar
<a href=httpswwwmicrosoftcomen uswindowswindows 11 pc gamingr=1>Source<a>

Widgets are also a really cool part of the Game Bar. You can choose from a wide variety of widgets, such as Xbox Achievements, Spotify, Gallery, Xbox Social and more. 

Moreover, the Xbox Game Pass has been streamlined on Windows 11. Game Pass is a subscription service that unlocks hundreds of awesome games and supports cloud streaming. Do keep in mind that the games are only unlocked for a certain period of time, as the selection rotates once in a while.

What can you do for a better gaming experience?

Windows 11 does offer tweaks that require zero input from you. However, there are a few things you can do manually to get even more out of your new OS while gaming.

  • Turn off enhanced pointer precision. Most games enhance precision by default, so having this feature on might interfere with that.
  • Make sure to select your high performance graphics card for each game. Go to Settings > Gaming > Game Mode and tap ‘Graphics’ from the ‘Related settings’ menu. Find the game you want to adjust, click on ‘Options’ and choose your high performance graphics card to be the default setting. While there, you can also turn on ‘Hardware-accelerated GPU scheduling’ at the top.
  • Disable unnecessary apps and programs. As long as they aren’t essential to running your game, they might take up valuable system resources, so disable them to make space for your gaming requirements.
  • Check for pending updates and install them. It’s well-known that out-of-date software causes bugs, latency and crashes. The same goes for your GPU drivers.
  • Use the High-performance power plan (Control Panel > Power Options > Additional plans) to maximize the use of resources for the best possible performance.

Summary

Windows 11 has done quite a bit for avid gamers. We hope your setup is compatible with all these new features and you can experience these enhancements ASAP!

Do You Need Help with Your Device?

Our Team of Experts May Help
Troubleshoot.Tech Experts are There for You!
Replace damaged files
Restore performance
Free disk space
Remove Malware
Protects WEB browser
Remove Viruses
Stop PC freezing
GET HELP
Troubleshoot.Tech experts work with all versions of Microsoft Windows including Windows 11, with Android, Mac, and more.

Share this article:

You might also like

Gaming vs Regular headset comparison

Regular and gaming headphones have many differences between them and not knowing what they are can lead you to get yourself the wrong one. In this article, our goal is to analyze the differences between them so you can choose the right one for you.

headphone

Price

One thing that goes in both worlds is that the cheapest models on both sides are not really worth the purchase since both the quality and longevity will be very low. If we compare high-end models, regular headphones are far far more expensive than gaming ones. Hi-end gaming models can go as far as 400$, perhaps a little more but hi-end audio regular headphones are going even for over 2000$.

If we compare same-price headphones generally regular ones will offer you a little better sound quality but gaming headphones will offer some features such as positional audio that regular ones do not have.

Surround sound and positional audio

One of the main advantages of gaming headsets is positional audio and true surround sound. this technology is built-in so you can hear more clearly where your enemy is coming from that is a big help in competitive games. This is achieved by positioning multiple speakers in various positions and angles inside them. Each speaker has a different sound channel that is mixed with another speaker in order to provide you with a full surround experience.

Regular headphones have typically one or two speakers on both sides aimed at the same angle and can not offer precise surround or positional audio.

Noise cancellation

Both gaming and hi-fi headphones offer some sort of noise cancelation to minimize outside noise but if you really want to focus and have good noise cancelation you will have to look out for headphones with active noise cancelation or ANC.

Microphone quality

Let us say this right at the start, most middle and quality regular audio headphones do not have a microphone at all, and ones that might pack one usually have it at a lower quality than gaming ones. This of course makes perfect sense since regular headphones will focus on audio, and gaming ones will focus on playing games where having a good microphone is essential in order to game properly.

Speaker and sound quality

Speaker quality will reflect directly on the sound quality and fidelity. This is where audio regular headphones have an advantage over gaming ones. Since they do not have many small speakers positioned at various angled and instead have just a few, usually 2 or 1 large one, that one is of much better quality and range for audio than a pack of small ones. If you are searching for clarity and quality of the audio itself, especially if you are listening to some FLAC uncompressed music, then regular HiFi ones are a much better choice.

Longevity and durability

Another area where regular ones have an advantage but that is no surprise since their price goes far up compared to gaming ones. Most of the time everything in hi-end audio headphones is made from quality materials and designed to last a long time and therefore advantage. Most of the time gaming headphones will come in plastic versions whereas higher quality audio ones pack a lot of durable metal in frames and in buds making them much more durable. Of course, we are talking here about proper headphone use, not extreme cases of throwing, etc.

Read More
Fix 0xC000007B STATUS INVALID IMAGE FORMAT
If you are trying to open a program or a game but you suddenly see a dialog box with a message stating that the application was unable to start correctly along with the Error Code 0xC000007B , STATUS INVALID IMAGE FORMAT then this indicates that the application is not compatible with the architecture of your Windows 10 computer or is missing dependencies. Although error code 0xC000007B can also occur with other various programs, the STATUS_INVALID_IMAGE_FORMAT error code also means that when you try to run an application that’s designed to run on a 64-bit system and hence gets into a termination state. In addition, if you are also pointed to the NTStatus.h file then it means that the error might be caused by some file corruption. Here’s the full context of the error message:
“0xC000007B | STATUS_INVALID_IMAGE_FORMAT | {Bad Image} %hs is either not designed to run on Windows or it contains an error. Try installing the program again using the original installation media or contact your system administrator or the software vendor for support.”
When you see this error message, the first thing you can do is to click on OK to close the application and then try installing the media again to see if it fixes the issue. If not, then you can check out the suggestions given below.

Option 1 – Try installing the application with admin privileges

The first thing you can do to fix the error is to restart your Windows 10 computer and then try installing the application again and this time with admin privileges. Just right-click on the application and select the “Run as Administrator” option. And if your account is a regular one, you need to make sure to ask an admin to help you in installing the application by entering the password when you are prompted to do so.

Option 2 – Install and update Dependencies

There are times when programs and applications need to have drivers and supporting software installed for them to properly work. Although the installation usually takes care of it, it’s time for you to do some manual checks especially if you are getting this issue of abnormal program termination.

1. Install some qualified drivers

A number of high-end games and applications need to have correct and valid drivers for them to work. They just don’t work with general drivers though. Microsoft has this Windows Hardware Quality Labs testing also known as WHQL testing which makes sure that drivers meet the correct experience and pass through the proper testing before certification. Thus, when installing drivers, you need to ensure that they are qualified drivers for your Windows 10 PC.

2. Download and install or update DirectX

As you know, Microsoft DirectX is a suite of technologies developed by Microsoft to provide hardware acceleration for heavy multimedia applications like HD videos and 3D games. Since you are using Windows 10, you have the DirectX 12 version while the earlier Windows versions use the DirectX 11 version.

3. Install the Microsoft DirectX End-user runtime

The Microsoft DirectX end-user runtime gives updates to version 9.0c as well as previous versions of DirectX. To install it, click on this link and download it.

4. Update or install the .NET framework

The .NET framework is used by games and applications during development which means that without the runtime files that are installed in your computer, it definitely won’t work. Thus, you need to install or update this framework. You can also use the .NET setup verification tool to verify it.

Option 3 – Try running the System File Checker Scan

The SFC or System File Checker scan could detect and automatically repair damaged system files that could be causing the Error Code 0xC000007B , STATUS INVALID IMAGE FORMAT error. SFC is a built-in command utility that helps in restoring corrupted files as well as missing files. It replaces bad and corrupted system files with good system files. To run the SFC command, follow the steps given below.
  • Tap Win + R to launch Run.
  • Type in cmd in the field and tap Enter.
  • After opening Command Prompt, type in sfc /scannow
The command will start a system scan which will take a few whiles before it finishes. Once it’s done, you could get the following results:
  1. Windows Resource Protection did not find any integrity violations.
  2. Windows Resource Protection found corrupt files and successfully repaired them.
  3. Windows Resource Protection found corrupt files but was unable to fix some of them.
Read More
Diablo 3 lost connection to the game server
Diablo has changed how action RPG games are made and has placed homework for many developers. Diablo 3 is 3rd continuation in the series and to the joy of many players worldwide it has brought some interesting things in the genre like teaming up with other friends to slay demon hordes together introducing much needed multiplayer element. Sadly sometimes we get the error that Diablo 3 can not connect or that the connection to the game server has been lost. Keep reading and try provided solutions as they are presented to fix this issue and continue gaming.
Read More
How to Fix Error Code 0xC004C4AE on Your PC

Error Code 0xC004C4AE - What is it?

Activation errors in Windows 10 can interfere with your ability to fully use the system. When Error Code 0xC004C4AE appears on your computer, you may see a message that shows that the validation process has been stalled due to binaries that appear to have been tampered with.  

While the text of this message may sound intimidating to people who are not familiar with the inner workings of the Windows 10 system, the basic meaning of the error message is that something has been introduced to the system that is not natively supported in Windows 10. During the Activation process, Windows checks to ensure that all of the Windows elements that are currently on the computer are valid and authentic to the Windows system. Usually, this particular error code refers to a language package that has been downloaded into the system using an outside application, which the Windows 10 operating system does not support. 

Common symptoms include: 

  • An error message when the activation is attempted 
  • Inability to complete the Windows 10 Activation process 
  • Inability to fully use apps in Windows 10 until the issue is resolved 

This particular error can easily be resolved with a few simple steps. However, if you are not confident in your ability to use the methods below or they do not fully remove the issue on your computer, you may want to seek the assistance of a qualified repair technician who is well versed in the Windows 10 Activation process.

Solution

Restoro box imageError Causes

The most basic cause of Error Code 0xC004C4AE is that an unsupported language package has been enabled in the computer. This most often occurs when third-party applications have been used to introduce additional display languages to your system. While third-party applications that provide language packs are acceptable in some versions of the Windows operating system, the Windows 10 Activation process will not be able to complete if the system detects that one of these unofficial language packs exists on your machine.

Further Information and Manual Repair

There are several methods that may be helpful in resolving the basic issue in the display languages that causes Error Code 0xC004C4AE to appear: 

Method 1: Restore Your System to an Earlier Point to Revert Changes 

Use a backup copy to restore your computer to an earlier date, in effect undoing the changes that caused the error. When your system has been restored, you will be able to go through any language packs that are not native to the Windows operating system and remove them before re-attempting the installation and activation of the Windows 10 system. 

This method is most useful if you keep a regular backup of your system and files. If you do not regularly back up the information on your computer, attempt one of the other methods instead. If you are unsure of how to use a backup to revert your changes or are not comfortable completing this step on your own, contact a certified Windows technician to assist you in the process. 

Method 2:  Revert to an Earlier System to Remove the Language Pack 

If you are unable to restore your system using a backup, the other option to resolve Error Code 0xC004C4AE is to halt your installation of Windows 10 and go back to Windows 7 or Windows 8.1, from which you will be able to remove the language pack in question. Once the offending language pack has been completely removed from your computer, the Windows 10 Activation process should be able to proceed normally. 

Several versions of windows don’t support language packages, so the best way to prevent this error from occurring is to avoid using any kind of third-party tool to install additional languages onto your Windows system. Activities Language You may be able to use third-party tools to instead complete alternative language actions without installing these languages as language packs. 

If the above solutions do not help you to resolve Error Code 0xC004C4AE on your machine, get in touch with a qualified Windows repair technician, who may be able to perform the operations needed to remove the problematic language pack from your computer and allow the Windows 10 Activation process to continue to completion. 

Read More
Enable or Disable Auto-Mounting in Windows
Every time a new drive or any storage device is connected to a Windows 10 computer, the operating system tends to allot a drive letter to it automatically. Not only that, as the OS also maps the location of the drive which helps it point the letter to the exact port location of the drive and serve requests from the user. As a result, it builds up a bit of cache as per the pattern in which the user uses the storage of the computer. This whole process is known as “Auto Mounting” which works for hard disks or optical drive readers that are connected using the SATA ports and even for USB drives that are connected using the USB ports. There are several ways you can enable or disable the Auto-Mount feature in Windows 10. You can do it using the MountVol tool or the Registry Editor or the Diskpart utility. Before you proceed, it is recommended that you create a System Restore point first so that you can always undo the changes you made in case anything goes wrong.

Option 1 – Enable or disable Auto Mounting via MountVol tool

In this option, you will be using the mountvol command in the Command Prompt. Refer to the steps below.
  • Tap the Wins key once and type in “command prompt” in the field.
  • From the search results, right-click on Command Prompt and select the “Run as administrator” option to run it with admin privileges.
  • Next, type the following command and tap Enter to enable the Auto Mount feature:
mountvol /E
  • On the other hand, if you want to disable the Auto Mount feature, type the following command instead:
mountvol /N
  • After that, type the command below to remove all the previously assigned drive letters:
mountvol /R
  • Finally, restart your computer.

Option 2 – Enable or disable Auto Mounting via Registry Editor

  • Tap the Win + R keys to open the Run dialog box.
  • Then type “Regedit” in the field and tap Enter to open the Registry Editor.
  • After that, navigate to this registry key: ComputerHKEY_LOCAL_MACHINESYSTEMCurrentControlSetServicesmountmgr
  • Next, look for a DWORD named “NoAutoMount”. If you can’t find a DWORD with that name then simply create a new DWORD with the same name and make sure that the base is selected to Hexadecimal.
  • Now double click on that DWORD and change its value to 0 if you want to enable it, otherwise, input 1 as its value to disable it.
  • Restart your computer.

Option 3 – Enable or disable Auto Mounting via Diskpart utility

  • Tap the Wins key once and type in “command prompt” in the field.
  • From the search results, right-click on Command Prompt and select the “Run as administrator” option to run it with admin privileges.
  • After opening Command Prompt as admin, type the following command and hit Enter to launch the Diskpart utility:
diskpart
  • After that, a User Account Control prompt will appear. Just click on the Yes button.
  • Next, type the following command and hit Enter:
automount
  • Following the command you entered, you will an output that either says, “Automatic mounting of new volumes enabled” or “Automatic mounting of new volumes disabled” which means you can use it to check the status of Auto Mount.
  • Now if you want to enable the Auto Mount feature, type the following command and tap Enter:
automount enable
  • And if you want to disable the Auto Mount feature, just enter the following command:
automount disable
  • To remove all the assigned letter and history of drives that were connected previously, type the following command:
automount scrub
  • Finally, restart your computer.
Read More
How to Fix the Sysfader iexplore.exe Application Error

The Sysfader iexplore.exe Application Error - What is it?

To understand Sysfader iexplore.exe application error, first, it is important to learn what is Sysfade.exe file. Sysfader.exe is basically an IE (Internet Explorer) application file that provides cool animation effects. These animation effects include fading menus in and out, animated windows and etc. It is responsible for the graphical enhancements for animated pages. The Sysfader iexplore.exe application error occurs when this file fails to execute properly and open animated websites on Internet Explorer. The error code is displayed in the following format:

“SysFader: iexplore.exe – Application Error The instruction at “0×00000000″ referenced memory at “0×00000000″. The memory could not be “read”.”

Solution

Restoro box imageError Causes

The Sysfader iexplorer.exe application error may be triggered due to many causes. These include:
  • Sysfader.exe file corrupted by malware and spyware
  • Recently upgraded Internet Explorer which resulted in the Sysfader iexplorer.exe application error due to incompatibility issues with the system program.
  • Issues with IE configuration
  • Damaged registry files
  • Damaged DLL files
  • Obsolete and bad registry entries
Due to Sysfader iexplorer.exe application error, your Internet Explorer browser may crash. Furthermore if the error is not fixed timely, it may result in even more severe PC problems like system slowdown, system crash and failure. This happens especially when Sysfader iexplorer.exe application error is related to the registry. The registry saves all the activities performed on the computer. This also includes junk files, invalid registry entries, bad registry keys, cookies, temporary internet files, and files of the programs uninstalled. If the registry is not cleaned frequently, these obsolete files overload the RAM causing great deal of damage to the registry. When you try to upgrade your browser, the installation fails and results in browser incompatibility issues because of the previous files of the uninstalled program saved in the registry. Furthermore, the error code may also pop up due to the Sysfader.exe file corrupted by malicious software like spyware and adware on your system if you don’t run an antivirus on your system regularly.

Further Information and Manual Repair

To prevent IE web browser and your PC from coming crashing, here are some solutions that you can try to resolve the Sysfader iexplorer.exe application error:
  1. Repair and restore the registry by changing the configuration settings in the Registry Editor Window. This is accessible by typing ‘Regedit’ in the Run window. However, to edit the configuration settings manually and restore the registry, you should be technically sound. If not then making the changes would be slightly complex and time-consuming for you.
  2. However, another alternative to this is to download Restoro. Restoro is a powerful, advanced, and highly functional PC repair tool that includes multiple utilities such as a registry cleaner and a system optimizer. The registry cleaning feature scans your entire PC for registry issues triggering error codes like Sysfader iexplorer.exe.It wipes out all the unnecessary and obsolete files and fixes the damaged dll files thus simultaneously restoring the registry. The antivirus utility scans for and removes viruses and spyware from your PC which as we explained earlier could be the reason for Sysfader error code.
With Restoro, it takes only a few seconds to resolve this error and repair the registry. If you have system slowdown issues, it takes care of that too. It has simple navigations and a user-friendly interface which makes it very easy to operate even if you are not technically sound. It is safe, efficient, and compatible on all Windows versions including Vista, XP, Windows 7, 8, 8.1, and 10. Click here to download Restoro and resolve Sysfader iexplorer.exe application error on your PC today!
Read More
Access Denied, You don’t have permission
When you try to open a website but instead encounter an “Access Denied, You don’t have permission to access on this server” error message along with the ULR which you aren’t able to access with a reference number, then it is most likely caused by some network-related issue in your browser. Note that this error mostly occurs on Firefox browsers. The “Access Denied” error appears when your Mozilla Firefox browser uses a different proxy setting or VPN instead of what’s really set on your Windows 10 PC. Thus, when a website detected that there is something wrong with your browser cookies or your network, it blocks you which is why you can’t open it. To resolve this error, here are some suggestions you can try. And if you got the same error message on a different browser, you can still follow the possible solutions given below.

Option 1 – Try clearing everything about the website

  • Open your browser and tap the Ctrl + H keys on your keyboard.
  • After that, look for the listing of the website from your browser history and right-click on it.
  • Then select the “Forget about this site” option. This will get rid of all the data such as browsing history, cache, cookies, and passwords. Thus, if you have a password saved or other important data of the website, you have to save it first before you tap the Ctrl + H keys.

Option 2 – Try disabling the VPN

As pointed out earlier, if you are using VPN, this could be the reason why you’re getting the “Access Denied” error so the most obvious thing to do is for you to turn off the VPN and try to run the Windows Update once more. And if you use a VPN software that works using their software, you can just completely exit or log-off from its account. On the other hand, if you are using a built-in Windows 10 VPN, you can simply turn it off or delete all the settings you have created there.

Option 3 – Uninstall the VPN service you are using or use a different provider

If you disabling the VPN service worked in fixing the “Access Denied” error, you might want to uninstall it. As mentioned, website administrator blocks IP ranges if they notice any malicious activities and because of this, your IP address might fall into the banned range even if you didn’t do anything at all. To uninstall the VPN service, follow the steps below.
  • Tap the Win + R keys to open the Run dialog box
  • Then type “appwiz.cpl” in the field and hit Enter to open the Programs and Features in Control Panel.
  • From there, look for the VPN service you are using, select it and then click on Uninstall to remove it.
  • After that, restart your computer and try to install the latest version of the program again. It should work now. If not, proceed to the next available option below.

Option 4 – Try disabling the proxy server for your LAN

If your PC was just attacked by some adware or malware as of late, it is possible that it has changed the network settings in the system and might display spam advertisements. Thus, you have to disable the proxy server for your LAN. To do that, refer to these steps:
  • Tap the Win + R keys to open the Run dialog box.
  • Then type “inetcpl.cpl” in the field and hit Enter to pull up the Internet Properties.
  • After that, go to the Connections tab and select the LAN settings.
  • From there. Uncheck the “Use a Proxy Server” option for your LAN and then make sure that the “Automatically detect settings” option is checked.
  • Now click the OK and the Apply buttons.
  • Restart your PC.
Note: If you are using a third-party proxy service, you have to disable it.
Read More
How to Fix Error Code 0xc1900106 on Windows 10

Error Code 0xc1900106  – What is it?

One of the most common errors encountered by Microsoft users upgrading from Windows 7 or Windows 8/8.1 to Windows 10 is the Error Code 0xc1900106. Microsoft users experience a failure in the installation process. Either they will be notified that the installation process was ended but failed or that Windows is not able to install the update.

Solution

Restoro box imageError Causes

More and more Windows users are having trouble upgrading their operating system to Windows 10. There are a lot of errors being encountered by users and one of them is the Error Code 0xc1900106. This error is normally due to the misconfigured system files. If a Windows user encounters this error, most likely their device has some registry problems.

Further Information and Manual Repair

Fixing error code-related issues could be best resolved to do manual repair methods. Applying repair methods manually can help Windows users address the root causes of the errors they encounter, as well as apply definite solutions to rectify the issue.

Most Windows users can be able to implement manual repair methods themselves but there are some cases where help from a Windows professional is needed. If you’re not a very tech-savvy person and not confident performing the manual repair methods yourself, it would be advisable to seek help from a professional Windows technician who is knowledgeable enough to address the errors or problems you are encountering. However, if you don’t want to resort to seeking help from a professional, you can also consider using a powerful automated tool.

In trying to fix Error Code 0xc1900106, here are the following manual repair methods you can take:

Method One: Custom Installation

  1. Make a backup of your personal files
  2. Users of Windows 8/8.1 should Refresh first then proceed to upgrade.
  3. If the Refresh process does not work, reset your device then try again.
  4. If resetting your device still does not work, you can proceed with a custom installation.
  5. When your Windows installation media is ready, you need to choose to boot from CD, DVD, or USB drive to begin setup. (For example purposes, this article will discuss booting from DVD).
  6. When your device is all set to boot from DVD, you will be prompted to Press any key to boot from CD or DVD…
  7. Once you’ve pressed any key, the screen will show the Windows logo which might take a while. No need to worry though, as long as you can see the indicator, you’re good.
  8. Choose your Language, Time, and Keyboard method from the drop-down menu then hit Next.
  9. Click on the Install Now button then wait until Setup begins.
  10. Tick on the I accept the license terms check box then select Next.
  11. Choose Custom: Install Windows only (advanced)
  12. Choose the Primary partition then select Next. You will be prompted by the following warning: The partition you selected might contain files from a previous Windows Installation. If it does, these files and folders will be moved to a folder named Windows.old. You will be able to access the information in Windows.old, but you will be able to use your previous version of Windows. Just click the OK button then wait as the Windows continue to install. Windows will restart once this phase of the setup completes and will reboot into setup once again.
  13. At this point, Windows will detect and install your hardware. Once this finishes, Windows will restart again.

Method Two: Reset Windows Update Components

  1. From your device’s desktop, hit Windows key + X to open the command prompt as admin.
  2. Once the command prompt window appears, you can type or copy and paste the following commands (all at once):

net stop wuauserv net stop cryptSvc net stop bits net stop msiserver ren C:WindowsSoftwareDistribution SoftwareDistribution.old ren C:WindowsSystem32catroot2 catroot2.old net start wuauserv net start cryptSvc net start bits net start msiserver pause

  1. Exit the command prompt.
  2. After you reset the Windows Update components, see if you receive Windows Updates which includes the firmware updates for your computer.

Method Three: Ensure Windows is Updated

  1. If you have an antivirus, make sure to disable it during the upgrade process.
  2. Run Windows Update to check if the system is updated.
  3. Ensure that the latest firmware and drivers are installed. To be able to do this, go to the computer manufacturer’s website or you can also try contacting company support.
Read More
How to Fix Remote Computer requires network level authentication Error in Windows 10
A couple of Windows 10 users have reported an error on domain-connected systems when they tried accessing their computer systems remotely. This occurs when the network level authentication or NLA is enabled on the computer. If you are one of these users, you better keep reading as this post will guide you on how you can fix this error. To resolve this issue, there are several workarounds you can try. You can either disable this option directly via properties or you can also modify some registry entries or sub-keys and restart the system. When you encounter this problem, an error message pops up that states:
“The remote computer that you are trying to connect to requires network level authentication (NLA), but your windows domain controller cannot be contacted to perform NLA. If you are an administrator on the remote computer, you can disable NLA by using the options on the Remote tab of the System Properties dialog box.”
Or you could also see this error message instead:
“The remote computer requires Network Level Authentication, which your computer does not support. For assistance, contact your system administrator or technical support.”
Before you proceed in troubleshooting the problem using the options provided below, you need to create a backup for your data or system restore point as well as make a copy of any registry entries you are going to modify.

Option 1 – Disable Network Level Authentication via Properties

The NLA is a useful tool that provides your computer with extra security and helps network administrators in controlling who can log into the system with just a click of a single box. However, there are times when it can become a disadvantage and could prevent you from accessing your system remotely. Thus, you need to disable it using Properties.
  • Tap the Win + R keys to open the Run dialog box.
  • After that, type in “sysdm.cpl” and tap Enter to open System Properties.
  • Next, go to the remote tab and uncheck the checkbox for the “Allow connections only from computers running Remote Desktop with Network Level Authentication (recommended)” option.
  • Now click the Apply button to save the changes made and exit System Properties and then try logging into the remote computer again and see if the problem is fixed or not.

Option 2 – Disable NLA via Registry Editor

Note that you can only use this option if the first one didn’t work for you. Take note that this option will require you to restart your PC completely which could mean some downtime if your computer is running a production server. So make sure to save all your work.
  • Tap the Win + R keys to open the Run dialog box and then type in “Regedit” in the field and tap Enter to open the Registry Editor.
  • From there, click on File > Connect Network Registry and input the details of the remote computer and then try to connect.
  • Navigate to the path below after you’re connected:
HKLM >SYSTEM > CurrentControlSet > Control >Terminal Server > WinStations > RDP-Tcp
  • After that, change the values given below to “0”
    • SecurityLayer
    • UserAuthentication
  • The navigate to PowerShell and execute this command – restart-computer

Option 3 – Disable NLA via PowerShell

PowerShell allows you to tap into the remote computer and once you’ve targeted the machine, you can execute the commands given below to disable NLA.
  • Tap the Win + S to open Search and then type in “PowerShell” in the field. Right-click on the related result and select the “Run as administrator” option.
  • After opening PowerShell, execute the command below:
  1. Once in the PowerShell, execute the following command:
$TargetMachine = “Target-Machine-Name” (Get-WmiObject -class “Win32_TSGeneralSetting” -Namespace rootcimv2terminalservices -ComputerName $TargetMachine -Filter “TerminalName=’RDP-tcp'”).SetUserAuthenticationRequired(0) Note: In the command given, the “Target-Machine-Name” is the name of the machine you are targeting.

Option 4 – Use the Group Policy Editor to disable NLA

Another option you can use to disable NLA is via the Group Policy Editor. This is ideal for you if you are blanket disabling. Just take note that the Group Policy Editor is a powerful tool and that if you make some mistakes by changing values you have no clue about, you can render your computer useless so make sure that you create a backup for all the values before you proceed.
  • Tap the Win + R keys to open the Run dialog box.
  • Then type in “gpedit.msc” and tap Enter to open the Group Policy Editor.
  • From there, go to this path – Computer Configuration > Administrative Templates > Windows Components > Remote Desktop Services > Remote Desktop Session Host > Security
  • After that, search for “Require user authentication for remote connections by using Network Level Authentication” and set it to disabled.
  • Now check if the error is fixed or not.
Read More
Install Remote Server Administration Tools
RSAT or Remote Server Administration Tools for Windows 10 is a collection of programs for IT experts. It helps in managing Servers from a Windows 10 PC and starting with the Windows 10 v1809 or the October 2018 update, users have to install the Remote Server Administration Tools for Windows 10 as Features on Demand or as Optional Features. The program includes the Microsoft Management Console or MMC snap-ins, Server Manager, consoles, Windows PowerShell cmdlets, and providers as well as command-line tools for managing roles and features that run on the Windows Server. So if you have updated your Windows 10 pc to v1809 or later then the RSAT tool has to be installed as a set of Features on Demand right from Windows 10. You can install RSAT Tools on Windows 10 Enterprise or Windows 10 Professional and once you install it, make sure that you do not install RSAT tools from the Microsoft Download page directly. Step 1: Open Settings and then go to Apps > Apps & Features. Step 2: Next, click on Manage Optional Features. Step 3: After that, click on Add a Feature which will load all the optional features one can install. Step 4: Now scroll to find the listing of all 18 RSAT tools and depending on what you need, click and install them. Step 5: Then go back to where you should see the progress of the installation. Click on the Manage Optional Features page to check the status. Note: If you are well-versed with the command line or automation, you can also install Remote Server Administration Tools for Windows 10 via DISM /add-capability. And when you install anything via Features on Demand, they stay across Windows 10 version upgrades. On the other hand, if you feel that you don’t need a particular RSAT feature, you have the option to uninstall it using the Manage Option Features. However, bear in mind that some tools depend on one another which means that if you uninstall anything that has a dependency, it will only fail that’s why you need to be careful.

To uninstall an RSAT feature, here’s what you have to do:

Step 1: Go to Settings > Apps > Manage Optional Features. Step 2: After that, look for the list of installed feature that appears before this. Step 3: Now select the feature you want to uninstall and go back. If you have some system-related issues that need to get fixed, there is a one-click solution known as [product-name] you could check out to resolve them. This program is a useful and efficient tool that could repair corrupted registries and optimize your PC’s overall performance. Aside from that, it also cleans out your computer for any junk or corrupted files that help you eliminate any unwanted files from your system. This is basically a solution that’s within your grasp with just a click. It’s easy to use as it is user-friendly. For the complete set of instructions in downloading and using it, refer to the steps below.
Read More
1 2 3 171
Logo
Copyright © 2023, ErrorTools. All Rights Reserved
Trademark: Microsoft Windows logos are registered trademarks of Microsoft. Disclaimer: ErrorTools.com is not affiliated with Microsoft, nor claims direct affiliation.
The information on this page is provided for information purposes only.
DMCA.com Protection Status