So you have just got home from that new computer store with your fancy and all-new mouse, screen, keyboard, etc. You plugged in your new component, Windows detected it, installed drivers for it and it is working like a charm. A few months later down the road and the computer starts little by little to slow down.
Plug and play is a great concept, and automatic detection is even greater but how time passes old unused stuff piles in your hard drive and in Windows itself thus slowing down your computer and taxing it more and more as new components and software are added. Old drivers from old components sadly are not removed from Windows itself and over some larger period of time they can pile up and slow down your daily operations on the computer or even cause some problems in it.
This guide will teach you how to manually remove old unused device drivers from your Windows so it is fresh and like new again.
Making old devices visible
In order for us to remove old drivers, the first thing we must do is make them visible in our device manager, old drivers are hidden and will not show up, we must make this happen. We do this by pressing WINDOWS + X keys on your keyboard to bring up a hidden menu in Windows.
Once the menu appears, click on Command Prompt (admin)
Once the command prompt with administrator privileges comes on-screen type in it following string:
SET DEVMGR_SHOW_NONPRESENT_DEVICES=1
This command will force Windows to show all devices in the device manager including old ones that are not used anymore, but since their drivers are still installed, devices will show up.
When you type command press ENTER.
Once again press WINDOWS + X to show the hidden menu but this time choose the device manager
The device manager will open, go to view > snow hidden devices in order to show unused devices.
Removing old device
Open any category and if there is a device that was once used and still has its drivers in the system it will be shown as faded out.
Right-click on the device and click on uninstall device to remove it completely from your system.
Please always be careful when removing devices so you do not remove the device which is being used by mistake and always double-check that you are removing something that you used to have on your system. This method will show all hidden devices even ones that are hidden but crucial to the system working properly.
The Adaptive Brightness setting in Windows 10 is a useful setting you can use in adjusting your computer’s brightness. It helps you get the brightness automatically based on the light around your computer. However, there are times when it does not work or it doesn’t turn off when you want it to. If this issue happened right after you update or install Windows 10, then read on as this post will give you a couple of options you can try to resolve the problem.
Option 1 – Try to run the Power Troubleshooter
The first thing you can do to resolve the issue with Adaptive Brightness is to run the Power Troubleshooter as the problem could occur due to some conflicted power settings. To use it, refer to the following steps:
Open the Windows 10 Settings panel and go to Update & Security and then to Troubleshoot.
After that, scroll down to your left-hand side and click the Power option.
From there, you should see the “Run the troubleshooter” button. Click on it to fix the problem.
Afterward, follow the next on-screen instructions that follow.
Option 2 – Try disabling or turning off the corresponding options in GPU settings
The problem might be due to the Graphics card settings. If you are using either an AMD graphics card or the HD graphics of Intel, you may have to disable the power-related options in the GPU settings. To be specific, you have to disable the Vari-Bright in AMD graphics card settings or the Display Power Saving Technology under Intel’s Graphics panel.
AMD users:
Open the AMD Radeon settings panel.
Then go to Preferences. From there, select Radeon Additional Settings.
Next, go to the Power tab and click the PowerPlay option.
You should find an option called “Enable Vari-Bright” located on your right-hand side. Remove the mark from its checkbox and then save the changes you’ve made.
Intel users:
Open the Intel Graphics and Media Control Panel from your Desktop.
Then select the Basic mode and go to the Power tab.
From there, select “On battery” as Power Source and then you’ll get the Display Power Saving Technology option. It should be set to enabled by default.
Now remove the mark from the checkbox and then save the changes you’ve made.
Option 3 – Try resetting the Power Plan defaults
You might also want to use a command-line tool to resolve the problem. This command-line tool is known as PowerCfg. It is a command utility tool that will scan your computer for 60 seconds to know its power. This tool gives detailed results in the form of an HTML report that will help you in evaluating the real cause of the battery drain issues. You can also use this tool to reset the Power Plan defaults of your computer. To use it, follow the steps below.
Open the Command Prompt as administrator.
Then type in the following command and tap Enter to execute it:
powercfg –restoredefaultschemes
After the command has been executed, restart your computer.
Option 4 – Try updating your Graphics drivers
First, boot your computer into Safe Mode.
After that, tap the Win + R keys to launch Run.
Type in devmgmt.msc into the box and tap Enter or click OK to open the Device Manager.
After that, a list of device drivers will be displayed. From there, look for the Display Adapters and click on them.
After that, right-click on each entry under the Display Adapters and select the “Uninstall Device” option from the menu.
Now restart your computer.
After restarting your computer, go to the Settings app and Check for Updates in the Windows Update section.
Note: You also have the option to go directly to the website of your graphics card manufacturers like NVIDIA, Intel, or AMD and go to the section called Drivers then check if there’s a new available update – if there is, download and install it.
Option 5 – Try disabling adaptive brightness via Registry Editor
Since you will be dealing with Registry files in this post, you need to create a System Restore point first. Once you have that covered, proceed to the following steps:
Tap the Win + R keys to open the Run dialog box.
Next, type “regedit” in the field and hit Enter to open the Registry Editor.
After that, navigate to this path: HKEY_LOCAL_MACHINESOFTWAREIntelDisplayigfxcuiprofilesMediaBrighten Movie
Now double click on the “ProcAmpBrightness” and set its value to “0”.
Now go to this path: HKEY_LOCAL_MACHINESOFTWAREIntelDisplayigfxcuiprofilesMediaDarken Movie
From there, double click on “ProcAmpBrightness” and set the value to “0”.
Then close the Registry Editor and restart your PC and then see if the problem’s fixed or not.
There are instances when you have to connect to another Windows 10 PC via remote connection from another Windows 10 PC. However, when you encountered an error saying, “Your password may have expired or the remote pc might not accept blank passwords” while doing so then read on as this post will walk you through how you can fix it.
Here is the full content of the error message:
“Your password may have expired, or the remote PC might not accept blank passwords. Try connecting again. If this keeps happening, ask your admin or tech support for help.”
It is unknown what the exact cause of the error message is as it could involve several factors. Even so, there are still various potential fixes you can try to fix this kind of error. You can try to check if your password has expired or troubleshoot any issues with the network. You could also use a remote desktop application or configure the settings of firewall or restart the remote desktop service. For more details, refer to each one of the given options below. But before you proceed, make sure that you have someone to help assist you on the other side to help you troubleshoot the issue.
Option 1 – Try to check if the password has expired
The first thing you can do to fix the problem is to check if the password has expired as it could be the reason why you’re experiencing this problem. You have to make sure that you are using a user account that is on the remote computer and then check if the user account password has not expired yet. And if your PC is not within your access, then you can just ask someone to verify the password for you.
Option 2 – Try to troubleshoot network issues
To troubleshoot network-related issues that might be the one that triggers the error, you need to run the Network Troubleshooter. To get started, refer to these steps:
Open the Search bar on your computer and type in “troubleshoot” to open the Troubleshoot settings.
Next, scroll down and select the “Network Adapter” option from the right pane.
Then click on the Run Troubleshooter” button.
After that, your computer will check for any possible errors and will pinpoint the root cause of the problem if possible.
Restart your computer.
Option 3 – Try to use a remote desktop software
A number of users reported that the issue occurred when they used the universal app for Remote Desktop and they were able to fix it by switching to the Remote Desktop application. Thus, you can try to switch to the remote desktop software and see if it fixes the problem or not.
Option 4 – Try to configure Firewall settings
You might also want to configure the settings of the Firewall as it could also help in fixing the problem. It is possible that the firewall is blocking the incoming connection on the remote computer. To check if whether the firewall is the culprit or not, follow the steps below.
Go to Windows Security and then go to Firewall and network application.
Next, click on the Advanced Settings link. This will open the classic Windows Defender Firewall and Advanced Security application.
From there, look for the rule named “Remote Desktop – User Mode (TCP-In)” under inbound rules and check if it has been disabled or not.
If the rule is disabled, you have to enable it.
Once done, check if the error is now fixed or not.
Option 5 – Try to restart the Remote Desktop service
If none of the four given options given above worked, you might want to restart the Remote Desktop service as it can help you in fixing the problem. To do so, follow these steps:
Tap the Win + R keys to open the Run dialog box and type “services.msc” in the field and hit Enter to open the Windows Services Manager.
Next, from the list of services, look for the Remote Desktop Service and right-click on it, and then click on the Restart option.
Once done, check it was able to fix the “Your password may have expired or the remote pc might not accept blank passwords” error or not.
Each time you open an application inside your Windows 11 operating system, it is opened with standard privileges. Now, please note that your account privileges and application privileges are two different things, you might be the administrator of the system but when you open the app, it still opens with standard privilege.
Most of the time running applications with typical settings is fine but from time to time we might have some applications that will require running with administrator privilege in order to work properly. In this case, it is very easy to do it, you just right-click and choose run as administrator.
Although a very easy solution, it can be quite annoying if running the app is on a daily basis or even more times per day. If this is the case then right-clicking and choosing to run as administrator can be a daunting task, sometimes you can even forget to run it like this in heat of work and some unforeseen consequences might occur.
Luckily there is an easy hack so you can open the chosen application each time as an administrator with a simple double click each time.
Setting application to run as administrator always
Locate application executable file
Right-click on in and choose properties
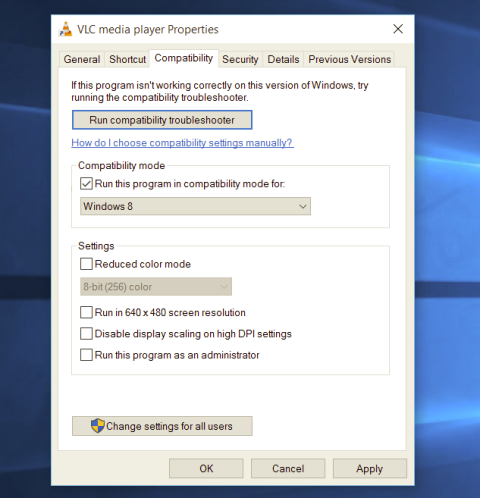
Click on the Compatibility tab
Check the box next to Run this Program as an Administrator
Click on Apply
Click on OK
From now on each time you open an application normally with a double click, it will be opened as administrator privileges.
In today's modern world many households have internet access, most of the connection nowadays is done via Wi-Fi or wireless but there is a high probability that you have also a few devices connected via cable. There are of course many disadvantages and advantages between cable connection and wireless connection.
The main advantages of a hard cable connection are of course faster speed and stability compared to Wi-Fi. But if we look into the cables themselves there is also a big difference between them. Not all cables are the same and quality as well as speed vary a lot between them. Choosing the right cable is essential in order to make a maximum of your internet and we have some great tips and explanations of what cables do so you can make the right choice and enjoy your full internet potential.
Not all cables are the same
Cheap cables and expensive ones are not the same no matter what everyone tells you. The old proverb you get what you pay is true and more expensive cables will be made from better materials and will have a higher transfer rate.
Quality network cables are separated into different categories with proper markings and when buying one you should always look for these markings on the cables themselves, do not buy cables that do not have markings since they will often provide lower transfer rates or will not be shielded from outside influences resulting in packet drops and instability in a network.
Categories and what they mean are:
Cat-5 with a maximum speed of 100Mbps, typically unshielded.
Cat-5e with a maximum speed of 1Gbps, available in both shielded and unshielded varieties.
Cat-6 with a maximum speed of 10Gbps for runs under 55 meters (around 180ft), available in both shielded and unshielded varieties.
Cat-6a with a maximum speed of 10Gbps, shielded.
Cat-7 uses a proprietary GG45 connector rather than the standard RJ-45 connector seen on other cables for speeds of 10Gbps, shielded.
Cat-8 with a maximum speed of 25Gbps (Cat-8.1) or 40Gbps (Cat-8.2) at a distance of around 30 meters (around 100ft), shielded.
Unless stated, these standards are typically rated at their quoted speeds for a run of around 100 meters (around 330 ft) and use a standard RJ-45 Ethernet connector. Each generation of cable is designed to be compatible with the generations that came before it, so it’s possible (for example) to use a Cat-6a cable with a router that only supports speeds of 1Gbps.
Shielded cables
When purchasing higher quality cable you might not be able to choose if you have shielding or not since some standards like Cat-6a, Cat-7, and Cat-8 are always shielded. But if you do not have the need for these and you are satisfied with Cat-5e for example you can choose.
Shielded cables are a little more expensive but they will provide you with a coating that will eliminate interference from outside waves making cables more reliable. Of course, if the cable will go through a room that does not have many radio waves or some other interferences then buying a shielded cable is a waste of money.
Cable platings
Usually, there are two types of connector platings on connectors, silver, and gold, and people usually think that gold is much better but there are major differences between silver and gold platings and truth to be told there is no better one, both are different and should be considered depending on your need.
Silver plating will provide you with faster speed since its conductivity is larger than gold, but gold is slower on the oxidation front so its life span is longer. On the other hand, if your cables are always connecting and disconnecting gold will be first to be scrubbed off from the surface since the gold coating is much thinner.
Overall if you would only connect cable once and have slower internet than cable capacity gold is the way to go, in another case if you would use the cable as always connecting and switching and your internet plan is the same as cable transfer capacity you might want to go with silver one.
Cable material quality
Network cables are made from copper, your standard conduction material but even here there are differences in quality and therefore the chance of pocket losses over it. More quality less loss and more stable connection and this will depend on the purity of copper that is used in the cable itself. More purity in copper, more stability, simple as that.
Conclusion
So as you can see, there are a lot of different things that will influence your pick of proper network cable but the overall best advice is to get one that will fit well into your needs and setup. pair it up with your router and your internet plan since just simply buying something that you can not use is really a waste of money.
Error code 1309 is an error code that occurs when installing either Microsoft Office 2003 or Microsoft Office Project 2003.
This error code may hamper your ability to run and use applications associated with Microsoft Office. To ensure installation is successful, it is first advisable to fix this error code. Error 1309 is displayed in any one of the two formats illustrated below.
When installing Microsoft Office Project 2003, the error message may pop up as:
Error 1309. Error reading from file: pathfilename.cab. Verify that the file exists and that you can access it.
When installing Microsoft Office 2003, the error message may appear in the following format:
Fatal Error During Installation
Solution
Error Causes
Error code 1309 message may appear during Microsoft Office installation due to several reasons. These include:
Problems in the Oclncore.opc file. Project 2003 uses this version of the file for program installation.
Lack of adequate use permission
The requested file was not found
Setup registry entries are modified in an unacceptable manner
To avoid inconvenience and access Microsoft Office 2003 or Microsoft Office Project 2003, it is recommended to fix the error immediately.
Further Information and Manual Repair
To resolve this error you don’t need to be a technical whiz. Here are some of the best, easiest, and proven do-it-yourself methods to resolve error 1309 on your computer screen instantly.
Method 1 - Change CacheLevel Settings
If the problem is related to Oclncore.opc file then try changing CacheLevel settings.
Follow these steps to work around this method.
First, locate the PRJPRO*.XML file in the FILESSETUP folder of the Project 2003 installation source and then open this file in the Notepad.
Also, make sure that you do not open the file as read-only and make sure that a checkmark is not displayed next to Word Wrap on the Format menu.
The next step is to search the file for the following text string: OCLNCORE.OPC_1033.
Now on the line where this string is located, change the CacheLevel=’1’ setting to the following CacheLevel=’3’ save the file back to the original location, and then quit Notepad.
After the changes are activated, try installing the software again on your system. If it installs successfully, then this means error 1309 is resolved. If the error still persists then try other given methods.
Method 2 - Configure security settings to get full permission
When the cause of error 1309 on your PC is related to lack of adequate permission issues, then configure security settings to resolve.
To do this, simply locate the folder on your installation drive.
Then right-click the folder and click Properties. On the Security tab, click edit and now make sure your user name is added to the list.
Grant required security permissions and then click OK to save changes.
After this, try installing Microsoft Office 2003 again on your system.
Method 3 - Copy the requested file from another source
If the error 1309 pops up because the requested file was not found, then try this method. Simply copy the file specified in the error to the destination directory.
For example, if the error shows data1.cab was not found, then copy this file from another source and paste it into the directory specified in the error description.
Method 4- Remove bad registry entries
Bad registry entries are responsible for registry setup modification. If this is the reason for error code 1309, then download Restoro.
This is a user-friendly PC Repair Tool embedded with a powerful registry cleaner. It scans and removes all bad and invalid entries accumulated in the registry. It cleans and repairs the registry resuming it back to its normal function.
Click here to download Restoro and repair error 1309 today.
0x00000050 is a type of stop error code. It is also known as a Blue Screen of Death error. It usually occurs when you try to start your PC or load a program. It can also occur while running a program.
This error may also pop up when you restart your PC after installing Windows XP Service Pack (SP1) on your computer. Unlike some PC related errors, 0x00000050 error code occurs without any warning.
The stop 0x00000050 error is displayed in a blue screen and interrupts you from carrying your desired activities on your PC smoothly. This error message is prompted in the following format:
Stop 0x00000050 error code may pop up on your Windows computer screen due to multiple causes. The most common causes for this error code include:
Poor PC maintenance
Registry issues- Bad registry keys, invalid entries, corrupt and damaged registry
Incompatible DLL files
Corruption of system files- Pool corruption in the Srvnet.sys file
Spyware and viruses
Overheating of PC components
The conflict between Windows XP SP1 and the display adapter drivers that are currently installed on your PC.
It is advisable to resolve 0x00000050 error code on your PC right away. BSOD errors are fatal errors and can pose serious threats to your PC. If not fixed timely it can lead to system crash, failure and valuable data loss.
Further Information and Manual Repair
To prevent data loss and system failure, there are some effective methods to resolve Stop 0x00000050 error code on your PC. To implement these solutions on your PC, you don’t need to be a technical whiz or a computer programmer.
Method One
If the error cause is the conflict between Windows XP SP1 and the display adapter drivers then here’s what you need to do to resolve it:
First start Windows in safe mode. To do this, restart your computer and press F8. On the Windows Advanced Options Menu, use the arrow keys to select Safe Mode.
Once you select it press enter. Now use the arrow keys to select the operating system, press enter to start your computer in safe mode.
Go to Start, click Run and then type ’msinfo32’ in the open box and press OK to continue. Then under the System Summary option, expand Components and then click Display to note the information that corresponds to the INF File Item. And then simply quit the utility.
After that, go to the start menu again and then the My Computer and Properties option.
Press the Hardware Tab and then click the Device Manager tab. Go to the ‘Display Adapters’ option and press the option ‘Uninstall. To confirm action press OK.
Once again, go to the start menu and run and then type the following commands as illustrated below and after each command press enter.
ren %systemroot%infINF file name from Step 5.inf *inf.old
ren %systemroot%infINF file name from Step 5.pnf *pnf.old
This procedure may look pretty lengthy but it is worth it. Once you insert the commands, close all open windows and then reboot your system. Now download the latest drivers for your display adapter and install them. This will hopefully resolve the 0x00000050 error code on your system.
Method Two
Sometimes 0x00000050 BSOD error may occur due to temporary issues like overheating PC components. In times like these, all you need to do to fix the issue is to switch off your computer and allow the components to cool down. Try starting your PC after a few hours.
Method Three
If the issue is triggered by malware, then it is advisable to download a powerful antivirus. Scan your entire PC to detect and remove viruses affecting your PC and generating BSOD errors on your system.
Method Four
However, if the error still persists after trying all the methods stated above, then this means the cause of the error is deep-rooted. It is related to the Windows registry. Registry stores all your system files and activities performed on your PC. It usually gets damaged and corrupt if it is not cleaned frequently.
The registry loads with unnecessary and obsolete files like junk files, cookies, internet history, bad registry keys and invalid entries. These files if not removed, accumulate and damage the registry, DLL files, and system files too thereby generate BSoD errors like 0x00000050 error messages.
You can clean and repair the registry manually but it requires a great deal of expertise.
The ideal and easiest way to clean it is to download Restoro. This is highly functional and easy-to-use software. It is embedded with multiple powerful utilities including such as a registry cleaner, an antivirus and a system optimizer.
The registry cleaning feature scans for all errors related to the registry. It removes obsolete files, invalid entries, restores damaged DLL and system files.
The antivirus feature simultaneously detects and removes all kinds of malware. These include viruses, Trojans, spyware, and adware affecting your PC. While the system optimizer feature ensures that your PC functions at its optimum speed.
It is a safe and powerful PC Fixer. It has a user-friendly interface and compatible with all Windows versions.
Click here to download Restoro and Fix Error 0x00000050
In case you didn’t know, the new Windows 10 v1903 has brought tons of new features around Windows 10 Updates. One of these features is the ability to automatically adjust the Active Hours based on your computer activity. This feature is really useful as it tells the operating system when to install the Windows Updates.
A lot of users use the Active Hours feature to ensure that the Windows Update won’t force them to restart their PCs to install the update. So if your computer is turned on, it won’t apply the update during the active hours you’ve specified. In addition, the active hours change for many users and they are not that strict. For instance, if you set the active hours between 10 am to 5 pm, Windows Update won’t be forcing you to restart your computer to install the updates at those times.
Note that Windows Update allows enabling an option using where it can monitor the active hours in your computer and change it. To configure this setting, here’s what you have to do:
Frist, go to Settings > Update & security > Windows Update.
Next, take note of your current active hours and click on the “Change active hours” link.
Then toggle the option that says, “Automatically adjust active hours for this device based on activity”. This will change the active hours and if you match it with the previous one, it should be different.
As you can see on the image given above, the earlier active hours were between 8:00 to 17:00 and were changed to 11:00 to 19:00. If you have been using this feature for a while you’ll find how useful and handy it is especially when you’re using your computer and don’t want any notifications like the prompts for Windows Updates to bother you while working.
Hello and welcome to our software series review. Weel this time we could say this is more of a service review since the application we are going through today is online and you can use it freely without ever needing to install it.
When we choose software that we are going to review and recommend we really try to recommend something that is worth your time and money, Cartoonize fits in both categories in my opinion.
First of all basic plan of this graphic software is completely free and as mentioned it is working online, also as one more feature basic plan does not even require you to have an account of any kind, all you need to do is go to the website of the application and you can start using it right away. There is also paid plan for extra features if you need them billed monthly or annually.
Features
First things first, this is not Photoshop or GIMP and it does not aim nor want to be. This is something else, directed and pointed at the different types of users. This application is aimed at people that want to make some quick graphics and post them on social media and it does that very well. Even without knowledge to use graphic software this one is so well designed and straightforward that even a complete newcomer can do something right away.
So as the application that wants to be used by people that want to place some cool pictures or ads on their social media what it offers. For starters simplicity and ease of use, every option that you can use is on the left side of the screen nicely packed into the vertical toolbox. Inside the toolbox, you have access to various tools, effects, and filters that you can apply to your image.
Tools explained
Image manager
The first section on the tool panel is the image manager, here you can upload your images, delete them, search stock images, and so forth. nothing more to say about this one as it is only a basic file manager.
Edit
In this tool panel, there are a lot of basic settings for your image manipulations divided into 3 sections: Basics, Enhance, and Creative. In the basic section, you can crop, resize and rotate your image. Enhance panel will let you set exposure, color, vibrance, tint, and details (sharpen). Finally, the Creative part will let you remove the background with AI in a single click, replace colors in the image, and add a vignette and round image.
Effects
In the effects panel, you will be given 4 options to choose from Cartoonizer, Digital art, Sketcher, and painting. Each option once clicked will open another set of options tied to chosen preset where you will be able to choose a different style from chosen template. Once you click on the desired template it will be applied to your image and in the upright corner, you will have edit options to tweak it to your liking. You can play around as much as you want because only once you click on the apply button, the effect will be applied to your image.
Filters
Same as in the effects tool panel here you will also get a series of different filters that you can apply to your image. As in the previous tool once clicked on the chosen filter, you will be given options for its variations and details edits. How there is really plenty of filters options and combined with its own presets I will not focus on explaining what each one is doing since picture thumbnails are pretty accurate and just one look at them will explain to you everything you need to know.
Overlays
In the overlays panel, you can as the name says overlay different kinds of effects on your image. You can add snow, fog, sun flares rain, and many more. Presets work identically to previous effects and filters.
Masks
If you want to place your image in a certain shape or in-text this is the section for you. You will be presented with sections as custom text, shapes, brushes, floral, animals, and patterns. Each section will once again lead to plenty of variations on the chosen subject where you can pick one that you like the most and tweak its options.
Text
As the name suggests, this section is to add text to your picture or design. If you are making some cool ad for Facebook, Instagram, or other social media I believe that you will spend most of your time in this section adding text and tweaking it so it looks best. You have all the tools that you will need to make a catchy title or smaller block of text and you can add multiple texts to your picture tweaking their own visual appearance, the font used, color, and some effects like a drop shadow.
Draw
In the draw section, you will be able to freely draw whatever you like with your mouse or pen if you have one. you have basic options for a brush and eraser so you can erase stuff. Pretty basic tool but it gives a nice touch to underline something, circle it, etc.
Graphics
This panel will let you place various already made graphic assets into a picture. You have hearts, hats, glasses, etc. There really are tons of premade graphics along with thematic ones like new year, st. Patric day and more.
Frames
As the name suggests this section will place a frame of your choice around your picture. You can choose the style of frame, position, color, and many more. There are various styles and each style has its own options.
Conclusion
Cartoonize is a great online application that will let you quickly and easily do cool and nice image edits. As mentioned you can also add various effects, text, and graphics and use this app to make some quick and nice ads for social media. You have the option to publish to your social media right from the app in the save dialog but you can also of course download your image or design to your local computer.
Please note that for this review we used the pro, paid version so all of the features were unlocked. We wanted to give you a full overview of the full potential of the app. In my opinion, the small monthly fee that they charge is well worth it when you see all things that you can do with it.
Go to the cartoonize website and check it out, basic option is completely free and it does not even require making an account. Have fun, be creative and take care, I hope to see you again tomorrow.
Building your own custom PC system can be one of the greatest things you can do to your budget. Instead of going for a rebuild, we will go into detail about why building your own PC is a much better option. Also, note that if you do not possess enough technical knowledge about a topic there are plenty of stores that will offer you advice on components and after all, you can always get help from a friend.
So without further diversion from the topic, let us explore all the benefits of building a custom computer.
Building a custom PC is cheaper
At the first look, this statement does not feel right since when you look at the prebuilt systems you get a feeling that it is much cheaper than do it yourself variant and although CPU and GPU seem like a great deal I beg you to look under the hood on other components. Usually to lower price compromise would be made on other crucial components like SD or power supply, a PC case, or motherboard so even if you have a good CPU and GPU that will not matter much since other components would not be able to catch up with them. After all, prebuild computers will need to pay people who are building them and there is no way that will be cheaper if you just plain went and bought the same components yourself and install them.
When you are in control in choosing each component there is not only being cheaper online, it is flexibility with building itself. You choose which components you want to be stronger and which to be normal. Also, you can choose the exact model of the given component leaving you more in control and open to future upgrades.
More flexibility
Also, it may sound irrelevant but when building your own custom PC you can also choose which company you would like to purchase for each model, yes considering the CPU it is AMD or Intel but when you are buying a case, SSD, GPU, and other components choosing the right company for your needs is also the thing that should not be overlooked.
You can customize it the way you want
Not really a quality argument but with a custom PC build, you can choose would you like that RGB component or not, you choose do you like white or black fans, and many more things. You really can place a personal stamp on the computer making it indeed a personal computer.
You choose OS and applications
When you buy an already prebuilt PC, usually it comes with some sort of OS on it, sometimes it is freedos, Linux and sometimes it is Windows Home. When you get your hands dirty you can place whichever system you want on it and install applications that you use and know and some preinstalled typical apps.
Many Windows 10 users use a Bluetooth headset as these kinds of Audio devices, as you know, lack wires since wires tend to get entangled and break which could get quite inconvenient. This is why using a wireless headphone is more preferable since it’s much simpler, however, using a wireless headphone also means it comes with a charging requirement and if it fails to charge, there is no music or audio or anything that you need a Bluetooth headphone for.
However, wireless headphones are also susceptible to problems as you might encounter some problems when connecting your wireless headphone to your Windows 10 computer. One of these problems include when you try to get sound from the wireless device but nothing happened. This indicates that the Bluetooth headphone is disconnected in some way for some unknown reason even if you’ve already plugged it in. Thus, if you encounter this scenario, then there are several options you need to check out to fix the problem. To start troubleshooting the problem, here are the options you need to use as a reference.
Option 1 – Try turning off the device and turning it back on
The first thing you can do to resolve the problem is to turn off your wireless audio device and wait for a couple of seconds before you turn it back on. In most cases, this should fix the problem. In fact, you can also try to unpair and pair the Bluetooth audio device and see if it fixes the problem or not.
Option 2 – Try to set the headphone as the default device manually
There are times when you plug a headphone, it does not toggle the default audio device. Thus, to fix this issue, you have to set the default audio device to the headphones manually. To do that, follow these steps:
First, right-click on the volume icon located on the system tray.
Next, select the Open sound settings option to open the Sound section in the Windows 10 Settings app.
After that, go to the Output section and select Headphones for the “Choose your output device” option. This should fix the problem for you.
Option 3 – Try running the Bluetooth Troubleshooter
As you know, Windows 10 has various troubleshooters with user-friendly interfaces where you can utilize them to fix issues in your PC. And since you’re dealing with some Bluetooth problem, you have to run the built-in Bluetooth Troubleshooter. To do this, follow these steps:
Open the Windows 10 Settings.
Then go to Update & Security > Troubleshoot.
You should find the option for Bluetooth on your right-hand side – click on it then click on the “Run the troubleshooter” option.
Now follow the next screen options.
Option 4 – Try to update or reinstall the Bluetooth driver
The issue might have something to do with the Bluetooth drivers. It could be that it is outdated and needs to be updated or that you recently updated it and since then you have trouble in removing the Bluetooth devices and so to fix the issue, you can update, roll back or uninstall the Bluetooth drivers. How? Follow the steps below.
Tap the Win + X keys to open the Device Manager.
Next, look for the Bluetooth device and right-click on it.
Select the option “Update driver”.
After that, a new popup window will appear. In there, select the option, “Search automatically for updated driver software”.
Note: Checking the update may take a few minutes so you’ll have to wait until it finishes. If it is able to find an update, you must install it. And if you want to reinstall the Bluetooth driver, just select the “Uninstall driver” option and follow the next on-screen instructions that follow.
 Once the menu appears, click on Command Prompt (admin)
 Once the command prompt with administrator privileges comes on-screen type in it following string:
 This command will force Windows to show all devices in the device manager including old ones that are not used anymore, but since their drivers are still installed, devices will show up.

 Right-click on the device and click on uninstall device to remove it completely from your system.
 Please always be careful when removing devices so you do not remove the device which is being used by mistake and always double-check that you are removing something that you used to have on your system. This method will show all hidden devices even ones that are hidden but crucial to the system working properly.
 Most of the time running applications with typical settings is fine but from time to time we might have some applications that will require running with administrator privilege in order to work properly. In this case, it is very easy to do it, you just right-click and choose run as administrator.
Although a very easy solution, it can be quite annoying if running the app is on a daily basis or even more times per day. If this is the case then right-clicking and choosing to run as administrator can be a daunting task, sometimes you can even forget to run it like this in heat of work and some unforeseen consequences might occur.
Luckily there is an easy hack so you can open the chosen application each time as an administrator with a simple double click each time.
Most of the time running applications with typical settings is fine but from time to time we might have some applications that will require running with administrator privilege in order to work properly. In this case, it is very easy to do it, you just right-click and choose run as administrator.
Although a very easy solution, it can be quite annoying if running the app is on a daily basis or even more times per day. If this is the case then right-clicking and choosing to run as administrator can be a daunting task, sometimes you can even forget to run it like this in heat of work and some unforeseen consequences might occur.
Luckily there is an easy hack so you can open the chosen application each time as an administrator with a simple double click each time.