Some users installing or upgrading to Windows 10 experienced the theKMODE_EXCEPTION_NOT_HANDLED Blue Screen of Death (or commonly known as BSOD) error. This error can be due to different types of things, ranging from software to driver issues. When you experience this BSOD error while trying to install Windows 10, it will prompt you to restart your computer every single time you experience it. In most cases, you will also not be able to proceed with the Windows 10 set-up.
 Error Causes
The “KMODE_EXCEPTION_NOT_HANDLED” error is normally caused by:
You won’t be able to successfully upgrade or set up Windows 10 if you continue to encounter this BSOD error. Note that this error will always prompt your computer to restart every time it happens, preventing you from completing the Windows 10 set-up.
If you’re not tech-savvy or not capable of debugging this issue, it’s highly advisable to proceed with the basic troubleshooting techniques available in this link.
After troubleshooting, below you’ll find a few solutions to rectify the issue.
Two common causes of the KMODE_EXCEPTION_NOT_HANDLED issue are hardware incompatibility and faulty device driver or system service.
If you experience this error, check first if any of your newly installed hardware is compatible with Windows 10. You can find the required hardware for Windows 10 from this link.
If all your hardware is compatible with Windows 10, you might need to check the device driver or system service. Review the bug check message. If any of the drivers you have is listed in the message, either disable or uninstall them before upgrading or setting up Windows 10.
You might also find it useful to check the System Log available in the Event Viewer for other error messages that can help you figure out the driver or device that’s causing the error. Running hardware diagnostics can also be useful.
If you’re upgrading Windows 10 from Windows 7 or Windows 8.1, you might need to disable or uninstall the software first.
First, try uninstalling your Antivirus utility before starting the upgrade. Restart a few times before starting the Windows 10 installation.
If you’re upgrading using the Windows 10 update, make sure that you disconnect from your Wi-Fi or Internet LAN (Ethernet) connection as soon as the download reaches 100% before attempting to start the set-up.
Other users also reported that the cause of the KMODE_EXCEPTION_NOT_HANDLED issue is BitDefender. If this is what happened in your case, it will show in the error message such as KMODE_EXCEPTION_NOT_HANDLED (bdselfpr.sys). Users reported that a common solution for this is renaming the file. In the case of BitDefender, try renaming it to bdselfpr.s__. However, make sure to do this cautiously. Sometimes, renaming a file will even do more damage than good.
If you’re connected to any general USB devices (such a smart card reader), disable it. If your computer is connected to other external devices, disconnect all of them. Examples of this include gaming controllers, printers, external hard disk, USB keys, and other non-essential devices).
Other troubleshooting steps include:
If you still experience the error after doing the methods above, you might want to try a powerful and trusted automated tool to fix the job.

“A USB device has malfunctioned and exceeded the power limits of its hub port. You should disconnect the device”.To easily fix the problem, you can try to disconnect the device and click on Reset and if you click on Close, the port will not work until you unplug it and then restart your computer. On the other hand, if disconnecting the device did not resolve the problem, you can try running the Hardware & USB troubleshooter or use a USB hub. You can also try to reinstall, uninstall or roll back the USB drivers or run the OEM diagnostics. For more information, refer to each one of the potential fixes provided below.
 The list contains some nice essential and good things but we gave our best not to break the bank so you will not find any large screens or 300$ keyboards here. Of course, you can always get expensive gifts and if you have money for it do it, it is just we want to have affordable stuff here.
Hello all the wonderful people and welcome to our new article where we take a little different turn than usual and discuss why keeping old electronics around the house is not such a good idea. We all have some drawer or in some bag around the house and in the end of the day if that electronic has battery inside it is probably not the smart thing to keep it.
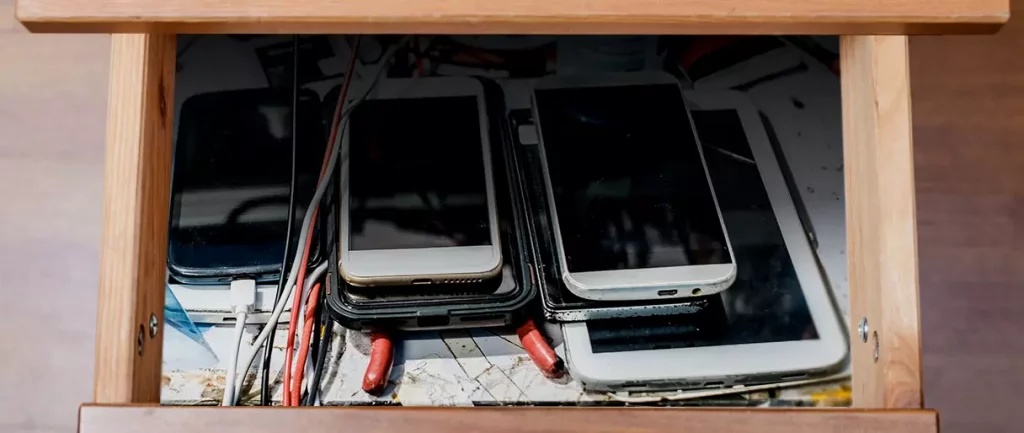
So naturally, the question comes why it is a bad idea to have old electronics with batteries in them? Well unlike a battery failure with, say, some AA batteries jammed in the back of an old toy, the risk with a lithium-ion battery failing isn’t just some leaking and corrosion in the battery compartment, it’s a potential fire as the battery swells up and the gases (combined with the stored energy) turn the battery into a potential fire hazard.
Good thing is that the battery will not explode just like that, it will swallow over time and get bigger and bigger until the breaking point is reached and all the fire breaks lose. So if by any chance you have some old gadgets lying around you can check up on them and see if has swelling process started, if yes, dispose properly of that piece of the old device immediately.
If you’re not ready to get rid of the gadget then it’s best to charge it properly for storage. Proper charging keeps the battery cells and circuits in optimum health.
While recommendations vary by manufacturer and application, the general consensus is that lithium-ion batteries should be charged to approximately 40%. (Some manufacturers recommend charging 50% or 60% instead.)
Really, the important part here isn’t the exact percentage. What’s important is ensuring that the battery is charged to roughly half capacity and not stored with a completely discharged or completely full battery.
Discharge rates on lithium-ion batteries in completely powered-off devices are very slow, but you should still plan to top off the charge every 12-18 months or so to keep it around 50%.
If you wanted to go above and beyond, a metal storage container with a snug lid on a basement shelf with a desiccant pack inside to control the moisture would offer optimum conditions.
“There were some problems installing updates, but we’ll try again later. If you keep seeing this and want to search the web or contact support for information this may help: (0x8024002e)”.Common symptoms include:
Error Causes“Windows Resource Protection did not find any integrity violations.” This means you do not have any missing or damaged system files.OR you may receive a message saying:
“Windows Resource Protection could not perform the requested operation.”To resolve this problem, run the System File Checker in safe mode and make sure that the PendingDeletes and PendingRenames folders exist under %WinDir%WinSxSTemp.
OR you may also receive a message saying, “Windows Resource Protection found corrupt files and successfully repaired them. Details are included in the CBS.Log%WinDir%LogsCBSCBS.log.” OR you may receive a message saying, “Windows Resource Protection found corrupt files but was unable to fix some of them. Details are included in the CBS.Log%WinDir%LogsCBSCBS.log.”
 I going to admit right here that I am a big fan of Cooler Master PC cases, I like them and they are always one of the things that I consider when building a new PC, overall I like their ideas and quality so personal for me it was quite a surprise to see that they are one that is making a new generation gaming chair.
Now truth to be told Orb X is not your typical gaming chair as you can clearly see from the pictures. The chair itself will come in two colors: white or black and RGB lighting looks to be prominently featured throughout.
I going to admit right here that I am a big fan of Cooler Master PC cases, I like them and they are always one of the things that I consider when building a new PC, overall I like their ideas and quality so personal for me it was quite a surprise to see that they are one that is making a new generation gaming chair.
Now truth to be told Orb X is not your typical gaming chair as you can clearly see from the pictures. The chair itself will come in two colors: white or black and RGB lighting looks to be prominently featured throughout.
 The chair itself is advertised as both meant and aimed for professional and gaming crowds but I believe the gaming crowd is in general more interested in this hardware piece.
Hardware is enclosed in a fully motorized shuttle dome which aims to maximize your privacy, it supports a single 49inch display or three 27inch monitors along with surround speakers if you do not wish to use headphones.
The chair itself is advertised as both meant and aimed for professional and gaming crowds but I believe the gaming crowd is in general more interested in this hardware piece.
Hardware is enclosed in a fully motorized shuttle dome which aims to maximize your privacy, it supports a single 49inch display or three 27inch monitors along with surround speakers if you do not wish to use headphones.
 It offers an adjustable headrest, lumbar support, and footrest so you can spend some time in it and be comfortable. Controls on the chair itself allow you to raise or lower the dome for easier getting in and out of it.
Orb X also has a compartment in its backside, it folds out and has a sliding tray designed to hold your PC or console. Everything is enclosed so wiring is not the issue.
Overall Orb X seems really like the computer chair of the future, Cooler Master expects to release the Orb X by December 2021, priced around $12,000-$14,000.
It offers an adjustable headrest, lumbar support, and footrest so you can spend some time in it and be comfortable. Controls on the chair itself allow you to raise or lower the dome for easier getting in and out of it.
Orb X also has a compartment in its backside, it folds out and has a sliding tray designed to hold your PC or console. Everything is enclosed so wiring is not the issue.
Overall Orb X seems really like the computer chair of the future, Cooler Master expects to release the Orb X by December 2021, priced around $12,000-$14,000.