Logo

Install Windows 11 on any computer officially

Windows 11 system requirementsMicrosoft’s initial Windows 11 hardware requirements were not really well received by users and they were not really clearly represented from the start making a lot of potential customers slowly drift away from the hype.

It seems that Microsoft has acknowledged this since they have changed their tune about system hardware requirements for the upcoming Windows 11.

It seems that Windows 11 will be able to be officially installed on unsupported computers but with a little inconvenience.

What is a catch?

Windows 11 will still have the same hardware requirements and if the PC meets them, that computer will be officially supported, other ones (any that can run Windows 10) that do not meet system requirements can still run Windows 11 but the system will have to be clean installed. So no upgrade option for old computer users, just a clean install.

This means of course that you will need to download the ISO image and make a bootable USB in order to install it. Also since you will be doing a clean install do a backup of the hard drive since it will need to be formatted.

Also, Microsoft has stated that with unofficially supported PC some driver updates might not be delivered leaving you with either older driver versions or relying on your hardware manufacturer on them. This is still not confirmed by Microsoft, just stated as an option. We will see how it goes.

Conclusion

It is very good that Microsoft has reconsidered its system requirements and will not stubbornly push its initiatives over the top requirements allowing even older computers to install new OS.

I am sure over time lot of users will upgrade their hardware and drive into officially supported waters, but it is good that they will be able to use new OS on their current hardware.

Do You Need Help with Your Device?

Our Team of Experts May Help
Troubleshoot.Tech Experts are There for You!
Replace damaged files
Restore performance
Free disk space
Remove Malware
Protects WEB browser
Remove Viruses
Stop PC freezing
GET HELP
Troubleshoot.Tech experts work with all versions of Microsoft Windows including Windows 11, with Android, Mac, and more.

Share this article:

You might also like

How to Fix Windows Activation Error Code 0xc004f050

Error Code 0xc004f050 – What is it?

Error code 0xc004f050 refers to a problem with activating the Windows key. The problem appears when you try to activate a copy of Windows by using Windows Activation wizard. This happens when the system becomes unstable and critical system files start missing. Though Windows 10 is a free upgrade for Windows 7/Windows 8/Windows 8.1 users, the activation error is still an issue. If you already had Windows 7/Windows 8/Windows 8.1 activated and did an upgrade successfully, then there should be no problem. This Problem Occurs only when you do a clean install.

Symptoms

When you try to activate a copy of Windows Vista or Windows 7 by using the Windows Activation wizard, you receive an error similar to the one below:
An error has occurred Code: 0xC004F050 Description: The Software Licensing Service reported that the product key is invalid

Solution

Restoro box imageError Causes

  • This causes due to an invalid product key.
  • This problem may occur if the license validity interval has expired, or if the license is not signed correctly.
  • Error Code 0xc004f050 occurs when the system becomes unstable and critical system files start missing.
  • Improper way of installing, deletion of some very important system files, misconfigured system files, etc. may also cause this error.
  • When you do a clean install, it wipes everything from the Primary Drive and after the install, windows can't find the Hardware ID which is used to verify your license.
  • For Windows 7, Windows Server 2008, and Windows Vista-based computers, this error may occur if you have entered the key for a beta version of the operating system while using the released version of the operating system.

Further Information and Manual Repair

This error is not something that can be fixed in seconds but will require some time and technical knowledge.

Method 1:

Re-insert the product key by using the Change Product Key tool:
  1. Click Start, click Computer, and then click System properties on the toolbar.
  2. In the Windows activation section, click Change product key.
  3. If you are prompted for an administrator password, type the password or click Continue.
  4. In the Product key box, type the product key, and then click Next.
  5. Follow the steps in the Windows Activation Wizard to complete the activation process.

Method 2:

Activate Windows by using the automated telephone system:
  1. Click Start, and then click Computer.
  2. Click System properties on the toolbar, and then click Click here to activate Windows now in the Windows activation
  3. If you are prompted for an administrative password, type it and click Continue.
  4. Click Show me other ways to Activate.
  5. Click Use the automated phone system and follow the instructions.

Method 3:

  1. Clean install Windows 7/Windows 8/Windows 8.1 using the installation disk and activate your copy.
  2. Now, download all the updates to see the Windows 10 Upgrade notification or download Windows Media Creation Tool and use the option Upgrade this PC to get Windows 10 right away.
  3. Once the upgrade is done, check the Activation Status. It will be fully activated as it should be. The Error code 0xc004f050 should not appear anymore.
If you want to get rid of the old Windows installation folder, then use the Windows Media Creation Tool to create a Flash Drive. Clean Install Windows 10. Now, every time when it asks for a product key, skip it. After installation is complete, Windows will automatically identify and activate your Copy. NOTE: Clean Install will make Sure you cannot roll back to your previous Windows 7 or Windows 8. So do it only if you are confident of using Windows 10 from here on. To verify the Windows activation status, follow these steps:
  • Click the Start button, and then click Computer.
  • Click System properties on the toolbar, and then view the activation status in the Windows activation section.
Read More
MS will release single office apps in MS Store
It seems that Microsoft is going to offer subscription and sales of individual office applications in the Windows Store. The office package will still be available as a package but for the first time, we will get single applications as standalone ones available for purchase. ms officeThis is a very interesting decision by Microsoft and I fully support it, this time users will be able to pay less and to choose only applications that they need instead of paying for the whole package and not using it.
Read More
Disable Windows 11 animations for fast work
windows 11 animationsWindows 11 has some cool animations including fading effects which make working in it feels nice and futuristic but the cost of this is that there is a slight delay to certain actions performed. If you want the snap fast feature in Windows 11 and do not care about this eye candy there is an easy way to turn animations off inside it.
  • First, open Windows Settings by pressing ⊞ Windows + I on your keyboard
  • Alternatively, click on Start, search for Settings, and then click its icon.
  • When Settings appears, look in the sidebar and select Accessibility.
  • In Accessibility settings, click on Visual Effects.
  • In Visual Effects, switch Animation Effects to Off.
That’s it, changes will be applied automatically, you can close settings and continue working inside Windows 11 without animations and fades. You can always switch animations back On via settings if you change your mind.
Read More
NVIDIA GameStream is not working
The GameStream is an NVIDIA service that allows users to stream games from their Windows 10 computers to other supported devices which includes the NVIDIA SHIELD devices. However, a number of users reported that the NVIDIA GameStream is not working on their Windows 10 computers. This kind of issue is most likely caused by improper installation, some glitches with the network, and many more. To fix this issue in the NVIDIA GameStream, there are several options you need to check out to fix the problem. You can try to lo logout of GameStream and try logging back in again. You could also try to update or uninstall and reinstall the drivers related to NVIDIA or fix some network glitches or update the NVIDIA SHIELD device. For more details, you can refer to each one of the given potential fixes below.

Option 1 – Try to logout and log back into NVIDIA GameStream

The first thing you can do is to log out and then log back into NVIDIA GameStream. Some users claimed that by doing this simple task, they were able to resolve the problem. This is probably because with the re-login, the entire cache of the system and service is rebuilt and any bad sectors of that data will be replaced with the fresh one so this should resolve the problem with the NVIDIA GameStream, if not, refer to the other given options below.

Option 2 – Try updating the drivers from the official site of NVIDIA

If both the first and second given options didn’t work, you can also try updating the drivers from the official NVIDIA website. And in case you don’t know the type of Nvidia graphics card that your computer is on, follow the steps below:
  • Tap the Win + R keys to open the Run dialog box.
  • Next type in “dxdiag” in the field and click OK or hit Enter to open the DirectX Diagnostic Tool.
  • From there, you can see what type of Nvidia graphics card that your system is on.
  • Take note of your graphics card information and then look for the best drivers for your operating system. Once you’ve downloaded and installed the file, restart your PC.

Option 3 – Try to roll back the driver to the previous version

If updating the NVIDIA display drivers didn’t work for you, then it’s time to roll back the device drivers. It is most likely that after you updated your Windows computer that your driver also needs a refresh.
  • Tap the Win + R keys to launch the Run window and then type in the “MSC” command and hit Enter to open the Device Manager window.
  • Under the Device Manager, you will see a list of drivers. From there, look for the NVIDIA Drivers and expand it.
  • Next, select the driver entries that are labeled appropriately.
  • Then select each one of them and double click to open a new mini window.
  • After that, make sure that you’re on the Driver tab and if you are not, just navigate to it then click the Roll Back Driver button to switch back to the previous version of the NVIDIA Drivers.
  • Now restart your computer to successfully apply the changes made.

Option 4 – Try fixing your network

The next thing you can do to fix the problem with the NVIDIA GameStream is to fix the glitches in your network. Make sure that you connect both of your devices to a 5 GHz Wi-Fi network and you also have to ensure that the Wi-Fi connection you’re connected to is strong enough for both the devices for the latency to go down. Once you’ve covered all of these things with your network, restart your computer and change the Wi-Fi channel both devices are connected to. This should resolve the problem.

Option 5 – Try to update the NVIDIA SHIELD device

You might also want to update the NVIDIA SHIELD device. There are times when an outdated NVIDIA SHIELD device can result to several issues like the problem with the NVIDIA GameStream. Thus, you need to update NVIDIA SHIELD and check if it fixes the problem or not.
Read More
Fix “We couldn’t find any drives” Error
If you encountered an error message saying, “We couldn’t find any drives, To get a storage driver, click Load driver” when you try to install Windows in a VirtualBox machine, then you’ve come to the right place as this post will guide you in fixing this error. This error message is displayed on the screen where you have to choose a partition to install the guest operating system. This error is most likely due to the lack of correct settings as well as a corrupted virtual disk. To fix this error, you have to remove existing storage devices, create a new storage device and select the correct ISO file.

For complete instructions, follow the given steps below.

Step_1: The first thing you have to do is remove all the existing Storage devices and since this option is already available in VirtualBox by default, there is no need for you to install any third-party software. Step_2: After that, open VirtualBox and select the virtual machine and then click the Settings button. Step_3: Next, switch to the Storage section and on your right-hand side, you will see “Controller: SATA” and two other sub-labels. From there, select Controller: SATA and then click on the red cross button that says, “Remove selected storage controller”. Step_4: Now click on the Add new storage controller icon and select the “Add SATA Controller” option from the given list. Step_5: Afterwards, click the “Add hard disk” button and select the “Create new disk” option, and then you have to create a new virtual disk for your virtual machine. Step_6: Verify if you have selected Dynamically allocated while you create the virtual hard disk. Once the process is completed, you will get a “.vdi” file in the list. Step_7: Next, click on the “Add optical drive” button and select the “Choose disk” option. Here, you have to select the ISO file and if you can find an ISO file in the given list, select it from there, else, you have to click the Add button and navigate to the folder where the ISO file is located. Step_8: Once you’re done, click the OK button and boot your virtual machine. You should see options instead of the “We couldn’t find any drives, To get a storage driver, click Load driver” error message. If you see the options, you can now create a new partition and start the installation process of the Windows operating system in the VirtualBox machine without any problem.
Read More
Setting default applications in Windows 11
Setting default applications in Windows 11Same as in previous Windows versions, Windows 11 will also use certain applications as default ones for opening certain file types and file extensions. And yes, same as in previous versions it will come preconfigured for certain file types and associated applications like for example photos for pictures. Of course, users usually have their own favorite applications for certain file types and much more prefer to open them inside the application of their choice instead of the default one. We can change the default application like in previous Windows versions but this time there are two ways and overall more control of this process. Windows 11 has settings for choosing default file type applications and default file extension applications giving you more control of this process.

The opening setting for apps

Whatever you wish to change default application or default extension application you will need to open settings for default application. Follow steps to quickly go into it.
  1. Press ⊞ WINDOWS + I to open settings
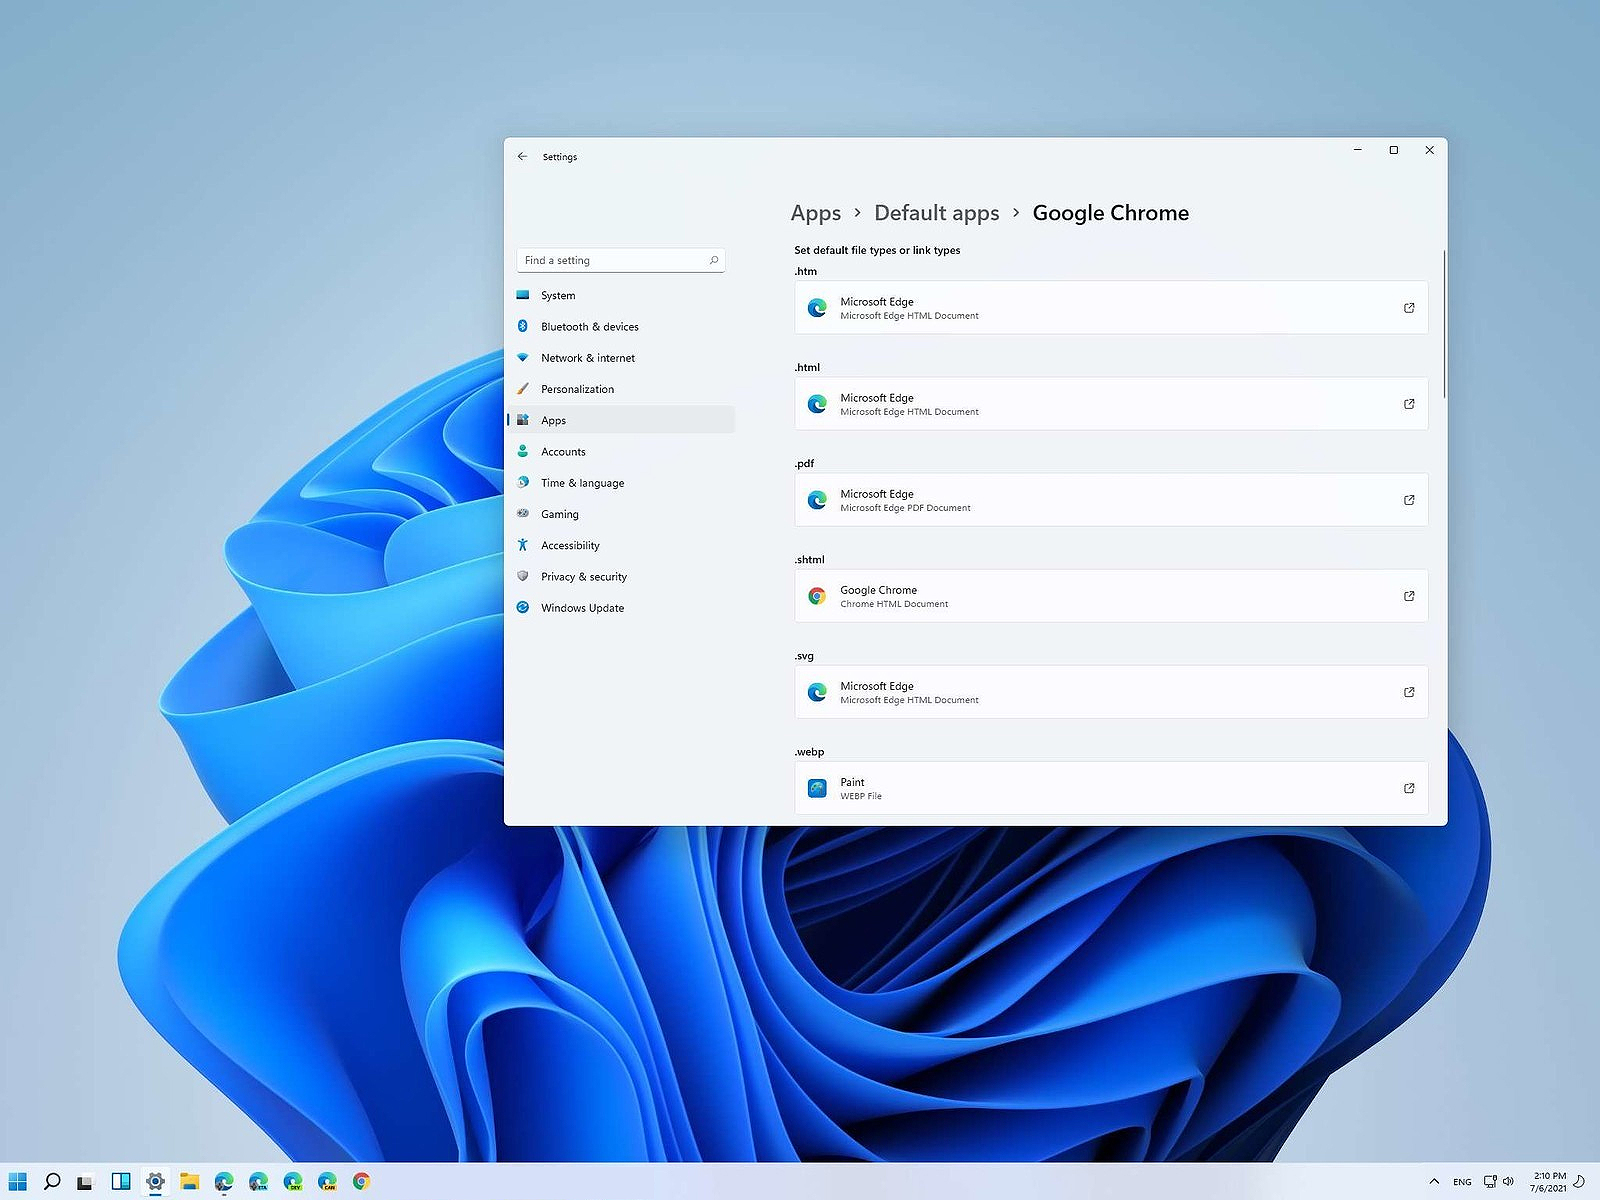
  2. Select Apps on left
  3. On the right part select Default Apps
Now you are in settings for choosing default applications

Choosing default application by file type extension

This is considering by Microsoft as a typical way to set default applications inside Windows 11. Once you are inside the settings app there is a box labeled Enter a file type or link type. Inside the search box, type in file extension that you wish to associate the application with like .JPG, .TXT, or other. If the file extension is not associated with any application you will be presented with a Choose a Default button, if however, the file extension is already associated with the app, you will need to click on the app box itself. In any case, a pop-up will appear and ask How do you want to open YOUR FILE EXTENSION files from now on? Choose Application from the list of presented ones and click on OK.

Choosing default file type

Another method is to select the default application by file type selecting application for it. In the settings screen, under the search box, you will have a list of installed applications. Choose the application that you would like to associate a file type with and click on it. On the next details screen scroll down and select the file type that you want to associate with the selected application and click on OK.

Other/third method

There is also the third method for choosing the default application for file type but it includes some surfing on your hard drive and it can be more time-consuming for first-time settings. But it is fairly quick when you need to only use it once on some new file type (for example you have a new application installed and want to switch just one file type extension to that application). Locate the file that you want to associate with the application and right-click on it. Select Open With from the menu and then Choose Another App. Pop up will appear, select the application that you would like to use, and check the box beside Always use this app to open CHOOSEN EXTENSION files followed by clicking on the OK button.
Read More
Restore, Minimize and Close are not working
Recently, a number of users reported not being able to use the Restore, Minimize and Close buttons on their Windows 10 computers. This kind of issue can be quite annoying as you won’t be able to use your computer properly, especially when you navigate between programs and windows. In such cases, the buttons on the right side of the title bar won’t respond to any inputs which could be caused by a number of factors such as different input modes, corrupted system files, and many more. If you are one of the users who are currently facing this problem, worry not for this post will guide you on what you can do to resolve it. There are several potential fixes you can check out to fix the issue. You can try to check if Tablet Mode is enabled and if it is, you have to disable it. You could also boot your computer in a Clean Boot State to check if a third-party program is the one that’s causing the problem. In addition, you could also reinstall the program where you experience the problem or run built-in utilities like System File Checker and DISM tool.

Option 1 – Make sure that you are not in Tablet Mode

Since Windows 10 is designed to work on both desktop and mobile devices, it could be that your computer has slipped into Tablet Mode which explains why you’re not seeing the Taskbar. To check if your computer is really in Tablet Mode, follow these steps:
  • Go to the Start menu and select Settings.
  • Next, select the System setting and from the left pane select the Tablet Mode.
  • From there, make sure that the buttons next to the options given below are set to the off position:
    • Hide app icons on the taskbar in tablet mode
    • Automatically hide the taskbar in tablet mode

Option 2 – Put your computer in a Clean Boot State

As pointed out, it is possible that some third-party program or service is the one that’s behind the problem. To isolate this possibility and to identify the culprit, you have to put your computer into a Clean Boot State. To do so, follow the steps below.
  • Log onto your PC as an administrator.
  • Type in MSConfig in the Start Search to open the System Configuration utility.
  • From there, go to the General tab and click “Selective startup”.
  • Clear the “Load Startup items” check box and make sure that the “Load System Services” and “Use Original boot configuration” options are checked.
  • Next, click the Services tab and select the “Hide All Microsoft Services” check box.
  • Click Disable all.
  • Click on Apply/OK and restart your PC. (This will put your PC into a Clean Boot State. And configure Windows to use the usual startup, just simply undo the changes.)
  • Once your computer is in a Clean Boot State, try to open the program where the problem occurred.

Option 3 – Try reinstalling the program

If the first two options didn’t work, then you might want to consider uninstalling the program and then install it back with its latest version. This should resolve the problem.

Option 4 – Try to run System File Checker

System File Checker or SFC is a built-in command utility that helps in restoring corrupted files as well as missing files. It replaces bad and corrupted system files to good system files that might be the cause why the Restore, Minimize and Close buttons don’t work. To run the SFC command, follow the steps given below.
  • Type “cmd” in the Start search and then right-click on the appropriate search result.
  • Next, select “Run as administrator” to open Command Prompt with admin privileges.
  • After opening Command Prompt, type in sfc /scannow
The command will start a system scan which will take a few whiles before it finishes. Once it’s done, you could get the following results:
  1. Windows Resource Protection did not find any integrity violations.
  2. Windows Resource Protection found corrupt files and successfully repaired them.
  3. Windows Resource Protection found corrupt files but was unable to fix some of them.
  • Now restart your computer and see if the problem is fixed or not.

Option 5 – Run the DISM tool

You can try running the Deployment Imaging and Servicing Management or DISM tool to fix the problem. Using this built-in tool, you have various options such as the “/ScanHealth”, “/CheckHealth”, and “/RestoreHealth”.
  • Open the Command Prompt with admin privileges.
  • Then type in the following commands and make sure to hit Enter right after you type each one of them:
    • Dism /Online /Cleanup-Image /CheckHealth
    • Dism /Online /Cleanup-Image /ScanHealth
    • exe /Online /Cleanup-image /Restorehealth
  • Do not close the window if the process takes a while as it will probably take a few minutes to finish. Once it’s done, restart your computer.
Read More
PDF text disappears when editing or saving
If you are trying to save a file in a PDF format on your Windows 10 computer but then the PDF text content in an Adobe file suddenly disappears, then read on. This post will give you more insight into this issue. This kind of issue is rare and mostly occurs in forms that you can fill upon. In such a case, the text you enter in the form vanishes right after you click the Save button. One of the benefits of working with PDF files is that it has the ability to compress high-quality files to relatively small file sizes. This is really useful especially when you are saving hard drive space and you’re working with limited storage resources. However, these files can contain layered content if they are created from layered documents using applications like Adobe InDesign. Consequently, a single page of the PDF file can contain different layers with different content. So if you try to save or print a PDF file that contains layered content, the elements will disappear from the PDF. To resolve this issue, you can try to merge or flatten the file since it will help keep the changes in the PDF file. On the other hand, you can no longer make any alterations or form data once you flatten the file. Another thing to keep in mind is that merging or flattening the file can’t be undone so you might want to save another copy of the file before you proceed.

Option 1 – Print to PDF

  • First, you have to open the desired PDF file and tap the Ctrl + P keys to open the Print dialog box.
  • After that, select the “Microsoft Print to PDF” option as the printer.
  • Once the action is confirmed, it will regenerate another version of the PDF file with the default settings and merge all the existing layers into a single layer.
  • On the other hand, you can also click on the “File” menu of the PDF file and select Print.
  • From there, click on the Print button and select “PostScript (*.ps)” as the “Save as” type to save a PostScript copy of the original PDF file.
  • Once you’re done, double click on the .ps file to open the file in the Adobe Distiller which will flatten the file automatically and convert it to a PDF file with only one visible layer.

Option 2 – Save the PDF file as an Optimized PDF file

If you are using the Acrobat Reader Pro version such as the Acrobat Pro, Foxit, and so on, you can try to flatten the layers by saving the PDF file as an Optimized PDF file. Refer to these steps to do so:
  • Select File > Save as > Optimized PDF.
  • Next, select the Transparency checkbox from the Settings window that opens.
  • Then click on the Save button to apply and save the changes made. After that, the PDF text content should not disappear when you try to save a file on your Windows 10 computer.
Read More
5 Windows 10 Upgrade errors you might encounter

5 Windows 10 Upgrade Errors

The recently released Windows 10 captivated the mass but its rollout, polished as it might have been, proved everything but seamless. Surf the Internet and you’ll get the gist. People are complaining and they need assistance. Assistance with what you might ask? Many have attempted to make an upgrade but failed after encountering various strange combinations of letters and numbers. These are none other than error codes. If you’ve tried and failed, feast your visuals below as you might encounter one of these 5 Windows 10 Upgrade errors.

Error Code 0x80073712

Encountering error code 0x80073712 in no way implies that you need to throw out your computer system and acquire a new one. Not at all! This error code simply means that a very important file to Windows might have gone missing or corrupted. This file is crucial to Windows update so without obtaining this file, you won’t be able to proceed with the update.

Error Code 0x800F0923

Likely, there are many programs and drivers installed on your computer. They all play a vital role. However, if you’ve received error code 0x800F0923, it might be time to consider or turn your eyes to installed drivers on your system. Why? Error code 0x800F0923 means that there’s a driver or driver on your current Operating System that’s not compatible with Windows 10. There’s clearly a dilemma here.

“We couldn't complete the updates. Undoing changes. Don't turn off your computer.” Or “Failure configuring Windows Updates. Reverting changes”

That’s a pretty odd error but I will say it's slick… That Windows 10 upgrade error is straightforward. Microsoft is just letting you know that they won’t be able to complete the update to Windows 10 and so they are putting your computer back to where it was. How nice of them.

The error messages above are pretty generic and will manifest when the upgrade fails for one reason or the other. To resolve this issue, you’ll most definitely have to decipher what error code was presented. Identifying that will provide a glimpse into exactly what steps you need to take.

The Update Isn't Applicable to Your Computer

I don’t know about you but I strongly believe Microsoft is subtly letting you know that your computer system is old and needs to be thrown out. Also, this update could imply that your PC needs to install important updates to rev you up to the requirements. All relevant updates to your computer must be installed before you can get past this stage.

Error… “Something Happened”

This Windows 10 upgrade error has been the talk of the Internet. In fact, users of Windows OS have been making it a mockery. Clearly, not many have had success after encountering this error. Obviously, “something happened” but it’s just not easy to decipher what went wrong. Microsoft is still trying to figure it out.

Solution

Restoro box image
Read More
Quick Workarounds to Repair Error 126

What Is Error 126?

Error 126 is a very commonly occurring error that is often the result of damaged system files of Windows. They usually occur during the installation of some Windows program or application. When Error 126 is generated, it terminates the installation process almost instantly. It is important to take corrective measures immediately to ensure that no such problems are encountered again in the future.

Solution

Restoro box imageError Causes

There are a variety of conditions that may trigger Error 126. These conditions are listed below as follows.
  • Corruption of the service-related DLL file
  • Missing or damage service-related DLL file
  • Corrupt, damaged, or Misconfigured system files
  • Improper hardware or application installations or uninstallations
  • Existence of viruses, malware, adware, or spyware in the system
  • Corrupt or incorrect registry entries in the system files
When any of the above-listed conditions occur, the corrupt system files will go to the improper links or missing information. Eventually, the problems with the files will keep the applications or programs from responding in the usual manner. Whatever are the reasons for error generation, it is of utmost importance that the error is removed to ensure smooth functioning of the system.

Further Information and Manual Repair

There are many different ways this error can be rectified. However, the two most effective solutions are listed below as follows.
  • This solution is for the advanced user. Turn on the system and log on to it as the Administrator. Now click on the Start button. Now click on All programs -> Accessories -> System Tools. Here you will come across the option for System Restore. Click on it. A new window will appear. Select 'restore my computer to an earlier time' point. Now clock on Next. A list of restore points will now appear in front of you. Choose the latest restore point you come across from this list and click on ‘Next’. In the next window that opens, click on ‘Next’ again. This is the confirmation window. Once the restoration finishes, restart your computer.
  • This solution is for novice users. Download an Error 126 repair utility program. Install it on your system. Now use it to scan your system for errors. Find out if there is an option to fix/repair error. When you come across it, click on it as soon as the scan is complete. Restart your computer. Your system is now free of Error 126.
Read More
1 2 3 171
Logo
Copyright © 2023, ErrorTools. All Rights Reserved
Trademark: Microsoft Windows logos are registered trademarks of Microsoft. Disclaimer: ErrorTools.com is not affiliated with Microsoft, nor claims direct affiliation.
The information on this page is provided for information purposes only.
DMCA.com Protection Status