Logo

How to turn off auto brightness

Windows 10 and Windows 11 have automatic dynamic screen brightness depending on the surrounding light inside the room. Please take note that this option is available only on devices with build-in screens like laptops, tablets, and all in one desktop PC. If you are connected with your PC via an external monitor you will not have these settings available and probably feature is not even working.

screen brightness

Some computers will also allow automatic brightness changes also on what is displayed on the screen. This option is meant to save battery life on devices. Microsoft calls this automatic brightness feature Content adaptive brightness control. In order to change this setting, we will go to settings inside Windows.

Disabling automatic brightness inside Windows

Open Settings inside Windows, in Windows 11 press WINDOWS + I to open settings, then click on the system in the sidebar and then go to Display. Click on the small arrow beside the Brightness slider in order to expand a small menu and then uncheck Help improve battery by optimizing the content show and brightness. If you see Change brightness automatically when lighting changes, uncheck that as well. Close the settings and you are good to go, now brightness will always be as set in settings.

Inside Windows 10, go to Settings and then go to System and then in Display under the Brightness and Color section look below and locate the box that says Automatically adjust contrast based on the displayed content to help improve battery and uncheck it, if the box below with text Change brightness automatically when lighting changes exists, uncheck it as well. Close settings and you are done.

Do You Need Help with Your Device?

Our Team of Experts May Help
Troubleshoot.Tech Experts are There for You!
Replace damaged files
Restore performance
Free disk space
Remove Malware
Protects WEB browser
Remove Viruses
Stop PC freezing
GET HELP
Troubleshoot.Tech experts work with all versions of Microsoft Windows including Windows 11, with Android, Mac, and more.

Share this article:

You might also like

File or directory is corrupted and unreadable
If you encounter an error message that says, “<Drive>: is not accessible, The File or directory is corrupted and unreadable” when you try to connect your USB or external device, then the File System could have been corrupted or the external device might be infected with malware. On the other hand, it is also possible that the device might have some physical damage. To fix the “The file or directory is corrupted and unreadable” error, you can try to run Check Disk or scan your computer for malware or you could also format the destination drive. For more details, refer to each one of the given options below.

Option 1 – Run the Check Disk utility

You can also run the Check Disk utility to fix the error when you connect your USB or external device.
  • In the Windows Search box, type “command prompt” and from the search results, right click on Command Prompt and select “Run as administrator”.
  • After opening Command Prompt, type this command and tap Enter: chkdsk <Partition Letter>: /f /r /x /b
  • The command you entered will start to check for errors and fix them automatically. Else, it will throw an error message saying, “Chkdsk cannot run because the volume is in use by another process. Would you like the schedule this volume to be checked the next time the system restarts? (Y/N)”.
  • Tap the Y key to schedule Disk Check the next time your computer restarts.

Option 2 – Try to format the destination drive

Formatting the drive can also help you resolve the error. To format it, follow these steps:
  • To get started formatting your drive, tap the Win + E keys and then go the access page of the drive.
  • Next, right click on the drive and select Format.
  • After that, uncheck the “Quick Format” option and then format your drive properly.
  • Now once the formatting process is finished, unplug the drive and plug it back in afterwards.
  • Check if the error is already fixed. If the drive is not initialized, tap the Win + R keys and hit Enter.
  • After opening the Run dialog box, type “diskmgmt.msc” and hit Enter to open Disk Management.
  • From there, right click on the drive volume and select initialize Disk.
  • Next, select the correct partition type and proceed.
Option 3 – Try scanning your computer for malware using Windows Defender Your computer could be infected with malware which might have triggered the “The file or directory is corrupted and unreadable” error. To fix this, you need to scan your computer using a reliable program like Windows Defender.
  • Tap the Win + I keys to open Update & Security.
  • Then click on the Windows Security option and open Windows Defender Security Center.
  • Next, click on Virus & threat protection > Run a new advanced scan.
  • Now make sure that Full Scan is selected from the menu and then click the Scan Now button to get started.
Read More
The Extended Attributes Are Inconsistent Error
One of the most critical errors inside your Windows operating system is The Extended Attributes Are Inconsistent error. This error means that your operating system has been corrupted and it may produce many annoying issues like for example time lags, random crashes, and even freezing of the system when running multiple applications. There are a lot of reasons for this error, from the registry to faulty application installations to sometimes even hardware issues like bad RAM memory or bad hard drive. Mostly issue is due to corrupted files inside Windows and most often people only think that resetting the PC or complete reinstallation is the only way to fix this problem. Although reinstalling the system or resetting the PC will solve this error for sure there are other less time-consuming ways to fix this error. The Extended Attributes Are Inconsistent Error
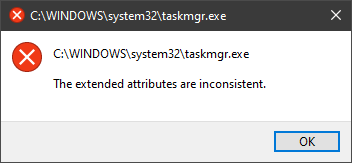
In this guide, we will show you common ways in fixing Extended Attributes are inconsistent errors inside your Windows that are easy to do and less time-consuming than complete reinstallation of the system.

Fixing Extended Attributes Are Inconsistent error

Run SFC scan

  1. Press ⊞ WINDOWS + X to open the hidden menu
  2. Click on command prompt (admin)
  3. In command prompt type in SFC /scannow and press ENTER
  4. Wait for the operation to complete
  5. Reboot your PC

Use System Image Repair Tool

  1. Press ⊞ WINDOWS + X to open the hidden menu
  2. Click on command prompt (admin)
  3. In command prompt type in Dism /Online /Cleanup-Image /RestoreHealth and press ENTER
  4. Wait for the operation to complete
  5. Reboot your PC

Change all user accounts to the administrator

  1. Press ⊞ WINDOWS + R to open the run dialog
  2. Type in netplwiz and press ENTER
  3. Select a first user account and click on Properties
  4. Click on the Group Membership tab
  5. Choose Others from the options
  6. Select administrator (if all accounts are already administrators change all to users)
  7. Repeat process for all other accounts
  8. Click OK to save settings

Change Windows Sound scheme to default

  1. Right-click on the sound icon in the taskbar
  2. Click on Sound options
  3. Go to the Sounds tab
  4. In Sound Scheme click and choose Windows Default
  5. Under Program Events choose Windows User Account Control
  6. Click on the drop-down menu and choose None
  7. Click on Apply
  8. Click on OK

Downgrade the Sound driver

  1. Press ⊞ WINDOWS + X to open the hidden menu
  2. Click on Device Manager
  3. Find your Audio driver and right-click on it
  4. Click on uninstall and then on OK
  5. Reboot your system

Do System Restore

If none of the provided solutions have worked, perform a system restore to the last point where everything was working fine.

Reset PC

If even system restore has not solved the issue or you do not have valid point in system restore time, perform Reset this PC and hopefully, the error will be finally fixed.

Conclusion

If all of the provided methods have not managed to repair this error that checks your hardware, your computer might have some faulty components if after complete PC reset error persists.
Read More
Windows ImageAcquisition High CPU & Disk usage
What is Windows ImageAcquisition High CPU & Disk usage? The Windows Image Acquisition is the driver model in charge of the communication between the graphics hardware and the operating system. There are times when it causes high disk and CPU usage in Windows 10 systems which results in slow performance of the computer. To fix this issue, read on as this post will help you in addressing the problem. The cause of this problem might have something to do with the hardware or the drivers. And so if your computer becomes slow because of the Windows Image Acquisition process, here are some suggestions that might be of help. You can try to restart the Windows Image Acquisition service, run a System File Checker Scan, disconnect & reconnect imaging hardware as well as update and reinstall the drivers and updating the graphics drivers. For a complete set of instructions, follow the given options below.

Option 1 – Try restarting the Windows Image Acquisition Service

  • Tap the Win + R keys to open the Run dialog box.
  • Then type “services.msc” in the field and hit Enter to open the Windows Services Manager.
  • From there, look for the Windows Image Acquisition Service and check on its service Status.
  • If the Service Status is blank, right-click on it and select Start. And if the service Status is Running right-click on it and select Restart. After that, check if your computer’s performance is now back to normal.

Option 2 – Try running a System File Checker scan

As you know, running a System File Checker scan can help in replacing missing files as well as repair the corrupted ones which might be the reason behind the problem.
  • Tap Win + R to launch Run.
  • Type in cmd in the field and tap Enter.
  • After opening Command Prompt, type in sfc /scannow
The command will start a system scan which will take a few whiles before it finishes. Once it’s done, you could get the following results:
  1. Windows Resource Protection did not find any integrity violations.
  2. Windows Resource Protection found corrupt files and successfully repaired them.
  3. Windows Resource Protection found corrupt files but was unable to fix some of them.
  • Restart your computer after the scan is completed.

Option 3 – Try disconnecting and reconnecting the imaging hardware and then update and reinstall its drivers

It could be that the hardware that calls for the Windows Image Acquisition service has some issues which are why disconnecting and reconnecting the imaging hardware like scanners, printers, cameras can help in fixing the problem. In addition, you can also boot your computer in a Clean Boot State so that you can find the problematic hardware by hit and trial method. Refer to the steps below to do so:
  • Log onto your PC as an administrator.
  • Type in MSConfig in the Start Search to open the System Configuration utility.
  • From there, go to the General tab and click “Selective startup”.
  • Clear the “Load Startup items” check box and make sure that the “Load System Services” and “Use Original boot configuration” options are checked.
  • Next, click the Services tab and select the “Hide All Microsoft Services” check box.
  • Click Disable all.
  • Click on Apply/OK and restart your PC. (This will put your PC into a Clean Boot State. And configure Windows to use the usual startup, just simply undo the changes.)

Option 4 – Try updating the Graphics drivers

  • First, boot your computer into Safe Mode.
  • After that, tap the Win + R keys to launch Run.
  • Type in devmgmt.msc into the box and tap Enter or click OK to open the Device Manager.
  • After that, a list of device drivers will be displayed. From there, look for the Display Adapters and click on them.
  • After that, right-click on each entry under the Display Adapters and select the “Uninstall Device” option from the menu.
  • Now restart your computer.
  • After restarting your computer, go to the Settings app and Check for Updates in the Windows Update section.
Note: You also have the option to go directly to the website of your graphics card manufacturers like NVIDIA, Intel, or AMD and go to the section called Drivers then check if there’s a new available update – if there is, download and install it.
Read More
How to Fix Windows 10 Error 0x80072ee7

Error Code 0x80072ee7 - What is it?

Error Code 0x80072ee7 is an error code that is most commonly associated with Windows 10 and the use of the Windows Store. Several things can cause this error, which has been present as an error message in Windows 10 and all the way back through Windows 8.

Common symptoms include:

  • An error message when you attempt to connect to the Windows Store.
  • Inability to download or install purchases from the Windows Store.

Fortunately, there are several simple methods that can be used to attempt to resolve Error Code 0x80072ee7 on your Windows machine. These methods don’t require advanced computer knowledge or familiarity with high-level tools, so the average user should be able to complete them without help. However, if you feel like you need assistance in resolving Error Code 0x80072ee7, always contact a qualified Windows repair technician who can assist you.

Solution

Restoro box imageError Causes

There are four basic things that can cause Error Code 0x80072ee7 to appear on a Windows device. The first is that the connection to the Internet is limited in some manner, either due to a system or equipment error. Secondly, some parts of the update components could be missing. Next, an error within the DNS can be a cause. Finally, having any kind of compatibility errors on the machine (for example, between the antivirus software that you run and the Windows Update tool) can lead to the appearance of Error Code 0x80072ee7.

Further Information and Manual Repair

There are a few different methods that you can try in order to resolve the appearance of Error Code 0x80072ee7 on your Windows machine. These are fairly simple to complete, but if you do not feel confident in your ability to carry them out successfully, you may want to get in touch with a qualified computer repair technician to help you.

Here are the best methods to employ as you seek to resolve Error Code 0x80072ee7 on your Windows device:

Method One: Check Your Connection

Make sure that you are able to connect to the Internet by visiting several common sites like Google in order to ensure that your issue is not related to your Internet service provider or the equipment that you are using to access the Internet.

Method Two: Use an Alternative DNS

If you believe that your DNS connection may be the problem, you can change the specific DNS that you are using to one that is provided by Google. This can resolve any conflicts that may occur because of the IP address detected on your device. In order to do this, simply follow these steps:

  • Step One: Go into your control panel and click on the option for “Network and Internet,” then select “Network and Sharing Center.” You’ll want to find the option to “change adapter settings,” which is normally located on the left bar of the navigation panel.
  • Step Two: Find the connection method that you are employing (i.e. Wi-Fi network).
  • Step Three: Right-click and find the connection properties menu. Under the TCP/IPV4 menu, click on the option to change your DNS numbers to manual entry and set your preferred DNS server to “8.8.8.8” and your alternate server to “8.8.4.4”.

Once these steps are complete, you can reattempt to connect to the Windows Store. You may need to restart your computer before connecting.

Method Three: Run the Fix It Tool from Windows

Microsoft has created a great tool that can automatically scan your computer for a number of common errors and attempt to fix them as they are encountered. This can be downloaded directly from the Windows site and can be used to try to fix not only Error Code 0x80072ee7 but also many other error messages that may pop up on your computer.

After you have run the Fix It tool, it is always a good idea to restart your computer to allow any changes that have been made to fully take effect.

Method Four: Use An Automated Tool

If you wish to always have at your disposal a utility tool to fix these Windows 10 and other related issues when they do arise, download and install a powerful automated tool.

Read More
Word icon is not showing on .doc & .docx
Recently, a number of users reported seeing plain white icons on their “.docx” files instead of the Word icon. This kind of issue is mostly caused by a conflict with the default program settings in Windows which is why you may not see any Microsoft Word icon on your .docx files. So if you suddenly find that the Microsoft Word icon is either blank or missing and does not show properly on .doc and .docx document files of Office on your Windows 10 computer, then you can check out the potential solutions outlined below. Before you proceed, you can try to restart your computer as there are instances when a simple system restart can resolve some issues like this one. However, if it does not help, create a System Restore point first. This is to ensure that you can always undo the changes you are about to make in case something goes wrong. Once you have that covered, proceed to the following options.

Option 1 – Try to configure .docx files to open with “winword.exe”

You can try configuring the .docx files to open with the winword.exe in order to fix the problem.
  • Right-click on a .docx file and select the “Open with…” option.
  • After that, if a prompt appears with a message saying, “How do you want to open this file”, select the “More apps” option to proceed.
  • Next, scroll down and check the checkbox that says, “Always use this app to open .docx files” option.
  • Then click on the “Look for another app on this PC” link and choose the WINWORD.exe application from one of the following paths based on the installed Office version in your computer and click Open:
    • Word 2016 (64-bit): C:/Program Files/Microsoft Office/root/Office16
    • Word 2016 (32-bit): C:/Program Files (x86)/Microsoft Office/root/Office16
  • Now check if you can now see the Word icon on the .doc or .docx files.

Option 2 – Try changing the default Word icon via Registry Editor

  • Tap the Win + R keys to open the Run utility.
  • Then type “Regedit” in the field and hit Enter to open the Registry Editor.
  • Next, navigate to this path located in the left pane: HKEY_CLASSES_ROOTWord.Document.12DefaultIcon
  • From there, double click on the default value at the right pane and based on the Word version you are using as well as the architecture (32 bit or 64 bit) and then copy-paste the corresponding value in the Value data box:
    • For Word 2016 (64-bit) keep it as C:/Program Files/Microsoft Office/root/Office16/wordicon.exe,13
    • For Word 2016 (32-bit) Keep it as C:/Program Files (x86)/Microsoft Office/root/Office16/wordicon.exe,13
  • Once you’re done, tap Enter and then close the Registry Editor.
  • Restart your computer and see if the problem’s fixed.

Option 3 – Try to rebuild the Icon cache

You may want to rebuild the Icon cache as it could also help fix the issue.
  • Tap Win + E to open File Explorer and then click Folder Options and click Views to show Hidden System Files.
  • After that, go to C:Users%username%AppDataLocal folder and look for a file named Iconcache.db and delete it.
  • Next, go to C:Users%username%AppDataLocalMicrosoftWindowsExplorer.
  • From there, look for the following files and delete them.
    • iconcache_32.db
    • iconcache_48.db
    • iconcache_96.db
    • iconcache_256.db
    • iconcache_1024.db
    • iconcache_1280.db
    • iconcache_1600.db
    • iconcache_1920.db
    • iconcache_2560.db
    • iconcache_exif.db
    • iconcache_idx.db
    • iconcache_sr.db
    • iconcache_wide.dd
    • iconcache_wide_alternate.db
  • Restart your computer. This will purge and rebuild the icon cache.

Option 4 – Try fixing Office apps

Fixing the Office apps can help you resolve the Word icon issue. All you have to do is open Settings > Apps. From the app list, look for the Microsoft Office Desktop apps and select it and then click on the Advanced options and click Fix. After that, wait until the process is completed and restart your PC. However, if the problem still persists, repeat the steps again but this time, click on Reset instead of Fix.

Option 5 – Try to repair Office Installation

If the options given above didn’t work, you can try to repair the Office installation and see if it can fix the problem.
  • Open Control Panel and click on Programs and Features.
  • Next, right-click on the Office program that you want to repair which in this case is, Word.
  • Select Change and click Repair > Continue. After that, Office will start to repair Microsoft Word.
  • Wait until the process is done and then reboot your computer.
Read More
How to Fix the File Too Large Error in Windows 10
If you are trying to copy large files that are over 4GB to a USB flash drive or SD card, but you suddenly get an error message saying, “File Too Large, The file is too large for the destination file system”, read on as this post will help you fix this problem. A user recently reported that while trying to copy a 4.8GB zipped file from a Windows 10 PC to a new 8GB USB drive but only got the File Too Large error message instead. If you share the same problem with this user and you know that there is more than enough available space for the file in your USB drive or SD card, continue reading until you get to the instructions provided in this post so that you will be able to copy the file successfully. It is most likely that the USB drive has been FAT32 formatted which is why you’re unable to copy the file and got an error. The FAT32 file system has a built-in limitation on the size of the individual file that it may contain. For instance, it’s 4GB so even though collectively, it may have files or even 1TB individually it shouldn’t be more than 4GB. Thus, you need to change the file system from FAT32 to NTFS. To do that, carefully follow the instructions provided below.
  • Step 1: Connect the USB drive and open the Windows File Explorer.
  • Step 2: Afterwards, right-click on the USB drive letter and select Format from the context menu.
  • Step 3: Next, select NTFS instead of FAT32 the instant a dialog box appears from the drop-down menu for the file system.
  • Step 4: Now click on the Quick Format option and then click the Start button to reformat the USB drive.
Note: There is also another way you can change the file system. In this alternative way, you need to open an elevated Command Prompt and type the convert X: /fs:ntfs /nosecurity command, and hit Enter to execute it. Remember that in this command, “X” is the letter of your USB drive so whatever the letter of your drive is, you need to make sure to put it instead of “X”. Once the process is completed, try copying the file again.
Read More
Fix Error opening file for writing
If you got encounter an error message saying, “Error opening file for writing” while running a setup file to install some program on your computer, read on as this post will give you some suggestions on how you can fix it. You can encounter this error when running a setup file for installing a program like GlassWire, Notepad++, VLC, Steam, OBS, Mod Organizer, WinpCap, NSIS, FileZilla, BSPlayer, Kodi, Wireshark, rtcore64, qt5core.dll, MSI Afterburner, GWCtlSrv.exe, npf.sys, vcredist_86 and many more. And so when this error pops up while you run a setup file, refer to the steps given below which might help resolve the problem. Step 1: First, you have to make sure that there is no other installation in progress as multiple installations can most likely cause this error to show up. You can restart your computer and try to run the setup file again. Step 2: If you still got the error even after your restart your computer, click on Retry to try again and if it does nothing, click Abort to terminate the installation. After that, go to the folder where you’ve placed the setup file and then delete it. Step 3: Make sure that you have enough disk space on your computer. You can use the Windows 10 Storage Sense feature which can clean all the temporary files from your computer and help you save storage space. To use Storage Sense, follow the steps below.
  • Open Setting > System > Storage from the WinX Menu.
  • From there, you will see a list of all the local and connected storage devices along with the details on the free space.
  • Now make sure that the Storage Sense feature is turned On then go find a link that says “Free Up Space” and click it to open.
  • After that, a screen which is the built-in program in Windows 10 will appear and will scan your computer for the following junk files so you can free up disk space:
  • Windows Upgrade Log Files
  • The system created Windows Error Reporting Files
  • Thumbnails
  • Temporary Internet Files
  • Previous Windows Installation Files
  • Delivery Optimisation Files
  • DirectX Shader Cache
Note: Once you’re done freeing up space on your drive, try to run the setup file again. Step 4: If freeing up space didn’t help, you can just delete the setup file and download another one from the official homepage of the program. From there download the setup file and place it in a different location. After that, run the setup file once again. Step 5: Make sure that you have downloaded the correct setup file according to your operating system, i.e. x64 or x86. Step 6: Restart your computer once more and make sure that you sign in as administrator. After that, right-click on the setup file and click “Run as administrator”. If it still didn’t help, you might want to take ownership of the folder where you saved the setup file. How? Follow the steps below but before you do that, you have to create a System Restore Point first, once that’s done, proceed.
  • First, locate the concerned folder and right-click on it then select Properties.
  • Next, click on the Edit button in the Properties window and click OK to confirm if you got a User Account Control elevation request.
  • After that, select user/group from the permission windows or click on the Add button to add another user or group. It would be best if you add “Everyone” to give permission.
  • Then check “Full Control” under the “Allow” column to assign full access rights control permissions.
  • Now edit the permission to Full Control for “Everyone”.
  • Click OK to save the changes made and then exit.
Read More
How to clear cache inside Windows 11
Cache files are temporary files that have been created by various applications and services when used.  As temporary files, they are safe to be removed and deleted from the system since the application or service will create new ones when needed but sadly will not remove old ones, this task is left to OS itself. windows 11 cacheAutomatic Windows cleanups can mostly take care of these things but for top-notch performance clearing cache manually is a far better option. We will here explore various cache temporary files, where they are, and how to clean them. Sit back and let’s do some cleaning!

Clear cache using Disk Cleanup

  1. Open Start menu and search Disk Cleanup
  2. Click on it in search results
  3. Click on the drives drop-down menu and select the drive where is Windows 11 installed
  4. In the Files to Delete section enable all boxes and click on OK
  5. Click on delete Files to confirm

Clear Microsoft store cache

  1. Press ⊞ WINDOWS + R to open the run dialog
  2. Type in WSReset.exe and press ENTER
  3. Black blank windows will appear, wait for the window to close itself and you are done

Clearing location cache

  1. Press ⊞ WINDOWS + I to open location history
  2. Select Privacy & Security
  3. In the App Permissions section click on Location
  4. On-Location page click on Clear

Clear and flush DNS

  1. Press Start and search for Windows Terminal
  2. Click on Terminal in search results
  3. Type in: ipconfig /flushdns and press ENTER
And that is that!
Read More
Windows keyboard language changes on its own
If you have multiple keyboards, things can get quite tricky. There are times when the keyboard language changes on its own since the keyboard changes while you are typing. The thing is, the keyboard changes because sometimes we accidentally tap shortcuts like Win key + Space key or Alt + Shift or Ctrl + Shift which changes the keyboard pairs or language. Thus, if your keyboard language changes on its own, there are two ways to resolve it. First, you have to make sure that Windows 10 does not add keyboards without your permission. Second, you have to make sure that the shortcut keys don’t change the keyboard language. This second option is what we’re going to discuss in this post. You need to first set a different input method for each app window. To do that, you have to disable the change in layout. Refer to these steps:
  • Go to Settings > Language and input.
  • Next, type “switching input methods” to open the Advanced keyboard settings with this option inside.
  • After that, select the checkbox labeled as “Let me set a different input method for each app window” and then click the Save button.
  • Restart your computer.
Now that you’ve disabled the change in layout, you now have to find the keyboard settings. Just go to Settings > Devices > Typing > Advanced Keyboard settings. From there, you have the option to select which keyboard is going to be used for any app. When you change the keyboard every time you use an app, usually, Windows remember it so that you won’t have to set it up all over again. In addition, the Advanced keyboard settings page also allows you to override the default input method which could be different from the first one in your language list. Aside from that, there is also a Language bar option that comes in handy as you can quickly switch between keyboards. And if you removed it, you have the option to restore the language bar back as well. Now all that’s left for you to do is to change the Language Settings under the Administrative tab. A user from a forum that came up with this solution, reported that the issue occurred when he started typing in some program with non-Unicode characters which caused Windows to use the default system local language to interpret these characters even though the language is unavailable in the Language bar. To change the Language Settings under the Administrative tab, follow these steps:
  • Go to Settings > Time and Language > Language > Administrative language settings.
  • After that, click on Copy Settings under the Administrative tab.
  • Now make sure that all the Display language, Input language, and Format are English (United States) or any language you prefer.
  • Then mark the two checkboxes in “Copy your current settings to Welcome screen and system accounts & New user accounts”.
  • After that, click OK and then exit.
Note: You also have the option to disable those shortcut combinations which can change your keyboard settings accidentally.
Read More
Fixing the Port in use, please wait
Recently, a number of Windows 10 users reported an issue wherein they try to print from their PCs but were unable to and got an error message instead that states, “Port in use, please wait”. However, no matter how long they waited, nothing changed and they were still unable to print from their computers. On the other hand, when some of the users attempted to print wirelessly from their mobile devices, the printing continues which indicates that there is some issue between the computer and the printer. So if you are one of the users who are currently facing this problem, then this post should help. To fix this issue with your Printer, here are some possible fixes you can try that might work.

Option 1 – Run the Printer Troubleshooter

The first thing you can do to fix the “Port in use, please wait” error is to run the Printer Troubleshooter. This built-in troubleshooter in Windows 10 can help you fix most print issues. It checks if you have the latest printer drivers and then tries to fix and update them automatically. Aside from that, it also checks if you have connectivity issues or if the Print Spooler and the required Services are running fine. To run it, follow the steps below.
  • Tap the Win + R keys to open the Run dialog box.
  • Next, type “msdt.exe /id PrinterDiagnostic” in the field and click OK or hit Enter to open the Printer Troubleshooter.
  • Then click the Next button and follow the next on-screen instructions to fix the issue with the printer.

Option 2 – Try updating the Printer drivers

You might also want to try updating your printer drivers. All you have to do is locate the USB Composite Device. For complete details, follow the steps below.
  • First, click the Start button and type “device manager”.
  • Then click on the “Device Manager” from the search results to open it.
  • From there, look for the USB Composite Device option and right-click on it, and select the Update Driver from the options.
  • Restart your PC and then click the “Search automatically for updated driver software” option.
Note: You also have the option to download the latest version of your Printer from the manufacturer’s website.

Option 3 – Try selecting the correct port for your Printer

If the first two options given above didn’t work, then maybe it’s time to select a correct port for your printer since the wrong port has been selected which is why you’re getting the “Port in use, please wait” error.
  • Open “Devices and Printers” from the Start search.
  • Next, look for your printer from the list of devices and right-click on it, and then select Printer Properties.
  • Now go to the Ports tab under the newly opened Properties window and make sure that the port type matches the connection on the list of ports currently in use.
Note: If your printer is using a USB connection then the port should have a USB or DOT 4 in its description but if your printer is using a network connection then it should have the following description:
  • WSD
  • Network
  • IP
And if you notice that there are several listings for the same type of port, you have to change the selection to a different one and then click the OK button to save the changes made.
Read More
1 2 3 171
Logo
Copyright © 2023, ErrorTools. All Rights Reserved
Trademark: Microsoft Windows logos are registered trademarks of Microsoft. Disclaimer: ErrorTools.com is not affiliated with Microsoft, nor claims direct affiliation.
The information on this page is provided for information purposes only.
DMCA.com Protection Status