The Error Code 0xC1900208 – 0x4000C is an error that is caused by an installed application or program on your computer that is not compatible with Microsoft Windows 10. The incompatible application prevents you from being able to complete the upgrade to Microsoft Windows 10 and will continue to do so until the issue is resolved.
Common symptoms include:
You receive a dialog box displaying Error Code 0xC1900208 – 0x4000C
You are unable to successfully complete the Microsoft Windows 10 upgrade process.
Solution
Error Causes
Error Code 0xC1900208 – 0x4000C is caused by a non-compatible application or program that is currently installed on your computer, and is not allowing the Microsoft Windows 10 upgrade to finish the installation and update process.
The upgrade is stopped due to an incompatible app or program.
Out of date or no longer supported software can cause this error to occur.
Device drivers that are not up to date or no longer compatible.
The computer might pick up malware along the way and might be preventing the upgrade. If error code 0xC1900208 – 0x4000C is not rectified, you’ll not be able to proceed with your Windows 10 upgrade.
Further Information and Manual Repair
The good news is, error code 0xC1900208 – 0x4000C is a relatively common problem that is usually easily fixed by the user at home, though it can be a little time-consuming. To elude this time-consuming process, use a powerful tool to rectify the issue in no time (TSC). Before making any attempts to repair this error, ensure to perform a compatibility test.
Check the compatibility of applications and programs installed on your computer to locate and remove, or fix the one that is incompatible. (Don't stop at the first one you find, there could be multiple incompatibility issues.)
Check to ensure all programs and software are not outdated or no longer supported, and remove or fix any outdated or unused, unnecessary programs or software. (This is also a great way to free up space and clean your computer up a bit.)
Check to ensure that all of your device drivers are current, up to date, and compatible with Microsoft Windows 10, and replace or update where necessary.
Method 1:
Use the get Microsoft Windows 10 application on your computer to check its compatibility, follow the steps below to run the check.
Look at the taskbar, to the right; you will see an icon for Microsoft Windows 10, right-click the icon. Locate the option in the menu to check the status of your upgrade. This will open an app for getting Microsoft Windows 10.
Next, you will see 3 lines on top of one another on the upper left side, this will open a drop-down menu, once you have this menu open, locate the option to check the compatibility of your computer.
Microsoft Windows will then run a check of your entire computer to check for compatibility with Microsoft Windows 10. Once it has finished its check, a pop-up window will display whether or not your computer will work with Microsoft Windows 10, and will also display a list of any hardware and software that are not compatible with the upgrade.
This may not catch everything and there may still be incompatible programs so the previous steps, though time-consuming may still be necessary.
Method 2:
Once the incompatible applications are discovered, use the control panel to remove/uninstall them. The steps are below:
Locate your computer’s Control Panel.
Choose the option that says “Programs”
From the options available, select the ‘Programs and Features’ link.
Locate the app in the queue or menu.
Right-click and choose the uninstall option.
… another option
You can also locate the app on the ‘app homepage’, right-click and choose the ‘uninstall’ option. If after following these steps the problem is still not corrected, download and install an automated tool for a quick fix.
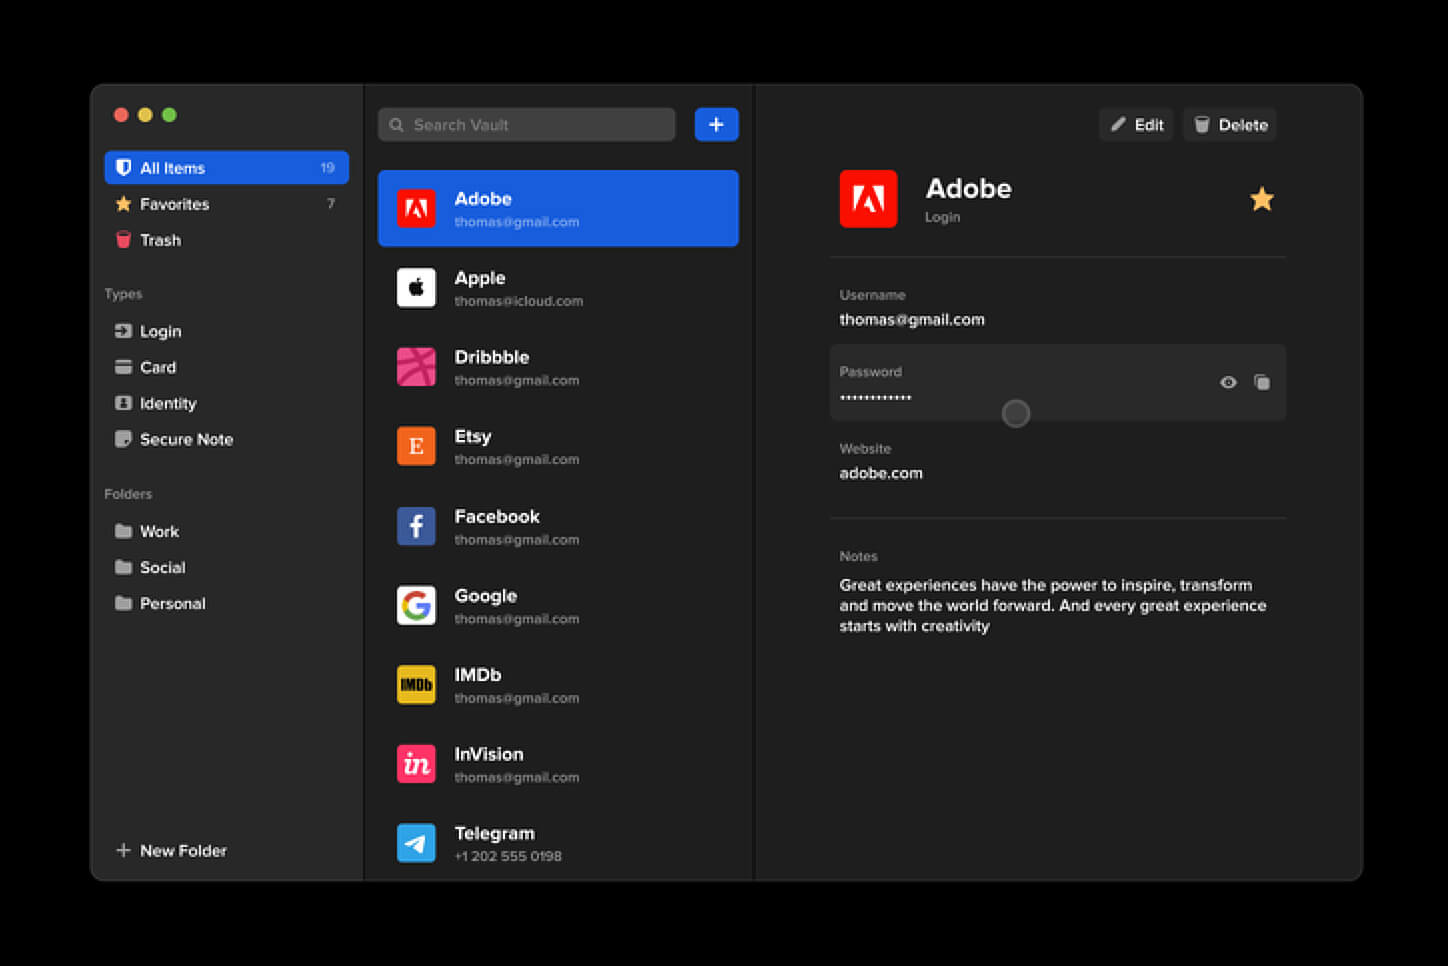
Many times we were talking and writing here on Errortools.com about security, privacy, hacking, identity theft, etc. We tried to raise important security questions and I hope I have managed to at least shed some light and change maybe some bad behaviors for some, helping them embrace better routines about their security on their PC.
In this light, I will today present you with one neat and awesome piece of software, a password manager worth your time and money (if you want premium features): BitWarden.
What BitWarden offers?
The first thing that it offers is the completely free basic plan, granted BitWarden is not an open-source project nor completely free but it has an unlimited free basic plan that will cover 90% of user needs. There is also a free basic unlimited plan for Organizations letting you and one more user share files and other stuff via BitWarden making it a cool option if you need it.
Premium features offer you encrypted sharing of files, two-step login, 1GB file attachments (encrypted), Bitwarden Authenticator (TOTP), Vault Health Reports, Emergency Access, and Priority Support. The cost for all of these additional features is 10 USD per year for an individual plan or 40 USD per year for organizations where you will get an increase of maximum users from 2 to 6. Yes, you read that correctly, only 10 USD per YEAR for the whole set of features. Granted if you do not need any of them, enjoy the free version forever.
Besides very low premium cost BitWarden will offer you compatibility with all major browsers and devices including both Android and iOS platforms making it a great cross-platform solution to login and maintain your passwords anywhere with just one click.
Once installed all you need to do is set one master password and be very careful not to lose or forget this one, if you do all of your other generated passwords will be lost forever.
Features
Secure Password Sharing
Share your encrypted data quickly and easily, and only with the users or teams who need access
Cross-Platform Accessibility
Access critical data in your Bitwarden vault from any location, browser, and device
Cloud-Based or Self-Host
Get up and running in minutes in the cloud or you can self-host Bitwarden for complete data control
Security Audit & Compliance
Open source and third-party audited, Bitwarden complies with Privacy Shield, GDPR, CCPA regulations
Vault Health Reports
Access insightful reports to reveal weak, reused passwords, and other helpful data security metrics
Directory Sync
Our powerful Directory Connector streamlines user and group onboarding and keeps them in sync
Always-On Support
Our Customer Success agents are available to support you around the clock
Detailed Event Logs
Bitwarden creates audit trails to help you keep track of user and group access to sensitive data
Flexible Integrations
Unite your existing systems with Bitwarden using SSO authentication, Directory services, or powerful APIs
Conclusion
There are many password managers out there but via recommendation I have tried BitWarden and truth to be told, I really never felt the need to try anything else, it is great at what it does and it is moving forward with features and it is constantly updated and maintained.
If you have set a static IP address manually in your Windows 10 computer and you encounter an error saying, “This operation failed as no adapter is in the state permissible for this operation”, then you won’t be able to connect to any network.
Many users have reported that they were unable to connect to any network after they set their IP addresses manually and all they see is a red cross symbol on the network icon located at the left-hand side of the taskbar. And upon trying to release the IP configuration and renew the address using Command Prompt or Windows PowerShell, they are getting the error instead. Users also noted that their internet connection is fine since they were able to connect to their Wi-Fi connection on their mobile devices. However, they find it hard to connect to the internet using their PCs. To fix this issue, here are some possible fixes you can check out. Make sure to follow each one of the instructions carefully.
Option 1 – Try to run the Internet Connections troubleshooter
As you were not able to connect to your internet connection using your PC, you can try to run the Internet Connections troubleshooter as it might resolve the problem. Refer to the following steps to run this troubleshooter:
Tap the Win + I keys to open Settings.
After opening Settings, go to Update and Security.
Next, navigate to the Troubleshoot pane and select the Internet Connections section and click the Run Troubleshooter button to get started.
Wait until the troubleshooter is finished doing its job and then try connecting to your network again.
Option 2 – Try to perform Network Reset
As pointed out, the “This operation failed as no adapter is in the state permissible for this operation” error occurs due to the static IP you’ve set. Thus, to fix it, you can try to perform a Network Reset. This will reset the entire network configuration including your IP address. To perform Network Reset, follow these steps:
Tap the Win + I keys to open Settings.
From there, go to the Network and Internet section.
Next, scroll down and look for “Network Reset” under the status pane.
After that, click on Network Reset and then on Reset now to start resetting the network configuration. Once done, check if it is able to fix the error or not.
Option 3 – Try to update or rollback or uninstall the Network drivers
You might also want to update, roll back, or disable your Network drivers to fix the “This operation failed as no adapter is in the state permissible for this operation” error.
Tap the Win + R keys to launch the Run window and then type in the “MSC” command and hit Enter to open the Device Manager window.
Under the Device Manager, you will see a list of drivers. From there, look for the Network Adapters and expand it.
Then right-click on each one of the Network drivers and depending on your preference, you can either select “Update driver”, “Disable device” or “Uninstall device”.
After that, restart your PC and see if it helped in fixing the netio.sys Blue Screen error.
Option 4 – Try to reset Winsock, TCP/IP & Flush DNS
You might also want to try resetting Winsock, TCP/IP, and flushing DNS might help you resolve errors. To do so, follow these steps:
Right-click on the Start button and click on Command Prompt (administrator) so you can pull up an elevated Command Prompt.
After that, execute each one of the commands listed below. And after you typed in one after the other, you have to hit Enter.
netsh winsock reset – type in this command to reset Winsock
netsh int ip reset resettcpip.txt – type in this command to reset TCP/IP
ipconfig /flushdns – type in this command to flush the DNS cache
Next, restart your PC and check if the problem’s fixed.
Option 5 – Temporarily disable Firewall and third-party antivirus
Firewall and antivirus programs are known to block files the instant it detects a threat to the system. However, there are some cases when it can also block a file even when it’s a safe one. Thus, your antivirus or firewall programs might be the reason why you can’t download anything on your Windows 10 computer. To isolate the issue, you need to temporarily disable both the Firewall and antivirus programs and then check if you can now download anything from the internet. Do not forget to enable them again as disabling them can leave your computer vulnerable to cyber threats.
Steam Autumn sale is still raging and other storefronts like EPIC and GOG have also had their go, and as the year slowly closes we reflect on the best games released this year.
The games presented are not in any particular order and as sales are still raging pick one for you for a good time.
F1 Manager 22
If you are into formula racing this new manager is something we will wholeheartedly recommend. How it has been a very long time since a good F1 manager has been released this one is breath of fresh air. Masterfully done and fun to play, also licensed with real teams and cars get it here: https://store.steampowered.com/app/1708520/F1_Manager_2022/
Stray
I like cats, but this game is on another level from its competitors. Unique approach, great storyline, and of course orange cat as the main character! Set in a cyberpunk environment following the story of some unfortunate androids you can do most cat things like playing in boxes, etc but essentially the game is a puzzle platformer which in my opinion is a great thing. Meow your things and get the game while it is discounted: https://store.steampowered.com/app/1332010/Stray/
Neon White
Mirror's Edge was the very unique game when it was released introducing parkour into the gaming world, and Neon white brings it one level up. With competitive parkour FPS gameplay this game is great for killing some time and competing with your friends but most of all it is fun to play experience. Get it here: https://store.steampowered.com/app/1533420/Neon_White/
This game needs to be experienced in order to fully grasp its magnitude and quirkiness. From the creators of borderlands comes a new IP fusion of fantasy, guns, and crazy ideas all wrapped into an action RPG looter shooter with a recognizable borderlands style of graphics. https://store.steampowered.com/app/1286680/Tiny_Tinas_Wonderlands/
Norco
Winner of multiple awards, Norco is a classic point-and-click adventure game with a great sci-fi story with a lot of environmental focus. Story and atmosphere are the main selling points for the game and if you enjoy good stories with interesting characters give this one a go: https://store.steampowered.com/app/1221250/NORCO/
Final Fantasy 14: Endwalker
Expansion for Massive multiplayer online roleplaying game brings so much to the table that we just could not oversee it and place it aside. Technically not full standing game since it is the expansion it still delivers on many fronts and since it is supposedly the last expansion now is the best time to pick it up and give a final fantasy 14 a go: https://store.steampowered.com/app/1592500/FINAL_FANTASY_XIV_Endwalker/
Elden Ring
Of course, the list would not be complete if we did not include Elden ring, a great example of how a difficult but well-executed game can go over and beyond. With a story on par with great epics and compact as in dark souls, this title will provide you with many hours of gameplay and content. https://store.steampowered.com/app/1245620/ELDEN_RING/
Fatal error C0000034 happens during the installation of the Windows update and if you are one of the unlucky users who sadly run into this, keep reading as we will provide solutions to this error and how to get around it.
Start from point 1 to the bottom and hopefully you will have your PC back into working order in no time.
Run Windows Update troubleshooter
Usually, a built-in Windows troubleshooter can solve issues painlessly and fast, my advice is to try this as the first option, it is a simple and clean solution worth trying and in 90% it solves the issue all by itself.
Do a clean boot
Using task manager, remove all nonessential applications and services from starting up, reboot your computer, and once it is cleanly booted try re-running the update process again, if the issue was running the application this time everything will work since the problematic application is not running.
Reset Windows update components to the default
This solution requires you to use the Reset Windows Update Agent Tool to reset Windows Update components to default or use this PowerShell script to reset Windows Update Client. You can also manually reset each Windows Update component to default and then re-run the update.
Disable firewall and antivirus
Altho not likely it is still a possibility that some firewalls and antivirus can detect windows updates as malicious software and cut them off. If everything else failed, disable the firewall and your PC protection and when it is fully disabled try updating.
Do automatic startup repair
This should be the last thing to do but if everything else failed, do it. Perform Windows 10 Startup Repair. Once the startup repair completes successfully, you can re-run the update. The update should install without errors.
Setting up the Windows operating system in a computer can be quite a complicated task since there are a couple of things that take place in the background to ensure a full and protected setup of the operating system which includes a number of programs, scripts, and so on. They work together in the background to guarantee the integrity of the Windows operating system. However, there are times when this piece of code could also go wrong. As a result, you might encounter errors like the “There was a problem running preinstall.cmd scripts” error. “Preinstall.cmd” is a type of CMD file associated with Applications & Drivers developed by Gateway for the Windows OS.
To fix the “There was a problem running preinstall.cmd scripts” error, there are several things you can try. You can try to download a new Windows installation image or create a new bootable drive as well as uninstall conflicting or incompatible programs. In addition, you can also run the Windows Update troubleshooter or reset Windows 10.
Option 1 – Try to download a new Windows installation image
Your first option to fix the “There was a problem running preinstall.cmd scripts” error is to download a new Windows installation image. You can get the official ISO files for the latest release of Windows 10. After you’ve downloaded the ISO files, you can use them to upgrade to the latest Windows 10 version.
Option 2 – Try creating a new bootable drive
Insert your USB drive into your PC.
Tap the Win + R keys to open the Run dialog box and type in “cmd” and tap Enter to open the Command Prompt. Alternatively, you can also search for “cmd” in the Cortana search box to open Command Prompt.
Once you’ve opened CMD, type in this command to open the DISPART utility – diskpart
After that, you should see a new black and white window that would say, “DISKPART>”.
Next, type in “list disk” in the command line and tap Enter to see the list of all the Storage devices as well as your hard disk connected to your PC. Here, you have to identify your disk’s number.
Type in this command where “X” is the disk number you have identified and then tap Enter – disk X
Type in this command and hit Enter to clear the table records and all the visible data on the drive – clean
Now you have to recreate a new primary partition of the drive so you’ll have to type in this command and tap Enter right after – create part pri
A new primary partition has been created so you have to select it by typing this command and tapping Enter – select part 1
Now you have to format it to make it visible to normal users by typing – format fs=ntfs quick
Note: If your platform supports the Unified Extensible Firmware Interface or UEFI, replace the “NTFS” with “FAT32” in the command on Step 10.
After that, type in this command and tap Enter after – active
Finally, type this command and hit Enter to exit the utility – exit
After you prepare the image for the operating system, save it to the root of your USB Storage device.
Option 3 – Try to uninstall conflicting programs
If you are using a computer made by Dell and got Windows 10 preinstalled in it, then you can try to uninstall the programs listed below and see if it fixes the problem.
Dell Encryption Management service
Dell Digital Library service
Option 4 – Run the Windows Update Troubleshooter
You might also want to run the built-in Windows Update Troubleshooter in Windows that could help you in resolving the “There was a problem running preinstall.cmd scripts” error. All you have to do is go to Settings > Update& security > Troubleshoot > Windows Update. From there, click on the Run the troubleshooter button and follow the next one-screen instructions that appear. After that, restart your computer and check if the error is now fixed or not by trying to install the update once again.
Option 5 – Run Microsoft’s online troubleshooter
Running Microsoft’s online troubleshooter might also help you fix the error. This online troubleshooter is known to help in fixing Windows Update errors, it scans your computer for issues that might be causing the problem and then fixes them automatically.
Option 6 – Try to reset Windows 10
Tap the Win key or click on the Start button located in the Taskbar.
Then click on the Power button at the bottom right portion of the screen.
Next, press and hold the Shift key on your keyboard and then click on Restart. This will restart your Pc into the Advanced Startup options.
Note: Once you have access to the Advanced Startup options, you have to go to the setting which allows you to Reset your Windows 10 PC. All you have to do is select Troubleshoot > Reset this PC to reach the following screen
Afterward, select either the “Keep my files” option and then proceed to the next on-screen instructions that follow to reset your Windows 10 computer without losing your files.
Computer upgrades are the most common and most efficient ones. RAM upgrade is one of the easiest ones you can do and the most common ones but even as simple an upgrade as this one can cause certain issues.
If you are experiencing error 0164, memory size decreased after RAM upgrade we are offering you solutions on how to fix this particular error and get your computer back in working order.
Change BIOS settings
Enter your motherboard BIOS (usually by pressing the del key on startup)
Load BIOS defaults
Save changes and exit
If the Error 0164: Memory size decreased issue persists even after loading setup defaults, then it must be configured manually inside the BIOS.
Clear CMOS
Follow the instructions precisely:
Turn off all peripheral devices connected to the computer.
Disconnect the power cord from the AC power source.
Remove the computer cover.
Find the battery on the board. The battery may be in a horizontal or vertical battery holder or connected to an onboard header with a wire.
If the battery is in a holder, note the orientation of the + and – on the battery. With a medium flat-blade screwdriver, gently pry the battery-free from its connector.
If the battery is connected to an onboard header with a wire, disconnect the wire from the onboard header.
We have all experienced Windows errors over time and that can range from simple ones that will do very little to no harm and can be even system breaking making us lose our work or completely making the PC unusable. No one likes them but they happen, and usually, they happen once we least expect them.
No matter how frequent and unpleasant they might be there are ways to keep them at the minimum and even avoid them.
We will discuss steps that you can take in order to do this, simple tips and guides on how to keep your computer in top form and eliminate not just Windows, but any kind of errors altogether.
Keep your hardware clean
Believe it or not, some serious Windows errors like the dreaded blue screen of death can come from hardware issues not from the software at all. It is very important to keep your computer clean and with enough air flow so it can function properly.
Keeping applications on the drive might seem harmless but sadly that is not the case. Some applications have a certain impact on the system itself after all most of them are tweaking registry entries in Windows and sometimes having too many applications means an increased possibility of conflict over certain resources even when they are not running.
Some applications like adobe creative suite, for example, will have certain services always running in the background, and more of these kinds of applications you have, more services, more places for unexpected errors when they collide. Some of them will also install certain dependencies that could be problematic.
The general idea is: if you are not using it, uninstall it and you will be safer and more resilient to errors inside OS.
Do not use pirated or cracked software
Besides moral and law implications that using pirated or cracked software might bring you there are also certain other things that might be problematic. Certain "free" software might come packet with some problematic malware, for example, it is not uncommon for attackers to use some popular software to pack their malicious application with it.
Other things might be wrong and incomplete tweaking with application in order to bypass security and thus bringing some instability due to scripts needed to run in order to achieve this goal.
Keep your drivers updated
Errors can also come from old drivers or bad drivers, device manufacturers are not all-knowing and perfect, and sometimes drivers can wreak havoc on the system. Having updated drivers can minimize any kind of unexpected behaviors inside the operating system making it more stable and reliable.
You can check your driver version in the control panel inside the Windows OS and then compare it to the ones found on the manufacturer's site, if there are newer available it is recommended to download and install them,
Keep software updated
Applications can have bugs, and bugs can lead to certain errors both in the system and when using the app as well. It is in your best interest to get the latest patch or newer version of the software in order to avoid these unpleasant experiences.
Also, certain codecs and extensions that are installed directly in Windows can also have some unpredictable behavior, updating is the best solution to keep them in line.
Keep Windows updated
Same as with drivers and applications, Windows itself is not immune from bugs and some unpredictable issues. Luckily Microsoft is always working on fixes and features of Windows but in order to actually have benefited from that work, you will need to keep Windows updated. Sometimes a bad update can introduce some errors but you can always roll back to the previous and wait for them to fix everything and then download them all.
Check the health of your hardware regularly
Hardware components have their life cycle, more quality ones tend to last longer but eventually, they will reach the end of their lifecycle. There are a lot of testers for various components in your computer that can check different things and provide you with information about the state of your components.
If you are on Windows 11, Microsoft has included a basic health app inside OS, just type PC health check in search and start the app. For some more detailed information and advanced checks, you will have to use a custom application. There are plenty of them specialized for single components like RAM, SSD, etc. A simple google search with providing you with top results and most of them are free for personal use.
Remember, a faulty component or component that is reaching its life cycle can produce many errors inside the operating system.
A PC that turns on by itself every so often can get quite annoying. Many users have faced this problem countless times. There are lots of possible reasons why your Windows 10 PC turns on by itself, wakes up from sleep, standby, or even when it’s shut down.
To find out what exactly woke your computer, simply open Command Prompt as admin and type the following command:
powercfg –lastwake
Once you enter the command given above, it will show you the last device that woke your PC up. After that, you need to type in the next command:
powercfg –devicequery wake_armed
After entering the command, it will show you a list of all the devices that could wake your PC up. The goal in running these commands is to understand the reason what’s really causing your PC to turn on and see the reason is on the hardware level or not. Here are a couple of options you can try if your Windows 10 PC turns on by itself.
Option 1 – Try disabling Fast Startup
As you know, Windows 10 comes with a mode called Fast Startup which does not turn off the computer in the usual manner. This mode keeps your computer in a mixed state so that when you turn it on again, it will be a lot faster. However, as useful as this feature appear to be, some security experts find this an issue, for numerous reasons – for one, it can turn on your Windows 10 PC by itself. Thus, you need to disable this feature to fix the problem.
Option 2 – You need to stop the Task Scheduler from waking up your computer
There are times when the issue has something more to do with the software than hardware. It could be that you are using a Scheduled Task to get some work done on your computer at a particular time of the day or many times a day. That’s why if you really are using Task Scheduler, you need to change the Power settings of Windows to make sure that it ignores those tasks rather than deleting them instead when your computer is either on Hybrid or Standby mode.
Open the Power Options and then click on “Change Plan Settings”.
After that, make sure to choose the correct power plan and then select the “Change advanced power settings” option.
Next, look for the Sleep tree and expand it to view the “Allow Wake Timers” option and then disable it. Disabling this option will make sure that none of the program that could wake your PC up when it’s either on shutdown or sleep mode. However, this only applies to laptops.
Option 3 – Try to disable Automatic Restart
There are instances when the computer crashes and the system restarts itself. This is actually by design – when your computer has been left on standby, the computer will restart and if the program repeats, it will keep on waking your PC up.
In the Search bar, type in “system”.
Once it appears from the search results, click on it.
Next, select Advanced system settings on the left side and then go to the Advanced tab.
From there, click on Settings under Startup and Recovery.
Then unmark “Automatically Restart” and click on OK.
Option 4 – Adjust the Power Management option of both the Keyboard and Mouse
As you know, two of the culprits in waking your PC up are the keyboard and the mouse. If they’re slightly moved or hit, your PC turns on. To prevent these two from waking your computer up, you need to make some adjustments to their power management option since they have one. You can disable this option to ensure that they won’t wake your PC up unless you really want it to.
Tap the Win + X keys and then tap M to open the Device Manager and list all the hardware on your computer. From there, select your keyboard or mouse.
Next, right-click and then go to Properties and go to the Power Management tab.
In this tab, uncheck the “Allow this device to wake the computer” box.
Note: Aside from the keyboard and mouse, if you are also using any gaming rig to play games on your computer, then you might have to disable their power options as well as they could also wake your computer. Just make sure that either the keyboard or the mouse has the ability to wake your computer up at the very least as it can be quite inconvenient to tap the Power button every time you want to turn on your computer.
Option 5 – Modify Wake On Lan
The Wake On Lan feature can bring back your computer online if it is connected to a network. This feature is useful especially when a computer wants to communicate or to send data or files to a network computer which should come online only when it’s requested. Wake On Lan is built into the hardware, i.e. network adapter so it is one of the possible reasons why your PC turns on by itself.
Tap the Win + x keys then hit M to open the Device Manager and then under the Network adapters, look for the one that was listed above. Take note that you must not change anything with the ones that are listed as Miniport.
Next, right-click and select Properties and then go to Power management and from there, uncheck the “Allow this device to wake up the computer” option. This will ensure that no PC on the network can ever wake your computer up.
Option 6 – Prevent any scheduled Windows Update and Automatic maintenance
It is also possible that the Windows Update has restarted your PC to complete the update. This depends on your active hours or a predefined schedule. AS you know Windows has a built-in Automatic Maintenance mode which wakes the computer up at the scheduled time and performs the system update. This could be one of the possible reasons why your computer turns on by itself. so to prevent any scheduled updates and maintenance, you can simply change the time for Automatic maintenance. How? Follow these steps:
Open Settings then go to Windows Update and Security >Windows Update and select Active Hours.
After that, type in “Automatic maintenance” in the search bar to change the time for Automatic maintenance.
From there, you can adjust the timing or just uncheck the “Allow scheduled maintenance to wake up my computer at the scheduled time” box.
Libmysql.dll is missing or not found error appears in Windows when the user is trying to open and run the application.
In this guide, we will offer you solutions on how to fix and remove this annoying error.
Check recycle bin
Some applications or purely by accident itself libmysql.dll gets deleted. If you have not turned recycle bin off go to it and check to see if the file is by any chance there. If you find it, right-click on it, choose restore, the error will be gone.
Update drivers
Press ⊞ WINDOWS + X to open the Windows menu and click on Device manager
In device manager locate device which has alert mark next to it
Right-click on it and choose update driverReboot your computer
Run SFC scan
Press ⊞ WINDOWS + X and choose command prompt (admin)
In command prompt type in sfc /scannow and press ENTERwait for the operation to complete and Reboot your system
Reinstall application
if you are getting an error only on one application or an error has started to appear after the installation of a particular application go to Windows applications, uninstall it and then install it again. There is a chance that the file has been corrupted during the installation process.
When you try to open a website but instead encounter an “Access Denied, You don’t have permission to access on this server” error message along with the ULR which you aren’t able to access with a reference number, then it is most likely caused by some network-related issue in your browser. Note that this error mostly occurs on Firefox browsers.
The “Access Denied” error appears when your Mozilla Firefox browser uses a different proxy setting or VPN instead of what’s really set on your Windows 10 PC. Thus, when a website detected that there is something wrong with your browser cookies or your network, it blocks you which is why you can’t open it. To resolve this error, here are some suggestions you can try. And if you got the same error message on a different browser, you can still follow the possible solutions given below.
Option 1 – Try clearing everything about the website
Open your browser and tap the Ctrl + H keys on your keyboard.
After that, look for the listing of the website from your browser history and right-click on it.
Then select the “Forget about this site” option. This will get rid of all the data such as browsing history, cache, cookies, and passwords. Thus, if you have a password saved or other important data of the website, you have to save it first before you tap the Ctrl + H keys.
Option 2 – Try disabling the VPN
As pointed out earlier, if you are using VPN, this could be the reason why you’re getting the “Access Denied” error so the most obvious thing to do is for you to turn off the VPN and try to run the Windows Update once more. And if you use a VPN software that works using their software, you can just completely exit or log-off from its account. On the other hand, if you are using a built-in Windows 10 VPN, you can simply turn it off or delete all the settings you have created there.
Option 3 – Uninstall the VPN service you are using or use a different provider
If you disabling the VPN service worked in fixing the “Access Denied” error, you might want to uninstall it. As mentioned, website administrator blocks IP ranges if they notice any malicious activities and because of this, your IP address might fall into the banned range even if you didn’t do anything at all. To uninstall the VPN service, follow the steps below.
Tap the Win + R keys to open the Run dialog box
Then type “appwiz.cpl” in the field and hit Enter to open the Programs and Features in Control Panel.
From there, look for the VPN service you are using, select it and then click on Uninstall to remove it.
After that, restart your computer and try to install the latest version of the program again. It should work now. If not, proceed to the next available option below.
Option 4 – Try disabling the proxy server for your LAN
If your PC was just attacked by some adware or malware as of late, it is possible that it has changed the network settings in the system and might display spam advertisements. Thus, you have to disable the proxy server for your LAN. To do that, refer to these steps:
Tap the Win + R keys to open the Run dialog box.
Then type “inetcpl.cpl” in the field and hit Enter to pull up the Internet Properties.
After that, go to the Connections tab and select the LAN settings.
From there. Uncheck the “Use a Proxy Server” option for your LAN and then make sure that the “Automatically detect settings” option is checked.
Now click the OK and the Apply buttons.
Restart your PC.
Note: If you are using a third-party proxy service, you have to disable it.


 Many times we were talking and writing here on Errortools.com about security, privacy, hacking, identity theft, etc. We tried to raise important security questions and I hope I have managed to at least shed some light and change maybe some bad behaviors for some, helping them embrace better routines about their security on their PC.
In this light, I will today present you with one neat and awesome piece of software, a password manager worth your time and money (if you want premium features): BitWarden.
Many times we were talking and writing here on Errortools.com about security, privacy, hacking, identity theft, etc. We tried to raise important security questions and I hope I have managed to at least shed some light and change maybe some bad behaviors for some, helping them embrace better routines about their security on their PC.
In this light, I will today present you with one neat and awesome piece of software, a password manager worth your time and money (if you want premium features): BitWarden.