Fix Windows Update Install Error 0x80070020

Getting a few errors here and there when updating your Windows 10 computer is not uncommon. Some of these errors won’t allow the Windows Update service to initiate while the other ones will halt the process while it’s running. So in this post, we’ll show you what you can do to fix the Windows Update error 0x80070020.

The Windows Update error 0x80070020 is most likely caused by some programs installed in the system which interferes with the Windows Update process. It might be an antivirus program, an incompatible program, a potentially unwanted program, or worse, malware. In addition, corrupted or missing files might also be the culprit. Whichever the cause may be, here are some suggestions you need to check out to resolve the problem.

Option 1 – Try to reset the Windows Update components manually

  • To manually reset the Windows Update components, first, you need to stop the Background Intelligent Transfer Service, Windows Update, and the Cryptographic Services. To do so, run the following command in Command Prompt and make sure to press Enter after you enter each one of them:
    • net stop bits
    • net stop wuauserv
    • net stop cryptsvc
  • Next, delete the “qmgr*.dat” file in order to reset the Windows Update components. To do delete this file, run the following command in Command Prompt:
    • Del “%ALLUSERSPROFILE%Application DataMicrosoftNetworkDownloaderqmgr*.dat
  • Now you have to rename both the SoftwareDistribution and Catroot2 folders by entering the following command in Command Prompt:
    • Ren %systemroot%SoftwareDistributionSoftwareDistribution.bak
    • Ren %systemroot%system32catroot2catroot2.bak
  • Reset BITS and Windows Update service by entering the following commands in Command Prompt:
    • sc.exe sdset bits D:(A;;CCLCSWRPWPDTLOCRRC;;;SY)(A;;CCDCLCSWRPWPDTLOCRSDRCWDWO;;;BA)(A;;CCLCSWLOCRRC;;;AU)(A;;CCLCSWRPWPDTLOCRRC;;;PU)
    • sc.exe sdset wuauserv D:(A;;CCLCSWRPWPDTLOCRRC;;;SY)(A;;CCDCLCSWRPWPDTLOCRSDRCWDWO;;;BA)(A;;CCLCSWLOCRRC;;;AU)(A;;CCLCSWRPWPDTLOCRRC;;;PU)
  • Now enter the following command:
  • cd /d %windir%system32
  • RE-register BITS and other Windows Update related files by typing each one of the following commands:
    • regsvr32.exe atl.dll
    • regsvr32.exe urlmon.dll
    • regsvr32.exe mshtml.dll
    • regsvr32.exe shdocvw.dll
    • regsvr32.exe browseui.dll
    • regsvr32.exe jscript.dll
    • regsvr32.exe vbscript.dll
    • regsvr32.exe scrrun.dll
    • regsvr32.exe msxml.dll
    • regsvr32.exe msxml3.dll
    • regsvr32.exe msxml6.dll
    • regsvr32.exe actxprxy.dll
    • regsvr32.exe softpub.dll
    • regsvr32.exe wintrust.dll
    • regsvr32.exe dssenh.dll
    • regsvr32.exe rsaenh.dll
    • regsvr32.exe gpkcsp.dll
    • regsvr32.exe sccbase.dll
    • regsvr32.exe slbcsp.dll
    • regsvr32.exe cryptdlg.dll
    • regsvr32.exe oleaut32.dll
    • regsvr32.exe ole32.dll
    • regsvr32.exe shell32.dll
    • regsvr32.exe initpki.dll
    • regsvr32.exe wuapi.dll
    • regsvr32.exe wuaueng.dll
    • regsvr32.exe wuaueng1.dll
    • regsvr32.exe wucltui.dll
    • regsvr32.exe wups.dll
    • regsvr32.exe wups2.dll
    • regsvr32.exe wuweb.dll
    • regsvr32.exe qmgr.dll
    • regsvr32.exe qmgrprxy.dll
    • regsvr32.exe wucltux.dll
    • regsvr32.exe muweb.dll
    • regsvr32.exe wuwebv.dll
  • Now type each one of those commands below.
    • net start bits
    • net start wuauserv
    • net start cryptsvc

Option 2 – Install the updates in a Clean Boot State

You might want to try putting your computer in a Clean Boot state and then install Windows Updates again without any trouble. During this state, you can start the system with a minimum number of drivers and startup programs that will surely help you in isolating the root cause of the issue.

  • Log onto your PC as an administrator.
  • Type in msconfig in the Start Search to open the System Configuration utility.
  • From there, go to the General tab and click “Selective startup”.
  • Clear the “Load Startup items” check box and make sure that the “Load System Services” and “Use Original boot configuration” options are checked.
  • Next, click the Services tab and select the “Hide All Microsoft Services” check box.
  • Click Disable all.
  • Click on Apply/OK and restart your PC. (This will put your PC into a Clean Boot State. And configure Windows to use the usual startup, just simply undo the changes.)
  • After that, try to install the Windows Updates or upgrade again.

Option 3 – Clear the contents of both the SoftwareDistribution and Catroot2 folders

  • Open the WinX Menu.
  • From there, open Command Prompt as admin.
  • Then type in the following command – don’t forget to hit Enter right after typing each one of them.

net stop wuauserv

net stop bits

  • After entering these commands, it will stop the Windows Update Service and the Background Intelligent Transfer Service.
  • Next, go to the C:/Windows/SoftwareDistribution folder and get rid of all the folders and files thereby tapping the Ctrl + A keys to select them all and then click on Delete. Note that if the files are in use, you won’t be able to delete them.
  • Once all the contents in the Software Distribution folder are deleted, restart your PC and then go back to Command Prompt and input the following commands again.

net start wuauserv

net start bits

 Since the folder has already been flushed, it will be populated afresh the instant your restart your computer and open Windows Update.

Option 4 – Try to run the Windows Update Troubleshooter

Running the built-in Windows Update troubleshooter could also help you resolve the Windows Update error 0x80070020. To run it, go to Settings and then select Troubleshoot from the options. From there, click on Windows Update and then click the “Run the troubleshooter” button. After that, follow the next on-screen instructions and you should be good to go.

Option 5 – Try restarting the Windows Update Services

  • Open the Services Manager.

From there, make sure that you set the following services and Startup types:

  • Background Intelligent Transfer Service: Manual
  • Cryptographic Service: Automatic
  • Windows Update Service: Manual (Triggered)

Do You Need Help with Your Device?

Our Team of Experts May Help
Troubleshoot.Tech Experts are There for You!
Replace damaged files
Restore performance
Free disk space
Remove Malware
Protects WEB browser
Remove Viruses
Stop PC freezing
GET HELP
Troubleshoot.Tech experts work with all versions of Microsoft Windows including Windows 11, with Android, Mac, and more.

Share this article:

You might also like

What is Trojan Kryptik and what does it do
Trojan. Kryptik is a malicious computer infection known as a Trojan horse. Trojan. Kryptik can load at startup and recreate itself which makes it difficult to manually remove from the infected computer. Trojan. Kryptik can compromise the infected system by allowing a remote hacker to gain access without the user's permission or knowledge. Trojan. Kryptik can also lead to the infection of other unknown malware parasites.

trojan kryptic
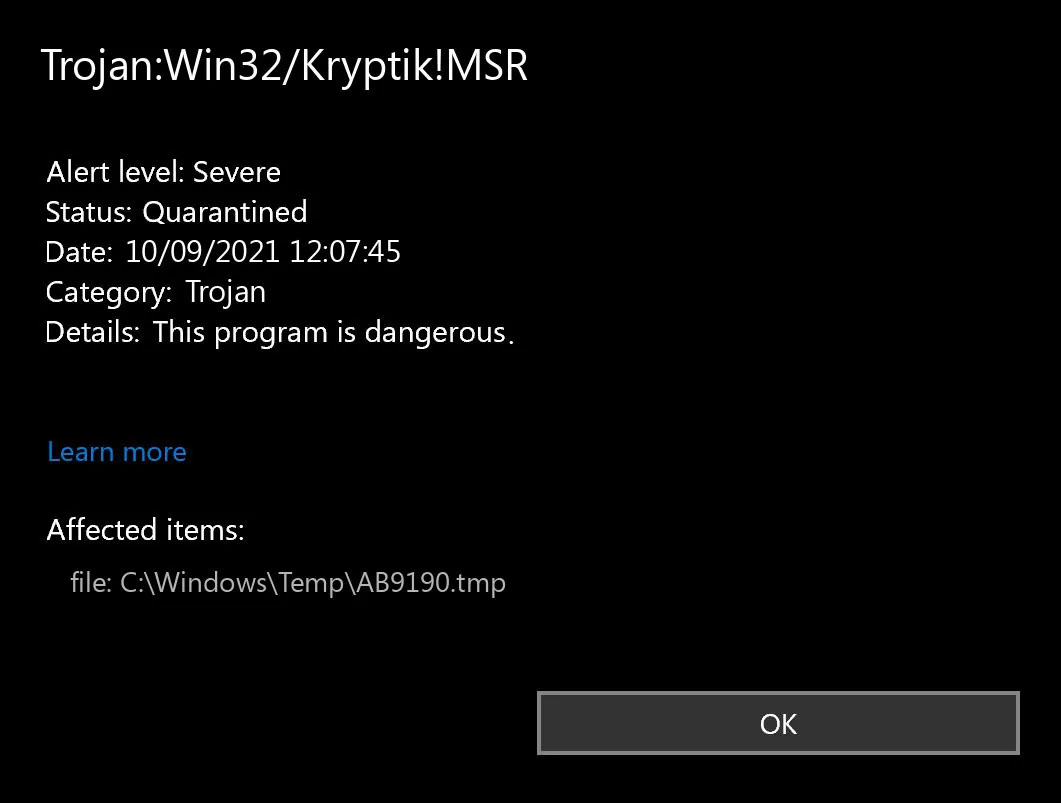
Trojan.Kryptik creates the following registry entry or registry entries:

Directory %ALLUSERSPROFILE%\windrivgr 19.7 %LOCALAPPDATA%\DsHcaJnIIz File name without path scaalqtw.exe Regexp file mask %ALLUSERSPROFILE%\sqldump.exe %APPDATA%\b[NUMBERS].exe %APPDATA%\Microsoft\Windows\Start Menu\Programs\Startup\[RANDOM CHARACTERS].com.url %APPDATA%\Origin\update.vbe %APPDATA%\Stanfind.exe %APPDATA%\vpn gui.exe %LOCALAPPDATA%\Microsoft\Windows\Symbols\wvfilters.sys %TEMP%\nvc.exe %TEMP%\system.exe %TEMP%\winsrvcs32.exe
Read More
Android malware spies while posing as a Update
New malware with extensive spyware capabilities steals data from infected Android devices and is designed to automatically trigger whenever new info is read to be exfiltrated. The spyware can only be installed as a 'System Update' app available via third-party Android app stores as it was never available on Google's Play Store. This drastically limits the number of devices it can infect, given that most experienced users will most likely avoid installing it in the first place. The malware also lacks a method to infect other Android devices on its own, adding to its limited spreading capabilities. However, when it comes to stealing your data, this remote access trojan (RAT) can collect and exfiltrate an extensive array of information to its command-and-control server. Zimperium researchers who spotted it observed it while "stealing data, messages, images and taking control of Android phones."

What happens when malicious software is installed

"Once in control, hackers can record audio and phone calls, take photos, review browser history, access WhatsApp messages, and more," they added. Zimperium said its extensive range of data theft capabilities includes:
  • Stealing instant messenger messages;
  • Stealing instant messenger database files (if the root is available);
  • Inspecting the default browser's bookmarks and searches;
  • Inspecting the bookmark and search history from Google Chrome, Mozilla Firefox, and Samsung Internet Browser;
  • Searching for files with specific extensions (including .pdf, .doc, .docx, and .xls, .xlsx);
  • Inspecting the clipboard data;
  • Inspecting the content of the notifications;
  • Recording audio;
  • Recording phone calls;
  • Periodically take pictures (either through the front or back cameras);
  • Listing of the installed applications;
  • Stealing images and videos;
  • Monitoring the GPS location;
  • Stealing SMS messages;
  • Stealing phone contacts;
  • Stealing call logs;
  • Exfiltrating device information (e.g., installed applications, device name, storage stats).

How does it work?

Once installed on an Android device, the malware will send several pieces of info to its Firebase command-and-control (C2) server, including storage stats, the internet connection type, and the presence of various apps such as WhatsApp. The spyware harvests data directly if it has root access or will use Accessibility Services after tricking the victims into enabling the feature on the compromised device. It will also scan the external storage for any stored or cached data, harvest it, and deliver it to the C2 servers when the user connects to a Wi-Fi network. Unlike other malware designed to steal data, this one will get triggered using Android's contentObserver and Broadcast receivers only when some conditions are met, like the addition of a new contact, new text messages, or new apps being installed. "Commands received through the Firebase messaging service initiate actions such as recording of audio from the microphone and exfiltration of data such as SMS messages," Zimperium said. "The Firebase communication is only used to issue the commands, and a dedicated C&C server is used to collect the stolen data by using a POST request."

Camouflage

The malware will also display fake "Searching for the update.." system update notifications when it receives new commands from its masters to camouflage its malicious activity. The spyware also conceals its presence on infected Android devices by hiding the icon from the drawer/menu. To further evade detection, it will only steal thumbnails of videos and images it finds, thus reducing the victims' bandwidth consumption to avoid drawing their attention to the background data exfiltration activity. Unlike other malware that harvests data in bulk, this one will also make sure that it exfiltrates only the most recent data, collecting location data created and photos taken within the last few minutes. If you would like to read more helpful articles and tips about various software and hardware visit errortools.com daily.
Read More
A required device isn’t connected
If you are currently facing the “A required device isn’t connected or cannot be accessed” error with codes 0xc0000185, 0xc0000225, 0xc0000001, 0xc00000f, and 0xc000000e on your Windows 10 computer, worry not for this post will help you resolve this problem. All these error codes point out the same thing – your computer needs to be repaired. Some of these error codes are related to the “winload.efi” file which means that you are using the UEFI system. This file also loads up important drivers in order to start the Windows Kernel. And if you got a remark from any of these error codes indicating that there is a hardware failure or that the driver configuration is incorrect, then you must physically check if the wires are connected properly. This kind of error occurs mostly when your computer wasn’t able to locate the system files that are needed to boot up your computer. Thus, the only way to fix this problem is to correct the boot record. It is recommended that you utilize the “/RebuildBCD” option in order to rebuild the BCD files. To do so, follow these steps:
  • You can start by booting into the installation environment for Windows 10 from an installation media.
  • After that, click on Repair your computer and on the blue screen, select Troubleshoot and then select the Advanced options menu.
  • From there, select Command Prompt and once you open it, enter each one of the commands given below by sequence.
    • bootrec /FixMbr
    • bootrec /FixBoot
    • bootrec /ScanOS
    • bootrec /RebuildBcd
  • Once you’re done executing the commands given above, type “exit” to close the Command Prompt window and then restart your computer and see if it fixed error code 0xc000014c.
On the other hand, if rebuilding the BCD using the /RebuildBCD option didn’t help, you can try a crude way to rebuild the boot record from scratch. You can do that by following the given steps below which will export and delete/backup the BCD available in the system.
  • Go to the Advanced Recovery Mode.
  • From there, go to Command Prompt and execute the commands given below and make sure to enter them one after the other.
    • bcdedit /export C:BCD_Backup
    • c:
    • cd boot
    • attrib bcd -s -h –r
    • ren c:bootbcd bcd.old
    • bootrec /RebuildBcd
If it still didn’t help, then troubleshoot the problem further with the help of the following instructions.

Option 1 – Disable the Secure Boot in the BIOS

Disabling the Secure Boot in the BIOS settings is definitely recommended to resolve the error. To disable Secure Boot, here’s what you have to do:
  • First, boot your computer into Windows 10.
  • Next, go to Settings > Windows Update. From there, check if there is anything that you have to download and install if you see any available updates. Usually, OEMs send and update the list of trusted hardware, drivers, and operating systems for your computer.
  • After that, go to the BIOS of your computer.
  • Then go to Settings > Update & Security > Advanced Startup options. If you click on Restart Now, it will restart your computer and give you all the advanced options.
  • Next, select Troubleshoot > Advanced Options. As you can see, this screen offers you further options including System restore, Startup repair, Go back to the previous version, Command Prompt, System Image Recovery, and UEFI Firmware Settings.
  • Select the UEFI Firmware Settings which will take you to the BIOS.
  • From there, go to the Security > Boot > Authentication tab where you should see Secure Boot. Note that every OEM has its own way of implementing the options so it varies.
  • Next, set Secure Boot to Disabled and set Legacy Support to On or Enabled.
  • Save the changes made and exit. Afterward, your computer will reboot.

Option 2 – Run System File Checker

You could also run a System File Checker or SFC scan. All you have to do is select Command Prompt from the Advanced Options. Once you’ve opened Command Prompt, type the “sfc /scannow” command and tap Enter to execute it.

Option 3 – Disable the Early Launch Anti-Malware Protection

  • You need to restart your computer in the Start Menu first while holding down the Shift key on your keyboard.
  • After that, it will restart your computer to Startup Settings.
  • Now ensure that the 8th option is labeled as “Disable early launch anti-malware protection.
  • Then tap the F8 key since the aforementioned option above is listed at number 8. This should launch and load Windows on your PC with the Early Anti-malware protection disabled for that session only when you try to carry out the same task and then check if the error related to the Winload.efi file is now fixed.

Option 4 – Try to run Automatic Startup Repair

In this option, you need to boot your computer into the Advanced Startup Options and from there, run the Automatic Startup Repair and then wait until the process is completed.

Option 5 – Try to reset the BIOS or the UEFI Settings

If updating the BIOS didn’t help in fixing the error, you can try to reset the BIOS instead.
  • Start your computer and tap the F10 key during the booting process to enter the BIOS. If it does not work, you can try tapping the F1 or F2 key as well as the Del key.
  • Once you’re already in the BIOS, tap the F9 key to get the prompt to RestoreLoad default configuration now for the BIOS.
  • Next, click on Yes and then follow the next on-screen instructions that appear to set the BIOS back to its default settings.
  • Once you’re done restoring the default settings of the BIOS, restart your computer and then check if it now boots properly.

Option 6 – Try to physically check the hardware

You should also check the physical status of the hardware in your computer. You can clean the dust off the hardware components like the Network Card of the computer. You might want to use a small blower or you could also use a soft cloth and run the components gently. Make sure that you don’t damage any parts with moisture or cause harm to any circuits while you carry out this task.
Read More
BringMeSports Removal Malware Removal Tutorial

BringMeSports is a browser extension developed by Mindspark Inc. that lets you watch live sports streams, follow sports scores, and catch up on the latest news from the sports world. BringMeSports installs an extension into your browser that replaces your default home page with the MyWebSearch starting page, it also replaces your default search engine, shows additional ads, and while running, collects personal and web browsing data that is later sent back to be Sold / Forwarded to serve ads. While browsing the internet with this extension installed, you will see additional ads and sponsored links appear in your search results. It may even show pop-up ads. Several anti-virus scanners have marked this extension as a Browser Hijacker and are therefore not recommended to keep on your computer.

About Browser Hijackers

Browser hijacking is a type of unwanted software, commonly a web browser add-on or extension, which causes modifications in web browser’s settings. Browser hijacker malware is created for many different reasons. The idea would be to force users to visit particular websites that are trying to increase their website visitor traffic and produce higher ad income. Although it might appear naive, all browser hijackers are damaging and therefore always regarded as security risks. Browser hijackers can even allow other harmful programs without your knowledge to further damage your personal computer.

Signs of browser hijack

There are various symptoms of browser hijacking. Here are a few of them: 1. you notice unauthorized changes to your Internet browser’s homepage 2. you find re-directed to websites you never meant to visit 3. the default search engine is changed and the web browser security settings have been lowered without your knowledge 4. you’re finding new toolbars you have never seen before 5. you observe numerous ads pop up on the browsers or computer screen 6. your web browser gets slow, buggy crashes frequently 7. you are blocked to access those sites of computer security solution providers.

Precisely how browser hijacker infects computers

Browser hijackers attack computer systems through malicious email attachments, downloaded infected computer files, or by going to infected internet sites. They could also come from add-on programs, also called browser helper objects (BHO), web browser extensions, or toolbars. A browser hijacker could also be installed as a part of freeware, shareware, demoware, and pirated programs. Common examples of browser hijackers include CoolWebSearch, Conduit, Coupon Server, OneWebSearch, RocketTab, Snap.do, Delta Search, and Searchult.com. The existence of any browser hijacker malware on your computer might drastically diminish the web browsing experience, track your online activities that result in troublesome privacy concerns, create system stability problems and eventually cause your computer to slow down or to a practically unusable state.

How you can remove browser hijackers

Some hijackers could be removed by deleting the free software they were included with or by removing any extension you have recently added to your system. Having said that, many hijackers are quite tenacious and need specialized tools to eliminate them. And there’s no denying the very fact that the manual fixes and removal methods can certainly be a complicated job for a novice PC user. Also, there are plenty of risks associated with fiddling around with the system registry files.

What To Do If You Cannot Install Any Anti-Malware?

Every malware is bad and the consequences of the damage could vary based on the specific kind of malware. Certain malware variants alter internet browser settings by including a proxy server or modify the computer’s DNS configurations. In these instances, you will be unable to visit certain or all of the websites, and therefore unable to download or install the required security software to remove the infection. If you are reading this, odds are you’re stuck with a malware infection that is preventing you to download or install Safebytes Anti-Malware software on your system. Although this type of issue will be difficult to circumvent, there are a few actions you can take.

Install in Safe Mode

In Safe Mode, you could change Windows settings, uninstall or install some programs, and remove hard-to-delete malware. If the malicious software is set to load automatically when the computer starts, switching to this particular mode may prevent it from doing so. To enter into Safe Mode or Safe Mode with Networking, press F8 while the PC is starting up or run MSCONFIG and look for the “Safe Boot” options in the “Boot” tab. Once you are in Safe Mode, you can try to install your antivirus software application without the hindrance of the malware. After installation, run the malware scanner to get rid of most standard infections.

Utilize an alternate internet browser to download the anti-malware application

Web-based viruses could be environment-specific, aiming for a particular browser or attacking particular versions of the browser. The most effective way to overcome this issue is to select a web browser that is renowned for its security features. Firefox comprises built-in Malware and Phishing Protection to keep you safe online. Create a portable anti-malware for removing viruses Another option is to create a portable anti-malware program onto your USB stick. To run anti-virus using a USB flash drive, follow these simple steps: 1) Download the anti-malware on a virus-free PC. 2) Insert the USB drive on the same system. 3) Run the setup program by double-clicking the executable file of the downloaded software, which has a .exe file format. 4) Select the drive letter of the pen drive as the place when the wizard asks you exactly where you want to install the anti-malware. Do as instructed on the screen to complete the installation process. 5) Transfer the flash drive from the uninfected PC to the infected PC. 6) Run the Safebytes Anti-malware directly from the flash drive by double-clicking the icon. 7) Click the “Scan” button to run a full system scan and remove malware automatically.

Protect Your PC & Privacy With SafeBytes Anti-Malware

If you are looking to buy anti-malware for your PC, there are lots of brands and packages for you to consider. A few of them do a great job in getting rid of malware threats while some will affect your PC themselves. You need to be careful not to pick the wrong product, especially if you buy a premium program. One of the recommended software is SafeBytes AntiMalware. SafeBytes carries a very good reputation for top-quality service, and clients appear to be very happy with it. Safebytes is among the well-established computer solutions firms, which provide this complete anti-malware application. Using its cutting-edge technology, this application will assist you to eliminate multiples types of malware such as viruses, PUPs, trojans, worms, ransomware, adware, and browser hijackers. SafeBytes has got a variety of features that can help you protect your computer from malware attacks and damage. Let’s check out a few of them below: Robust Anti-malware Protection: With a critically acclaimed malware engine, SafeBytes offers multilayered protection which is intended to catch and get rid of viruses and malware which are hidden deep in your computer system. Active Protection: SafeBytes provides real-time active checking and protection against all known viruses and malware. It’ll continuously monitor your laptop or computer for hacker activity and also provides users with superior firewall protection. “Fast Scan” Abilities: SafeBytes Anti-Malware has a multi-thread scan algorithm that works up to 5 times faster than any other anti-malware software. Internet Security: Safebytes assigns all sites a unique safety score that helps you to have an idea of whether the webpage you are going to visit is safe to view or known to be a phishing site. Lightweight Utility: SafeBytes is a lightweight and user-friendly anti-virus and anti-malware solution. Since it utilizes negligible computer resources, this application leaves the computer’s power exactly where it belongs: with you actually. Premium Support: Support service is available for 24 x 7 x 365 days via email and chats to answer your queries.

Technical Details and Manual Removal (Advanced Users)

If you wish to manually remove BringMeSports without the use of an automated tool, it may be possible to do so by removing the program from the Windows Add/Remove Programs menu, or in cases of browser extensions, going to the browsers AddOn/Extension manager and removing it. You will likely also want to reset your browser. To ensure the complete removal, manually check your hard drive and registry for all of the following and remove or reset the values accordingly. Please note that this is for advanced users only and may be difficult, with incorrect file removal causing additional PC errors. In addition, some malware is capable of replicating or preventing deletion. Doing this in Safe Mode is advised. The following files, folders, and registry entries are created or modified by BringMeSports
Files: C:Program Filesbringmesports_1c chrome extensionbarBringMeSportsCrxSetup.exe C:Program Filesbringmesports_1c chrome extensiont8sql.dll C:Program Filesbringmesports_1c chrome extensionBringMeSportsCrxSetup.exe C:Program Filesbringmesports_1c chrome extensionBringMeSportsCrxSetup.05F72CDF-5595-450B-9BAB-B1F6C606AAEC.exe C:Program Filesbringmesports_1c chrome extensionBringMeSportsCrxSetup.1E4C7E0D-19E7-4C18-ADB3-3D45FC4BE84C.exe C:Program Filesbringmesports_1c chrome extensionBringMeSportsCrxSetup.85D40F0D-233C-463F-8BAB-F6D446902D65.exe C:Program Filesbringmesports_1c chrome extensionBringMeSportsCrxSetup.A94A3339-330B-4B96-B05A-B909E6BB85A1.exe C:Program Filesbringmesports_1c chrome extensionBringMeSportsCrxSetup.EEE1FB37-85E3-49E8-BC44-36CC97CE3B73.exe C:Program Filesbringmesports_1c chrome extensionsqlite3.dll C:Program Files (x86)BringMeSports_1cEI C:Program Files (x86)BringMeSports_1c C:Users%USERNAME%AppDataLocalBringMeSports_1c C:Users%USERNAME%AppDataLocalIAC C:Users%USERNAME%AppDataLocalLowBringMeSports_1cEI C:Users%USERNAME%AppDataLocalLowBringMeSports_1c C:Users%USERNAME%AppDataRoamingMozillaFirefoxProfilesXXX.defaultextensionscffxtbr@BringMeSports_1c.com C:Users%USERNAME%AppDataLocalGoogleChromeUserDataDefaultExtensionsllkjooekcinmdmojmfdjhidbakfpepod Registry: HKEY_CURRENT_USERMicrosoftInternet ExplorerApproved Extensions, value: F653D037-97FA-4755-98C1-7F382EEB59A7 HKEY_CURRENT_USERMicrosoftInternet ExplorerApproved Extensions, value: CC53BD19-7B23-43B0-AB7C-0E06C708CCED HKEY_CURRENT_USERMicrosoftInternet ExplorerApproved Extensions, value: 002D1BA6-4766-4D7D-82B8-F49439C66F97 HKEY_CURRENT_USERMicrosoftInternet ExplorerToolbar, value: cc53bd19-7b23-43b0-ab7c-0e06c708cced HKEY_CURRENT_USERWow6432NodeMicrosoftInternet ExplorerToolbar, value: cc53bd19-7b23-43b0-ab7c-0e06c708cced HKEY_CURRENT_USERMicrosoftWindowsCurrentVersionExtPreApprovedbc61ca7a-6b81-47ec-b62d-ae1a236cadb9 HKEY_CURRENT_USERMicrosoftWindowsCurrentVersionExtPreApproved82c7004a-078e-468c-9c0f-2243618ff7cb HKEY_CURRENT_USERMicrosoftWindowsCurrentVersionExtPreApproved6285c254-4465-4f8b-a009-5f42ab02c291 HKEY_CURRENT_USERMicrosoftWindowsCurrentVersionExtPreApprovedA8CC25D-66FF-41DF-B3B4-416079EF8F87 HKEY_CURRENT_USERMicrosoftWindowsCurrentVersionexplorerBrowser Helper Objectsf653d037-97fa-4755-98c1-7f382eeb59a7 HKEY_CURRENT_USERMicrosoftWindowsCurrentVersionexplorerBrowser Helper Objects02d1ba6-4766-4d7d-82b8-f49439c66f97 HKEY_CURRENT_USERWow6432NodeMicrosoftWindowsCurrentVersionExtPreApprovedf0c8ccc2-baaa-4236-ad0a-22b5a401b9ef HKEY_CURRENT_USERWow6432NodeMicrosoftWindowsCurrentVersionExtPreApprovedA8CC25D-66FF-41DF-B3B4-416079EF8F87 HKEY_CURRENT_USERWow6432NodeMicrosoftWindowsCurrentVersionexplorerBrowser Helper Objectsf653d037-97fa-4755-98c1-7f382eeb59a7 HKEY_CURRENT_USERWow6432NodeMicrosoftWindowsCurrentVersionexplorerBrowser Helper Objects02d1ba6-4766-4d7d-82b8-f49439c66f97 HKEY_CURRENT_USERMicrosoftInternet ExplorerLow RightsElevationPolicyfa460720-7b38-421d-981c-66f0ae288fb9 HKEY_CURRENT_USERMicrosoftInternet ExplorerLow RightsElevationPolicya2b4da91-a53c-4a84-b486-40080de13a9b HKEY_CURRENT_USERMicrosoftInternet ExplorerLow RightsElevationPolicy89b7ae32-9c52-41d6-a64d-14d7bdec9c58 HKEY_CURRENT_USERMicrosoftInternet ExplorerLow RightsElevationPolicy32a63172-5bcc-4d7e-9fe8-072eee6c287e HKEY_CURRENT_USERWow6432NodeMicrosoftInternet ExplorerLow RightsElevationPolicya2b4da91-a53c-4a84-b486-40080de13a9b HKEY_CURRENT_USERWow6432NodeMicrosoftInternet ExplorerLow RightsElevationPolicy89b7ae32-9c52-41d6-a64d-14d7bdec9c58 HKEY_CURRENT_USERWow6432NodeMicrosoftInternet ExplorerLow RightsElevationPolicy32a63172-5bcc-4d7e-9fe8-072eee6c287e HKEY_CURRENT_USERWow6432NodeMicrosoftInternet ExplorerLow RightsElevationPolicy1856a7bd-de8c-488b-aa7a-5682d13166fc HKEY_CURRENT_USERWow6432NodeMicrosoftInternet ExplorerLow RightsElevationPolicy164ea1fc-b0a0-4202-8c65-e4ba4d54a3ae HKEY_CURRENT_USERMicrosoftWindowsCurrentVersionExtStatsF653D037-97FA-4755-98C1-7F382EEB59A7 HKEY_CURRENT_USERMicrosoftWindowsCurrentVersionExtStatsCC53BD19-7B23-43B0-AB7C-0E06C708CCED HKEY_CURRENT_USERMicrosoftWindowsCurrentVersionExtSettingsCC53BD19-7B23-43B0-AB7C-0E06C708CCED HKEY_CURRENT_USERMicrosoftWindowsCurrentVersionExtSettings02D1BA6-4766-4D7D-82B8-F49439C66F97 HKEY_CURRENT_USERWow6432NodeMicrosoftInternet ExplorerSearchScopes8c9ef753-beb6-4582-b653-93ac59274437 HKEY_CURRENT_USERMicrosoftInternet ExplorerSearchScopes8c9ef753-beb6-4582-b653-93ac59274437 HKEY_CURRENT_USERMicrosoftInternet ExplorerDOMStoragebringmesports.com HKEY_CURRENT_USERMicrosoftInternet ExplorerDOMStoragebringmesports.dl.tb.ask.com HKEY_CURRENT_USERBringMeSports HKEY_CURRENT_USERMicrosoftInternet ExplorerDOMStoragebringmesports.dl.myway.com HKEY_LOCAL_MACHINEHKEY_CURRENT_USER[APPLICATION]MicrosoftWindowsCurrentVersionUninstall..Uninstaller BringMeSports_1cbar Uninstall Internet Explorer BringMeSports_1cbar Uninstall Firefox BringMeSportsTooltab Uninstall Internet Explorer
Read More
Basic IT skills everybody should know
In today’s world and age, there are some essential IT skills that basically everyone should know. No matter in what field you are working some skills are just needed in order to function properly in the work. So, without further ado let's dive into what are these essential IT skills everyone, even your grandmother should know.

Basic IT skills5 Essential IT skills everybody should know

  1. Word processing

    No matter are you creating or editing business documents or just trying to help a friend or relative, word processing skill is an essential asset and requirement in today’s age. Writing anything on a bunch of paper is time-consuming, papers can get lost, and searching for a particular item inside a bunch of papers is not a really enjoyable experience. A much easier solution is to write, format, and keep everything on the computer and almost all employers are asking for this skill.
  2. Send and using emails

    Today we live in the digital age and most communication is done in real-time via messaging apps and file sharing is done via file-sharing services. Despite mentioned technology, many files are shared and sent through emails. When a message is too long or complex when it needs to have some attachment or to be kept in archive emails are the way to go and therefore using email is a must-have essential skill.
  3. Using search engines

    When talking about using search engines we really do not think about firing up your favorite browser, going into the search engine,s and typing cat pictures. What we think is that a person should know how to use a search engine properly, tweak its search options, and phrase words and sentences to find everything he or she needs.
  4. Doing data work

    Data entry and data calculations have been made easier than ever thanks to today's technology. Microsoft excel, libre office calc, google sheets, etc. are all capable of performing a great variety of calculations and keeping track of plenty of required data. This skill is often asked by employers as an essential one.
  5. Cyber security

    Each employee or person, in general, should be quite aware of various scams and best practices to keep itself safe in this digital world. We have several articles on this topic and there are a great variety of articles on the internet as well.

Conclusion

No matter are you young or old, employed or looking for a job, these skills are a must-have in today’s world.  There are a lot of great tutorials online on these various topics and I am sure that your knowledgeable friend or cousin would be happy to help and show you how to do all of these things.
Read More
Samsung Odyssey Neo G9 monitor review
samsung Odyssey Neo G9Odyssey Neo G9 is a successor to Odyssey G9 curved gaming monitor and it is aimed again at the gaming community with its specifications but of course, it can be used for work as well. Gapping at a stunning $2500 USD price it is not really a cheap piece of hardware so it is normal to see what do you get for this kind of price and do features justify it, so let’s dive in.

Size and resolution

The first thing that you can notice about the screen is that it is big and curved, 49 inches big which is pretty big, and with it, I believe you can forget about using 2 or 3 screens because this single one will cover everything you need really. Going as far as 5120 X 1440 resolution is the strange definition, basically, this is 5K which is kind of nice but I do not see the advantage. Sure it is larger than 4K, but for the price of $2500 I expected an 8K monstrosity so if the resolution is not the main price justification then what is? Let’s move on and find out.

Odyssey tech specs

The monitor comes with HDR and 240Hz refresh rate which is very nice and coupled with 1ms pixel response time, adaptive sync, and Variable Refresh Rate you get pretty good other tech specs. All of this is very nice but the monitor's strongest selling point is Mini Led tech. Mini Led is a next-gen tech currently found only in high-end TVs. With this technology, monitors can produce truer blacks sort of speak thanks to a greater number of dimming zones. Odyssey Neo G9 is rated at 2000 nits in the brightness values and local dimming zones go to stunning 2048. It comes also with Quantum HDR that supports 10+, Freesync, and G-Sync capability. In connection, the department monitor comes with a single display 1.4 port and two HDMI 2.1 ports. It also includes a headphone jack along with two USB 3.0 ports.

Conclusion

While the resolution of the monitor is nothing impressive for the given price, its size and the rest of the tech specs surely are. Now I will not lie, the price is still a little too high but if you could afford it easily I think you should.
Read More
Screen of death colors in Windows 10
Receiving a screen of death is not a pleasant experience at all and most users would agree that they would very much like not to face one during their work with the computer. Sadly PC is not a perfect machine and it is not working in a perfect environment so errors happen. The most famous and well-known death screen is blue which is also the most common one, my bet would be that there is not a user which has not been faced with this blue error screen. There is no simple explanation why these stop errors occur as several factors can be involved. However, it is known that the malfunctioning of hardware drivers or drivers that are installed by third-party software drive this unwanted change. But did you know that there is more colors for infamous death screens and not just blue one? Microsoft has coded different errors to different colors in the goal for the technical team to be aware right away of what type and kind of error they are dealing with. Color for screen errors are: Blue, Black, Pink, Brown, Yellow, Red, Orange, Green and White If you are interested in what color represents what keep reading.

BLUE

blue screen of deathA stop error or exception error commonly called the blue screen of death (BSoD) or blue screen, is an error screen displayed on Windows computers following a fatal system error. It indicates a system crash, in which the operating system has reached a condition where it can no longer operate safely. This is caused by many different problems, such as a general hardware failure or a crucial process terminating unexpectedly.

BLACK

black screen of deathOn Windows 10 systems, a Black Screen of Death can be caused by an unfinished Windows Update. To resolve this problem, simply hold the power button down on your PC or laptop to switch off the computer. A cold start should result in the system booting properly.

PINK

pink screen of deathIt is a diagnostic screen with a white type on a pink background. Pink Screen is mainly seen when the VMkernel of an ESX/ESXi host experiences a critical error, becomes inoperative, and terminates any virtual machines that are running. It is not fatal and generally considered more of a developer testing issue. When encountered, it can be fixed quickly by following the simple action of pressing and holding your computer’s power button to shut down the device.

BROWN

brown screen of deathThe Microsoft Windows 10 Operating System Brown Screen of Death is an on-screen fatal error notification with bug check codes which is seen when a computer crashes due to graphics hardware or software-related problems (failing graphics drivers).

YELLOW

yellow screen of deathIt affects the functioning of a browser, particularly Mozilla Firefox. The Yellow Screen of Death makes the appearance with a weird buzzing sound in the background when the XML parser refuses to process an XML document causing a parsing error and a weird buzzing sound. The issue persists unless the computer is manually rebooted.

RED

red screen of deathCommonly the Windows 10 red screen is caused due to the hardware error, particularly if you overclock your Windows PC/laptop. Despite this, sometimes the red screen of death is also caused by outdated or incompatible drivers or due to BIOS issues.

ORANGE

orange screen of deathThe Orange Screen of Death on Windows occurs due to fatal hardware errors. Multiple reasons have been reported for the Orange Screen of Death. Some had this issue when watching a YouTube video, some were not able to boot into Windows. It can even occur when waking up from Sleep.

GREEN

green screen of deathThe green screen of death only appears when you're running an Insider Preview version of Windows 10. It's the same as the blue screen of death, and it will show the same error messages. ... If you see a green screen of death (GSOD) on your PC, that's a sign you're using an Insider Preview build of Windows 10.

WHITE

white screen of deathThe White Screen on Windows is also an error where the screen of the computer just turns white and freezes. There can be several things that can cause the white screen to appear on the Windows laptop monitor. But the main issue could be because of malfunctioning of the graphics hardware.
Read More
What to do if Windows 10 Disk Management is not working
The Disk Management tool in Windows 10 is a built-in tool that contains a user interface used to manage disk partitions to administrators of the computer. There are lots of instances when you have to change the size of the hard disk partition or reduce the size and so on. This is where the Disk Management tool comes in. It’s useful as the command line interface can be quite confusing and risky for some users. However, there are cases when this tool stops working. A proof of this the reports submitted recently by some Windows 10 users. Based on the reports, the Disk Management does not load or respond. If you are having the same problem, read on as this post will give you some suggestions on what you can do to resolve the problem.

Option 1 – Try restarting the Disk Management Service

  • Tap the Win + R key combination to open the Run dialog box.
  • Then type “services.msc” in the field and hit Enter or click OK to open the Windows Services Manager.
  • Next, scroll down in the service list until you see the Virtual Disk Service. Double click on it to open and then select Automatic.
  • Click on Apply and OK to save the changes made.
  • If it hasn’t started yet, you can just click on the Start button to start the Service. The Virtual Disk service provides management services for disk, volumes, file systems as well as storage arrays.
  • Now save all the changes you’ve made and restart your computer. Then check if you can now use the Disk Management tool without any problem.

Option 2 – Try using the System File Checker scan

System File Checker or SFC is a built-in command utility that helps in restoring corrupted files as well as missing files. It replaces bad and corrupted system files with good system files that might be causing some issues with the Disk Management tool. To run the SFC command, follow the steps given below.
  • Boot your PC into Safe Mode.
  • Tap Win + R to launch Run.
  • Type in cmd in the field and tap Enter.
  • After opening Command Prompt, type in sfc /scannow
The command will start a system scan which will take a few whiles before it finishes. Once it’s done, you could get the following results:
  1. Windows Resource Protection did not find any integrity violations.
  2. Windows Resource Protection found corrupt files and successfully repaired them.
  3. Windows Resource Protection found corrupt files but was unable to fix some of them.

Option 3 – Try using the DISM tool

Aside from the System File Checker, the DISM tool can also help you resolve the issue with the Disk Management tool. It helps in restoring the health of your computer.
  • Open the Command Prompt as admin.
  • Then type in this command: Dism /Online /Cleanup-Image /RestoreHealth
  • Do not close the window if the process takes a while as it will probably take a few minutes to finish.

Option 4 – Try using Diskpart and Fsutil

If both the System File Checker and DISM tool didn’t work, you can use command-line tools like diskpart and fsutil. These command-line tools are powerful but you need to be careful especially if you’re not that familiar with using them. However, it’s recommended that you have somebody who knows if you’re really inexperienced with this kind of stuff.
Read More
Nvidia RTX 4090 & RTX 4080 unveiled

Nvidia announced the third generation of GeForce RTX GPUs called Ada Lovelace. New technology is bringing 76 billion transistors with 18,000 CUDA cores along with new gen ray tracing cores and improved Tensor cores as well. The new lineup also comes with DLSS 3 which is vastly improved from its previous version pushing a 4 times increase in frame rates over native rendering.

Nvidia RTX 4090

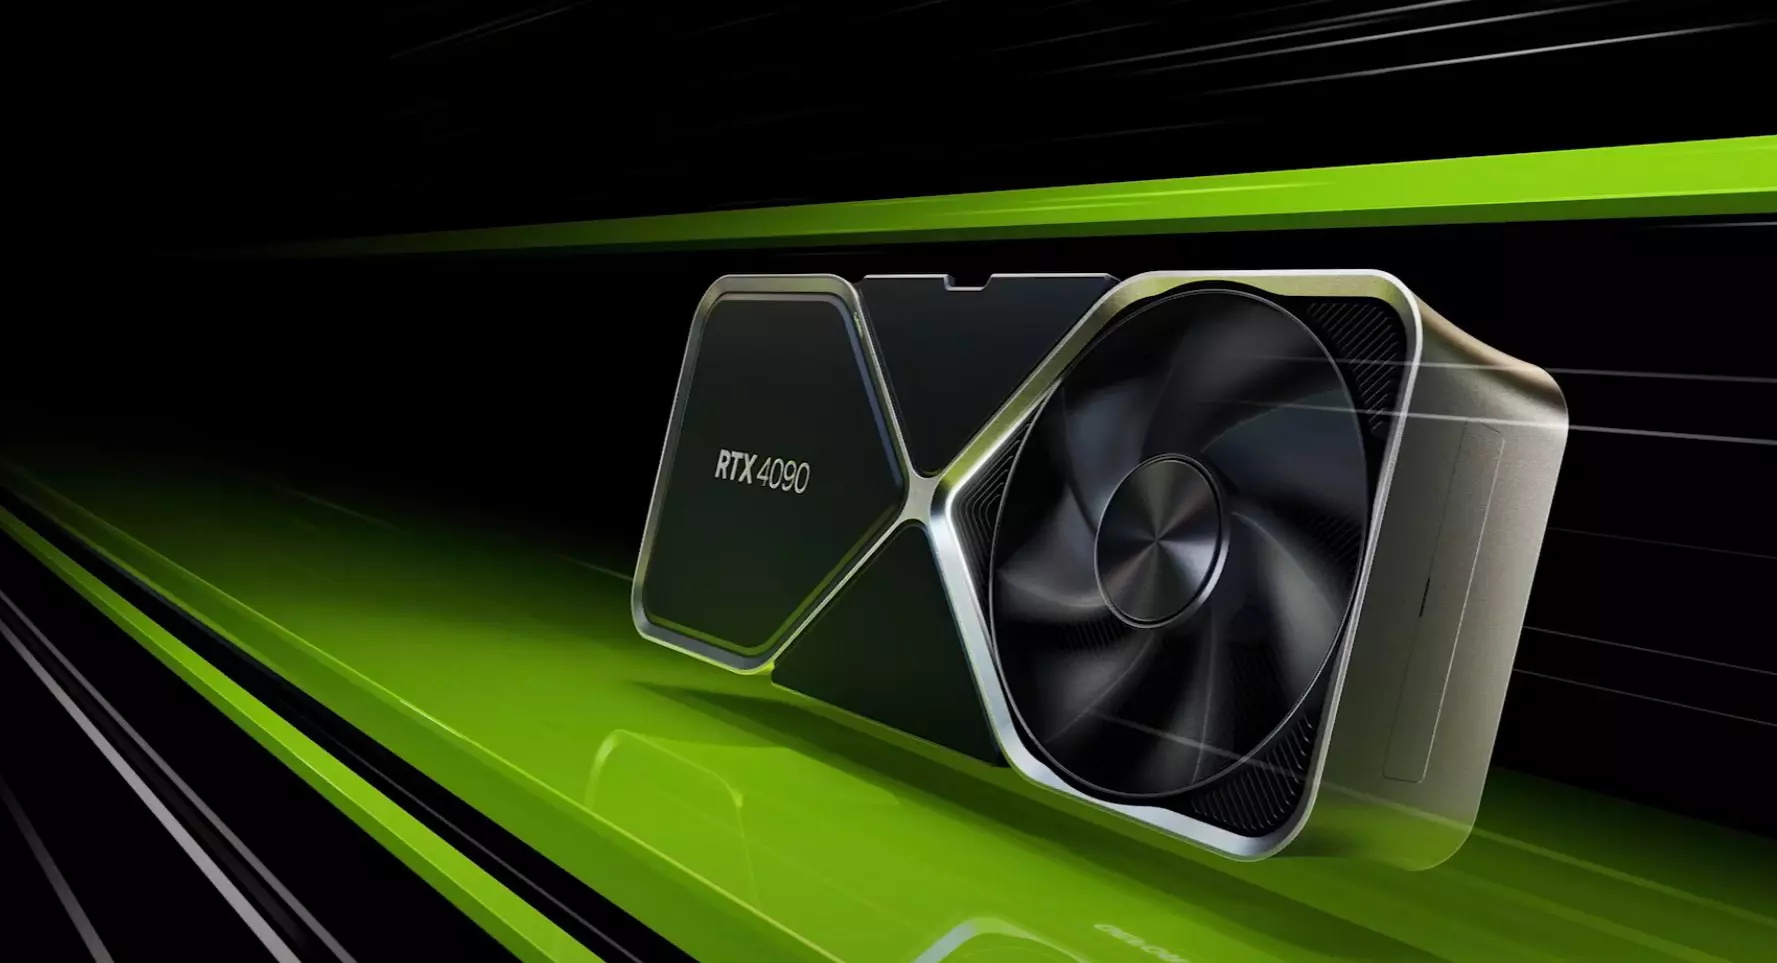
RTX 4090, a better model of GPU will come with 16,384 CUDA cores and a boost clock speed of 2.52 GHz. Also, it is packed with stunning 24 GB of GDDR6V VRAM. In Nvidia's words, its performance is twice faster than the 3090 Ti in games like Flight simulator, three times faster on Portal RTX, and four times faster on RacerX.

RTX 4080 comes in two modes, one with 12GB VRAM and a stronger one with 16GB VRAM but differences do not end here. The lower model is packing 7,680 CUDA cores while the stronger one is going to 9,728 CUDA cores. We will wait to see how will these cores count impact real-world performance in games.

As for prices, the flagship model RTX 4090 will be $1,600 USD and it will hit the market on October 12th. RTX 4080 12GB model will be $900 USD and the model with 16GB VRAM will go up to $1,200 USD. This, of course, is the price for Founders Edition cards, OEM cards from third parties like ASUS, MSI, Gigatech, etc will cost more.

Read More
A Guide to Fixing Corefoundation.dll Error on Your PC

Corefoundation.dll Error - What is it?

Corefoundation.dll error is a DLL error code associated with Apple software such as iTunes, MobileMe, QuickTime and etc. To understand this error better, first you need to understand what corefoundation.dll file is. Corefoundation.dll is a Dynamic Link Library file that is used by Apple software products. This file is created by Apple computer Inc and is designed to help open up some of the media files that you might have on your PC. DLLs help promote modularization of code, efficient memory usage, code reuse and reduced disk space allowing the operating system and the programs to load and run faster and take less disk space on the computer.

Error Messages

This error pops on the screen when there is an issue related to Apple software products on your system. Corefoundation.dll error is displayed on the computer screen in any one of the following formats:
“The program can not start because corefoundation.dll is missing from your computer. Try reinstalling the program to fix this problem”. "This application has failed to start because CoreFoundation.dll was not found. Re-installing the application may fix this problem." “The procedure entry point_CFBundleCopyFileTypeForFileData could not be located in the dynamic link library corefoundation.dll.” "MobileMe Control Panel cannot continue as Apple Application Support is missing or outdated. Please uninstall and reinstall the latest version of iTunes and MobileMe Control Panel to fix this issue.”
Though this error code is not fatal but if it is not fixed immediately it will hamper your ability to load and run Apple programs on your system.

Solution

Restoro box imageError Causes

Corefoundation.dll error can be triggered due to several reasons. Here are some of the most common corefoundation.dll error causes:
  • Outdated PC drivers
  • Viral infection
  • Damaged Windows registry files
  • Corrupted corefoundation.dll file
  • Missing corefoundation.dll file
  • Incorrectly installed third-party software

Further Information and Manual Repair

To fix this issue on your computer here are some of the best, easy and quick do it yourself methods that you can try:

Method 1: Download the Original Corefoundation.dll File

If the underlying reason for corefoundation.dll error is file corruption or it goes missing, then the best way to resolve is to download the original corefoundation.dll file. Once you download it, paste it to its exact location. DLL files are normally located in the following location C:\Windows\System32. Once you paste it, register the file by typing ‘regsvr corefoundation.dll’ at the command prompt. When the process is complete, restart your PC to activate changes. Alternatively, you can uninstall and re-install any Apple Software you may have on your Windows Computer. To do that, Open the Control Panel, navigate to "Install/Uninstall a Program", search for Apple software, and uninstall them.

Method 2: Update Window Drivers

If the error code is related to outdated drivers, then it is recommended that you update them promptly to resolve the corefoundation.dll error on your PC. This can be done by using a driver update wizard from within Device Manager. The driver update wizard walks you through the entire drive update process, making updating a hassle-free process.

Method 3: Download Restoro

If the error still persists, then try method 3. Sometimes the cause of corefoundation.dll can be viral infection or registry issues.  Viruses may enter your PC unknowingly through phishing emails and downloads which can corrupt and damage your dll files. Also, if you don’t clean your registry frequently, unnecessary and obsolete files may accumulate in the registry like cookies, junk files, internet history and temporary files. These files take up a lot of disk space corrupt DLL files and lead to disk fragmentation. Regardless of what the issue is, Restoro is your one-stop PC Fixer. It is a multi-functional and user-friendly repair tool embedded with 6 different scanners including a registry cleaner and an antivirus. It scans and removes all types of viruses and cleans and restores the registry too. Click here to download Restoro and resolve the corefoundation.dll error today!
Read More
1 2 3 171
Logo
Copyright © 2023, ErrorTools. All Rights Reserved
Trademark: Microsoft Windows logos are registered trademarks of Microsoft. Disclaimer: ErrorTools.com is not affiliated with Microsoft, nor claims direct affiliation.
The information on this page is provided for information purposes only.
DMCA.com Protection Status