If you are trying to run Windows Update but encountered an Error 0x80070003, read on as this post will guide you on how you can fix it. This kind of error in Windows Update can occur when you activate Windows Firewall or download from the Windows Store. This kind of error indicates that the Windows Update service or WUAUSERV is not started or that the Background Intelligent Transfer Service or BITS can’t be started. Aside from that, you can also encounter this error with the other Windows Update components.
To fix the Windows Update error 0x80070003, you can try to run the built-in Windows Update troubleshooter or replace the old Configuration file named “Spupdsvc.exe”. You can also try to reset the Windows Update components or check the status of all the Windows Update-related services, as well as run a System File Checker scan.
Option 1 – Run the Windows Update Troubleshooter
Running the built-in Windows Update troubleshooter is one of the things you can first check out as it is known to automatically resolve any Windows Update errors like error code 0x80070003. To run this troubleshooter, Refer to these steps:
Tap the Win + I keys to open Settings.
From there, click Update and Security and go to the Troubleshoot section.
Next, select Windows Update and click the “Run the troubleshooter” button and wait until it’s finished, and then try to run Windows Update again.
Option 2 – Try replacing the old Configuration file named “Spupdsvc.exe”
The next thing you can do to fix the Windows Update error is to replace the Spupdsvc.exe file. This is a process file that comes under the Microsoft Update RunOnce service. So when an update becomes available for your computer, the process responsible for performing the upgrade is notified. In addition, the RunOnce entry is also added to the registry for the spupdsvc.exe and this process is executed when your computer restarts and when you log on.
In the Start Search, type “command prompt” and from the search results, right-click on Command Prompt and select the “Run as administrator” option.
Next, execute this command to replace the old configuration of the Spupdsvc.exe file with a new one: c m d (remove spaces on CMD) /c ren %systemroot%System32Spupdsvc.exe Spupdsvc.old
After that, try to run Windows Updates again and check if the error is now gone.
Option 3 – Try deleting the files from the SoftwareDistribution folder and resetting the Catroot2 folder
The downloaded Windows Updates are placed in a folder called “SoftwareDistribution”. The files downloaded in this folder are automatically deleted once the installation is completed. However, if the files are not clean up or if the installation is still pending, you can delete all the files in this folder after you pause the Windows Update service. For complete instructions, refer to the steps below.
Open the WinX Menu.
From there, open Command Prompt as admin.
Then type in the following command – don’t forget to hit Enter right after typing each one of them.
net stop wuauserv
net start cryptSvc
net start bits
net start msiserver
After entering these commands, it will stop the Windows Update Service, Background Intelligent Transfer Service (BITS), Cryptographic, and the MSI Installer
Next, go to the C:/Windows/SoftwareDistribution folder and get rid of all the folders and files thereby tapping the Ctrl + A keys to select them all and then click on Delete. Note that if the files are in use, you won’t be able to delete them.
After resetting the SoftwareDistribution folder, you need to reset the Catroot2 folder to restart the services you just stopped. To do that, follow these steps:
Type each one of the following commands.
net start wuauserv
net start cryptSvc
net start bits
net start msiserver
After that, exit Command Prompt and restart your computer.
Option 4 – Check the status of some Windows Update Services
Tap the Win + R keys to open the Run dialog box.
Next, type “services.msc” in the field and hit Enter or click OK to open Services.
From the list of Services, look for the following services and make sure that their Startup type is as follows:
Windows Update – Manual (Triggered)
Background Intelligent Transfer Service – Manual
Cryptographic Services – Automatic
Workstation Service – Automatic
After that, check if the Service status of the listed services above are set to Running. If they’re not, click on the Start button to start these services and then check if the Windows Update error 0x80070003 is now fixed or not.
Option 5 – Run the System File Checker Scan
If manually resetting the Windows Update components didn’t work, you can run a System File Checker scan instead. It is a built-in command-line utility that replaces bad and corrupted system files with good system files that might be the cause why you’re getting the error when you try updating your computer. To run the SFC command, follow the steps given below.
Tap Win + R to launch Run.
Type in cmd in the field and tap Enter.
After opening Command Prompt, type in sfc /scannow
The command will start a system scan which will take a few whiles before it finishes. Once it’s done, you could get the following results:
Windows Resource Protection did not find any integrity violations.
Windows Resource Protection found corrupt files and successfully repaired them.
Windows Resource Protection found corrupt files but was unable to fix some of them.
This is a typical MS Outlook error code. This error message may prevent you from sending and receiving emails via your Outlook account. The error message is displayed in the following format:
"An unknown error has occurred. 0x80040600"
If this is the primary source of your communication in the office, then this error can cause you a great deal of inconvenience as it may prevent you from running important business errands via your Outlook account efficiently.
Therefore, when you experience the 0x80040600 error on your PC, it is advisable to fix it immediately.
Solution
Error Causes
This error code is triggered due to multiple reasons. These include but are not limited to:
PST (Personal Storage Table) file reaches its file size limit
PST file corruption
Viral infection
Incorrect Windows registry settings
Improper shutdown of Outlook
This error code can lower your office productivity as you may be unable to send and receive emails on your Outlook account. Also, you may get locked out of your account and be unable to view your calendar entries and open email attachments saved previously in your account.
Further Information and Manual Repair
To resolve the error on your PC, you don’t have to wait for the network personnel to fix it or be a computer expert. Here is a list of easy and effective DIY methods to help you fix this error code right away.
Method 1: Download a PST File Repair
If the error occurs because your PST file has reached it maximum limit which is normally 2 GB or because of PST file corruption, then it is advisable to download a PST file repair tool. After downloading it, simply run it on your PC. This tool will immediately fix the damaged PST file and file the issue.
Method 2: Download an Antivirus
Deadly viruses like Trojans and spyware can penetrate into your PC if through downloads and opening phishing emails. Therefore, to remove such viruses it is important to install an antivirus and scan your entire PC.
Method 3: Install Restoro.
If the problem is associated with incorrect Windows registry settings or viral infection, it is advisable to download Restoro.
This software is multi-functional deployed with 6 different and powerful utilities including an antivirus, a registry cleaner, and a system optimizer to name a few.
The registry cleaner repairs the registry corrects the settings and fixes the damaged files.
The antivirus on the other hand simultaneously removes all types of viruses including Trojans, spyware, malware, and adware on the system. While the system optimizer feature ensures the PC performance and speed are not compromised during the scanning and cleanup process.
This software is safe, efficient, and compatible with all Windows versions. It has a user-friendly interface and simple navigations which makes it quite easy for all levels of users including novice and intermediate to operate.
Click here to download Restoro and resolve the 0x80040600 error code on your PC today!
This is a type of DLL error code. DLL is the abbreviation of Dynamic Link Library. DLL files contain small programs which are similar to executable files. One DLL file may be used to load and run several programs.
Fmod.dll is created by Electronic Arts Inc. and associated with Crysis. This file is developed for the Windows OS. This error code occurs when you are unable to access, run and load programs supported by Crysis on your PC.
Fmod.dll error code message is displayed in different formats such as:
"Fmod_event.dll not found."
"The file fmod_event.dll is missing."
"This application failed to start because fmod_event.dll was not found. Re-installing the application may fix this problem."
"Cannot start Crysis. A required component is missing: fmod_event.dll. Please install Crysis again."
"Fmod_event.dll Access Violation."
"Cannot register fmod_event.dll."
"Cannot find C:\Windows\System32\fmod_event.dll."
Error Fmod.dll may pop up when you start-up or shut down the PC or even during the installation of a program.
Solution
Error Causes
Narrowing down to one cause for Fmod.dll error code is impossible virtually because this error may result due to different reasons on your system. Some of the common causes associated with this error code are:
Viral Infection
Hardware failure
Missing, Corrupt, or Deleted Fmod.dll file
Improper program installation
Registry issues
No matter what the underlying cause of the reason may be, it is recommended to resolve the issue immediately to avoid serious PC threats.
Further Information and Manual Repair
To resolve this error on your system, try the methods discussed below:
Method 1 - Check the Recycle Bin
As mentioned above, Fmod.dll is a DLL file that is used to run and load a variety of programs on your system. There is a possibility that you uninstalled a program that was supported by the Fmod.dll file and accidentally deleted it.
In such a scenario, the easiest way to resolve the Fmod.dll error code is to re-install the deleted file from the recycle bin. For this, go to the recycle bin and search for the file. If you find it reinstall if you can’t then simply download the Fmod.dll file from a reliable website.
Method 2 - Scan for Malware
Malware usually enters through phishing emails and downloads. These malicious programs then hide in your system disguising as either DLL or EXE files.
The occurrence of fmod.dll file error may be due to malicious programs hiding in your system. Therefore scan your entire PC with a powerful anti-virus. An antivirus detects and removes all malicious software programs such as viruses, malware, Trojans, spyware, and adware.
Try this, to resolve error code Fmod.dll and see the results.
Method 3 - Fix Hardware Problems
Fmod.dll file error may also pop on your screen due to hardware failure. If this is the reason, then we advise you to use the Device Manager an in-built tool in Windows 7 and 8 to fix hardware failures.
For this go to the start menu then control panel. Now click on the ‘hardware and sound link’ and then click on the Device Manager. If you find any devices in red exclamation point, then this means this device is problematic.
Uninstall the driver for that hardware device and then update the driver. Install the latest version to resolve. Remember, hardware problems are mostly related to outdated drivers.
Method 4 - Restore Points
Use System Restore, an in-built utility also known as the recovery tool, to restore points and ensure your PC is back to its previous working condition before the error code occurred.
Simply put, it helps undo recent changes. You can find the System Restore tool in the System Tools folder.
Method 5 - Clean and Repair the Registry
The registry is that part of your PC that stores all the information, activities performed, and files including the junk files, invalid keys, bad entries, and cookies.
When these files accumulate on your PC, they take up all the registry space and corrupt the important system and DLL files also stored in the registry, thereby generating such errors. Now you can clean the registry manually.
But this process can be time-consuming and slightly technical, hence we advise you to download Restoro. This is a PC Fixer integrated with a registry cleaner.
It is easy to use deployed with an intuitive interface. The registry cleaner scans the entire PC and removes all registry errors. It wipes out all the obsolete files and repairs the damaged DLL and system files.
Click here to download Restoro.
What is PyLocky ransomware? And how does it execute its attack?
PyLocky ransomware is a file-locking malware created in order to lock important files and demand ransom from victims in exchange for data recovery. This new ransomware uses the .lockymap extension in marking the files it encrypts. It starts to execute its attack by dropping the following malicious payload in the system:
After dropping its malicious payload, this crypto-malware connects the infected computer to a remote server where it downloads more malicious files and places them on system folders. It then applies a data gathering module used to gather data about the user and the computer. The malicious files that were downloaded earlier along with the data obtained are used for another module called stealth protection. This allows PyLocky ransomware to execute its attack without detection from any security or antivirus programs installed in the system. It also modifies some registry keys and entries in the Windows Registry such as:
Once all the modifications are carried out, PyLocky ransomware will begin encrypting its targeted files using a sophisticated encryption cipher. Following the encryption, it adds the .lockymap extension to each one of the encrypted files and releases a ransom note named “LOCKY-README.txt” which contains the following content:
“Please be advised:All your files, pictures document and data has been encrypted with Military Grade Encryption RSA ABS-256.Your information is not lost. But Encrypted.In order for you to restore your files, you have to purchase a Decrypter.Follow these steps to restore your files.1* Download the Tor Browser. ( Just type in google “Download Tor“2‘ Browse to URL: http://4wcgqlckaazungm.onion/index.php3* Purchase the Decryptor to restore your files.It is very simple. If you don’t believe that we can restore your files, then you can restore 1 file of image format for free.Be aware the time is ticking. Price will be doubled every 96 hours so use it wisely.Your unique ID :CAUTION:Please do not try to modify or delete any encrypted file as it will be hard to restore it.SUPPORT:You can contact support to help decrypt your files for you.Click on support at http://4wcgqlckaazungm.onion/index.php”
How does PyLocky ransomware spread over the web?
PyLocky ransomware spreads using malicious spam email campaigns. Creators of this threat embed an infected attachment to spam emails and send them using a spambot. Crooks may even use deceptive tactics to trick you into opening the malware-laden immediately which is something you must not do. Thus, before opening any emails, make sure that you’ve thoroughly checked them.
To successfully obliterate PyLocky ransomware from your computer, refer to the removal guide laid out below.
Step 1: Launch the Task Manager by simply tapping Ctrl + Shift + Esc keys on your keyboard.
Step 2: Under the Task Manager, go to the Processes tab and look for the process named facture_4739149_08.26.2018.exe and any suspicious-looking process which takes up most of your CPU’s resources and is most likely related to PyLocky ransomware.
Step 3: After that, close the Task Manager.
Step 4: Tap Win + R, type in appwiz.cpl and click OK or tap Enter to open Control Panel’s list of installed programs.
Step 5: Under the list of installed programs, look for PyLocky ransomware or anything similar, and then uninstall it.
Step 6: Next, close the Control Panel and tap Win + E keys to launch File Explorer.
Step 7: Navigate to the following locations below and look for PyLocky ransomware’s malicious components such as facture_4739149_08.26.2018.exe and LOCKY-README.txt as well as other suspicious files, then delete all of them.
Step 11: Delete the registry keys and sub-keys created by PyLocky ransomware.
Step 12: Close the Registry Editor and empty the Recycle Bin.
Try to recover your encrypted files using the Shadow Volume copies
Restoring your encrypted files using Windows Previous Versions feature will only be effective if PyLocky ransomware hasn’t deleted the shadow copies of your files. But still, this is one of the best and free methods there is, so it’s definitely worth a shot.
To restore the encrypted file, right-click on it and select Properties, a new window will pop up, then proceed to Previous Versions. It will load the file’s previous version before it was modified. After it loads, select any of the previous versions displayed on the list like the one in the illustration below. And then click the Restore button.
Hello and welcome everyone, just a few years ago we had FLASH video content on the internet, we had FLASH games, full FLASH website experiences, and more, but then flash was shut down mostly due to security reasons meaning that in just a few months we have lost most of FLASH web content.
However, there is still FLASH content on the internet even today, there are still FLASH videos and flash games, but we can not play any of that content since browsers do not support FLASH and you can not get the FLASH plugin for browsers. So what might be the solution for this situation?
Ruffle and FLASH emulation
Emulation of course. We will not be able to get the flash player working, well at least not the original and official one, but we can make flash content playable again inside our browsers.
The first thing is first, we need to get an emulator package from the internet in order for this trick to work, one we will be using is RUFFLE. It is lightweight, it is free, it is open source and it is reliable, everything we need.
Download RUFFLE from its official website here.
For Chrome and Edge download the ZIP package, for Firefox, go to the Firefox section of the tutorial.
There is also a desktop version of RUFFLE there so if you are keen on playing your flash content on your desktop computer you might well grab that as well, but for the sake of this tutorial where we are enabling flash in our browsers, we will not focus on that part since it is pretty straightforward.
Now once you have downloaded the RUFFLE emulator, please extract it to the desired folder somewhere on your computer.
Once it is extracted, start your browser of choice and follow instructions.
FOR CHROME:
Navigate to: chrome://extensions/
Turn ON developer mode in the top right corner
Click on Load unpacked
Navigate to the folder where you have extracted RUFFLE
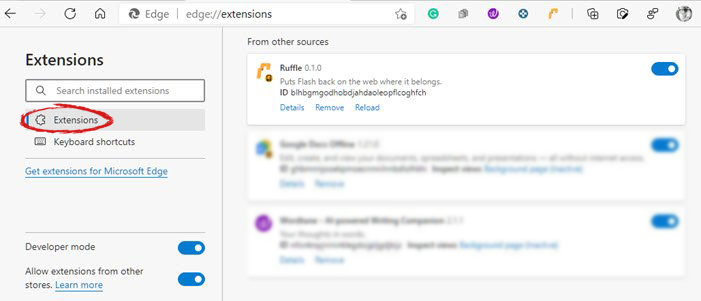
FOR EDGE:
Navigate to: edge://extensions/
Turn ON developer mode on the bottom left corner
Navigate to the folder where you have extracted RUFFLE
Turn RUFFLE ON
FOR FIREFOX:
Go to the RUFFLEdownload page, we can not use the zip package we were using for Chrome and Edge
Right-click on the Firefox download link
Save link by clicking on Save link as...
Navigate to about: debugging
Click on this Firefox
Click Load Temporary Add-on
Select the .xpi that you have downloaded
BONUS:
If you want to enable FLASH content live on your website use: <script src="path_to_ruffle/ruffle.js"></script>
Bttray.exe is basically a Bluetooth Tray Application. Bluetooth Tray Application is developed by WIDCOMM.
It provides a system tray icon that allows users to see the status of their Bluetooth connections at a glance. It allows you to easily access the configuration and settings for the Bluetooth products enabling you to change the configuration of the Bluetooth devices.
The bttray.exe application error may pop up on your computer screen due to some issue with the Bluetooth software. The process fails to initialize and therefore stops working.
Bttray.exe application error code is displayed in the following format:
“BTTray.exe can’t initialize (0xc0150004).”
“BTTray.exe – System Error”
Though this is not a fatal or critical computer error it is advisable to resolve it otherwise it will hamper your access to Bluetooth software and cause you a great deal of inconvenience.
Solution
Error Causes
Bttray.exe application error code may be triggered due to one of the reasons stated below:
Bttray.exe application is damaged
Bttray.exe is accidentally removed from your PC
The Bluetooth software or driver becomes problematic.
Some modules that run by the process are corrupt
Malware infection
Invalid registry entries
Further Information and Manual Repair
If you experience a bttray.exe application error code on your system, it is recommended to fix it right away.
To resolve this error you don’t have to be a computer programmer or a technical whiz or have to hire a professional and spend hundreds of dollars in repair. It is easy to fix, simply follow the manual methods given below:
Method 1- Reinstall Bluetooth Software
If the Bluetooth Software is damaged or outdated, the bttray.exe will also not work. If this is the cause of the error code, then simply reinstall Bluetooth software on your system.
To do this, first, uninstall the current software and then download the latest version of the Bluetooth Software on your PC. To uninstall click start, go to the control panel, and then programs. Now select Bluetooth software and click uninstall to remove it.
After that, install the latest version and update it. To activate changes
Method 2: Scan for Malware
Sometimes the bttray.exe application error code may pop up due to malware and viral infection. To fix it, download a powerful antivirus. Scan and remove malware to resolve.
Method 3: Clean Registry
The registry basically saves all the activities being performed on the PC including junk and obsolete files. If the registry is not clean frequently, unnecessary files like cookies, junk files, temporary files, and internet history can take up a lot of space and cause the registry to damage.
Due to this error code like the bttray.exe application can also pop up. To resolve, clean the registry. You can do it manually but that may be difficult and time-consuming if you are not a computer programmer. However, a good alternative would be to download Restoro.
This is a user-friendly and next-generation PC Fixer deployed with multiple utilities like a registry cleaner and an antivirus. Simply run it to remove viruses and clean the registry.
Click here to download Restoro and resolve the bttray.exe application error now!
HWiNFO (Hardware Information) is a professional hardware information and diagnostic tool supporting the latest components, industry technologies, and standards. It's targeted to recognize and extract the most possible amount of information about computer hardware which makes it suitable for users searching for driver updates, computer manufactures, system integrators, and technical experts too. Retrieved information is presented in a logical and easily understandable form and can be exported into various types of reports. System health monitoring and basic benchmarking available too.
If you would like to read more helpful articles and tips about various software and hardware visit errortools.com daily.
In today's modern world many households have internet access, most of the connection nowadays is done via Wi-Fi or wireless but there is a high probability that you have also a few devices connected via cable. There are of course many disadvantages and advantages between cable connection and wireless connection.
The main advantages of a hard cable connection are of course faster speed and stability compared to Wi-Fi. But if we look into the cables themselves there is also a big difference between them. Not all cables are the same and quality as well as speed vary a lot between them. Choosing the right cable is essential in order to make a maximum of your internet and we have some great tips and explanations of what cables do so you can make the right choice and enjoy your full internet potential.
Not all cables are the same
Cheap cables and expensive ones are not the same no matter what everyone tells you. The old proverb you get what you pay is true and more expensive cables will be made from better materials and will have a higher transfer rate.
Quality network cables are separated into different categories with proper markings and when buying one you should always look for these markings on the cables themselves, do not buy cables that do not have markings since they will often provide lower transfer rates or will not be shielded from outside influences resulting in packet drops and instability in a network.
Categories and what they mean are:
Cat-5 with a maximum speed of 100Mbps, typically unshielded.
Cat-5e with a maximum speed of 1Gbps, available in both shielded and unshielded varieties.
Cat-6 with a maximum speed of 10Gbps for runs under 55 meters (around 180ft), available in both shielded and unshielded varieties.
Cat-6a with a maximum speed of 10Gbps, shielded.
Cat-7 uses a proprietary GG45 connector rather than the standard RJ-45 connector seen on other cables for speeds of 10Gbps, shielded.
Cat-8 with a maximum speed of 25Gbps (Cat-8.1) or 40Gbps (Cat-8.2) at a distance of around 30 meters (around 100ft), shielded.
Unless stated, these standards are typically rated at their quoted speeds for a run of around 100 meters (around 330 ft) and use a standard RJ-45 Ethernet connector. Each generation of cable is designed to be compatible with the generations that came before it, so it’s possible (for example) to use a Cat-6a cable with a router that only supports speeds of 1Gbps.
Shielded cables
When purchasing higher quality cable you might not be able to choose if you have shielding or not since some standards like Cat-6a, Cat-7, and Cat-8 are always shielded. But if you do not have the need for these and you are satisfied with Cat-5e for example you can choose.
Shielded cables are a little more expensive but they will provide you with a coating that will eliminate interference from outside waves making cables more reliable. Of course, if the cable will go through a room that does not have many radio waves or some other interferences then buying a shielded cable is a waste of money.
Cable platings
Usually, there are two types of connector platings on connectors, silver, and gold, and people usually think that gold is much better but there are major differences between silver and gold platings and truth to be told there is no better one, both are different and should be considered depending on your need.
Silver plating will provide you with faster speed since its conductivity is larger than gold, but gold is slower on the oxidation front so its life span is longer. On the other hand, if your cables are always connecting and disconnecting gold will be first to be scrubbed off from the surface since the gold coating is much thinner.
Overall if you would only connect cable once and have slower internet than cable capacity gold is the way to go, in another case if you would use the cable as always connecting and switching and your internet plan is the same as cable transfer capacity you might want to go with silver one.
Cable material quality
Network cables are made from copper, your standard conduction material but even here there are differences in quality and therefore the chance of pocket losses over it. More quality less loss and more stable connection and this will depend on the purity of copper that is used in the cable itself. More purity in copper, more stability, simple as that.
Conclusion
So as you can see, there are a lot of different things that will influence your pick of proper network cable but the overall best advice is to get one that will fit well into your needs and setup. pair it up with your router and your internet plan since just simply buying something that you can not use is really a waste of money.
Windows and Devices chief Panos Panay has revealed new focus sessions feature that will be in Windows 11 on his Twitter account today. He himself is referring to it as a game-changer especially with Spotify integration.
So what is a focus session?
From the video clip provided on Twitter, we can see that focus session users will be able to choose a specific task from the previously made task list, choose songs that will play in the background while the task is active, and set a timer for the chosen task with breaks.
Maybe the best comparison and explanation would be a desktop google calendar task with music, basically, that’s it. A neat and good organizer inside your Windows 11 operating system. I think that this is generally a good idea and for sure it will find its audience.
Error 1706 is a Windows PC error. It occurs when you insert a Microsoft CD-ROM either to repair an Office or to install a feature set to Installed on First Use. The error message is displayed in the following format:
Error 1706. Setup cannot find the required files. Check your connection to the network, or CD-ROM drive. For other potential solutions to this problem, see C:\Program Files\Microsoft Office\Office101033\Setup.hlp.
Solution
Error Causes
Error 1706 may occur due to several reasons. These include:
You originally installed MS Office from a network administrative installation
You are trying to use Office CD-ROM when the error is prompted by the Windows Installer for an Office source location
Viral Infection
Further Information and Manual Repair
The good news is that this error code is not fatal. However, to avoid inconvenience, it is recommended to resolve the error right away. To fix the problem you don’t have to be a computer programmer or hire one. In fact, this error code can be resolved quite easily.
Here are some of the best and easiest do it yourself methods to resolve error 1706 on your PC:
Method 1
To resolve this issue find a different administrative installation for the Office source file location.
To do this, go to the start menu and then click run. In the open box, simply type this command line new network pathSetup.exe /fvm package name.msi and press OK to continue and update changes. Once the update is complete and finished press OK to save and proceed.
Please note after you follow these steps, the Windows Installer uses this new server location whenever it needs to reinstall, repair, or add a feature to your Office Installation.
Method 2
Another alternative method to resolve this method is to use CD-ROM for the Office Source Location. To do this you will have to remove Office and then re-install Office from the CD-ROM.
Here are the steps to remove the Office program. First, quit all Office programs.
Go to the Control Panel then click on the Program and Features option.
Now double click the Add/Remove programs and remove the entry for the Microsoft Office 2003 or Microsoft Office XP product installed on your PC.
After that, click on the Maintenance Mode Options dialog box, select Uninstall Office, and then click Next to proceed.
Click Yes to confirm changes.
Now insert Office 2003 or Office XP CD-ROM and follow the setup dialog boxes to reinstall the program on your system from CD-ROM.
Download Restoro to Correct Registry Errors
However, to ensure the installation is successful this time around, it is advisable to clean the registry and ensure the uninstalled program is not located in the registry.
To do this, download Restoro and run it on your computer. This is a powerful PC Fixer integrated with a registry cleaner.
The registry cleaner wipes out all the unnecessary files and uninstalled program files saved in the registry. Once the registry is cleaned, try reinstalling MS Office again. This will resolve the error 1706.
Click here to download Restoro and repair error 1706.
As of late, many users reported getting an error in Windows Sandbox that has an error code of 0x80070015. According to users, they encountered this error when they tried to start Windows Sandbox. Based on the error code, it seems that there are some problems with the supporting services of Windows Sandbox that trigger the error. It is possible that these services are misconfigured or that they are outdated and have to be updated. Here’s the complete message of the error:
“Windows Sandbox failed to start. Error 0x80070015. The device is not ready. Would you like to submit feedback about this issue?”
If you are one of the users who encountered this kind of error in Windows Sandbox, then you’ve come to the right place as this post will help you sort this problem out. All you have to do is follow each one of the options provided below.
Option 1 – Make sure that all the supporting processes and services of Windows Sandbox are running properly
If running Windows Sandbox as an administrator didn’t fix the error, you have to ensure that all related processes for Windows Sandbox are running properly. To do that, follow these steps:
Tap the Win + R keys to launch the Run utility and type “services.msc” in the field and hit Enter to open the Windows Services Manager.
Next, from the list of services, look for the following services in the given order:
After you find the aforementioned services, restart each one of them.
Once done, try to open the Windows Sandbox again and see if the error is fixed or not.
Option 2 – Try to install any pending Windows Updates
If the second option still didn’t work, then you might want to check Windows Updates on your computer and see if there are any pending Windows Updates you have to install. All you have to do is go to the Windows 10 Settings app and then go to the Windows Updates section and click on the “Check for updates” button to check if there are any pending updates that are needed to be installed. This could fix the Windows Sandbox Error 0x80070015.
Option 3 – Try to run Windows Sandbox as an admin
In the Start Menu, scroll down until you see the entry for the Windows Sandbox.
Then right-click on it and select More and then select the “Run as administrator” option to open it with admin privileges.
Next, if a User Account Control or UAC prompt pops up, just click on Yes to proceed.
You should now be able to open the Windows Sandbox without the error. However, if the error persists, proceed to the next given option below.

 Error Causes
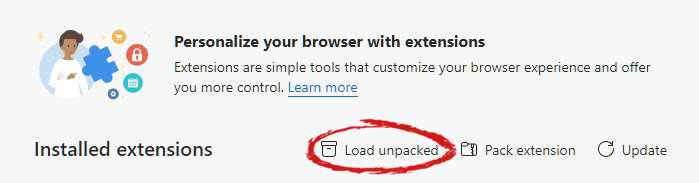

 Windows and Devices chief Panos Panay has revealed new focus sessions feature that will be in Windows 11 on his Twitter account today. He himself is referring to it as a game-changer especially with Spotify integration.