Windows Defender error code 0x80073afc

If you receive an error code of “0x80073afc” in Windows Defender after you boot your Windows 10 computer or when you try to manually run Windows Defender, then it could be that the Windows Defender files are corrupted. In such cases, this error could also occur if there is third-party security software that interferes with the smooth functioning of this Microsoft Security Client.

If you are one of the users who are currently facing this issue, then here are some suggestions you can check out to resolve the Windows Defender error code 0x80073afc.

Option 1 – Try to check the status of all the Windows Defender-related services

  • In the Cortana search box, type “services” and click on the Services icon to open the Services Manager. Alternatively, you can also tap the Win + R keys to launch the Run prompt and then type “msc” in the field and hit Enter to open the Services Manager
  • After opening the Services Manager, look for the following services and make sure that their Startup type is set to their default values:
    • Windows Defender Advanced Threat Protection Service – Manual
    • Windows Defender Antivirus Network Inspection Service – Manual
    • Windows Defender Antivirus Service – Manual
    • Windows Defender Firewall Service – Automatic
  • You can right-click on each one of the listed services and then select Start to start them.
  • And if some of the services don’t have their default values, just double-click on the Services to change the Startup types and select the correct option from the drop-down menu of the Startup type under the Properties box.
  • Next, set up the Startup type of these services to Automatic and then click on the Start button if the services are not running yet.
  • Now click on the Apply and OK buttons to save the changes made and then see if it fixed the problem or not.

Option 2 – Try to re-register the concerned DLL files

You could also try to re-register some Dynamic Link Library or DLL files on your computer as this could also help in fixing the Windows Defender error.

  • In the Start search, type “cmd” and from the search results that appear, right-click on Command Prompt and select the “Run as administrator” option from the context menu.
  • After opening Command Prompt as admin, type the following commands one after the other:
    • regsvr32 dll
    • regsvr32 dll
    • regsvr32 dll
    • regsvr32 dll
  • Once you’ve entered the commands given above, it will re-register the concerned DLL files in your system.
  • Now restart your computer for the changes to take effect.

Option 3 – Try to use the Registry Editor

  • Tap the Win + R keys to open the Run dialog box,
  • Then type “Regedit” in the field and hit Enter to open the Registry Editor.
  • Afterward, navigate to this registry path: ComputerHKEY_LOCAL_MACHINESOFTWAREMicrosoftWindows NTCurrentVersionImage File Execution Options
  • Next, look for the DWORDs named “MSASCui.exe”, “MpCmdRun.exe”, “MpUXSrv.exe” and “msconfig.exe”.
  • If you can’t find these DWORDs, refer to the next given option below.
  • Restart your computer.

Option 4 – Check the Environmental Values

  • Type “View advanced system settings” in the Windows search box and select the appropriate result.
  • This will open a new mini window. From there, go to the Advanced tab and click on the “Environment Variables…” button located at the bottom part of the window.
  • Next, look for the “%ProgramData%” variable name and make sure that its value is set to C:/ProgramData.
  • Then click OK to save the changes made.

Option 5 – Run the System File Checker Scan

System File Checker or SFC is a built-in command utility that helps in restoring corrupted files as well as missing files. It replaces bad and corrupted system files to good system files. To run the SFC command, follow the steps given below.

  • Tap Win + R to launch Run.
  • Type in cmd in the field and tap Enter.
  • After opening Command Prompt, type in sfc /scannow

The command will start a system scan which will take a few whiles before it finishes. Once it’s done, you could get the following results:

  1. Windows Resource Protection did not find any integrity violations.
  2. Windows Resource Protection found corrupt files and successfully repaired them.
  3. Windows Resource Protection found corrupt files but was unable to fix some of them.
  • Restart your computer.

Option 6 – Perform a System Restore

Performing a System Restore on your computer can also help you fix the Windows Defender error. You can do this option either by booting into Safe Mode or in System Restore. If you are already in the Advanced Startup Options, just directly select System Restore and proceed with the next steps. And if you have just booted your PC into Safe Mode, refer to the steps below.

  • Tap the Win + R keys to open the Run dialog box.
  • After that, type in “sysdm.cpl” in the field and tap Enter.
  • Next, go to the System Protection tab then click the System Restore button. This will open a new window where you have to select your preferred System Restore point.
  • After that, follow the on-screen instructions to finish the process and then restart your computer and check if the problem is fixed or not.

Do You Need Help with Your Device?

Our Team of Experts May Help
Troubleshoot.Tech Experts are There for You!
Replace damaged files
Restore performance
Free disk space
Remove Malware
Protects WEB browser
Remove Viruses
Stop PC freezing
GET HELP
Troubleshoot.Tech experts work with all versions of Microsoft Windows including Windows 11, with Android, Mac, and more.

Share this article:

You might also like

IW Unicorn and Scorpion PC Chair cockpits
Recently on errortools.com, we were talking about Cooler Master’s Orb X gaming chair that is an absolute beast and an amazing product. One downside of Orb X is its price. IW product line is somewhat competing with Orb X with a much more affordable price aiming to probably take customer base with lower income but offering them a great experience as well. The first thing you will notice is a different design and somewhat feeling of cheaper quality if you compare it to Orb X but that is quite reasonable considering the chair itself is around 3.5 times cheaper than Orb X which really puts it in range of everyone can get it. But does a much cheaper price means low quality? Let’s explore.

IW Unicorn

IW unicornThe 2021 CLUVENS BRAND newly issued model UNICORN has fully electrical tilting capabilities to 160 degrees, Reading light-two LED & RGB illumination lighting, manual open/close keyboard tray, and armrests. This model is suitable for home and office, and also gaming computer work environments. It offers functions that enable the user to experience unprecedented comfort and quasi total immersion through strategically positioned 1-3 monitors, audio systems, and accessories. The result is a complete computer office, ergonomically optimized, with a minimal footprint that improves overall performance and productivity and health and comfort. Sitting on a chair can help a lot for relieving health problems like lower back pain, herniated discs, sciatica, and neck pain and also enhance performance and viewing effects.

More Luxury and More comfortable:

Equipped with Luxury feeling reclining Gaming chair made with high-density Mold Shaping Foam and superior quality PU leather with very comfortable texture, electrical recline to 128 degrees, and more to 160 degrees for the flat position for the user.

More High-End Setting and more High-tech:

Manual push for open / close of big sized (87x34cm) Self-Balancing Keyboard tray, adjustable with 20cm distance range with Electrical control for the height of roof arm & monitors. Electrical control for reclining Zero Gravity position or even flat position, Manual adjusted Feet pedal for a more comfortable position for feet. Using a High-Quality PU leather Gaming chair that has Heat/Massage functions with it! The IW-Unicorn monitor mounts allow the use of a single monitor up to Ultra-wide 49” or 43” in size or triple monitor setups up to 3 x 29” other monitors configurations are available upon request. (VESA standard)

IW Scorpion

IW scorpionScorpion is basically a premium version of Unicorn with being able to hold more weight, having cup holders on the armrest, etc. The look is also similar with Scorpion being more sinister-looking but overall Steel frame and chair are the same.

Conclusion

Sadly I have not personally experienced neither of these products including Orb X but from all information I have found and looked over, I would say these products are not trying to compete with each other. Although Products are similar in nature, Orb X is aimed at hi end-users focusing on privacy and robustness while IW is filling the gap of users that would like an advanced chair but are not willing or ready to shell hi amount of money for it offering advanced chairs with advanced features in somewhat affordable price.
Read More
Fix Something went wrong with the projection
As you know, Windows 10 is created with the goal of developing an operating system that caters to users’ needs and enhances productivity. That’s why modern computers that are running the Windows 10 OS have the capabilities to project their screen to an external display wirelessly. That said, Microsoft has a dedicated and pre-installed app called Connect which helps another device to project their screen on the computer. However, this feature is kind of delicate and won’t work unless it’s properly configured. So if some configuration does not work out well, it will throw an error message that says
“Something went wrong with the projection”.
This kind of error is caused by some issues with the Display driver, hardware, corrupted or damaged system files, and so on. And to fix it, there are several methods you can check out. You can try to update, roll back or reinstall the Display drivers. You could also run the Network Adapter troubleshooter or the Video Playback troubleshooter as well as run System Restore to undo any recent changes that might have triggered the error or reset your Windows 10 computer without deleting any files. For more details, refer to each one of the options provided below.

Option 1 – Try to update or rollback the Graphics driver

You can try to update your Graphics card driver using the Device Manager in your computer to resolve the blank dialog boxes problem or you can also go directly to the website of your graphics card manufacturers like NVIDIA, Intel, or AMD and go to the section called Drivers then check if there’s a new available update – if there is, download and install it. To update your Graphics driver via Device Manager, refer to these steps:
  • First, boot your computer into Safe Mode.
  • After that, tap the Win + R keys to launch Run.
  • Type in MSC into the box and tap Enter or click OK to open the Device Manager.
  • After that, a list of device drivers will be displayed. From there, look for the Display Adapters and click on them.
  • After that, right-click on each entry under the Display Adapters and select the “Uninstall Device” option from the menu.
  • Now restart your computer.
  • After restarting your computer, go to the Settings app and Check for Updates in the Windows Update section.
Note: If updating the Graphics driver didn’t fix the problem, you can also try to roll back to its previous version and see if that helps or you could also try to roll back, update or reinstall the Network Adapter drivers.

Option 2 – Try to run the Network Adapter troubleshooter

To run the Network Troubleshooter, refer to these steps:
  • Open the Search bar on your computer and type in “troubleshoot” to open the Troubleshoot settings.
  • Next, scroll down and select the “Network Adapter” option from the right pane.
  • Then click on the Run Troubleshooter” button.
  • After that, your computer will check for any possible errors and will pinpoint the root cause of the problem if possible.
  • Restart your computer.

Option 3 – Try to run the Video Playback troubleshooter

If the Network Adapter troubleshooter didn’t work in fixing the problem, you can try to run the Video Playback troubleshooter instead. To run it, simply go to Settings > Update & security > Troubleshoot. From there, scroll down until you see the Video Playback option and then click on the “Run the troubleshooter” button to get started. This troubleshooter will detect and automatically fix any problems related to video playback so it should help fix the error.

Option 4 – Try performing a System Restore

You might also want to perform a System Restore that might help you in fixing the error. You can do this option either by booting into Safe Mode or in System Restore. If you are already in the Advanced Startup Options, just directly select System Restore and proceed with the next steps. And if you have just booted your PC into Safe Mode, refer to the steps below.
  • Tap the Win + R keys to open the Run dialog box.
  • After that, type in “sysdm.cpl” in the field and tap Enter.
  • Next, go to the System Protection tab then click the System Restore button. This will open a new window where you have to select your preferred System Restore point.
  • After that, follow the on-screen instructions to finish the process and then restart your computer and check if the problem is fixed or not.

Option 5 – Reset your computer

  • Tap the Win key or click on the Start button located in the Taskbar.
  • Then click on the Power button at the bottom right portion of the screen.
  • Next, press and hold the Shift key on your keyboard and then click on Restart. This will restart your Pc into the Advanced Startup options.
Note: Once you have access to the Advanced Startup options, you have to go to the setting which allows you to Reset your Windows 10 PC. All you have to do is select Troubleshoot > Reset this PC to reach the following screen Afterward, select either the “Keep my files” option and then proceed to the next on-screen instructions that follow to reset your Windows 10 computer without losing your files.
Read More
A Guide to Fixing Error 0x80070652 Windows 10

Error Code 0x80070652 – What is it?

Error code 0x80070652 occurs when Windows users attempt to upgrade their operating system while another program is in the process of being downloaded. It may also occur due to problems related to previously failed update attempts within Window Update. When this Windows 10 upgrade occurs, Windows users fail to access the version of Windows they are attempting to download. Instead, a message box occurs stating that error code 0x80070652 has occurred on the device. If this error message is not rectified, it could give birth to other Windows 10 errors such as error code 0x80072EE2.

Solution

Restoro box imageError Causes

Error code 0x80070652 may result from Windows 10 users attempting to download another program while upgrading their operating system. It may also be caused by an issue related to previous installations of updates. For instance, in some cases, your previous installation of the Windows process may have been interrupted or it was simply not completed properly. This causes any other upgrade process that follows to result in error code 0x80070652.

Further Information and Manual Repair

But what can be done in such a situation to resolve the error code? Windows users have several options available. For instance, they can wait on any additional program that may be in the process of downloading to complete the process before attempting to upgrade Windows. They may also troubleshoot problems related to any failed updates or select a system restore point in which the error code was not present.

The manual repair methods Windows 10 users choose may involve any of the solutions mentioned previously. The choice is largely dependent on the user and his determination to fix the error code. However, note that automated tools or Windows repair technicians may also provide solutions to PC issues like error code 0x80070652.

Method One: Verify and Troubleshoot Failed Upgrades

Since previously failed updates within Windows Update can lead to the occurrence of error code 0x80070652, Windows 10 users will need to verify which of these failed updates occurred by checking the history section of the Windows Update tool. Once you’ve been able to verify that failed updates have occurred in the recent past, you’ll need to troubleshoot these problems to rectify the error code. Follow the instructions below to check for updates that have failed to install properly via Windows Update.

  • Step one: Type Windows Update in the Search box near Start Menu
  • Step two: Select Windows Update settings
  • Step three: Select Update history
  • Step four: Review updates from the most recent to least recent to see which updates have failed
  • Step five: Click failed updates for more details and troubleshoot accordingly.

Once you’ve completed the troubleshooting of any updates which failed, proceed by rebooting your device. You may then reattempt to upgrade to the latest version of Windows 10 once no other program is in the process of being downloaded.

If the problem causing error code 0x80070652 was related to failed updates of the past, these issues will likely be resolved once you successfully troubleshoot them. However, if the error code reoccurs, apply the next manual repair solution mentioned in this article.

Method Two: Download Updates Manually via Microsoft Download Center

Another option available to users is simply downloading updates manually by visiting the official Microsoft website, specifically the Windows section which provides downloads. To successfully complete this process, ensure you look for stand-alone packages of these downloads available on the website. You will need to know the Microsoft Knowledge Base (KB) article number related to the specific update(s) which failed.

Once a Windows user has verified the KB article number of the specific update, download it from the Microsoft website, then select Run to install the update. Reboot your PC, then check Windows Update to see if you are able to successfully complete the Windows 10 upgrade.

If the upgrade fails, you may need to implement the next manual repair method as is mentioned below.

Method Three: Use Windows System Restore

One of the best options for Windows 10 users facing certain PC problems is to apply System Restore. This allows them to reset their machine for a period of time in which the problem was not present. This is known as the restore point. To apply this manual repair method, follow the steps below.

  • Step one: In the search box beside the Start Menu, type System Restore
  • Step two: Select Create a restore point
  • Step three: Select the System Protection tab then Configure or Create
  • Step four: Provide details regarding a system restore point of your choice
  • Step five: Select Create, then OK.

Method Four: Download an Automated Tool

If you wish to always have at your disposal a utility tool to fix these Windows 10 and other related issues when they do arise, download and install a powerful automated tool.

Read More
What to do if the Windows 10 Control Panel is not opening
The Control Panel is one of the most important tools in Windows which allows users to control and change various settings. However, there are cases when it experiences some problems like when users aren’t able to open it. Recently, a lot of users complained about not being able to open the Control Panel. To be more specific, users were able to open it but only lasted for a second, and then it’s gone. This is not just some issue you can ignore as this will prevent you from accessing some major settings in your computer and you won’t be able to perform some important task without it. According to security experts, this issue is most likely caused by a bug in the Windows Update. If you have installed an update recently, then it’s most likely the culprit. Aside from the Windows Update, there are also other things that can cause this issue. Some of them are the IDT audio panel and a control panel file that causes conflicting issues with the control panel that leads to this problem. Aside from these aforementioned cases, the Windows Error reporting services could also be one of the causes of this issue. As you can see, since there are a lot of possible causes for this problem, this post prepared a lot of options as well which you have to check out. Follow each one of them and see which one worked best for you.

Option 1 – Try updating your Windows 10 PC

If you haven’t updated your PC to the latest version of Windows 10, then you should. A lot of users found that the issue with the Control Panel was fixed right after they updated their Windows 10 PCs. This is probably because Microsoft has probably released a fix on one of the latest updates.

Option 2 – Try uninstalling the IDT Audio Panel

For some users, uninstalling the IDT Audio Panel from their PCs did the trick. You can also try doing the same thing to fix the vanishing Control Panel. According to these users. The IDT audio panel was the one that’s causing the issue. To uninstall the IDT audio panel, here’s what you have to do:
  • Tap the Win + R keys at the same time to open the Run dialog box.
  • Then type in “appwiz.cpl” in the field and tap Enter to open the “Uninstall or change a program” screen of the Control Panel.
  • From there, look for the IDT audio panel, select it and then select the Uninstall option and follow the next on-screen instructions that appear.
Note: If you are unable to locate the IDT audio panel or you simply can’t access the Uninstall or change program screen or you can’t keep Control Panel open for a long time, here’s what you can do:
  • Tap the Win + R keys at the same time once again to open the Run dialog box.
  • And in the field, type in “devmgmt.msc” and hit Enter to open the Device Manager.
  • After opening the Device Manager, look for the “Sound, video and game controllers” option and double-click on it.
  • From there, locate the IDT audio panel or “IDT High Definition CODEC” and select Uninstall and follow the next instructions that appear.

Option 3 – Try deleting or renaming IDTNC64.cpl

IDTNC64.cpl is a control file in the control panel. However, it might be the one that’s causing the problem as it could be conflicting with the control panel. As a result, the control panel crashes after a second or more. Many users have fixed the problem by either renaming or deleting this file – the safer option would be is renaming it.
  • Tap the Win + E keys to open File Explorer.
  • In the address bar located at the top, type in “C:\Windows\System32” and tap Enter to open this folder.
  • From there, look for the IDTNC64.cpl file, right-click on it and select the Rename option.
  • You can name the file anything you want but it’s better if you rename it to “oldcpl”.
  • After you rename the file, try opening the Control Panel again. It should work fine now.

Option 4 – Try to disable the Windows Error Reporting Service

As mentioned earlier, the Windows Error Reporting Service is also known to cause the issue so some users disable it and got the issue fixed.
  • Tap the Win + R keys.
  • In the field, type in “MSConfig” and hit Enter to open System Configuration.
  • After opening System Configuration, go to the Services tab and look for the Windows Error Reporting Service and uncheck its checkbox.
  • Click the Apply button and click OK. You should now see a date in the Disable Date column. Then check if the Control Panel is now working properly if not, restart your computer and check once more. That should fix the problem.

Option 5 – Try opening Control Panel via Run

This option is more of a workaround than a solution as it does not really fix the issue with the Control Panel but rather helps you in accessing the controls at the very least.
  • Tap the Win + R keys to open Run.
  • Type in “appwiz.cpl” in the field and tap Enter to open the Uninstall or change program screen of the Control Panel.
  • Next, copy and paste “Control panel all control panel items” on the address bar located at the top-mid part of your screen. You must not type the given address and simply copy and paste it. After that, you will see a list of control panel controls you can use.
Read More
Delete files and folders using Command Prompt
There are times when you might find it difficult to delete folders or files in File Explorer and it could be due to many reasons. One of these reasons can be attributed to the failure that can lock down the folders or files which prevents you from deleting them. In this kind of situation, you can utilize the Command Prompt to delete the folders, sub-folders, and files on your computer, and in this post, you will be guided on how exactly you can do that. Before you proceed, keep in mind that when you use the Command Prompt incorrectly, it might affect your computer and render it inoperable, thus, you must be extra careful when executing the steps given below and it would also be better if you create a System Restore Point. After that, refer to the following instructions. Step 1: First, in the Start Search, type “command prompt” in the field and from the search results, right-click on Command Prompt and then select the “Run as administrator” option to open Command Prompt with admin privileges. Step 2: After opening Command Prompt as admin, navigate to the folder where the file you want to delete is located. Note that you have to execute the “cd” or the change directory command. Step 3: Next, execute the following command in Command Prompt:
DEL /F /A <file path with extension>
Note: In the given command, “/F” is the force delete command, while “/A” is the command that selects the files with the ready for archiving attribute. Step 4: After that, go to the location where you can find the folder you want to delete by using the “cd” command again. And then execute the following command right after:
RD /S <folder path>
Note: In the given command, “RD” is the command that removes the folder from the directory, while “/S” removes all of its sub-folders and files. On the other hand, if you also use the “/Q” parameter, you won’t see the “Y/N” confirmation but if you didn’t use it, then simply tap the Y button to proceed.
Read More
Fixing the No such interface supported
If you are using File Explorer but suddenly encountered an error saying, “No such interface supported”, read on as this post will guide you on how to fix the problem. This kind of error occurs due to the corruption in the system files which supports several tasks in the system that works with the Windows File Explorer process or File Explorer. This kind of error can give you a hard time in browsing the files on your computer, or when you open important utilities like the Control Panel, or when you copy files and other inconveniences. Needless to say, it won’t bring you any productivity at all and can only leave you frustrated. To fix this problem, there are several options you can try. You can try to run the System File Checker scan or the DISM tool. You could also try to re-register the potentially corrupted DLL files or fix the User Profile. For more details, refer to each one of the given options below.

Option 1 – Try to run System File Checker

System File Checker or SFC is a built-in command utility that helps in restoring corrupted files as well as missing files. It replaces bad and corrupted system files to good system files that might be the cause why you’re getting the errors 0x8024a11a and 0x8024a112. To run the SFC command, follow the steps given below.
  • Type “cmd” in the Start search and then right-click on the appropriate search result.
  • Next, select “Run as administrator” to open Command Prompt with admin privileges.
  • After opening Command Prompt, type in sfc /scannow
The command will start a system scan which will take a few whiles before it finishes. Once it’s done, you could get the following results:
  1. Windows Resource Protection did not find any integrity violations.
  2. Windows Resource Protection found corrupt files and successfully repaired them.
  3. Windows Resource Protection found corrupt files but was unable to fix some of them.
  • Now restart your computer and see if the problem is fixed or not.

Option 2 – Try to fix the User Profile

The next thing you can do to fix the problem is to fix the User Profile. All you have to do is migrate to a new User Profile in Windows 10 by creating a new User Account and migrating all your personal files from the current user profile folder in the C:/Users location to the new user profile folder which is also located in the same folder.

Option 3 – Run the DISM tool

You can try running the Deployment Imaging and Servicing Management or DISM tool to fix the “No such interface supported” error. Using this built-in tool, you have various options such as the “/ScanHealth”, “/CheckHealth”, and “/RestoreHealth”.
  • Open the Command Prompt with admin privileges.
  • Then type in the following commands and make sure to hit Enter right after you type each one of them:
    • Dism /Online /Cleanup-Image /CheckHealth
    • Dism /Online /Cleanup-Image /ScanHealth
    • exe /Online /Cleanup-image /Restorehealth
  • Do not close the window if the process takes a while as it will probably take a few minutes to finish. Once it’s done, restart your computer.

Option 4 – Try to re-register the problematic DLL file

You may have to re-register the ntdll.dll file using the regsvr32.exe before you can successfully install the program and fix the error. The Regsvr32 tool is a command-line utility that can be used to register and unregister OLE controls like DLL and ActiveX (OCX) controls in the Windows operating system. Follow the steps below to use it.
  • Open Command Prompt as admin from the WinX menu.
  • Next, type the following command in the elevated Command Prompt and hit Enter to execute it. This will re-register the affected DLL file using the Windows operating system tool, regsvr32.exe.
regsvr32 c:windowssystem32actxprxy.dll
  • After you execute the given command, you should see a message saying, “DllRegisterServer in vbscript.dll succeeded” if the Regsvr32 tool was able to run successfully. If it didn’t work, you can try to execute this command instead: FOR /R C: %G IN (*.dll) DO "%systemroot%system32regsvr32.exe" /s "%G"
  • Once it’s done, restart your computer.
Read More
How to Fix DCOM Error 1084 on Windows
Distributed Component Object Model or DCOM is a module on Windows computers that allows computers to run programs over a network to another computer. It is a software component from Microsoft that allows COM objects to communicate with each other while that program is remotely running over the network. The COM Model is another extension of the DCOM model which both work together in order for the intended task to be executed. To make this module work, there are three components needed such as the Class Identifier or CLSID, the Programmatic Identifier or PROGID, and the Application Identifier or APPID. However, DCOM does not always work as expected as it could still encounter some errors. One of them is error 1084. Because of this error, the execution of programs in a remote computer on the network would be interrupted. So if you encounter the DCOM error 1084 when you try to start a service like running the DISM tool or in other scenarios on your Windows 10 computer, then this post could help you. Refer to the instructions given below to start troubleshooting the problem.

Option 1 – Try checking the status of DCOMLAUNCH Service or DCOM Server Process Launcher and its 3 dependencies

The DCOM Server Process Launcher service launches both COM and DCOM servers in response to object activation requests. This is why if this service is stopped or disabled, the programs that are using COM and DCOM won’t properly function. So you need to make sure that the DCOMLAUNCH service is running.
  • In the Cortana search box, type “services” and click on the Services icon to open the Services Manager. Alternatively, you can also tap the Win + R keys to launch the Run prompt and then type “services.msc” in the field and hit Enter to open the Services Manager.
  • Next, check the following services:
    • DCOM Service Process Launcher
    • Background Tasks Infrastructure Service
    • Local Session Manager
    • Remote Procedure Call (RPC)
  • Then right-click on each one of the services and click on their Properties.
  • After that, select Automatic from the drop-down menu of Startup Type and make sure that all the aforementioned services are Running.
  • Now click OK for each one of the services.

Option 2 – Troubleshoot the problem in a Clean Boot State

There are instances that some conflicting programs installed in your computer might be the one that’s causing DCOM error 1084. To identify which program is causing the problem, you need to put your computer in a Clean Boot State. To do so, follow the steps below.
  • Log onto your PC as an administrator.
  • Type in MSConfig in the Start Search to open the System Configuration utility.
  • From there, go to the General tab and click “Selective startup”.
  • Clear the “Load Startup items” check box and make sure that the “Load System Services” and “Use Original boot configuration” options are checked.
  • Next, click the Services tab and select the “Hide All Microsoft Services” check box.
  • Click Disable all.
  • Click on Apply/OK and restart your PC. (This will put your PC into a Clean Boot State. And configure Windows to use the usual startup, just simply undo the changes.)
  • From there, start to isolate the problem by checking which one of the programs you installed recently is the root cause of the problem.

Option 3 – Try to use the DISM tool

You might want to repair potentially corrupted files in your system as having them could also trigger the DCOM error 1084. To repair these corrupted system files, you can run the DISM commands:
  • Tap the Win + X keys and click on the “Command Prompt (Admin)” option.
  • After that, input each one of the commands listed below sequentially to execute them:
    • Dism /Online /Cleanup-Image /CheckHealth
    • Dism /Online /Cleanup-Image /ScanHealth
    • Dism /Online /Cleanup-Image /RestoreHealth
  • Once you’ve executed the commands given above, restart your computer and check if the DCOM error is now fixed.

Option 4 – Reset your computer

  • Tap the Win key or click on the Start button located in the Taskbar.
  • Then click on the Power button at the bottom right portion of the screen.
  • Next, press and hold the Shift key on your keyboard and then click on Restart. This will restart your Pc into the Advanced Startup options.
Note: Once you have access to the Advanced Startup options, you have to go to the setting which allows you to Reset your Windows 10 PC. All you have to do is select Troubleshoot > Reset this PC to reach the following screen Afterward, select either the “Keep my files” option and then proceed to the next on-screen instructions that follow to reset your Windows 10 computer without losing your files.
Read More
Removing Default Taskbar Buttons in Windows 11
Windows 11 taskbarI do not know about you, but I prefer to set my Windows to be more to my liking and not how Microsoft thinks it should be. Let’s face it, not all users feel comfortable whit Microsoft settings and idea how things should be. One of the things I particularly did not like even in Windows 10 is icons that come by default on my taskbar, now so far, well until the latest Windows 11 update you could remove default taskbar icons the same way as in Windows 10, just right-click on them and unpin, sadly with latest update build on Windows 11 this option has been removed. In order to remove default icons from the taskbar, one must go now to Windows 11 settings and choose from there which one you would like to be placed on it. Of course, this is nothing game-breaking but it still feels strange why the standard option has been removed, it just makes no sense but lately not many things that come from Microsoft do. I do not know about you, but I prefer to set my Windows to be more to my liking and not how Microsoft thinks it should be. Let’s face it, not all users feel comfortable whit Microsoft settings and idea how things should be. One of the things I particularly did not like even in Windows 10 is icons that come by default on my taskbar, now so far, well until the latest Windows 11 update you could remove default taskbar icons the same way as in Windows 10, just right-click on them and unpin, sadly with latest update build on Windows 11 this option has been removed. In order to remove default icons from the taskbar, one must go now to Windows 11 settings and choose from there which one you would like to be placed on it. Of course, this is nothing game-breaking but it still feels strange why the standard option has been removed, it just makes no sense but lately not many things that come from Microsoft do.
Read More
Enable or Disable Automatic Encryption
You might be familiar with the Encryption File System or EFS algorithm if you rather keep your files and folders encrypted. Encryption File System is a built-in feature in Windows 10 which allows users to secure their important files. Although there is an alternative way for you to secure your data on your Windows 10 computer, you can’t ignore the fact that the main advantage of an Encryption File System over BitLocker is that the former can help you encrypt a particular folder rather than encrypting the whole hard drive partition. If you move a file inside a folder encrypted with the Encrypting File System it will automatically get encrypted. There are some users who like this feature but unsurprisingly, there are some that don’t. So if whether you want your files encrypted when you place them in an encrypted folder or if you want to keep it as it is, read on as to how you can do it either way. You can enable or disable automatic encryption of files moved to encrypted folders in Windows 10 using the Registry Editor or the Group Policy Editor. Before you proceed, make sure to create a System Restore Point first because the modifications you’re about to make in your computer might affect its overall functioning so if anything goes wrong, you can always undo the changes. Once you have that covered, refer to the options given below to enable or disable automatic encryption in Windows 10.

Option 1 – Enable or disable automatic encryption using Registry Editor

  • Press the Win key + R key at the same time to open the Run dialog box.
  • Then type “Regedit” in the field and press Enter to open the Registry Editor and if a User Account Control or UAC prompt appears, just click Yes to proceed.
  • After opening the Registry Editor, navigate to this key location: HKEY_LOCAL_MACHINESOFTWAREMicrosoftWindowsCurrentVersionPoliciesExplorer
  • Next, right-click on Explorer and select New > DWORD (32-bit) Value and then name the newly create DWORD to “NoEncryptOnMove” and press Enter to save it.
  • After that, double click on the NoEncryptOnMove DWORD and set its value to the following preferences:
    • 1 – Disable Auto Encryption of files moved to encrypted folders.
    • 0 – Enable Auto Encryption of files moved to encrypted folders.
  • Now close the Registry Editor and restart your computer to successfully apply the changes made.

Option 2 – Enable or disable automatic encryption using the Group Policy Editor

  • Press the Win + R keys to open the Run box and type “gpedit.msc” in the field and press Enter to open the Group Policy Editor.
  • After that, navigate to this path: Computer ConfigurationAdministrative TemplatesSystem
  • Next, look for the “Do not automatically encrypt files moved to encrypted folders” option and double click on it to set the policy. From there, you will see the following description:
“This policy setting prevents File Explorer from encrypting files that are moved to an encrypted folder. If you enable this policy setting, File Explorer will not automatically encrypt files that are moved to an encrypted folder. If you disable or do not configure this policy setting, File Explorer automatically encrypts files that are moved to an encrypted folder. This setting applies only to files moved within a volume. When files are moved to other volumes, or if you create a new file in an encrypted folder, File Explorer encrypts those files automatically.”
  • Now select one of the radio buttons below depending on your preference:
    • Not Configured or Disabled: Enable Auto Encrypt of files moved to EFS Encrypted folders.
    • Enabled: Disable Auto Encrypt of files moved to EFS Encrypted folders.
  • Then click on the Apply and OK buttons to save the changes made.
  • Exit the Group Policy Editor and restart your computer.
Read More
Creating a new Windows 10 user account
When we purchase a computer, usually it is meant to be used by one person. Sometimes we would like to share our computer with other people, with friends and family members but we would also like to keep some privacy for ourselves in the process. Lucky for us Windows 10 will let us create multiple user accounts which then can be used by other persons with their own settings, documents, etc. The only requirement is to already have one user account which is automatically created when Windows is installed. This guide will lead you step by step in the creation of a new user account within Windows 10, so grab your favorite drink, and let's begin.

Creating new account
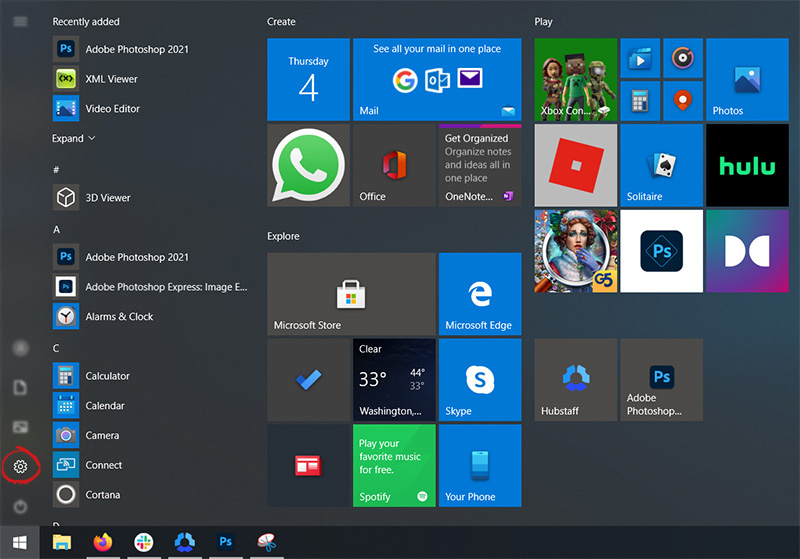
First thing is to click on the windows icon on the bottom left and open start menu, from start menu click once on settings. Windows 10 Star menu with marked settings iconWhen the settings window opens, choose ACCOUNTS on it. Windows settings accounts section selectedWindows will then go to the accounts settings page. Within that page, click on the Family & other users to open the setting for the chosen section on right. On the right settings, screen navigate to the lower section and click once with the left button on add someone else to this PC When add someone else to this PC is clicked, pop up window will appear which will ask you to provide the persons email address and later on the password of his/her Microsoft account, after the required information is provided you are done, a new user has been added and he can use his Microsoft credentials on the login screen to use this computer.

Setting up a user without Microsoft ID

However, if you do not wish to add a new user via his Microsoft login credentials or the person does not have them, on the pop-up window click on I don't have this person's sign-in information. User account no informationThis will open yet another pop-up giving you the option to create a Microsoft account for this person, to use a phone number instead of a Microsoft account, or to create a new email address for the user. Any of these options will create a new user for this computer with provided credentials but there is the last option at bottom of the pop-up which will allow you to create a local user only without a Microsoft account. This user will be able to use this computer, will not be able to transfer his document through various devices like he/she would if using a valid Microsoft account but it could use the computer and personalize it fully to his/her liking. user account new account without ms idOnce the link is clicked, you will be presented with a floating window requiring you to input needed information in order for the account to be created. You will need to provide username, password, and answers to 3 security questions. user account create an accountOnce all information has been provided, click on next and your new non-Microsoft local user has been created. Now when you click on Family & other users you will see that Windows has added a new user with the provided name to this computer. If you wish, you can add another user in the same manner, following the previous steps. Microsoft Windows does not have a limit for how many users can be on one computer so feel free to create as many as you like.

User account options

Now, clicking on the existing created user will open user options. From there you will have options to remove the user, therefore removing him/her from this computer, note that removing the local user will remove permanently his/her settings and they would not be able to be restored, or you can change the user account type. User account new accountClick on Change account type. User account account typeUnder account type, you will have the option to promote this user to an administrator if you wish or you can leave it as a standard user.
Read More
1 2 3 171
Logo
Copyright © 2023, ErrorTools. All Rights Reserved
Trademark: Microsoft Windows logos are registered trademarks of Microsoft. Disclaimer: ErrorTools.com is not affiliated with Microsoft, nor claims direct affiliation.
The information on this page is provided for information purposes only.
DMCA.com Protection Status