As you know, Windows 10 has a complicated mechanism for Activation which helps in the verification of a genuine copy of Windows 10. However, there are times when you might encounter some errors during the activation process. One of these errors is the error code 0xc000f074. This kind of error could be due to the Key Management Service or KMS which is unreachable by the client computer or if the key used in the SLSetAuthenticationData function call is incorrect.
This kind of error mostly affects surfaces on computers that are upgraded from either Windows 7 or Windows 8.1 to Windows 10. In such cases, you may encounter any of the following error messages:
“Windows is unable to reach your company’s activation service. Please connect to your corporate network. If you are connected and continue to see the error, contact your system administrator. You can also click on the error detail to find the exact error. Error code: 0xC004F074.”
“Activating Windows(R),
(Key hash)…
Error: 0xC004F074 The Software Licensing Service reported that the computer could not be activated. No Key Management Service (KMS) could be contacted.
Please see the Application Event Log for additional information.”
“Error 0xC004F074, SL_E_AUTHN_MISMATCHED_KEY, The Software Licensing Service reported that the key is mismatched.”
To fix the Windows 10 Activation error 0xC004F078, you have to use the correct key for your type of Windows copy or use Command Prompt to reinstall the key or you could also try running the Activation troubleshooter.
Option 1 – Try running the Windows 10 Activation Troubleshooter
The first thing you can do to resolve the Activation error code 0xc000f074 is to run the Windows 10 Activation Troubleshooter. To do so, follow these steps:
Go to Settings and then select Activation.
After that, click on the Windows Activation and then troubleshoot. This will help you address most of the commonly found activation issues in Windows devices.
The Windows 10 Activation Troubleshooter will determine if your license key is a valid Windows 10 digital license for an edition that is not currently installed. If it turns out that it’s not, then the troubleshooter will show you how to install the correct edition.
Option 2 – Try to use the correct key for the type of Windows version you have
If the Windows Activation troubleshooter wasn’t able to resolve the error, then you can try using the correct key for your type of Windows version. All you have to do so is check the type of your Windows copy if it’s OEM, retail, or volume. And make sure that you have the correct, valid product key for your operating system.
Option 3 – Try to use Command Prompt to reinstall the key
In the Start Search, type “command prompt” and right-click on Command Prompt from the search results, and then select “Run as administrator”.
After that, execute this command to uninstall the existing key: vbs /upk
Next, you need to install the KMS product key by executing this command: vbs /ipk <The KMS Product Key>
Once you’re done, you will see a prompt that’ll tell you whether the operation was either successful or not.
To active, the KMS product key online, use this command: vbs /ato
Use this command to activate the key using the telephone: exe 4
After you’ve activated the KMS product key, restart the Software Protection Service. You can also verify the Activation Status to check if your fix was successful or not.
Option 4 – Contact Microsoft Support for assistance
If you’re at your wits’ end in trying to upgrade your computer, you should consider contacting Microsoft Support for help as they can offer you various options that would make fixing Windows Activation error code 0xc000f074 a lot easier and faster.
Oh, gamers rejoice, the Steam autumn sale is just around the corner!!!
The sale starts on November 22nd and lasts until November 29th. A great deal for any gamer, especially for ones that have plenty on their wishlist. Speaking of wishlists now would be a good time to place some interesting titles on them so you can be notified about discounts on them.
If you by any chance are unavailable to participate in the Autumn sale, do not worry, Steam winter sale is coming on December 22nd and it will last until January the 5th so you can save for it.
The best tactic for sale is not to jump on the train right away, it is best to wait until a few days, maybe even until the last 2 days since some games can go even lower on discount in the last days of the sale. Also, there might be also some packages that include games you wish to buy but are packed with other ones in a bundle and even with a higher discount.
So get prepared for the upcoming sale and treat yourself to something nice!
Google Docs has cemented itself as a great free alternative to Microsoft Office Word. Most of the time people just share links to google Docs among themselves but sometimes you need to save and download files.
Luckily Google docs let you download easily files in various formats including PDF as well. In this short tutorial we will explain how can you download your Google document as a PDF file.
Saving Google Docs as a PDF
Open the Google document inside the browser and click on the File drop-down menu. In the file drop-down menu go to Download and choose PDF document. Next, choose the location where you would like your file to be saved and click on SAVE.
And that's all that needs to be done. Also, you can edit PDF files as well in google docs if you need to.
When you get an igfxem.exe error in Windows, it is not really clear what does this means, usually, Windows throw us some code or we get a DLL error, rarely we get an EXE error. So what does this error means?
Intel Graphics Executable Main Module, shortly called as IgfxEM module is a part of the Windows operating system. When you run Microsoft .NET Framework applications that use the AS/400 Data Queue ActiveX control (Mseigdq.dll) to read from and to write to IBM iSeries (AS/400) data queues, you may experience this error.
In order to overcome this error and cope with it try the following things:
Increase Virtual Memory
Go to the Start Menu and click on Settings.
Type performance.
Choose Adjust the appearance and performance of Windows.
In the new window, go to the Advanced tab and under the Virtual memory section, click on Change.
At the bottom of the new window, check what the Recommended value is and how it compares to Currently allocated.
If the current setting is significantly less than the recommended, uncheck the Automatically manage paging file size for all drives box at the top of the same windows and then click on Custom size.
Enter the Recommended value in the Initial Size box, and a larger figure in the Maximum size box.
Click OK to save the new settings.
Download and update .NET framework
Go to the Microsoft website and download the latest .NET framework. Once the download is complete, install the package following onscreen instructions.
Reinstall INTEL graphic drivers
Go to the intel website and download the latest graphic drivers for your graphic card model. Once the download is complete, install the package following onscreen instructions.
Run SCF scan
If all else fails, run command prompt and inside type sfc /scannow
One of the most basic and commonly used features in the Windows operating system is the copy and paste feature that helps users accomplish tasks in a faster and easier way. However, if you notice that it’s not working properly for some reason, then this post might be of help as it will provide you with options you can check out to resolve the problem.
You can encounter this kind of problem with the copy and paste feature if some system files are corrupted or if there’s some third-party application or process that interferes with this function. Worry not though for there are some options you can check out to fix this. You can try to restart the
rdpclip.exe process or the explorer.exe process. You could also try to reinstall the program where you encountered the issue with the Copy and Paste function. In addition, you could try clearing the clipboard history or run the built-in tools like the DISM tool and SFC scan. You could also troubleshoot the problem in a Clean Boot State or use the Refresh Windows tool. For more information, refer to each one of the options below.
Option 1 – Try to restart the rdpclip.exe and the explorer.exe processes
The first thing you can do to resolve the problem is to restart certain processes namely, the rdpclip.exe process and the explorer.exe process via Task Manager.
First, right-click on your Taskbar and select the Task Manager.
Next, look for the rdpclip.exe process and right-click on it, and select the End process option.
After that, click on the File tab > Run new task and then type “rdpclip.exe” and tap Enter.
This should help fix the problem. If not, you could also try to restart the explorer.exe process – just look for the explorer.exe process in the Task Manager and right-click on it, and then select the Restart option.
Option 2 – Try reinstalling the concerned program
If you only experience this issue on a particular program, you might want to uninstall this program and install it back again, and then see if it fixed the problem or not.
Option 3 – Try to clear the clipboard history
You could also try clearing the clipboard history as it has been known to help in fixing this kind of issue. You can clear the clipboard history using the command line.
Tap the Win + R keys to launch the Run dialog box and type “cmd” in the field and hit Enter to open Command Prompt.
Next, execute this command: echo off | clip
After that, check if the Copy and Paste function is now working properly or not.
Option 4 – Try running the DISM tool
You can run the DISM tool as well to help fix the “Tile Database is corrupt” error. Using this built-in tool, you have various options such as the “/ScanHealth”, “/CheckHealth”, and “/RestoreHealth”.
Open the Command Prompt with admin privileges.
Then type in the following commands and make sure to hit Enter right after you type each one of them:
Dism /Online /Cleanup-Image /CheckHealth
Dism /Online /Cleanup-Image /ScanHealth
DISM.exe /Online /Cleanup-image /Restorehealth
Do not close the window if the process takes a while as it will probably take a few minutes to finish.
Once it’s done, check if it was able to fix the corrupted Start Menu or not.
Option 5 – Try to run System File Checker or SFC scan
Tap Win + R to launch Run.
Type in cmd in the field and tap Enter.
After opening Command Prompt, type in sfc /scannow and hit Enter.
Once done, restart your computer.
Option 6 – Restart your computer in a Clean Boot State
If a third party program like antivirus is the one that’s causing the problem, you can try to put your computer in a Clean Boot State to isolate the issue by following these steps:
Log onto your PC as an administrator.
Type in msconfig in the Start Search to open the System Configuration utility.
From there, go to the General tab and click “Selective startup”.
Clear the “Load Startup items” check box and make sure that the “Load System Services” and “Use Original boot configuration” options are checked.
Next, click the Services tab and select the “Hide All Microsoft Services” check box.
Click Disable all.
Click on Apply/OK and restart your PC. (This will put your PC into a Clean Boot State. And configure Windows to use the usual startup, just simply undo the changes.)
Now try to connect your device or copy the files to your external device again and check if the problem with the Copy and Paste function is fixed.
If the display of your Windows 10 computer turns on all of a sudden no matter how put it to sleep over and over again, it always wakes up, read on as this post will guide you in resolving this peculiar issue.
In case you don’t know, the Windows 10 computer Sleep state is made in such a way that if it’s really important, it wakes up. You may have configured this kind of behavior or there could be some hardware component that’s interrupting its Sleep state. Thus, this post will give you some troubleshooting tips to fix the Sleep state issue caused by the Legacy Kernel Caller. The Legacy Kernel Caller points to the external hardware that’s causing your Windows 10 to wake up even when it’s in a Sleep state.
Step 1: Find out what’s keeping your computer from going to sleep.
To figure out what really is keeping your computer from going to sleep, you can execute the “powercfg –requests” command instead of checking the power configuration of your computer. This command will look for requests from applications and drivers that prevent the computer from turning off the display or from going to sleep.
To execute the command, simply open Command Prompt and type “powercfg –requests” and hit Enter. After that, you will see part of the result that looks like this:
“SYSTEM[DRIVER] USB AUDIO DEVICEAn audio stream is currently in use[DRIVER] Legacy Kernel Caller.”
Step 2: The next thing you have to do is remove all the external hardware connected to your computer.
In this step, you have to disconnect external hardware from your computer. Based on reports from users who experienced the same issue, the “TV card” is the culprit so make sure you remove that one. Once you’ve removed it, open Command Prompt and run the “powercfg –requests” command again and you’ll see that the “Legacy Kernel Caller” will no longer be on the list. In addition, your computer will get into its regular sleep mode once the hardware is removed. Once you do that, the driver gets hung and won’t release the power request despite being used.
Step 3: Try using the request override option
The powercfg command also offers a request override option which allows users to disable the requests from applications and services to wake the computer from sleep mode. To run this command, simply open Command Prompt with admin privileges. After you open Command Prompt, type the following command and hit Enter to disable requests from applications and services that causes the computer to wake from sleep state.
Powercfg -requestsoverride Driver "Legacy Kernel Caller" System
Step 4: Check the streaming and media applications
You also have to check if your computer is running an audio or video service in the background. In such cases, your computer won’t be able to go to sleep mode if these services are running in the background. You might have noticed that when you play a video or audio, your computer never goes to sleep. And if you have put it to sleep in between watching the video, then it’s probably why your computer is waking up. Thus, you have to stop these services.
Step 5: Check the devices that can wake your computer
If you didn’t see the Legacy Kernel Caller in the result after you execute the ”powercfg –requests” command, then you can try to execute the following command instead.
powercfg –devicequery wake_armed
After you enter this command, it will give you a list of all the devices that can wake your computer. So if there is anything other than the mouse, keyboard, touchpad, you have to check the power configuration of that device. To do that, go to the Device Manager and disable the device’s “Allow this device to wake the computer” option in its Properties
Step 6: Check the Sleep Advanced Settings
Click on the Windows key and type “control panel” in the field and select the related search result.
Next, select the Security and Maintenance option and click on the Power Options.
After that, you have to select the Change Plan Settings but keep in mind that this option is barely readable so you need to read each option carefully.
Now click on the Change advanced power settings button and a new window will appear.
Then look for the “Sleep” option and expand it. Make sure that the “Allow hybrid sleep” option is on.
Reboot your computer and check if your computer now functions properly. If it still didn’t work, you may have to reverse the changes you’ve made.
On the other hand, you could also run the Power Troubleshooter to resolve the Sleep state issue. This built-in troubleshooter will automatically fix any power-related issues in your computer.
System image backup error 0x807800A1 & 0x800423F3 appears when you are trying to create a system image backup and the operation fails to do so.
If you’re faced with any of these error codes, try our recommended solutions in the order presented below and resolve the issue.
To restart the Volume Shadow Copy Service (VSS) on Windows 10, do the following:
Press ⊞ Windows + X to bring up the Windows menu.
Click on command prompt (admin)
In the command prompt window, type the commands below and hit Enter after each line:
net stop vssnet start vss
Once the commands execute successfully, try the system image backup again. The operation should complete successfully.
You need to also check if the Software Protection Service is disabled. If it is, then Start it and ensure that it is set to default which is Automatic (Delayed Started).
Create System Image using PowerShell
Command lines are less prone to errors provided the syntax is correct, unlike GUIs that can suffer a glitch every now and then.
To create a system image with PowerShell do the following:
Open the Windows PowerShell as administrator. To create a System Image in Windows 10 using PowerShell, you will have to run the Wbadmin command.
Inside the Powershell window type, then press Enter: wbadmin start backup-backup target: E:-include: C:-quiet-allCriticalE: is the target drive where you’re going to save the system image, and C: is the system root drive where Windows is currently installed
To extract the created system image, starting over from Windows 10 USB installation media, select advanced startup or open run and type: C: \ Windows \ System32 \ Shutdown.exe / r / o
Use third-party imaging software
If the previous two solutions have not managed to solve the issue there is always an option to use a third-party imaging solution. There are free open source and buying options offering various advantages each. Find out which one works best for you and use it.
Bad_Pool_Header is one of the types of BSOD (Blue Screen of Death) error codes. This error triggers a problem with Windows memory allocation.
When this error message occurs, the screen turns blue and locks the user out of the application running on the system. The computer shuts down or restarts.
Solution
Error Causes
There is no one particular cause for the occurrence of the Bad_Pool_Header error code. It may appear on your system due to multiple reasons such as:
Device driver issues
Cluttered disk
Disk writing issues
Faulty memory hardware
Driver issues and disk writing issues occur when your try to update new driver versions.
During this process, users often forget to remove the files of the uninstalled version from the registry. And due to the presence of the uninstalled driver files in the registry updating and disk writing becomes an uphill task which leads to the Bad_Pool_Header display on the computer screen.
The main database of your system is the registry so you need to keep it clean to avoid disk cluttering. The hard disk clutters because the registry saves all the activities that you perform in your system. It saves junk files, internet history, invalid entries, and other unnecessary files.
This occupies a lot of your disk space thus resulting in disk cluttering and faulty memory hardware issues triggering the Bad_Pool_Header.
Ignoring the Bad_Pool_Header error is not wise. It is advisable to repair the Bad_Pool_Header right away as it can lead to serious threats like system failure and data loss.
Further Information and Manual Repair
The easiest, time and money-saving way to resolve the Bad_Pool_Header error on your system is to install Restoro.
This is a high and multi-functional repair tool that features a powerful inbuilt registry cleaner, anti-virus, and a system optimizer. This tool is the one-stop solution for all your PC-related errors including the Bad_Pool_Header blue screen of death error.
Whether it’s a driver issue, faulty memory, or cluttered disk, all the causes triggering the Bad_Pool_Header error code fall under the registry which is why it is recommended to install Restoro.
Its innovative and powerful registry cleaner scans detect and repair all the errors related to the registry in one go including the Bad_Pool_Header errors.
With this helper, you can easily remove all the unnecessary files cluttering your hard disk and damaging your registry. It wipes out the clutter in seconds and frees up disk space.
Why Should You Clean The Registry?
Sometimes the registry also gets cluttered by malicious software like viruses, spyware, and malware. These may also take up your disk space and prevent you to perform disk writing successfully and also corrupt the registry.
The privacy error finding utility embedded in Restoro helps you scan for such malicious software on your system and removes them immediately. It lends the software anti-virus properties.
When it comes to using repair tools, many users who are not technically sound often worried.
They think it may be difficult to operate. If you think the same way, let us tell you that Restoro is very easy to use. It is integrated with a high-functional yet user-friendly interface complemented by simple navigation.
Restoro Special Features
This makes it simple for all levels of users to operate it regardless of whether they are technically adept or not.
Restoro is compatible with all Windows versions. You can download it with ease and run it for scans on any Windows version you have installed on your system.
To get started, all you have to do is:
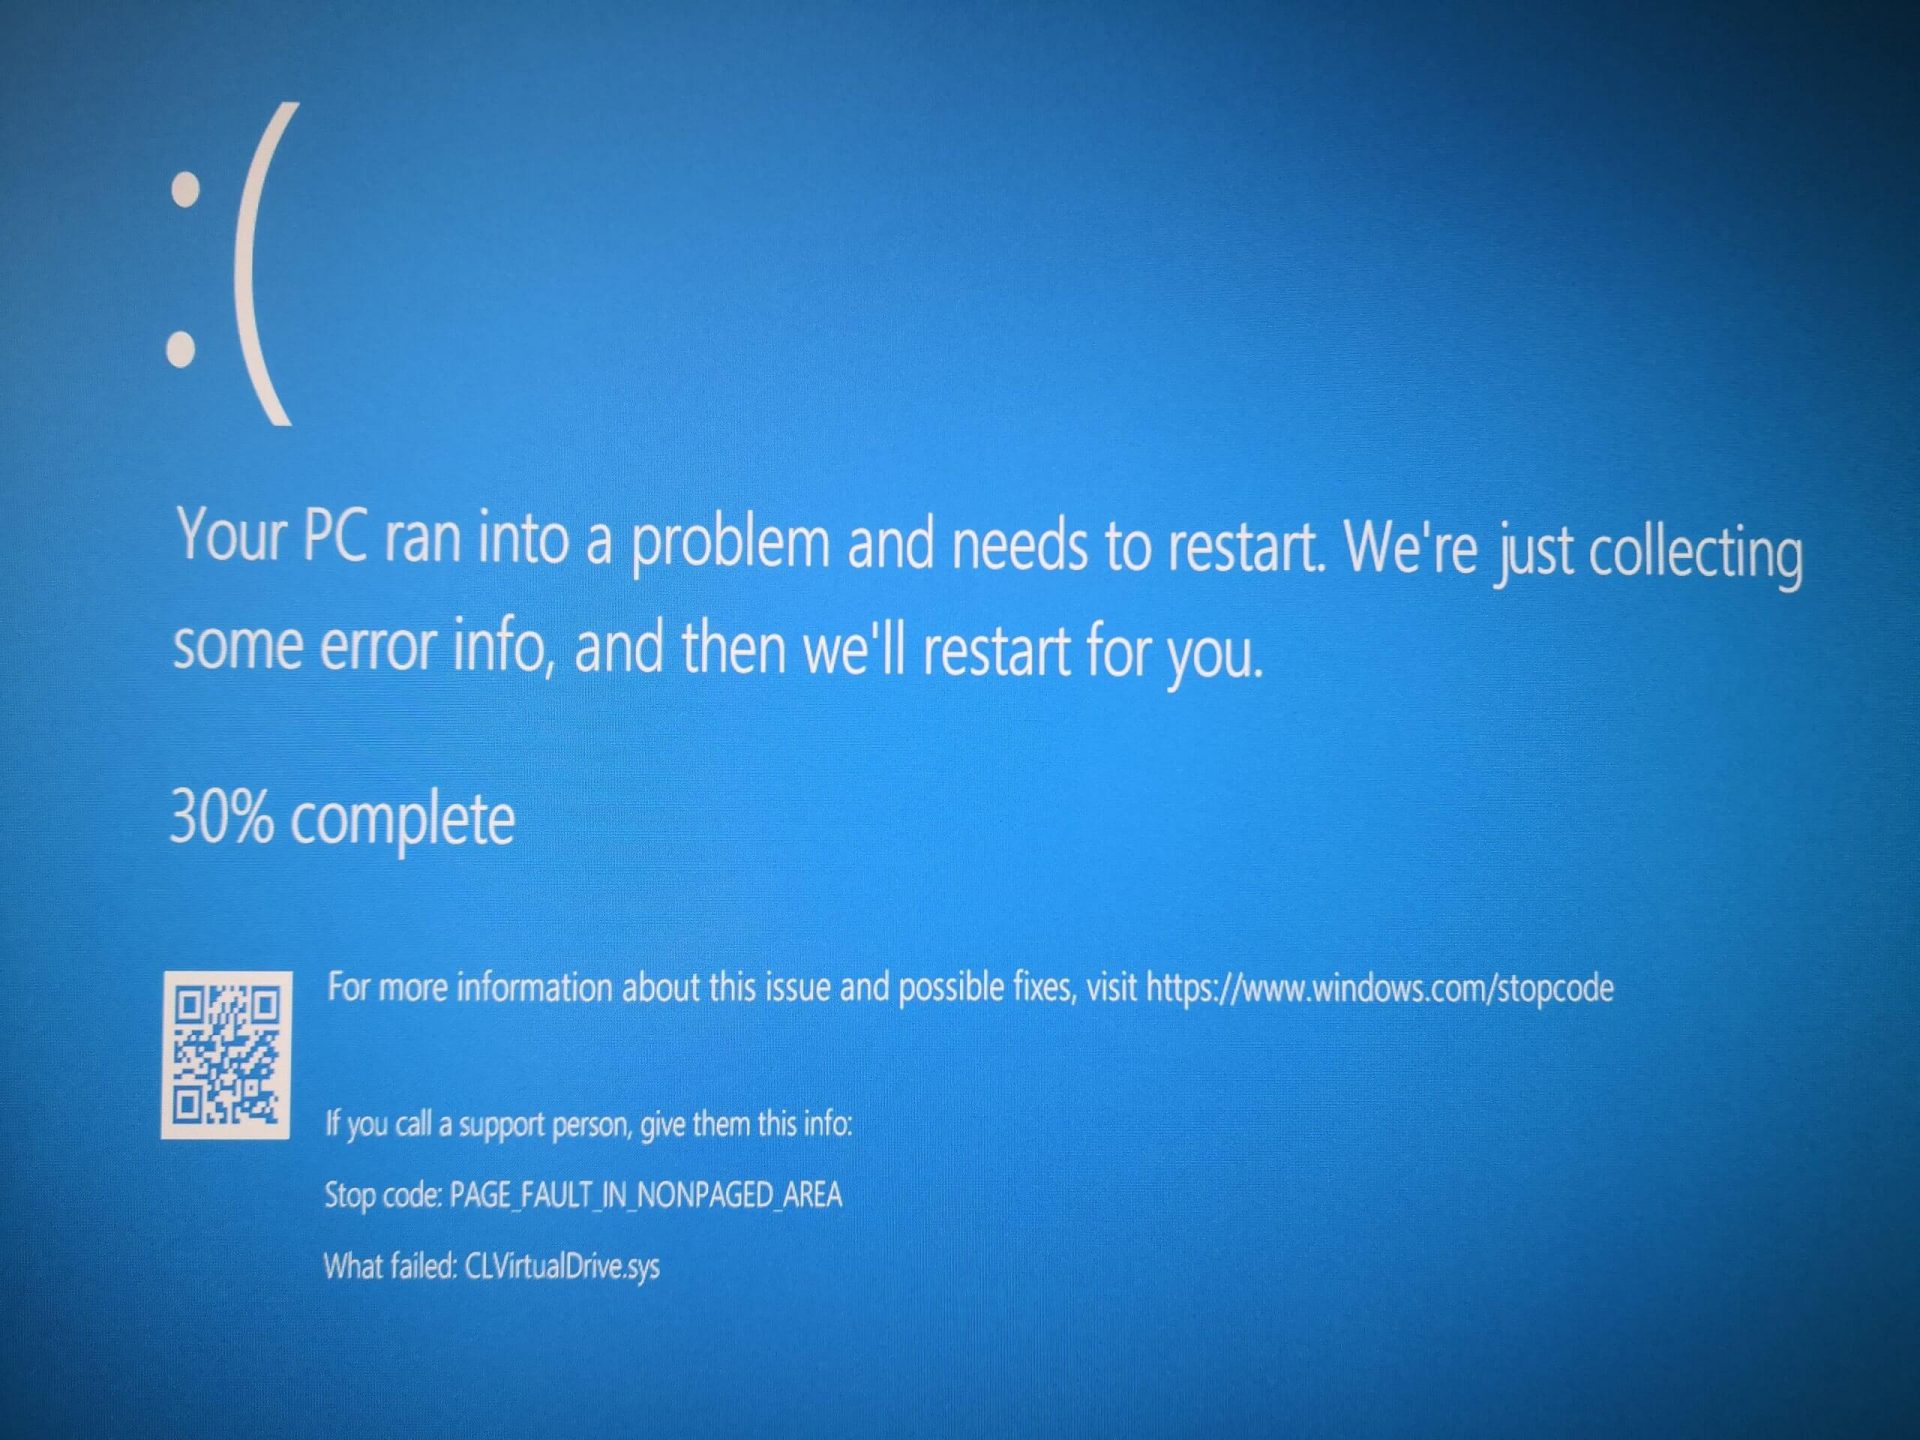
Page Fault in Non-Paged Area is a blue screen error usually happening with faulty drivers but it can come from different issues like faulty RAM.
In this short article, we will cover usual ways on how to approach and solve this error.
Solving Page fault in Non-Paged Area
Rollback using system restore
Simple and easy solution, roll back to the previous system restore point where Windows was stable and working.
Fix Page Fault in Non-Paged Area using device manager
Press ⊞ WINDOWS + X to open the hidden menu
Click on device manager
Find a device with a question mark and right-click on it
Click on the rollback driver button
Fix via command prompt
Press ⊞ WINDOWS + X to open the hidden menu
Click on command prompt (admin)
Inside command prompt type in SFC / scannow and press ENTER
Wait for the process to be finished and then reboot the PC
Fix via DISM tool
Press ⊞ WINDOWS + X to open the hidden menu
Click on command prompt (admin)
Inside command prompt type in DISM /Online /Cleanup-image /Restorehealth and press ENTER
Wait for the process to be finished and then reboot the PC
Page fault in Non-Paged Area via a dedicated tool
Sometimes manual and provided solutions just simply cannot cut it because the issue is triggered also with something else and not just a single issue.
Use DRIVERFIX to fix this specific issue with a single click.
In today's modern world many households have internet access, most of the connection nowadays is done via Wi-Fi or wireless but there is a high probability that you have also a few devices connected via cable. There are of course many disadvantages and advantages between cable connection and wireless connection.
The main advantages of a hard cable connection are of course faster speed and stability compared to Wi-Fi. But if we look into the cables themselves there is also a big difference between them. Not all cables are the same and quality as well as speed vary a lot between them. Choosing the right cable is essential in order to make a maximum of your internet and we have some great tips and explanations of what cables do so you can make the right choice and enjoy your full internet potential.
Not all cables are the same
Cheap cables and expensive ones are not the same no matter what everyone tells you. The old proverb you get what you pay is true and more expensive cables will be made from better materials and will have a higher transfer rate.
Quality network cables are separated into different categories with proper markings and when buying one you should always look for these markings on the cables themselves, do not buy cables that do not have markings since they will often provide lower transfer rates or will not be shielded from outside influences resulting in packet drops and instability in a network.
Categories and what they mean are:
Cat-5 with a maximum speed of 100Mbps, typically unshielded.
Cat-5e with a maximum speed of 1Gbps, available in both shielded and unshielded varieties.
Cat-6 with a maximum speed of 10Gbps for runs under 55 meters (around 180ft), available in both shielded and unshielded varieties.
Cat-6a with a maximum speed of 10Gbps, shielded.
Cat-7 uses a proprietary GG45 connector rather than the standard RJ-45 connector seen on other cables for speeds of 10Gbps, shielded.
Cat-8 with a maximum speed of 25Gbps (Cat-8.1) or 40Gbps (Cat-8.2) at a distance of around 30 meters (around 100ft), shielded.
Unless stated, these standards are typically rated at their quoted speeds for a run of around 100 meters (around 330 ft) and use a standard RJ-45 Ethernet connector. Each generation of cable is designed to be compatible with the generations that came before it, so it’s possible (for example) to use a Cat-6a cable with a router that only supports speeds of 1Gbps.
Shielded cables
When purchasing higher quality cable you might not be able to choose if you have shielding or not since some standards like Cat-6a, Cat-7, and Cat-8 are always shielded. But if you do not have the need for these and you are satisfied with Cat-5e for example you can choose.
Shielded cables are a little more expensive but they will provide you with a coating that will eliminate interference from outside waves making cables more reliable. Of course, if the cable will go through a room that does not have many radio waves or some other interferences then buying a shielded cable is a waste of money.
Cable platings
Usually, there are two types of connector platings on connectors, silver, and gold, and people usually think that gold is much better but there are major differences between silver and gold platings and truth to be told there is no better one, both are different and should be considered depending on your need.
Silver plating will provide you with faster speed since its conductivity is larger than gold, but gold is slower on the oxidation front so its life span is longer. On the other hand, if your cables are always connecting and disconnecting gold will be first to be scrubbed off from the surface since the gold coating is much thinner.
Overall if you would only connect cable once and have slower internet than cable capacity gold is the way to go, in another case if you would use the cable as always connecting and switching and your internet plan is the same as cable transfer capacity you might want to go with silver one.
Cable material quality
Network cables are made from copper, your standard conduction material but even here there are differences in quality and therefore the chance of pocket losses over it. More quality less loss and more stable connection and this will depend on the purity of copper that is used in the cable itself. More purity in copper, more stability, simple as that.
Conclusion
So as you can see, there are a lot of different things that will influence your pick of proper network cable but the overall best advice is to get one that will fit well into your needs and setup. pair it up with your router and your internet plan since just simply buying something that you can not use is really a waste of money.
Due to the latest android malware security analyst, there are alarmingly 5.8 million downloads of applications that will steal your Facebook data, your Facebook login credentials!
Russian anti-malware company Dr.Web has found Trojan apps that steal your Facebook login credentials by tricking users into entering their private information in order to eliminate in-app ads.
All of the applications have been removed from the play store and cannot be installed anymore but please do check your phone in order to remove them from your phone as well.
List of malware applications:
If by any chance you have any application from this list, consider uninstalling it from your phone for security reasons.
PIP Photo
Processing Photo
Rubbish Cleaner
Inwell Fitness
Horoscope Daily
App Lock Keep
Lockit Master
Horoscope Pi
App Lock Manager
During the investigation, Dr.Web analysts found an additional Trojan app that had previously made its way onto the Google Play Store. Image editing software app EditorPhotoPip had already been removed but could be downloaded through aggregator websites.


 Rollback using system restore