In trying to upgrade your Windows 10 computer, you might have come across the error 0x800F0923. This kind of Windows upgrade/update error is caused by an incompatible driver or software that’s installed on your computer. Thus, to fix the problem, you need a working fix which you can choose from below.
As mentioned, you can try updating the concerned application or software to its latest version to resolve the compatibility issue and in turn, fix error 0x800F0923. Note that depending on where you had installed the application, your steps will change. So if you have it installed directly from the website, refer to these steps:
Look for the built-in option to check the updates since the most application has this option.
You also have the option to go to the website of the application and check if there is a new version available. If there is, download and update the app.
On the other hand, if you have downloaded the app from the Microsoft Store, here’s what you have to do:
Open the Store and click on the three dots located at the top-right of the window.
Next, click the Download and Updates option.
From there, check if there is an update available for the store. If there is, update it.
Option 2 – Try to uninstall the application or software
If updating the app or software to its latest version didn’t help and you’re still getting the error 0x800F0923 every time you attempt to install the Windows Updates, you may have to uninstall it. You will need to use the usual Program and Features to uninstall it if you have downloaded it from the website.
In the search box, type in “control” and then click on Control Panel (desktop app) among the search results.
After that, select Programs and Features from the list which will give you a list of all the programs installed on your computer.
From there, look for the concerned program and select it and then uninstall it.
Note: If you have downloaded the app from the Windows Store, you can simply right-click on it from the application list and then uninstall it.
Option 3 – Try to disable your antivirus program
Disabling the antivirus program or any security software installed in your computer is always a good idea you can try when the Windows Update process does not go smoothly. So before you try updating your computer again, make sure to disable the antivirus or security program and once the Windows Update is done, don’t forget to enable the antivirus program back again.
Option 4 – Try to run the Windows Update Troubleshooter
Running the built-in Windows Update troubleshooter could also help you resolve the Windows Update error 0x80073712. To run it, go to Settings and then select Troubleshoot from the options. From there, click on Windows Update and then click the “Run the troubleshooter” button.
Option 5 – Try to do the Update in a Clean Boot state
Putting your PC in a Clean Boot state can also help you install Windows Updates or Upgrades without any trouble because, during this state, you can start the system with a minimum number of drivers and startup programs that will surely help you in isolating the root cause of the issue.
Log onto your PC as an administrator.
Type in MSConfig in the Start Search to open the System Configuration utility.
From there, go to the General tab and click “Selective startup”.
Clear the “Load Startup items” checkbox and make sure that the “Load System Services” and “Use Original boot configuration” options are checked.
Next, click the Services tab and select the “Hide All Microsoft Services” checkbox.
Click Disable all.
Click on Apply/OK and restart your PC. (This will put your PC into a Clean Boot State. And configure Windows to use the usual startup, just simply undo the changes.)
After that, try to install the Windows Updates or upgrade again.
If you are trying to update or upgrade your Windows 10 computer using the Windows Update and suddenly an “Error 0x800f0900” appears, then you’ve come to the right place as this post will help you resolve this Windows Update issue. When you encounter this error, you will see the following error message on your screen:
“There were problems installing some updates, but we’ll try again later. If you keep seeing this and you want to search the web or contact support for information, this may help:2018-03 Cumulative Update for Windows 10 Version 1709 for x64-based Systems (KB4088776) – Error 0X800F0900”
This kind of Windows Update error is most likely caused by some corrupted files in the system. It is also possible that the Windows Database might have become corrupted as well. So if you are currently experiencing this problem, refer to the options given below and see which one of them works best for you.
Option 1 – Try running the DISM Tool
Running the DISM Tool helps in repairing the Windows System Image as well as the Windows Component Store in Windows 10. Using this built-in tool, you have various options such as the “/ScanHealth”, “/CheckHealth”, and “/RestoreHealth”.
Open the Command Prompt as admin.
Then type in this command: exe /Online /Cleanup-image /Restorehealth
Do not close the window if the process takes a while as it will probably take a few minutes to finish.
After you run this tool, a log file is created at C:WindowsLogsCBSCBS.log. On the other hand, if the Windows Update client is already broken, you will be prompted to use a running Windows installation as the repair source or use a Windows side-by-side folder from a network share, as the source of the files. Although the chances of this happening are less, if it turns out to be the case, you need to run an advanced command in the DISM tool to repair a broken Windows Update. Just repeat the process above but use the following command instead:
Option 2 – Try running the System File Checker or SFC scan
The SFC scan or System File Checker is a built-in command utility in Windows that helps in restoring corrupted files as well as missing files that cause several issues in the computer like the Windows Update Error 0x800f0900. It replaces bad and corrupted system files with good system files. To run the SFC command, follow the steps given below.
Tap Win + R to launch Run.
Type in cmd in the field and tap Enter.
After opening Command Prompt, type in sfc /scannow
The command will start a system scan which will take a few whiles before it finishes. Once it’s done, you could get the following results:
Windows Resource Protection did not find any integrity violations.
Windows Resource Protection found corrupt files and successfully repaired them.
Windows Resource Protection found corrupt files but was unable to fix some of them.
Option 3 – Try running the Windows Update Troubleshooter
Running the built-in Windows Update troubleshooter could also help you resolve the Windows Update error 0x80073712. To run it, go to Settings and then select Troubleshoot from the options. From there, click on Windows Update and then click the “Run the troubleshooter” button. After that, follow the next on-screen instructions and you should be good to go.
Option 4 – Perform a System Restore
You can also try to perform a System Restore as it can also help you fix the Windows Update Error 0x800f0900. You can do this option either by booting into Safe Mode or in System Restore. If you are already in the Advanced Startup Options, just directly select System Restore and proceed with the next steps. And if you have just booted your PC into Safe Mode, refer to the steps below.
Tap the Win + R keys to open the Run dialog box.
After that, type in “sysdm.cpl” in the field and tap Enter.
Next, go to the System Protection tab then click the System Restore button. This will open a new window where you have to select your preferred System Restore point.
After that, follow the on-screen instructions to finish the process and then restart your computer and check if the problem is fixed or not.
Option 5 – Reset both the SoftwareDistribution and Catroot2 folders
You have to stop a couple of services such as BITS, Cryptographic, MSI Installer, and Windows Update Services. And to do that, you need to flush the contents in the SoftwareDistribution folder. The Software Distribution folder in the Windows operating system is a folder that can be found in the Windows directory and is used to store files temporarily which might be required to install the Windows Update on your PC. Thus, it is required by the Windows Update and maintained by WUAgent. Aside from that, it also contains all the Windows Update History files and once you delete them, you will most likely lose the Update history. As a result, the next time you run the Windows Update, it may result in a longer detection time.
Open the WinX Menu.
From there, open Command Prompt as admin.
Then type in the following command – don’t forget to hit Enter right after typing each one of them.
net stop wuauservnet start cryptSvcnet start bitsnet start msiserver
After entering these commands, it will stop the Windows Update Service, Background Intelligent Transfer Service (BITS), Cryptographic, and the MSI Installer
Next, go to the C:/Windows/SoftwareDistribution folder and get rid of all the folders and files thereby tapping the Ctrl + A keys to select them all and then click on Delete. Note that if the files are in use, you won’t be able to delete them.
After resetting the SoftwareDistribution folder, you need to reset the Catroot2 folder to restart the services you just stopped. To do that, follow these steps:
Type each one of the following commands.
net start wuauservnet start cryptSvcnet start bitsnet start msiserver
After that, exit Command Prompt and restart your computer, and then try to run Windows Update once more.
0x80004005 Outlook is an error that users commonly encounter while attempting to send or receive emails on Outlook.
The message that appears usually states “This message could not be sent. Try sending the message again or contact your network administrator."
The client operation failed. Error is [OX80004005- 0X0004B9-OXOO501].
Error Causes
This error is usually caused by a problem in the Local Area Network or LAN. What actually happens is that signals with the wireless LAN are lost or a connection problem occurs within the network cable.
As a result, the 0x80004005 Outlook error is triggered while sending or receiving an email. Sometimes the problem goes away on its own. However, if it recurs after a few hours, it shows that some problem exists within the network.
Also, it is important to understand that different factors can affect the quality of wireless connections in a network.
For instance, garage door openers, microwave ovens, and Bluetooth devices can easily become obstacles, disrupting the connection and causing the quality to degrade. Other causes are listed below as follows.
Missing, corrupt, or damaged registry keys
Existence of viruses
Outdated drivers
It is a must to fix this error otherwise potential risks associate with this error such as permanent damage and blue screens.
Further Information and Manual Repair
There are two ways to fix this error and both are listed below as follows.
One solution is to disable script blocking in Norton Antivirus. Most users encountering this problem have Norton Antivirus installed on their PCs. To correct this problem, simply turn off the ‘Enable Script Blocking’ feature. However, there is a downside associated with this solution. Enabling script blocking will make your network or computer vulnerable to viruses and malware. That’s why it is not advised to implement this solution.
The alternative solution is to simply disable the new-mail notification feature offered in Outlook. To disable notifications of any new emails, the steps go as follows. Open Outlook and go to the Tools menu. Here you will come across ‘Options’.Click on it and then select the ‘Preferences’ tab. Here you will find the ‘Email Options’. Click on it and then uncheck the checkbox against the option, ‘Display a notification message when new mail arrives’. Click Ok two times.
Both these workarounds will work. Therefore, it is advised that you employ any one of them as per your needs.
If you are using your Google Chrome browser and suddenly notice a constant flickering after you’ve upgraded your Windows 10 computer, read on as this post will help you sort out the issue. A lot of users have reported this screen flickering issue in Chrome after having upgraded their devices to a recent Windows 10 build. The bizarre thing about this problem is that it only affects the Google Chrome browser and when it occurs, the Chrome browser will start to flash or flicker.
According to users who experience the problem in Chrome, it seems to get worse when they try to play videos on YouTube or other streaming sites. To resolve this problem, many users tried to use Chrome in Incognito Mode, cleared the browser cache as well as cookies. They even tried resetting the browser settings and reinstall Chrome but nothing seems to work. Worry not though as there are still other options you can try to fix the problem and they’re easy ones so you’ll have no problem following them.
The screen flickering problem in Chrome appears to be related to the Windows background and color settings as well as incompatible display drivers. This is why it is advised that you have both the video card drivers and Chrome browser updated to prevent the same problem from happening again.
To get started troubleshooting the screen flickering issue in Chrome, refer to the following options.
Option 1 – Try modifying the background and colors settings
Tap the Win + I keys to open the Settings app.
From Settings, go to Personalization to load the Background Preferences and if this window does not appear, just select the Background option from the left side panel.
Next, select a Solid Color as the new background from the drop-down menu.
After that, check if the problem is fixed. This should be fixed especially if the one that’s causing screen flickering is the Windows automatic background switching.
Once you’ve selected the Solid color as the background preference, go to the Colors tab under Personalization. This will open a new window and from there, check the box of the “Automatically pick an accent color from my background” option.
Now close the Settings app and open Chrome again.
Option 2 – Try to update or rollback the Graphics driver
You can try to update your Graphics card driver using the Device Manager in your computer to resolve the blank dialog boxes problem or you can also go directly to the website of your graphics card manufacturers like NVIDIA, Intel, or AMD and go to the section called Drivers then check if there’s a new available update – if there is, download and install it.
To update your Graphics driver via Device Manager, refer to these steps:
First, boot your computer into Safe Mode.
After that, tap the Win + R keys to launch Run.
Type in devmgmt.msc into the box and tap Enter or click OK to open the Device Manager.
After that, a list of device drivers will be displayed. From there, look for the Display Adapters and click on them.
After that, right-click on each entry under the Display Adapters and select the “Uninstall Device” option from the menu.
Now restart your computer.
After restarting your computer, go to the Settings app and Check for Updates in the Windows Update section.
Note: If updating the Graphics driver didn’t fix the problem, you can also try to roll back to its previous version and see if that helps.
Option 3 – Try to disable the Hardware Acceleration
For better performance, Google Chrome uses the Hardware Acceleration by default. Unfortunately, there are just some cases when your hardware, GPU to be specific, might not be able to cope with the requirements, resulting in the black screen issue. And if this is your case, you should try to disable the hardware acceleration from your Google Chrome browser settings panel. To do so, follow the steps below.
Open the Google Chrome settings page.
Click on the Advanced button to get more options.
Look for the option called “Use hardware acceleration when available” and then disable it by toggling the button to the left.
After that, check if the screen flickering issue in Chrome is fixed.
Option 4 – Try to disable “Smooth Scrolling” in Chrome
Disabling “Smooth Scrolling” in Chrome might also help you fix the issue. To do so, follow these steps:
Open Chrome and type “chrome://flags” and hit Enter.
Next, look for a flag named “Smooth Scrolling”. You can scroll down until you find it or search it in the Search Flag bar. Note that Smooth Scrolling is enabled by default in the newer versions of Chrome.
After that, select the drop-down menu and select Disabled.
"Stop Running This Script" Error is a Windows Internet Explorer error message that is displayed in the following format with a yes and a no button:
Stop running this script?
A Script on this page is causing your web browser to run slowly. If it continues to run, your computer might become unresponsive.
This occurs when some scripts take an excessive amount of time to run. To be precise, there are some websites that use JavaScript, JQuery, and Active X scripts to run.
These scripts are notorious for taking too much time to run. So, if you use the Internet Explorer as your web browser, then by default if the website takes a long time to load, the ‘Stop running this script error will be triggered.
Other than this, if you are scripting an Active X control on the web page to transfer a very heavy file or run a huge database query, this may cause delays and lead to the error display.
However, if you use Firefox, then the ‘Stop running this script error code will be promoted as ‘Unresponsive Script’ error.
Solution
Error Causes
The ‘Stop running this script error code’ is triggered due to multiple reasons. These include:
Webpage programming errors
Running a pop-up killer
Spyware and viral infection
Active X control errors
Further Information and Manual Repair
Here are some of the best methods that you can try to resolve Internet Explorer’s ‘stop running this script error’ on your PC:
1. Change the Internet Explorer Settings
This can be done by opening Internet Explorer and in the top menu, click on Tools, and then go to Internet Options. Now click on the Advanced Tab option. Locate where it says ‘Disable Script Debugging’.
Once you find it uncheck the box beside it. Now close the browser and restart your PC. Access the same website on your IE web browser and see if the website opens. If it does, then the error is resolved.
However, if it doesn’t, then you the underlying causes for the stop running this script error message could either be spyware or ActiveX control error.
2. Download Restoro
Whether the error occurs due to spyware invasion of Active X control error, it is advisable to download Restoro on your PC.
This is a next-generation, innovative, and multi-functional PC repair tool that has several powerful utilities deployed together in one program.
Plus you don’t have to get into the technicalities of resolving Active X control issues.
Restoro is safe, bug-free, and efficient. It has a user-friendly interface and simple navigation which makes it quite easy for all levels of users to operate. It is compatible with all Windows versions including Windows 7, 8, XP, Vista, 8.1, and 10.
This PC repair tool is a one-stop solution for all your script error repair needs. It includes the following utilities: a registry cleaner, a system stability detector, and an ActiveX control error scanner.
It simultaneously scans for ActiveX control errors too. So, if the IE script error is triggered by ActiveX control issues, it resolves them too.
To fix the ‘stop running this script’ error code on your PC, click here to download Restoro
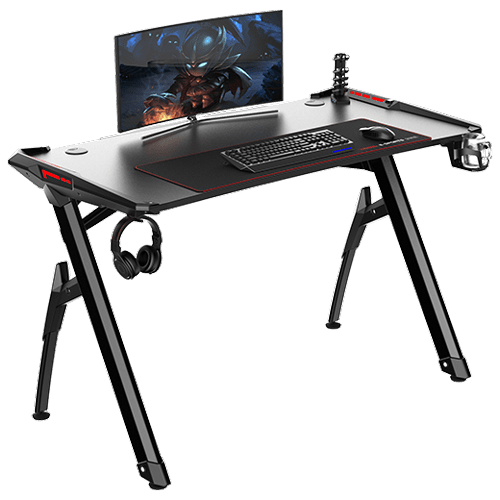
If you spend a large amount of time gaming or working on a computer gaming chair is a very important asset. One other thing that is mostly looked past but could help greatly is a good desk. A great chair accompanied by a great desk can make your long sitting sessions more pleasant and more healthy which is very important in the long run.
Hey, but it is only a desk, what is so special about having an expensive desk? Well truth to be told desk is just a desk and any kind of desk can serve the purpose of hosting a keyboard, mice, and screen. But a good desk will offer some other advantages that may not seem so important but they could mean a lot like adjusting desk height so it fits perfectly on your size and sitting position making long hours more pleasant and lower stress on hands sitting on it.
Advanced desk features
Bytezone might not be a company that will sound familiar to you, mostly because they manufacture gaming chairs and desks, now in the gaming chairs world there are a lot of competitors and Bytezone has managed to make a name for itself despite this fact. But they are more popular in their gaming and office modern-looking desk category.
The advanced desk is made from carbon steel and plastic combination, it is very durable and it weighs 27kg. Now that is not really light but it is not very heavy if we compare it to wood desks. The top layer of the table is made from easy-to-clean material and the desk comes with a large mouse and keyboard pad.
The table itself includes a cup holder, headphones bracket under the table and it has a cable management drawer in the back. The desk is sized 66x120x76 cm. Also for anyone interested desk itself comes also with RGB lights for that true gaming feel.
Copy & Paste function is an essential option in properly working Windows, from copying text to weblinks and many other sources like pictures and files it is one of the crucial features in Windows.
When the copy and paste feature is not working we are somewhat left in Windows limbo, essentially Windows itself is working but without this specific feature it is very hard, almost impossible to get any work done, if you are an unfortunate user who has faced this particular issue do not worry, we have solutions for you.
Update Windows
Glitches come in various forms and sometimes they are introduced in updates, check to see if it is available Windows update and if it, download and install it, there is a very high chance that the next update will bring fixes for known glitches.
Disable antivirus
A good antivirus is an essential piece of software for any PC, however, sometimes it can interfere with the basic operations of windows itself. Disable it completely to see if copying and pasting will start to work, if this is a case, see can you somehow turn options off in antivirus or switch to another one.
Run Check disc
Corrupted applications and system files can cause issues with Windows functioning, the easiest way to solve this issue is to run build-in Windows Check disk utility and let it scan and fix potential issues.
Run SFC
If the check disk failed to fix the issue, run command prompt as administrator and type in sfc /scannow, file checker will go through all files and fix if it finds anything including corrupted system files. Reboot your system after the operation completes. Please note that an SFC scan can take a long time sometimes, do not interrupt the scanning process and leave it to finish.
Restart rdpclip process
Restarting rdpclip.exe can solve the issue. Open task manager and under process find rdpclip.exe, right-click on it and end it, then go to windows/system32 and search for rdpclip.exe and double click it. Please note that you will be able to find this process only if you are on a remote PC machine, on a local user machine rdpclip is not running.
Rollback to the previous system restore point
If this particular issue was introduced in the latest update and previous solutions have not worked, roll back to the restore point where everything was working as it should.
Stop virtualization
if you are using virtual software there is a chance that the shared clipboard feature is interfering with Windows, turn the Virtual machine off and try copy & paste again.
Great news everyone!!! Artstation, a popular learning platform for artists has been acquired by EPIC and their first move was to make artstation learning material free for all registered and non-registered users forever. This move by EPIC is a great but also logical one as well. How the industry is in demand for good artists, providing them with free education will hopefully produce some good talent.
So if you ever wanted to learn about photoshop, maya, substance, unreal engine, or some general skills like sketching, drawing, etc. Now is the perfect time to level up your skills. Drop to the artstation website and start learning today!
Dsound.dll is a type of Dynamic Link Library. This is one of the many files that are associated with DirectX software. And DirectX software is used by most Windows-based games.
Dsound.dll contains small programs that help run and load Windows-based games on your system.
The Dsound.dll error pops when Windows-based games are unable to load and run on the computer.
The error code appears on the screen in one of the following formats:
"The file dsound.dll is missing"
"File dsound.dll not found"
"Dsound.dll not found. Reinstalling might help fix this."
"Dsound.DLL Not Found"
Solution
Error Causes
Dsound.dll error is generated due to multiple reasons. These include:
Corrupt, damaged, or missing Dsound.dll file
Malware infection
Outdated drivers
To play the games on your computer, it is important to fix the Dsound.dll error immediately.
Further Information and Manual Repair
To resolve Dsound.dll error at home on your own without hiring a professional and spending hundreds of dollars in repair, here are some methods you can try:
Method 1 - Restart Your PC to Resolve
Sometimes the error may be a fluke and can be resolved by simply restarting your PC. So, before you try other methods, it is recommended that you restart your system first.
If it resolves the issue, then that’s great. If it doesn’t, then try other methods given below!
Method 2 - Reinstall the Deleted Dsound.dll File
Since DLL files are shared files, there is a possibility that while uninstalling a game on your PC, you might have accidentally deleted this file too.
If so, check your recycle bin and search for the deleted file. If you locate it, simply restore it. But if you can’t, then download the Dsound.dll file from a reliable DLL website. Make sure that the site is authentic because the last thing you want is to download malware instead of a DLL file.
Method 3 - Update Driver for Your Video Card
If Dsound.dll error occurs because of outdated drivers, then update them to resolve. You can do this by using a driver update wizard from within Device Manager. The wizard will guide you through the process, making updates simple.
Method 4 - Remove Malware
Download a powerful antivirus to scan and remove malware from your system. A malware infection can trigger a Dsound.dll error too.
Method 5 - Uninstall the Game and then reinstall it again
Try uninstalling the game during which you experienced this error. Sometimes the error may pop because of improper game installation. Uninstall it and then reinstall it. Once you’ve reinstalled it, try accessing it again. If it is accessible, the error is resolved.
Method 6 - Repair the Registry
DLL errors are also related to the registry. These files can get damaged if the registry gets loaded with junk files and cookies. In such as situation clean and repair the registry. You can do this manually but it can be time-consuming and tricky if you are not technically sound.
Therefore download Restoro. It is a powerful and user-friendly PC Fixer embedded with a registry cleaner. The registry cleaner scans and removes all junk files clean the registry and repairs damaged DLL files immediately.
Click here to download Restoro and resolve error Dsound.dll today!
If you are using UEFI and you encountered an error message that says, “Selected boot image did not authenticate”, then read on as this post will show you what to do it fix it. This kind of error indicates that UEFI is having an issue in figuring out if the boot image has tampered with. UEFI offers Secure Boot and if the boot image seems to be invalid, you won’t be allowed to boot into your computer. Aside from that, it could be that you may be using endpoint encryption and the software can’t validate the certificate.
To fix the “Selected boot image did not authenticate” error in UEFI, you need to first check if the error has given any reference to any software that you might have for encryption. If it has, then you need to disable the Encryption tool to resolve the problem. In addition, you could also try to disable Secure Boot or perform Startup Repair in case the disabling Encryption tool didn’t work. For more details, make sure to use each one of the options provided below as a reference.
Option 1 – Try to disable the Encryption tool
The first thing you can do to fix the “Selected boot image did not authenticate” error is to disable the Encryption tool. Many users reported that some encryption tools like the ESET Endpoint Encryption won’t let them boot into the computer if the system manufacturer does not include the correct certifications as a part of the UEFI BIOS. And since there is no way to bypass this, you have to disable Secure Boot in order for you to boot into your computer.
Option 2 – Disable the Secure Boot in the BIOS
Disabling the Secure Boot in the BIOS settings is definitely recommended to resolve the error. To disable Secure Boot, here’s what you have to do:
First, boot your computer into Windows 10.
Next, go to Settings > Windows Update. From there, check if there is anything that you have to download and install if you see any available updates. Usually, OEMs send and update the list of trusted hardware, drivers, and operating systems for your computer.
After that, go to the BIOS of your computer.
Then go to Settings > Update & Security > Advanced Startup options. If you click on Restart Now, it will restart your computer and give you all the advanced options.
Next, select Troubleshoot > Advanced Options. As you can see, this screen offers you further options including System restore, Startup repair, Go back to the previous version, Command Prompt, System Image Recovery, and UEFI Firmware Settings.
Select the UEFI Firmware Settings which will take you to the BIOS.
From there, go to the Security > Boot > Authentication tab where you should see Secure Boot. Note that every OEM has its own way of implementing the options so it varies.
Next, set Secure Boot to Disabled and set Legacy Support to On or Enabled.
Save the changes made and exit. Afterward, your computer will reboot.
Option 3 – Try to run the Automatic Repair Utility
If disabling Secure Boot did not fix the problem, you might also want to run the Automatic Repair utility in fixing the error. To do so, follow the steps below.
You can start by booting into the Advanced Recovery Mode.
After that, select Troubleshoot > Startup Repair.
Next, follow the on-screen instructions that appear on the screen and finish the Automatic Repair process.
Now check if the block is gone once the reboot is completed.
Finally upgraded to Microsoft’s newest OS, but the performance is a bit sluggish? Here are a few useful tips you may not have thought about that could significantly transform your experience!
How to speed up Windows 11?
1. Disable startup programs
There are many programs that launch right on startup that really aren’t essential. This, in turn, causes your PC to launch and run more slowly.
To check which programs are enabled on startup, go into the Task Manager and select the Startup tab. Find every program that doesn’t need to launch immediately, right-click on it and press ‘Disable’.
This will not shut down the program in that instant. It’ll just prevent it from running automatically as you turn on your PC. You can always launch it manually when you need it.
2. Expand your memory and storage
If you want your PC to run super smoothly, you need to have enough memory to support that. This is especially significant for those of you who love to multitask. Upgrading your RAM gives your PC more space to store the temporary data it needs to complete processing tasks. In other words, processing takes a lot less time.
Your long-term storage is equally important. Hopefully at this point you’re already using SSD over HDD, since this type of storage offers a faster boot time.
Credit: Marc Pezin on Unsplash
In any case, we recommend expanding your storage capacity. The more files and data you store, the more there is to load, significantly influencing your PC’s speed. Larger storage capacity means new data and essential updates can be stored comfortably, preventing any strain on your PC’s performance.
3. Clean up disk space
If you aren’t willing to upgrade your storage just yet, the least you can do is clean up your storage right now.
Aside from manually deleting stuff you no longer need, you can also get rid of temporary files that clutter up your storage and eat up performance for no reason. To get to them, click Windows + X and select ‘Run’ (or just type it in the search bar).
A small window will pop up, where you need to type %temp%. This will take you to a whole folder full of all the temporary files you can remove without thinking twice.
For those who upgraded from Windows 10, there’s a neat trick to get rid of potential leftover files you don’t need on your brand new iteration. Only do this if you’re 100% sticking with Windows 11, though. Go to System > Storage > Temporary files. Make sure to only leave ‘Previous Windows Installation’ and ‘Windows Update Clean-up’ checked and click on ‘Remove files’.
Lastly, make use of Windows 11’s fantastic Storage Sense feature. Turning it on will enable your PC to constantly watch out for junk or unused files to optimize your PC’s performance to the maximum.
4. Install pending updates
This one should go without saying, but pending updates can be detrimental to your Windows 11 performance. The longer you leave them untouched, the more bugs the outdated programs and patches can cause. So, make sure to regularly check for updates and install them as soon as they’re available.
5. Disable visual effects
As cool as visual effects, animations, shadows and transparency are, they can also put quite a toll on your computer’s speed. On a newer setup this generally shouldn’t be a problem, but if you do notice a drop in performance, definitely consider turning off some of these settings.
To do this you can go to the Control Panel, System Properties and click the ‘Advanced’ tab. In the Performance section, choose Settings. If you’d like a quicker way to get to the dialog (Performance Options) with Visual Effects, you can also type sysdm.cpl in the search bar.
Once there, you can either have your PC choose what’s best, choose the best appearance or the best performance. The other option is to manually toggle the effects off and on. The biggest obstacles to speed are taskbar animations, window shadows, control/element animations and animations upon minimizing/maximizing.
Credit: Windows on Unsplash
In the same vein, you should go to Settings > Personalization > Colors and disable Transparency, to prevent your computer from doing overtime just to hit the aesthetic appeal.
6. Get rid of bloatware
Bloatware is one of the biggest culprits of slow computer speed.
Pre-installed software that’s pretty much useless but takes up valuable system resources has been around since day one. No matter which device or platform you’re talking about. Luckily, a lot of it is removable, making it easy to lighten the load on your device.
To boost your Windows 11 computer, go to Settings > Apps > Installed apps.You’ll probably see a bunch of apps you don’t want or need. Click on the three dots next to each one you want to remove and press ‘Uninstall’.
Aside from helping optimize performance, removing bloatware has another great benefit. Unfortunately, often this pre-installed software is quite vulnerable, exposing you to great risk of cyberattacks. So, removing it definitely improves your device’s security and gives you at least some peace of mind.
Summary
These are a few of our fastest tips for boosting performance. There are other, more complex and time-consuming ways, of course. If you’ve tried these quick ones and still need advice on how to improve your PC’s speed, feel free to reach out!


 Advanced desk features
 So if you ever wanted to learn about photoshop, maya, substance, unreal engine, or some general skills like sketching, drawing, etc. Now is the perfect time to level up your skills. Drop to the
