Any modifications in a computer, either big ones or small ones can definitely trigger some errors which is why you have to be careful when you modify the system setting. One of the errors you might encounter when you’ve modified your computer is the WHEA_UNCORRECTABLE_ERROR 0x00000124 Blue Screen Error. According to the error data provided by the Windows Hardware Error Architecture or WHEA, aside from system modifications, you could also encounter this error if your computer has a hardware failure which could be due to a hard drive, RAM, or any other hardware component. In most cases, it is related to physical hardware failures which might have something to do with defective hardware, heat-related, memory as well as a processor that is starting to fail or has already failed.
To fix the WHEA_UNCORRECTABLE_ERROR 0x00000124 Blue Screen error, here are some suggestions you have to check out.
Before you further troubleshoot the problem, you might want to perform System Restore first as the BSOD error might be caused by system modifications. Thus, to undo them, you can use System Restore. Run it using these steps:
If overclocking is enabled, you might have to disable it as some users reported that the WHEA_UNCORRECTABLE_ERROR 0x00000124 error started to appear right after overclocking. To disable it, follow the steps below.
It is a known fact that an overheated PC causes system slowdowns and even Blue Screen errors like WHEA_UNCORRECTABLE_ERROR 0x00000124. To fix it, you need to check your computer’s cooling components to see whether they’re properly working or not. Then make sure that you clean them up including the fan and other hardware from dust and other debris.
Since the problem has something to do with the physical RAM, you need to use Windows Memory Diagnostics. To run it, refer to these steps:
Note: After you select the option, your PC will restart and check for memory-based issues. If it finds any issues, it will automatically fix them.
To fix the WHEA_UNCORRECTABLE_ERROR 0x00000124 error, you can also try to roll back, or update, or disable the concerned device drivers.
Note: You can install a dedicated driver on your computer in case you have it or you could also look for it directly from the website of the manufacturer. On the other hand, if you have just updated your device drivers then you need to roll back the drivers to their previous versions or disable them.
You could also run System File Checker or SFC scan to fix the BSOD error. It is a built-in command utility that helps in restoring corrupted files as well as missing files. It replaces bad and corrupted system files with good system files. To run the SFC command, follow the steps given below.
The command will start a system scan which will take a few whiles before it finishes. Once it’s done, you could get the following results:

intel's first gaming card that will hit the market soon has been shown in its innovation event, the Intel Arc A770. In its core ticks ACM-G10, coming with 32 Xe-cores and all the way up to 16GB of GDDR6 memory (the basic entry-level version will have 8GB of GDDR6). The card will support ray tracing and supersampling with Intel's XeSS.

This is Intel's first gaming desktop GPU and after testing with some YouTube channels it turned out that the card itself sits somewhere between nVIDIA RTX 3060 Ti and an RTX 3070 so it will still be low in performance compared with the new RTX 4090 or AMD's new RDNA3 upcoming lineup. But as stated this is Intel's first gaming graphics card and having this kind of performance is no small feat for the first-time product.
One thing that is really great tho and that is going for Arc A770 GPU is its price! The Limited Edition card will cost $329 which is at this moment most cheapest GPU currently on the market in that performance range. nVIDIA is between $500 and $700 for comparison and if Intel can hold on to its performance with almost half the price card could be a great hit among gamers. GPU itself will launch on October 12th.
“This policy setting turns off the Windows Location Provider feature for this computer. If you enable this policy setting, the Windows Location Provider feature will be turned off, and all programs on this computer will not be able to use the Windows Location Provider feature. If you disable or do not configure this policy setting, all programs on this computer can use the Windows Location Provider feature.”
 Steam has cemented itself as the largest digital game shop in the World. First, release all the way back on September 12th, 2003, it was meant to be a standalone software client aimed to deliver updates to Valve’s games. It was soon expanded to include titles from third parties.
The greatest Steam expansion and its popularity started in 2004 with the release of Half-life 2. Steam allowed prepurchased editions to be downloaded before the official release of the game making it available for play the moment it was officially out.
Very soon after Steam gained its popularity, Valve has opened doors to other developers and offered them to use Steam as means for a digital distribution platform. Today it hosts over 30000 different game titles, not including DLC or applications.
And how soon Valve’s steam deck is coming out soon we would like to share some great tips and tricks about Steam itself for easy everyday gaming.
Steam has cemented itself as the largest digital game shop in the World. First, release all the way back on September 12th, 2003, it was meant to be a standalone software client aimed to deliver updates to Valve’s games. It was soon expanded to include titles from third parties.
The greatest Steam expansion and its popularity started in 2004 with the release of Half-life 2. Steam allowed prepurchased editions to be downloaded before the official release of the game making it available for play the moment it was officially out.
Very soon after Steam gained its popularity, Valve has opened doors to other developers and offered them to use Steam as means for a digital distribution platform. Today it hosts over 30000 different game titles, not including DLC or applications.
And how soon Valve’s steam deck is coming out soon we would like to share some great tips and tricks about Steam itself for easy everyday gaming.
 Error Causes
Some users wanting to upgrade to Windows 10 from Windows 7 or Windows 8.1 experienced errors with installation. One of these errors is CPU Not Compatible. When you click and run the “Get Windows 10” from your system tray bar, you’ll receive the “CPU is not compatible with Windows 10” error. When this happens, it might be good to check if there’s a bug or if your NX feature (a requirement for the Windows 10 installation) is enabled.
Error CausesThe “CPU is not compatible with Windows 10” error normally occurs when:
To successfully upgrade to Windows 10, your CPU must support Physical Address Extension (PAE), SSE2, and NX features. If any of these features are not activated on your system, it’ll cause the CPU not compatible error. However, some users still reported experiencing this error even though their CPU has these features activated. Normally, this is due to the bug that Windows acknowledged.
If any of these two scenarios apply to your computer, the following methods will help you fix the problem:
The bug applies to some Windows 7 and Windows 8.1 systems. The bug occurs when the “Get Windows 10” app fails to recognize CPUs as being compatible. This produces a false negative result with a message, “Here’s why Windows 10 cannot be installed on this PC: The CPU isn’t supported”. To fix this bug, Microsoft released an update.
Unfortunately, the patch update (KB2976978 for Windows 8/8.1 and KB2952664 for Windows 7 SP1) to fix the bug may not be automatically downloaded to your computer. If this is the case, you need to verify first if the patch was installed correctly. To do this, follow the steps below:
A major requirement for Windows 10 upgrade is for the CPU to have Physical Address Extension (PAE), SSE2, and NX features enabled on your system. If you receive the CPU not compatible error, one possible cause is that any of the mentioned features are not available OR not enabled on your system. Here’s how you can fix this:
If changing the settings in your BIOS doesn’t do the trick, your final option is to force enable the NX bit in your Windows system. However, this is only applicable IF and ONLY IF your CPU does support it. To force enable NX bit, do the following:
Error Causes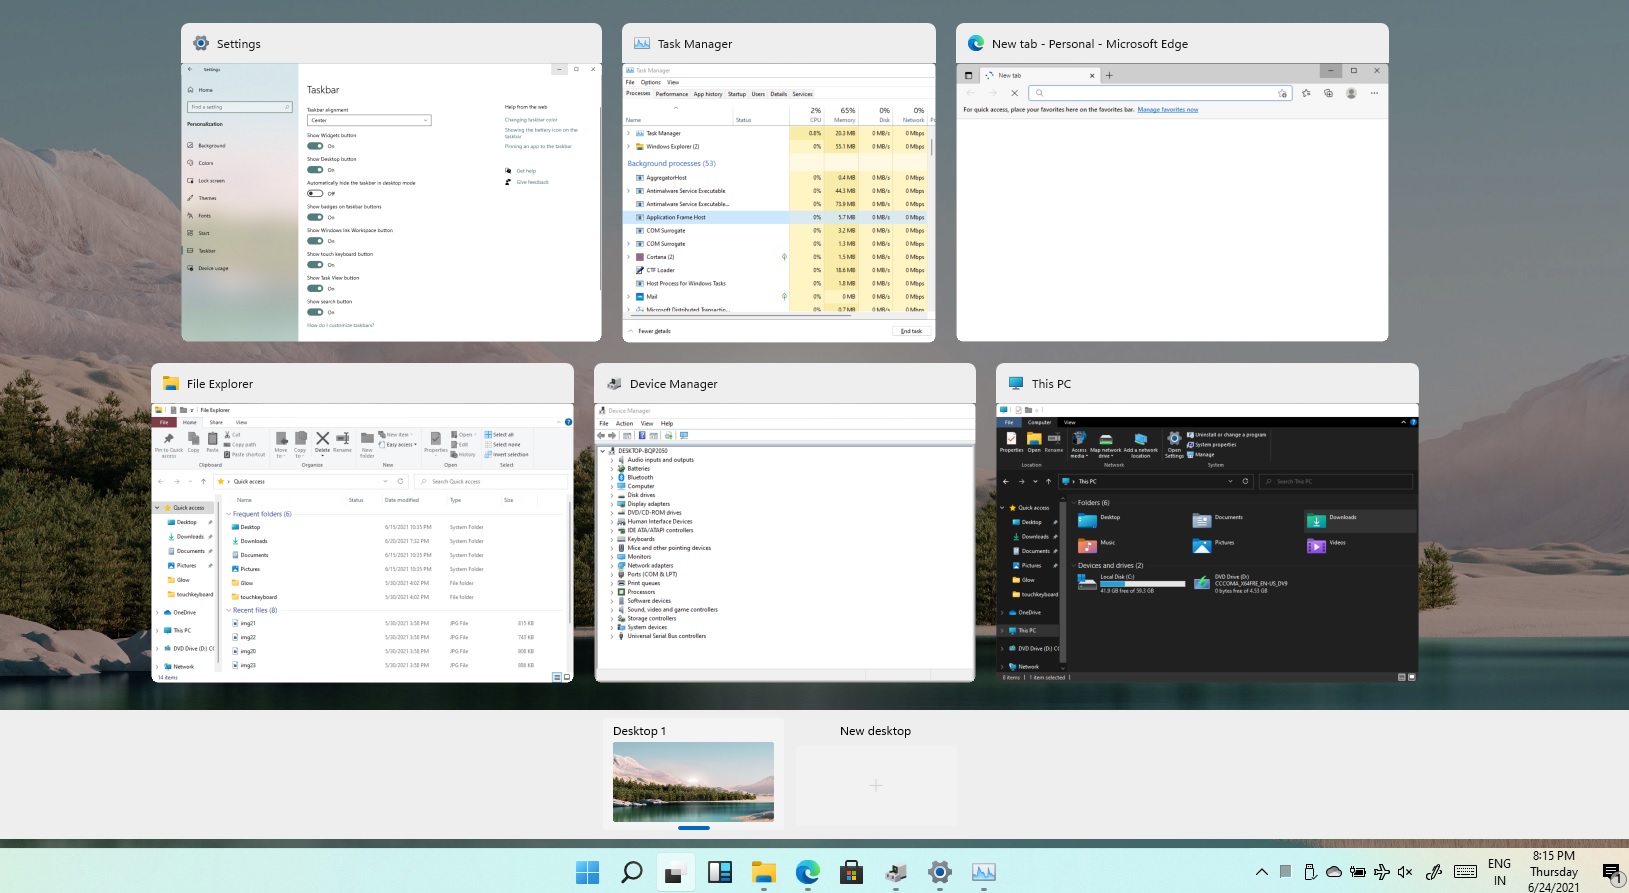 Task View feature inside Windows 11 is actually a great feature, letting you quickly view open windows and virtual desktops. How Task view itself could be reached with keyboard shortcut combination of ⊞ WINDOWS + TAB some users will prefer this way of using it and thus button on the taskbar is something you do not want or need.
There is a very easy way to remove mentioned button and I will show you how to do it.
Right-click the taskbar button itself and click on Hide From Taskbar.
That’s it, you have done it.
Now in order for you to bring it back if you change your mind, you will have to do some extra steps but it is nothing difficult.
Right-click on the taskbar and click on Taskbar settings, you will be lead to Personalization > Taskbar.
Inside locate Taskbar Items and switch Task View to ON, you will see the Task View button right away showing itself again.
Task View feature inside Windows 11 is actually a great feature, letting you quickly view open windows and virtual desktops. How Task view itself could be reached with keyboard shortcut combination of ⊞ WINDOWS + TAB some users will prefer this way of using it and thus button on the taskbar is something you do not want or need.
There is a very easy way to remove mentioned button and I will show you how to do it.
Right-click the taskbar button itself and click on Hide From Taskbar.
That’s it, you have done it.
Now in order for you to bring it back if you change your mind, you will have to do some extra steps but it is nothing difficult.
Right-click on the taskbar and click on Taskbar settings, you will be lead to Personalization > Taskbar.
Inside locate Taskbar Items and switch Task View to ON, you will see the Task View button right away showing itself again. Dism /Online /Cleanup-Image /CheckHealth Dism /Online /Cleanup-Image /ScanHealth Dism /Online /Cleanup-Image /RestoreHealthalso