As you know, each one of the Windows 10 versions is priced differently and one of the considered more expensive compared to the Windows 10 Home version is the Windows10 Pro. The good thing is, Microsoft allows its users to upgrade from the Windows 10 Home version to the Windows 10 Pro version at a reasonable cost instead of buying the entire license again.
However, upgrading your Windows 10 computer is not always that easy and you might encounter some errors along the way. One of the reported errors you could encounter is an error message that says, “Something happened, and we couldn’t start the upgrade”. This kind of problem is due to the problems with the Microsoft Store or the key authorization and to fix it, there are several options you can check out. You can try to run the built-in troubleshooters such as the Windows Update troubleshooter, Windows Store Apps troubleshooter, or Microsoft Accounts troubleshooter. You could also try to reset the Windows Store cache or re-register the Windows Store app. For more details, refer to each one of the given options below.
Option 1 – Try to run the Microsoft Accounts troubleshooter
Since the Microsoft Accounts troubleshooter is not built-in into the Windows operating system, you can download this troubleshooter by clicking on this link.
Option 2 – Try running the Windows Update Troubleshooter
Running the built-in Windows Update troubleshooter could also help you resolve the “Something happened, and we couldn’t start the upgrade” error. To run it, go to Settings and then select Troubleshoot from the options. From there, click on Windows Update and then click the “Run the troubleshooter” button. After that, follow the next on-screen instructions and you should be good to go.
Option 3 – Run the Windows Store App troubleshooter
The Windows 10 Store Apps Troubleshooter will help you in fixing the problem in Microsoft Store. This is a great built-in tool from Microsoft that helps users fix any app issues. To use the Windows Store Apps Troubleshooter, follow the steps below.
Tap Win + I keys again to open the Windows Settings panel.
Go to Update & Security and then go to Troubleshoot.
Under the Troubleshoot section, on your left-hand side, scroll down to find Window Store Apps.
Then click on the Run the troubleshooter option and follow the on-screen instructions and then see if it fixes the problem.
Option 4 – Try to reset the Microsoft Store cache
As you know, like any other apps, Microsoft Store also caches as you view apps and games so it is most likely that the cache is no longer valid and must be removed. To do so, follow the steps below.
Right-click on the start button and click on Command Prompt (administrator).
Next, type in the command, “wsreset.exe” and tap Enter. Once you do, the command will clear the cache for the Windows Store app.
Now restart your PC and afterward, try opening Microsoft Store again and then try to install your app or update your computer again.
Option 5 – Try to re-register the Microsoft Store app via Windows PowerShell
Tap the Win + X key combination or right-click on the Start button and click on the Windows PowerShell (Admin) option.
If a User Account Control or UAC prompt appears, just click on Yes to proceed and open the Windows PowerShell window.
Next, type in or copy-paste the following command to re-register the Microsoft Store app and tap Enter:
Error Code 30088-26 is shown when the user tries to install the MS Office suite to their PC. It is mostly due to several reasons including corrupted Office installation, the remnant of old office installation, or even Windows updates. We will cover all reasons along with provided solutions to each one.
Follow the guide below to address each scenario with the fix for it.
Corrupted Office installation
In order to fix this issue, you will need to repair the installation itself.
Press ⊞ WINDOWS + R to open the run dialog
Inside run dialog type in Control Panel
In the control panel double click on Programs and features
In the list of installed application find MS Office and click on it to select it
On top, just above the application list click on the change
Office dialog will be opened with multiple choices
Click and select Online repair and then click on Repair
Make sure that you have a stable internet connection and leave the process to be finished
Remnants of old office installation
Manually cleaning remnants of old office installation is not an easy task and it can be different from system to system depending on the previous Office version.
Luckily Microsoft has a dedicated office cleaning tool made for purpose of removing old tails and remnants of old office installations.
After the tool has been successfully downloaded, double-click on the .diagcab file to open it
Click on Advanced and make sure that the box associated with Apply repair automatically is checked.
Click the Next button to proceed
Wait until the initial detection phase is complete, then click on Installing at the first prompt
Select the program that you’re encountering issues with (most likely Microsoft Office) and click Next once again
At the next screen, click on Yes, try to uninstall
Wait until the operation is complete, then restart your computer and re-install the Microsoft Office suite
Windows Updates
After digging and trying out various solutions for this issue we came to the conclusion that this error can occur if Windows is not fully updated, and by fully updated we mean fully, not just critical updates, but all available ones. Check-in your setting to see if there are some uninstalled or pending updates waiting to be installed and if that is the case install them all.
After completely updating your Operating system error should vanish and you should be able to install Microsoft office without issues.
Error 115 is a type of GameGuard redundant execution error. If you have GameGuard installed on your PC, then you will most likely experience this error code.
GameGuard is basically an anti-cheating robot toolkit developed by INCA Internet.
It is installed to block possibly malicious applications and common methods of cheating on multiplayer online role-playing games. But at the same time, this software is infamous for error pop-ups.
Error 115 is displayed on the Windows screen when a game has been executed multiple times or you have left the game running without logging out. Error 115 is displayed in the following format:
GameGuard Execute Error: 115‘There are multiple events of game execution or GameGuard is already running. Close the game then try again.’
Solution
Error Causes
The error 115 may appear on your Windows screen due to multiple reasons. These include:
Multiple executions of the game
Antivirus Conflict
Firewall Conflict
Registry Overloaded with Bad and Invalid Entries
This error may cause a great deal of inconvenience to you if you love to play multi-player role-playing games over the web like Blood Feud, 9Dragons, Phantasy Star Universe, and Alliance of Valiant Arms.
To avoid such inconvenience, it is advisable to fix this error immediately.
Further Information and Manual Repair
Here are some easy do-it-yourself methods to resolve the error 115 on your PC. These methods require no technical expertise.
Method 1 - Terminate the Game Already Running on Your System
To resolve the issue, hit ‘Ctrl+Shift+Esc’ to launch Task Manager. Here you will find a list of applications running on your system, terminate the gaming application to resolve error 115. If this doesn’t work, then restart your PC.
Method 2 - Disable Antivirus Programs or Firewall Temporarily
Sometimes this error may appear on your computer screen because of antivirus or Firewall security conflict.
These programs often block gaming applications and software like GameGuard and because of that, you are unable to play online games on your system. To fix the issue, try disabling these programs on your PC temporarily.
Method 3 - Clean and Repair the Registry
The error 115 may also occur because of the registry issue with Symantec. Follow these steps to enable the game to run:
Go to your start menu then find Run then write Regedit.
Find HKEY_LOCAL_MACHINE. To proceed, go to SYSTEM then CurrentControlSet, and then Services.
Look in the list for SysPlant and click it. Then look for the word 'Start', right-click on Start, and select rename.
Rename 'start' to 'DWORD: 00000004’ then close Regedit and reboot your PC to activate changes.
Method 4 - Download and Run Total System Care.
This process can be slightly tricky and a bit time-consuming. Therefore it is advisable to download Restoro.
This is a cutting-edge, easy-to-use PC Fixer deployed with a powerful registry cleaner. It removes all the unnecessary files cluttering the registry like bad and invalid registry entries.
It fixes the damaged registry and enables it to resume back to its normal functioning.
Click here to download Restoro.
For PC users that are blind or have low vision, the Narrator accessibility feature in Windows 10, lets you use your PC without a display or mouse to complete common tasks – it reads and interacts with things on the screen, like text and buttons. The narrator can be used to read and write an email, browse the internet, and work with documents.
In Windows 10, there are a lot of options for Narrator that you can customize. You can change its keyboard shortcuts, personalize Narrator’s voice, enable Caps Lock warnings, and more. You can choose the voice for the Narrator, adjust the speaking rate, pitch, and volume.
To change the default audio output device used to play the voice of the Narrator in Windows 10:
Press the ⊞ WINDOWS + I
From the Settings menu, click Ease of Access.
Click Narrator on the left pane.
In the Narrator window, on the right pane, toggle the button to On to enable Narrator if required.
Scroll down to the Personalize Narrator’s voice section.
For the Select where you hear Narrator’s voice option, click the drop-down and select the audio output device you want from the list. Please know that you will not be able to choose if you do not have multiple audio output devices connected to your Windows 10 computer.
Exit Settings when done.
If you would like to read more helpful articles and tips about various software and hardware visit errortools.com daily.
If you have the HP printer, then you may come across this error. HP Printer Spooler not running errors does not mean there is anything wrong with your printer. It indicates printer driver issues.
Solution
Error Causes
There can be multiple causes behind the HP printer Spooler not running error code such as:
The poor or unsuccessful printer driver installation
Invalid registry entries
Though this is not a critical error code as it does not pose serious damage threats to your PC, however, it is advisable to resolve it as it can cause you a great deal of inconvenience especially if you want to take out printouts every now and then.
Further Information and Manual Repair
Here are some ways you can try to resolve HP Printer Spooler Not Running Error on your system:
1. Reinstall the HP Printer driver on Your System
Simply go to the control panel and then click on the Device Manager option
Once you click it you will see details pane with a list of devices. Now simply click on the printer, to reinstall the driver software.
Double click on it to open the properties dialog box
After that click on the driver tab and then click update driver
Once you update the driver, try using the Printer to see if it works. Sometimes you may come across a pop-up displaying the following message: ‘Driver installed correctly, Device is ready to use however, you may not see the printer under the printer’s pane. This triggers registry issues.
2. To resolve registry issues, install Restoro on your system.
This is a highly functional registry cleaner integrated with a powerful antivirus. It helps resolve registry issues, malware, and guarantees system optimization. This feature-filled tool is the answer to all your PC-related issues.
Restoro is a next-generation PC repair software that extends outstanding usability and helps PC users resolve errors efficiently.
Its simple navigation and user-friendly interface make it so easy to use that even novice users can also work around it and repair issues without any hassle or difficulty.
It’s a smart and intuitive in-built registry cleaner that wipes out all the unnecessary and obsolete files on your hard disk. This includes junk files, internet history, invalid registry keys, and files from the uninstalled old program versions.
Sometimes the files from the uninstalled programs hamper your ability to update new program versions thus leading to unsuccessful driver installation. Nonetheless, all such files are removed in seconds with this helper and you are then ready to reinstall the driver.
This registry cleaner cleans the clutter from your hard disk and optimizes your system's speed, lowering your PC boot time significantly. Total System Care can be used on all Windows versions
To fix the HP printer spooler not running error on your computer, simply click here to install Restoro. Run it to scan for the error and fix it in seconds. Once the issue is resolved, update the printer driver. You’ll see the driver will be updated successfully and the HP printer will also appear in the printer’s panel.
By installing Restoro on your system, you can also resolve several other issues like privacy errors triggered by malware and virus infections. With this tool, you will not have to download and run a separate anti-virus on your system.
As you know, the USB security keys are a secure medium to validate a lot of components in a computer. They can be used to log in to Windows 10. Now with the advancement of APIs, you can authenticate across the website as well using the same key. However, there are times when it may not work and it could be caused by several factors. It could be due to corrupted or incompatible drivers or it could also be due to compromised integrity of the key, and many more.
So if you happen to encounter an issue with the USB security key on your Windows 10 computer, then there are several potential fixes you can try. You can try toggling the Internet Options settings or reinstall the respective USB drivers. You could also try changing the PIN of the security key or disable the antivirus program on your computer or troubleshoot the web browser. Refer to the potential fixes provided below to fix the problem.
Option 1 – Try to toggle the settings of the Internet Options
In the Windows Search box, search for Internet Options to open it.
Next, go to the Security tab and drag the security slider to the lowest possible security for all the given zones.
After that, click on OK to save the changes made and close the Internet Options.
Note that this option is only a temporary measure as it can make your computer vulnerable. Make sure to press the Reset all zones to default level button.
Option 2 – Try to update or reinstall the respective drivers
If updating the drivers of the device did not fix the problem with the USB security key, you can try to update or reinstall the Universal Serial Bus Controller drivers instead of using the Device Manager. Refer to the following steps:
First, click the Start button and type “device manager”.
Then click on the “Device Manager” from the search results to open it.
From there, look for the “Universal Serial Bus controllers” option and then right-click on each one of the USB drivers and select the Update Driver from the menu.
Note: If it is a regular USB drive, then it will be listed as a USB Mass Storage Device but if you have a USB 3.0 device, then look for a USB 3.0 Extensible Host Controller.
Restart your PC and then click the “Search automatically for updated driver software” option.
Note: If updating the USB Controller drivers didn’t work, you can try to reinstall them instead.
Option 3 – Try to change the PIN of the security key
If the first two options didn’t work, you can try changing the PIN of the security key. There are instances when the PIN for the security key might have been corrupted. Thus, resetting it can help you resolve the problem.
Option 4 – Temporarily disable Firewall and third-party antivirus
Firewall and antivirus programs are known to block the proper functioning of the USB security key. Thus, your antivirus or firewall programs might be the reason why you can’t download anything on your Windows 10 computer. To isolate the issue, you need to temporarily disable both the Firewall and antivirus programs and then check if you can now download anything from the internet. Do not forget to enable them again as disabling them can leave your computer vulnerable to cyber threats.
Option 5 – Try to troubleshoot the web browser
Troubleshooting your web browser can also help you fix the USB security key problem. You can do that by checking if your web browser supports the security key and you can do that by checking on the official website of your browser. You can also try to update your web browser to its latest version but if it didn’t help, you can try to reinstall it or switch to another web browser.
If you suddenly encounter a PNP_DETECTED_FATAL_ERROR Blue Screen error, then this post can help you out. The PNP_DETECTED_FATAL_ERROR BSOD usually occurs when any new hardware that is mostly the Plug and Play type is attached. In such cases, when the device is plugged, and the driver for that device crashes or isn’t found or is not compatible, you will most likely encounter this particular BSOD error.
There are several error codes that come under this category, some of them are 0x000000CA (0x01681690, 0xEA96A7BE, 0x938A81AD, 0xF8362881. This BSOD error can also occur at any time. However, the only constant thing here is when you plug a PNP device like earphones, microphones, USB drives, and many more.
The PNP_DETECTED_FATAL_ERROR bug check has a value of 0x000000CA which indicates that the Plug and Play Manager encountered some severe error which is most likely have something to do with a problematic Plug and Play driver. To fix this error, here are some possible solutions that could help.
Option 1 – Run the Blue Screen Troubleshooter
The Blue Screen troubleshooter is a built-in tool in Windows 10 that helps users in fixing BSOD errors like PNP_DETECTED_FATAL_ERROR Blue Screen error. It can be found on the Settings Troubleshooters page. To use it, refer to these steps:
Tap the Win + I keys to open the Settings panel.
Then go to Update & Security > Troubleshoot.
From there, look for the option called “Blue Screen” on your right-hand side and then click the “Run the troubleshooter” button to run the Blue Screen Troubleshooter and then follow the next on-screen options. Note that you might have to boot your PC into Safe Mode.
Option 2 – Try disabling or removing newly installed hardware
In this option, you will have to disable or remove the hardware you’ve just installed recently since external devices could be the one that’s causing the Blue Screen of Death error to appear. To do that, just disconnect any external device that’s connected to your computer physically and then check if it fixes the PNP_DETECTED_FATAL_ERROR Blue Screen error.
Disabling the BIOS Memory options such as Caching and Shadowing can help you in fixing the PNP_DETECTED_FATAL_ERROR Blue Screen error. All you have to do is enter the BIOS first and then use the Arrow and Enter keys to select your choices. And if you can’t seem to find it, look for specific instructions from your OEM or you could also look out for instructions from the manufacturer of your motherboard.
Option 4 – Try to run the CHKDSK utility
Running the CHKDSK utility might also help you resolve the PNP_DETECTED_FATAL_ERROR Blue Screen error. If your hard drive has issues with integrity, the update will really fail as the system will think that it’s not healthy and that’s where the CHKDSK utility comes in. The CHKDSK utility repairs hard drive errors that might be causing the problem.
Open Command Prompt with admin privileges.
After opening Command Prompt, execute the following command and hit Enter:
chkdsk /f /r
Wait for the process to be completed and then restart your computer.
Option 5 – Try to uninstall programs you’ve installed recently
Chances are, some programs that you just installed might be the one that’s causing the BSOD error. Thus, you need to uninstall the program to resolve the problem.
In the search box, type in “control” and then click on Control Panel (desktop app) among the search results.
After that, select Programs and Features from the list which will give you a list of all the programs installed on your computer.
From there, look for the concerned program and select it and then uninstall it.
Option 6 – Update the Device drivers
Tap the Win + R keys to launch Run.
Type in devmgmt.msc into the box and tap Enter or click OK to open the Device Manager.
After that, a list of device drivers will be displayed. Look for the device driver you and then select either “Update driver” or “Uninstall device”. And if you find any “Unknown device”, you need to update it as well.
Select the “Search automatically for updated driver software” option and then follow the instructions to complete the process.
If you have chosen to uninstall the driver, follow the screen options to complete the process and then restart your PC.
Connect the device and Scan for hardware changes – you can see this option under Device Manager > Action.
Option 7 – Perform a System Restore
Performing System Restore might help you in fixing the PNP_DETECTED_FATAL_ERROR Blue Screen error. You can do this option either by booting into Safe Mode or in System Restore. If you are already in the Advanced Startup Options, just directly select System Restore and proceed with the next steps. And if you have just booted your PC into Safe Mode, refer to the steps below.
Tap the Win + R keys to open the Run dialog box.
After that, type in “sysdm.cpl” in the field and tap Enter.
Next, go to the System Protection tab then click the System Restore button. This will open a new window where you have to select your preferred System Restore point.
After that, follow the on-screen instructions to finish the process and then restart your computer and check if the problem is fixed or not.
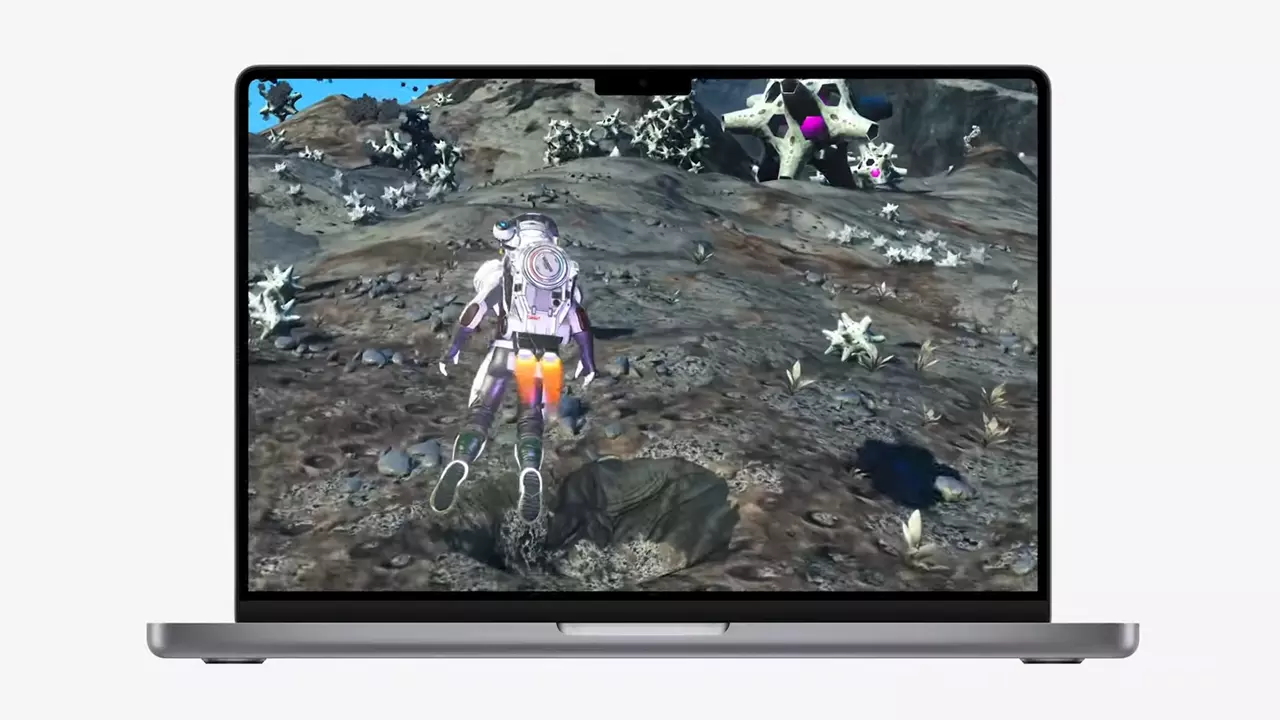
New Apple's upscaling technology called MetalFX will place iOS and macOS devices back into the gaming world. Apple had great games back in the old days and some all-time hits like the prince of Persia have been made first for apple but along the way, it just lost it.
Same as NVIDIA's DLSS and Intel's XeSS systems, Apple MetalFX also uses AI algorithms to upscale the resolution of output game frames. So, for example, the GPU inside your MAC might render the game at 1080p, but through MetalFX and AI upscaling it will look like a 4K image but have a good frame rate since it is rendered in base resolution.
The ability to make AI strike a good balance between performance and image quality is a key to technology in today's modern gaming and having this technology will help developers a ton to be able to achieve great results on Apple hardware.
The First MetalFX Games
So far three official games that will use this technology and be released natively for Appl hardware are Resident Evil 8 Village, GRID legends, and No Man's Sky. All three games have been confirmed and Resident Evil 8 Village is already sent for review people are impressed since the game can run smoothly on all Apple devices, even ones with an M1 CPU.
Apple is back into gaming
When you say Apple gaming is probably the last thing that comes to your mind but truth be told Apple makes more money from games than Microsoft, Nintendo and Sony combined. Also, Apple itself was a big player once regarding computer games as well, Myst and Prince of Persia are games that were made and have been released for Apple first. Bungie was also founded by Apple developers and Halo was originally announced as a Mac game.
Apple has been trying and pushing gaming on its platform since it kind of died down. Today all Sony, Nintendo, and Microsoft controllers work without any issues with all Apple products. Apple also has its own gaming subscription service, Apple Arcade, and its Apple TV is packed with GPU that can rival Xbox ones.
MetalFX API ties and brings it all together, it is designed to get the most performance from the hardware by minimizing overhead.
Now, computers and laptops do not hold any large numbers if we look at the user base, and that could deter developers but if we look at iPad and iPhone things are different there, much different. How same CPU power these devices and how MetalFX is available across all products it is clear that there is a market for games there. No Man's Sky is coming to iPad using these technologies and bringing full computer experience to tablets.
Error Code C19000101 - 2000B on Windows 10– What is it?
Error Code C19000101 - 2000B is a Blue Screen of Death (BSOD) error encountered by Windows users in an attempt to upgrade their operating system from Windows 7 or Windows 8/8.1 to Windows 10. The system upgrade does not successfully finish and when the installation is resurrected, it fails then reverts back to the original operating system. More and more Windows users come across this error that may have been triggered by a few reasons to be discussed in this article.
Solution
Error Causes
Microsoft users can experience the BSOD error C19000101-2000B due to the following reasons:
There’s an incompatibility with the drivers
Antivirus software
Further Information and Manual Repair
In fixing error code C19000101-2000B, you can try doing it manually. Manual repair methods can offer users solutions effectively and efficiently, having to address the root causes and issues in relation to a number of Windows error codes. If properly implemented, these manual repair methods can help Windows users resolve problems at hand immediately. However, there are cases where the help of a Windows professional is necessary. In such instances, it would be best to consult a certified Windows expert or you can also try using a powerful automated tool whenever needed.
To be able to fix error code C19000101-2000B, implement the first method used in resolving errorcode 0xc000021a, then you can proceed with this first method:
Method One: Perform Clean-Boot
Prior to performing an upgrade, you need to disable your antivirus. Or, better yet, uninstall it.
Ensure that your PC name is simple without hyphens, periods, or dashes.
Restart your device several times, then try again.
Disable all USB devices such as a smart card reader.
If you are using a SCSI hard disk, be sure to have the drivers ready and available for a storage device like a thumb drive to be connected. While on the Windows 10 setup, select the Custom Advanced Option then use the Load Driver command to load the right driver for the SCSI drive. If the setup still fails, try switching to an IDE-based hard disk.
Launch a clean boot, restart your device, then try again.
If you are upgrading to Windows 10 using the .ISO file, make sure to disconnect from your internet connection during setup. If your device is connected by Wi-Fi or through LAN, you need to disable both before attempting to run a system upgrade again.
Switch to a local account if you are connected to a domain.
Ensure that all external devices such as USB keys, external hard drives, gaming controllers, or printers are not attached to your device.
If you are upgrading to Windows 10 using Windows Update, you can perform a manual repair using the next method.
Method Two: Upgrading Via Windows Update
Make sure to disconnect from the Wi-Fi or LAN once the download reaches 100% before you proceed with the system upgrade.
Press Windows + X to open the command prompt window as an administrator.
Stop the Windows Update service, BITS, MSI Installer, and Cryptographic by inputting the following commands one by one, hitting Enter after every command:
Net stop wuauserv
Net stop bitsNet stop msiserverNet stop cryptSvc
Restart both Software Distribution and Catroot2 folders. You can do this by typing Ren C: WindowsSoftwareDistribution SoftwareDistribution.old and Ren C: WindowsSystem32catroot2 Catroot2.old in the command prompt to change the names of both Software Distribution and Catroot2 files.
Restart the Windows Update service, BITS, MSI Installer, and Cryptographic by inputting the following commands one by one, hitting Enter after every command:
Net start wuauserv
Net start bitsNet start msiserverNet start cryptSvc
Exit the command prompt then restart your device. You can now try to proceed with the system upgrade again.
Method Three: Disable or Uninstall Antivirus
If you opt to just disable your antivirus, you just have to right-click on the antivirus’ icon from your toolbar then choose Disable.
Press Ctrl + Alt + Del to open the Task Manager.
Check if all the files or services linking to your antivirus are turned off.
If you choose to uninstall your antivirus (which is recommended), open Control Panel.
Once the Control Panel window is open, select Programs then Uninstall a Program.
Look for your antivirus on the list, right-click it then choose Uninstall.
If you are trying to update your Windows 10 computer using Windows Update but encounter an error code 0x80242006, then you’ve come to the right place as this post will guide you in fixing this particular Windows Update error. This kind of error might be due to mishandling by the operating system. It could also be caused by the antivirus program or security software installed in your computer.
When you encounter this error, you will see the following error message on your screen as you try to run Windows Update:
“0x80242006, WU_E_UH_INVALIDMETADATA. A handler operation could not be completed because the update contains invalid metadata.”
Here are some troubleshooting tips you can try to fix Windows Update Error 0x80242006.
Option 1 – Try to reset the Windows Update components
If by any chance that the second option didn’t work, resetting the Windows Update components could also help you resolve the problem. How? Refer to the following steps:
Open Command Prompt with admin privileges.
After that, type each one of the following command and hit Enter after you key in one after the other.
net stop wuauserv
net stop cryptsvc
net stop bits
net stop msiserver
Note: The commands you entered will stop the Windows Update components such as Windows Update service, Cryptographic services, BITS and MSI Installer.
After disabling WU components, you need to rename both the SoftwareDistribution and Catroot2 folders. To do that, type each one of the following commands below and don’t forget to hit Enter after you type one command after the other.
Next, restart the services you’ve stopped by entering another series of commands. Don’t forget to hit Enter after you key in one command after the other.
net start wuauserv
net start cryptsvc
net start bits
net start msiserver
Close Command Prompt and reboot your PC.
Option 2 – Run the Windows Update Troubleshooter
If resetting the Windows Update components didn’t work, you could also try running the Windows Update Troubleshooter as it could also help in fixing any issues related to Windows Update including this one. To run it, go to Settings and then select Troubleshoot from the options. From there, click on Windows Update and then click the “Run the troubleshooter” button. After that, follow the next on-screen instructions and you should be good to go.
Option 3 – Try to disable your antivirus program
Disabling the antivirus program or any security software installed in your computer is always a good idea you can try when the Windows Update process does not go smoothly. So before you try updating your computer again, make sure to disable the antivirus or security program and once the Windows Update is done, don’t forget to enable the antivirus program back again.
Option 4 – Check the Background Intelligent Service and the Cryptographic Service
Tap the Win + R keys to open the Run dialog box.
Next, type “services.msc” in the field and hit Enter or click OK to open Services.
From the list of Services, look for the following services and make sure that their Startup type is as follows:
Background Intelligent Transfer Service – Manual
Cryptographic Service – Automatic
After that, check if the Service status of the listed services above are set to Running. If they’re not, click on the Start button to start these services and then check if you can now enable the Windows Update service or not.
Option 5 – Run the System File Checker Scan
System File Checker or SFC is a built-in command utility that helps in restoring corrupted files as well as missing files. It replaces bad and corrupted system files to good system files. To run the SFC command, follow the steps given below.
Tap Win + R to launch Run.
Type in cmd in the field and tap Enter.
After opening Command Prompt, type in sfc /scannow
The command will start a system scan which will take a few while before it finishes. Once it’s done, you could get the following results:
Windows Resource Protection did not find any integrity violations.
Windows Resource Protection found corrupt files and successfully repaired them.
Windows Resource Protection found corrupt files but was unable to fix some of them.
Restart your computer.
Option 6 – Try running the DISM tool
You can try running the Deployment Imaging and Servicing Management or DISM tool to fix the Windows Update error 0x80242006. Using this built-in tool, you have various options such as the “/ScanHealth”, “/CheckHealth”, and “/RestoreHealth”.
Open the Command Prompt with admin privileges.
Then type in the following commands and make sure to hit Enter right after you type each one of them:
Dism /Online /Cleanup-Image /CheckHealth
Dism /Online /Cleanup-Image /ScanHealth
exe /Online /Cleanup-image /Restorehealth
After that, wait until the process is finished and do not close the window as the process will probably take a couple of minutes.
If you got an error message saying, “Windows could not start the Windows Update service on Local Computer, Error 87. The parameter is incorrect” while you were trying to start the Windows update service on your computer, then this post could help you resolve the problem. Along with this error, you might also get any of these error codes such as 0x80240034, 0x80244019, 0x80070643, and so on. Aside from these error codes, you will also notice that the Windows Update service has been stopped.
To fix this issue, here are a couple of suggestions that might help but before you go on, you need to create a System Restore point first.
Option 1 – Try checking Services Dependencies
Dependencies of a Windows Service in Windows 10 are when windows services depend on other services. Such is the case with the Windows Update service – it also depends on three different services such as the Remote Procedure Call or RPC service, DCOM Server Process Launcher, and the RPC Endpoint Mapper. Meaning to say, if two of these services are not working as expected, then the dependant service will also be affected. This could be the reason why the Windows Update service could not start.
Tap the Win + R keys to open the Run dialog box.
Next, type “services.msc” in the field and hit Enter to open Windows Services.
From the list of Services, look for the following services:
Remote Procedure Call (RPC) Service
DCOM Server Process Launcher
RPC Endpoint Mapper
After you find these services, double click on each one of them and check whether the Startup type for all is set to Automatic and the Service status is set to Running or not.
If the service status is not running, then click the Start button. Afterward, check if you can now run the Windows Update service.
Option 2 – Check the Background Intelligent Service and the Cryptographic Service
Tap the Win + R keys to open the Run dialog box.
Next, type “services.msc” in the field and hit Enter or click OK to open Services.
From the list of Services, look for the following services and make sure that their Startup type is as follows:
Background Intelligent Transfer Service – Manual
Cryptographic Service – Automatic
After that, check if the Service status of the listed services above is set to Running. If they’re not, click on the Start button to start these services and then check if you can now enable the Windows Update service or not.
Option 3 – Reset Windows Update components
If the first two options did not work then you might want to reset the Windows Update components manually. Follow the steps below to reset them.
Open Command Prompt with admin privileges.
After that, type each one of the following commands and hit Enter after you key in one after the other.
net stop wuauserv
net stop cryptsvc
net stop bits
net stop msiserver
Note: The commands you entered will stop the Windows Update components such as Windows Update service, Cryptographic services, BITS, and MSI Installer.
After disabling WU components, you need to rename both the SoftwareDistribution and Catroot2 folders. To do that, type each one of the following commands below, and don’t forget to hit Enter after you type one command after the other.
Next, restart the services you’ve stopped by entering another series of commands. Don’t forget to hit Enter after you key in one command after the other.
net start wuauserv
net start cryptsvc
net start bits
net start msiserver
Close Command Prompt and reboot your PC.
Option 4 – Run the Windows Update Troubleshooter
If resetting the Windows Update components didn’t work, you could also try running the Windows Update Troubleshooter as it could also help in fixing any issues related to Windows Update including this one. To run it, go to Settings and then select Troubleshoot from the options. From there, click on Windows Update and then click the “Run the troubleshooter” button. After that, follow the next on-screen instructions and you should be good to go.
Option 5 – Try removing a value from the Windows Registry
If running the Windows Update troubleshooter didn’t help and you receive a message instead saying, “Service Registration is Missing or Corrupt”, you can try to remove a value from the Windows Registry.
Tap the Win + R keys to open the Run dialog box.
Then type “Regedit” in the field and hit Enter to open the Windows Registry.
Next, navigate to this path: HKEY_LOCAL_MACHINESOFTWAREMicrosoftWindowsSelfHostApplicability
From this path, look for a value named “ThresholdOptedIn” and if you find it, delete it.
Exit the Registry Editor and see if you can now enable the Windows Update service.