Logo

How to Fix: Not a Valid Win32 Application Error

Not a Valid Win32 Application Error - What is it?

Not a Valid Win32 Application error code that indicates either the file or the program you are attempting to run missing or corrupt. And because of this error, Windows is unable to open your desired file or run the program successfully.

Error Causes

The ‘Not a Valid Win32 Application’ is triggered due to multiple reasons such as:

  • Unsuccessful program installation due to damaged disc/CD
  • Corrupted or incompatible file
  • The hard drive is loaded with bad and invalid entries
  • Malware invasion or viral infection

When you come across this error code on your PC, it is advisable to resolve it as it will cause you a great deal of inconvenience hampering program and file accessibility.

Furthermore, if the error code occurs due to malware or viruses, then it can lead to severe data security threats and privacy issues.

Further Information and Manual Repair

To resolve the Not a Valid Win32 Application error on your PC, you don’t need to be a technical expert or hire a professional. Though this error might be crucial it is easy to fix.

Here are some of the many methods that you can try to resolve this error code on your PC:

  • Check for File Compatibility

If you downloaded a file that is not compatible with your Windows version then you will come across this error. In this case, it is advisable to download the file version that is compatible and can run easily on the Windows version installed on your system.

Nonetheless, if the file is compatible but still doesn’t run on your PC, then it’s possible that the file became corrupt during the download.

Try downloading the file again.

  • Check if the CD is Clean

You may also come across the Not a valid Win32 application error code if the program installation from the CD is unsuccessful.

This happens when the CD is dirty or it is scratched. The program does not copy properly onto the computer from the damaged CD. So, if the CD is scratched and dirty, buy a new CD and try installing the program again.

  • Verify the Program You Want to Run is Still on the Computer

If you are running the program from a shortcut, then verify that the program is still installed on your PC. This error may occur if the program is no longer installed on the computer.

If you find the program is not installed on your system, then reinstall and try running the program again.

  • Wrong File Name Issue

Make sure the program or the file you are attempting to run on your system does not contain the same name as the long filename directory it is saved in. For example, running a file named ‘program’ in the ‘program files’ directory can cause errors in some Windows versions.

If this is the issue, then try installing the program in a different directory.

  • Repair Hard Drive

If the hard drive is bad or corrupted, it can also generate the not a valid Win32 application. And because of this error files and programs fail to execute successfully as not all data can be read from the hard drive.

To repair this issue first you need to run defrag and ScanDisk Microsoft built-in tools. These tools check for errors on the hard drive.

  • Run an Antivirus

If the error code occurs due to a viral infection or malware attack on your system, then you must download an antivirus, scan, and remove such malicious software. However, antivirus may slow down the speed of your PC.

So, to resolve speed issues and boost the performance of your system, you may have to download a system optimizer.

Do You Need Help with Your Device?

Our Team of Experts May Help
Troubleshoot.Tech Experts are There for You!
Replace damaged files
Restore performance
Free disk space
Remove Malware
Protects WEB browser
Remove Viruses
Stop PC freezing
GET HELP
Troubleshoot.Tech experts work with all versions of Microsoft Windows including Windows 11, with Android, Mac, and more.

Share this article:

You might also like

How to be a healthy PC gamer

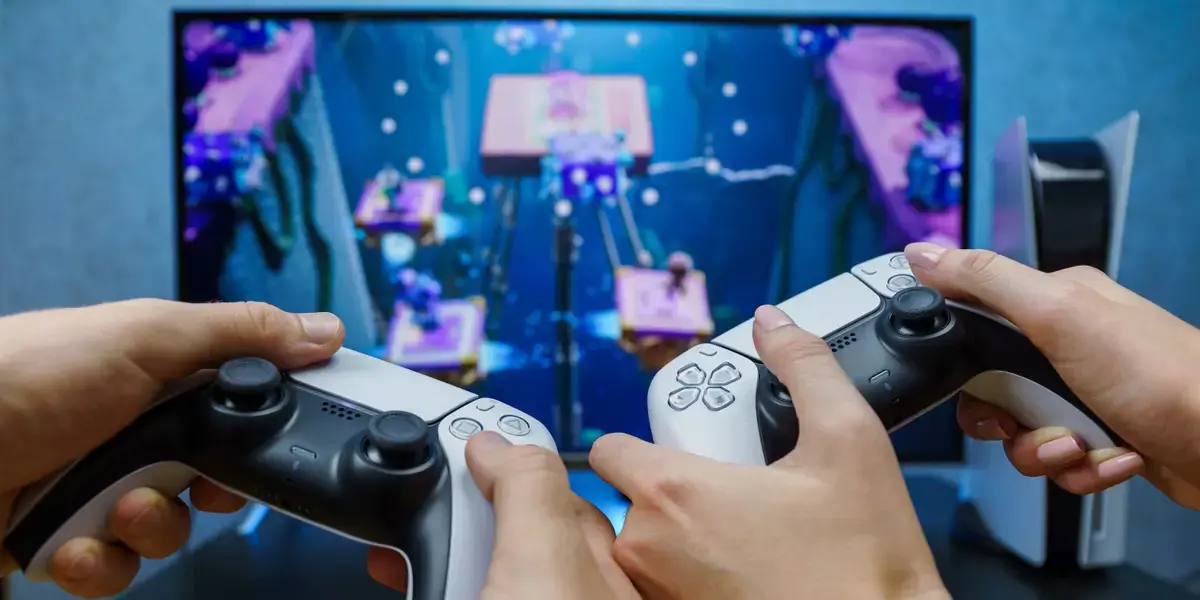
Spending a large amount of time working or gaming in front of the computer can take a toll on your health. And as someone who indeed spends a large amount of time in front of the computer, I would like to share some insights about how can you be happy and healthy at the same time by incorporating some practices and habits.

gaming

Get good chair

This is first on the list because it matters the most. A proper sitting chair is essential for back health. If your budget allows it, do yourself a favor and get an anatomic sitting chair or gaming chair with lumbar support. It costs but it is worth it.

Learn to sit properly

As the important chair is, sitting properly is also as important as much. Your spine believe it or not is a very important part of your body and you need to take care of it. Sadly long periods of sitting sessions are bad for muscles around the spine that could reflect on the spine itself. Keep your back straight and keep your head not down nor up, place it in a position like when you are walking so the spine that is going from your head is in line with the spine on your back.

Stretch

By medical standards, each hour of sitting should be accompanied by a stretch session since sitting itself is placing too much pressure on certain muscles and blood circulation is lowered. Changing leg position and doing just a little stretch each hour can be really beneficial for your health in long run.

Take breaks

Yes, playing games is fun and most of the time we do not want to stop playing, especially if we are winning but taking breaks is essential for your personal health. Old saying goes that overdoing anything is bad and this applies true even to things that we do for pleasure and relaxation. Take periodic breaks to stretch, stand up and maybe even walk just a little.

Drink water

During long work hours or long gaming sessions, it is not uncommon that we are so focused on our activity that we forget to take our water intake. Approximately 2liters of water per day is needed for an adult person to function properly during that day and if you spend long times in front of a PC do not forget to drink water.

Do not neglect your daily tasks

As enjoyable as it is gaming can make us forget about our daily tasks, do not neglect your life and your tasks. Remember, gaming is only OK if it does not interfere with the daily things that you need to do. Do not postpone going for groceries because of gaming, do not switch shower for another level in the game. Do all of the things you must do first and then sit and game.

Take care of yourself mentally

Having mental health is as important as having a physical one. Playing games is fun, but playing games with someone is even better, do not forget to socialize and invite some friends so you can share some fun times together. Also, detach yourself from outcomes that will come because of gaming, this is very important for gamers that do a lot of PVP games and get annoyed and angry when they lose or when some other player is talking trash. Remember, gaming is for you to relax and enjoy, not to stress you.

Read More
Logitech lift ergonomic mouse

Recently Logitech has released a new line of ergonomic mouse products on market, strangely shaped and lifted on a vertical axis Logitech claims that these devices will fix your issues and ease your hand pains for prolonged use of the computer.

Logitech ergonomic vertical mouse

The first time I saw this mouse I was not really impressed with its looks and somehow I thought it will not feel good. This all changed when I actually started using it, surprisingly altho strange in looks it does feel much more natural and much less stressful on hand. Also, it felt like I have used it before, personally, I did not need any adjustment period in order to use it fully.

All of that being said I will admit that using it for gaming is still not an option for me, someone might find it ok, especially if they play some games that do not need to be responsive like strategies or similar but for RTS and FPS I will still stick to the typically shaped mouse. This might be just a habit for me but somehow I feel more responsive with the typical mouse, but for anything else, this is the mouse that will keep your hands stress-free.

Now in order to get the mouse to be really recommended it needs to have some good technical specifications as well, looks are not all. The less important detail is that the mouse comes in 3 different colors: Black, white and pink, and its technical specifications are:

Specs & Details

Dimensions

Height: 71 mmWidth: 70 mmDepth: 108 mmWeight: 125 g

Technical Specifications

Sensor technology
  • Sensor type: Logitech Advanced Optical Tracking
  • Dpi range: 400-4000 dpi (Fully adjustable with 100DPI increments)
  • Nominal value: 1000 dpi
Buttons
  • Number of buttons: 6 (Left/Right-click, Back/Forward, Middle button, Scroll-wheel with a middle click)
Battery
  • Battery type: 1x AA battery (included)
  • Battery life: up to 24- months Battery life may vary based on user and computing conditions.
Connection type support
  • Logi Bolt USB receiver (included)
  • Bluetooth® Low Energy Technology
Wireless range
  • 10-m wireless range

Personally, I would recommend this mouse for anyone who does work in front of the computer during the whole workday since it really does loosen grip and strain on hands.

Read More
Microsoft vs Google & Facebook
microsoft hqMicrosoft wants to escalate the situation from Australia to the EU, what a surprise. Hello all and welcome to another news article, this time we are focusing on Microsoft pushing the EU to accept law proposition from Australia. For all of you who are not familiar with the given situation let me quickly explain. The feud began when the Australian government proposed a new law that targeted Facebook and Google specifically. The government said that it believed that both of the tech giants were using content from news outlets without paying. Have you ever seen the little news snippets that Google or Facebook sometimes show its users to keep them up to date? These are lifted directly from news websites, and the Australian government claimed that this practice meant that people didn't bother visiting the news website. This then staved news websites of revenue. As such, the government put forward a new law that would mean Google and Facebook would have to pay the source website for every time they displayed a news snippet. Facebook responded by removing its Australian news coverage in light of the law. Google, however, put up a fight. It argued that its snippets encouraged people to click on it to read more, thus driving more traffic to the news website. It also said that such a law would be too expensive to maintain in the long run. As such, Google threatened to remove itself from Australia if the law passed. This was likely a scare tactic, as 95 percent of Australian web users use Google; however, it actually opened the door for its rival, Microsoft. Microsoft saw how it could push its own search engine BING to replace google. It of course went and reached the Australian government to assure them that BING is more than capable to fulfill its needs and fully abide by the proposed law. Now Microsoft knows that if this law passes it could see a similar situation happening in Europe and it is pushing it. US News reported on how Microsoft plans to encourage EU countries to adopt this new law too. The company has teamed up with the European Publishers Council and News Media Europe to make the following statement: Publishers might not have the economic strength to negotiate fair and balanced agreements with these gatekeeper tech companies, who might otherwise threaten to walk away from negotiations or exit markets entirely
Read More
Installing Wi-Fi drivers in Windows
If you don’t have the required drivers installed in your computer, the hardware that you try to connect to your computer will most likely fail. In order to keep the operating system running on your computer, manufacturers develop drivers that can work harmoniously with your devices and applications. However, internet Wi-Fi connections can fail if suitable drivers are not installed. Worry not though for this post will guide you in installing Wi-Fi drivers on your Windows 10 computer. As you know, a driver is an essential piece of software designed for a specific operating system like Windows 10, Linux, and many more. The operating system uses it to communicate with other hardware devices such as printers and mice. Most hardware manufacturers feature a support page of their own product where you can look for the necessary drivers available for download. You will see that the Windows operating system has a set of drivers that are already installed and you do not have to do anything except plug in the device. So if the driver is not locally available, it will pull it down from its web server and automatically install it for you after you connect the device. However, there are instances when you might encounter some issues while using your Wi-Fi and during these times, you might have to reinstall your Wi-Fi drivers so read on as this post will provide you guidelines in installing Wi-Fi drivers in Windows 10. Refer to the steps below to do so. Step 1: First, go to your manufacturer’s website and look for the right driver you want to install to download your Wi-Fi driver. Step 2: After that, you have to download the correct Wi-Fi driver if it’s available. You have to know the exact name and version of the driver so that you can download it and this information can be found from the Device Manager. Just make sure that you have the right wireless adapter driver downloaded. Step 3: Once done, open the setup of the new driver that you’ve downloaded earlier and run the file and then follow the next on-screen instructions that appear right after. Step 4: You’re not done yet as you need to verify if you have downloaded and installed the correct Wi-Fi driver. Refer to the sub-steps below to do so:
  • First, right-click on the Start button and select the Device Manager to open it.
  • From there, look for the Network Adapters and expand its category to make all the network adapters visible including the wireless adapter.
  • You can easily spot the wireless adapter as it has the “wireless” term in its entry.
  • Next, right-click on the wireless driver entry in the Device Manager and select Network adapters, and then click on Properties to check the version number of the driver.
  • Now select the Driver tab and view the details. If it looks well then it means that you have the right version of the driver installed.
Step 5: Restart your computer.
Read More
Remove Task View button from Windows 11
Task View
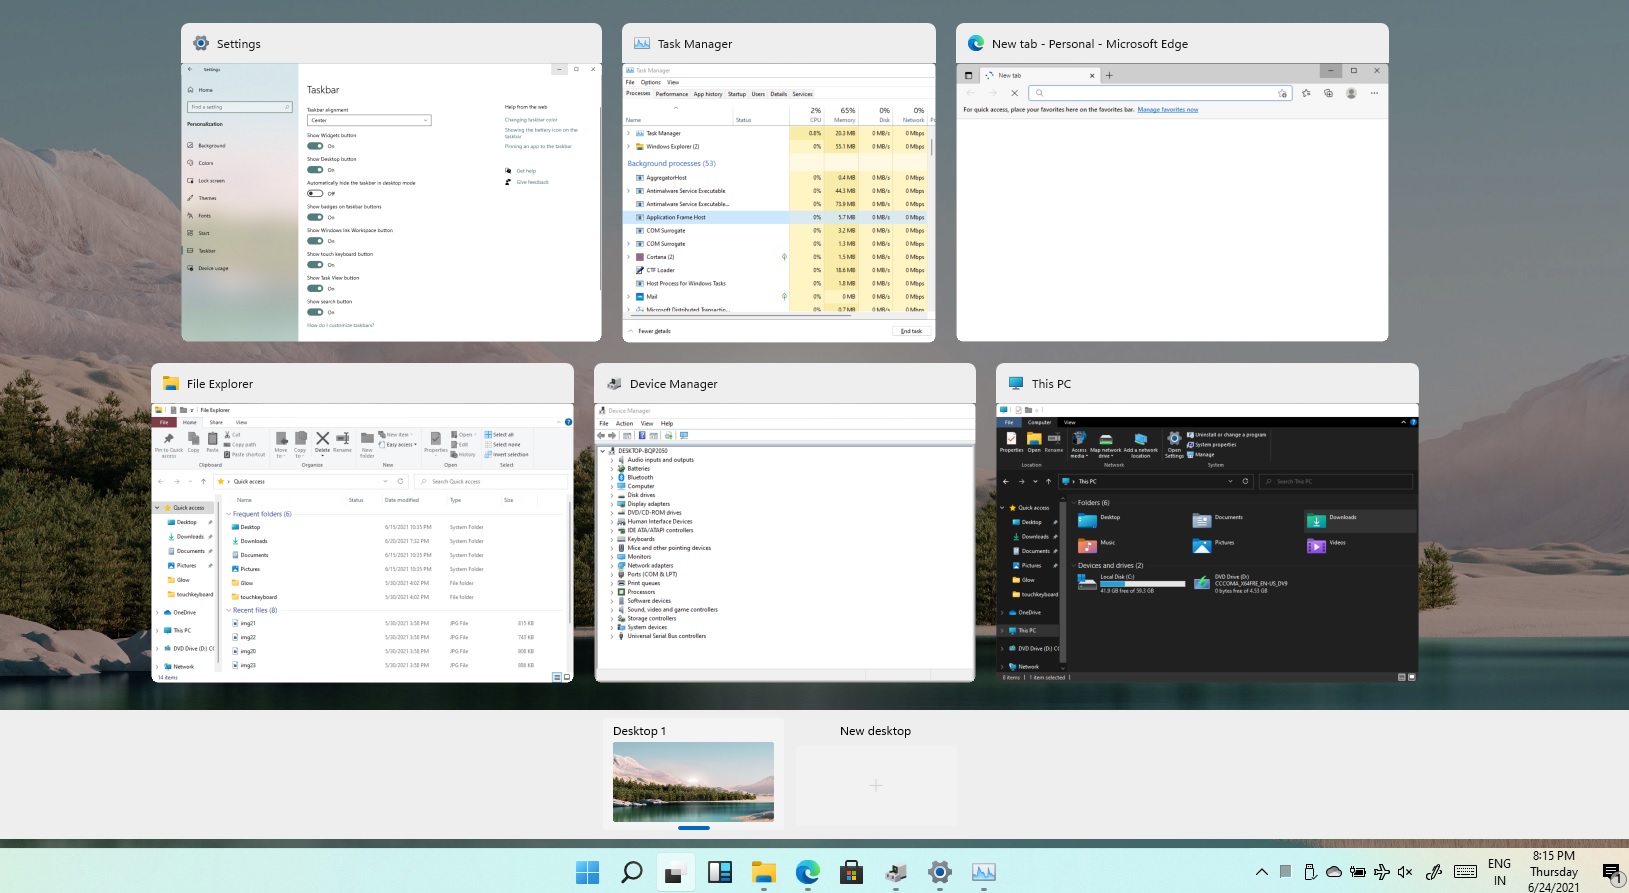
Task View feature inside Windows 11 is actually a great feature, letting you quickly view open windows and virtual desktops. How Task view itself could be reached with keyboard shortcut combination of ⊞ WINDOWS + TAB some users will prefer this way of using it and thus button on the taskbar is something you do not want or need. There is a very easy way to remove mentioned button and I will show you how to do it. Right-click the taskbar button itself and click on Hide From Taskbar. That’s it, you have done it. Now in order for you to bring it back if you change your mind, you will have to do some extra steps but it is nothing difficult. Right-click on the taskbar and click on Taskbar settings, you will be lead to Personalization > Taskbar. Inside locate Taskbar Items and switch Task View to ON, you will see the Task View button right away showing itself again.
Read More
Cooler Master XG850 PLUS PLATINUM

Enter Cooler Master XG850 PLUS PLATINUM, a new, in-house designed power supply from Cooler Master. I will admit that in last years I was a big fan of Cooler Master and their components, well not all but power supply and PC cases were always products from them that I liked and used. The latest power supply from them does not disappoint and I must say that I like it very much, it is hi-quality, it is silent, it has a large LCD display where you can see its current state and also has some RGB lights so it looks cool in your case.

cooler master power supply XG850 PLUS PLATINUM

Technical specifications

So without further detours here are the technical specifications and then we will talk a little about it.

Model: MPG-8501-AFBAP-X
ATX Version: Intel ATX 12V Ver. 2.53
PFC: Active PFC
Input Voltage: 100-240V
Input Current: 12-6A
Input Frequency: 50-60Hz
Dimensions (L x W x H): 160 x 150 x 86 mm
Fan Size: 135mm
Fan Speed: 1800 RPM
Noise Level @ 100%: ≤ 25 dBA
Efficiency: ≥ 92% @ Typical Load
80 PLUS Rating: 80 PLUS Platinum
ErP 2014 Lot 3: Yes
Operating Temperature: 0-50°C
Power Good Signal: 100 - 150 ms
Hold Up Time: ≥ 16ms
MTBF: >100,000 Hours
Protections: OPP, OVP, OCP, UVP, SCP, OTP, Surge, and Inrush Protection
Regulatory: TUV, cTUVus, CE, BSMI, FCC, CCC, EAC, UKCA
ATX 24 Pin Connectors: 1
EPS 4+4 Pin Connectors: 1
EPS 8 Pin Connector: 1
SATA Connectors: 12
Peripheral 4 Pin Connectors: 4
PCI-e 6+2 Pin Connectors: 6
USB Protocol 10P: 1
Series: XG Series
80 Plus: Platinum
Modular: Full Modular
Wattage: Above 750W

Opinion about Cooler Master XG850 PLUS PLATINUM

If we put aside the technical characteristics of the power supply itself we are left with visual and real working experience. Now real working experience will not be covered here since yea it is working great but it needs some time and a long period of testing in order to be able to say that it is indeed reliable and great but considering I have never had any issues personally with power supplies from Cooler Master I will assume that this one is also very reliable and hi-quality.

That leaves us basically with looks and feels of supply itself and I must say that I like it, and I mean I like it a lot. It feels hi-quality and it looks hi-quality. The LCD display is very good looking and it is very crisp and readable. With power supply some proprietary software so you can choose what you want on display on the screen and also you can control RGB and display colors with it.

I have not opened the power supply to see how it looks inside but from what I could see I think this would be my new power supply if I were building a new PC now. I recommend it and if you decide to get it I hope it will serve you long long time.

Thank you for reading and I hope to see you next time.

Read More
Microsoft Surface Go 2 review

The new upgraded Surface Laptop Go 2 is the new iteration of the affordable original Surface Laptop Go aimed to offer good performance at a lower price of under $1000. The new version is not anything vastly different from the original but it comes with much-needed upgrades.

microsoft surface go 2 laptop

The biggest and main upgrade is the CPU, the Surface Laptop Go 2 is packing now Intel Core i5 1135G7, an Intels 11th generation CPU that should increase battery life. The laptop is also coming with an improved WEB camera and the cheapest one comes now with 128GB of storage instead of 64GB. Price went up from $550 to $599 which is not a big increase considering what was upgraded.

The bad news of new models is that sadly they are still packing only 4GB of RAM, that's really not enough for most applications released in 2022 and the screen is having a relatively low resolution of 1536 X 1024.

Microsoft is still offering all the color variations as in its first offering but added as well a new Sage color that is muted green in tint.

When we look at hardware it seems a little weak but for this price, there is not much competition in the field, and after all this line of models is aimed to provide good performance for an affordable price. If you really need something better you will go with a standard Surface or MAC book instead.

The new laptops are available to pre-order at Best Buy and Microsoft’s online store, and they’ll start shipping on June 7.

Read More
What Is a VPN and What Can It Do For You?

Have you been feeling anxious in the digital space? Feeling like you have a million eyes on you each time you visit a website? It can definitely make you uneasy. Luckily there’s an easy fix, and it’s called a VPN.

In this article we’ll take you through the basics of what a VPN does and some of the biggest benefits you can reap from buying one.

VPN: definition and how it works

VPN stands for Virtual Private Network, so its name already says a lot about what it does. 

A VPN is specialized software that keeps your browsing private and secure. Essentially it hides your identity, preventing possible cyberattacks and data theft. This is especially important in cases of public network use, where you’re highly exposed to potential threats.

To be more specific, this software encrypts your Internet Protocol (IP) address by filtering it through a server hosted by the VPN provider first. That way, it prevents your Internet service provider, third parties and lurking online thieves from tracking the actual you.


Credit: FLY:D on Unsplash

Some providers, such as Surfshark VPN with its IP Rotator feature, even make it a habit to frequently change your IP address to further protect your identity. With most VPN providers, you can also appear to be in a completely different country, adding to your disguise.

There are tons of advantages you can look forward to if you decide to use a VPN. Take a look at some of the crucial ones.

Benefits of using a VPN

When choosing a VPN, you can find both free and paid options. We recommend you go with the paid ones, since they have stronger security, encryption and data protection, as well as more advanced features. Free VPNs come with limitations and risk of malicious attacks on the software itself.

You can choose to buy a singular VPN service or opt for antivirus software that has a VPN built in, for example Bitdefender’s Ultimate Security plan. That depends on what you use your computer for and how much. 

When you pick one, here’s what it can do for you.

1. Access region-specific content

When we said you could change your location, we meant it. Say you’re using a streaming service and a show you desperately want to watch isn’t available in your country. You can use your VPN to make it look like you’re browsing from a country where it’s unlocked.

This option is also convenient for gamers who want to access maps, skins and other in-game items unavailable in their location.

Surfshark VPN
Surfshark VPN (Credit: Dan Nelson on Unsplash)

In addition, you can use this powerful feature when you’re traveling to a region where some of your favorite content may not be accessible.

Do keep in mind that you need to read the Terms and Conditions (yeah, we know - who does that?) of your games and services before doing this, since you could end up getting a penalty. It’s also important to remember that there are entire countries that have strict regulations or even bans on VPNs, for example Belarus, Russia and China. So make sure to be very cautious with your VPN use, friends.

2. Browse like no one’s watching

VPNs shield your browsing habits from prying eyes on the web. Those can be malicious hackers or just third-party cookies tracking your every move to later bombard you with targeted ads. For example, Surfshark VPN features a Cookie blocker that blocks all cookie-related pop-ups and lets you browse in peace (and secret). It works even when the VPN is turned off, which is also pretty neat.

In addition, their CleanWeb 2.0 technology makes sure ads and especially malware don’t stand a chance at all, since they’re blocked before they can even load.

The inability of sites to track your browsing means they can’t collect and analyze any of your data. So, your personal information - or your company’s information in case that’s what you’re using your computer for - is entirely hidden and secure.

3. Save money

It’s well-known that the prices of certain items and services vary based on your location, browsing time, age and many other factors. This most commonly goes for airline tickets and hotel stays.

You can use your VPN to avoid high prices and surcharges. Clear all cookies, turn on your VPN and visit an online shopping site to check out their prices. Then compare your findings with the offers you see when your VPN is off, when you spend a long time on the site or have an active account with the company. 

Sometimes this can really help you find the best deals and avoid breaking the bank. But again, check the Terms and Conditions before you purchase something using a VPN.

4. Secure your smart home

The more smart devices you have connected to your network, the more exposed you are to potential cyberattacks. Phones and computers are generally designed to be decently secure even without a VPN or antivirus, but smart home devices leave a lot to be desired in that regard. 

Protecting your home network with a VPN software means all devices connected to it are secure, be it an air purifier or Alexa.

Credit: Bence Boros on Unsplash

5. Prevent connection slowdown

Your ISP can intentionally slow down your internet speed based on how much data you’ve consumed (data throttling) or your activities online (bandwidth throttling).

But with a VPN, what kind of data you send and receive and how much is entirely hidden. Therefore, if your ISP can’t see you, they can’t control you and they can’t throttle down your speed.   

The bottom line

You can never be too safe online. So definitely think about getting yourself a solid VPN to pump up your privacy and security as much as you can. And if you have any questions or need help choosing the perfect software for you, feel free to reach out to us.

Read More
How to Unmerge the User folder in Windows 10
The Windows 10 system allows users to change the default location of the User folders to another drive. This is probably to make sure that the files stay safe in case the system suddenly crashes. However, in some cases, while changing the path to another drive, for instance, the D drive or any folder, the Windows system recognized it as a hard drive as well so even though the files will be saved on that folder, it will appear as a hard drive in the Windows Explorer or look merged with another folder. It could also be that you had dragged and dropped a user folder to another user folder by accident. So if you’re wondering how you can unmerge the User folders, read on as this post will guide you on how exactly you can do that. Take note that even if you try to use the File History to restore the User folders, it still won’t work and you won’t be able to move them back to their previous locations nor restore the folders back to their previous versions and it would only state that they are not available. In the instructions given below, we are using the Downloads folder as an example.
  • Step 1: Tap the Win + R keys to open the Run dialog box.
  • Step 2: Next, type “Regedit” in the field and hit Enter to open the Registry Editor.
  • Step 3: After opening the Registry Editor, navigate to the following registry key:
ComputerHKEY_CURRENT_USERSoftwareMicrosoftWindowsCurrentVersionExplorerUser Shell Folders
  • Step 4: Then double-click on the multi-string value {374DE290-123F-4565-9164-39C4925E467B} located in the right hand pane. And in the Value Data, copy and paste the following value:
%USERPROFILE%Downloads
  • Step 5: Now click OK and close the Registry Editor.
Note: Look close enough and you’ll see that the multi-string values belong to each one of the folders. From there, you have a Desktop, Favorites, Skydrive, Music, Pictures, and many more.
  • Step 6: Restart your computer. After that, the operating system will pick up the new folder location during the startup. Here are the values for the other folders:
Music – {1CF1260C-4DD0-4ebb-811F-33C572699FDE} Pictures – {3ADD1653-EB32-4cb0-BBD7-DFA0ABB5ACCA} Videos – {A0953C92-50DC-43bf-BE83-3742FED03C9C} Documents – {A8CDFF1C-4878-43be-B5FD-F8091C1C60D0} Desktop – {B4BFCC3A-DB2C-424C-B029-7FE99A87C641}
  • Step 7: Now all you have to do is to change the location correctly. Start by tapping the Win + E keys to open the Windows File Explorer.
  • Step 8: After that, right-click on the Downloads folder located in the right-hand pane.
  • Step 9: Then click on Properties and go to the Location tab then type “D:\Downloads” in the location box.
  • Step 10: Click the Apply button and then the OK button to save the changes made. Doing so would ensure that not only the Downloads folder is restored but also that it does not stay merged to another folder or appear as a drive.
Read More
How to Repair Error Code 0xC190010, 0x30018 in Windows 10

Error Code 0xC1900101, 0x30018? - What is it?

Users, when upgrading to Windows 10 from Windows 7 or Windows 8/8.1, or when upgrading to a new version, build, service pack, or major update of Windows 10, can encounter error code 0xC1900101, 0x30018. Windows 10 installation fails and stops or hangs. During the installation process, it will reach a certain maximum limit (normally at 6% or 32%) then reverts back to the previous version of the operating system and displays the following message:

We couldn’t install Windows 10. We’ve set your PC back to the way it was right before you started installing Windows 10.

0xC1900101 – 0x30018 The installation failed in the FIRST_BOOT phase with the error during the SYSPREP operation.

Solution

Restoro box imageError Causes

In attempting to fix Error Code 0xC1900101-0x30018, it is vital to know what causes this issue. The most probable causes of this error are:

  • Incompatible hardware or driver
  • Incompatible security programs or antivirus or incompatible utility software
  • A device driver possibly stopped responding to setup.exe while on the installation process.
In some cases, you might be opened to other error messages when attempting to update to Windows 10, including error code 8007002c.

Further Information and Manual Repair

In fixing issues related to error codes, it is best to employ manual repair methods. Using these methods helps users pinpoint the root causes of the issue and apply solutions permanently to fix the issues. While most manual repair methods can be done by every Windows user, even those without technical abilities, there are certain cases where help from a Windows professional is needed. If you’re not up to facing risks in implementing manual methods yourself, consider getting help from a professional Windows technician or you can use a powerful automated tool. In fixing Error Code 0xC1900101-0x30018, you can repeat the same steps used for 0xc000021a (Method One) or you can try doing the following:
  • Disable or uninstall your Antivirus program before proceeding to upgrade the system
  • Ensure that the machine name is simple (having at least 8 characters) with no special characters like hyphens or dashes.
  • Restart the device a few times then try again.
  • Disable General USB Devices such as the Smart Card Reader.
  • If you use an SCSI hard disk, ensure that you have available drivers you can use for your storage such as a thumb drive and make sure that it is connected. During the Windows 10 setup, select the Custom Advanced Option and use the Load Driver command to be able to load the suitable driver for the SCSI drive. If this fails, try switching to an IDE-based hard disk.
  • You can now perform a clean boot. Restart your device then try again.
  • If you are using the .ISO file for upgrading the system, you need to disconnect from the Internet first before proceeding to the setup. If you are connected to Wi-Fi or by Ethernet (LAN), make sure to disable both connections then you can proceed to set up again.
  • If you’re performing the update through Windows Update, once the download reaches 100%, disconnect from the Internet, and then proceed with the installation.

NOTE: If this fails, if possible, you can try using the .ISO file in upgrading.

  • Switch to a local account if the device is connected to a domain.
  • Disconnect all external devices attached to the computer such as gaming controllers, printers, or USB keys.

If you’re using Windows Update in installing Windows 10, you can implement the following:

  1. Open the Command Prompt window by pressing Windows Key + X. Select Command Prompt (Admin) from the menu.
  2. Stop the BITS, Cryptographic, MSI Installer, and the Windows Update Services. In order to do this, Type or Copy and Paste the following commands one at a time:

NOTE: Don’t forget to hit Enter after every command.

net stop wuauserv

net stop cryptSvc

net stop bits

net stop msiserver

  1. Rename the Catroot2 and SoftwareDistribution In order to do this, Type or Copy and Paste the following commands one at a time:

NOTE: Don’t forget to hit Enter after every command.

                        ren

C:WindowsSoftwareDistribution SoftwareDistribution.old

                          ren

C:WindowsSystem32catroot2 Catroot2.old

  1. Restart the BITS, Cryptographic, MSI Installer, and the Windows Update Services. In order to do this, Type or Copy and Paste the following commands one at a time:

NOTE: Don’t forget to hit Enter after every command.

net start wuauserv

net start cryptSvc

net start bits

net start msiserver

  1. Type Exit in the Command Prompt then close the Command Prompt window then restart the computer.
Can’t seem to put up with the long and technical manual repair process? You can still fix this error by downloading and installing a powerful automated tool that will surely get the job done in a jiffy!
Read More
1 2 3 171
Logo
Copyright © 2023, ErrorTools. All Rights Reserved
Trademark: Microsoft Windows logos are registered trademarks of Microsoft. Disclaimer: ErrorTools.com is not affiliated with Microsoft, nor claims direct affiliation.
The information on this page is provided for information purposes only.
DMCA.com Protection Status