If you were trying to print some documents but encounter the HIDCLASS.SYS Blue Screen error instead, then you’ve come to the right place as this post will guide you in fixing any Blue Screen errors related to the HIDCLASS.SYS file. HIDCLASS.SYS is a Windows operating system driver file. HID or Human Interface Device includes Keyboards, mice, and other input devices.
HIDCLASS.SYS is a critical system driver file that is responsible for connecting different kinds of devices all over the system, including the functionality where a Word Processor can access the printer to print documents. This file comes under the category of kernel-mode device drivers and if the driver fails, it can result in a Stop Error. There are a lot of Stop errors related to the HIDCLASS.SYS file, such as:
The fixes for the Blue Screen errors related to the HIDCLASS.SYS files are pretty simple but before you troubleshoot the problem using these fixes, make sure that you boot your computer into Safe Mode with Networking first. After that, get started on these tips:
To fix the HIDCLASS.SYS error, you can also try to roll back, or update, or disable the concerned device drivers.
Note: You can install a dedicated driver on your computer in case you have it or you could also look for it directly from the website of the manufacturer. On the other hand, if you have just updated your device drivers then you need to roll back the drivers to their previous versions or disable them.
The next thing you can do to troubleshoot the HIDCLASS.SYS Stop error is to plug in and out each one of the different hardware that is connected to your computer. Doing so will help you determine which one of the hardware is the one that’s triggering the error to pop up. You will also know what hardware drivers or anything else that could be causing this error which includes external devices like mouse, keyboard, printer, as well as internally attached components like the Graphics card and so on.
Running the ChkDsk utility can also help you resolve any Blue Screen errors related to the HIDCLASS.SYS file. To run this tool, refer to these steps:
Note: After you select the option, your PC will restart and check for memory-based issues. If it finds any issues, it will automatically fix them.
System File Checker or SFC is a built-in command utility that helps in restoring corrupted files as well as missing files. It replaces bad and corrupted system files with good system files. To run the SFC command, follow the steps given below.
The command will start a system scan which will take a few whiles before it finishes. Once it’s done, you could get the following results:

Nvidia announced the third generation of GeForce RTX GPUs called Ada Lovelace. New technology is bringing 76 billion transistors with 18,000 CUDA cores along with new gen ray tracing cores and improved Tensor cores as well. The new lineup also comes with DLSS 3 which is vastly improved from its previous version pushing a 4 times increase in frame rates over native rendering.
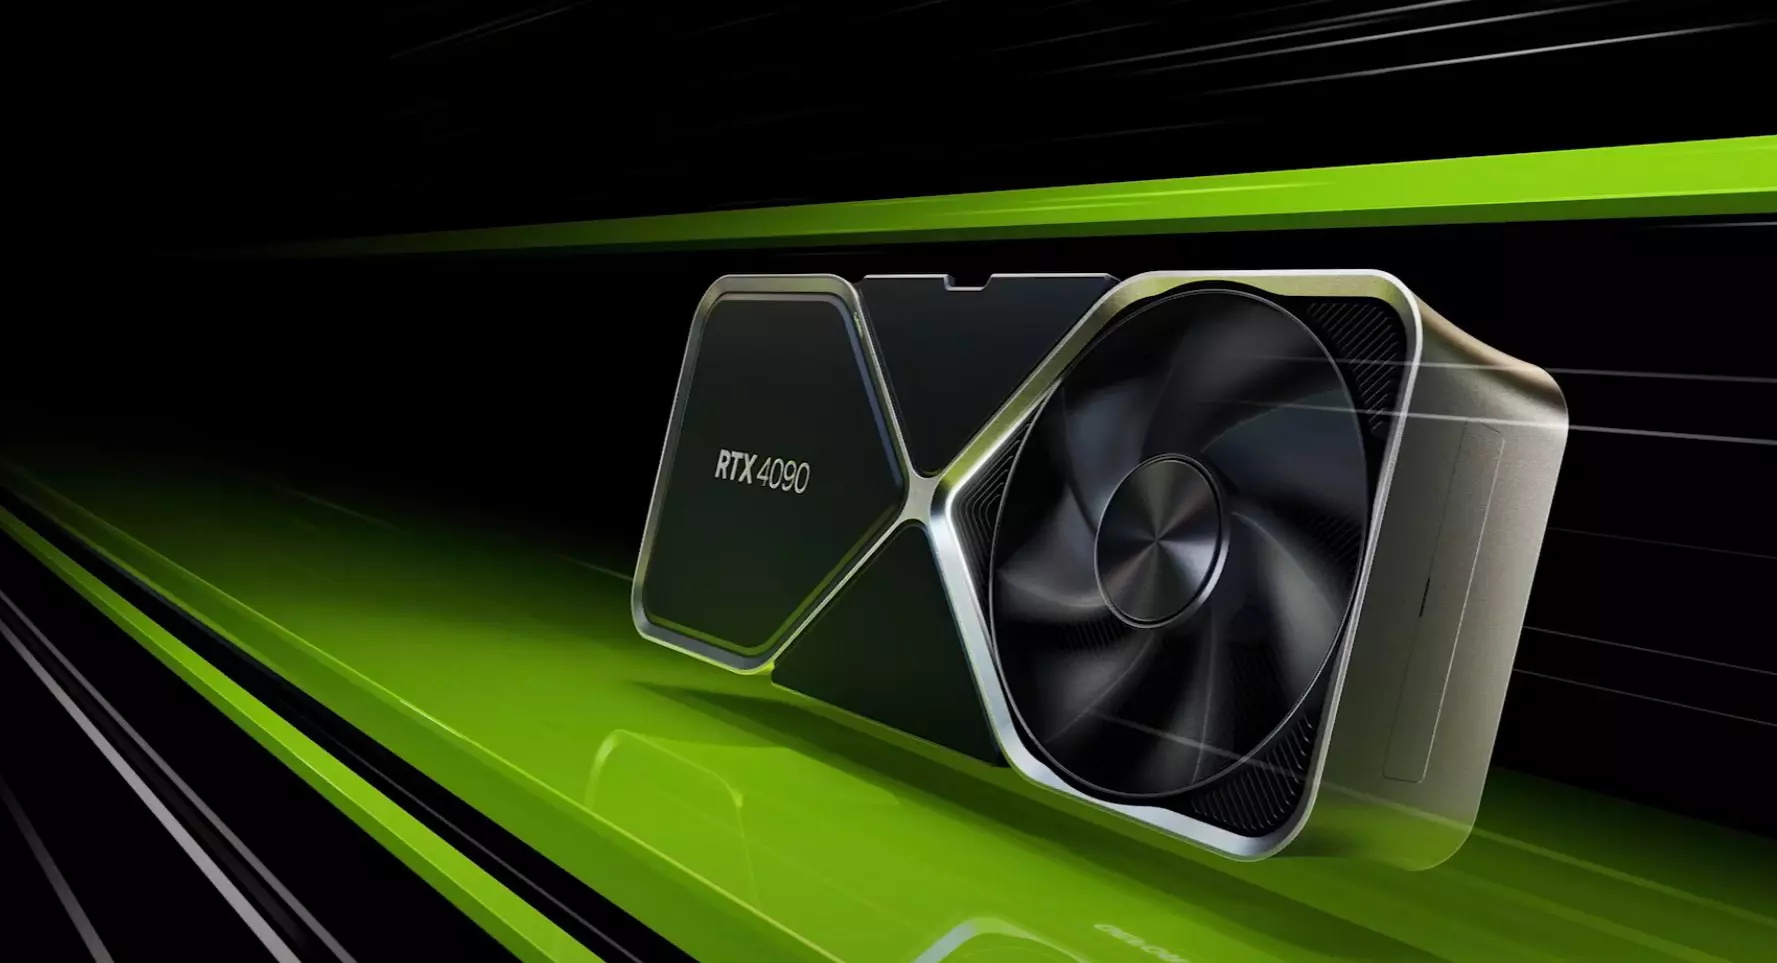
RTX 4090, a better model of GPU will come with 16,384 CUDA cores and a boost clock speed of 2.52 GHz. Also, it is packed with stunning 24 GB of GDDR6V VRAM. In Nvidia's words, its performance is twice faster than the 3090 Ti in games like Flight simulator, three times faster on Portal RTX, and four times faster on RacerX.
RTX 4080 comes in two modes, one with 12GB VRAM and a stronger one with 16GB VRAM but differences do not end here. The lower model is packing 7,680 CUDA cores while the stronger one is going to 9,728 CUDA cores. We will wait to see how will these cores count impact real-world performance in games.
As for prices, the flagship model RTX 4090 will be $1,600 USD and it will hit the market on October 12th. RTX 4080 12GB model will be $900 USD and the model with 16GB VRAM will go up to $1,200 USD. This, of course, is the price for Founders Edition cards, OEM cards from third parties like ASUS, MSI, Gigatech, etc will cost more.
Error code 0x8007007b will present itself when Windows users are trying to activate Windows. You may try to activate it through the update and security option, but it is likely that you will receive the same error code. Error code 0x8007007b may be presented when Windows 7 and Windows 8.1 users try to upgrade and activate Windows 10 on their computer.
Common symptoms include:
 Error Causes
There are multiple causes for the user to see this error code, including if a user is using volume-licensed media while installing a number of various Windows operating systems. This error may also be caused because the activation wizard cannot connect to a KMS host computer. It is likely that if the user has a volume-licensed form of media, they were likely given a MAK (multiple activation keys).
There are several ways to go about repairing error code 0x8007007b. It is important to try all of the methods, but if it is too difficult or you do not know what you are doing, please do contact a Windows repair technician. They will likely be able to fix the problem with ease.
When KMS activation is not used, and when there is not a KMS server, the product key type should then be changed to a MAK. For MSDN (Microsoft Developer Network) or TechNet, the SKUs that are listed on the media are generally volume-licensed media, and that means that the product key that is supplied is a Multiple Activation Key.
To change the KMS to a MAK, click Start, All Programs, Accessories, and then right-click on Command Prompt. Click Run as Administrator. If prompted for a password or confirmation, enter it now.
When the command prompt opens, type in the following command, and press enter after:
slmgr -ipk xxxxx-xxxxx-xxxxx-xxxxx (these x's are representative of the MAK product key).
While on the desktop, press the Windows key and R. The Run window should appear, and then you should enter the following command: Slui 3. Press Enter and then wait for the window to appear. This window will ask for the operating system activation product key. Enter the product key and then press the Activate button. Reboot the computer. Now the Error Code 0x8007007b should be gone.
Open the Command Prompt with access as administrator as mentioned previously. Enter the following command: sfc /scannow. The command will then complete its task. This will take a good bit of time, so leave the computer to do its work. The sfc must finish the scan. When the scan has finished, reboot the computer. Now you can check for activation. The error code should be gone.
This method for correction should be used when the network does have a KMS host computer setup, and the client is not able to locate the KMS host on the network to complete activation.
To verify that the computer does in fact have the KMS host installed. Click Start, All Programs, Accessories, and then right-click on Command Prompt. Run as administrator. If you are now prompted to enter a password or confirmation, do so. When the command prompt box comes up, type in the following command, and then press Enter: nxlookup -type=all_vlmcs._tcp>kms.txt
The command will generate a file, open this KMS file. The file will contain one or more entries. As a default, the KMS host server will dynamically register a DNS SRV server evidence once every 24 hours. In order to check the registry to ensure that this is happening, follow these steps:
If you wish to always have at your disposal a utility tool to fix these Windows 10 and other related issues when they do arise, download and install a powerful automated tool.
In the Windows ecosystem, MS Surface laptops are among the best laptops on the market, they are regarded as equivalent to Apple MAC laptops but for Windows. Microsoft Fall 2022 Event will be held on October 12th at 10 AM. The event itself will be held right before it kicks off its annual, developer-focused Ignite event in Seattle from that same day through October 14.

This event is the first in-person event that Microsoft has held since the beginning of the pandemic. We expect the launch of the Surface Pro 9 and the Surface Laptop 5, and maybe Surface Studio 3 as well. There are also some rumors about products themselves like choices between an ARM or x86 CPU but nothing is confirmed so far, we can just wait and see.
Finally upgraded to Microsoft’s newest OS, but the performance is a bit sluggish? Here are a few useful tips you may not have thought about that could significantly transform your experience!
There are many programs that launch right on startup that really aren’t essential. This, in turn, causes your PC to launch and run more slowly.
To check which programs are enabled on startup, go into the Task Manager and select the Startup tab. Find every program that doesn’t need to launch immediately, right-click on it and press ‘Disable’.
This will not shut down the program in that instant. It’ll just prevent it from running automatically as you turn on your PC. You can always launch it manually when you need it.
If you want your PC to run super smoothly, you need to have enough memory to support that. This is especially significant for those of you who love to multitask. Upgrading your RAM gives your PC more space to store the temporary data it needs to complete processing tasks. In other words, processing takes a lot less time.
Your long-term storage is equally important. Hopefully at this point you’re already using SSD over HDD, since this type of storage offers a faster boot time.

In any case, we recommend expanding your storage capacity. The more files and data you store, the more there is to load, significantly influencing your PC’s speed. Larger storage capacity means new data and essential updates can be stored comfortably, preventing any strain on your PC’s performance.
If you aren’t willing to upgrade your storage just yet, the least you can do is clean up your storage right now.
Aside from manually deleting stuff you no longer need, you can also get rid of temporary files that clutter up your storage and eat up performance for no reason. To get to them, click Windows + X and select ‘Run’ (or just type it in the search bar).
A small window will pop up, where you need to type %temp%. This will take you to a whole folder full of all the temporary files you can remove without thinking twice.
For those who upgraded from Windows 10, there’s a neat trick to get rid of potential leftover files you don’t need on your brand new iteration. Only do this if you’re 100% sticking with Windows 11, though. Go to System > Storage > Temporary files. Make sure to only leave ‘Previous Windows Installation’ and ‘Windows Update Clean-up’ checked and click on ‘Remove files’.
Lastly, make use of Windows 11’s fantastic Storage Sense feature. Turning it on will enable your PC to constantly watch out for junk or unused files to optimize your PC’s performance to the maximum.
This one should go without saying, but pending updates can be detrimental to your Windows 11 performance. The longer you leave them untouched, the more bugs the outdated programs and patches can cause. So, make sure to regularly check for updates and install them as soon as they’re available.
As cool as visual effects, animations, shadows and transparency are, they can also put quite a toll on your computer’s speed. On a newer setup this generally shouldn’t be a problem, but if you do notice a drop in performance, definitely consider turning off some of these settings.
To do this you can go to the Control Panel, System Properties and click the ‘Advanced’ tab. In the Performance section, choose Settings. If you’d like a quicker way to get to the dialog (Performance Options) with Visual Effects, you can also type sysdm.cpl in the search bar.
Once there, you can either have your PC choose what’s best, choose the best appearance or the best performance. The other option is to manually toggle the effects off and on. The biggest obstacles to speed are taskbar animations, window shadows, control/element animations and animations upon minimizing/maximizing.

In the same vein, you should go to Settings > Personalization > Colors and disable Transparency, to prevent your computer from doing overtime just to hit the aesthetic appeal.
Bloatware is one of the biggest culprits of slow computer speed.
Pre-installed software that’s pretty much useless but takes up valuable system resources has been around since day one. No matter which device or platform you’re talking about. Luckily, a lot of it is removable, making it easy to lighten the load on your device.
To boost your Windows 11 computer, go to Settings > Apps > Installed apps. You’ll probably see a bunch of apps you don’t want or need. Click on the three dots next to each one you want to remove and press ‘Uninstall’.
Aside from helping optimize performance, removing bloatware has another great benefit. Unfortunately, often this pre-installed software is quite vulnerable, exposing you to great risk of cyberattacks. So, removing it definitely improves your device’s security and gives you at least some peace of mind.
These are a few of our fastest tips for boosting performance. There are other, more complex and time-consuming ways, of course. If you’ve tried these quick ones and still need advice on how to improve your PC’s speed, feel free to reach out!
“We’ve set your PC back to the way it was right before you started installing Windows 10. 0x8007002C-0x400D The installation failed in the SECOND_BOOT phase with an error during MIGRATE-DATA operation”This kind of Windows upgrade error indicates that some of the files needed for the installation are locked out for some reason and that Windows was not able to migrate them to a new version. It could be that your computer does not have sufficient space for those files. Thus, no matter how many times you try to upgrade your computer, you always end up going back to the previous version of Windows. To fix the “0x8007002C – 0x400D, The installation failed in the SECOND_BOOT phase with an error during MIGRATE-DATA operation” error, here are some suggestions that might help:
net stop wuauserv net stop bits rename c:windowsSoftwareDistribution SoftwareDistribution.bak
net start wuauserv net start bitsSince the folder has already been flushed, it will be populated afresh the instant your restart your computer and open Windows Update.