Error Code C0000135- What is it?
C0000135 is a blue screen of death error code (BSoD) also referred to as the ‘Stop’ error. This error code usually pops up on the screen at startup. The system stops and displays the error code:
Stop: c0000135 {Unable to Locate DLL}
The dynamic link library FILE_NAME could not be found in the specified path Default Load Path
Solution
 Error Causes
There are multiple reasons behind the error code C0000135 BSoD such as:
- Missing and damaged .DLL files which is linked to registry corruption
- Malware attack
- Viral infection
When this error code pops, the computer screen turns blue and hampers your ability to use Windows successfully. Nonetheless, if the error C0000135 is not repaired timely this error can cause a great deal of damage to your PC. It puts you at risk of:
- Data Loss with possibly no chances of recovery
- System Failure and crash
- Cybercrime if malware is the underlying cause of the occurrence of the error code C0000135
To avoid serious PC damages and inconvenience it is advisable to repair this error immediately.
Further Information and Manual Repair
There are two ways to fix the error code C0000135:
- Hire a Professional
- Download Error Tools PC Repair
Hire a Technician
Hiring a professional can be costly. You may have to pay hundreds of dollars to the technician to resolve this issue.
However, the latter option is not only money-saving but also time-saving, convenient, and simple. In fact, it is so easy that even if you have no technical knowledge you can still work your way around it and repair the error in seconds.
Download Restoro
Restoro is a top-quality, efficient, and multi-functional PC fixer. It is integrated with cutting-edge technology.
It has a comprehensive suite of advanced utilities like an intuitive registry cleaner, powerful anti-virus, and a smart system stability detector. All of these exciting and highly functional features are combined together in one.
With this helper, you don’t need to search for the underlying cause of the error.
When you experience the
BSoD error code C0000135 on your system all you have to do is run it for a scan and its intuitive in-built technology will detect the issues and causes in no time and display them to you in the form of a comprehensive scan report.
Once the scan is complete, you just have to hit the repair tab to resolve it. It’s that easy and fast!
Restoro is powered by a highly functional registry cleaner. This cleaner helps detect all the errors related to the
registry.
It cleans the unnecessary files cluttering and damaging the hard disk including the junk files, invalid registry entries, internet history, and the files from the programs that you have uninstalled on your PC.
These files acquire a lot of disk space and damage .dll files as well.
Overloaded registry also slows down the system and the CPU and RAM then require more power to start and function.
The registry cleaner embedded in the Restoro removes and wipes out all this unnecessary clutter, clears up the disk space and repairs the damaged files, and corrupted registry, and thus resolves the error code C0000135 on your system.
Restoro also serves as a system optimizer. And when you repair issues on your PC with this helper, you’ll see a massive difference in the speed and performance of your computer. It will run smoothly and boot efficiently.
Restoro is safe to use. It is bug-free and used widely by PC users experiencing different types of PC-related issues including the error code C0000135. It has easy navigation and a user-friendly interface.
You can download and run Restoro on all Windows versions.
Click here to download Restoro today!


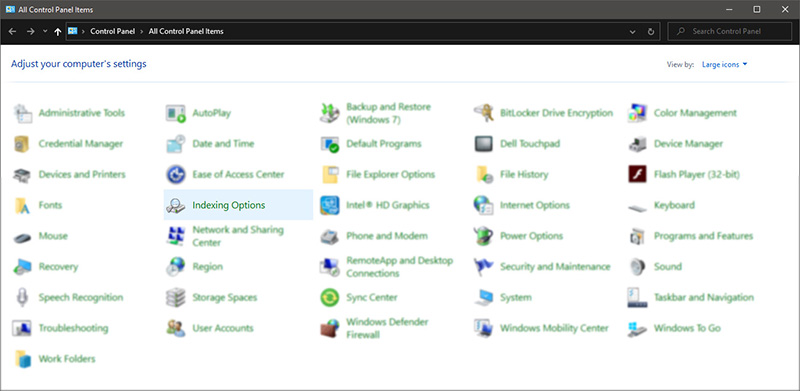
 Once you are in the control panel, switch your view to large icons and locate Indexing options.
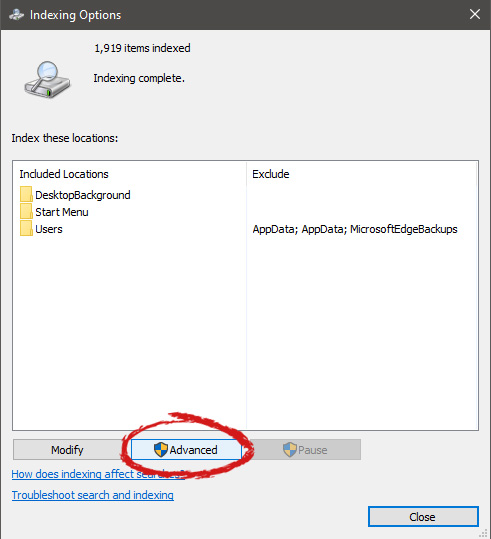
 Inside indexing options, click on advanced.
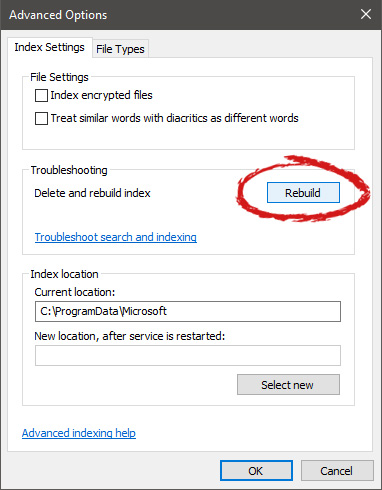
 In advanced options click on the rebuild and confirm.
 Leave your computer to finish and your searches should be working fine now.
  The console itself is coming in cylindrical shape powered by Intel CPU and ASUS GPU of the unknown chipset. It has Seagate Baraccuda 1TB SSD and it is VR-ready. The console will have raytracing and will be 4K ready.