If you got the FAULTY_HARDWARE_CORRUPTED_PAGE Blue Screen error on your Windows 10 computer then it is most likely caused by various factors. It could be caused by an incomplete installation or uninstallation of some applications or program, or it could also be caused by some exploit that intervenes with the normal functioning of the computer, as well as bad sectors on the hard disk, damaged system files, malfunctioned system drivers, modified Windows Registry files, or a Blue Screen occurrence during a Windows Update and many more. Getting this bug check means that a single-bit error was found on this page. It also indicates that this is a hardware memory error and to resolve it, you need to follow the suggestions laid out below but before that, it is recommended for you to create a System Restore Point first so that if anything goes wrong, you can always go back to the previous state.
Option 1 – Run a Memory Check to test RAM
Since the problem might have something to do with hardware memory, you need to test RAM by running a Memory Check using the Windows Memory Diagnostic. Refer to these steps to do so.
Tap the Win + R keys to open the Run dialog box.
Then type “mdsched.exe” in the field and hit Enter to open the Windows Memory Diagnostic.
After that, the Windows Memory Diagnostic will give out two options such as:
Restart now and check for problems (recommended)
Check for problems the next time I start my computer
Select any of the given options. After that, your computer will restart and check for memory-based issues upon the restart. If there are any issues, it will automatically them.
Option 2 – Run the System File Checker
System File Checker or SFC is a built-in command utility that helps in restoring corrupted files as well as missing files. It replaces bad and corrupted system files with good system files that might be the cause why you’re getting the FAULTY_HARDWARE_CORRUPTED_PAGE Blue Screen error. To run the SFC command, follow the steps given below.
Tap Win + R to launch Run.
Type in cmd in the field and tap Enter.
After opening Command Prompt, type in sfc /scannow
The command will start a system scan which will take a few whiles before it finishes. Once it’s done, you could get the following results:
Windows Resource Protection did not find any integrity violations.
Windows Resource Protection found corrupt files and successfully repaired them.
Windows Resource Protection found corrupt files but was unable to fix some of them.
Option 3 – Check for conflicting or incompatible programs by putting your PC in a Clean Boot state
As mentioned, the FAULTY_HARDWARE_CORRUPTED_PAGE Blue Screen error might be caused by some problematic programs that clash with your existing operating system. Several users reported that numerous programs that are supposedly designed to enhance computer performance are causing conflict in the system instead. To identify which program is causing the problem, you need to put your computer in a Clean Boot State. To do so, follow the steps below.
Log onto your PC as an administrator.
Type in MSConfig in the Start Search to open the System Configuration utility.
From there, go to the General tab and click “Selective startup”.
Clear the “Load Startup items” checkbox and make sure that the “Load System Services” and “Use Original boot configuration” options are checked.
Next, click the Services tab and select the “Hide All Microsoft Services” checkbox.
Click Disable all.
Click on Apply/OK and restart your PC. (This will put your PC into a Clean Boot State. And configure Windows to use the usual startup, just simply undo the changes.)
From there, start to isolate the problem by checking which one of the programs you installed recently is the root cause of the problem.
Option 4 – Update or rollback drivers
If the first few options didn’t work for you, then it’s time to either update or roll back the device drivers. It is most likely that after you updated your Windows computer that your driver also needs a refresh. On the other hand, if you have just updated your device drivers then you need to roll back the drivers to their previous versions. Whichever applies to you, refer to the steps below.
Open the Devices Manager from the Win X Menu.
Then locate the device drivers and right-click on them to open the Properties.
After that, switch to the Driver tab and click on the Uninstall Device button.
Follow the screen option to completely uninstall it.
Finally, restart your computer. It will just reinstall the device drivers automatically.
Note: You can install a dedicated driver on your computer in case you have it or you could also look for it directly from the website of the manufacturer.
This post will guide you on how you can fix the Error 0x80070079. This kind of error mostly occurs during the transfer of files across the networks. It could be caused by several factors which include the incorrect configuration of drivers or the network, as well as deadlock state or the server is loaded with a lot of tasks and if any location is not available. This error could also appear when you try to create a System Image or copy or move files on your computer. Here’s the full context of the error message:
“Error 0x80070079: The semaphore timeout period has expired.”
To fix this error, you can try to run the three built-in Network-related troubleshooters or update or reinstall the network adapter drivers or perform a network reset. For more details, follow the options laid out below.
Option 1 – Try to run the three built-in Network-related troubleshooters
The first thing you could do to fix the problem is to run any of the three built-in troubleshooters related to Networks such as Incoming Connections, Network Adapter, and Shared Folders troubleshooters. To access them, just open the Windows Settings app, and go to Update & security > Troubleshoot. From there, run any or each one of the aforementioned troubleshooters.
Option 2 – Update the Network Adapter drivers
You might also want to update the Network Adapter drivers by following these steps:
Tap the Win + R keys to launch the Run window and then type in the “MSC” command and hit Enter to open the Device Manager window.
Under the Device Manager, you will see a list of drivers. From there, look for the Network Adapters and expand them.
Then right-click on each one of the Network drivers and update them all.
Restart your PC and see if it helped in fixing the BSOD error.
Note: If updating the network drivers didn’t help in fixing the “Windows could not find a driver for your network adapter” error, you can also try to uninstall the very same drivers and restart your Windows 10 PC. After that, the system itself will reinstall the drivers you just uninstalled. Alternatively, you can also download and install the drivers from the manufacturer’s website directly.
To reinstall the network adapter driver, refer to these steps:
Open the Devices Manager from the Win X Menu.
Then locate the device drivers and right-click on them to open the Properties.
After that, switch to the Driver tab and click on the Uninstall Device button.
Follow the screen option to completely uninstall it.
Finally, restart your computer. It will just reinstall the device drivers automatically.
Option 3 – Perform a Network Reset
Network Reset is a feature in Windows 10 that will help you reinstall the Network adapters as well as reset the Networking Components back to their original settings.
Open the Start Menu and click on the Settings icon.
Next, click on the Status link on the left side where you should see the status of your Network. Aside from that, you should also see a link that will let you open the Network Troubleshooter – click on that link to expand Network Troubleshooter.
Under Network Troubleshooter, select the link for “Network reset”.
After you click on Network reset, it should redirect you to the following page. From there, click on the Reset now button.
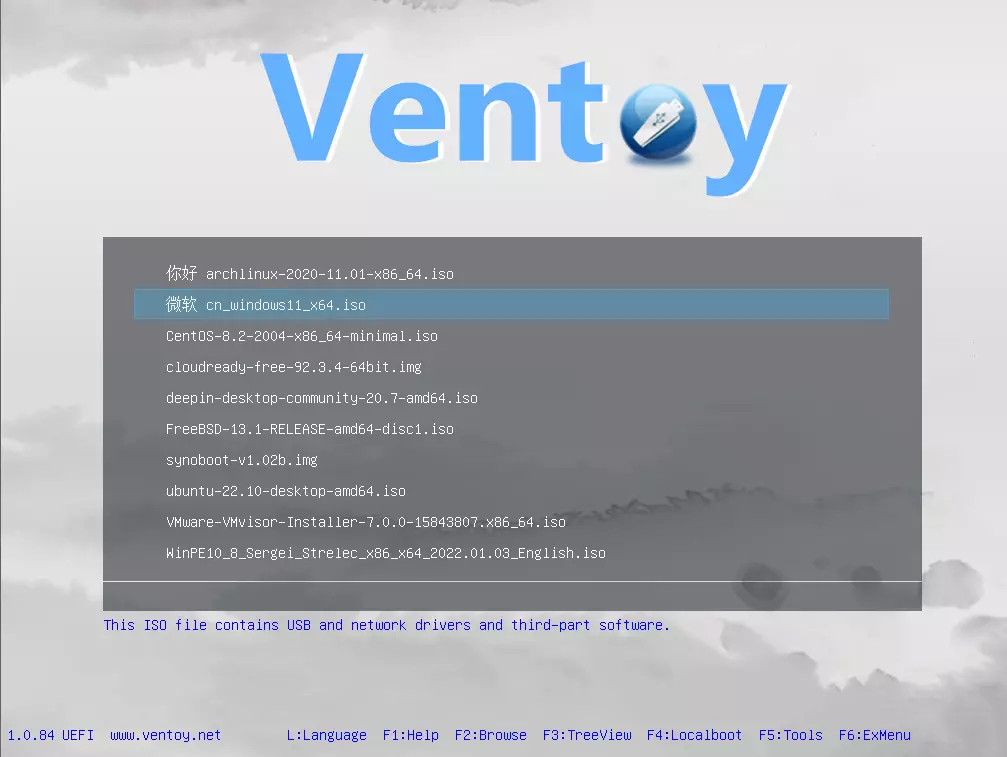
There is a lot of software on the market today, but from time to time we discover something extraordinary and unique worth sharing and today we have a threat for you. Ventoy is a tool that will help you with system reinstallations and system maintenance once and for all.
If you are a computer user that has multiple operating systems or you are installing and maintaining different hardware via different OS there is a high chance that you have multiple USB sticks with different operating systems on them.
Now the problem with that is that there are probably too many unlabeled sticks around or you do not have enough so you keep making system USBs depending on which one you might need.
Ventoy solves all of these problems by letting you have as many operating systems images as your USB has capacity. The only thing you need to do is get the software here: https://www.ventoy.net/en/index.html and make a USB with it, then you can freely just copy your ISO images onto the USB and once it is inserted into the computer you will be given a menu to choose which one you would like to start with, simple as that.
DuckDuckGo has risen in the public eye as a private search engine offering searches without tracking. A less known fact about DuckDuckGo is that they have their own browser, well they have it for the Android platform and it was stated that it is coming for desktops soon.
People were excited for this new browser for a few reasons, one of them being privacy and another that it is built from scratch, not using existing chromium runtime that assured users that privacy is the main focus. Still, lately, things got a little out of control. Duckduckgo is under fire from users since a security researcher has discovered that there is an exception for Microsoft trackers inside Browser.
The main feature of their browser is that it blocks tracking scripts and most online advertising with the goal of preventing servers from collecting data about your online behavior. Of course, tracking protection is never 100% effective since it requires a lot of manual labor from people to add sites and links to blocklists but it was discovered that DuckDuckGo has a defined exception in the browser for Microsoft owned ad networks and tracking scripts giving them free pass even when they are related to privacy compromisation.
Zach Edwards first pointed out the exception in a series of tweets, after noticing DuckDuckGo on iPhone and Android wasn’t blocking LinkedIn and Bing advertisements on Facebook’s Workplace site.
You can capture data within the DuckDuckGo so-called private browser on a website like Facebook's https://t.co/u8W44qvsqF and you'll see that DDG does NOT stop data flows to Microsoft's Linkedin domains or their Bing advertising domains.
DuckDuckGo’s CEO and founder, Gabriel Weinberg, replied with his own series of tweets.
Most of our other protections also apply to MSFT-owned properties as well. This is just about non-DuckDuckGo and non-Microsoft sites, where our search syndication agreement prevents us from stopping Microsoft-owned scripts from loading, though we can still apply protections post-load (like 3rd party cookie blocking). We are also working to change that.
DuckDuckGo says it uses over 400 sources for search engine results, including the company’s own web crawler, but typical link results are sourced most commonly from Bing. According to Weinberg, DuckDuckGo’s ability to use Bing search results depends on a carved-out exception for Microsoft’s ads in the mobile browser. A representative from DuckDuckGo told that third-party cookies from Microsoft services are still blocked.
Of course, the main aim and campaign of DUckDuckGo's rise was private search and private browsing so this kind of news did not go well among long supporters. The latest statement from them is as follows:
We have always been extremely careful to never promise anonymity when browsing, because that frankly isn’t possible given how quickly trackers change how they work to evade protections and the tools we currently offer. When most other browsers on the market talk about tracking protection, they are usually referring to 3rd-party cookie protection and fingerprinting protection, and our browsers for iOS, Android, and our new Mac beta, impose these restrictions on third-party tracking scripts, including those from Microsoft.
What we’re talking about here is an above-and-beyond protection that most browsers don’t even attempt to do — that is, blocking third-party tracking scripts before they load on 3rd party websites. Because we’re doing this where we can, users are still getting significantly more privacy protection with DuckDuckGo than they would using Safari, Firefox and other browsers. This blog post we published gets into the real benefits users enjoy from this approach, like faster load times (46% average decrease) and less data transferred (34% average decrease). Our goal has always been to provide the most privacy we can in one download, by default without any complicated settings.
This is a typical MS Outlook error code. This error message may prevent you from sending and receiving emails via your Outlook account. The error message is displayed in the following format:
"An unknown error has occurred. 0x80040600"
If this is the primary source of your communication in the office, then this error can cause you a great deal of inconvenience as it may prevent you from running important business errands via your Outlook account efficiently.
Therefore, when you experience the 0x80040600 error on your PC, it is advisable to fix it immediately.
Solution
Error Causes
This error code is triggered due to multiple reasons. These include but are not limited to:
PST (Personal Storage Table) file reaches its file size limit
PST file corruption
Viral infection
Incorrect Windows registry settings
Improper shutdown of Outlook
This error code can lower your office productivity as you may be unable to send and receive emails on your Outlook account. Also, you may get locked out of your account and be unable to view your calendar entries and open email attachments saved previously in your account.
Further Information and Manual Repair
To resolve the error on your PC, you don’t have to wait for the network personnel to fix it or be a computer expert. Here is a list of easy and effective DIY methods to help you fix this error code right away.
Method 1: Download a PST File Repair
If the error occurs because your PST file has reached it maximum limit which is normally 2 GB or because of PST file corruption, then it is advisable to download a PST file repair tool. After downloading it, simply run it on your PC. This tool will immediately fix the damaged PST file and file the issue.
Method 2: Download an Antivirus
Deadly viruses like Trojans and spyware can penetrate into your PC if through downloads and opening phishing emails. Therefore, to remove such viruses it is important to install an antivirus and scan your entire PC.
Method 3: Install Restoro.
If the problem is associated with incorrect Windows registry settings or viral infection, it is advisable to download Restoro.
This software is multi-functional deployed with 6 different and powerful utilities including an antivirus, a registry cleaner, and a system optimizer to name a few.
The registry cleaner repairs the registry corrects the settings and fixes the damaged files.
The antivirus on the other hand simultaneously removes all types of viruses including Trojans, spyware, malware, and adware on the system. While the system optimizer feature ensures the PC performance and speed are not compromised during the scanning and cleanup process.
This software is safe, efficient, and compatible with all Windows versions. It has a user-friendly interface and simple navigations which makes it quite easy for all levels of users including novice and intermediate to operate.
Click here to download Restoro and resolve the 0x80040600 error code on your PC today!
If you encounter a Blue Screen error that points to the Wdf01000.sys file, then this post might be of help. Wdf01000.sys is a file related to the Windows Driver Framework which is the one that manages the system drivers. So if this file ends up being corrupted, the drivers would start to cause trouble in the system which would lead to a Blue Screen of Death error eventually. There are lots of error descriptions that are associated with the Wdf01000.sys file such as:
DRIVER_IRQL_NOT_LESS_OR_EQUAL
System_Thread_Exception_Not_Handled
Page_Fault_In_Nonpaged_Area
System_Service_Exception
Kmode_Exception_Not_Handled
DRIVER_VERIFIER_DETECTED_VIOLATION
Although the troubleshooting steps you must take depends on the kind of BSOD error you are getting, there are a couple of options you can try to resolve the Blue Screen errors related to the Wdf01000.sys file. Refer to the options given below.
Option 1 – Try running the DISM tool
You can try running the Deployment Imaging and Servicing Management or DISM tool to fix the Wdf01000.sys Blue Screen error. Using this built-in tool, you have various options such as the “/ScanHealth”, “/CheckHealth”, and “/RestoreHealth”.
Open the Command Prompt with admin privileges.
Then type in the following commands and make sure to hit Enter right after you type each one of them:
Dism /Online /Cleanup-Image /CheckHealth
Dism /Online /Cleanup-Image /ScanHealth
exe /Online /Cleanup-image /Restorehealth
Do not close the window if the process takes a while as it will probably take a few minutes to finish.
Option 2 – Try to update or rollback your device drivers
If the first option didn’t work for you, then it’s time to either update or roll back the device drivers. It is most likely that after you updated your Windows computer that your driver also needs a refresh. On the other hand, if you have just updated your device drivers then you need to roll back the drivers to their previous versions. Whichever applies to you, refer to the steps below.
Open the Devices Manager from the Win X Menu.
Then locate the device drivers and right-click on them to open the Properties.
After that, switch to the Driver tab and click on the Uninstall Device button.
Follow the screen option to completely uninstall it.
Finally, restart your computer. It will just reinstall the device drivers automatically.
Note: You can install a dedicated driver on your computer in case you have it or you could also look for it directly from the website of the manufacturer.
Option 3 – Use the Driver Verifier Manager
The Driver Verifier Manager is another tool in Windows that could help you fix driver-related issues. And so if you want to fix the Wdf01000.sys Blue Screen error, you need to use the Driver Verifier Manager:
Type in the keyword “Verifier” in the Cortana search box to search for Verifier in Windows 10.
After that, select the option “Create custom settings”.
Make sure that you have checked everything except the options “DDI compliance checking” and “Randomized low resources simulation”.
Next, select the option “Select driver names from a list” option.
Afterward, you have to select all the drivers from any unofficial or third-party provider. To simply put it, you have to select all the drivers that are not supplied by Microsoft.
Then click on the Finish button.
Open Command Prompt as administrator and execute this command – verifier /querysettings
The command you just executed will display the Driver Verifier settings so if you see any of the flags enabled boot your Windows 10 PC into Safe Mode.
Open the Command Prompt as admin again and run this command – verifier /reset
The command will reset the Driver Verifier. Once the process is done, restart your PC and check.
Option 4 – Run the System File Checker Scan
System File Checker or SFC is a built-in command utility that helps in restoring corrupted files as well as missing files. It replaces bad and corrupted system files to good system files. To run the SFC command, follow the steps given below.
Tap Win + R to launch Run.
Type in cmd in the field and tap Enter.
After opening Command Prompt, type in sfc /scannow
The command will start a system scan which will take a few whiles before it finishes. Once it’s done, you could get the following results:
Windows Resource Protection did not find any integrity violations.
Windows Resource Protection found corrupt files and successfully repaired them.
Windows Resource Protection found corrupt files but was unable to fix some of them.
Reboot your computer.
Option 5 – Run the Blue Screen Troubleshooter
The Blue Screen troubleshooter is a built-in tool in Windows 10 that helps users in fixing BSOD errors like Wdf01000.sys. It can be found on the Settings Troubleshooters page. To use it, refer to these steps:
Tap the Win + I keys to open the Settings panel.
Then go to Update & Security > Troubleshoot.
there, look for the option called “Blue Screen” on your right-hand side and then click the “Run the troubleshooter” button to run the Blue Screen Troubleshooter and then follow the next on-screen options. Note that you might have to boot your PC into Safe Mode.
Recently Logitech has released a new line of ergonomic mouse products on market, strangely shaped and lifted on a vertical axis Logitech claims that these devices will fix your issues and ease your hand pains for prolonged use of the computer.
The first time I saw this mouse I was not really impressed with its looks and somehow I thought it will not feel good. This all changed when I actually started using it, surprisingly altho strange in looks it does feel much more natural and much less stressful on hand. Also, it felt like I have used it before, personally, I did not need any adjustment period in order to use it fully.
All of that being said I will admit that using it for gaming is still not an option for me, someone might find it ok, especially if they play some games that do not need to be responsive like strategies or similar but for RTS and FPS I will still stick to the typically shaped mouse. This might be just a habit for me but somehow I feel more responsive with the typical mouse, but for anything else, this is the mouse that will keep your hands stress-free.
Now in order to get the mouse to be really recommended it needs to have some good technical specifications as well, looks are not all. The less important detail is that the mouse comes in 3 different colors: Black, white and pink, and its technical specifications are:
Specs & Details
Dimensions
Height: 71 mmWidth: 70 mmDepth: 108 mmWeight: 125 g
Technical Specifications
Sensor technology
Sensor type: Logitech Advanced Optical Tracking
Dpi range: 400-4000 dpi (Fully adjustable with 100DPI increments)
Nominal value: 1000 dpi
Buttons
Number of buttons: 6 (Left/Right-click, Back/Forward, Middle button, Scroll-wheel with a middle click)
Battery
Battery type: 1x AA battery (included)
Battery life: up to 24- months Battery life may vary based on user and computing conditions.
Connection type support
Logi Bolt USB receiver (included)
Bluetooth® Low Energy Technology
Wireless range
10-m wireless range
Personally, I would recommend this mouse for anyone who does work in front of the computer during the whole workday since it really does loosen grip and strain on hands.
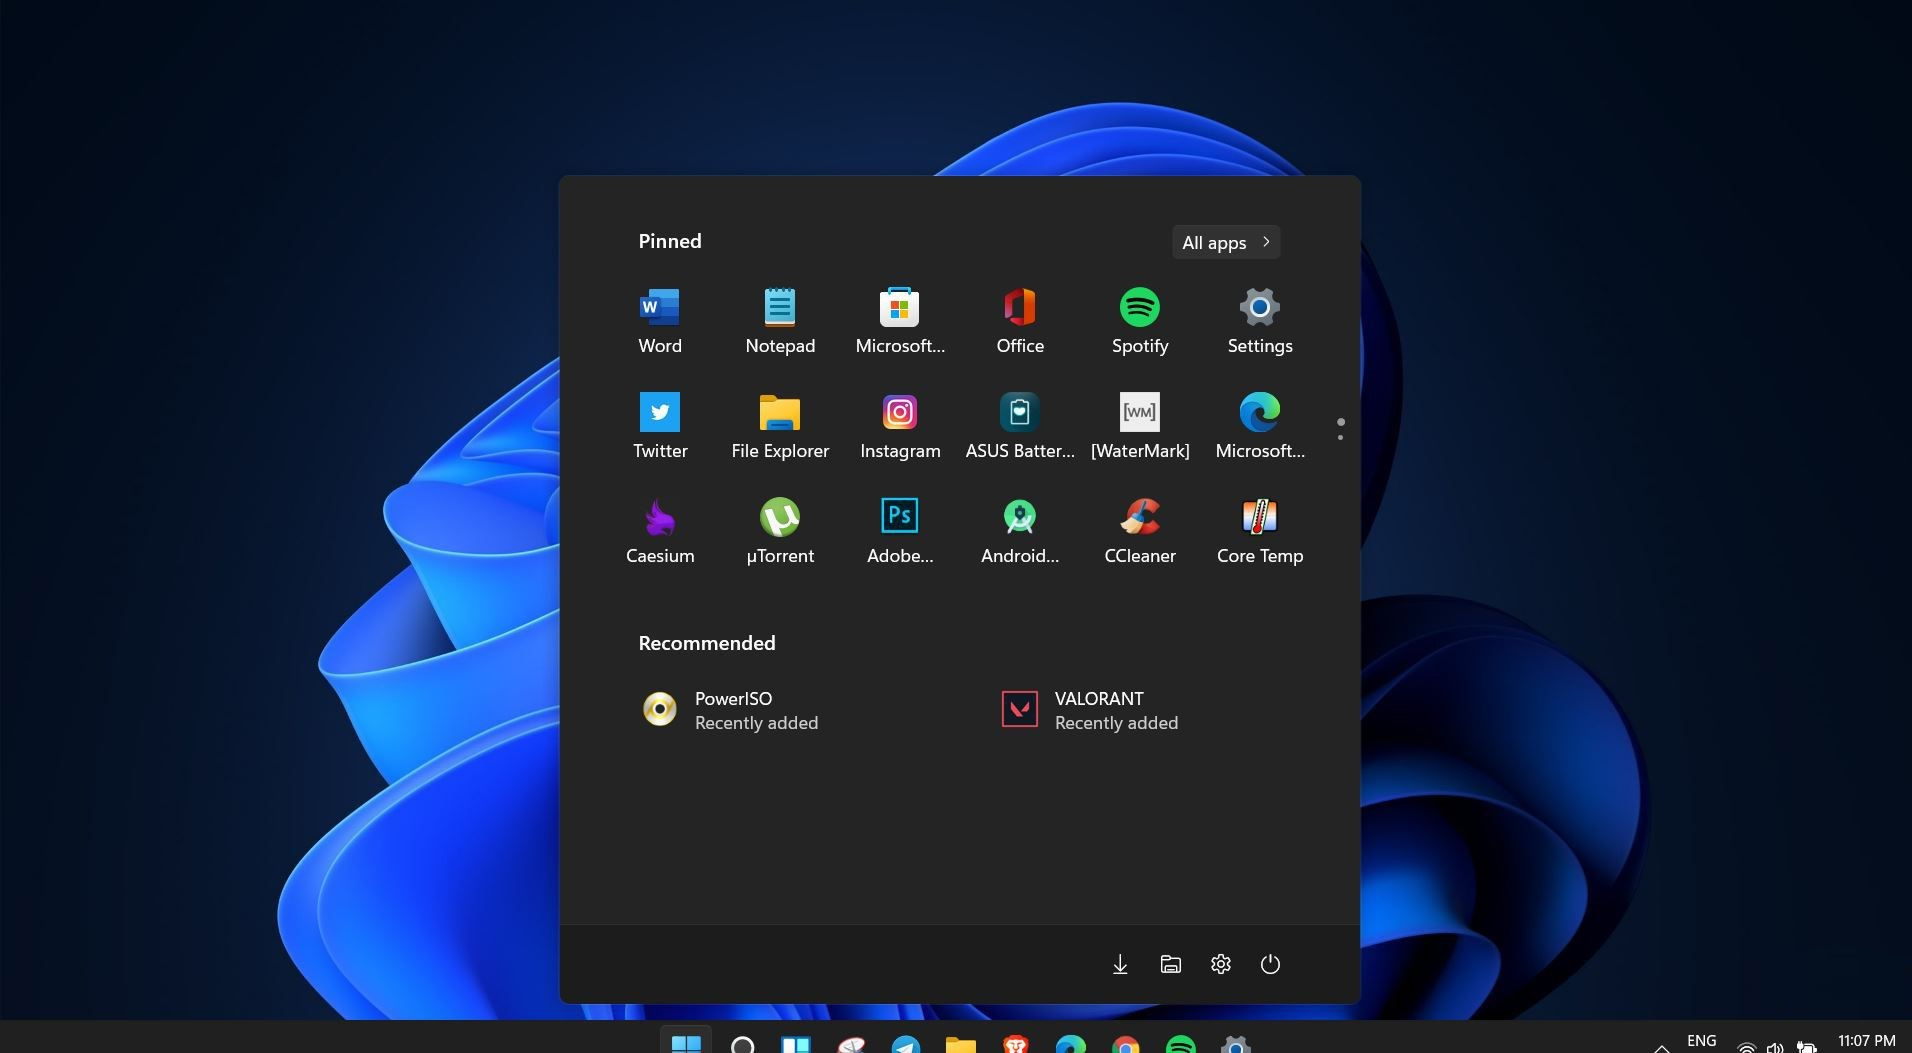
Windows 11 is coming soon, from its typical view and color scheme, Windows 11 will natively support dark mode.
The dark mode is very popular in many applications today, some large companies like Adobe, Autodesk, and many more have already adopted a dark color scheme for their software so it is logical for others to follow and Microsoft is aboard for it.
The dark mode itself has its benefits, for people who work on computer for longer period of time dark mode inside applications will throw less white and blue light on their eyes making workhours easier and pleasant on them.
As a person who does indeed spend a lot of time in front of the screen, I would advise you to switch to dark mode regardless of the time that you spend with a computer, your eyes will be grateful.
Switching to Dark mode in Windows 11
Open Windows 11 Settings by pressing ⊞ WINDOWS + I
Click on Personalization on the left sidebar
On the right side click on Color
In color options click on the drop-down menu right next to Choose your color
Select Dark
Your choice will be applied right away and you can safely close settings.
Can graphic cards wear out over a longer period of time? Recent studies and experience from crypto miners say no but they can die due to different reasons like improper use, low cleaning habits, factory mistakes, etc.
Many gamers and people who use GPU intense applications tend to think that some glitches and hiccups in the software are a sign that graphic card is dying out and that it is time to be replaced. Altho this could be true in many cases these kinds of behavior are mostly due to old drivers and software issues.
Older cards can produce these kinds of results due to their old age and new software is often more demanding than these cards can handle.
So in order to diagnose and be sure that your GPU is indeed dying out lookout for these signs.
The Main Signs of a Dying GPU:
The Computer Crashes and Won’t Reboot
If your computer shutdown while working in the graphic application or while playing the game and the monitor loses signal there is a high chance the graphic card is soon going to be gone. Some motherboards have hardware detection failure and can signal immediate fail. If when turning your computer ON you are greeted with a blue screen with the message that the signal can not be found or you do not have picture at all it is most likely that GPU has failed.
Graphic Glitches While Playing Games
If you are playing the game and all of sudden you get off-color pixels, screen flickering, strange graphic behaviors, random artifacts, or similar and that keeps repeating in multiple games it is likely that GPU days are coming to an end.
Abnormal Fan Noise or Performance
Fans are an essential part of cooling the GPU and over time if they are intensively used they could wear out and need replacing. If however you have not noticed and have not replaced the fans card can sustain overheating damage.
Many cards have cooling fans that are designed to spin at a higher RPM only when the GPU is under load. It prevents bearings in the fans from dying prematurely, so don’t worry if one of your fans is inactive while you are browsing the web.
However, when you play games that utilize software that your card isn’t built to support, the bearings in the fans wear out faster. Once the fans stop working under load, the graphics card can quickly die.
How to Diagnose a Dying Graphics Card
Presented next are essential steps in order to recognize a dying graphic card.
Check Motherboard Error Codes
Many motherboards today completely shut down a component that is no longer working. If your graphics card has died completely, this may be one of the easiest ways to tell. If your motherboard doesn’t have display codes, you can try testing the card in a new system.
Open the computer case: Use your screwdriver to remove screws on the side panel and gently slide it back.
Locate the error code display on your motherboard: If you have a motherboard with error codes, they should appear near an outer corner.
Try to reboot your computer: Record each error number you see after you boot your computer.
Consult the motherboard manufacturer manual for error codes: Open the manual and locate the list for your error codes. If the code matches a graphics processing unit error, your video card could have died.
Check Hardware for Damage or Debris
A graphics card that has damage or debris on the physical parts might quickly overheat and kill the card.
Remove the screws holding the GPU in place: There are typically one or two screws holding the card to a bracket on the case.
Unhook the power cords from the GPU and pull the release tab: Remove the power cords from your GPU by pushing in their tabs and gently rocking them out. Once you remove each cord, gently push or pull up on the release tab near the motherboard.
Inspect the GPU for damage/debris: Check the card for any dirt or debris buildup and clean it out with a Q-tip. You can replace broken fan pieces from the manufacturer.
Test Your GPU Under Load
Download GPU stress-testing and heat-monitoring software.
With the card installed, run a stress test.
As you are running the stress test, run heat-monitoring software: With the stress test running, check your heat-monitoring software for GPU overheating. Any reading over 80 degrees Celsius is too hot.
Check device manager for outdated drivers: If your GPU is clean, but still running too hot, your software drivers are not installed correctly. To check, type in “device manager” at the bottom of your desktop and click on Device Manager. Find your display adapter and right-click on it to see if it’s working. If your drivers are not working correctly, it is indicated here usually. However, the driver may appear to be functioning even if it says otherwise in the properties.
Keep your graphic card drivers updated
When you don’t have the right driver installed, graphics cards can quickly burn up, and their cooling components may fail faster. That’s why you should always keep drivers updated for each new game you install or play. Older games may also release new software patches, so your GPU drivers should be updated accordingly.
Windows 10 is has a lot of features that help a user in optimizing a computer. So when the operating system encounters a problem, it is able to provide users with proper resources to get the problem fixed. There are even times when a user is not notified and an issue is either being repaired or dodged in the background. This kind of feature is known as the Diagnosis of the Automatic Repair feature that starts when your computer is booting. In such times, you will either see the “Diagnosing your PC” or “Preparing Automatic Repair” message on your screen.
Although this feature is useful and has proven to be effective, some users reported that the process gets stuck. If you experience the same problem, read on as this post will guide you on what to do to fix it but before you start troubleshooting the problem, you might want to perform a Hard Boot first. All you have to do is to power down your computer, remove the battery and the AC adapter and then reconnect them. After that, tap and hold the power button for about 20 seconds and see if your computer boots up properly. If it doesn’t, follow the given fixes below.
Option 1 – Try disabling the automatic Startup Repair
The Automatic Startup Repair window will automatically open during boot when you have some system driver-related problem. So if you think that this is where the problem lies, you can try to disable the automatic Startup Repair.
Click on Troubleshoot and go to the Advanced options.
After that, select Command Prompt and execute the following command:
bcdedit /set recoveryenabled NO
Restart your computer after that and then check.
Option 2 – Run the System File Checker
System File Checker or SFC is a built-in command utility that helps in restoring corrupted files as well as missing files. It replaces bad and corrupted system files to good system files that might be the cause why you’re facing this problem. To run the SFC command, follow the steps given below.
Type “cmd” in the Start search and then right-click on the appropriate search result.
Next, select “Run as administrator” to open Command Prompt with admin privileges.
After opening Command Prompt, type in sfc /scannow
The command will start a system scan which will take a few whiles before it finishes. Once it’s done, you could get the following results:
Windows Resource Protection did not find any integrity violations.
Windows Resource Protection found corrupt files and successfully repaired them.
Windows Resource Protection found corrupt files but was unable to fix some of them.
Now restart your computer and see if the problem is fixed or not.
Option 3 – Run CHKDSK to check your disk for errors
When it comes to some issues concerning the hard drive or removable devices, there is a utility in Windows that might help which is called “chkdsk”. This error check utility can help with several issues in the system.
Tap the Win + S keys to open the Search box.
Then type “command prompt” in the field and from the search results that appear, right-click on Command Prompt and select “Run as administrator”.
After opening an elevated command prompt, copy and paste the following command and hit Enter:
chkdsk /r /f
Now if you are prompted to run CHKDSK after your reboot your computer, just tap Y and reboot your PC.
If CHKDSK is not able to find any errors, tap the Win + E keys and navigate the access window. From there, right-click on the concerned drive and click on Properties.
After opening Properties, click on the tab Tools and then click on the “Check” button under the Error-checking section.
Wait until the process is completed and then restart your computer.
Once your computer has restarted, try accessing the file and check if the error persists.
Option 4 – Run the DISM tool
The next thing you can do is run the DISM tool. This tool is known to repair potentially corrupted files in your system as having them could also system issues like your computer getting stuck in the “Diagnosing your PC” or “Preparing Automatic Repair” screen.
Tap the Win + X keys and click on the “Command Prompt (Admin)” option.
After that, input each one of the commands listed below sequentially to execute them:
Dism /Online /Cleanup-Image /CheckHealth
Dism /Online /Cleanup-Image /ScanHealth
Dism /Online /Cleanup-Image /RestoreHealth
Once you’ve executed the commands given above, restart your computer and check if the problem is now fixed.
Option 5 – Try to use installation media to boot and repair your computer
Another thing you can try to resolve the issue is to use the Windows installation bootable media so you can boot and repair the operating system. To use it, follow these steps:
You need to first create an installation media which has the dame version of the operating system installed in your computer.
After that, once you reach the Install Windows screen, click on the “Repair your computer” link.
Wait until the repair is completed and then shut down your computer
Now once your computer has restarted, check if it can now boot properly.
If you suddenly encounter a Blue Screen error that points out to either the mfewfpk.sys and epfwwfp.sys files, then this post might help. Both of these files are created by third-party software. The mfewfpk.sys file is created by the McAfee security software while the epfwwfp.sys is created by the ESET Antivirus. These files are residual files and sometimes it blocks upgrading Windows 10.
Aside from blocking Windows 10 upgrade/update, these files can also cause a Blue Screen error after an upgrade which leaves your Windows 10 computer useless. When you get a Blue Screen error caused by any of these files, you will see an accompanying error message that states, “DRIVER IRQL NOT LESS OR EQUAL”. To fix this Blue Screen error, you can check out the suggestions laid out below but before you do that, you need to create a System Restore point first as it can help you undo any unwanted changes. In addition, make sure to also boot your computer into Safe Mode with Networking before you troubleshoot.
Option 1 – Try to remove the epfwwfp.sys file
You can try to remove the epfwwfp.sys file using Command Prompt. To do so, refer to the following steps:
Right-click on the Start button and click on Command Prompt (Admin) from the menu to open Command Prompt with admin privileges.
Next, type the following command and hit Enter to delete the epfwwfp.sys file:
DEL /F /S /Q /A “%systemroot%System32driversepfwwfp.sys”
After the scan is completed, restart your computer and see if it fixed the Blue Screen error.
Note: You can also use the ESET AV Remover tool to uninstall Eset security software to remove the epfwwfp.sys file.
Option 2 – Try to remove the mfewfpk.sys file
The same with the first option, you can remove the mfewfpk.sys file using CMD.
First, right-click on the Start button and click on Command Prompt (Admin) from the menu to open Command Prompt with admin privileges.
After, type the following command and hit Enter to delete the epfwwfp.sys file:
DEL /F /S /Q /A “%systemroot%System32driversmfewfpk.sys”
Once the scan is completed, restart your computer and see if it fixed the Stop error.
Note: You also have the option to remove the mfewfpk.sys file using McAfee Product Removal tool to uninstall the McAfee security software. All you have to do is download the McAfee Product Removal tool and run it and then follow the onscreen instructions to install it. Once it is installed, click on Next. After you select the radio button to agree to the terms of use, click on Next once again. Finally, restart your computer and check if it is able to resolve the problem or not.
Option 3 – Run the Blue Screen Troubleshooter
Troubleshooting Blue Screen of Death errors wouldn’t be complete without the Blue Screen troubleshooter. As you know, it is a built-in tool in Windows 10 that helps users in fixing BSOD errors. It can be found on the Settings Troubleshooters page. To use it, refer to these steps:
Tap the Win + I keys to open the Settings panel.
Then go to Update & Security > Troubleshoot.
From there, look for the option called “Blue Screen” on your right-hand side and then click the “Run the troubleshooter” button to run the Blue Screen Troubleshooter and then follow the next on-screen options. Note that you might have to boot your PC into Safe Mode.
Option 4 – Try running the DISM tool
You can try running the Deployment Imaging and Servicing Management or DISM tool to fix the Blue Screen error. Using this built-in tool, you have various options such as the “/ScanHealth”, “/CheckHealth”, and “/RestoreHealth”.
Open the Command Prompt with admin privileges.
Then type in the following commands and make sure to hit Enter right after you type each one of them:
Dism /Online /Cleanup-Image /CheckHealth
Dism /Online /Cleanup-Image /ScanHealth
exe /Online /Cleanup-image /Restorehealth
Do not close the window if the process takes a while as it will probably take a few minutes to finish.


 Windows 11 is coming soon, from its typical view and color scheme, Windows 11 will natively support dark mode.
The dark mode is very popular in many applications today, some large companies like Adobe, Autodesk, and many more have already adopted a dark color scheme for their software so it is logical for others to follow and Microsoft is aboard for it.
The dark mode itself has its benefits, for people who work on computer for longer period of time dark mode inside applications will throw less white and blue light on their eyes making workhours easier and pleasant on them.
As a person who does indeed spend a lot of time in front of the screen, I would advise you to switch to dark mode regardless of the time that you spend with a computer, your eyes will be grateful.
Windows 11 is coming soon, from its typical view and color scheme, Windows 11 will natively support dark mode.
The dark mode is very popular in many applications today, some large companies like Adobe, Autodesk, and many more have already adopted a dark color scheme for their software so it is logical for others to follow and Microsoft is aboard for it.
The dark mode itself has its benefits, for people who work on computer for longer period of time dark mode inside applications will throw less white and blue light on their eyes making workhours easier and pleasant on them.
As a person who does indeed spend a lot of time in front of the screen, I would advise you to switch to dark mode regardless of the time that you spend with a computer, your eyes will be grateful.