If you encounter an error saying, “Boot Device Not Found” when you turn on your Windows 10 computer, then you’ve come to the right place as this post will guide you on how you can fix this problem. Apart from the error message, you will also see a message that states, “Please install an operating system on your hard disk, Hard Disk<xxx>”. You will then be asked to tap the F2 key to initiate the System Diagnostics.
If you install the Windows operating system, it becomes the boot device, and when your computer boots, the UEFI or the BIOS looks for the operating installed on your drive and continues the process. So when you encounter the “Boot Device Not Found” error, this means that the UEFI or the BIOS wasn’t able to locate the drive where it can boot.
There are several suggestions you can check out to resolve this error. You can try checking the connection with your boot drive or change the boot order. You can also fix the Boot Record from Recovery and see if the primary partition is active or not. But before you troubleshoot the problem, make sure that you have a bootable Windows USB drive ready since two of the options provided below will require you to boot into the Advanced Recovery mode. Once you have this covered, proceed to each one of the following options.
Option 1 – Try checking the connection with the boot drive
If you have a custom computer that comes with a cabinet, you might want to open it and remove any connected power supply, and then check the wires. As you know, drives are connected with the motherboard using a cable. So all you have to do is check if both ends are connected properly and make sure that the connection is not loose. You could also try to unplug the cable and plug it back in.
Option 2 – Try changing the boot order
You might also want to try changing the boot order of your computer. Each time a computer boots, the BIOS or the UEFI follows a boot order. It is the one that tells where to first look for the boot drive and if for some reason, a USB is connected to your computer and the first boot device found in the USB, then you have resolved the problem. All you have to do is to remove the USB device and boot or go into the BIOS and change the boot order yourself.
Option 3 – Try to rebuild the BCD files
The next thing you can do to resolve the issue is to Rebuild Boot Configuration Data or BCD files.
You can start by booting into the installation environment for Windows 10 from an installation media.
After that, click on Repair your computer and on the blue screen, select Troubleshoot and then select the Advanced options menu.
From there, select Command Prompt and once you open it, enter each one of the commands given below by sequence.
bootrec /FixMbr
bootrec /FixBoot
bootrec /ScanOS
bootrec /RebuildBcd
Once you’re done executing the commands given above, type “exit” to close the Command Prompt window and then restart your computer and see if it fixed the “Boot Device Not Found” error.
Option 4 – Try setting the System Partition to Active
Like the first given option, you also have to make sure that you have a bootable Windows 10 USB drive before you proceed to set the System Partition to Active. Once you have it covered, refer to these steps:
Boot your computer using the bootable Windows 10 USB drive.
Next, click Next when you get to the Welcome Screen.
Then click on Repair your computer located at the bottom left part of the window and select Troubleshoot > Advanced Options > Command Prompt.
After opening Command Prompt, type the following command and hit Enter to start the Diskpart utility. It is a command line-based utility just like Command Prompt but has a UAC prompt once you provoke it. So if you encounter a UAC prompt, just click on Yes to proceed.
diskpart
Now type the following command:
list disk
From there, select your primary disk by typing the following command:
select disk number
After that, list all the partitions on the selected disk by entering the following command:
list partition
The command you just entered will list all the partitions created on your PC including both types of partitions that are visible to a normal user in the File Explorer as well as the ones created by Windows 10 by default which helps it in storing the boot files and other important system files.
Now type the following command to select the partition that is usually around 100 MB in size:
select partition number
Finally, type the following command to mark the partition active:
active
Then type the “exit” command to exit the disk part utility.
Once it’s done, the primary drive should now be active and you should now be able to boot into your computer without the “Boot Device Not Found” error.
Google's Pixel smartphone is one if not the best Android smartphone on the market. It regularly gets updates and Google is really trying to keep it as a top choice for Android smartphone users. One of the new things that Google has released for its smartphone series is a new emergency dialer.
With an emergency dialer, you will be able to quickly access local contact information for police, fire, and medical services. This dialer is able to contact before mentioned services even when the phone is locked and when you are traveling.
The idea is to quickly access the default emergency number no matter in which country you are currently in, service will find the appropriate number and set it as default so if you need it there is no delay in searching for the appropriate number and dialing it.
Once the service is enabled on the device you can swipe up and tap Emergency call without unlocking your phone or you can press and hold the power button for five seconds and tap Emergency.
If you have a Pixel smartphone go to the Google support page and follow instructions on how to enable this service. It costs nothing and it could potentially even save your life.
If you continuously encountered the “VirtualBox FATAL: No bootable medium found, System halted” error when you try to install Windows 10 in VirtualBox, read on as this post will give you some potential fixes to resolve the problem – you will be guided on how to choose the ISO image to fix this error in VirtualBox. This kind of error is a very common one especially if you have a corrupted ISO file or if you have not selected an ISO file for your virtual machine.
Like pointed out, this error pops up when you have a corrupted ISO file or if the ISO file is not attached to the virtual machine. You have to select the ISO file while you create the virtual hard disk, else, you will most likely face this problem, and to fix it, you need to download fresh Windows ISO, create a new IDE Controller, assign Windows ISO to the IDE Controller and then boot your virtual machine. For detailed steps, follow the instructions below but before you start, make sure that you have a valid and uncorrupted Windows ISO.
Step 1: First, you need to open the VirtualBox program on your computer and select the virtual machine.
Step 2: Next, click on the Settings button or you can also right-click on the virtual machine and select Settings from the context menu.
Step 3: Once you’re in the Settings panel, go to the Storage section and from there, create a Controller: IDE.
Step 4: To create a Controller: IDE, click the Add new storage controller icon and select the “Add IDE Controller” option.
Step 5: After that, click the Add optical drive icon and click on the Choose disk button. You will then see all the attached and non-attached ISO files. However, you have to add the new ISO file that you just downloaded.
Step 6: To add the new ISO file, click the Add button and select the ISO file and then select the .iso file from the Non Attached section.
Step 7: Now click the Choose button and afterward, make a checkmark in the Live CD/DVD checkbox and then select the IDE Primary Master from the drop-down menu of the Optical Drive.
Step 8: Once you’re done, save the changes made and try booting into your virtual machine again.
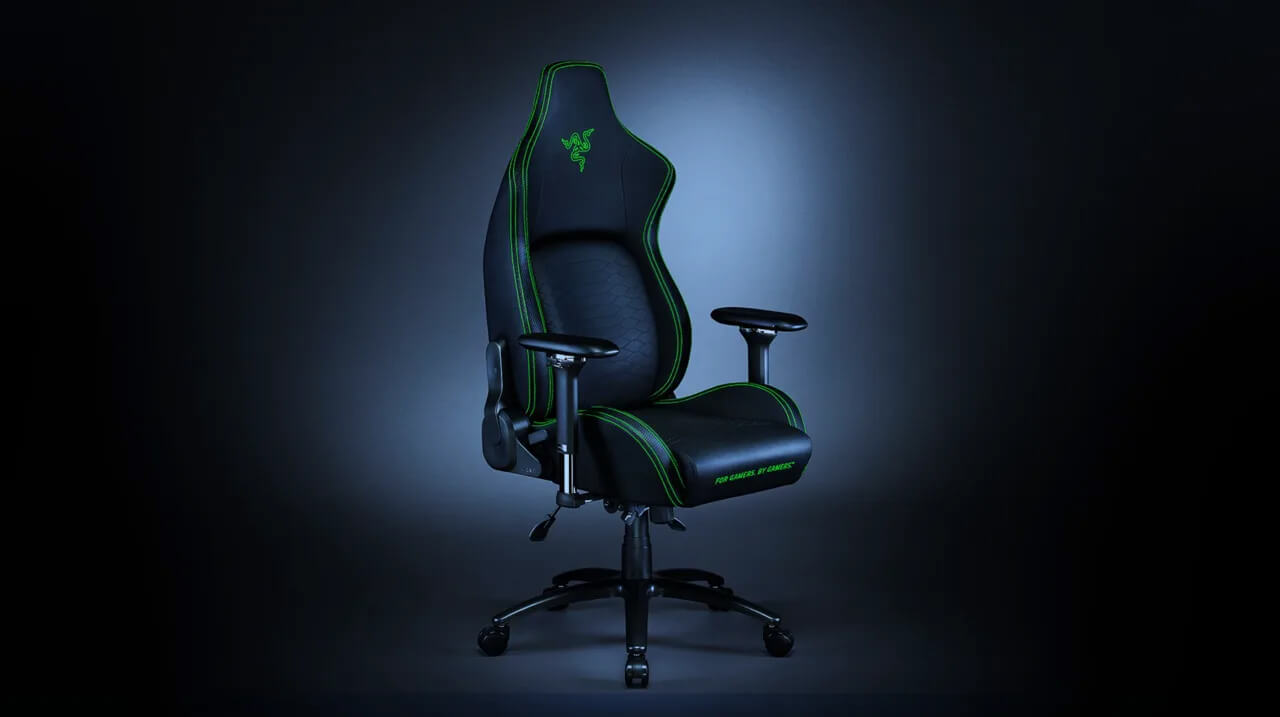
It seems that last few days we were riding some Razer bandwagon but rest assured that we are not sponsored by them in any way, truth is that simply they come up with some interesting accessories which I believe are worth covering.
Gaming Chair itself comes in two colors, fully black and green black combination and it is not really an entry-level chair if we are talking about price. The chair itself is around 600USD depending on the distributor and considering that price range it is placed in more top cream of gaming chairs but it is worth every dime.
Iskur Specifications
Iskur is made of a steel frame with a reinforced plywood lumbar support frame for added weight tolerance. Frame and lumbar support are surrounded with memory foam and all of that is wrapped in cotton and polyester layer which is again wrapped in multi-layer synthetic leather making the chair very durable for long hours of daily use.
The chair also comes with a memory foam head cushion which is detachable and removable if you do not wish to use it. On the Razer website among specifications, it stands that the chair is best suited for persons from 5’6” – 6’2” (170 – 190cm) height and up to 299lbs (136kg).
Features
The chair has, of course, height adjustment as any gaming chair and surprisingly it has great control for the armrest. The armrest can be adjusted in 4 different ways: up & down, left & right, forward & backward, and inward & outward. The backrest can be also tilted up to 26 degrees angle.
All of these features are great and good but there is one more feature that really makes this chair stand out from rest and it is Lumbar support. Iskur has an adjustable lumbar support system on the lower part of the backrest. With your lumbar support secured, you can then make the necessary tweaks to optimize the rest of your posture using the Razer Iskur’s adjustable height, backrest, and armrests.
Conclusion
Razer Iskur is neither cheapest nor perhaps the best gaming chair you can buy, but it is a really good one. It is well manufactured and made to feel and look like a premium product that actually it is.
If your Windows PC encounters an error, it will display a Blue Screen of Death or BSOD error which usually comes up for a fraction of second and creates some logs or Dumps Files as what other user prefers to call it and then boots your PC suddenly. This process usually takes place quickly that most users find it hard to get the error code and won’t probably be able to check what really went wrong with their PCs. This is where the dump files come in. They are stored internally in your computer and can only be accessed by an administrator. They are classified into 4 main types and in Windows 10 they are either:
Complete Memory Dump
Kernel Memory Dump
Small Memory Dump (256 KB)
Active Memory Dumps
Dump Files are useful as they could help you in resolving the problem and so you need to configure your Windows 10 PC to create them but first, you need to make a system restore point. This is essential as you are about to modify some system files as well as critical Windows 10 settings. There are two ways you can create Dump files – first is by modifying the settings in the Startup and Recovery and lastly is via the WMIC command line. Refer to the instructions prepared below to be guided on how you can create Dump files after any BSOD error using these options.
Option 1 – via Startup and Recovery
Type in “control panel” in the Cortana Search box and then click on Control Panel from the search results to open it.
After opening Control Panel, you need to make sure that you view the contents by their Category then click on the header link which is labeled “System and Security” or you could also right-click on the This PC icon and then click on Properties.
Next, select the Advanced system settings from the left panel. Once you do, a new and small window will pop up.
Under the newly opened window, look for the section called Startup and Recovery and then click on the Settings button.
And from the System Failure section, you can choose any option from the drop-down for Write debugging information such as:
None – this means that there is no dump file created by Windows
Small Memory Dump – this means that Windows will create a Minidump file on BSOD
Complete Memory Dump – this means that Windows will create a Complete Memory Dump file on BSOD
Automatic Memory Dump – this means that Windows will create an Automatic Memory Dump file on BSOD
Active Memory Dump – this means that Windows will create an Active Memory Dump file on BSOD
Note: The complete dump needs a page file that is allowed to be the size of the physical memory installed in your PC with a dedicated 1 MB of space for just the page header.
Now once you have selected the most suitable option for you, just click on OK/Apply and then exit.
Restart your PC to successfully apply the changes made.
Option 2 – via the WMIC command line
The first thing you need to do to create Dump files via the WMIC command line is to tap the Win + X keys combination or simply right-click on the Start button and then select the Command Prompt (Admin) option. You could also type in “cmd” in the Cortana search box and then right-click on Command Prompt from the results and select Run as administrator.
After that, type in any of the commands given below depending on your preferences so that your Windows 10 PC will be configured to create Dump Files:
No dump file: wmic RECOVEROS set DebugInfoType = 0
Small Memory Dump: wmic RECOVEROS set DebugInfoType = 3
Kernel Memory Dump: wmic RECOVEROS set DebugInfoType = 2
Complete Memory Dump: wmic RECOVEROS set DebugInfoType = 1
Automatic Memory Dump: wmic RECOVEROS set DebugInfoType = 7
Active Memory Dump: wmic RECOVEROS set DebugInfoType = 1
Note: A complete dump has to have a Page file which is allowed to be the size of the physical memory installed on your PC accompanied by a 1 MB space for just the page header.
Now type in “exit” in the Command Prompt to exit it.
Restart your PC to apply the changes made successfully.
If you find it hard to update Google Chrome to its latest version and each time you try to do so it keeps on failing, worry not for this post will guide you in fixing a list of Google Chrome Update errors. Even though there are a lot of error codes around Chrome, these are only caused by issues with the update.
Here are some of the errors you can encounter when updating Google Chrome:
Update failed: You can encounter this error when the Updates are disabled by the administrator.
Update failed with
Error 3 or 11: When Chrome’s inbuilt updater fails to find the Update server to download the latest version.
Error 4 or 10: This happens while checking for updates with the message “Update check failed to start”
Error 7 or 12: This occurs when the download fails while checking for updates.
Windows OS version is not supported.
Google Chrome may not be able to keep itself updated.
Any other errors that mention that “Update failed”
Since these aforementioned error codes are related to “Update Failure”, then they have common solutions and here they are:
Option 1 – Restart your computer
You need to restart your computer first and then try updating Chrome again. There are times when it’s only a temporary issue that can be fixed by simply restarting your computer.
Option 2 – Try checking antivirus programs, firewall, and parental control settings
If you have antivirus programs, a firewall installed in your computer, as well as parental controls, then any of these could be blocking you to download anything, including the update for Chrome. This is why you have to double-check and make sure that software updates aren’t being blocked by these programs. On the other hand, you can also try running the Network Troubleshooter as it can help you resolve any DNS or connectivity issues. To use it, follow the steps below.
Open the Search bar on your computer and type in “troubleshoot” to open the Troubleshoot settings.
Next, scroll down and select the “Network Adapter” option from the right pane.
Then click on the Run Troubleshooter” button.
After that, your computer will check for any possible errors and will pinpoint the root cause of the problem if possible.
Option 3 – Try to remove Proxy
Removing the Proxy might also help you in fixing the Chrome Update errors. Here’s how you can do it:
Tap the Win + R keys to open the Run dialog box.
Then type “inetcpl.cpl” in the field and hit Enter to pull up the Internet Properties.
After that, go to the Connections tab and select the LAN settings.
From there. Uncheck the “Use a Proxy Server” option for your LAN and then make sure that the “Automatically detect settings” option is checked.
Now click the OK and the Apply buttons.
Restart your PC.
Note: If you are using a third-party proxy service, you have to disable it.
Option 4 – Try to reset Winsock, TCP/IP & Flush DNS cache
Resetting Winsock, TCP/IP, and flushing DNS might help in resolving the Chrome Update errors just follow these steps:
Right-click on the Start button and click on Command Prompt (administrator) so you can pull up an elevated Command Prompt.
After that, execute each one of the commands listed below. And after you typed in one after the other, you have to hit Enter.
netsh winsock reset – type in this command to reset Winsock
netsh int ip reset resettcpip.txt – type in this command to reset TCP/IP
ipconfig /flushdns – type in this command to flush the DNS cache
Next, restart your PC and check if the problem’s fixed.
Option 5 – Try to run the Chrome Cleanup tool
You might want to run Google Chrome’s built-in Malware Scanner & Cleanup tool as it could also help in getting rid of any unwanted ads, pop-ups, and even malware, as well as unusual startup pages, toolbars, and anything else that might overtake the network and could affect the performance of the browser.
Option 6 – Get rid of any conflicting browser extensions
Open Chrome and press Alt + F keys.
Go to More tools and click Extensions to look for any suspicious browser extensions or toolbars.
Click the Recycle bin and select Remove.
Restart Chrome and press Alt + F keys again.
Proceed to On Startup and mark Open a specific page or set of pages.
To check if the browser hijacker is still active, click Set pages, if it is active, overwrite the URL.
Option 7 – Reset Google Chrome
Resetting Chrome can also help you get rid of the error. Resetting Chrome will restore its default settings, disabling all the extensions, add-ons, and themes. Aside from that, the content settings will be reset as well and the cookies, cache, and site data will also be deleted. To reset Chrome, here’s what you have to do:
Open Google Chrome, then tap the Alt + F keys.
After that, click on Settings.
Next, scroll down until you see the Advanced option, once you see it, click on it.
After clicking the Advanced option, go to the “Restore and clean up option and click on the “Restore settings to their original defaults” option to reset Google Chrome.
If you are an iPhone or an iPad user and you sometimes open your email Yahoo Mail account on your phone, then you will most likely experience the MF Message Error Domain: Error 1032.
This error may occur when you access your mail account. The MF Message Error Domain: Error 1032 may prevent you from composing new emails and even stop the inbox from loading.
Solution
Error Causes
The error 1032 can be triggered due to multiple reasons such as:
Overloaded History
Problems with the account log-in credentials
Outdated Yahoo Mail app
Authentication issues
Further Information and Manual Repair
To fix this issue on your iPhone or iPad, here are some methods you can try:
Method 1 - Delink and Re-setup Yahoo Email Account
If the error code 1032 occurs due to problems with the account log-in credentials, then try re-setting up your Yahoo email account.
To do this, go to tap settings mail, contacts, and calendar, then remove your email account. Now repeat the process and provide valid log-in credentials to re-setup your Yahoo email account.
Method 2 - Update Yahoo Mail App
Another reason can be the outdated Yahoo Mail App. If this is the cause, then simply update it to the latest version. To do this, simply download the latest version from the iTunes store and run it. This will hopefully resolve the issue.
Method 3 - Manage App Connections to Resolve Authentication issues
If the error 1032 occurs due to authentication issues then there are possibilities of conflicts between account security settings. The best way to resolve the error in such a situation is to learn how to manage app connections. Here’s how it’s done:
Use your desktop computer to sign in to your Yahoo account. Now click the menu icon and select account info. Enter your account password and sign in again. Now click manage apps and website connections under Sign-in and security section.
A list of all authorized mobile devices and applications will be displayed to you. Remove any existing entries appearing for mobile devices. After this, try logging into your Yahoo account from your iPhone or iPad. You will not receive the error.
Method 4 - Clear History
When the cause of the issue is overloaded history, then the best way to go about it is clearing the clutter in the history. Also clear cache and cookies.
The cache is the location where temporary files are saved for speeding up the file retrieval process. But sometimes it can get corrupt and the iOS may fail to retrieve data from corrupt cache contents.
To clear history and cache, simply tap Settings, Safari, and then clear history, cookies, and data. The process may take some time depending on the cache file size.
In this post, you will be guided on how you can turn on or turn off the Tailored Experiences feature in Windows 10 using three methods – via Settings, Registry Editor, and Group Policy Editor.
The Tailored Experiences feature in Windows 10 helps Microsoft in delivering recommendations about Microsoft Products. The diagnostic data that comes with it allows Microsoft to know about its consumers’ experiences as well as collect feedback. To simply put it, tailored experiences are personalized tips, ads, and recommendations that enhance Microsoft products and services for consumer needs. And when you enable this feature, Windows will collect information from your browser, apps, features, and many more.
After collecting information, it will offer contents that are tailored based on the data gathered on the lock screen of your computer, Windows tips, and other related functions. On the other hand, the diagnostic data is the one that allows Microsoft to get feedback from the customer. So if you’ve noticed some prompts when you use Windows that ask you about the experience, that’s actually a part of the diagnostic data.
A lot of users find this feature useful. However, there are also skeptical ones that don’t share the same sentiments. If you are one of the skeptical ones, you actually have the option to turn this feature off if you do not want Microsoft to show ads, recommendations, and so on. It is also recommended that you enable the Diagnostic Data collection as you can choose to delete any collected data, as well as control the feedback frequency from Automatic to Once a day, or once a week, or to never.
As mentioned, there are three methods you can choose from to either turn on or turn off Tailored Experiences. You can do it via Settings, Registry Editor, and the Group Policy Editor. To get started, follow the options provided below.
Option 1 – via Settings
To turn on or off Tailored Experiences using Settings, refer to these steps:
Go to Settings and here, click on Privacy.
Next, go to Diagnostic and Feedback.
From there, toggle off the control under the Tailored experiences option to turn it off or toggle it on, if you want to turn it on.
Option 2 – via Registry Editor
To turn on or off Tailored Experiences via Registry Editor, follow the steps below.
Tap the Win + R keys to open the Run dialog box and type “Regedit” in the field and then tap Enter to open the Registry Editor.
Next, navigate to this registry path: HKEY_CURRENT_USERSoftwareMicrosoftWindowsCurrentVersionPrivacy
After that, look for the DWORD named “TailoredExperiencesWithDiagnosticDataEnabled” and change its value to 0 if you want to turn it off or 1 if you want to turn it on.
Option 3 – via Group Policy Editor
To turn on or off Tailored Experiences using the Group Policy Editor, here’s what you have to do:
Tap the Win + R keys to open the Run prompt and type “gpedit.msc” in the field and hit Enter to open the Group Policy Editor.
Next, navigate to this policy setting: User ConfigurationAdminstrative TemplatesWindows ComponentsCloud Content
Here, double click on the “Do not use diagnostic data for tailored experiences” option and select Enabled. Once you do that, you will see the following description:
“This policy setting lets you prevent Windows from using diagnostic data to provide tailored experiences to the user. If you enable this policy setting, Windows will not use diagnostic data from this device (this data may include browser, app, and feature usage, depending on the “diagnostic data” setting value) to customize the content shown on the lock screen, Windows tips, Microsoft consumer features, and other related features. If these features are enabled, users will still see recommendations, tips, and offers, but they may be less relevant. If you disable or do not configure this policy setting, Microsoft will use diagnostic data to provide personalized recommendations, tips, and offers to tailor Windows for the user’s needs and make it work better for them. This setting does not control Cortana tailored experiences, since there are separate policies to configure it.”
Disk partitioning is a concept that’s been around for so long, but is still only familiar to few. If done right, it can help get your computer in perfect order.
Today we bring you a simple definition of disk partitioning, its pros and cons, and a quick tip on how to do it properly to reap its full benefit!
Definition and purpose
The simplest way to define disk partitioning would be: it’s exactly what it sounds like. It means taking a hard disk drive and separating it into different segments. These segments are called partitions. You can visualize it as cutting a cake into smaller pieces - not necessarily of the same size, though.
So what is the purpose of these pieces?
Well, when you first get a hard drive, it’s basically just a bunch of unallocated storage space. Until there’s at least one partition, this space is unusable to your operating system. Once you create a partition, your OS will recognize it as usable storage space.
You can choose to create a single partition and use it for all your files, from program files to personal data. A lot of off-the-shelf computers come with one primary partition like this and a small secondary one reserved for recovery purposes.
Whether or not you want to split your disk into more than one segment is up to you. We would generally recommend it, though. The whole point of partitioning is for each segment to have its own purpose.
So treating all your storage space as a single unit containing different file types would be like constructing an office building with only one massive room for everything - day-to-day work, conferences, interviews, etc. And all of this for different departments of the company. You can see how this might get a little messy.
Creating multiple partitions eliminates the task of running several different types of files from the same place. This takes a heavy load off the entire process of accessing data.
Disk partitioning also brings a ton of other benefits to the table. An important disclaimer, though: there are disadvantages too. We will walk you through both sides to help you get an objective idea and make an informed decision.
Source: Kina on Unsplash
What are the benefits of disk partitioning?
1. Better file organization
This is the most obvious and perhaps the biggest advantage of partitioning your hard drive.
As we already mentioned, partitioning allows you to create separate segments for different file and data types. You wouldn’t want to use the same partition for your system files and for games, would you?
If organization and time management are important to you, then multiple partitions are the right solution. Searching for specific files will be much easier overall. Say you have one hard drive, but three partitions: C for the system files alone, D for multimedia files and documents, and E for games and apps. Your computer loads the system from C without interference from the other two, and you know exactly where to look when searching for a file.
2. Easy reinstallation
File management isn’t the only thing made faster and simpler thanks to partitioning. If you opt for creating multiple segments on your drive, reinstalling Windows will be easy peasy.
That’s because all you need to do is format the partition your system is on. Then you reinstall the OS on it, and there you go. Now you have a clean installation, with all your files saved on other partitions intact. You can even make a copy of your system partition, so you can revisit the exact same installation in the future if you want. And the whole time your pictures, music, documents stay exactly where you left them.
Source: Andrew M on Unsplash
3. Possibility of using multiple file systems
By now you’ve understood that partitions function completely separately. This means that, if for some reason you need multiple file system capabilities, partitioning will allow that.
One segment could be used for, say, an NTFS file system, while another could run ext or APFS.
4. Running different OSes
You’re an avid Windows user but need to use Linux on the side? No problem. You don’t need to buy a separate computer or anything. The possibility of running different file systems also means you can use partitioning to run multiple operating systems.
Doesn’t that sound enticing? One machine for multiple totally different uses!
5. Backup and recovery made simple
Data loss can happen on any disk, partitioned or not. However, it’s much easier to get it back on a partitioned one. You know where you stored what, and each partition can be backed up exactly as it is. It’s also a lot faster to back up single partitions than entire hard drives.
Ultimately this also means a faster path to recovery. If you lose or accidentally delete important files and data, you might want to use a recovery tool like Recuva to scan for them and get them back. Recuva is even powerful enough to recover data from damaged hard drives. But no matter how powerful, scanning a whole drive is strenuous for any recovery tool. Scanning independent partitions is a lot more convenient than that, and will get you to your goal more efficiently.
6. Optimized performance
Now, let’s keep in mind that computer performance is influenced by a number of factors. Partitioning alone isn’t what makes it better or worse. However, it can contribute to optimization. It’s easier for your computer to scan, say, a 40 GB partition to fetch the system file it needs than scanning the entire capacity of your drive.
7. Improved security (possibly*)
Separate partitions can help make your system more secure. Firstly, they minimize file corruption. If one partition gets corrupted, the others should remain unaffected. And keeping in mind the previous point about backup and recovery, ‘fixing’ the damaged partition would be much easier than fixing the entire hard drive.
Partitioning also improves security in terms of malware protection. A malicious attack on one partition is easier to deal with than malware on the whole drive. If your system partition gets infected, you can simply reinstall your OS and that should do the trick.
*Do keep in mind that partitioning can’t defend you against more advanced attacks. So make sure not to give in to a false sense of security.
What are the disadvantages of partitioning?
1. Data is still vulnerable
Yes, it’s easier to back up and recover data from independent partitions. And yes, partitioning may help protect separated files and data to a higher degree. But remember: everything is still on a single physical drive. So while digital errors and issues may be easier to deal with on partitioned drives, physical damage obviously won’t be.
If your hard drive is destroyed in some way, all data on it will be gone. That’s why, if you have crucial files on your PC, it’s important to give them the proper backup treatment before it’s too late.
2. Disbalance of space
Allocating storage space on separate partitions may be a little more tricky than you think. You may fill up one partition a lot faster than another. So on one side you’re struggling with space, and on another you have too much of it to spare. Imagine nearly filling up your system partition and then it turns out you need a lot more space for its updates than you thought.
That’s why you really have to be sure you actually have enough files of different types that you need help managing efficiently. Otherwise you’ll just create a struggle and disbalance in terms of storage.
3. Increased risk of error
If done incorrectly, partitioning can lead to more harm than good. Aside from space disbalance, there is an increased risk of incorrect partition sizes and formatting. Plus, human error is also a factor: in a moment of distraction, you may erase one partition when you meant another. Undoing such mistakes will definitely be tedious and time-consuming.
4. SSDs eliminate the need of partitioning
SSDs (solid-state drives) don’t function in the same way that HDDs do. They have faster read times and can organize files on their own. This quite literally eliminates the need for organization on your part.
Partitioning: yes or no?
The bottom line is that multiple partitions might not be necessary for the average user. But if you’re planning on storing many file types or different file and operating systems on the same PC, then you should give it a shot. It’s also an excellent solution for businesses, of course.
And if our pros and cons list isn’t enough to help you decide, you can always send us a message and we’ll help you make the right choice.
Decided to partition your hard drive?
If you’ve decided to give it a go, you definitely should make sure to do it right.
The two most effective and reliable ways to partition are using the built-in options on Windows or investing in a dedicated partitioning tool, like the EaseUS Partition Master. Which one you'll opt for depends on your specific needs.
Option 1 may be more suitable for users with at least some level of experience. In this case, you’d have to know exactly which steps to take without making errors. This is done in Disk Management on Windows 10/11. From there, you can select the partitions you’d like to split into different volumes of selected sizes.
If this is your first time partitioning, we highly suggest you either consult professionals for this or move on to option 2. The EaseUS partitioning software is specifically designed for beginners, with an intuitive interface helping you succeed in the process. All you need to do is pick the Partition Master package tailored to your needs and follow their guide.
Each package offers technical support as well, and even free upgrades (to varying degrees based on your subscription). Plus, all of this is valid for not one, but two PCs.
It’s the perfect solution for a smooth and error-free partitioning process. If you want to organize your hard drives efficiently and make the most of all your space without doing irreparable damage, it’s definitely worth the investment.
Dune, arguably one of the best science fiction novels ever written was brought to a big screen first time by David Linch. Sadly movie itself went through development hell and a lot of troubles and the end result was somewhat strange. The audience was divided on it, some hated it, some loved it but for sure it left a mark in cinema history. Years have passed and just when people forgot about ever receiving another try on a book adaptation Denis Villeneuve has brought his vision of Frank Herbert's novel into its full glory on a big screen.
The interesting thing about this new Dune movie was that from the start Denis envisioned it as a two-movie part openly saying that book itself is too complex to be done in a single movie. But, the issue arises when information about Dune part two was hanging on a thread on how well Dune part one will be received and performed in the box office. This naturally brought all kinds of speculation and worry among fans of the franchise, especially because the movie itself was really good and well made.
Well for all of you fans and people who wanted to see a continuation of the story can rest at peace now since the Legendary picture has officially announced and green-lighted Dune part two. The budget was given and we can expect part two at the beginning of 2023.
If you got the FAULTY_HARDWARE_CORRUPTED_PAGE Blue Screen error on your Windows 10 computer then it is most likely caused by various factors. It could be caused by an incomplete installation or uninstallation of some applications or program, or it could also be caused by some exploit that intervenes with the normal functioning of the computer, as well as bad sectors on the hard disk, damaged system files, malfunctioned system drivers, modified Windows Registry files, or a Blue Screen occurrence during a Windows Update and many more. Getting this bug check means that a single-bit error was found on this page. It also indicates that this is a hardware memory error and to resolve it, you need to follow the suggestions laid out below but before that, it is recommended for you to create a System Restore Point first so that if anything goes wrong, you can always go back to the previous state.
Option 1 – Run a Memory Check to test RAM
Since the problem might have something to do with hardware memory, you need to test RAM by running a Memory Check using the Windows Memory Diagnostic. Refer to these steps to do so.
Tap the Win + R keys to open the Run dialog box.
Then type “mdsched.exe” in the field and hit Enter to open the Windows Memory Diagnostic.
After that, the Windows Memory Diagnostic will give out two options such as:
Restart now and check for problems (recommended)
Check for problems the next time I start my computer
Select any of the given options. After that, your computer will restart and check for memory-based issues upon the restart. If there are any issues, it will automatically them.
Option 2 – Run the System File Checker
System File Checker or SFC is a built-in command utility that helps in restoring corrupted files as well as missing files. It replaces bad and corrupted system files with good system files that might be the cause why you’re getting the FAULTY_HARDWARE_CORRUPTED_PAGE Blue Screen error. To run the SFC command, follow the steps given below.
Tap Win + R to launch Run.
Type in cmd in the field and tap Enter.
After opening Command Prompt, type in sfc /scannow
The command will start a system scan which will take a few whiles before it finishes. Once it’s done, you could get the following results:
Windows Resource Protection did not find any integrity violations.
Windows Resource Protection found corrupt files and successfully repaired them.
Windows Resource Protection found corrupt files but was unable to fix some of them.
Option 3 – Check for conflicting or incompatible programs by putting your PC in a Clean Boot state
As mentioned, the FAULTY_HARDWARE_CORRUPTED_PAGE Blue Screen error might be caused by some problematic programs that clash with your existing operating system. Several users reported that numerous programs that are supposedly designed to enhance computer performance are causing conflict in the system instead. To identify which program is causing the problem, you need to put your computer in a Clean Boot State. To do so, follow the steps below.
Log onto your PC as an administrator.
Type in MSConfig in the Start Search to open the System Configuration utility.
From there, go to the General tab and click “Selective startup”.
Clear the “Load Startup items” checkbox and make sure that the “Load System Services” and “Use Original boot configuration” options are checked.
Next, click the Services tab and select the “Hide All Microsoft Services” checkbox.
Click Disable all.
Click on Apply/OK and restart your PC. (This will put your PC into a Clean Boot State. And configure Windows to use the usual startup, just simply undo the changes.)
From there, start to isolate the problem by checking which one of the programs you installed recently is the root cause of the problem.
Option 4 – Update or rollback drivers
If the first few options didn’t work for you, then it’s time to either update or roll back the device drivers. It is most likely that after you updated your Windows computer that your driver also needs a refresh. On the other hand, if you have just updated your device drivers then you need to roll back the drivers to their previous versions. Whichever applies to you, refer to the steps below.
Open the Devices Manager from the Win X Menu.
Then locate the device drivers and right-click on them to open the Properties.
After that, switch to the Driver tab and click on the Uninstall Device button.
Follow the screen option to completely uninstall it.
Finally, restart your computer. It will just reinstall the device drivers automatically.
Note: You can install a dedicated driver on your computer in case you have it or you could also look for it directly from the website of the manufacturer.

 It seems that last few days we were riding some Razer bandwagon but rest assured that we are not sponsored by them in any way, truth is that simply they come up with some interesting accessories which I believe are worth covering.
Gaming Chair itself comes in two colors, fully black and green black combination and it is not really an entry-level chair if we are talking about price. The chair itself is around 600USD depending on the distributor and considering that price range it is placed in more top cream of gaming chairs but it is worth every dime.
It seems that last few days we were riding some Razer bandwagon but rest assured that we are not sponsored by them in any way, truth is that simply they come up with some interesting accessories which I believe are worth covering.
Gaming Chair itself comes in two colors, fully black and green black combination and it is not really an entry-level chair if we are talking about price. The chair itself is around 600USD depending on the distributor and considering that price range it is placed in more top cream of gaming chairs but it is worth every dime.


