Fixing Windows 10 stuck at “Preparing Security Options”
There are cases when your Windows 10 PC can encounter an issue where it gets stuck and will display a message that says, “Preparing Security Options”. If this is happening to your Windows 10 PC, you won’t be able to use your keyboard or even mouse and your screen will only be stuck on the screen as mentioned above.
As your computer is still stuck, you will be left with no choice but to shut it down and restart it. Tap the F11 key as soon as your PC powers on. This will take you to the Advanced Startup options where you can carry out some steps. If it still didn’t work, you have to boot your Windows 10 PC into Safe Mode and then try out the troubleshooting options below.
Option 1 – Try using System Restore
You can do this option either by booting into Safe Mode or in System Restore. If you are already in the Advanced Startup Options, just directly select System Restore and proceed with the next steps. And if you have just booted your PC into Safe Mode, refer to the steps below.
Tap the Win + R keys to open the Run dialog box.
After that, type in “sysdm.cpl” in the field and tap Enter.
Next, go to the System Protection tab then click the System Restore button. This will open a new window where you have to select your preferred System Restore point.
After that, follow the on-screen instructions to finish the process and then restart your computer and check if the problem is fixed or not.
Option 2 – Uninstall the Windows Updates you’ve installed recently
The issue could be caused by Windows Updates so you need to check if it’s indeed the case. The best way you can do so is via Safe Mode.
Boot your PC into Safe Mode and then tap the Win + I keys to open Settings.
After that, click on Update and Security and then select Windows Update from the left side menu column.
Next, select the “View installed update history” option on the right-side column and click on Uninstall Updates which will open a window that will show the list of all the installed updates on your PC.
From there, select the update you want to uninstall and click the Uninstall button located in the lower right corner of the window.
Option 3 – Try disabling the Fast Startup
Boot your PC into Safe Mode.
Then tap the Win + R keys to open the Run dialog box.
Next, type in “control” to open Control Panel.
After that, select Hardware and Sound and click on Power Options.
Select “Choose what the power buttons do” from the left side menu pane and click on Change settings that are currently unavailable.
Afterward, uncheck the “Turn on fast startup (Recommended)” entry and click on Save Changes.
Now restart your PC and check if the problem’s fixed.
Option 4 – Try running both the SFC scan and CHKDSK utility
You can do both SFC and CHKDSK using Safe Mode and Advanced Startup options. For Advanced Startup options, click on the Command Prompt option and proceed with the steps. And if you have booted your computer into Safe Mode, follow these steps:
Tap the Win + X keys or right-click on the Start button and click Command Prompt (admin).
After that, type in this command and tap Enter to run the System File Checker or SFC – “Sfc /scannow”.
Alternatively, you can use this command instead if the previous command didn’t work – “sfc /scannow /offbootdir=c: /offwindir=c:windows”.
Wait until the SFC scan is done with the process and then restart your PC.
Next, run the CHKDSK utility and once it’s done checking your disk for errors and then reboot your PC to save the changes made.
Option 5 – Try resetting Windows 10
You can reset your Windows 10 PC using either the Advanced Startup Options or by booting into Safe Mode.
Tap the Win + I keys and go to Update and Security > Recovery.
Then click on Get Started under the Reset this PC section.
After that, follow the on-screen instructions with how you want to reset your PC and what files and settings you want to revert.
Then it will reset your PC by reinstalling it
Option 6 – Try to rename the SoftwareDistribution folder
In this option, the Command Prompt is supposed to be like the one in option 4. You can use both ways there to open the Command Prompt.
Open an elevated Command Prompt as admin and type in the commands below and tap Enter right after you typed in each one of them
Note: You can also rename the SoftwareDistribution folder to “SoftwareDistribution.bak” or “SoftwareDistribution.old” after you boot your PC into Safe Mode.
Option 7 – Try rebuilding BCD
Rebuilding the BCD can help you in fixing the stuck Windows 10.
You can start by booting into the installation environment for Windows 10 from an installation media.
After that, click on Repair your computer and on the blue screen, select Troubleshoot and then select the Advanced options menu.
Next, select Command Prompt and type in the commands below one by one, and tap Enter right after you do so.
This post will help you fix the ATTEMPTED_WRITE_TO_READONLY_MEMORY Blue Screen issue with an error code 0x000000BE. If you encounter this kind of BSOD error when you try to boot into your Windows 10 computer, note that there are various possible causes for this error. It could be caused by an error with a device driver, hardware issues, or some error in the BIOS of your computer.
The ATTEMPTED_WRITE_TO_READONLY_MEMORY Blue Screen error with a bug check of 0x000000BE appears when a driver tries to write a read-only memory segment. You’ll be able to see the name of the driver in the Blue Screen error if the driver that’s causing the error can be identified. You can also see it in memory at the location (PUNICODE_STRING) KiBugCheckDriver. In most cases, this kind of error is usually caused by various files such as iusb3hub.sys, ntkrnlpa exe or vhdmp.sys, ntoskrnl.exe, ntfs.sys, dxgkrnl.sys, tcpip.sys, atikmdag.sys, and win32k.sys. There are several possible fixes you can try to fix this issue but the main issue lies within booting into Windows since the error occurs as soon as you boot into your Windows 10 computer.
Refer to each one of the options provided below to resolve the ATTEMPTED_WRITE_TO_READONLY_MEMORY Blue Screen error.
Option 1 – Try to rollback, update or disable drivers
The first thing you can do to fix the ATTEMPTED_WRITE_TO_READONLY_MEMORY Stop error is to roll back, or update, or disable device drivers. It is most likely that after you updated your Windows computer that your driver also needs a refresh. On the other hand, if you have just updated your device drivers then you need to roll back the drivers to their previous versions. Whichever applies to you, refer to the steps below.
Open the Devices Manager from the Win X Menu.
Then locate the device drivers and right-click on them to open the Properties.
After that, switch to the Driver tab and click on the Uninstall Device button.
Follow the screen option to completely uninstall it.
Finally, restart your computer. It will just reinstall the device drivers automatically.
Note: You can install a dedicated driver on your computer in case you have it or you could also look for it directly from the website of the manufacturer.
Option 2 – Try running the Memory Diagnostic Tool
The Memory Diagnostic tool in windows can help resolve the ATTEMPTED_WRITE_TO_READONLY_MEMORY Blue Screen error by checking and automatically fixing any memory-based issues. To run it, refer to these steps:
Tap the Win + R keys to open Run and type exe and hit Enter to open the Windows Memory Diagnostic Tool.
After that, it will give two options such as:
Restart now and check for problems (Recommended)
Check for problems the next time I start my computer
Once your computer has restarted, perform a basic scan or you could also go for the “Advanced” options such as “Test mix” or “Pass count”. Simply tap the F10 key to start the test.
Note: After you select your preferred option, your computer will restart and check for memory-based issues. If it finds any issues, it will automatically fix them and if there’s no issue found, then it’s most likely not a memory-based issue so you should try the other options given below.
Option 3 – Try to update the BIOS
Updating the BIOS can help you fix the ATTEMPTED_WRITE_TO_READONLY_MEMORY BSOD error but as you know, BIOS is a sensitive part of a computer. Even though it is a software component, the functioning of the hardware depends on it largely. Thus, you must be careful when modifying something in the BIOS. So if you don’t know much about it, it’s best if you skip on this option and try the other ones instead. However, if you are well-versed in navigating the BIOS, then follow the steps below.
Tap the Win + R keys to open the Run dialog box.
Next, type “msinfo32” in the field and press Enter to open System Information.
From there, you should find a search field on the bottom where you have to search for the BIOS version and then press Enter.
After that, you should see the developer and version of the BIOS installed on your PC.
Go to your manufacturer’s website and then download the latest version of BIOS on your computer.
If you are using a laptop, make sure that you keep it plugged in until you have updated the BIOS.
Now double click on the downloaded file and install the new BIOS version on your computer.
Now restart your computer to apply the changes made.
Option 4 – Try disabling BIOS Memory Options
Disabling the BIOS Memory options such as Caching and Shadowing can help you in fixing the ATTEMPTED_WRITE_TO_READONLY_MEMORY Stop error. All you have to do is enter the BIOS first and then use the Arrow and Enter keys to select your choices. And if you can’t seem to find it, look for specific instructions from your OEM or you could also look out for instructions from the manufacturer of your motherboard.
Option 5 – Try running the Blue Screen Troubleshooter
The Blue Screen troubleshooter is a built-in tool in Windows 10 that helps users in fixing BSOD errors like ATTEMPTED_WRITE_TO_READONLY_MEMORY. It can be found on the Settings Troubleshooters page. To use it, refer to these steps:
Tap the Win + I keys to open the Settings panel.
Then go to Update & Security > Troubleshoot.
From there, look for the option called “Blue Screen” on your right-hand side and then click the “Run the troubleshooter” button to run the Blue Screen Troubleshooter and then follow the next on-screen options. Note that you might have to boot your PC into Safe Mode.
When you have to connect to a drive that’s on a different computer or on external storage, that’s where the mapped network drives come in. Mapped network drives make accessing files a lot easier. However, there are times when it won’t work for some reason.
Windows will notify you about the unavailability of mapped network drives in several ways. For one, Windows might display a red X on the network drives or it could be that its status will be unavailable when you try to use it from the Command Prompt or via a notification.
It is recommended that you run a few scripts when you log in to your PC as it may so happen that the network drive takes more than usual to connect. Before you start troubleshooting the problem using the given options below, keep in mind that some workouts might only work under certain scenarios. You might need some network access at logon or you might need access to the Group Policy settings. So you need to choose what you prefer more.
You can try the given workarounds below if the mapped network drives are not showing or connecting or working on your Windows 10 computer. These workarounds use scripts to make sure that you are connected to them as soon as you start to use your PC.
As mentioned, before you can troubleshoot, you need to create scripts first. There are two scripts here namely MapDrives.ps1 which is executed by the second script named MapDrives.cmd and is done at a regular and non-elevated Command Prompt. Follow the steps below to get started.
You have to create a script file named “MapDrives.cmd” first and then save it on a place where the files are safe. To do that, open a text editor like Notepad and then copy and paste the following script:
After that, save the file and name it “MapDrives.cmd”.
Next, create a script file named “MapDrives.ps1” and then copy and paste the following content. Just make sure to save both scripts in the same folder.
$i=3while($True){ $error.clear() $MappedDrives = Get-SmbMapping |where -property Status -Value Unavailable -EQ | select LocalPath,RemotePath foreach( $MappedDrive in $MappedDrives) { try { New-SmbMapping -LocalPath $MappedDrive.LocalPath -RemotePath $MappedDrive.RemotePath -Persistent $True } catch { Write-Host "There was an error mapping $MappedDrive.RemotePath to $MappedDrive.LocalPath" } } $i = $i - 1 if($error.Count -eq 0 -Or $i -eq 0) {break} Start-Sleep -Seconds 30}Note: Now that you’ve created the script files, it’s time for you to proceed to the options given below.
Option 1 – Try creating a startup item
Note that this option only works on devices that have network access at login. So if it’s not there, the script will fail to reconnect the network drivers automatically. To create a startup item, here’s what you have to do:
Open the Startup folder located at %ProgramData%MicrosoftWindowsStart MenuProgramsStartUp.
From there, copy and paste the MapDrives.cmd.
After that, open the Scripts folder located at %SystemDrive%Scripts copy-paste MapDrives.ps1 and then copy and paste MapDrives.ps1 in there.
Note: After you complete the steps above, a log file named “StartupLog.txt” will be created in the %TEMP% folder. Now all that’s left for you to do is to log out of your computer and then log back in. This will ensure that the mapped drives are open.
Option 2 – Create a scheduled task
It is possible to create a scheduled task that runs as soon as you log in to your computer. To create a scheduled task, follow the steps below.
You have to copy the MapDrives.ps1 script file to the scripts folder of Windows located at %SystemDrive%Scripts.
After that, open the Task Scheduler and select Action > Create Task.
Next, type a name and description of the task in the General tab.
Then click on the Change User or Group button and select a local user group and click OK.
Now check the box labeled “Run with highest privileges” and switch to the Triggers tab.
From there, create a new trigger with the “At Logon” option in the Begin the task drop-down menu and then click OK.
After that, switch to the Actions tab and create a new action then choose to Start a program.
Next, type “Powershell.exe” in the Program/Script field, and in the Add arguments (optional) field, type the following:
And in the Start in the (optional) field, type “%SystemDrive%Scripts” as the location of the script file.
Now under the Conditions tab, select the “Start only if the following network connection is available” option and then select Any connection and click OK.
Restart your computer or log off from your account and then log back in so that the task will be executed.
Option 3 – Use the Group Policy settings
You need this option if the mapped network drives are defined via Group Policy settings. You have to update the action of the drive maps to Replace. As a result, it will delete the existing mapped drive and create the mapping on each logon again. However, any settings on the mapped drive that are changed from the Group Policy settings will be gone on each logon. So if the changes don’t work, you need to run the gpupdate command together with the /force parameter in order to refresh the Group Policy setting quickly.
Windows Setup in Continuous Reboot Loop – What is it?
After upgrading to Windows 10 operating system from Windows 7 or Windows 8/8.1, a lot of Windows users are complaining about the Windows setup in a continuous reboot loop. The computer would just keep on rebooting every time the machine is booted and this incites frustration for a lot of Windows users.
Solution
Error Causes
When Windows launched the third update for Windows 10, users trying to upgrade to Windows 10 encountered an endless reboot loop problem. The computer will crash repeatedly. The KB3081424, which is a roll-up of bug fixes of Windows 10, continuously fails once you start the update process and then triggers a message showing: “We couldn’t complete the updates, undoing the changes.” The undoing process will then cause a system reboot mandatorily.
Once you log back on your computer again, the Windows 10 update will try to reinstall KB3081424. You will not be able to stop the update which will cause your Windows setup in a continuous reboot loop.
The KB3081424 will not be successfully installed since if it fails for the first time, that initial failure can be detected to create a bad entry in your Windows 10 registry. This will then prevent your subsequent attempts to reinstall KB3081424 to make it work correctly.
Further Information and Manual Repair
In order to fix the problem of Windows 10 setup in a continuous reboot loop, there are a few methods you can try. Try following these simple steps and you’ll be able to get rid of the problem.
Note: If you’re not highly confident to solve this issue on your own, it is highly recommended to consult an authorized computer technician who would be knowledgeable enough to fix the issue for you. In addition, you can also use a system optimizer to resolve the issue.
Method One: Check For Windows Update
Microsoft Windows released an updated fix for the Windows setup in continuous reboot loop problem. You can try fixing the issue through Windows Update.
Open Settings
Go to Update & Security
Select Windows Update then choose Check for updates
At this point, an additional update will be installed and downloaded to your operating system to resolve the continuous reboot loop problem.
Method Two: Eliminate Bad Registry Entry
Before KB3081424 attempts to install again, you can try doing this solution:
Click on the Start menu then type regedit
Once the window opens, go to HKEY_LOCAL_MACHINESOFTWAREMicrosoftWindows NTCurrentVersionProfileList
Create a backup for your registry key (since this process is a bit risky). Select ProfileList then click on File and Export then choose your backup name.
From the ProfileList IDs, remove anything with ProfileImagePath in it.
Close Regedit then reboot. By this time, the KB3081424 should properly install.
Method Three: Perform A Startup Repair
Another thing you can try to solve the Windows setup in continuous reboot loop problem is to perform a startup repair from a working computer.
Ensure that all unnecessary devices are disconnected from your computer as your computer might detect them.
If you are connected to a network, you need to disconnect from this as well.
On a working computer, download the Windows 10 ISO then you can perform a startup repair.
Boot your computer from the Windows 10 DVD.
To change your BIOS option to boot from the Windows 10 DVD, follow these steps:
Boot your computer then press the F2 function key to enter setup.
NOTE: You must do this quickly since the BIOS loads rapidly.
Once you’re inside the BIOS, navigate to the Boot Configuration screen. On this screen, you’ll be able to change the first device to be loaded.
Go to Removable Devices then hit Enter. Removable devices could either be a thumb drive or DVD. Select DVD to put it at the top and be the first boot device.
Save your changes by pressing on the F10 function key. A setup confirmation box will appear with a message Save configuration changes and exit now. Select Yes.
Exit BIOS by pressing on the ESC key. You should be prompted to boot from the Windows 10 DVD at this point.
If you're not able to execute the aforementioned processes on your own, get help or download and install a powerful system optimizerto assist with the windows continuous reboot loop process and other Windows 10 error messages.
In today's IT world, if you want a computer for typical day-to-day actions and gaming, there are 3 primary ways you can go. An Apple computer with its proprietary hardware and operating system or a typical machine with Windows or Linux operating system.
Each system has both advantages and disadvantages and picking the right one might be difficult for some users. From hardware differences to specific software and operating system, each system is aimed at a different type of work, and in this article, we will explore each one and help you in choosing the right one for you.
Apple ecosystem
Apple has managed to create a unique ecosystem of its own devices, from its iMac desktop computers to more professional MAC studio and power MAC and all the way to tablet iPad and iPhone are powered by Apple's own operating system that connects all of these devices into one large system. So if you really need one singular ecosystem this is a huge advantage.
The ecosystem on the side, MAC computer systems are great, some would argue best for coding, design, video work, and sound editing. MAC M2 chip is optimized for all of these tasks and a specially tailored operating system is just the icing on the cake. Specific Apple-made software like a logic pro or final cut also helps a lot to position MAC systems on top of the line.
Reading all of this you might think hey this is the computer for me, it does everything! Sadly the truth is not like that. The first thing that is difficult on MAC systems and a maybe big reason that it is not so adopted outside professional working environment is lack of games. If you are a gamer or plan on using MAC for gaming, well I have some bad news. The second big turn-off is that MAC systems tend to be more expensive than PC systems, yes components are of higher quality but rest assured that you will pay for also for branding.
Get MAC as your workstation for serious work and for good tech support, if you need a plain home computer keep reading.
Windows PC machine
There is no better feeling than assembling your own computer, tweaking hardware to make a monster and despite haters hating, Windows is the best all-around operating system on the market. It is supporting the largest variety of hardware and the largest variety of software.
The best platform for serious gaming and streaming Windows machine has cemented itself as a multimedia powerhouse. But, this kind of computer is not alien to being also a professional machine, you can practically do everything that you can do on Apple or Linux machine inside Windows, yes some things might require extra steps or will be slightly slower but in the end, being able to do anything is the greatest strength of Windows machine.
Of course, every system has its flaws and Windows is not immune to that. One of the biggest is being the operating system for every hardware ever made and every software as well while keeping legacy support for old software and hardware, basically, its biggest strength is in the same time its biggest weakness leading to sometimes stability issues. Also being able to place any kind of hardware can also lead to the same stability issues. Executing something a little slower than other systems and having some extra steps can also be looked upon as weaknesses.
Linux system
First and perhaps for some people, the biggest advantage of the Linux operating system is its price, it is completely free! Other advantages include the great server and networking included in the OS itself, the large amount of customization, and unmatched stability. The ability to write scripts inside the OS terminal is also a great thing and coding is much more streamlined and friendlier than on other machines.
The power of Linux is the ability to change anything, even on the system layer, no other operating system will let you change the basic functionality of the OS itself while Linux will let you do this. It is also the only operating system you can fully use by booting it up from a USB stick and having the same experience as it was installed on a local hard drive. Among other OS mentioned earlier, Linux is by far the lightest one, taking the smallest amount of memory among the three.
The bad side of the Linux machine is the steep learning curve, among the three mentioned operating systems rest assured Linux is the most difficult to learn and be comfortable in it. The operating system will require you to know the hardware and how computers work in order to fully use its potential. Other things that place it behind are not so wide hardware support compared to Windows and the somewhat confusing distro model.
Linux versions come in form of different distro packages and first-time users will face many of them being left in awe of which one to choose. Also installing drivers and software via a package system can also be a tedious task as well, often being that some version of the driver will not work on the newer version of the Linux distro.
Get a Linux machine if you are well versed in computer technology, if you want great customization of the OS itself or if you do not want to spend money on OS and software since almost entire Linux software is open source.
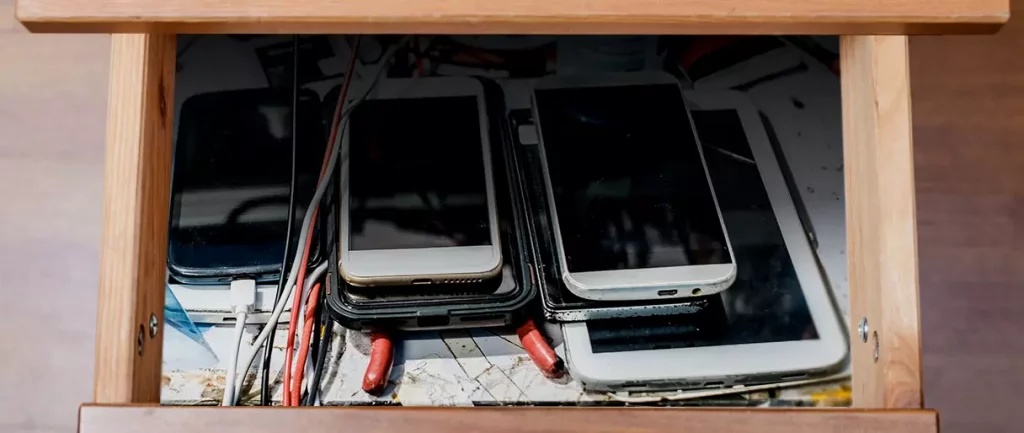
Hello all the wonderful people and welcome to our new article where we take a little different turn than usual and discuss why keeping old electronics around the house is not such a good idea. We all have some drawer or in some bag around the house and in the end of the day if that electronic has battery inside it is probably not the smart thing to keep it.
So naturally, the question comes why it is a bad idea to have old electronics with batteries in them? Well unlike a battery failure with, say, some AA batteries jammed in the back of an old toy, the risk with a lithium-ion battery failing isn’t just some leaking and corrosion in the battery compartment, it’s a potential fire as the battery swells up and the gases (combined with the stored energy) turn the battery into a potential fire hazard.
Good thing is that the battery will not explode just like that, it will swallow over time and get bigger and bigger until the breaking point is reached and all the fire breaks lose. So if by any chance you have some old gadgets lying around you can check up on them and see if has swelling process started, if yes, dispose properly of that piece of the old device immediately.
How to keep old electronics
If you’re not ready to get rid of the gadget then it’s best to charge it properly for storage. Proper charging keeps the battery cells and circuits in optimum health.
While recommendations vary by manufacturer and application, the general consensus is that lithium-ion batteries should be charged to approximately 40%. (Some manufacturers recommend charging 50% or 60% instead.)
Really, the important part here isn’t the exact percentage. What’s important is ensuring that the battery is charged to roughly half capacity and not stored with a completely discharged or completely full battery.
Discharge rates on lithium-ion batteries in completely powered-off devices are very slow, but you should still plan to top off the charge every 12-18 months or so to keep it around 50%.
If you wanted to go above and beyond, a metal storage container with a snug lid on a basement shelf with a desiccant pack inside to control the moisture would offer optimum conditions.
Mozilla Firefox has introduced a new feature known as Restart with Windows which allows the browser to automatically start when your Windows 10 computer boots. This means that if you leave the Firefox browser opened while shutting down your computer, Firefox will re-open automatically along with the tabs that were opened right before you shut down your computer.
Although some users may find this feature convenient, there are others who do not approve at all as it could be a nuisance. So if you’re one of the latter, then read on as this post will show you how you can disable the Restart with Windows feature in the Firefox browser on your Windows 10 computer. Refer to the instructions laid out below to get started.
Step 1: Open Mozilla Firefox and if it’s opened already, just open a new tab and then type the following text in the address bar:
about:config
Step 2: After typing the text given above, hit Enter and if a prompt with a warning message pops up, simply click on the “I accept the risk!” button to proceed.
Step 3: Next, type “Restart” in the search filter which should display the following preference in the window:
“toolkit.winRegisterApplicationRestart”
Step 4: After that, check for the preference value and then see if it’s set to true or not. If it is set to true, then it means that the Restart with Windows feature is enabled so obviously, to disable it, you need to set its value to false.
Step 5: Now restart your computer without closing Firefox. After restarting your computer, you should no longer see Firefox starting automatically.
The Restart with Windows feature by default is disabled for most users. On the other hand, Mozilla will have this feature enabled as the default configuration in the coming weeks so it’s best that you now know what to do when that time comes since the newer versions of Mozilla Firefox are already being shipped with the Restart with Windows feature. However, if this post did not help you, then you might want to check if the feature has been added to the Startup folder, and from there, you can disable this startup program using the Task Manager > Startup tab.
Recently, a number of users reported getting an error code 0x8007025D-0x2000C while updating their Windows 10 computers using an ISO or the Media Creation tool. You will also see a detailed error message saying, “The installation failed in the SAFE_OS phase with an error during APPLY_IMAGE operation” together with the error code 0x8007025D-0x2000C.
This kind of issue usually occurs when there is some problem with the installation files and when Windows Update fails to apply upgrade using the Media Creation Tool or ISO. To resolve this issue, you can use the troubleshooting options given below as a reference.
Option 1 – Try recreating the Windows 10 installation USB
Recreating the Windows 10 installation USB might help in fixing the problem. You can use a USB drive to do so but make sure that it has a great read-write speed. Follow the steps below to recreate Windows 10 installation USB”
Click this link and then click the Download Tool Now button.
Next, click the “Use the tool to create installation media (USB flash drive, DVD, or ISO file)…” option and follow the next given instructions on the screen.
Now select the ISO file option in step 5.
After that, you should now have an ISO file.
Next, go to the location where you’ve downloaded the ISO file.
Then right-click on the Windows 10 ISO file and select the Open with option and then select File Explorer.
Now click on “setup.exe” and follow the next instructions that appear on the screen. When asked, you have to select either Nothing (clean install) or Keep personal files only option. Take note that you must not select the “Keep personal files, apps, and Windows settings since it doesn’t really work.
Option 2 – Try running the Windows Update troubleshooter
You might also want to run the Windows Update Troubleshooter as it could also help in fixing Windows Update error code 0x8007025D-0x2000C. To run it, go to Settings and then select Troubleshoot from the options. From there, click on Windows Update and then click the “Run the troubleshooter” button. After that, follow the next on-screen instructions and you should be good to go.
Option 3 – Update the BIOS
Take note that you have to be careful when modifying something in the BIOS. So if you don’t know much about it, it’s best if you skip on this option and try the other ones instead. However, if you are well-versed in navigating the BIOS, then follow the steps below.
Tap the Win + R keys to open the Run dialog box.
Next, type “msinfo32” in the field and press Enter to open System Information.
From there, you should find a search field on the bottom where you have to search for the BIOS version and then press Enter.
After that, you should see the developer and version of the BIOS installed on your PC.
Go to your manufacturer’s website and then download the latest version of BIOS on your computer.
If you are using a laptop, make sure that you keep it plugged in until you have updated the BIOS.
Now double click on the downloaded file and install the new BIOS version on your computer.
Now restart your computer to apply the changes made.
Option 4 – Try restarting the Background Intelligent Transfer Service
The Background Intelligent Transfer Service or BITS is a part of the Windows Update service and is the one that manages the background download of Windows Update, as well as scans for new updates and so on. And if Windows Update is experiencing some problems, you can try restarting BITS but make sure that you have admin privileges to do so.
Tap the Win + R keys to open the Run dialog box.
Next, type “services.msc” in the field and hit Enter to open Windows Services.
From the list of Services, look for the Background Intelligent Transfer Service and double-click on it to open Properties.
After that, you need to set the Startup type to “Automatic (Delayed Start) and click on Apply.
Now click the Stop button to stop BITS and then click the Start button to restart the service.
Click OK to save the changes made and then restart your PC.
Option 5 – Try to update Windows after a couple of minutes or an hour
There are times when the issue is from Microsoft’s end. It could be that there’s some issue with Microsoft’s server so it would be better if you give it a couple of minutes or an hour or so before trying to run Windows Update again.
The author of the famous software library mode-ipc that gets over a million downloads per week found that it has some questionable code inside. The code itself behaves like this: if it finds out that your location is within Russia or Belarus it will try to replace the contents of all files on the computer with a heart emoji.
One important thing is that we here are not supporting the current Ukrainian situation and are against any type of violence or war but we also do not support this kind of behavior as well. If we look at this only from a technical perspective, we would then classify the mode-ipc library as malware and a harmful piece of code no matter the motivation behind it.
So this so-called protestware is well basically malware, but not always, it will protest when certain conditions are met. The issue with this is that companies and users should not be placed under harm if they do not share the personal view of the code author. Imagine if, for example, I would publish code to delete all pictures from your computer if my code found out that you do not like metal music. I guess you not liking metal music and war in Ukraine are two very different things but the source is the same, unreliable code that invades your privacy in order to serve one purpose, punishment for disagreeing with my personal views and that should not be allowed.
Not all protestware are equal, some will not harm your computer on purpose, they will just annoy you with some messages like viruses did in their infancy stages, others might place some developer sanctions but no matter the outcome basic principle is the same, it does something without user consent and without informing the user that something like that might happen.
On the internet, many blog posts and discussions were open about this issue and its morality. Discussion is still active with different takes on the situation and how to prevent it. Our take on this matter is that professional developers should have standards and not submit to doing harm for the sake of personal views and feelings.
In the long run, this kind of behavior and practice can only harm developers involved in this kind of entanglement. Infected libraries will in time stop being used since people would not trust them and authors will have a stain on their name as impulsive or not trustworthy.
Windows 10 users a set of rules or standards called Network Protocols in communicating over the internet. These protocols are the ones that made sure that the data is correctly sent between computers. However, if any of the Network Protocol is missing in your Windows 10 computer, then you will most likely encounter a problem like not being able to browse the internet, or share files. For this, you can try to run the Incoming Connections troubleshooter:
As you were not able to connect to your internet connection using your PC, you can try to run the Incoming Connections troubleshooter as it might resolve the problem. Refer to the following steps to run this troubleshooter:
Tap the Win + I keys to open Settings.
After opening Settings, go to Update and Security.
Next, navigate to the Troubleshoot pane and select the Incoming Connections section and click the Run Troubleshooter button to get started.
Wait until the troubleshooter is finished doing its job and then try connecting to your network again.
If after running the Incoming Connections troubleshooter you receive an error message instead that says, “Network Protocol is missing”, then here are some suggestions you need to check out to fix it. Take note that you must have admin privileges before you start troubleshooting the problem.
Option 1 – Try to update or rollback or uninstall the Network drivers
You might also want to update, roll back, or disable your Network drivers to fix the “This operation failed as no adapter is in the state permissible for this operation” error.
Tap the Win + R keys to launch the Run window and then type in the “devmgmt.msc” command and hit Enter to open the Device Manager window.
Under the Device Manager, you will see a list of drivers. From there, look for the Network Adapters and expand it.
Then right-click on each one of the Network drivers and depending on your preference, you can either select “Update driver”, “Disable device” or “Uninstall device”.
After that, restart your PC and see if it helped in fixing the netio.sys Blue Screen error.
Option 2 – Try to reset Winsock, TCP/IP & Flush DNS
You might also want to try resetting Winsock, TCP/IP, and flushing DNS might help you resolve errors. To do so, follow these steps:
Right-click on the Start button and click on Command Prompt (administrator) so you can pull up an elevated Command Prompt.
After that, execute each one of the commands listed below. And after you typed in one after the other, you have to hit Enter.
netsh winsock reset – type in this command to reset Winsock
netsh int ip reset resettcpip.txt – type in this command to reset TCP/IP
ipconfig /flushdns – type in this command to flush the DNS cache
Next, restart your PC and check if the problem’s fixed.
Option 3 – Diagnose the Network Adapter
To diagnose the Network Adapter, go to Control Panel > All Control Panel Items > Network Connections, and from there, look for the network adapter that could be causing the error. Note that if you are using a Wi-Fi connection, then it’s probably your Wi-Fi adapter, otherwise it has something to do with your Ethernet adapter. Just right-click on the problematic network adapter and select diagnose to troubleshoot.
Option 4 – Try to perform Network Reset
You can also try to perform a Network Reset to resolve the problem. This will reset the entire network configuration including your IP address. To perform Network Reset, follow these steps:
Tap the Win + I keys to open Settings.
From there, go to the Network and Internet section.
Next, scroll down and look for “Network Reset” under the status pane.
After that, click on Network Reset and then on Reset now to start resetting the network configuration. Once done, check if it is able to fix the error or not.
Option 5 – Try importing Winsock settings from another computer
If resetting Winsock or the Network didn’t fix the problem, then you can try to import settings from a computer that’s in good condition. You need to have access to the registry to get this done and then export and import a couple of settings. Refer to these steps to get started:
Tap the Win + R keys to open the Run dialog box and type “Regedit” in the field and hit Enter to open the Registry Editor.
After that, go to this registry path: HKEY_LOCAL_MACHINESYSTEMCurrentControlSetServices
Next, look for two registry keys named “Winsock” and “Winsock2” and then right-click on each one of them and select the Export option.
Now copy the registry keys to a USB drive and then copy the keys on the PC in excellent condition.
Then double click on each one of them and it will install the WINSOCK keys.
The Error Code 0x800F0923 is one that appears only when attempting to update from older versions of Microsoft Windows to Microsoft Windows 10. This error does not occur with every install and is believed to be the result of a driver incompatibility issue. It is unclear which specific drivers are having the compatibility issues, though it is widely believed that DuplexSecure's SPTD drivers are the ones at fault. When operating correctly, without errors, the update process should not take longer than 30 minutes.
Common symptoms include:
Error message window/pop-up during the install process, giving the Error Code 0x800F0923
Inability to install and update from older versions of Microsoft Windows to version 10
Solution
Error Causes
There are various relevant factors associated with the error code 0x800F0923 incompatibility issue in Windows 10 installation/upgrade. These factors include but are not limited to:
The Operating System (OS) upgrading does not support older hardware.
Your computer’s specs did not meet the minimum requirements.
Not enough hard disk space.
The new software might lack software drivers for older hardware
Further Information and Manual Repair
Microsoft has recently released its Windows 10 operating system. While there are still a few kinks to be worked out, overall the reviews have been positive. As with any new Microsoft update, compatibility issues can arise. If you are unsure whether your current PC will be able to handle the new Windows 10, here is an easy way to check your system.
Method 1: Check if your computer is compatible
Locate the “Get Windows 10” application icon in your notification tray (bottom right corner of your screen, white Windows logo).
Right-click on this icon, then select the “check your upgrade status” option.
Be prepared for the menu to take a few minutes to open.
Click on the menu on the upper left-hand corner of this new dialog box. (It looks like three blue horizontal lines)
Select “check your PC”
After the system checks for compatibility, it will let you know whether or not your PC has the appropriate drivers, etc. (Keep in mind that this is not a foolproof method for checking compatibility status).
Method 2: Download or upgrade your drivers/software
If you have already attempted to update to Windows 10, and have received the Error Code 0x800F0923, this is the simplest way to solve the issue yourself.
1. Open the “Get Windows 10” application.2. Open the menu in the upper left corner, looks like three blue lines.3. Select “Check your PC”.4. The system will tell you which drivers are incompatible.5. Go to the Microsoft Support website to install and/or update the drivers that proved to be an issue.6. Once the driver issue is corrected, retry the Windows 10 update.
Method 3: Create space on your computer
If your computer does not have sufficient space to accept the upgrade, you might want to clear up some space on your computer. Here’s how to do it.
If you have not attempted to install Microsoft Windows 10 yet, it is a good idea to check your system's compatibility prior to installing. While it is not absolutely necessary, it will save time and frustration. Microsoft Support suggests contacting them directly if you are unable to solve your driver compatibility issues, or if the above do-it-yourself method is unsuccessful.
To resolve this compatibility issue and get your upgrade going use a powerful and user-friendly tool to clean up the problem.
Click here to download Restoro.
Users should also be aware that those who choose to upgrade to Windows 10 have 30 days in which they may decide that they would rather use their old system. However, reverting back to the older system may not be a smooth process, and some data could be lost.