Fix Unable to terminate the process Error in Windows 10
There are times when you may find it hard to kill a particular process in the Windows Task Manager and every time you try to do so, you will only get an error message saying, “Unable to terminate the process, The operation could not be completed, Access is denied”. If you are one of the users who is constantly getting this error, read on as this post will provide you with a couple of options you can try to resolve the problem.
Refer to the given instructions below if you are unable to terminate a process in the Task Manager but before you proceed you need to restart your PC and then try killing the process again, if you’re still not able to do it, you need to follow the options laid out below.
Option 1 – Try using Taskkill
Open the Command Prompt as admin from the WinX Menu.
After opening Command Prompt, type in the following command and tap Enter to execute it:
taskkill /IM "processname" /T /F
processname – it is the name of the process which you can see on the Details tab of the Windows Task Manager.
/IM – it is the one that specifies the image name of the process, which follows, that is to be terminated.
/T – it is the one that kills not just the main process but also the child process.
/F – it is the one that terminates the process forcefully.
Option 2 – Try using the WMIC
Open Command Prompt as admin from the WinX Menu.
From the Command Prompt window that opens, type in the following command and hit Enter to execute it:
wmic process where name='processname.exe' delete
Note: In the given command, you need to replace “processname.exe” with the name of the particular process you want to terminate which is found in the Details tab of the Windows Task Manager.
Option 3 – Try using PowerShell
The first thing you have to do is open an elevated PowerShell prompt.
From there, type in the following command and hit Enter to execute it:
kill -id pid
Note: In the given command above, “pid” is the Process ID number of the process you want to terminate. And for you to identify this number, you need to open the Details tab of the Windows Task Manager once again and take note of the number against the process you want to get rid of.
Alternatively, you can also run the following command in the PowerShell prompt that you’ve pulled up to get the process ID number:
Get-Process
For example, “5364” is the process ID number for the DimScreen.exe process which is the process you want to terminate. In order for you to kill this process, you need to type in this command:
0x8007042c is a Windows Firewall error code. This error hampers your ability to turn on Windows Firewall on your PC. Firewall is a network security system.
It establishes a barrier between a trusted, secure internal network and another network (the internet) that is assumed unsecure.
Error 0x8007042c is displayed in the following format:
“0x8007042c” error message when you try to start Windows Firewall
Solution
Error Causes
Error 0x8007042c may pop up on your computer screen because of many reasons. These include:
Firewall service is disabled
Malware infection
Registry corruption
Further Information and Manual Repair
The good news is that this error code is easy to resolve. To repair, you don’t to be technically sound or hire a professional for the job. Try our DIY methods illustrated below to fix the problem by yourself in a few minutes.
Method 1 - Start Firewall Manually
This method allows you to start Windows Firewall service manually and then make sure that it starts automatically in the future. This can be done by following these steps, first, go to the start menu and then type services in the search box.
Right-click services and then click RUN as Administrator. Now scroll down until you see Windows Firewall. Then double click on it. After that, click the startup type box and then click Automatic.
If ‘Service Status’ is stopped, then click Start. Now click ‘Apply’ and then press OK. Scroll until you see ‘Base Filtering Engine’, double click it. If again the ‘Service Status’ is stopped, click start.
Press Apply and then OK to activate changes. Now restart Windows, Firewall will be enabled.
Method 2 - Remove Malware
If the error cause is a malware infection, use the Microsoft Safety Scanner to remove malware immediately from your PC.
Download it from Microsoft’s official website, install, accept terms and then run it to perform a quick scan. The Microsoft Safety Scanner will scan and remove all malware infecting your PC.
Once this is done, click Start and then type Windows Firewall in the Search box. Click Windows Firewall and the navigation pane of Control Panel;
Click Turn Windows Firewall on or off. Click Turn on Windows Firewall for each network location and then press OK to activate changes.
Method 3 - Repair the Registry
Sometimes the underlying cause can be registry corruption. In such a situation, download Restoro. It is a PC Repair Tool deployed with a registry cleaner.
It scans and removes all the bad entries and files infecting your PC, cleans and repairs the registry in a few minutes.
Click here to download Restoro.
Microsoft has officially announced details about the newest upgrades to its office 365 suite moving forward along with its new OS release.
It seems that Microsoft has listened to its user base and feedback since Word, Excel, and PowerPoint are getting much-needed redesign taking into account many suggestions from the community.
The new office should feel more like an application suite guiding focus on the interconnection of applications themselves providing users with a much more natural experience of using them.
The new office features so far
From Microsoft themselves:
“This Office visual refresh is based on feedback from customers who asked for a more natural and consistent experience within and between your applications, specifically on Windows. With this update, we deliver an intuitive, coherent, and familiar user interface, using the Fluent Design principles, across all your applications: Word, Excel, PowerPoint, OneNote, Outlook, Access, Project, Publisher, and Visio. We aligned this visual refresh with the design of Windows 11 to provide seamless experiences on your PC.”
It is always refreshing to hear when a company listens to its user base and actually does what is needed instead of trying to invent the wheel.
How to switch
Since beta is already rolling and if you have an active 365 subscription to office suite visual refresh will be automatically available to all Office insiders running beta channel builds. It can be turned on and off using the coming soon feature in the top right corner of the menu in any application.
Just click on the megaphone icon to open the coming soon pane and apply settings to all office apps.
Note that The Coming Soon feature is not available in Access, Project, Publisher, or Visio. If you turn on the visual refresh in any of the 4 apps mentioned above (Work Excel, PowerPoint, or OneNote), it will also be available in these 4 apps.
Difference themselves
The Home tab menu still has a familiar look with a few tweaks. For example, accessing frequently used Word commands will be a lot easier. By navigating to Designer > Show Quick Access Toolbar, users can add a customizable shortcut ribbon to Word that houses conveniently placed options.
Also, the office will not match your Windows operating system color theme so if you have a dark theme enabled, the office will also have a dark color theme.
Color palettes are more neutral, corners are a bit softer but customizable ribbons are a win here for me.
Conclusion
There was not much said other than visual upgrades and small tweaks that were supposed to make your life easier but then again Windows 11 itself is in the same boat.
I am not sure if this is a great update offering just some visual tweaks and focus on workflow mechanics or just being plain lazy and trying to cash in visuals as a completely new product.
One of the most important components of a computer in the network. The network, with the help of network devices, makes it possible for all kinds of devices to exchange information. One of the files associated with the network driver is the netio.sys file. It is a system file used by third-party programs to interact with the devices on the network.
If you encounter a Blue Screen of Death error that’s related to the netio.sys file then you’ve come to the right place as this post will guide you in fixing it. Here are some of the Blue Screen errors related to the netio.sys file:
KMODE EXCEPTION NOT HANDLED
PAGE FAULT IN A NONPAGED AREA
IRQL NOT LESS EQUAL
SYSTEM_SERVICE_EXCEPTION
DRIVER IRQL NOT LESS OR EQUAL
SYSTEM THREAD EXCEPTION NOT HANDLED
To fix the netio.sys Blue Screen errors on your Windows 10 computer, you can check out each one of the following suggestions.
Option 1 – Try to use the System File Checker
One of the built-in tools in Windows that you can use to fix Blue Screen errors is the System File Checker. This built-in command utility can help you restore corrupted or missing files as well as replace bad and corrupted system files. Chances are, the netio.sys file might be corrupted so to fix it, use System File Checker.
First, right-click on the Start button and click on the “Command Prompt (Admin) option.
Next, type in the sfc /scannow command and hit Enter to execute it.
The command will start a system scan which will take a few whiles before it finishes. Once it’s done, you could get the following results:
Windows Resource Protection did not find any integrity violations.
Windows Resource Protection found corrupt files and successfully repaired them.
Windows Resource Protection found corrupt files but was unable to fix some of them.
Finally, restart your computer.
Option 2 – Try checking the Memory for any errors
The first thing you can do to check the memory for errors is to run the CHKDSK utility. The CHKDSK utility repairs hard drive errors that might be causing the problem.
You need to open “This PC” first.
And then right-click on your operating system partition for Windows.
Next, click on Properties and navigate to the Tools tab.
After that, click on the Check button under the Error Checking section.
A new mini window will appear and from there, click on Scan drive.
Now let it scan your disk drive partition to check for errors and then restart your computer.
After running the CHKDSK utility, it’s now time to fix issues with your RAM by running the Memory Diagnostic tool. This tool in windows can help resolve the Blue Screen errors related to the netio.sys file by checking and automatically fixing any memory-based issues. To run it, refer to these steps:
Tap the Win + R keys to open Run and type mdsched.exe and hit Enter to open the Windows Memory Diagnostic Tool.
After that, it will give two options such as:
Restart now and check for problems (Recommended)
Check for problems the next time I start my computer
Once your computer has restarted, perform a basic scan or you could also go for the “Advanced” options such as “Test mix” or “Pass count”. Simply tap the F10 key to start the test.
Note: After you select your preferred option, your computer will restart and check for memory-based issues. If it finds any issues, it will automatically fix them and if there’s no issue found, then it’s most likely not a memory-based issue so you should try the other options given below.
Option 3 – Try to update or rollback or disable Network drivers
You might also want to update, roll back or disable your Network drivers to resolve the netio.sys Blue Screen errors.
Tap the Win + R keys to launch the Run window and then type in the “mdsched.msc” command and hit Enter to open the Device Manager window.
Under the Device Manager, you will see a list of drivers. From there, look for the Network Adapters and expand it.
Then right-click on each one of the Network drivers and depending on your preference, you can either select “Update driver”, “Disable device” or “Uninstall device”.
After that, restart your PC and see if it helped in fixing the netio.sys Blue Screen error.
Option 4 – Perform System Restore
Performing System Restore can also help fix BSOD errors, including the ones related to the netio.sys file. To run System Restore, follow the steps below.
First, tap the Win + R keys to open the Run dialog box.
After that, type in “sysdm.cpl” in the field and tap Enter.
Next, go to the System Protection tab then click the System Restore button. This will open a new window where you have to select your preferred System Restore point.
After that, follow the on-screen instructions to finish the process and then restart your computer and check if the problem is fixed or not.
Option 5 – Run the Blue Screen Troubleshooter
Troubleshooting Blue Screen of Death errors wouldn’t be complete without the Blue Screen troubleshooter. As you know, it is a built-in tool in Windows 10 that helps users in fixing BSOD errors like Storport.sys. It can be found on the Settings Troubleshooters page. To use it, refer to these steps:
Tap the Win + I keys to open the Settings panel.
Then go to Update & Security > Troubleshoot.
From there, look for the option called “Blue Screen” on your right-hand side and then click the “Run the troubleshooter” button to run the Blue Screen Troubleshooter and then follow the next on-screen options. Note that you might have to boot your PC into Safe Mode.
Stable Diffusion is a machine learning model developed by Stability AI to generate digital images from natural language descriptions. The model can be used for different tasks like generating image-to-image translations guided by text prompts and upscaling images.
Unlike competing models like DALL-E, Stable Diffusion is open source and does not artificially limit the images it produces. Stable diffusion was trained on a subset of the LAION-Aesthetics V2 data set. It can run on most consumer hardware equipped with a modest GPU and was hailed by PC World as "the next killer app for your PC".
Since Stable Diffusion is run locally and not in the cloud, as mentioned there is no limit to the number of images that you can produce but in order to use it you will have to get down a little dirty with setting your PC environment for it since it is not really an application, it is a command line text based descriptor that will use python to generate your images, so there is no install nor GUI.
In this guide, we will show you how to both install and run Stable Diffusion on your local PC so you can start producing some cool images all by yourself.
Hardware and software requirements
Make no mistake, Stable Diffusion will not run on a potato PC, in order to harvest the power of AI-generated imagery this is what you will need:
A GPU with at least 4GB of VRAM
10GB of hard disk space
Python and libraries (Miniconda3 installer will install everything you need)
The Stable Diffusion files
Git
Any OS (Windows, Linux, macOS)
Installing components
For this tutorial, we are covering the installation and running of Stable Diffusion on Windows PC. The steps presented here are presented in a way that installation can be performed on any operating system but precise instructions will be for Windows OS.
GIT
The first thing to do is to install GIT. It is a tool that will let you easily maintain and install repos from the internet. to install it go to: https://git-scm.com/ and click on download. Follow the instructions for your version of the operating system. If you are a developer you are familiar with GIT and if you already have it installed you can skip this step.
One thing that is important when installing GIT locally is to select to use it via the command line (the second option that says "Git from the command line and also from 3rd-party software").
Miniconda3
Now when we have GIT installed, next thing is to use Miniconda3 to install python and all required libraries that are needed. Get the installer at: https://docs.conda.io/en/latest/miniconda.html
Miniconda3 is basically an easy installer so you do not have to install tons of stuff manually from different websites and sources, it is nicely packaged in the installer that will take care of everything.
Stable Diffusion
After the previous two steps, we are ready now to actually install Stable Diffusion. Go to https://huggingface.co/CompVis/stable-diffusion#model-access and install the latest library (as of the writing of this article currently it is stable-diffusion-v1-4-original, the last one on the right), the library is almost 5GB in size so be prepared for big download.
Once downloaded click on the Windows start button and type in Miniconda3 and click on open. Create a folder and name it how you want on a drive of your choice. For this example, we will install it all in disk C under folder AI_art, follow the instructions below but use your own names and destination instead. Do not close Minicoda3 after typing commands!!!
cd c:/
mkdir AI_art
cd AI_art
Extract GitHub files that you have downloaded into your new folder and get back to Minicoda3 and type the next commands:
Let the whole process finish, some files are large and it might take a while. After the whole process is finished and completed, copy the checkpoint file that you have downloaded into: C:\AI_art\stable-diffusion-main\models\ldm\stable-diffusion-v1
After the file is copied rename it to model.ckpt and you are finished.
Running Stable Diffusion
The created environment is needed in order to actually use Stable Diffusion to create images. Each time you want to use it you will have to run it, so go into Miniconda3, and inside it type:
conda activate ldm
cd C:\AI_art\stable-diffusion-main
after we are inside the folder call the script with the parameters:
python scripts/txt2img.py --prompt "TXT DESCRIPTION OF IMAGE THAT YOU WANT TO CREATE" --plms --n_iter 5 --n_samples 1
and that's it, your image is created and it is located in C:\AI_art\stable-diffusion-main\outputs\txt2img-samples\samples
Entry Point not found dll errors are common in Windows PC. These errors indicate poor PC maintenance. An entry point is basically the memory address inside the dynamic link library. It contains the call being made.
A dynamic link library on the other hand is a collection of small programs which use and request this call to run and load programs successfully on your PC. However, when this process is unable to be executed successfully, you come across ‘entry point not found dll’ error messages.
Solution
Error Causes
Generally speaking, some of the typical causes of ‘entry point not found dll’ errors are:
Missing, corrupted, and damaged dll files
Registry overloaded with invalid entries
Disk fragmentation
Viral infection
It is advisable to resolve these ‘entry point not found dll’ errors on your PC immediately because dll errors can cause you a great deal of inconvenience as you may be locked out and unable to access your desired programs.
Furthermore, if dll errors are left unresolved, such errors can expose your PC to serious threats like system failure, system damage, corruption, and crash.
Further Information and Manual Repair
Though ‘entry point not found dll’ errors are critical errors but the good news is that these can be easily resolved. To fix dll errors on your PC, you don’t always have to hire a professional technician or be a computer programmer yourself.
Here are some of the best DIY (do it yourself) ways to resolve ‘entry point not found dll’ errors on your system:
1. Reinstall the Deleted Program
This method to resolve ‘entry point not found dll’ error code is very basic. It is advisable to uninstall and then reinstall the deleted program to retrieve the missing or deleted dll files. Here’s why: dll files are shared files. There are multiple programs on your PC that may be using one type of dll file to load.
Now when you uninstall a program that you no more need on your PC, chances are that it may also delete that particular dll file. And when this happens the other programs supported by the deleted dll file are unable to load.
Therefore, in such an event the best way to retrieve the missing dll file is to uninstall the program that displays the errors message and then reinstall it. This will help you restore the missing dll file and run the program successfully.
2. Install an Antivirus and a Registry Cleaner
As mentioned above, ‘entry point not found dll’ errors indicate poor PC maintenance. If you don’t maintain your system, the registry overloads with bad and invalid entries, redundant and obsolete files, junk files and cookies. These files acquire a lot of space which damages dll files and the registry.
Furthermore, due to data volume overload and less storage space, files are then saved in different places.
This is also known as disk fragmentation. When these files are called, it takes a lot of time for the disk to consolidate fragmented data and execute the function successfully.
To resolve these issues, you need to clean and restore the registry. Though this can be done manually it may be slightly complicated and time consuming therefore it is advisable to install and run a registry cleaner.
Restoro.
In addition to this, due to poor PC maintenance, viruses and malware can also enter your system unknowingly through file downloads and phishing emails.
These can also damage dll files. To remove viruses and malware from your PC it is important to run an anti-virus. Instead of downloading both tools separately on your system, we recommend Restoro.
This is a multi-functional and advanced PC fixer embedded with an intuitive algorithm and a user-friendly interface. It includes multiple utilities including a powerful antivirus, a high functional registry cleaner, and Active X controls and class scanner. It also functions as a system optimizer.
By running this software on your system, you can easily scan all registry issues and viruses simultaneously.
It repairs the damaged registry and dll files, removes unnecessary files and all types of malicious software. It is compatible with all Windows versions. It is easy to use and high on performance.
It is a one-stop solution for all ‘entry point not found dll’ errors on your PC. In just a few clicks you can resolve system errors and optimize your PC performance dramatically.
Click here to download Restoro and resolve ‘entry point not found dll’ errors.
Microsoft has presented its next version of their flagship product, Windows 11, and feelings are divided among users.
Some users like it very much and eager to upgrade, some do not like the graphic overhaul it went through, but overall I think Microsoft has done a good job with it.
Here in this article, we will discuss some of the new features which Windows brings to the table, well at least ones that were showed, I am sure there are plenty more which we will see once OS has been released.
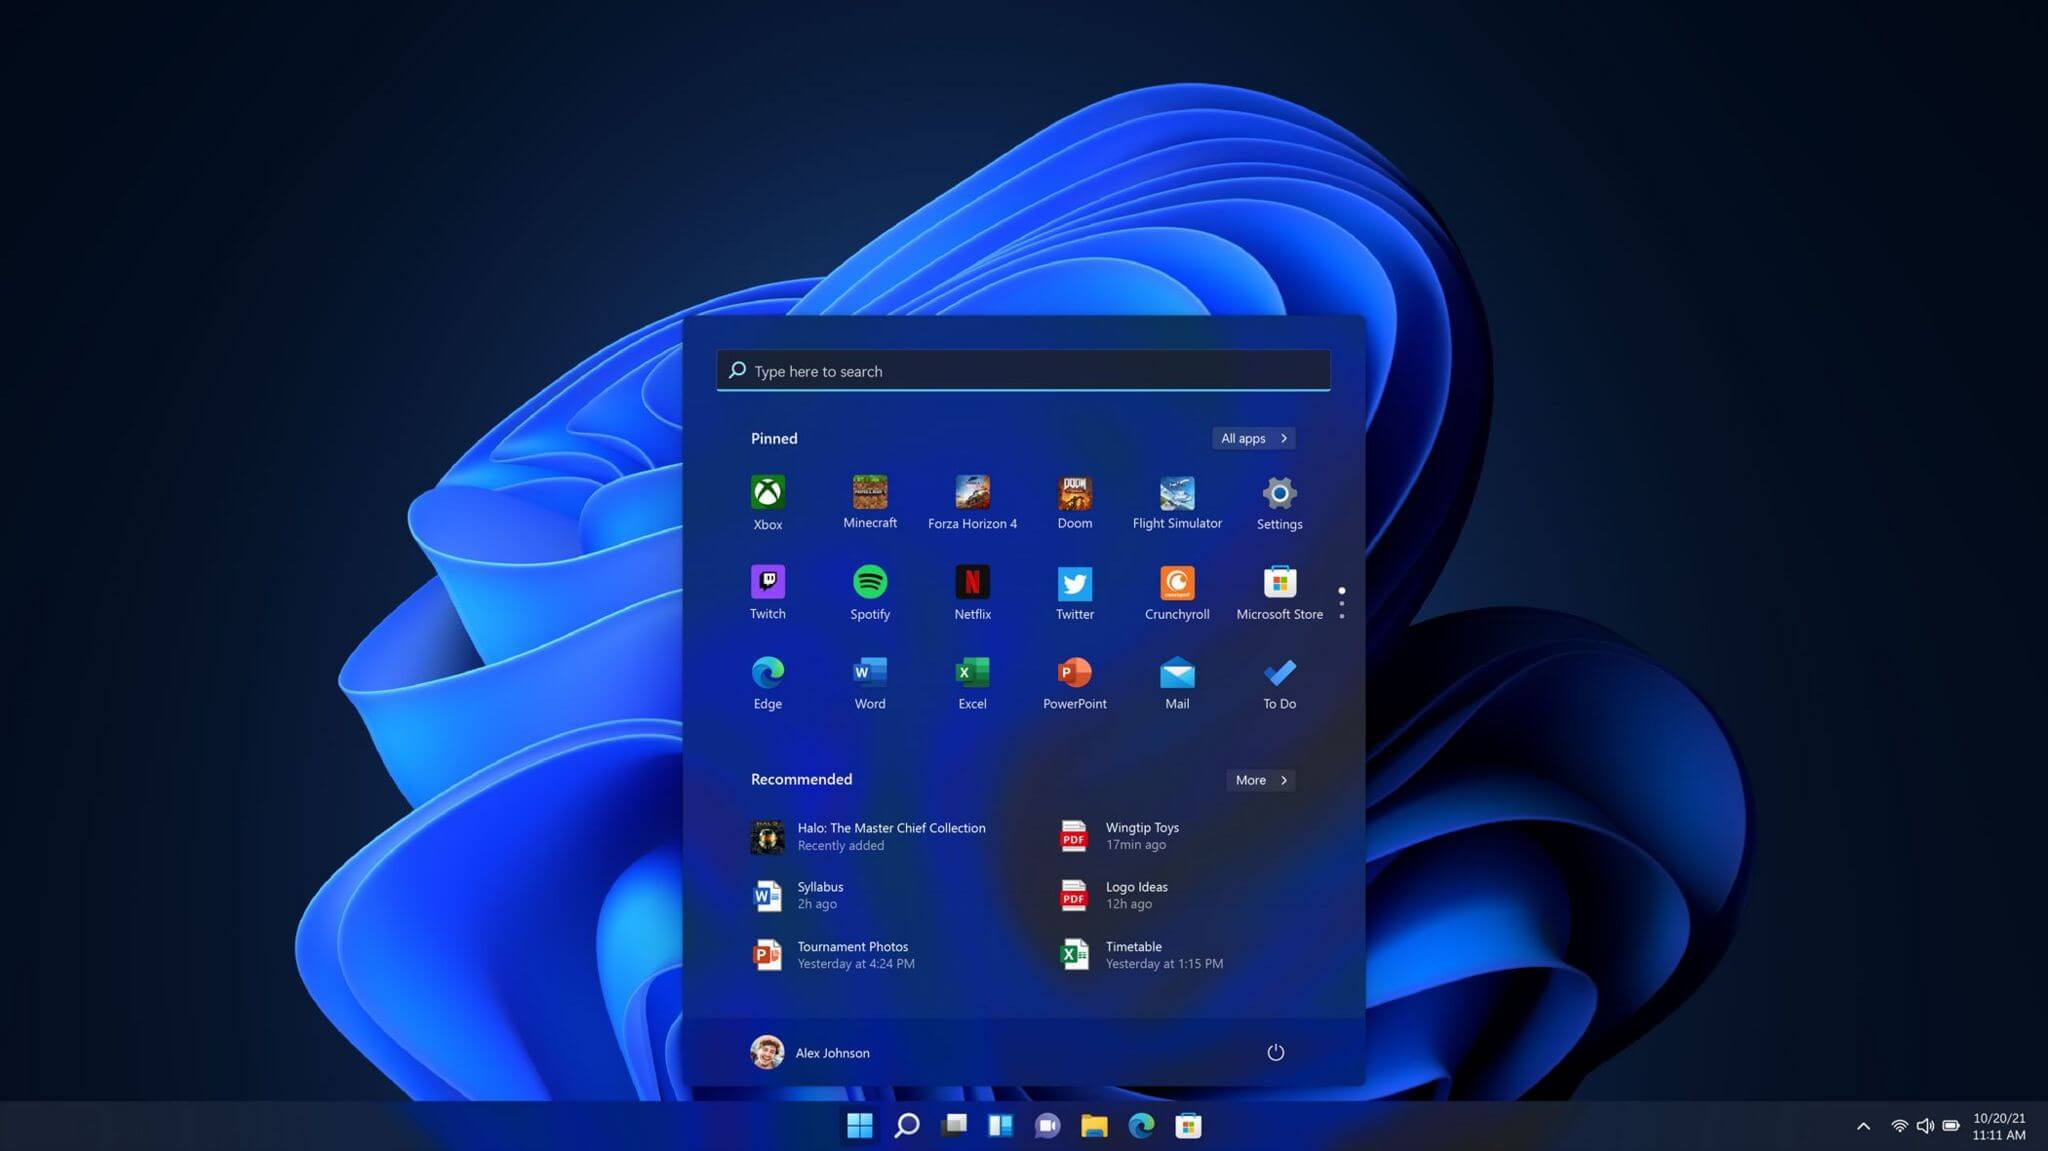
New Start menu
One of the first things that everyone saw when Microsoft has unveiled Windows 11 is its Start menu. Funny enough this is what has caused most of the divide among users, some find it interesting, and some do not like it. Truth is, it is different, and it is centered in the middle instead of the lower left part of the screen.
It has been confirmed however that the Start menu can be moved to any part of the screen so if you want, you could place it on the lower left as it has always been.
Live tiles do not longer exist in the Start menu, instead, we have styled simple icons.
Windows 11 Snap controls are great
If you have used the cascade option in previous Windows versions then it is most likely that you will like the new Snap controls.
You can quickly snap windows side by side, or arrange them in sections on your desktop just by hovering over maximize button on the title bar.
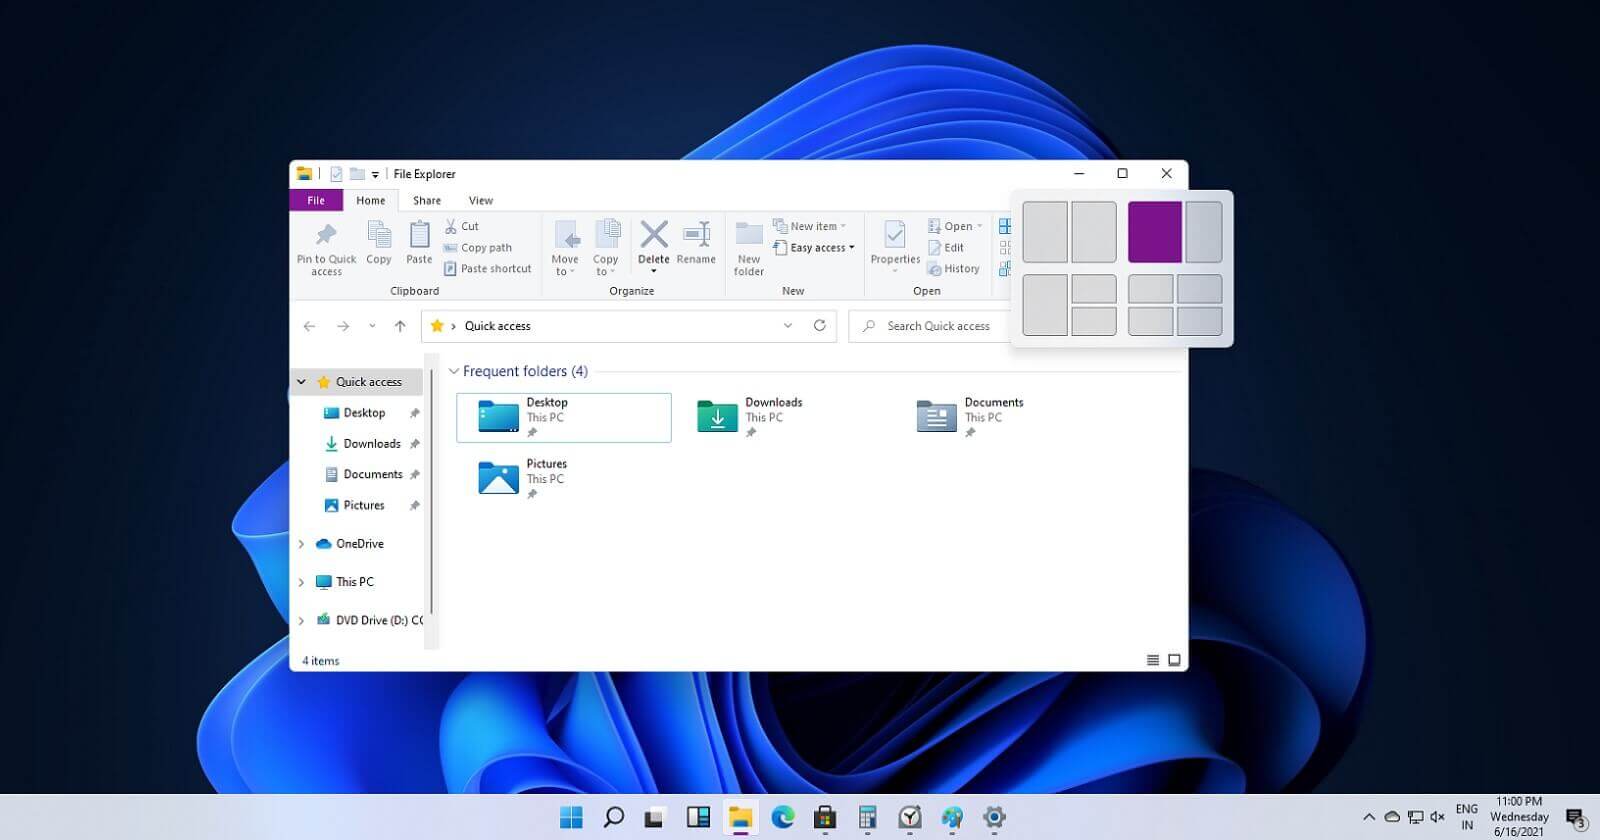
Windows 11 File Explorer
File explorer has gone through some visual and design changes, the ribbon on top has been completely removed and replaced with a header-like feature with a slick and clean design.
The header contains a nice organized and designed single row of icons like cut, paste, copy, rename, delete, and new folder icons.
Settings app ovberhaul
The settings app also has gone through visual and design changes. It has a new design that is very visually appealing and navigation has been simplified and more organized. Finding the right and desired setting is much faster and clearer now.
Widget tab makes comeback in Windows 11
Yes, widgets are back but not like you remember them.
Instead of being all-time present at your desktop like once they used to be, now there is a button on the taskbar which brings the widget bar up that contains desired widgets. This way they are easily accessible and do not clutter desktops.
So far we have weather, news, calendar, and stocks widget but we will see how development on these goes. I expect to have community-made widgets like in old days for all of our needs.
XBOX app
The new Xbox app is now integrated into Windows 11, offering quick access to Xbox Game Pass games, the social parts of the Xbox network, and the Xbox store.
Security and TPM 2.0 in Windows 11
As widely known by now Windows 11 will require you to have a TPM 2.0 module capable CPU in order to install it.
This system requirement has caused a lot of controversies but essentially it seems that MS's goal is to protect your personal data by using this module.
The upside of course is that your data will be protected much more than in previous Windows versions, the downside, of course, will be that you will need newer hardware to run OS on it.
and that is essentially it, keep on tuned on more Windows 11 information and overall articles tied to PC and technology here at errortools.com
NDIS or Network Driver Interface Specification is a programming interface for the network interface cards that aids in the proper functioning of a system driver in a computer network. The NDIS helps the computer system in order to communicate with other connected devices and hardware components on a computer network. In relation, the ndis.sys file is a critical system file developed by Microsoft for the Windows operating system. As you know, sys files or system files are important parts of the Windows operating system as well as a repository of system driver settings used by Windows to communicate with the connected hardware and devices.
The ndis.sys files are stored mostly in a driver folder at C:/Windows/System32/drivers and as mentioned, these files are essential for the system to function properly. Although the presence of ndis.sys system file is not yet known to affect the normal functioning of the Windows OS, some of the Windows 10 users reported that they encountered ndis.sys blue screen errors on their PCs. Blue Screen of Death errors or Stop errors usually occurs when you open a program or a function. Moreover, it could also occur when the driver gets loaded during the system startup or during system shutdown.
It isn’t yet clear what really causes the ndis.sys blue screen error. However, like other Stop errors, it may occur due to corrupted files, misconfigured device drivers, bad drivers, corrupted Windows Registry, missing or damaged system files, and malicious programs. Aside from the aforementioned reasons, the ndis.sys blue screen error might also occur if your hard disk is damaged and if the RAM is corrupted. In such cases, a lot of users usually disable the ndis.sys file. However, it won’t really resolve the issue since the file is required for the normal functioning of the operating system and even when you disable the file, it’s pretty useless as the file will start all over again. In addition, you might want to disable security programs or firewalls and antivirus programs in the meantime to check if these programs are the ones that are causing the error. And if you’ve determined that none of the security programs or firewalls and antivirus programs are to blame, refer to the options below that might help you resolve the DRIVER_IRQL_NOT_LESS_OR_EQUAL or ndis.sys Blue Screen of Death error.
Option 1 – Try to update or reinstall the PC device driver
The Ndis.sys Blue screen error can occur when the device driver in your computer is outdated or corrupted. Thus, you either have to update or reinstall it to fix the issue.
Tap the Win + R keys to launch Run.
Type in devmgmt.msc into the box and tap Enter or click OK to open the Device Manager.
After that, a list of device drivers will be displayed. If you see a red or yellow sign that shows up against the driver, right-click on the driver’s name and select “Update Driver Software” or “Uninstall”. And if you find any “Unknown device”, you need to update it as well.
Select the “Search automatically for updated driver software” option and then follow the instructions to complete the process.
Restart your PC.
Option 2 – Rollback your Network drivers
If you have updated the driver software as of late and you suddenly got this BSOD error, you might have to roll back the device driver – in other words, switch back to the previous working version. To do that, follow these steps:
Tap the Win + R keys to launch the Run window and then type in the “devmgmt.msc” command and hit Enter to open the Device Manager window.
Under the Device Manager, you will see a list of drivers. From there, look for the Network Adapters and expand it.
Next, select the driver entries that are labeled appropriately other than anything in the context of the WAN Miniport.
Then select each one of them and double-click to open a new mini window.
After that, make sure that you’re on the Driver tab and if you are not, just navigate to it then click the Roll Back Driver button to switch back to the previous version of your Network adapters.
Now restart your computer to successfully apply the changes made.
Option 3 – Try running the System File Checker
The SFC or System File Checker scan could detect and automatically repair damaged system files that could be causing the ndis.sys Blue Screen of Death error. SFC is a built-in command utility that helps in restoring corrupted files as well as missing files. It replaces bad and corrupted system files with good system files. To run the SFC command, follow the steps given below.
Tap Win + R to launch Run.
Type in cmd in the field and tap Enter.
After opening Command Prompt, type in sfc /scannow and hit Enter.
The command will start a system scan which will take a few whiles before it finishes. Once it’s done, you could get the following results:
Windows Resource Protection did not find any integrity violations.
Windows Resource Protection found corrupt files and successfully repaired them.
Windows Resource Protection found corrupt files but was unable to fix some of them.
Option 4 – Try running the CHKDSK utility
Running the CHKDSK utility might also help you resolve the Netwtw04.sys failed BSOD error. If your hard drive has issues with integrity, the update will really fail as the system will think that it’s not healthy and that’s where the CHKDSK utility comes in. The CHKDSK utility repairs hard drive errors that might be causing the problem.
Open Command Prompt with admin privileges.
After opening Command Prompt, execute the following command and hit Enter:
chkdsk /f /r
Wait for the process to be completed and then restart your computer.
Option 5 – Run the DISM Tool
The DISM tool is another command-line tool in the Windows operating system that could help users fix various corrupted system files. To use it, follow these steps:
Open the Command Prompt as admin.
Then type in this command: DISM /Online /Cleanup-Image /RestoreHealth
The DISM command you entered will repair the corrupted system image. Do not close the window if the process takes a while as it will probably take a few minutes to finish.
Restart your PC.
Option 6 – Perform a System Restore
Performing a System Restore on your computer can also help you fix the ndis.sys Blue Screen of Death error. You can do this option either by booting into Safe Mode or in System Restore. If you are already in the Advanced Startup Options, just directly select System Restore and proceed with the next steps. And if you have just booted your PC into Safe Mode, refer to the steps below.
Tap the Win + R keys to open the Run dialog box.
After that, type in “sysdm.cpl” in the field and tap Enter.
Next, go to the System Protection tab then click the System Restore button. This will open a new window where you have to select your preferred System Restore point.
After that, follow the on-screen instructions to finish the process and then restart your computer and check if the problem is fixed or not.
Cortana is your personal digital assistant fully integrated into Windows 10 designed to help you make your life easier. The more you use it, the more Cortana can learn about you, and the experience becomes more personalized and accurate. It can perform a variety of tasks, and it's full of handy tricks, but perhaps one of the best features is the advanced speech recognition that enables Cortana to understand the context of a natural voice conversation.
On Windows 10, and across platforms with the Cortana app on iPhone and Android, the assistant can understand virtually any voice command and perform tasks. For example, by just speaking you can find facts, create reminders and manage your calendar, launch applications, change settings, and a lot more.
Now, if you're looking for an official list of all the voice commands Cortana supports, you'll never find it because it doesn't exist. Cortana can understand natural language and context, there's no particular set of commands to make things happen. In a sort of way, you are speaking to Cortana as you would to any other person.
Invoking Cortana
Before using voice commands, it's important to know the ways in which you can invoke Cortana using natural language:
You can click the microphone icon in the taskbar next to the Start menu.
You can use the Shift + ⊞ Windows + C keyboard shortcut to open Cortana in listening mode.
You can use the Hey Cortana feature, which lets you invoke the assistant by simply saying Hey Cortana followed by the command. For example, Hey Cortana: How's the weather?.
On Windows 10 Mobile devices, you can press and hold the search button to open Cortana in listening mode.
Comprehensive list of Cortana voice commands
The following list of commands are examples you can use to learn how to control Cortana with voice commands. Keep in mind that there isn't a specific way to speak the commands. For example, Hey Cortana: Let me listen to some tunes is the same as asking for a more systematic command like Hey Cortana: Play music.
Cortana basic voice commands:
Getting the time for any location:
"What time is it?"
"What time is in New York?" or "What time is in Greece?"
Getting weather information for any location:
"What's the weather like?"
"What's the weather in Madrid?" or "What's the weather in Slovakia?"
"When does the sun set?"
"Is it hot in Hawaii?"
"How's the weather looking for tomorrow/next week?"
Opening (Store and desktop) apps and websites:
"Open Photoshop" or "Go to Firefox"
"Open errortools.com."
Getting news information:
"Show me top headlines."
"Show me the latest news."
"Show me weather news."
"Show me Blizzard stock."
"Show me bitcoin exchange rate."
"What was the score of the last Brazil football game."
Creating a note:
"Create a note."
"Create Shopping note."
"Create Shopping note: Buy a basket of eggs"
"Take a note."
"Draft a note."
"Write a note."
Translating to a different language:
"Translate."
"Translate Hello to German"
"Translate Where is the nearest park? to Spain"
Doing math:
"What's 34% or $764.89?"
"What's 43 times 59?"
"What the square root of 26509?"
"What's 29 times 6 divided by 12?"
"Convert 6.9 cups to fluid ounces."
"How many miles are in 89 Kilometers?"
Defining a word:
"Define Space."
Tracking packages:
"Where is my package?"
"Show me my packages."
Cortana search voice commands:
Finding documents, photos, videos:
"Find photos from August 1998."
"Find cat videos."
"Find document called Collection of poems."
Searching the web:
"Search the web for Heroes of Might and magic."
Finding facts:
"How tall is Mount Everest?"
"Who is Steve Jobs?"
"When Arnold Schwarzenegger was born?"
"Who is Mercedes CEO?"
"When does spring begin?"
"What's the capital of Zimbabwe?"
"When is Thanksgiving?"
It's important to note that Cortana is capable of conversational understanding, which means that you can also ask follow-up questions without having to be very specific.
For example, if you ask Cortana: "Who is the president of the United States", you can then ask a follow-up question, such as "Who is his wife?" or "When was he born?" and the assistant should be able to answer those questions accurately.
Discovering food places nearby:
"Find food places near me."
"Find restaurants near me."
"Find bars near me."
"What's a good restaurant near me?"
"What's interesting nearby?"
"Show me Chinese restaurants near me."
"Show me Italians restaurants in Los Angeles."
Cortana health and fitness voice commands:
"How was my sleep last night?"
"What was my step count yesterday?"
"How many calories did I burn today?"
These commands require a tracking device, such as the Microsoft Band 2 to enable your fitness and health activities, and you need to connect Cortana with the Microsoft Health (Microsoft Band) service.
Cortana settings voice commands:
Opening the Settings app:
"Open Settings."
"Open Action Center."
Controlling settings:
"Turn on/off Bluetooth"
"Turn on/off Wi-Fi"
"Turn on/off Airplane Mode"
Cortana reminders voice commands:
Creating reminders:
"Remind me to wash the car."
Creating location-based reminders:
"Remind me to buy CDs next time I go to Walmart."
Creating person-based reminders:
"Remind me to ask for vacation time next time I talk to Goran."
Creating time-based reminders:
"Remind me to watch the basketball game at 6 PM."
"Remind me to buy the food for the d&d session on Sunday at 3 PM."
Viewing reminders:
"Show me my reminders."
Cortana calendar voice commands:
Viewing calendar events:
"How's my schedule looking today?"
"Show me my appointments for next week."
"When is my dentist appointment?"
Adding new calendar events:
"Add dental appointment for Monday at 2 PM."
Moving calendar events:
"Move dental appointment to Friday at 5 PM."
Cortana alarms voice commands:
Creating alarms:
"Set an alarm for next Monday at 5:30 AM."
"Set an alarm for Saturdays at 9 AM."
Viewing alarms:
"Show my alarms"
Removing alarms:
"Cancel alarm for Saturdays at 9 AM."
Cortana timer voice commands:
Creating a timer:
"Set a timer for 5 minutes."
You can only start a one-timer at one point in time. If there is a timer already running, Cortana will ask you to restart it at a new time.
Viewing timer:
"Show timer."
"How much time is left on the timer?"
Canceling timer:
"Stop timer."
Cortana location voice commands:
Knowing your exact location:
"Tell me where am I?"
Cortana messaging voice commands:
Sending text messages:
"Send a text to Milan: I'll be late for lunch today."
Sending quick emails:
"Send email to Milena: See you later tonight."
"Send email to John and Claudia: How is the project coming along?"
Cortana location voice commands:
Getting directions:
"What's the traffic like on the way home?"
"How do I get home."
"How long would it take to drive to Madison Square Garden?"
"Get me directions to Port Authority."
"How do I get from my location to Long Beach, New York?"
"How far away is the moon?"
"Show me walking directions to the nearest gas station."
"Show me public transit to 11 Times Sq, New York, NY 10036."
"Show me the map of San Francisco."
Tracking flights:
"Track flight 1056."
"Is my flight delayed?"
"Is my flight on time?"
Cortana entertainment voice commands:
Controlling music:
"Play Metallica."
"Put some Symphonic music."
"Shuffle music."
"Play and Justice for all by Metallica."
"Stop music"
"Pause music"
"Pause song."
"Play next"
"Next track"
"Skip track."
Identifying what's playing:
"What is this song?"
"What's playing?"
Movies & TV:
"What's Blade Runner run time?"
"Who was the director of Gladiator?"
"What movies are playing near me?"
"What are the showtimes for Star Trek lower decks?"
Cortana technical support voice commands:
"How do I install a printer?"
"How do I project my screen?"
"How do I change my background?"
"How do I update Windows?"
"How do I make a backup?"
"How do I change default apps?"
"How do I change Privacy?"
"How do I connect a wireless device?"
Sometimes asking a "How to do I" question will result in a web search response.
When you encounter an error message that says, Chassis Intruded…Fatal Error…System Halted on your monitor then it indicates that the Chassis or the cabinet that holds the CPU, GPU, motherboard, and many more is open. It is a security feature offered by OEMs wherein a connector that is found in the motherboard can detect if the chassis component has been replaced or removed. There are a few OEMs that offer onboard speaker or PC chassis speaker which goes off in this kind of situation.
Obviously, the problem has something to do with the hardware and in most cases, you have to put the jumper back on the motherboard with the pin-labeled chassis signal and ground. There are times when some OEMs offer a simple switch that is armed automatically when you properly close the chassis. Thus, you need to check if this switch has something to do with the error. If there is no switch or if it doesn’t resolve the issue, although you may be able to get into Windows with a warm boot, the normal Windows boot won’t really work unless you fix the problem. It is rather false positive and has something to do with the RTC RAM state or the BIOS. You might need to completely disable the Chassis intrusion feature to fix the error.
Refer to the suggestions given below to try and fix the “Chassis Intruded, Fatal Error … System Halted” error.
Option 1 – Try to clear CMOS
You can easily clear CMOS by shorting two pins which can be found side by side on the motherboard. Keep in mind that it may vary from OEM to OEM although the basics are still the same to clear CMOS. In addition, you might also have to download the manual from the OEM’s website so that you’ll know its exact location.
Option 2 – Try booting into the BIOS
You can also try booting into the BIOS. All you have to do is tap either the DEL or F2 keys to get there. Note that everything will be set back to their default setting after you reset the CMOS.
Option 3 – Try disabling Chassis intrusion
In this option, you have to look for the Chassis intrusion feature in your BIOS. It might be located under security. From there, disable it and check if the problem’s fixed.
Option 4 – Try to reconfigure the BIOS
Once you have disabled the Chassis feature, you need to reconfigure the BIOS the way you expect it to be or to what it was before the reset.
Windows 11 provides several different ways to make your cursor stand out and be easier to spot inside it. You can make the mouse pointer larger, invert it, or change its color.
Press ⊞ WINDOWS + I to open settings
Click on Accessibility in the sidebar
Select Mouse Pointer and Touch
Adjust mouse cursor size with size slider by clicking on circle and dragging it left or right
Under Mouse Pointer Style pick desired style from White, Black, Inverted, and Custom
White: The cursor is white with a black outline (standard setting)
Black: Cursor is black with a white outline
Inverted: Cursor automatically changes color to an inverted version of the color it is currently hovering over
Custom: You can pick the color for the cursor that you want.
And that is all about it, once you are done with pointer customization just close settings, all changes are saved automatically.

 Error Causes
 How to switch
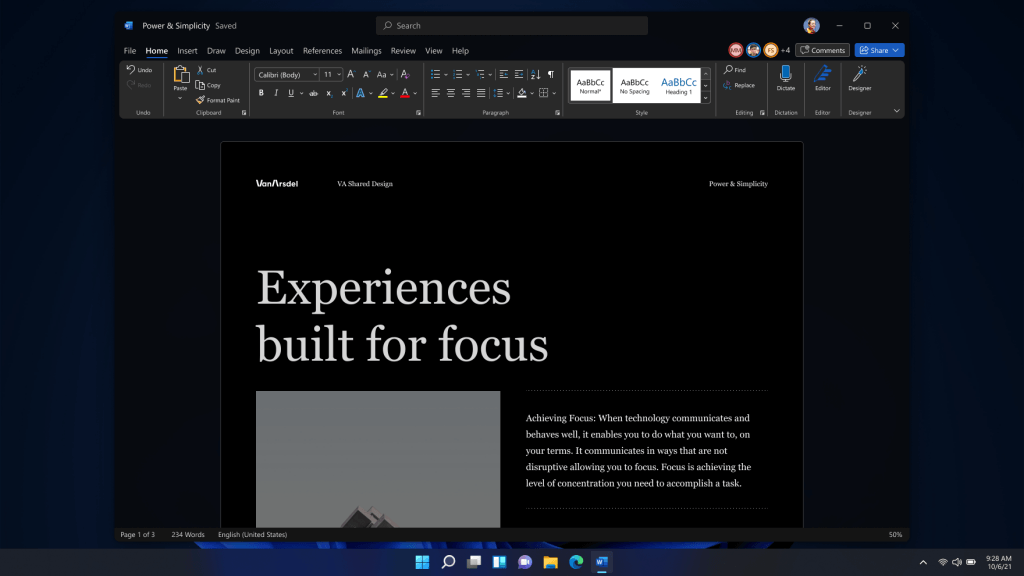 Conclusion
 One of the first things that everyone saw when Microsoft has unveiled Windows 11 is its Start menu. Funny enough this is what has caused most of the divide among users, some find it interesting, and some do not like it. Truth is, it is different, and it is centered in the middle instead of the lower left part of the screen.
It has been confirmed however that the Start menu can be moved to any part of the screen so if you want, you could place it on the lower left as it has always been.
Live tiles do not longer exist in the Start menu, instead, we have styled simple icons.
One of the first things that everyone saw when Microsoft has unveiled Windows 11 is its Start menu. Funny enough this is what has caused most of the divide among users, some find it interesting, and some do not like it. Truth is, it is different, and it is centered in the middle instead of the lower left part of the screen.
It has been confirmed however that the Start menu can be moved to any part of the screen so if you want, you could place it on the lower left as it has always been.
Live tiles do not longer exist in the Start menu, instead, we have styled simple icons.
 If you have used the cascade option in previous Windows versions then it is most likely that you will like the new Snap controls.
You can quickly snap windows side by side, or arrange them in sections on your desktop just by hovering over maximize button on the title bar.
If you have used the cascade option in previous Windows versions then it is most likely that you will like the new Snap controls.
You can quickly snap windows side by side, or arrange them in sections on your desktop just by hovering over maximize button on the title bar.
 File explorer has gone through some visual and design changes, the ribbon on top has been completely removed and replaced with a header-like feature with a slick and clean design.
The header contains a nice organized and designed single row of icons like cut, paste, copy, rename, delete, and new folder icons.
File explorer has gone through some visual and design changes, the ribbon on top has been completely removed and replaced with a header-like feature with a slick and clean design.
The header contains a nice organized and designed single row of icons like cut, paste, copy, rename, delete, and new folder icons.
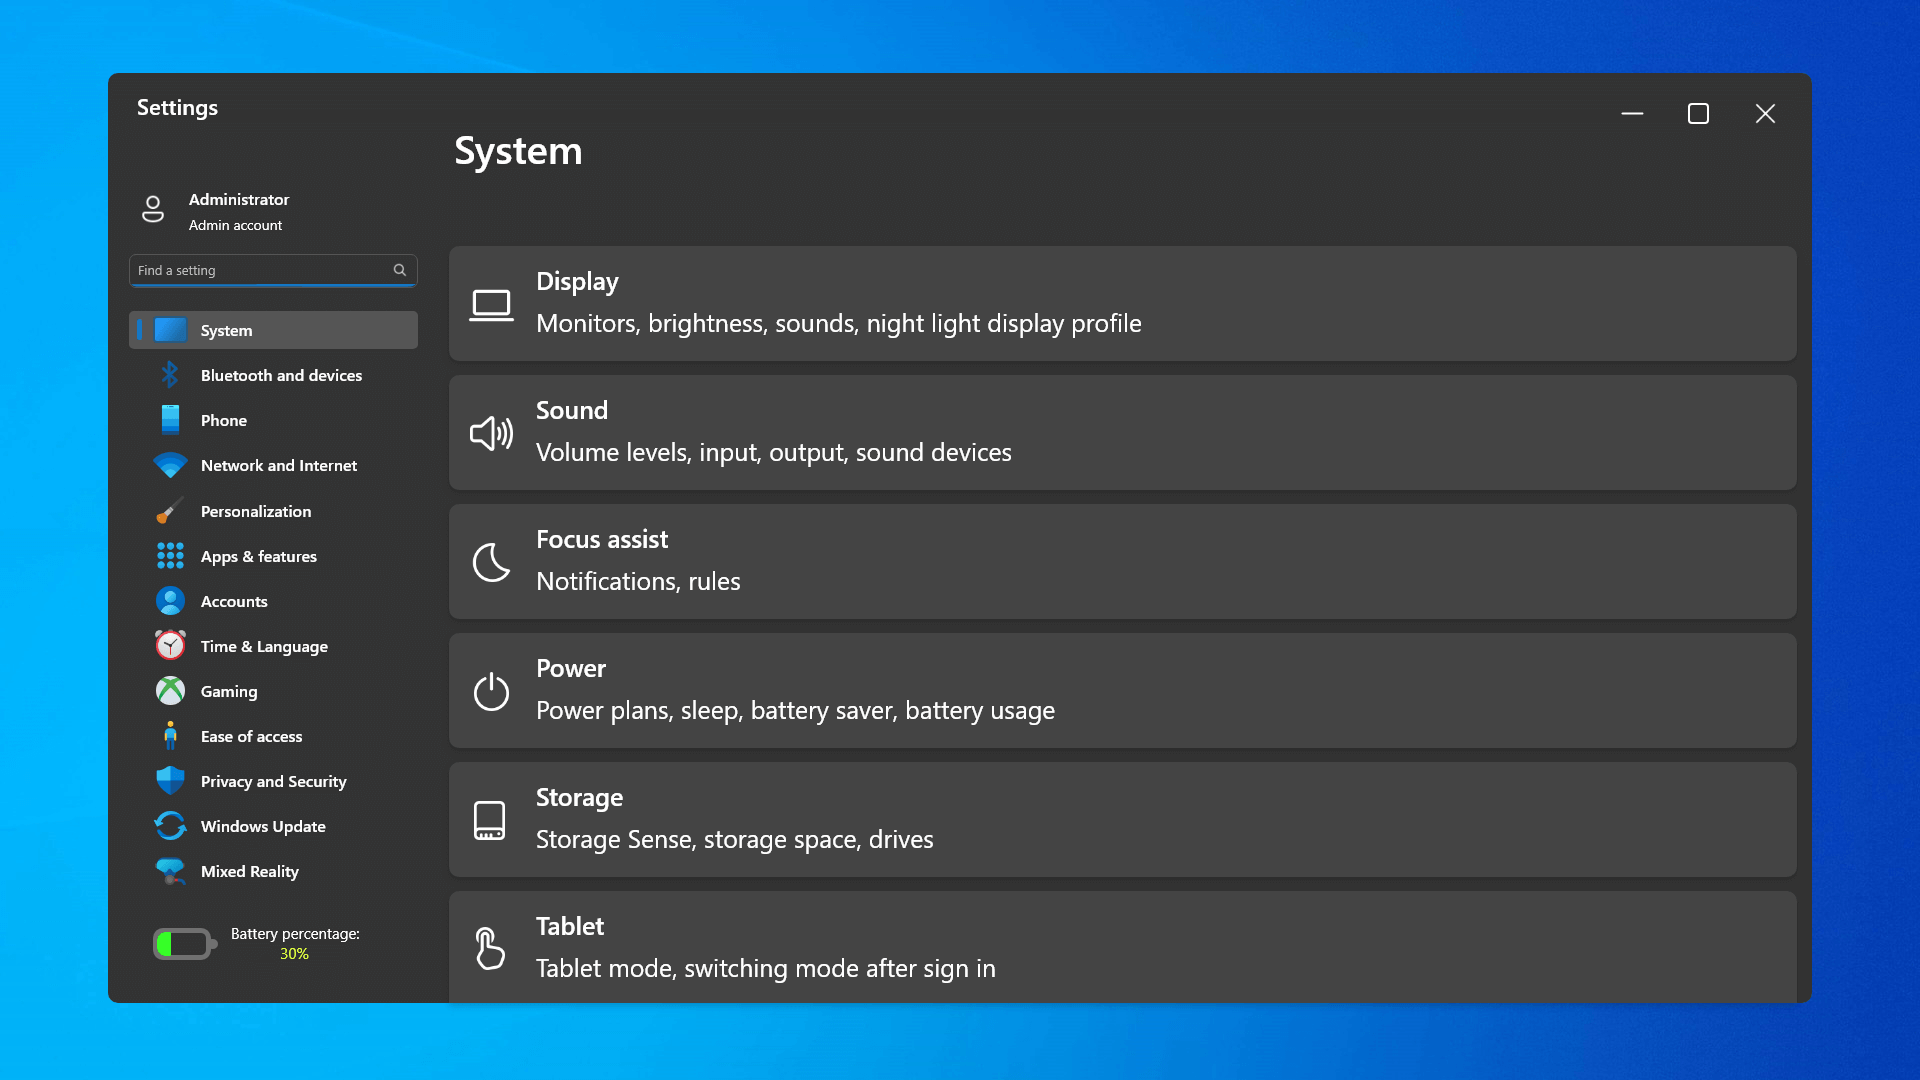 The settings app also has gone through visual and design changes. It has a new design that is very visually appealing and navigation has been simplified and more organized. Finding the right and desired setting is much faster and clearer now.
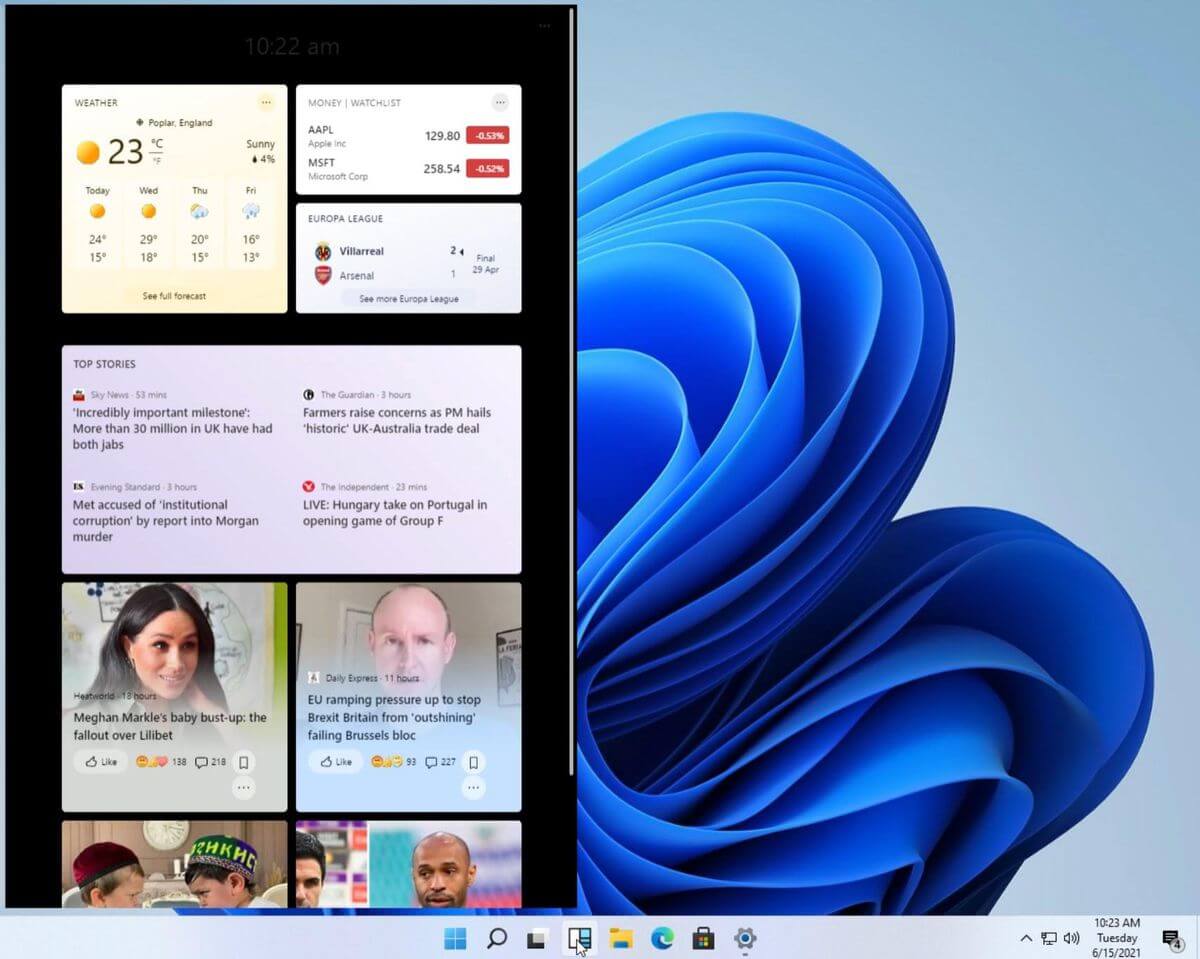 Yes, widgets are back but not like you remember them.
Instead of being all-time present at your desktop like once they used to be, now there is a button on the taskbar which brings the widget bar up that contains desired widgets. This way they are easily accessible and do not clutter desktops.
So far we have weather, news, calendar, and stocks widget but we will see how development on these goes. I expect to have community-made widgets like in old days for all of our needs.
Yes, widgets are back but not like you remember them.
Instead of being all-time present at your desktop like once they used to be, now there is a button on the taskbar which brings the widget bar up that contains desired widgets. This way they are easily accessible and do not clutter desktops.
So far we have weather, news, calendar, and stocks widget but we will see how development on these goes. I expect to have community-made widgets like in old days for all of our needs.
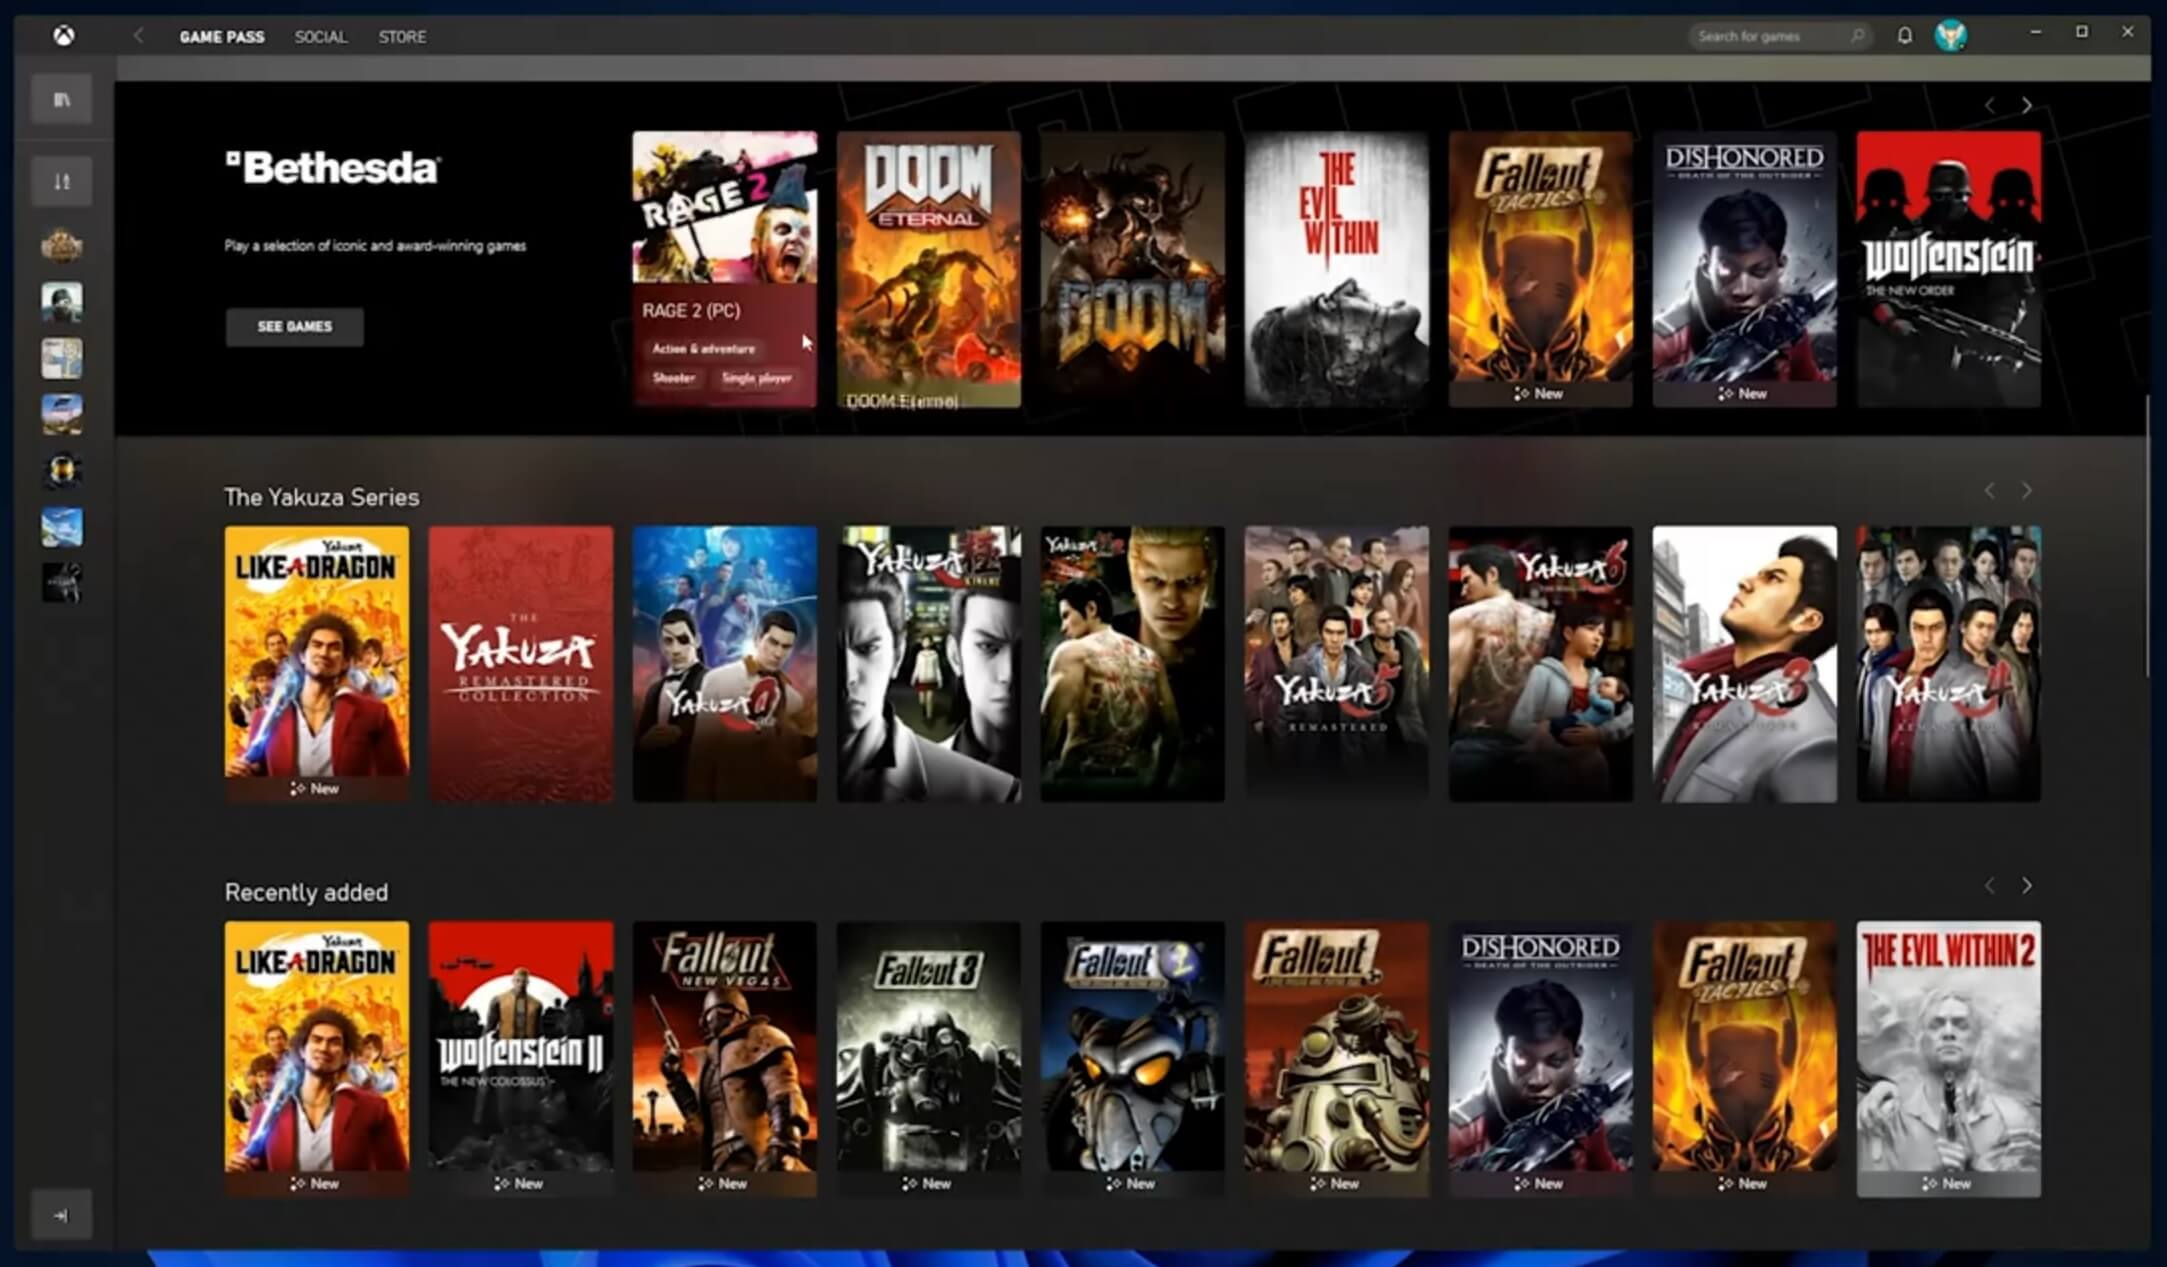 The new Xbox app is now integrated into Windows 11, offering quick access to Xbox Game Pass games, the social parts of the Xbox network, and the Xbox store.
 As widely known by now Windows 11 will require you to have a TPM 2.0 module capable CPU in order to install it.
This system requirement has caused a lot of controversies but essentially it seems that MS's goal is to protect your personal data by using this module.
The upside of course is that your data will be protected much more than in previous Windows versions, the downside, of course, will be that you will need newer hardware to run OS on it.
and that is essentially it, keep on tuned on more Windows 11 information and overall articles tied to PC and technology here at errortools.com
As widely known by now Windows 11 will require you to have a TPM 2.0 module capable CPU in order to install it.
This system requirement has caused a lot of controversies but essentially it seems that MS's goal is to protect your personal data by using this module.
The upside of course is that your data will be protected much more than in previous Windows versions, the downside, of course, will be that you will need newer hardware to run OS on it.
and that is essentially it, keep on tuned on more Windows 11 information and overall articles tied to PC and technology here at errortools.com  Windows 11 provides several different ways to make your cursor stand out and be easier to spot inside it. You can make the mouse pointer larger, invert it, or change its color.