Installation failed in the SAFE_OS phase

If you are trying to install a Windows 10 upgrade but was interrupted with an error saying, “0x80070003 – 0x2000D, The installation failed in the SAFE_OS phase with an error during MIGRATE_DATA operation”, then you’ve come to the right place as this post will help you sort this problem out.

When you get this kind of error while trying to upgrade your computer, although there could be various reasons for this, the primary one is that when you upgrade from one update to another, something stopped the upgrade process to migrate the user data. To fix this error, you can try to run both the DISM tool and the System File Checker to automatically repair any corrupted system files. You could also try checking the free storage space of your primary drive and if you have any file lock apps like BitLocker, consider disabling them for they could also be the reason why you’re getting the error.

Option 1 – Run the DISM tool

Running the DISM Tool helps in repairing the Windows System Image as well as the Windows Component Store in Windows 10 which might be the reason behind the Windows Upgrade error 0x80070003 – 0x2000D. Using this built-in tool, you have various options such as the “/ScanHealth”, “/CheckHealth”, and “/RestoreHealth”.

  • Open the Command Prompt as admin.
  • Then type in this command: exe /Online /Cleanup-image /Restorehealth
  • Do not close the window if the process takes a while as it will probably take a few minutes to finish.
  • Once it’s done, restart your computer and then check if the issue is resolved or not on the next startup.

Option 2 – Run the SFC scan

The SFC or System File Checker scan could detect and automatically repair damaged system files that could be causing the Windows Upgrade error to appear. SFC is a built-in command utility that helps in restoring corrupted files as well as missing files. It replaces bad and corrupted system files to good system files. To run the SFC command, follow the steps given below.

  • Tap Win + R to launch Run.
  • Type in cmd in the field and tap Enter.
  • After opening Command Prompt, type in sfc /scannow and hit Enter.

The command will start a system scan which will take a few whiles before it finishes. Once it’s done, you could get the following results:

  1. Windows Resource Protection did not find any integrity violations.
  2. Windows Resource Protection found corrupt files and successfully repaired them.
  3. Windows Resource Protection found corrupt files but was unable to fix some of them.
  • Reboot your PC.

Option 3 – Try checking the free storage space on your primary drive

The next option you can try to resolve the error is to see if you have enough free storage space on the primary drive because if you don’t then it’s probably the reason why you’re getting this error. To fix it, you need to free up some storage space by following these steps:

  • Open Setting > System > Storage from the WinX Menu.
  • From there, you will see a list of all the local and connected storage devices along with the details on the free space.
  • Now make sure that the Storage Sense feature is turned On then go find a link that says “Free Up Space” and click it to open.
  • After that, a screen which is the built-in program in Windows 10 will appear and will scan your computer for the following junk files so you can free up disk space:
  • Windows Upgrade Log Files
  • System created Windows Error Reporting Files
  • Thumbnails
  • Temporary Internet Files
  • Previous Windows Installation Files
  • Delivery Optimisation Files
  • DirectX Shader Cache

Note: Once you’re done freeing up space on your drive, try to run the setup file again.

Option 4 – Try disabling BitLocker and other file lock apps

If you are using BitLocker or other file lock apps, then it could be the reason why you’re getting the error. Usually, file lock apps don’t cause any kind of issue, however, if you have something that works on file level like BitLocker, you can try to disable it. Once you’ve disabled it, try to install the Windows 10 Upgrade again and after you do, enable BitLocker again. This should fix the problem.
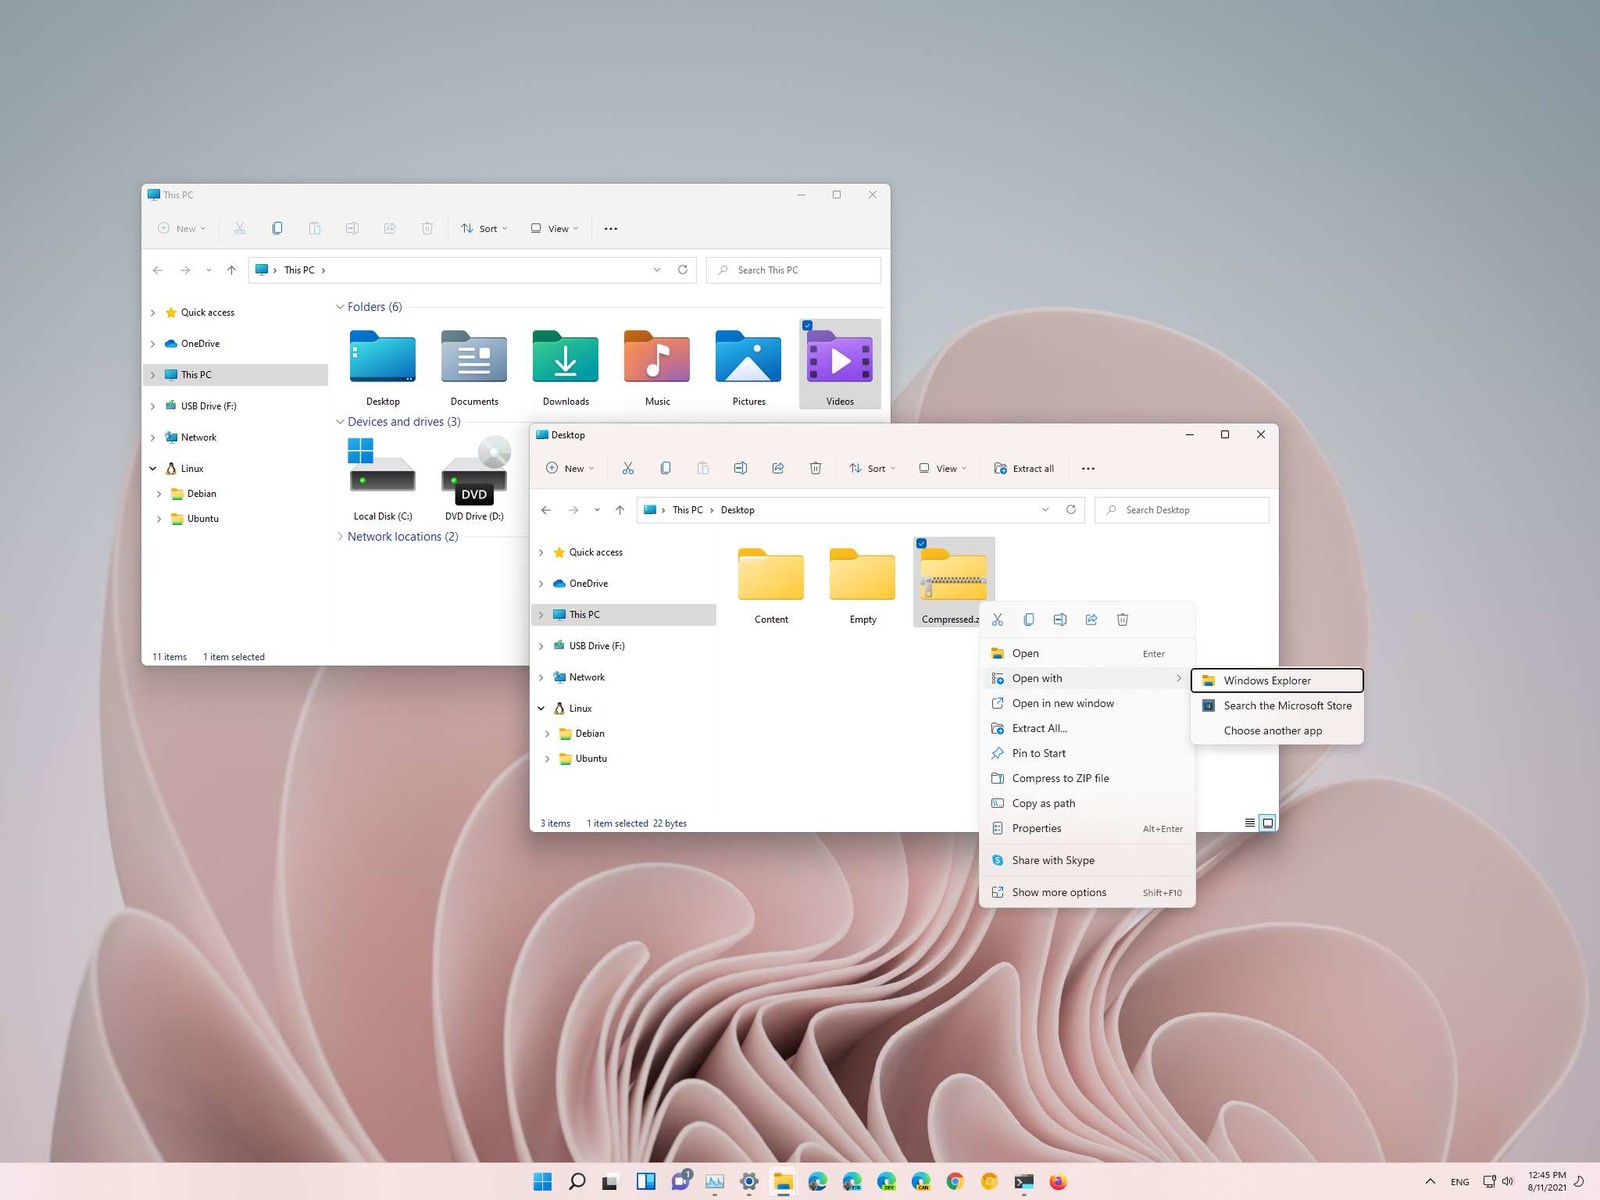
Do You Need Help with Your Device?

Our Team of Experts May Help
Troubleshoot.Tech Experts are There for You!
Replace damaged files
Restore performance
Free disk space
Remove Malware
Protects WEB browser
Remove Viruses
Stop PC freezing
GET HELP
Troubleshoot.Tech experts work with all versions of Microsoft Windows including Windows 11, with Android, Mac, and more.

Share this article:

You might also like

MS releases ISO for Windows 10 build 21354
On April 7th Microsoft has released Windows build 21354 for their flagship OS and updates are rolling. Alongside the new update builds Microsoft has decided to create and release Windows 21354 build as an installable ISO image for anyone who wishes to do a clean installation of Windows without the need to update it after the installation. We have not seen this move by Microsoft in a long time and honestly, we are welcoming it, it is always great to have updated ISO Windows build than to install the old version and sit through an hour or more of updates. If you are interested in getting this ISO image and you are part of the insider program you can download it from here. If you would like to read more helpful articles and tips about various software and hardware visit errortools.com daily.
Read More
An Easy Guide to Fixing Libvlc.dll Error

Libvlc.dll Error Code - What is it?

Libvlc.dll error is a type of DLL file error. Libvlc.dll is a type of Dynamic Link Library file associated with 3rd party software developed by the Videolan Team for the Windows OS. Libvlc.dll file contains small programs similar to EXE executable files which allow multiple software programs to share the same functionality. It helps load and run certain programs developed by Videolan Team on your system. The Libvlc.dll error pops up when the file fails to load and run your desired program. This error is usually triggered during program installation while a Libvlc.dll related software is running on the PC or during Windows start-up or shut down. Libvlc.dll error code may appear on your Windows computer in any of the following formats:
"Libvlc.dll not found." "The file libvlc.dll is missing." "Cannot register libvlc.dll." "Cannot find C:WindowsSystem32\libvlc.dll." "Libvlc.dll Access Violation." "Cannot start Third-Party Software. A required component is missing: libvlc.dll. Please install Third-Party Software again." "This application failed to start because libvlc.dll was not found. Re-installing the application may fix this problem."
Though Libvlc.dll error is not a fatal error code but nonetheless it is advisable to resolve it immediately to avoid any inconvenience.

Solution

Restoro box imageError Causes

Libvlc.dll error code may occur due to several reasons including but not limited to:
  • Corrupt Libvlc.dll registry entry
  • Malware infection
  • Hardware failure
  • Deleted or missing Libvlc.dll file
  • Another program overwrote the required version of Libvlc.dll

Further Information and Manual Repair

Here are some of the best and easy-to-work-around methods that you can try to resolve Libvlc DLL error on your system in minutes. Let’s get started:

Method 1: Re-install the Deleted Libvlc.dll file

Since DLL are shared files, sometimes the error code may pop up if it is deleted accidentally while uninstalling a program that is also run by the same file. In such a situation, to resolve the Libvlc.dll error all you have to do is re-install the deleted file by going into the recycle bin. If you find it reinstall, but if you don’t then simply download Libvlc.dll file from a reliable DLL file website and install. Hopefully this will resolve the issue. Alternatively, you can re-install VLC which should come with a complete copy of the libvlc.dll. However, if the error code still persists, then try other methods given below.

Method 2: Restore Points - Undo the Recent Changes

Another way to resolve Libvlc dll error is to restore your Windows system to an earlier point. System Restore can return your PC system files and programs back to a time when everything was working absolutely fine. This can help you avoid hours of troubleshooting headaches. This can be easily done by going to the start menu. In the search box type System Restore and press enter. Now click System Restore and enter administrator password if prompted. Follow the steps in the Wizard to choose a restore point and then reboot to activate changes.

Method 3: Repair the Registry

The Libvlc dll error can be triggered by invalid registry entries. To resolve, simply download Restoro. This is a user-friendly and multi-functional PC Fixer embedded with a powerful registry cleaner. It removes all the invalid files, repairs the damaged DLL files, and cleans the registry in seconds. Click here to download Restoro and resolve Libvlc dll error today!
Read More
Enable or disable Full-screen optimizations
In case you don’t know, there is a feature in Windows 10 computers that allows them to function a lot better. This feature is called Full-Screen optimization and it is enabled by default for several applications such as games and video players. If enabled, the Full-Screen optimization feature enhances the video playback and gaming by simply putting the CPU and GPU process as a priority. However, there are times when it can also result to a drop in the frame rate or FPS while in full-screen mode. And of course, the obvious solution to this dilemma is by disabling the Full-Screen optimization feature which is why Microsoft took action and removed this feature themselves in the recent Windows 10 Update releases. However, there is another way for you to enable it back or disable it yourself if you haven’t installed the recent updates yet and there are plenty of ways you can do both. All you have to do is follow the options given below carefully.

Option 1 – Try using Windows 10 Settings

If you haven’t installed the recent updates yet and all you have are the earlier releases, then this method would suit you.
  • Open the Windows 10 Settings app.
  • Next, navigate to System > Display > Graphics Settings or Advanced graphics settings.
  • From there, uncheck the “Enable Fullscreen optimization” option if you want to disable the feature, else just keep it checked.

Option 2 – Try using the Registry Editor

  • Tap the Win + R keys to open the Run dialog box and then type “Regedit” in the field and hit Enter to open the Registry Editor.
  • Afterward, if a User Account Control or UAC prompt appears, click on Yes.
  • Once the Registry Editor is pulled up, navigate to this registry key: HKEY_CURRENT_USERSystemGameConfigStore
  • Next, right-click on Explorer and select New > DWORD (32-bit) Value and then name it to “GameDVR_DSEBehavior and tap Enter to save it.
  • Now double click on the newly created GameDVR_DSEBehavior DWORD and set its value to “2” if you want to disable it, or “0” if you want to enable it.
  • Once you entered the value, close the Registry Editor and restart your computer to successfully apply the changes made.

Option 3 – Try running the application in Compatibility Mode

If the first two options didn’t work, the next thing you can do is to run the application in a Compatibility Mode. Follow the steps below to do so:
  • Go to the location of the application or game on which you need to disable or enable the Full-Screen optimization feature.
  • After that, right-click on it and select Properties.
  • Next, switch to the Compatibility tab where you can see the “Disable fullscreen optimization” option to disable the feature and vice versa.
  • Now click on the Apply and OK buttons to apply the changes made in the application’s settings.
Read More
An Easy Guide to Resolve Xpcom.dll Error

Xpcom.dll Error Code - What is it?

To understand the Xpcom.dll error better, first, you need to know what Xpcom.dll file is. Xpcom.dll is basically a typical DLL (Dynamic Link Library) file. It is associated with Firefox developed by Mozilla Foundation for the Windows Operating System. DLL file contains small programs similar to exe (executable) files. Just like any other DLL file, Xpcom.dll helps loads and run programs smoothly. Xpcom.dll functions as a shared file that can be used to run multiple programs on your PC. Xpcom.dll error code occurs when Windows cannot properly load the xpcom.dll file. The error may pop up on the screen in any one of the following formats:
  • "Xpcom.dll not found."
  • "The file xpcom.dll is missing."
  • "Cannot register xpcom.dll."
  • "Cannot find C:\Windows\System32\xpcom.dll."
  • "This application failed to start because xpcom.dll was not found. Re-installing the application may fix this problem."
  • "Xpcom.dll Access Violation."
  • "Cannot start Firefox. A required component is missing: xpcom.dll. Please install Firefox again."
The xpcom.dll error can occur during program installation or while rebooting your PC or when shutting it down.[/section]

Solution

Restoro box imageError Causes

It is difficult to narrow down a single cause of this error code simply because the Xpcom.dll error code may be triggered due to several reasons. Some of the common causes include:
  • Invalid or corrupt xpcom.dll registry entry
  • Viral infection
  • Outdated PC drivers
  • Another program overwrote the required version of xpcom.dll
  • Xpcom.dll file is accidentally deleted or uninstalled
  • Mozilla Foundation hardware failure

Further Information and Manual Repair

Here are the best, quick and easy DIY methods to resolve Xpcom.dll error code on your system within minutes:

Method 1: Update Window Drivers

To resolve the xpcom.dll error on your system, try updating Window drivers. To do this simply use the driver update wizard from within Device Manager. The driver update wizard walks you through the entire drive update process, making it easy and hassle-free for you to update drivers.

Method 2: Download and Install Xpcom.dll File

Since DLL are shared files and used to run and load multiple programs, it is possible that you might have accidentally removed this file while uninstalling a program on your system. This is the reason why the Xpcom.dll file goes missing. To retrieve the Xpcom.dll file simply go to the recycle bin. Reinstall the deleted program. However, if it still doesn’t resolve the error, then it is advisable to download and install the Xpcom.dll file from a trusted DLL file website over the internet.

Method 3: Scan for Viruses and Repair the Registry

If the error code occurs due to malware infection or is related to registry issues, then simply download Restoro. This is a user-friendly and multi-functional PC Fixer deployed with 6 scanners including a powerful antivirus and a registry cleaner. It is compatible with all Windows versions. Simply run it to remove all types of viruses infecting your system and clean/repair the registry. Click here to download Restoro and resolve the Xpcom.dll error on your PC.
Read More
8 Android Apps that threaten your security
Security on your PC and on your accounts is the important thing. Security on your phone device is also very very important. That is why we are bringing you a list of 8 applications that are marked by the cybersecurity team as ones that could be used to steal data from you. If you have by any chance any of these applications installed, uninstall them immediately.

List is as follows:

  • Cake VPN (com.lazycoder.cakevpns)
  • Pacific VPN (com.protectvpn.freeapp)
  • eVPN (com.abcd.evpnfree)
  • BeatPlayer (com.crrl.beatplayers)
  • QR/Barcode Scanner MAX (com.bezrukd.qrcodebarcode)
  • Music Player (com.revosleap.samplemusicplayers)
  • tooltipnatorlibrary (com.mistergrizzlys.docscanpro)
  • QRecorder (com.record.callvoicerecorder)
If you would like to read more helpful articles and tips about various software and hardware visit errortools.com daily.
Read More
What to do if Mouse Pointer lags or freezes in Windows 10
Although there are several Windows 10 devices that are touchscreen-based, the mouse still remains to be an important part of usage for many users especially the ones who do some hardcore work on their Windows 10 computers or laptops. If you’re one of the users who often edit images or videos either for fun or work, using Touch is difficult as it’s a bit hard to drag on the screen so nothing really beats the mouse. However, as awesome as the mouse is, there are times when you encounter issues while using it. One of these issues is when your mouse pointer lags or freezes so in this post, you can try out a few tips that can help you resolve the issue.

Option 1 – Clean both the mouse and the mousepad

It might sound silly but it is a fact that either the mouse or the mouse pad themselves is the problem. Even though mouse balls are long gone, the laser lights that replaced them are not immune to some dirt which is why you need to clean the bottom of the mouse and then clean the mouse pad afterward.

Option 2 – Try changing the USB port

This is another basic thing you can do to resolve the problem since there are instances when USB ports where either your mouse is connected have gone rogue so you need to try switching to a different port and then see if the problem’s fixed or not.

Option 3 – Switch back to the default settings of the mouse

Switching your mouse back to its default setting is always a good idea since you are dealing with a pointer issue. To go back to the default settings of the mouse, here’s what you have to do:
  • Click on Mouse and Touchpad.
  • Next, click on Additional Mouse Settings located in the right pane.
  • After that, click on the “Use Default” option under the Pointer tab.
  • Then click on Apply and OK to save the changes made.

Option 4 – Try disabling Smooth Scrolling

You have to slow down both the horizontal and the vertical scrolling of the mouse in the settings which are called “Smooth scrolling”. This will help if you think that the websites you are visiting scroll up and down way too fast.

Option 5 – Try to update or rollback mouse drivers

If the first few options didn’t work for you, then it’s time to either update or roll back the mouse drivers. It is most likely that after you updated your Windows computer that your driver also needs a refresh. On the other hand, if you have just updated the mouse driver then you need to roll back the driver. Whichever applies to you, refer to the steps below. The problem may be caused by a corrupted or outdated driver. So you have to update or reinstall the mouse driver. How? Follow these steps:
  • Open the Devices Manager from the Win X Menu.
  • Then locate the Mouse and other pointing devices and right-click on the mouse driver to open the Properties.
  • After that, switch to the Driver tab and click on the Uninstall Device button.
  • Follow the screen option to completely uninstall it.
  • Finally, disconnect the mouse and plug it back in to reinstall the mouse driver.
Note: You can install a dedicated driver on your computer in case you have it or you could also look for it directly from the website of the manufacturer.

Option 6 – Try to check if your laptop is turning off the mouse

In case you don’t know, the power management can turn off the devices that are not in use to save battery power if you use a laptop. And this can also happen on USB-based devices like the mouse. Thus, you need to verify if your laptop is turning off the mouse.
  • Go to Device Manager > Universal serial bus controllers > USB Root Hub > Power Management.
  • After opening Power Management, uncheck the “Allow the computer to turn off this device to save power” option.
  • If you have lots of USB Root hubs, you can try changing each one of them and see if it works or not.

Option 7 – Try updating the Graphics Drivers

  • Tap the Win + R keys to launch Run.
  • Type in devmgmt.msc into the box and tap Enter or click OK to open the Device Manager.
  • After that, a list of device drivers will be displayed. If you see a red or yellow sign that shows up against the driver, right-click on the driver’s name and select “Update Driver Software” or “Uninstall”. And if you find any “Unknown device”, you need to update it as well.
  • Select the “Search automatically for updated driver software” option and then follow the instructions to complete the process.
  • Restart your PC.
Note: You also have the option to go directly to the website of your graphics card manufacturer and check if there’s a new update – if there is, download it.

Option 8 – Try setting the No Delay option for Touchpad

If you are using a laptop that’s touchscreen-based, you can try setting the delay to zero in the settings. To do so, simply go to Settings > Devices > Mouse and Touchpad. From there, you can set the delay before clicks to “No Delay”.
Read More
Enable or Disable the Reserved Storage
A lot of users complain about low storage space each time a Windows Feature update is released as well as to complain about not being able to download the updates, slow update experience, and many other complaints. The main issue is that many users do not have enough storage space available on their PCs. And now to make sure that none of the updates gets stuck because of low storage space, Microsoft presented the Reserved Storage feature which comes preinstalled with v1903 or those where v1903 was clean installed. This guide will be showing you how you can enable or disable the Reserved Storage in your Windows 10 computer. As you know, the Windows Update process should have enough space so that it can download, extract and apply the update on the computer. Usually, the size of the Reserved Storage is around 7GB which gives enough space for the update, temporary files, system caches, apps, and many more. And according to Microsoft, the size of the Reserved Storage space will vary from time to time and will depend on how you use your computer.

Explanation

The Reserved Storage space feature is enabled by default on devices that come preinstalled with the May 2019 update or after performing a clean installation of the Windows 10 OS. To check if your computer has this feature, you need to go to Settings > System > Storage and from there click on the “Show more categories” link and then click on the “System & reserved” option. However, if you can’t find the Reserved Storage from the list, then it’s probably because your computer has limited space on the hard disk or it is not a fresh or new install. On the other hand, if you have this feature but have no use for it and want to disable it instead, then read on as this post will also show you how it’s done.

Solution

Keep in mind that when you disable the Reserved Storage feature, chances are, you might be unable to enable it back so you need to make sure that it’s really what you want to do before you disable it permanently. So if you really want to disable Reserved Storage, you can do so using the Registry Editor. Before you proceed, you have to create a System Restore point first and then carry out the following steps.
  • Tap the Win + R keys to launch the Run utility and type “Regedit” in the field and then tap Enter to open the Registry Editor.
  • Next, navigate to this registry path: ComputerHKEY_LOCAL_MACHINESOFTWAREMicrosoftWindowsCurrentVersionReserveManager
  • From there, double click on the DWORD named “ShippedWithReserves” and set its value to “1”.
  • Once you’re done, restart your computer and see if the Reserved Storage feature is now gone.
On the other hand, if you want to reduce the Reserved Storage space, there are two ways you can do that. First, you can go to Settings > Apps > Apps & features > Manage optional features and from there, uninstall the optional features that you do not use. The second one is you have to go to Settings > Time & Language > Language and then uninstall the languages and their add-on which you don’t use. Note: The Reserved Storage feature is also used by system processes and apps to create temporary files and once the Reserved Storage space fills up, Windows 10 will delete them automatically. It is undeniable a useful feature so disabling it is not recommended but if you are running on low storage space and don’t have much choice, then you may disable it at your own risk.
Read More
Fix Origin Error when loading the webpage
If you encounter a blank page with an error message saying, “Origin Error” when you try to load a webpage, then this post will surely help you resolve this error. As you can see, this error is a very uncommon one and it is not about the popular game known as Origin where all you have to do is reinstall the client. Although this error message is a very uncommon one, you will see a blank page with a message saying, “Origin Error” when you attempt to load a webpage. To fix this error, this post will provide you some potential fixes that might help. Follow the fixes given below carefully and see which one fixes the problem.

Option 1 – Use Ctrl + F5 keys to clear browser cache

The first thing you can try is to “Hard Refresh” to clear the cache of your browsers. You can do that by using the Ctrl + F5 keys on your keyboard. On the other hand, you can also clear the cache manually for Chrome, Edge, and Firefox.

Option 2 – Remove the Proxy

You might also want to try removing the Proxy as it could also help you in fixing the Origin error. Here’s how you can do it:
  • Tap the Win + R keys to open the Run dialog box.
  • Then type “inetcpl.cpl” in the field and hit Enter to pull up the Internet Properties.
  • After that, go to the Connections tab and select the LAN settings.
  • From there. Uncheck the “Use a Proxy Server” option for your LAN and then make sure that the “Automatically detect settings” option is checked.
  • Now click the OK and the Apply buttons.
  • Restart your PC.
Note: If you are using a third-party proxy service, you have to disable it.

Option 3 – Try to flush the DNS, reset Winsock and the TCP/IP

You might also want to flush the DNS and reset Winsock as well as reset TCP/IP as it could help in fixing the Origin error. To do so, refer to these steps:
  • Click the Start button and type in “command prompt” in the field.
  • From the search results that appear, right-click on Command Prompt and select the “Run as administrator” option.
  • After opening Command Prompt, you have to type each one of the commands listed below. Just make sure that after you type each command, you hit Enter
    • ipconfig /release
    • ipconfig /all
    • ipconfig /flushdns
    • ipconfig /renew
    • netsh int ip set dns
    • netsh winsock reset
After you key in the commands listed above, the DNS cache will be flushed and the Winsock, as well as the TCP/IP, will reset.
  • Now restart your computer and open Google Chrome then try opening the website you were trying to open earlier.

Option 4 – Try using Google Public DNS

You might want to try changing your current DNS to the Google Public DNS. All you have to do is change the DNS settings explicitly on your operating system by using the DNS IP addresses. Here’s are the steps to do that:
  • The first thing you have to do is right-click on the network icon in the Taskbar and select Network and Sharing Center.
  • Next, click on the “Change Adapter Settings” option.
  • After that, search for the network connection that you are using to connect to the internet. Note that the option might be “Wireless Connection” or “Local Area Connection”.
  • Right-click on your network connection and click on Properties.
  • Then select the new window to choose the “Internet Protocol 4 (TCP/IPv4)” option.
  • After that, click on the Properties button and click the checkbox in the new window for the option “Use the following DNS server addresses”.
  • Type in “8.8.8” and “8.8.4.4” and click OK and exit.
Read More
How to Fix DCOM Error 1084 on Windows
Distributed Component Object Model or DCOM is a module on Windows computers that allows computers to run programs over a network to another computer. It is a software component from Microsoft that allows COM objects to communicate with each other while that program is remotely running over the network. The COM Model is another extension of the DCOM model which both work together in order for the intended task to be executed. To make this module work, there are three components needed such as the Class Identifier or CLSID, the Programmatic Identifier or PROGID, and the Application Identifier or APPID. However, DCOM does not always work as expected as it could still encounter some errors. One of them is error 1084. Because of this error, the execution of programs in a remote computer on the network would be interrupted. So if you encounter the DCOM error 1084 when you try to start a service like running the DISM tool or in other scenarios on your Windows 10 computer, then this post could help you. Refer to the instructions given below to start troubleshooting the problem.

Option 1 – Try checking the status of DCOMLAUNCH Service or DCOM Server Process Launcher and its 3 dependencies

The DCOM Server Process Launcher service launches both COM and DCOM servers in response to object activation requests. This is why if this service is stopped or disabled, the programs that are using COM and DCOM won’t properly function. So you need to make sure that the DCOMLAUNCH service is running.
  • In the Cortana search box, type “services” and click on the Services icon to open the Services Manager. Alternatively, you can also tap the Win + R keys to launch the Run prompt and then type “services.msc” in the field and hit Enter to open the Services Manager.
  • Next, check the following services:
    • DCOM Service Process Launcher
    • Background Tasks Infrastructure Service
    • Local Session Manager
    • Remote Procedure Call (RPC)
  • Then right-click on each one of the services and click on their Properties.
  • After that, select Automatic from the drop-down menu of Startup Type and make sure that all the aforementioned services are Running.
  • Now click OK for each one of the services.

Option 2 – Troubleshoot the problem in a Clean Boot State

There are instances that some conflicting programs installed in your computer might be the one that’s causing DCOM error 1084. To identify which program is causing the problem, you need to put your computer in a Clean Boot State. To do so, follow the steps below.
  • Log onto your PC as an administrator.
  • Type in MSConfig in the Start Search to open the System Configuration utility.
  • From there, go to the General tab and click “Selective startup”.
  • Clear the “Load Startup items” check box and make sure that the “Load System Services” and “Use Original boot configuration” options are checked.
  • Next, click the Services tab and select the “Hide All Microsoft Services” check box.
  • Click Disable all.
  • Click on Apply/OK and restart your PC. (This will put your PC into a Clean Boot State. And configure Windows to use the usual startup, just simply undo the changes.)
  • From there, start to isolate the problem by checking which one of the programs you installed recently is the root cause of the problem.

Option 3 – Try to use the DISM tool

You might want to repair potentially corrupted files in your system as having them could also trigger the DCOM error 1084. To repair these corrupted system files, you can run the DISM commands:
  • Tap the Win + X keys and click on the “Command Prompt (Admin)” option.
  • After that, input each one of the commands listed below sequentially to execute them:
    • Dism /Online /Cleanup-Image /CheckHealth
    • Dism /Online /Cleanup-Image /ScanHealth
    • Dism /Online /Cleanup-Image /RestoreHealth
  • Once you’ve executed the commands given above, restart your computer and check if the DCOM error is now fixed.

Option 4 – Reset your computer

  • Tap the Win key or click on the Start button located in the Taskbar.
  • Then click on the Power button at the bottom right portion of the screen.
  • Next, press and hold the Shift key on your keyboard and then click on Restart. This will restart your Pc into the Advanced Startup options.
Note: Once you have access to the Advanced Startup options, you have to go to the setting which allows you to Reset your Windows 10 PC. All you have to do is select Troubleshoot > Reset this PC to reach the following screen Afterward, select either the “Keep my files” option and then proceed to the next on-screen instructions that follow to reset your Windows 10 computer without losing your files.
Read More
Operation did not complete successfully
It is common knowledge that when you open a file that contains viruses, it will automatically infect the operating system. This is why most antivirus programs like Windows Defender won’t allow the opening of a file or execution of any associated program if they detected that the file or program could potentially harm the computer. In situations like this, you may get an error stating, “Operation did not complete successfully because the file contains a virus”. In addition, it is also possible that this error message can pop up even for known programs. To open the program or file that triggered the error, you will be given a couple of options in this post but make sure that the program or file is really safe to open and does not contain any virus. You can open the file or execute the program by disabling the Windows Defender or any antivirus program temporarily. You could also try to add an exclusion in your antivirus program or repair File Explorer or run the Disk Cleanup tool. For more details, refer to each one of the options provided below.

Option 1 – Try to temporarily disable the Windows Defender program

Although you could encounter this error with any antivirus program, it is more common in Windows Defender. Thus, you can try to disable it for a while when you open the file or execute the program. To do so, follow these steps:
  • First, click on the Start button and go to Settings > Update and Security > Windows Security.
  • Here, select the “Open Windows Security” option located in the right pane.
  • After that, click on the “Virus and threat protection” option.
  • Next, click on Manage settings under the Virus and threat protection settings.
  • Then turn off the switch for both Real-time protection and Cloud-delivered protection.
  • Now restart your computer and try to open the file or execute the program again and see if it works.
  • Note: Do not forget to enable the Real-time protection and Cloud-delivered protection back in Windows Defender.

Option 2 – Try adding an exclusion in the Windows Defender program

  • Open the Windows Defender Security Center from the system tray area.
  • Next, click the “Virus & threat protection” option and then open the “Virus and threat protection settings”.
  • After that, scroll down until you find the “Exclusions” and click on the “Add or remove exclusions” option.
  • Then click the plus button and select the type of exclusion you want to add and from the drop-down list, select Folder.
  • Next, navigate to the path where the file or program is located.
  • When a User Account Control or UAC prompt, just click on Yes to proceed.
  • Now try to run the program or file again and see if it worked. If it did, then make sure to turn on your antivirus. However, if it didn’t work, proceed to the next given options below.

Option 3 – Try to run a System File Checker scan

System File Checker or SFC is a built-in command utility that helps in restoring corrupted files as well as missing files. It replaces bad and corrupted system files with good system files that might be the cause why you’re getting the errors 0x8024a11a and 0x8024a112. To run the SFC command, follow the steps given below.
  • Type “cmd” in the Start search and then right-click on the appropriate search result.
  • Next, select “Run as administrator” to open Command Prompt with admin privileges.
  • After opening Command Prompt, type in sfc /scannow
The command will start a system scan which will take a few whiles before it finishes. Once it’s done, you could get the following results:
  1. Windows Resource Protection did not find any integrity violations.
  2. Windows Resource Protection found corrupt files and successfully repaired them.
  3. Windows Resource Protection found corrupt files but was unable to fix some of them.
 Now restart your computer and see if the problem is fixed or not.

Option 4 – Run the Disk Cleanup tool

You can also try using the Disk Cleanup tool. To use it, refer to these steps:
  • Tap the Win + R keys to open the Run dialog box and then type “cleanmgr” in the field and hit Enter to open the Disk Cleanup window.
  • After that, select the drive you want to clean.
  • Now click OK to clean the disk and restart your computer.
Read More
1 2 3 171
Logo
Copyright © 2023, ErrorTools. All Rights Reserved
Trademark: Microsoft Windows logos are registered trademarks of Microsoft. Disclaimer: ErrorTools.com is not affiliated with Microsoft, nor claims direct affiliation.
The information on this page is provided for information purposes only.
DMCA.com Protection Status