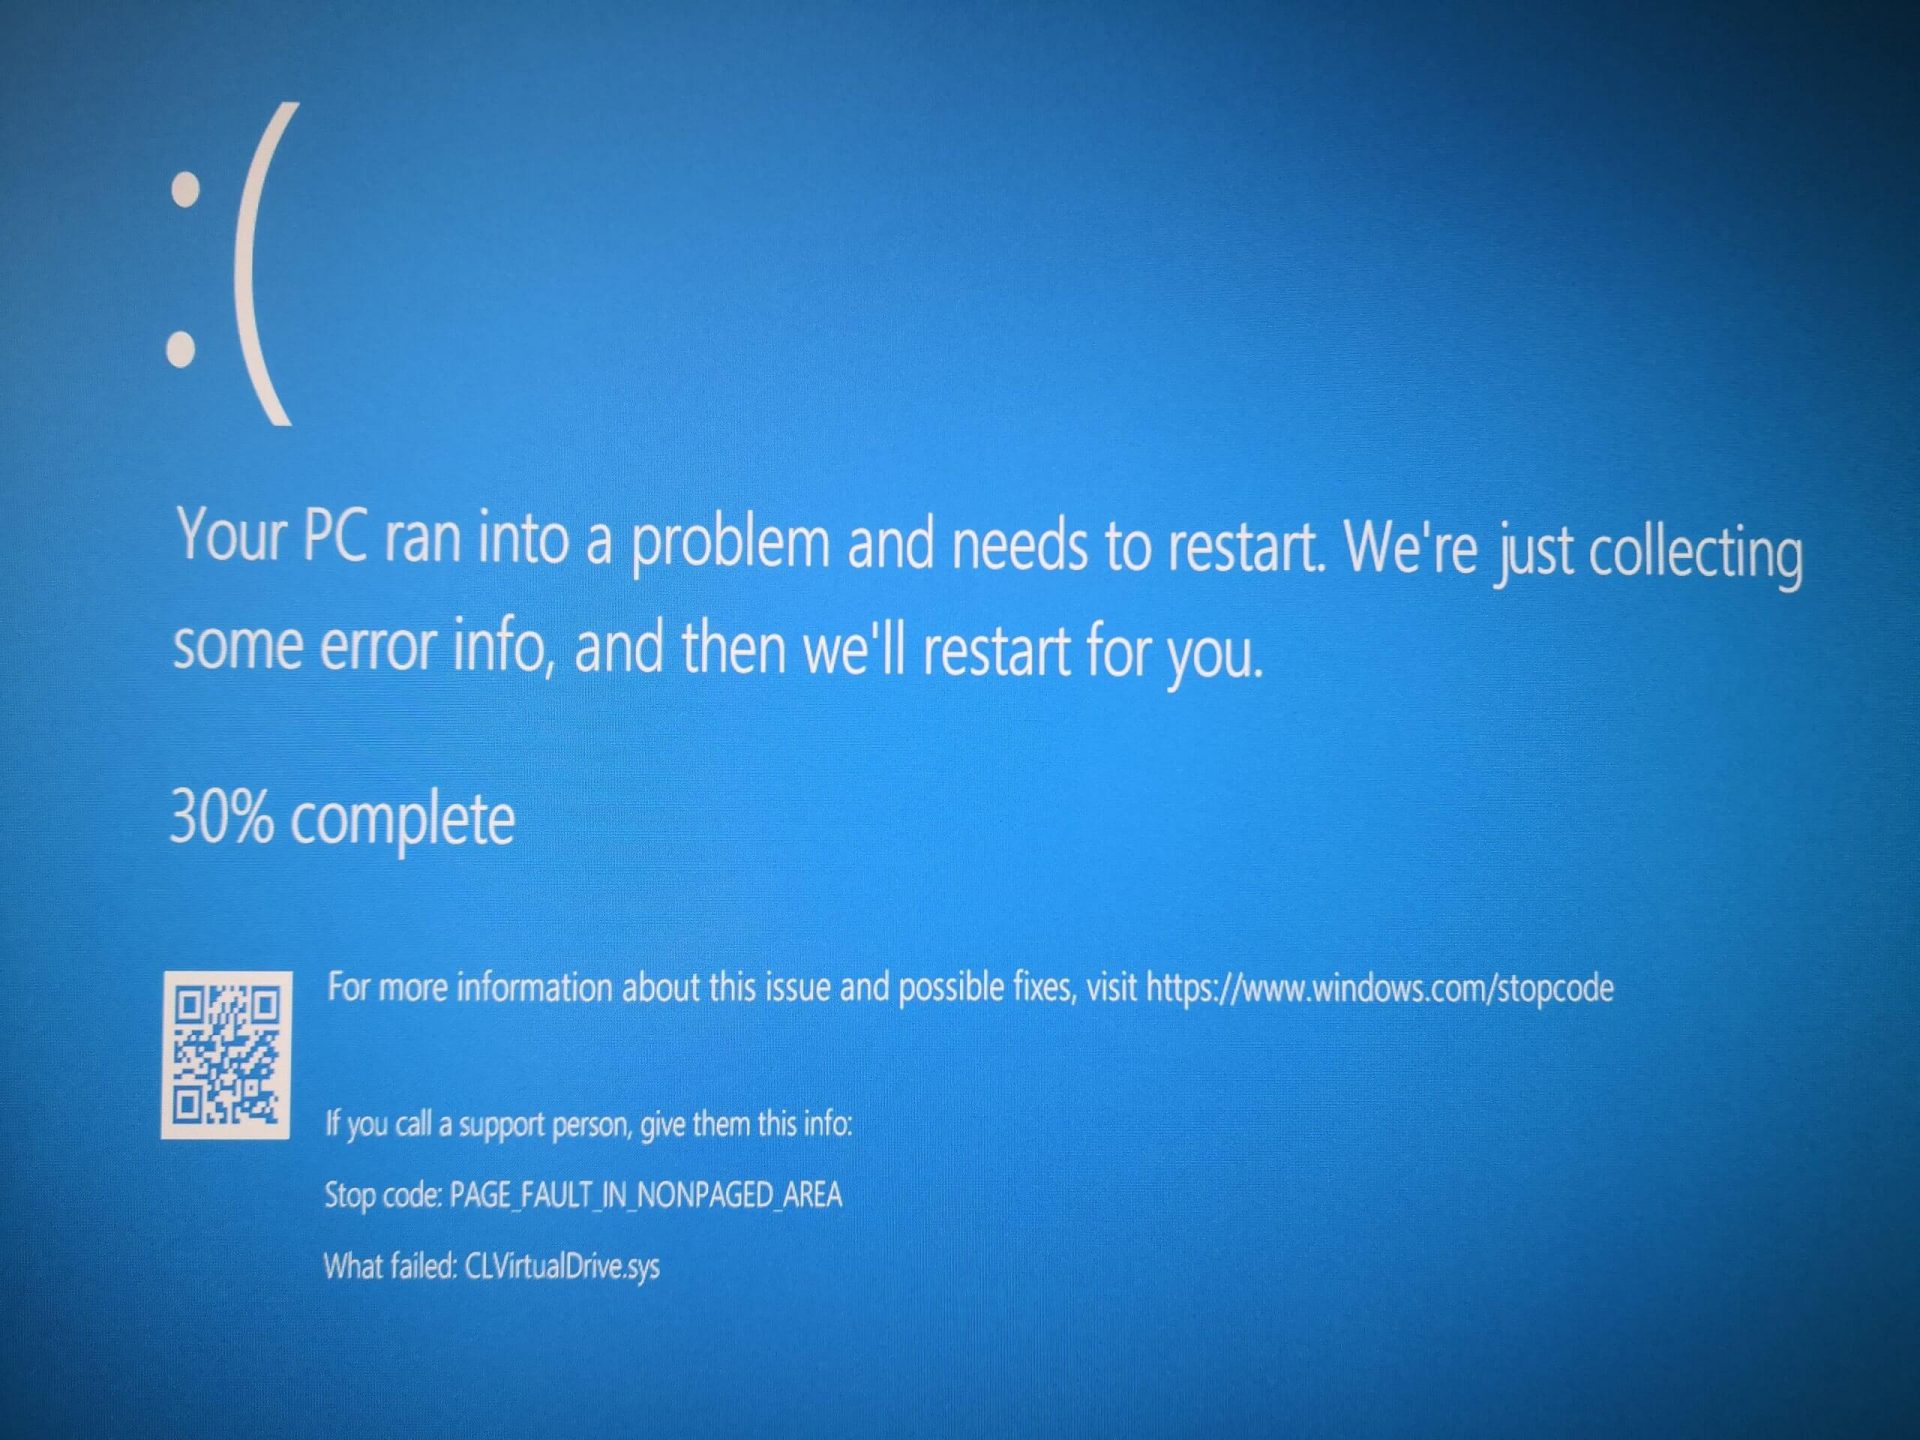
Logo

Fixing PowerShell: File cannot be loaded ...

If you are using Windows PowerShell and it suddenly throws an error message saying, “File cannot be loaded because running scripts is disabled on this system”, then read on as this post will guide you on how you can fix this issue your Windows 10 computer. This kind of error in PowerShell is most likely due to the fact that your user account does not have the required permissions to execute the script. Although this does not mean that you need to have administrator-level permissions as it could also indicate that you have to be unrestricted to run these types of PowerShell scripts or cmdlets. Thus, to fix the error and carry out the task, you have to set the execution policy to be unrestricted. And to do that, you need to use the steps provided below as a reference.

Step 1: To get started, you have to check what policies are set for the individual user groups on your computer by tapping the Win + X key combination or by right-clicking on the Start button and clicking on Windows PowerShell (Admin). You can also search for PowerShell in the Start Search and then right-click on Windows PowerShell and select Run as administrator.

Step 2: If a User Account Control or UAC prompt appears, just click Yes to proceed. Once you’ve pulled up Windows PowerShell, type the following command to get the List of Execution Policy for all the scopes on your computer.

Get-ExecutionPolicy –List

Step 3: After you execute the command, it will give you a list of the User Groups as well as their Execution Policy status, and under the Scope column, look for “LocalMachine”. Once you find its Execution Policy you will notice that it’s either set to Undefined or Restricted.

Step 4: Now that you’ve determined the Execution Policy, you need to set it to Unrestricted if it is set to Restricted. To do that, you have to enter the following command in the very same PowerShell window.

Set-ExecutionPolicy Unrestricted

Step 5: After you execute the command, you will see a message that asks for various permissions for which you either have to tap Y to say Yes to each one of the messages individually or tap the A key to say Yes to all the messages to once. However, if the command throws another error, you can just force the Execution Policy to change by executing the following command.

Set-ExecutionPolicy Unrestricted -Force

Step 6: Once you’re done, it will finally set the Execution Policy for the Windows PowerShell scripts as well as cmdlets to be Unrestricted and fix the “File cannot be loaded because running scripts is disabled on this system” error.

Do You Need Help with Your Device?

Our Team of Experts May Help
Troubleshoot.Tech Experts are There for You!
Replace damaged files
Restore performance
Free disk space
Remove Malware
Protects WEB browser
Remove Viruses
Stop PC freezing
GET HELP
Troubleshoot.Tech experts work with all versions of Microsoft Windows including Windows 11, with Android, Mac, and more.

Share this article:

You might also like

A Guide to Resolving Error Code 35

Error Code 35 - What is it?

Error Code 35 is a typical Device Manager error. It indicates information missing to properly configure your device.  Error code 35 is usually displayed in the following format:

“Your computer's system firmware does not include enough information to properly configure and use this device. To use this device, contact your computer manufacturer to obtain a firmware or BIOS update. Code 35”

Solution

driverfix boxError Causes

The 2 common reasons for Device Manager error code 35 are:

  • Outdated BIOS
  • Mis-configured, corrupted, or outdated Drivers

No matter what the reason may be, it is advisable to resolve the problem immediately without any delay otherwise you will be unable to use your hardware device.

Further Information and Manual Repair

Below is the list of the most effective and easy to perform solutions to resolve error code 35 on your PC. These solutions do not require any technical knowledge or understanding. Simply follow the instructions to resolve this error code.

Method 1 - Update the BIOS

BIOS (Basic Input/Output System) is the embedded software on the computer’s motherboard.

Though not all PCs have the same BIOS manufacturer, but the steps for updating the BIOS are similar for all versions. Before you get started with the updating process, first identify your current BIOS version.

  • For this, go to the start menu and type msinfo32, and press enter.
  • Now click System Summary to view your BIOS version. Here you will see the version number and date.
  • Now check your PC motherboard manufacturer’s website to download the BIOS update for the model you own. Also, download any Read Me Files and documentation. These contain guidelines and precautions that you should know before you update.
  • Backup all your data and existing BIOS before you update the BIOS version. This will keep your data protected in case the attempt to update BIOS fails.
  • Also, when updating, make sure to use an uninterruptible power supply. Remember power outage or even a small power fluctuation can corrupt the BIOS which is something you don’t want.
  • Now it’s time to perform the update. Run the downloaded installer for the BIOS updating software. Double click on the executable file.
  • Look for a button names Update, Flash, or Run.
  • Click on it to start updating the new version
  • After the update is complete, your computer will restart automatically.

This will hopefully resolve the problem. However, if the error still persists then there is a possibility that the error code is related to outdated drivers. To resolve, try method 2.

Method 2 - Download Driver Assist to Update Drivers Automatically

Update drivers to repair error code 35 on your PC by simply downloading DriverFIX. This is a cutting-edge program deployed with an intelligent programming system.

It is compatible with all Windows versions.

It scans your PC for problematic drivers and updates them with the latest and compatible versions automatically and in a few seconds thereby repairing all Device Manager error codes including error code 35 generated due to outdated/corrupted drivers.

In addition to this, it updates all device drivers on a regular basis, so you don’t have to stress over and keep a track of what drivers on your PC need to be updated and when.

Click here to download DriverFIX to resolve Device Manager error code 35 today!

Read More
Edge DevTools An error occurred while ...
In case you don’t know, Microsoft Edge, the new default browser of Windows 10, is equipped with the essential tools that are needed to help web developers in testing their websites in the Edge browser. However, it is not without its flaws as there are instances when you could also encounter some errors when using DevTools. One of these errors is the “An error occurred while starting the profiling session” error. You can see this error message in the DevTools Memory Panel, worry not for this post will help you resolve it. A memory panel is one that primarily measures your memory resource usage and compares heap snapshots in different states of code execution. The Memory panel also provides profiling of three different types, such:
  • Head Snapshot
  • Record Allocation timeline
  • Record Allocation profiles
Using a memory panel, you can find issues that affect the page performance in the most common scenarios like bloats and memory leaks. There are two steps you need to carry out to fix this error that’s associated with the Memory Panel of Microsoft Edge (Chromium) DevTools. First, you need to access the Microsoft (R) Diagnostics Hub Standard Collector Service. Second, you need to restart this service. For detailed steps, follow the instructions provided below. Step 1: Access the Microsoft (R) Diagnostic Standard Collector Service To access the Microsoft (R) Diagnostic Standard Collector Service, follow these steps:
  • Tap the Win + R keys to open the Run dialog box.
  • Then type “services.msc” in the field and hit Enter or click OK.
  • This will open the Services Manager. Here, look for the Microsoft (R) Diagnostic Service from the Services panel that opens on the right-hand side.
Step 2: Now restart the Microsoft (R) Diagnostic Hub Standard Collector Service
  • After accessing the Microsoft (R) Diagnostic Standard Collector Service, right-click on it and select the Restart option.
  • Once it’s done, exit the Microsoft Edge Developer Tools as well as the tab.
  • Next, open a new tab and navigate to your page and tap the F12 key.
  • Now, try to check if profiling begins.
Read More
Fix an Unformattable and Unusable USB Drive
If you have a USB that has stopped working and does not show any signs of life do not throw it away just jet. Hello and welcome to another great tutorial on errortools.com, today we will explore how to bring back to life dead USB memories.

Detect a Corrupted  Drive:

If your computer is still able to detect your USB drive, you might want to know if it’s been corrupted. Select the Properties of the drive folder and check the device status. If it says This device is working properly this USB drive is worth saving. There’s no need to worry if you can’t see the USB drive folder.

Erase the USB Drive with Diskpart Tool

Press ⊞ WINDOWS + X top open start menu and choose Command prompt (admin) Type diskpart and press ENTER Type in list disk and press ENTER Locate your USB drive by size and type in select disk#, where # is the number of removable disks.

Reallocate the USB Drive Volume

Press ⊞ WINDOWS + R to open the run dialog and type in diskmgmt.msc Select the USB drive and Right-click on it and select create simple volume. It will lead to a new simple volume wizard window. Once you click next, you can specify the volume size for the pen drive. Select the maximum volume, which is shown as a default unit in MB. As soon as you see the next step, select assign drive letter which will help you view your pen drive once again. Format the partition in the next step. This may be just an extra step because you have already wiped the data clean. But it is always better to be sure. Click Finish to complete the new simple volume wizard which will now be allocated to the USB drive. After you reallocate the unallocated USB drive space, you will be able to view the USB drive storage once again.
Read More
How to Fix Fatal Error c000021a

Fatal Error c000021a - What is it?

Fatal Error c000021a is a type of Windows stop error also known as the blue screen of death (BSoD) error. When this error occurs, it causes the computer screen to go blue and locks the user out of the current activity. This error code is fatal and can lead to serious issues like system crashes and freeze. The error code is usually displayed in the following format:
STOP: c000021a {Fatal System Error} The Windows Logon Process system process terminated unexpectedly with a status of 0xc0000034 (0x00000000 0x0000000)

Solution

Restoro box imageError Causes

Fatal Error c000021a occurs when the Windows kernel detects that either Winlogon.exe or Csrss.exe service processes have stopped responding or failed to load.  When this happens the error code pops up on the screen. Nonetheless, this is not the only reason for the occurrence of this error. There are plenty more reasons why Fatal Error c000021a may pop on your computer screen. These include:
  • Missing or corrupt hardware drivers
  • Faulty hardware
  • Windows System Restore failed during the rollback process
  • Malware or viral infection
  • Registry issues
No matter what the reason may be, it is advisable to fix the error right away without any delays. Remember it is a fatal error and can cause a great deal of damage to your PC.

Further Information and Manual Repair

Fatal Error c000021a is a serious PC issue but this does not mean you have to hire an expert to get it fixed. The good news is that this error is actually quite easy to resolve. You don’t have to be a technical whiz or a computer programmer to fix Fatal Error c000021a on your PC. Here are some do it yourself methods to fix this error code right away without any hassle: Let’s get started:

Method 1: Update Your PC Drivers

As we mentioned about corrupt or missing drivers can be one of the many reasons for the occurrence of this error. So, check the drivers first. Perform a driver scan and make sure all your drivers are updated.

Method 2: Perform a Windows System Restore

To do this, first launch Task Manager by pressing CTRL+SHIFT+ESC on your keyboard. Now click on the application tab and then click ‘New Task’ then browse. After that, go to C:\Windows\System32\Restore  folder and then double click the rstrui.exe file. This will help start system restoration. Your computer will reboot during the process and hopefully, the error will be resolved. Nonetheless, if the error still persists then try methods 3 and 4.

Method 3: Scan for Viruses

Sometimes Fatal Error c000021a may also occur due to malware infection. Your PC may be affected by viruses hidden in different locations without you knowing about it. Therefore to resolve this error, it is recommended to run an antivirus and scan for viruses. If detected, remove them right away to fix the error code.

Method 4: Repair the Registry

Another method to resolve Fatal Error c000021a code on your system is to repair the registry. The registry stores all the information and activities performed on the system. If it is not cleaned frequently, it gets loaded with too many files unnecessary and obsolete files like the junk files, cookies, internet history and temporary files which corrupts and damages the registry thereby generating blue screen of death error codes like Fatal Error c000021a. Though you can repair the registry manually it can be both time-consuming and slightly difficult especially if you are not a computer programmer. Therefore it is advisable to download a registry cleaner to fix it right away.

Automatic Repair with Restoro.

Whether the Fatal Error c000021a code occurs due to viral infection or registry issues, download Restoro. This is a next-generation, advanced, and multi-functional PC Fixer. This software is deployed with multiple utilities such as a powerful registry cleaner, an antivirus, a system optimizer, and more. The registry cleaner scans the entire PC and detects all types of registry issues at once. It cleans the registry, wipes out all the unnecessary files, and restores the registry back to normal. Simultaneously, the antivirus embedded in this software detects all types of viruses including malware, adware, spyware and Trojans and removes them in seconds. The system optimizer feature ensures the speed and performance of your PC are not compromised during the repairing process. It ensures your PC works at its optimal speed. Restoro is a one-stop solution for all your PC needs. It has a user-friendly interface making it easy for all levels of users to work around. It is compatible with all Windows versions Click here to download Restoro and resolve the Fatal Error c000021a code on your PC today!
Read More
Connecting Cortana on Windows and Android
Microsoft's anniversary update has come with many new features and improvements. One of these features is that Microsoft's Cortana can now be installed on your Android phone and as long as you are logged in to your Microsoft account on different devices, she can pass information between devices. You can not see battery life on your desktop PC, notifications, etc. There are some prerequisites in order to get this going, first is to have a Windows version 1607 or newer. The second is to have the last Android version

Installing Cortana on Android

  1. Download and install the Cortana app from the Google Play store.
  2. Open the app and accept the license terms.
  3. Enter the credentials for the Microsoft account you use to sign in to your PC.
  4. After a few seconds, Cortana will open.
  5. Click the settings button and select Sync Notifications.
  6. By default, missed calls, incoming messages, and low battery notifications will be turned on. You can turn this on\off from here. The only option off by default is for App notifications. Any non-system apps such as Facebook and Instagram can also send alerts to your Windows box. You can choose to enable the App notification sync option or leave it off.
  7. If you enable “App notification sync,” you will need to give Cortana permissions to read and control notifications on your phone.
  8. You can then select exactly which applications will be synched to your PC.
  9. Once done you can exit out of Cortana.

Configuring Cortana on PC

  1. Click the Windows button and type Cortana. Click the icon for Cortana and Search Settings.
  2. Scroll through the settings list and look for Send notifications between devices
  3. Click the switch to turn it on.
  4. Sign in to the same Microsoft account you used in the previous section
  5. Navigate back to the Cortana & Search settings tool.
  6. Click Edit Sync Settings. Make sure that your phone shows up on the list. You can also determine if you want PC notifications are sent to your phone.
With those settings in place, you should now start getting alerts for the items you enabled in your Action Center. As notices come in, you will see them pop up in a small bubble on the lower right of your screen. You can dismiss the notification or use the link to find a compatible app in the Windows store.
Read More
Media Player can't detect the length of file
Even with the new Groove Music in Windows 10, a lot of users still prefer to use the old Windows Media Player. This isn’t surprising since Windows Media Player still remains to be one of the best players you can find. However, that does not mean that it is without flaws as it could still encounter some issues from time to time. One of the issues you might encounter when using the Windows Media Player is when you try to burn DVDs or CDs but end up failing due to an error that pops up that says, Windows Media Player cannot detect the length of the file. At the time of writing, it isn’t clear yet what the real cause of the error is. However, there are several fixes that are provided in this post for you to check out so you can resolve the problem. You can try to get rid of any unsupported files from the burning list or you could also try running the Windows Media Player troubleshooters. Aside from that, you could also try to drag and drop music or change the burning speed. For more details, refer to the following options.

Option 1 – Get rid of the unsupported files from the burning list

You must get rid of the unsupported files from the list of files to burn. This list can be found on the right-hand side of the Windows Media Player. One of the indications that a file is causing problems is when there is a white cross in a red circle next to the file. You can simply click on that icon to remove the file from the burning list. Once you’ve gotten rid of all the unsupported files, try to burn your files to the CD or disk once more.

Option 2 – Try running the Windows Media Player troubleshooters

The next thing you can do to fix the error is to run the built-in troubleshooters for the Windows Media Player. Windows 10 actually comes pre-packed with three troubleshooters designed for Windows Media Player. They can help in fixing the “Windows Media Player cannot detect the length of the file” error. To run these troubleshooters, simply tap the Win + R keys to open the Run dialog box and type “msdt.exe -id WindowsMediaPlayerConfigurationDiagnostic” for the Windows Media Player Settings troubleshooter or type “msdt.exe -id WindowsMediaPlayerLibraryDiagnostic” for the Windows Media Player Library troubleshooter, or type “msdt.exe -id WindowsMediaPlayerDVDDiagnostic” for the Windows Media Player DVD troubleshooter.

Option 3 – Try to drag and drop music

Another thing you can check out is to drag and drop all the tracks into the Windows Media Player before you burn them. All you have to do is open the folder where the tracks are located and highlight all of them and then drag them to the Windows Media Player. It should now be able to detect the length of each one of the tracks without any errors.

Option 4 – Try to change the burning speed

Since the burning speed is set to fastest by default, you can try to change the burning speed to resolve the problem. Just open the Options window and then go to the Burn tab. From there, select either Medium or Slow burning speed and save the changes made. Now try to burn your files to the CD or disk once again.
Read More
How To Fix Error 504

Error 504 - What is it?

Error 504 is a type of runtime error that occurs on Windows PC. A runtime error is a bug that causes software or hardware problems thereby preventing programs from working on your PC correctly. This error may occur during the execution of the program.  It also slows down your PC performance.

Solution

Restoro box imageError Causes

Error 504 can be triggered by many causes such as:
  • Incompatibility between 2 software programs
  • Malicious software
  • Missing DLL files
  • Registry issues

Further Information and Manual Repair

Whenever you experience the error 504 on your system, it is advisable to resolve it immediately, typically because runtime errors like error 504 can lead to system failure and valuable data loss which is more than often hard to recover. To resolve this error code, you don’t necessarily have to hire a professional for the job. In fact, here are some solutions that you can try to fix by yourself, even if you are not a computer programmer.

1. Get the latest updates for Windows and for the program showing the error

This is a quick way to resolve runtime error 504 on Windows PC. To update the latest updates for Windows and for the program causing the error, open Windows Update by going to the start menu. In the search box type ‘update’ and then in the list of results click Windows Update.  In the left pane click on check for updates, wait while Windows looks for the latest updates. It will show you a list of updates available select the important updates that you want to install. Then click ok and then click install updates. After the updates are successfully complete, restart your PC and try running the application. If the error still persists, then try the solution given below.

2. Scan For Malicious Software

Sometimes the runtime error 504 may occur due to viral infection and malware. So, to resolve it download an antivirus. However, the antivirus can also slow down your PC performance.

3. Scan for Registry Issues

Another way to resolve it is to scan for registry issues. The registry and DLL files get damaged when it overloads with too much data. This particularly includes irrelevant and obsolete files. Registry issues trigger runtime errors like 504. The best way to resolve it is to download Restoro. This is an advanced and multi-functional PC Fixer embedded with multiple utilities like a registry cleaner, an antivirus, and a system optimizer. The registry cleaning utility resolves registry issues by removing the unnecessary files completely and repairing the damaged dll files. The antivirus module scans and removes all kinds of malicious software on your PC like viruses and Trojans, thereby resolving the runtime error 504 in seconds. As for speed, Restoro also functions as a system optimizer which boosts the performance of your system significantly. Restoro is safe and bug-free software. It has simple navigation and a user-friendly interface which makes it very easy to operate and workaround. It is compatible with all Windows versions. Click here to download Restoro and resolve error 504 today!
Read More
Cortana Web Preview is not working in Windows
Recently, a lot of users experience issues after the Windows 10 v1903 upgrade and one of them is that the Cortana Web Preview is not functioning like it’s supposed to. Even though Microsoft has already replaced the unified search where you no longer have to use Cortana, it is still undeniably useful and is packed with some great features, one of which is the Web view. Each time you type a search query, it will open a web view where you can see the results using Bing. However, some users reported experiencing some issue wherein the web view does not show anything and appears to be broken and users have to click on the Open in Browser link. Thus, if you are one of the users who experience the same problem, then this post is for you – it will guide you on what you can do if the web preview in Cortana is not working on your Windows 10 device. To fix the Web Preview issue in Cortana, you can try to restart Cortana or reset it using the Windows Settings app or change the Search filter level. You could also try to run the Windows Store App troubleshooter or re-register or reinstall Cortana. For more details refer to the options provided below.

Option 1 – Try to restart the process of Cortana

There are times when the running process of Cortana might encounter an error and breaks a particular component of the whole service so the first thing you can do is to restart Cortana’s process in the Task Manager.
  • Tap the Ctrl + Shift + Esc keys to open the Task Manager.
  • Next, go to the Processes tab and look for Cortana’s entry.
  • Once you find it, right-click on it and select the End task option.
  • Afterward, open Cortana again and see if it fixes the web view problem or not.

Option 2 – Try changing the search filter level

The next thing you can do to fix the Web View is to change the search filter level. All you have to do is go to Settings > Search and change filter level and from there, modify the search filter level and then see if it fixes the problem.

Option 3 – Run the Windows Store App troubleshooter

The Windows 10 Store Apps Troubleshooter will help you in fixing the Web Preview problem in Cortana. This is a great built-in tool from Microsoft that helps users fix any app issues. To use the Windows Store Apps Troubleshooter, follow the steps below.
  • Tap Win + I keys again to open the Windows Settings panel.
  • Go to Update & Security and then go to Troubleshoot.
  • Under the Troubleshoot section, on your left-hand side, scroll down to find Window Store Apps.
  • Then click on the Run the troubleshooter option and follow the on-screen instructions and then see if it fixes the problem.

Option 4 – Try to reset Cortana via Settings

  • Launch the Windows 10 Settings app and go to Apps > Apps & Features.
  • Next, look for the entry of Cortana on the right-side panel and select it.
  • After that, select the Advanced options and then select the Terminate button under the Terminate section.
  • Once done, click on the Reset button under the Reset section.
  • Restart your PC.
  • After your computer boots, launch Cortana again and check.

Option 5 – Try to re-register and reinstall Cortana

If none of the options given above works, you must consider reinstalling Cortana.
  • First, right-click on the Start button and click on the Windows Powershell (Admin) option from the list.
  • Next, type the following command and hit Enter to execute it:
Set-ExecutionPolicy Unrestricted
  • After that, execute this second command to reinstall Cortana:
Get-AppXPackage -AllUsers | Foreach {Add-AppxPackage -DisableDevelopmentMode -Register "$($_.InstallLocation)AppXManifest.xml"}
  • Restart your computer and check if the Web Preview in Cortana is now working.
Read More
Remove EmailAccountLogin PUP Removal Tutorial

EmailAccountLogin is a browser extension for Google Chrome, Mozilla, and Internet Explorer. This extension enables you one-click access to your favorite email providers, allowing you to easily check your email without typing the web address.

From the author: One-Click Access to quick links to the most popular email providers.

The Email Account Login new tab extension provides convenient, one-click access to several popular email services including Gmail, Yahoo, Facebook, Outlook, and Live mail along with providing direct access to a web search.

EmailAccountLogin is a browser hijacker, this extension hijacks your home page and replaces it with its own search engine. While active this extension monitors your website visits, links, clicks, and personal information. This information is later sold/forwarded to better server ads across its network. While using EmailAccountLogin you will see additional unwanted ads injected into your search results, sponsored links, and even sometimes pop-up ads. Several anti-virus scanners have categorized EmailAccountLogin as a Browser Hijacker and therefore, for security reasons, it is not recommended to keep it on your computer.

About Browser Hijackers

Browser hijack is a very common type of online fraud where your internet browser configuration settings are modified to make it do things you don’t intend. Browser hijacker malware is developed for many different reasons. It redirects you to the sponsored sites and inserts advertisements on the browser that helps its developer generate earnings. It may seem harmless, but most of these sites are not legitimate and could present a significant threat to your online safety. As soon as the program attacks your laptop or computer, it starts to mess things up a whole that slows your PC down to a crawl. In the worst-case scenario, you may be pushed to tackle serious malware threats as well.

Browser hijacking signs and symptoms

Signs that your internet browser is hijacked include: 1. your homepage has been reset to some mysterious webpage 2. when you key in a URL, you find yourself regularly directed to a different webpage than the one you actually meant 3. default web engine is modified 4. you’re getting new toolbars you haven’t witnessed before 5. you notice numerous ads pop up on your browsers or display screen 6. your web browser starts running slowly or displays frequent errors 7. you are blocked to access the websites of computer security solution providers.

How they get into your PC

Browser hijackers may use drive-by downloads or file-sharing networks or perhaps an e-mail attachment in order to reach a targeted computer. Many browser hijackings originate from add-on applications, i.e., toolbars, browser helper objects (BHO), or extensions added to web browsers to provide them additional functionality. A browser hijacker may also come bundled up with some freeware that you inadvertently download to your computer, compromising your internet security. A good example of some notorious browser hijackers includes Anyprotect, Conduit, Babylon, SweetPage, DefaultTab, Delta Search, and RocketTab, but the names are constantly changing. Browser hijacking can bring about severe privacy issues and even identity theft, disrupt your browsing experience by taking control over outbound traffic, considerably slows down your computer by depleting lots of resources and result in system instability also.

How to repair a browser hijack

Certain hijackers can be removed by simply uninstalling the corresponding free software or add-ons from the Add or Remove Programs in the Microsoft Windows control panel. Yet, some hijackers are far harder to find or get rid of as they might get themselves connected with some critical system files which allow it to operate as a necessary operating-system process. Furthermore, manual removal demands you to execute several time-consuming and complex actions which are very difficult to do for novice computer users. Browser hijackers can be effectively removed by installing and running anti-malware software on the affected PC. Safebytes Anti-Malware has a cutting-edge anti-malware engine to help you avoid browser hijacking in the first place, and mop up any existing issues. Along with anti-virus software, a PC optimizer tool will help you repair Windows registry errors, eliminate unwanted toolbars, secure your internet privacy, and improve overall system performance.

Find Out How To Install Safebytes Anti-Malware On An Infected Computer system

All malware is bad and the effects of the damage can vary according to the specific type of malware. Some malware variants modify browser settings by adding a proxy server or change the PC’s DNS configurations. In these cases, you will be unable to visit some or all of the websites, and thus unable to download or install the necessary security software to get rid of the malware. So what should you do if malicious software keeps you from downloading or installing Safebytes Anti-Malware? Follow the instructions below to get rid of malware through alternate methods.

Install the anti-malware in Safe Mode

In Safe Mode, you may adjust Windows settings, un-install or install some software, and eradicate hard-to-delete malware. In the event, the malware is set to load automatically when the PC starts, shifting to this mode may well prevent it from doing so. To start the computer into Safe Mode, hit the “F8” key on the keyboard just before the Windows logo screen comes up; Or right after normal Windows boot up, run MSConfig, look over the Safe Boot under the Boot tab, and then click Apply. After you restart into Safe Mode with Networking, you may download, install, as well as update the anti-malware program from there. At this point, you could run the antivirus scan to eliminate viruses and malware without any interference from another application.

Utilize an alternate internet browser to download security software

Some malware might target vulnerabilities of a specific browser that obstruct the downloading process. When you suspect that your Internet Explorer happens to be hijacked by a virus or otherwise compromised by online hackers, the most effective plan of action is to switch over to a different web browser such as Chrome, Firefox, or Safari to download your chosen computer security software – Safebytes Anti-Malware.

Install and run anti-virus from your flash drive

Another option is to save and run an antivirus software program entirely from a USB drive. Do these simple measures to clear up your affected PC using portable anti-malware. 1) On a virus-free PC, install Safebytes Anti-Malware. 2) Plug the Flash drive into the uninfected computer. 3) Double-click the Setup icon of the antivirus program to run the Installation Wizard. 4) Choose the drive letter of the pen drive as the location when the wizard asks you where you would like to install the anti-virus. Follow activation instructions. 5) Transfer the flash drive from the uninfected computer to the infected computer. 6) Double-click the antivirus software EXE file on the thumb drive. 7) Click on “Scan Now” to run a complete scan on the infected computer for malware. If no other method of downloading and installing an anti-malware program works, then you’ve no other choice than to hit the final resort: a full Windows reinstallation, which can get rid of that nasty virus and help you regain internet access. If you’re unsure which method to use, simply contact our toll-free number 1-844-377-4107 to speak to our technical team. Our experts will take you step-by-step through the malware removal process on the phone and also restore your computer remotely.

SafeBytes Anti-Malware: Lightweight Malware Protection for Windows PC

If you’re looking to download an anti-malware application for your computer, there are numerous tools out there to consider nonetheless, you just cannot trust blindly anyone, irrespective of whether it is paid or free software. Some of them are excellent, some are ok types, and some will harm your PC themselves! You need to choose one that is dependable, practical, and has a strong reputation for its malware source protection. On the list of recommended software programs is SafeBytes Anti-Malware. SafeBytes has a very good history of top-quality service, and customers are very happy with it. SafeBytes anti-malware is a very effective and easy-to-use protection tool that is made for end-users of all levels of IT literacy. With its cutting-edge technology, this application can help you get rid of multiples types of malware including computer viruses, worms, PUPs, trojans, adware, ransomware, and browser hijackers. There are numerous great features you will get with this particular security product. The following are some of the features you might like in SafeBytes. Robust Anti-malware Protection: This deep-cleaning antimalware software goes much deeper than most anti-virus tools to clean your computer system. Its critically acclaimed virus engine locates and disables hard to remove malware that conceals deep inside your computer. Real-time Active Protection: SafeBytes offers real-time active monitoring and protection from all known computer viruses and malware. This software will always keep track of your computer for any suspicious activity and updates itself regularly to keep current with the latest threats. Fast Scan: This computer software has one of the fastest and most efficient virus scanning engines in the industry. The scans are highly accurate and take a little time to complete. Internet Security: SafeBytes gives an instant safety rating on the web pages you are going to check out, automatically blocking harmful sites and making sure that you’re certain of your safety while browsing the net. Lightweight: This application is not “heavy” on the computer’s resources, so you’ll not notice any overall performance problems when SafeBytes is operating in the background. 24/7 Guidance: You can obtain high levels of support round the clock if you’re using their paid software.

Technical Details and Manual Removal (Advanced Users)

If you wish to manually remove EmailAccountLogin without the use of an automated tool, it may be possible to do so by removing the program from the Windows Add/Remove Programs menu, or in cases of browser extensions, going to the browsers AddOn/Extension manager and removing it. You will likely also want to reset your browser. To ensure the complete removal, manually check your hard drive and registry for all of the following and remove or reset the values accordingly. Please note that this is for advanced users only and may be difficult, with incorrect file removal causing additional PC errors. In addition, some malware is capable of replicating or preventing deletion. Doing this in Safe Mode is advised.

The following files, folders, and registry entries are created or modified by EmailAccountLogin

Files: C:Program FilesEmail Account Login C:UserAppDataRoamingEmail Account Login C:ProgramDataEmail Account Login C:UsersUserAppDataLocalEmail Account Login %TEMP%CF49E01A-6F41-4B56-9743-DBC375176677emailaccountlogin.exe %LOCALAPPDATA%MicrosoftInternet ExplorerRecoveryHighActiveRecoveryStore.E2864823-7CB8-11E7-989D-0A00278A626A.dat %LOCALAPPDATA%MicrosoftInternet ExplorerRecoveryHighActiveE2864824-7CB8-11E7-989D-0A00278A626A.dat %LOCALAPPDATA%MicrosoftInternet Explorerframeiconcache.dat %TEMP%CF49E01A-6F41-4B56-9743-DBC375176677Commondbg.js %TEMP%CF49E01A-6F41-4B56-9743-DBC375176677Commonimggreen-btn.png %TEMP%CF49E01A-6F41-4B56-9743-DBC375176677Commonimggrey-btn.png %TEMP%CF49E01A-6F41-4B56-9743-DBC375176677Commonjquery.min.js %TEMP%CF49E01A-6F41-4B56-9743-DBC375176677Commonjson3.min.js %TEMP%CF49E01A-6F41-4B56-9743-DBC375176677Commonstats.js %TEMP%CF49E01A-6F41-4B56-9743-DBC375176677Finish.zip %TEMP%CF49E01A-6F41-4B56-9743-DBC375176677Finishindex.html %TEMP%CF49E01A-6F41-4B56-9743-DBC375176677Finishscript.js %TEMP%CF49E01A-6F41-4B56-9743-DBC375176677Finishstyles.css %TEMP%CF49E01A-6F41-4B56-9743-DBC375176677IES.zip %TEMP%CF49E01A-6F41-4B56-9743-DBC375176677IESie.png Registry: HKEY_LOCAL_MACHINESYSTEMCurrentControlSetServicesWpm HKCUSoftwareMicrosoftWindowsCurrentVersionInternet Settingsrandom HKEY_LOCAL_MachineSoftwareClasses[adware name] HKEY_CURRENT_USERSoftwareMicrosoftWindowsCurrentVersionRun .exe HKEY_CURRENT_USERSoftwareMicrosoftWindowsCurrentVersionInternet Settings CertificateRevocation = 0 HKEY_LOCAL_MACHINESOFTWAREMicrosoftWindowsCurrentVersionrunrandom HKEY_CURRENT_USERSoftwareMicrosoftInternet ExplorerMain Default_Page_URL
Read More
Raptor Lake is promising much

Raptor Lake, a new and upcoming Intel 13th generation CPU will break the 6GHz barrier for the first time ever in normal working mode, overclocked mode in Intel words will go as high as 8GHz. CPU will be 15% faster than Alder lake in single-threaded tasks and a stunning 41% faster in multi-threaded workloads.

The current world record for overclocking is 8.72GHz done with AMD FX-8370 and Intel is aiming at breaking that record with Raptor Lake, of course, this kind of extreme overclocking will require some top-of-the-line nitrogen cooling systems.

raptor lake

Raptor Lake will run on the current LGA 1700 socket, so you will not need to buy another motherboard for CPU and they will also be manufactured on a 10nm process which means that you will need to take care of cooling and power supply if they really go over 6GHz.

Mid-range Intel Core i5-13600K processor will come with 14 cores inside and 20 threads running at a maximum P-core frequency of 5.1GHz, while Core i7-13700K will have 16 cores and 24 threads and run on 5.3GHz max P-core frequency. Best i9-13900K will come packed with 24 cores, 8 of them will be P-cores, and the rest 16 are E-cores, and 32 threads. It will reach 5.4GHz frequency but it was stated it can go to 5.8GHz with Thermal Velocity Boost.

After this statement, we can clearly see that the 6GHz breaker CPU will probably be an i9 special KS variant. In other words, specially tested and picked existing i9 running at higher speeds as was with Alder Lake as well where normal i9-12900K ran at 5.2GHz while i9-12900KS was running at 5.5GHz.

Read More
1 2 3 171
Logo
Copyright © 2023, ErrorTools. All Rights Reserved
Trademark: Microsoft Windows logos are registered trademarks of Microsoft. Disclaimer: ErrorTools.com is not affiliated with Microsoft, nor claims direct affiliation.
The information on this page is provided for information purposes only.
DMCA.com Protection Status