If you are trying to connect to the internet using the Microsoft Edge browser but encountered an error message instead that says, “Can’t connect to the proxy server”, read on as this post will show you how you can fix this error. This kind of error in Microsoft Edge could be caused by incorrect proxy settings or worse, malware.
To fix this error, here are some suggestions you need to check out:
Option 1 – Try to check your internet connection
The first thing you can do to resolve the “Can’t connect to the proxy server” error in Microsoft Edge is to check your internet connection. There are times when your internet connection or Wi-Fi router can cause such problems. In such cases, you have to ensure that you have a valid internet source and if you are using a Wi-Fi router, you can try to use another connection and then see if the error is gone or not.
Option 2 – Try to disable the manual proxy set up from the Settings
In case you miss it, there is actually an option in the Settings panel that you can use to set up proxy in your Windows 10 computer. So if you encounter the “Can’t connect to the proxy server” error, you should disable manual proxy for the meantime and check if it fixed the error or not.
Tap the Win + I keys to open the Windows Settings.
Then go to Network & Internet > Proxy.
And on your right-hand side, ensure that the Automatically detect settings are enabled and that the Use a proxy server option under the Manual proxy setup is disabled.
Now try to open any website again and see if the problem’s fixed.
Option 3 – Try disabling the VPN
Like pointed out earlier, if you are using VPN, this could be the reason why you’re getting the “Can’t connect to the proxy server” error so the most obvious thing to do is for you to turn off the VPN and try to load a website in Edge again. And if you use a VPN software that works using their software, you can just completely exit or log-off from its account. On the other hand, if you are using a built-in Windows 10 VPN, you can simply turn it off or delete all the settings you have created there.
Option 4 – Disable the proxy server for your LAN
If your PC was just attacked by some adware or malware as of late, it is possible that it has changed the network settings in the system and might display spam advertisements. Thus, you have to disable the proxy server for your LAN. To do that, refer to these steps:
Tap the Win + R keys to open the Run dialog box.
Then type “inetcpl.cpl” in the field and hit Enter to pull up the Internet Properties.
After that, go to the Connections tab and select the LAN settings.
From there. Uncheck the “Use a Proxy Server” option for your LAN and then make sure that the “Automatically detect settings” option is checked.
Now click the OK and the Apply buttons.
Restart your PC.
Note: If you are using a third-party proxy service, you have to disable it.
Option 5 – Temporarily disable Firewall and third-party antivirus
Firewall and antivirus programs are known to block files the instant it detects a threat to the system. However, there are some cases when it can also block a file even when it’s a safe one. Thus, your antivirus or firewall programs might be the reason why you can’t download anything on your Windows 10 computer. To isolate the issue, you need to temporarily disable both the Firewall and antivirus programs and then check if you can now download anything from the internet. Do not forget to enable them again as disabling them can leave your computer vulnerable to cyber threats.
Option 6 – Clear the browsing data of Microsoft Edge
Open Microsoft Edge.
Then click on the three horizontal dots to open the menu.
From there, click on Settings. And under Settings, click the “Choose what to clear” button under the Clear browsing data section.
Next, check all the checkboxes and then click the Clear button to clear the browsing data in the Edge browser.
Restart Edge.
Option 7 – Try to reset, repair or reinstall Edge via Settings
You can reset, repair or reinstall the Edge browser through Settings.
If none of it helped, you can try the following:
Open File Explorer and then go to this path – C:/Users/YourUsername/AppData/Local/Packages
Note: Before you type in the path in the Address bar, make sure that you put your user account name in place with the “YourUsername”.
Tap Enter to proceed.
Next, look for the folder named “MicrosoftEdge_8wekyb3d8bbwe” then right-click on it.
Click on Properties and uncheck the option “Read-only” under the General tab in the Properties window.
Click on Apply and then OK to save the changes made.
After that, look for the MicrosoftEdge_8wekyb3d8bbwe folder again and delete it. And if a prompt stating “Folder Access Denied” appears on your screen, just click on the Continue button to proceed – doing so will delete most of the content inside the folder except for the folder named “AC”.
Restart your PC.
Now all you have to do is to re-register Microsoft Edge using PowerShell. In the Start Menu, search “Windows PowerShell”.
Right-click on Windows PowerShell from the search results and select the “Run as administrator” option.
Type in this command in the PowerShell windows and tap Enter – Cd C:/Users/YourUsername
Note: Once again, make sure that you key in your user account name in place of “YourUsername.
After that, type in this command and tap Enter – Get-AppXPackage -AllUsers -Name Microsoft.MicrosoftEdge | Foreach {Add-AppxPackage -DisableDevelopmentMode -Register "$($_.InstallLocation)AppXManifest.xml" -Verbose}
Restart your PC.
Option 8 – Scan your computer for malware using Windows Defender
Your computer could be infected with malware which might have triggered the “Can’t connect to the proxy server” error. To fix this, you need to scan your computer using a reliable program like Windows Defender.
Tap the Win + I keys to open Update & Security.
Then click on the Windows Security option and open Windows Defender Security Center.
Next, click on Virus & threat protection > Run a new advanced scan.
Now make sure that Full Scan is selected from the menu and then click the Scan Now button to get started.
Error 0x0000001e is when you start the Windows XP Setup and you see a message which says something like:
STOP: 0x0000001E (0x80000003, 0xBFC0304, 0x0000000, 0x0000001)
Solution
Error Causes
You are most likely to face this error if you restart your PC while the Windows Setup is still under process and yet to complete.
Other causes of this error include any of the following conditions:
The drive on which you are installing Windows has insufficient disk space to accommodate the installation.
An incompatible or outdated third-party driver (or more) is installed on your PC which is conflicting with the installation. For instance, this could be a problematic video driver.
The system BIOS has incompatibilities with the installation.
Further Information and Manual Repair
This error is also called the “Bug check code”.
The STOP 0x1E signifies that there was an unknown or illegal processor instruction detected by the Windows XP kernel. You will see the exception address which shows up to indicate the root of the problem which is usually a driver or faulty hardware.
You should note this address down as well as the link date of the faulty driver or image which includes it.
If at any point it becomes impossible for you to handle and you end up contacting the Windows support center to help you out with the process then this information will help you out in making things a lot easier while the support team tries to troubleshoot the problem.
The parameters included in the STOP 0x1E error message are the following:
is the exception code which couldn’t be handled.
shows the module’s address where the exception took place.
signifies the exception’s parameter 0.
represents the exception’s parameter 1.
You can use this information which usually is provided in error 0x0000001e message to pinpoint the root cause of the problem and troubleshoot it.
In order to fix this error, you need to follow either one of the following procedures as needed according to your situation.
Clean Up Your Disk
If your disk doesn’t have ample space to accommodate the installation then you should free up some of the space on your disk to make sure the Windows can be installed on it.
You can also reinstall the Windows on another disk that has sufficient space.
Get Rid of the Third Party Driver
If the error 0x0000001e message gives you the name of the driver due to which the installation process is being halted, then get rid of that driver by disabling it or removing it.
If the problem is resolved by this then you should contact the manufacturer of the third-party driver and ask them about any newer versions of the driver that wouldn’t conflict with the installation of Windows.
Upgrade System BIOS
Upgrading your system BIOS is something that you can’t do on your own. You will need to find out more about how you can upgrade. For this, you should contact either your PC’s manufacturer or your motherboard’s manufacturer.
If nothing else works, you can always make use of the Microsoft Debugging Tools which will provide you ample information about the error message.
You will find the Debugging Tools and further information about them including the downloading and installation process on Microsoft’s website.
This post will guide you on how you can fix the Error 0x80070079. This kind of error mostly occurs during the transfer of files across the networks. It could be caused by several factors which include the incorrect configuration of drivers or the network, as well as deadlock state or the server is loaded with a lot of tasks and if any location is not available. This error could also appear when you try to create a System Image or copy or move files on your computer. Here’s the full context of the error message:
“Error 0x80070079: The semaphore timeout period has expired.”
To fix this error, you can try to run the three built-in Network-related troubleshooters or update or reinstall the network adapter drivers or perform a network reset. For more details, follow the options laid out below.
Option 1 – Try to run the three built-in Network-related troubleshooters
The first thing you could do to fix the problem is to run any of the three built-in troubleshooters related to Networks such as Incoming Connections, Network Adapter, and Shared Folders troubleshooters. To access them, just open the Windows Settings app, and go to Update & security > Troubleshoot. From there, run any or each one of the aforementioned troubleshooters.
Option 2 – Update the Network Adapter drivers
You might also want to update the Network Adapter drivers by following these steps:
Tap the Win + R keys to launch the Run window and then type in the “MSC” command and hit Enter to open the Device Manager window.
Under the Device Manager, you will see a list of drivers. From there, look for the Network Adapters and expand them.
Then right-click on each one of the Network drivers and update them all.
Restart your PC and see if it helped in fixing the BSOD error.
Note: If updating the network drivers didn’t help in fixing the “Windows could not find a driver for your network adapter” error, you can also try to uninstall the very same drivers and restart your Windows 10 PC. After that, the system itself will reinstall the drivers you just uninstalled. Alternatively, you can also download and install the drivers from the manufacturer’s website directly.
To reinstall the network adapter driver, refer to these steps:
Open the Devices Manager from the Win X Menu.
Then locate the device drivers and right-click on them to open the Properties.
After that, switch to the Driver tab and click on the Uninstall Device button.
Follow the screen option to completely uninstall it.
Finally, restart your computer. It will just reinstall the device drivers automatically.
Option 3 – Perform a Network Reset
Network Reset is a feature in Windows 10 that will help you reinstall the Network adapters as well as reset the Networking Components back to their original settings.
Open the Start Menu and click on the Settings icon.
Next, click on the Status link on the left side where you should see the status of your Network. Aside from that, you should also see a link that will let you open the Network Troubleshooter – click on that link to expand Network Troubleshooter.
Under Network Troubleshooter, select the link for “Network reset”.
After you click on Network reset, it should redirect you to the following page. From there, click on the Reset now button.
Error Code 0x8024001e is most commonly associated with the installation of apps from the Windows store, although versions of the error have been present in multiple versions of the Windows operating system. At its most basic level, the error says that a program has not been installed, even after the installation wizard has run through to completion.
Common symptoms include:
Inability to open or run apps downloaded from the Windows store
The error message reads, “Something happened and this app couldn’t be installed. Please try again.”
The solutions to Error Code 0x8024001e are somewhat complex, so it is a good idea to get in touch with a computer repair professional if you do not feel confident in your ability to follow the steps below to complete. However, most users should be able to follow the steps below and achieve the desired results.
Solution
Error Causes
There are a couple of different causes that can lead to the appearance of Error Code 0x8024001e. In some cases, extraneous data left in the app cache can cause the problem. In other cases, particular processes may need to be manually reset to clear the problem. Last, but not least, unresolved updates may lead to Error Code 0x8024001e causing issues with downloaded and installed apps from the Windows Store.
Further Information and Manual Repair
There are three primary methods to address the appearance of Error Code 0x8024001e. These should work for all users, regardless of the specific cause for their machine. The methods below do require some advanced skills in computing, so be sure to contact a Windows repair technician if you have trouble following the instructions below.
Here are the top ways to repair Error Code 0x8024001e on Windows 10:
Method One: Clear the App Cache and Use Power User Options
In many cases, simply clearing your app cache can resolve the errors that pop up when you are downloading, installing, or updating any apps that have come from the Windows store. This method may not perfectly resolve the problem every time, but it is a step that should always be done before any others.
Next, open up the Power User options by pressing both the Windows key and the X key at the same time. Choose “Command Prompt (Admin)” from the options that appear. Then type in the commands into the prompt, one at a time:
Restart your computer after these changes have been made so that all changes can take effect. You may be able to access the desired programs and apps after this is complete.
Method Two: Run Your Registry Repair Tools
Sometimes, the best way to repair Error Code 0x8024001e is to simply open up the Window Registry tools and run the repair process. This will scan your registry for any errant entries, corrupted entries, or missing entries, repairing them automatically as the device is able to do. This process may take some time to complete, so plan accordingly.
After this process is complete, it is always a good idea to restart your computer to apply any changes that have been made. Reattempt to install or run the program in question one this is done.
Method Three: Run Windows Updates as Necessary
Last, open up the Windows Update tools to check to see if any of your programs need to be updated or if your operating system needs to be updated. Install each of the updates, restarting your computer after the entire process has been completed so that they can fully take effect on your machine. You should be able to run the programs that had caused problems once this is complete.
It is important to keep up-to-date on your system and program updates to avoid future errors in installations and downloads from the Windows store.
In most cases, using the steps above should allow you to use the apps that you’ve downloaded from the Windows store without Error Code 0x8024001e popping back up. If the problem persists or if you have not been able to follow the steps listed above to remedy the error, it is a good idea to contact a qualified professional who is experienced in working with Windows 10 errors.
Method Four: Use An Automated Tool
If you wish to always have at your disposal a utility tool to fix these Windows 10 and other related issues when they do arise, download and install a powerful automated tool.
Stable Diffusion is a machine learning model developed by Stability AI to generate digital images from natural language descriptions. The model can be used for different tasks like generating image-to-image translations guided by text prompts and upscaling images.
Unlike competing models like DALL-E, Stable Diffusion is open source and does not artificially limit the images it produces. Stable diffusion was trained on a subset of the LAION-Aesthetics V2 data set. It can run on most consumer hardware equipped with a modest GPU and was hailed by PC World as "the next killer app for your PC".
Since Stable Diffusion is run locally and not in the cloud, as mentioned there is no limit to the number of images that you can produce but in order to use it you will have to get down a little dirty with setting your PC environment for it since it is not really an application, it is a command line text based descriptor that will use python to generate your images, so there is no install nor GUI.
In this guide, we will show you how to both install and run Stable Diffusion on your local PC so you can start producing some cool images all by yourself.
Hardware and software requirements
Make no mistake, Stable Diffusion will not run on a potato PC, in order to harvest the power of AI-generated imagery this is what you will need:
A GPU with at least 4GB of VRAM
10GB of hard disk space
Python and libraries (Miniconda3 installer will install everything you need)
The Stable Diffusion files
Git
Any OS (Windows, Linux, macOS)
Installing components
For this tutorial, we are covering the installation and running of Stable Diffusion on Windows PC. The steps presented here are presented in a way that installation can be performed on any operating system but precise instructions will be for Windows OS.
GIT
The first thing to do is to install GIT. It is a tool that will let you easily maintain and install repos from the internet. to install it go to: https://git-scm.com/ and click on download. Follow the instructions for your version of the operating system. If you are a developer you are familiar with GIT and if you already have it installed you can skip this step.
One thing that is important when installing GIT locally is to select to use it via the command line (the second option that says "Git from the command line and also from 3rd-party software").
Miniconda3
Now when we have GIT installed, next thing is to use Miniconda3 to install python and all required libraries that are needed. Get the installer at: https://docs.conda.io/en/latest/miniconda.html
Miniconda3 is basically an easy installer so you do not have to install tons of stuff manually from different websites and sources, it is nicely packaged in the installer that will take care of everything.
Stable Diffusion
After the previous two steps, we are ready now to actually install Stable Diffusion. Go to https://huggingface.co/CompVis/stable-diffusion#model-access and install the latest library (as of the writing of this article currently it is stable-diffusion-v1-4-original, the last one on the right), the library is almost 5GB in size so be prepared for big download.
Once downloaded click on the Windows start button and type in Miniconda3 and click on open. Create a folder and name it how you want on a drive of your choice. For this example, we will install it all in disk C under folder AI_art, follow the instructions below but use your own names and destination instead. Do not close Minicoda3 after typing commands!!!
cd c:/
mkdir AI_art
cd AI_art
Extract GitHub files that you have downloaded into your new folder and get back to Minicoda3 and type the next commands:
Let the whole process finish, some files are large and it might take a while. After the whole process is finished and completed, copy the checkpoint file that you have downloaded into: C:\AI_art\stable-diffusion-main\models\ldm\stable-diffusion-v1
After the file is copied rename it to model.ckpt and you are finished.
Running Stable Diffusion
The created environment is needed in order to actually use Stable Diffusion to create images. Each time you want to use it you will have to run it, so go into Miniconda3, and inside it type:
conda activate ldm
cd C:\AI_art\stable-diffusion-main
after we are inside the folder call the script with the parameters:
python scripts/txt2img.py --prompt "TXT DESCRIPTION OF IMAGE THAT YOU WANT TO CREATE" --plms --n_iter 5 --n_samples 1
and that's it, your image is created and it is located in C:\AI_art\stable-diffusion-main\outputs\txt2img-samples\samples
Each time you connect to a Wi-Fi network your PC saves that network password. If for any reason you need to see this password or passwords there are ways you can do it and we are here to show you how.
Hello and welcome to error tools where we aim to help you with all of your Windows problems and issues, where we offer our insight on various topics and sometimes go offroad and write something crazy. This time we will offer you a way on how to easily and quickly see how can you find out your memorized Wi-Fi password.
Find your W-Fi password
Make sure that you are connected to the Wi-Fi network you wish to find out the password of
Open Windows Settings app by pressing ⊞ WINDOWS + I
On the left side choose Network & Internet and click on it
Click on Advanced Network Settings
Inside Advanced Network Settings go to Related Settings
Select More Network Adapted Options
Right-click on your adapter and select Status
Click on Wireless Properties
Click on the Security tab
Click on enable on Show Character box beneath Network Security key to reveal Wi-Fi password
Updating your Windows 10 computer isn’t always as easy as it should be since there are times when you might encounter some errors along the way. One of these errors is the error code 0x80246017 that comes with the error message “WU_E_DM_UNAUTHORIZED_LOCAL_USER”.
According to Microsoft, the cause of this particular Windows Update error is that “The download failed because the local user was denied authorization to download the content”. So if you got this error when you tried updating your computer, read on as this post will provide you some suggestions on how you can fix it.
Before you troubleshoot the problem using the options given below, make sure that you are logged in as administrator. If you are already logged in as an administrator, follow each one of the options carefully.
Option 1 – Try to check the status of some Windows Update Services
Tap the Win + R keys to open the Run dialog box.
Next, type “services.msc” in the field and hit Enter or click OK to open Services.
From the list of Services, look for the following services and make sure that their Startup type is as follows:
Windows Update – Manual (Triggered)
Background Intelligent Transfer Service – Manual
After that, check if the Service status of the listed services above is set to Running. If they’re not, click on the Start button to start these services and then check if you can now enable the Windows Update service or not.
Option 2 – Try to grant Full Control of the System Volume Information directory
First, tap the Win + X key combination and then select Command Prompt (Admin) from the given menu.
After opening Command Prompt with admin privileges, type the following command and tap Enter to execute it:
Once the command is executed, it will run a batch of tasks and will show each one of their statuses on the command line window and once they’re done, exit Command Prompt.
Now restart your computer and see if it fixed the problem or not.
Option 3 – Try to disable your antivirus program or Firewall
Disabling the antivirus program or Firewall or any other security software installed in your computer is always a good idea you can try when the Windows Update process does not go smoothly. So before you try updating your computer again, make sure to disable the antivirus or security program and once the Windows Update is done, don’t forget to enable the antivirus program back again.
Option 4 – Try running the DISM tool
You can try running the Deployment Imaging and Servicing Management or DISM tool to fix the Windows Update error. Using this built-in tool, you have various options such as the “/ScanHealth”, “/CheckHealth”, and “/RestoreHealth”.
Open the Command Prompt with admin privileges.
Then type in the following commands and make sure to hit Enter right after you type each one of them:
Dism /Online /Cleanup-Image /CheckHealth
Dism /Online /Cleanup-Image /ScanHealth
exe /Online /Cleanup-image /Restorehealth
After that, wait until the process is finished and do not close the window as the process will probably take a couple of minutes.
Once it’s done, restart your computer.
Option 5– Run the Windows Update Troubleshooter
If the DISM tool didn’t work in fixing the error, you could also try running the Windows Update Troubleshooter as it could also help in fixing any issues related to Windows Update including the Windows Update error code 0x80246017. To run it, go to Settings and then select Troubleshoot from the options. From there, click on Windows Update and then click the “Run the troubleshooter” button. After that, follow the next on-screen instructions and you should be good to go.
Option 6 – Run Microsoft’s online troubleshooter
Running Microsoft’s online troubleshooter might also help you fix the Windows Update error code 0x80246017. This online troubleshooter is known to help in fixing Windows Update errors, it scans your computer for issues that might be causing the problem and then fixes them automatically.
Raptor Lake, a new and upcoming Intel 13th generation CPU will break the 6GHz barrier for the first time ever in normal working mode, overclocked mode in Intel words will go as high as 8GHz. CPU will be 15% faster than Alder lake in single-threaded tasks and a stunning 41% faster in multi-threaded workloads.
The current world record for overclocking is 8.72GHz done with AMD FX-8370 and Intel is aiming at breaking that record with Raptor Lake, of course, this kind of extreme overclocking will require some top-of-the-line nitrogen cooling systems.
Raptor Lake will run on the current LGA 1700 socket, so you will not need to buy another motherboard for CPU and they will also be manufactured on a 10nm process which means that you will need to take care of cooling and power supply if they really go over 6GHz.
Mid-range Intel Core i5-13600K processor will come with 14 cores inside and 20 threads running at a maximum P-core frequency of 5.1GHz, while Core i7-13700K will have 16 cores and 24 threads and run on 5.3GHz max P-core frequency. Best i9-13900K will come packed with 24 cores, 8 of them will be P-cores, and the rest 16 are E-cores, and 32 threads. It will reach 5.4GHz frequency but it was stated it can go to 5.8GHz with Thermal Velocity Boost.
After this statement, we can clearly see that the 6GHz breaker CPU will probably be an i9 special KS variant. In other words, specially tested and picked existing i9 running at higher speeds as was with Alder Lake as well where normal i9-12900K ran at 5.2GHz while i9-12900KS was running at 5.5GHz.
0x0000007c error inside Windows 11 is a printer error that is manifested when Windows users are trying to connect to a shared network remote printer. Error is displayed by the message:
Windows cannot connect to the printer. Operation failed with error 0x0000007c.
If you are experiencing this type of annoyance, fear now we are providing you with several solutions to this problem.
Update Windows 11
Open the Start menu, click on the settings app
Select Windows update tab
Click on Check for updates
Click on Advanced options
Inside select Optional updates
If there are optional updates click on Download & Install
Run the printer troubleshooter
Press ⊞ WINDOWS + I to open settings
Click on Troubleshoot navigation on the system tab
Select Other trouble-shooters
Click on the Run for printer troubleshooter
If the error is found click on Apply this fix
Restart the Print Spooler Service
Right-click on the Start button
Click on RUN
Type in services.msc and press OK
Right-click on Printer Spooler service and select Restart
Clear the Print Spooler
Open services like in the previous step
Right-click Print Spooler and select STOP
Open File explorer
Navigate to: C:\Windows\System32\spool\drivers\x64\3 (64-bit Platform)
C:\Windows\System32\spool\drivers\W32X86\3 (32-bit Platform)
Delete everything inside folders
Go back to services, right-click on Print Spooler and select RESTART
Reinstall Driver for printer
Right-click on Start and select device manager
Double click on the Print queues category
Right-click on the printer and select Uninstall device
Click on Uninstall on prompt
Right-click on the Print queues category and select Scan for hardware Changes
Google Chrome 94 is here and it has introduced a controversial idle detection API. For those people that do not know what idle detection API is, well basically Chrome can be asked by a website to report when a user of the site has a site open and is idle on the device. The issue that people have with this is that this particular feature can be used to report when the user is not using a computer at all.
Good thing is that website or web application will prompt you to allow it to use this feature like when a site/application wants to use your microphone or web camera. Developers are on board with this feature since it can provide them with more telemetric data on how users are interacting with their website/application but there are some that are strongly voicing against this.
Tantek Çelik, Mozilla Standards Lead, commented on GitHub, saying:
As it is currently specified, I consider the Idle Detection API too tempting of an opportunity for surveillance capitalism motivated websites to invade an aspect of the user’s physical privacy, keep long-term records of physical user behaviors, discerning daily rhythms (e.g. lunchtime), and using that for proactive psychological manipulation (e.g. hunger, emotion, choice)…Thus I propose labeling this API harmful and encourage further incubation, perhaps reconsidering simpler, less-invasive alternative approaches to solve the motivating use-cases.
Others who have spoken against this feature are people from the WebKit development team inside Apple. Ryosuke Niwa, an Apple software engineer who works on WebKit said:
That doesn’t seem like a strong enough use case for this API. For starters, there is no guarantee that the user won’t immediately come back to the device. Also, who is such a service supposed to know what another device user might be using at any given point? We’re definitely not going to let a website know all the devices a given user might be using at any given point. That’s a very serious breach of the said user’s privacy. It seems to me that such a suppression/distribution mechanism is best left for the underlying operating systems/web browsers to handle.
Of course, technology itself as always can be used for good or for bad and time will tell if this feature has brought good stuff or it has paved another brick in surveillance and privacy manipulation. As said for now option will prompt for agreement and let's hope that it will be used for good causes from this day into the future.
Stop error 7B is a blue screen of death error code that occurs during Windows XP setup or after installation. The error message is displayed in either of the following formats:
‘A problem has been detected and Windows has been shut down to prevent damages’
Setup has encountered a fatal error that prevents it from continuing.
Setup cannot continue. Power down or reboot your computer now.
Solution
Error Causes
There is no one particular cause for this error. The Stop error 7B may be triggered due to multiple reasons. These include:
Boot Sector Viruses
Device Driver Issues
Poor Windows XP installation
Registry Corruption
If you come across this error code on your PC, it is advisable to fix it right away particularly because it is a blue screen of death error that can cause severe damages to your system. It can lead to system failure, crash, and valuable data loss.
Further Information and Manual Repair
Here we’ve listed for you the best PC repair solutions to resolve and fix stop error 7B.
Cause: Boot Sector Viruses
Solution: Stop error 7B can occur when infected with a boot sector virus. If this is the cause, then first download a powerful antivirus on your system. After downloading it, run it to scan your PC for viral infection. Immediately delete the viruses if found.
However, if the virus is too powerful, the antivirus may fail to remove it. In such an event, you will have to repartition and format your hard disk and then later reinstall Windows XP.
Cause: Device Driver Issues
Solution: If the boot controller is not properly configured or the driver is not updated, Stop error 7B can occur. When this happens, simply restart your system and press F8 to go to the advanced boot options.
Here choose the Last Known Good Configuration option. After that boot into Windows and then perform a system restore. Now go to the start menu and type Device Manager in the search box.
To access the Device Manager window it may prompt you to enter an administrator password, insert it to proceed. Now go to Device Manager and perform a driver rollback to reinstall the drivers generating this stop error.
By following these simple steps you can easily resolve device driver and configuration issues.
Cause: Poor Windows XP Installation
Solution: In this case, you will have to perform a Windows start-up repair. This can be done by booting Windows XP from CD. Simply press enter at setup Windows Screen when prompted. Then press R to repair Windows XP installation.
This procedure copies the original Windows files over the bad ones.
Cause: Registry Corruption
Solution: Sometimes the stop error 7B is also triggered by the registry corruption. When this happens, it is advisable to download and run Restoro software for PC scan and repair.
Restoro is a powerful, advanced, and highly functional registry cleaner. It is deployed with intuitive algorithms that detect registry issues and errors like Stop error 7B on your system in seconds. It wipes out clutter from your hard disk, repairs damaged files and the corrupted registry.
It is safe, efficient, and bug-free. It is also compatible with all Windows versions. In addition to this, it is also embedded with other utilities like an antivirus, a system optimizer, and Active X controls, and a class ID scanner.
Click here to download Restoro and resolve to stop error 7B on your PC immediately!

 Error Causes
 If your disk doesn’t have ample space to accommodate the installation then you should free up some of the space on your disk to make sure the Windows can be installed on it.
You can also reinstall the Windows on another disk that has sufficient space.
If your disk doesn’t have ample space to accommodate the installation then you should free up some of the space on your disk to make sure the Windows can be installed on it.
You can also reinstall the Windows on another disk that has sufficient space.

 Hello and welcome to error tools where we aim to help you with all of your Windows problems and issues, where we offer our insight on various topics and sometimes go offroad and write something crazy. This time we will offer you a way on how to easily and quickly see how can you find out your memorized Wi-Fi password.

 Update Windows 11
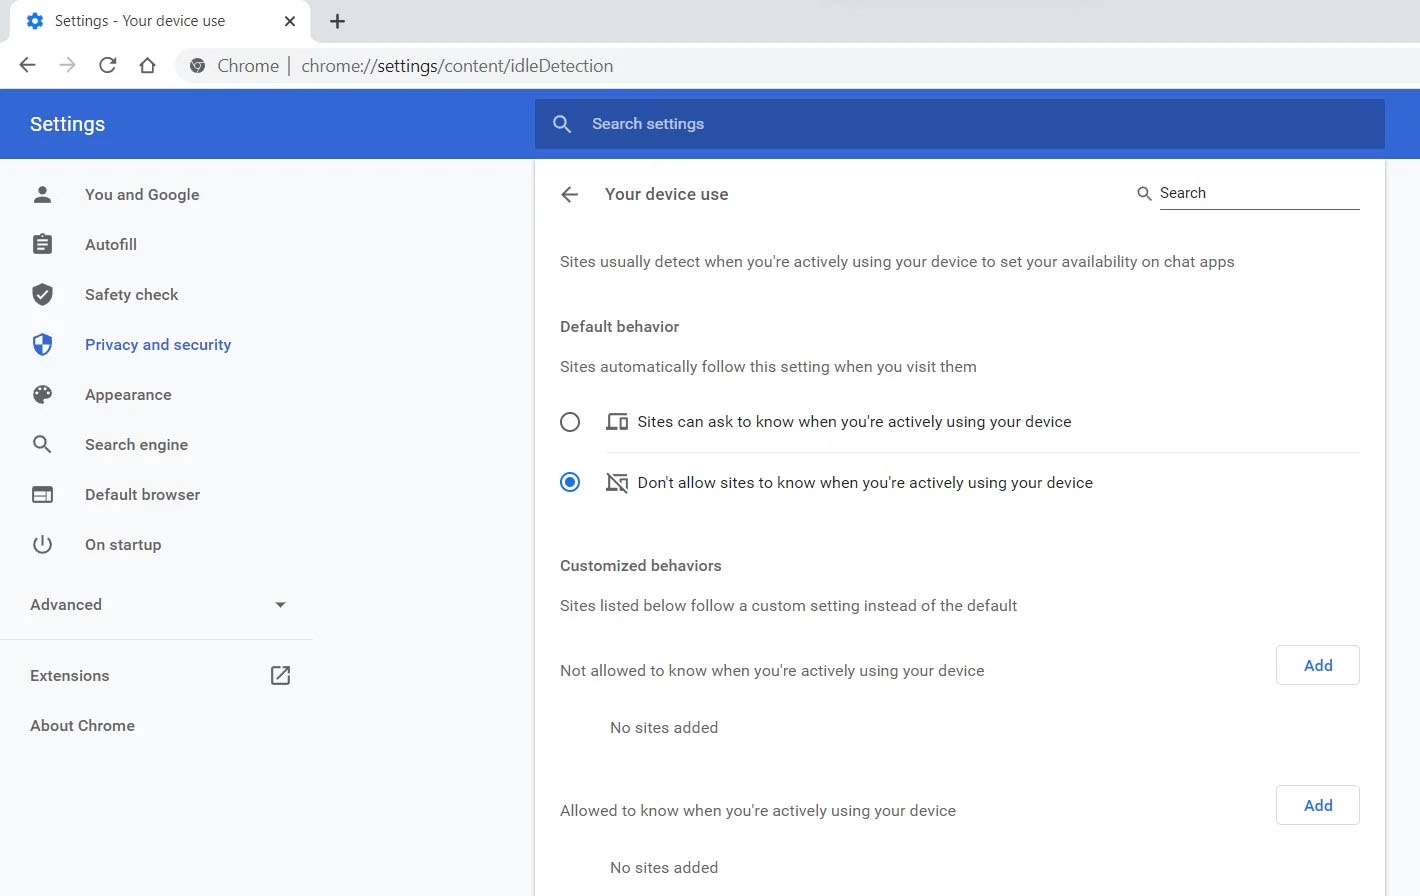 Good thing is that website or web application will prompt you to allow it to use this feature like when a site/application wants to use your microphone or web camera. Developers are on board with this feature since it can provide them with more telemetric data on how users are interacting with their website/application but there are some that are strongly voicing against this.
Tantek Çelik, Mozilla Standards Lead, commented on GitHub, saying:
Good thing is that website or web application will prompt you to allow it to use this feature like when a site/application wants to use your microphone or web camera. Developers are on board with this feature since it can provide them with more telemetric data on how users are interacting with their website/application but there are some that are strongly voicing against this.
Tantek Çelik, Mozilla Standards Lead, commented on GitHub, saying: