Error code 0xc004f034 occurs when Windows users are unable to activate their operating system. It affects Windows 8 and Windows 10 users and features common symptoms which include the following:
Inability to activate Windows
Message box with error code 0xc004f034
Solution
Error Causes
Error code 0xc004f034 often occurs due to an issue with the Windows product key. This may occur when users enter an invalid product key or use one that is appropriate for use on a different version of Windows. To correct the issue, users will need to use the correct product key for their system or contact an IT professional if their device is connected to a Key Management Service (KMS). Windows users affected by this error code may also need to check their system for viruses or missing system files since these issues can result in error codes on Windows devices.
Further Information and Manual Repair
Manual repair methods enable users to fix problems related to error codes. Though some manual repair methods require the use of Command Prompt and utility tools like the System File Checker, even non-technical Windows users can find success simply by following the instructions provided below.
However, note that some issues can be complex, thus requiring the use of an automated tool or help from a Windows repair technician. Consider these options if the manual repair methods below do not resolve error code 0xc004f034 on your Windows 8 device.
Method One: Enter Valid Windows Product Key
Microsoft currently offers several ways for customers to activate their Windows operating system, the most common of which is the product key. This 25-character code verifies that users have access to an authorized version of Windows.
You may get a valid product key from an authorized dealer, a new PC with Windows, or access a digital copy from a Windows website when you purchase your Windows operating system online. Once you have a valid product key, use it to activate Windows and resolve error code 0xc004f034 in Windows 8. Follow the steps below to access the Product Activation Wizard.
Step one: Click or tab Start button then select Settings
Step two: Tap or click PC Settings, then select Activate Windows
Step three: Type invalid product key
Once a valid product key is used, the Product Activation Wizard should complete the activation process. If you are unable to complete the process, however, and error code 0xc004f034 remains unresolved, click the link or instructions the Product Activation Wizard provides regarding activation via phone or customer support.
Method Two: Run System File Checker
Another option available to Windows 8 users is System File Checker (SFC). This tool enables Windows users to scan and repair corrupted or missing system files. Follow the steps below to access SFC.
Step one: Go to Start and type Command Prompt or CMD.
Step two: Run as Administrator
Step three: Type sfc /scannow ensuring a space is between “sfc” and “/scannow”.
System File Checker will repair any corruptions found on system files within your machine once you successfully follow the instructions provided. The tool will also replace missing files which will lead to better performance on your PC.
When the process is complete, restart your device then check if you are able to activate Windows. If error code 0xc004f034 is still present, you will need to find another solution via repair method three.
Method Three: Scan for Viruses and other Malware
Viruses and other forms of malware are one of the main issues resulting in poor PC performance and Windows error codes. To fix this issue on your PC, scan your machine for signs of these malicious programs. If you do not have anti-malware software and would like to download one from the Internet, ensure the software you choose is effective before attempting to download it.
Once you have powerful antimalware software on your PC, begin a scan for viruses, Trojan horses, and other forms of malware. If the Windows error code occurred due to issues related to malicious programs, you will be able to resolve the issue. If, however, this manual repair method proves ineffective in resolving error code 0xc004f034, download a powerful automated tool or contact a Windows repair technician to assist you.
Method Four: Use an Automated Tool
If you wish to always have at your disposal a utility tool to fix these Windows 8 and other related issues when they do arise, download and install a powerful automated tool.
The Winload.efi file is an Extensible Firmware Interface or EFI file. EFI files are executable files for the firmware of the computers that are mainly based on UEFI and execute the tasks of loading the files to the bootloader of the computer. They are used for a specific set of tasks such as turning on the computer, installing Windows, restarting the computer or resetting it, and so on. This is why the Winload.efi file is a significant file so if it gets corrupted, lost, or damaged, it would be impossible for the Windows operating system to proceed.
Here are some errors you can encounter that are related to the Winload.efi file:
efi is missing
efi cannot be found
efi is missing or contains errors
This program can’t start because winload.efi is missing from your computer
This application requires the file winload.efi, which was not found on this system.
There was a problem starting [path]winload.efi. The specified module could not be found.
In addition, the 0xc0000225 , 0xc00000e and 0xc0000001error codes are also associated with the Winload.efi file.
Before you start troubleshooting the problem, you can try to perform System Restore first. This will help undo any changes you’ve made in your computer that might have triggered the Blue Screen error. To perform System Restore, here’s what you have to do:
First, press the Win + R keys to open the Run dialog box.
After that, type in “sysdm.cpl” in the field and tap Enter.
Next, go to the System Protection tab then click the System Restore button. This will open a new window where you have to select your preferred System Restore point.
After that, follow the on-screen instructions to finish the process and then restart your computer and check if the problem is fixed or not.
If System Restore didn’t help in fixing the Blue Screen error, now’s the time for you to resort to the troubleshooting tips provided below but before you get started, make sure that your create a System Restore point first.
Option 1 – Try rebuilding the Boot Configuration Data (BCD) and repairing MBR
Once you get to the Welcome Screen part, click on Next.
Afterwards, click on the Repair your computer option located on the bottom-left part of the window.
Then click on Troubleshoot.
Next, select the Advanced Options and then Command Prompt.
Once Command Prompt has been pulled up, the following commands to rebuild BCD files and repair MBR. Don’t forget to hit Enter right after you type each command.
bootrec /repairbcd
bootrec /osscan
bootrec /repairmbr
Once the command line is successful in finding out a Windows installation, hit Y to let it boot from the list which will successfully rebuild BCD.
Now type “exit” to close Command Prompt and then restart your computer to successfully apply the changes made.
Option 2 – Disable the Secure Boot in the BIOS
Disabling the Secure Boot in the BIOS settings is definitely recommended to resolve errors related to the Winload.efi file. To disable Secure Boot, here’s what you have to do:
First, boot your computer into Windows 10.
Next, go to Settings > Windows Update. From there, check if there is anything that you have to download and install if you see any available updates. Usually, OEMs send and update the list of trusted hardware, drivers, and operating systems for your computer.
After that, go to the BIOS of your computer.
Then go to Settings > Update & Security > Advanced Startup options. If you click on Restart Now, it will restart your computer and give you all the advanced options.
Next, select Troubleshoot > Advanced Options. As you can see, this screen offers you further options including System restore, Startup repair, Go back to the previous version, Command Prompt, System Image Recovery and UEFI Firmware Settings.
Select the UEFI Firmware Settings which will take you to the BIOS.
From there, go to Security > Boot > Authentication tab where you should see Secure Boot. Note that every OEM has its own way of implementing the options so it varies.
Next, set Secure Boot to Disabled and set Legacy Support to On or Enabled.
Save the changes made and exit. Afterward, your computer will reboot.
Option 3 – Run System File Checker scan
You might also try running the System File Checker or SFC scan to fix the error. System File Checker is a command utility built into your computer that helps restore corrupted files and missing files. Refer to the following steps to run it:
Hit the Win + R keys to launch Run.
Type in cmd in the field and tap Enter.
After opening Command Prompt, type in sfc /scannow
The command will start a system scan which will take a few whiles before it finishes. Once it’s done, you could get the following results:
Windows Resource Protection did not find any integrity violations.
Windows Resource Protection found corrupt files and successfully repaired them.
Windows Resource Protection found corrupt files but was unable to fix some of them
Reboot your computer.
Option 4 – Disable the Early Launch Anti-Malware Protection
You need to restart your computer in the Start Menu first while holding down the Shift key on your keyboard.
After that, it will restart your computer to Startup Settings.
Now ensure that the 8th option is labeled as “Disable early launch anti-malware protection.
Then tap the F8 key since the aforementioned option above is listed at number 8. This should launch and load Windows on your PC with the Early Anti-malware protection disabled for that session only when you try to carry out the same task and then check if the error related to the Winload.efi file is now fixed.
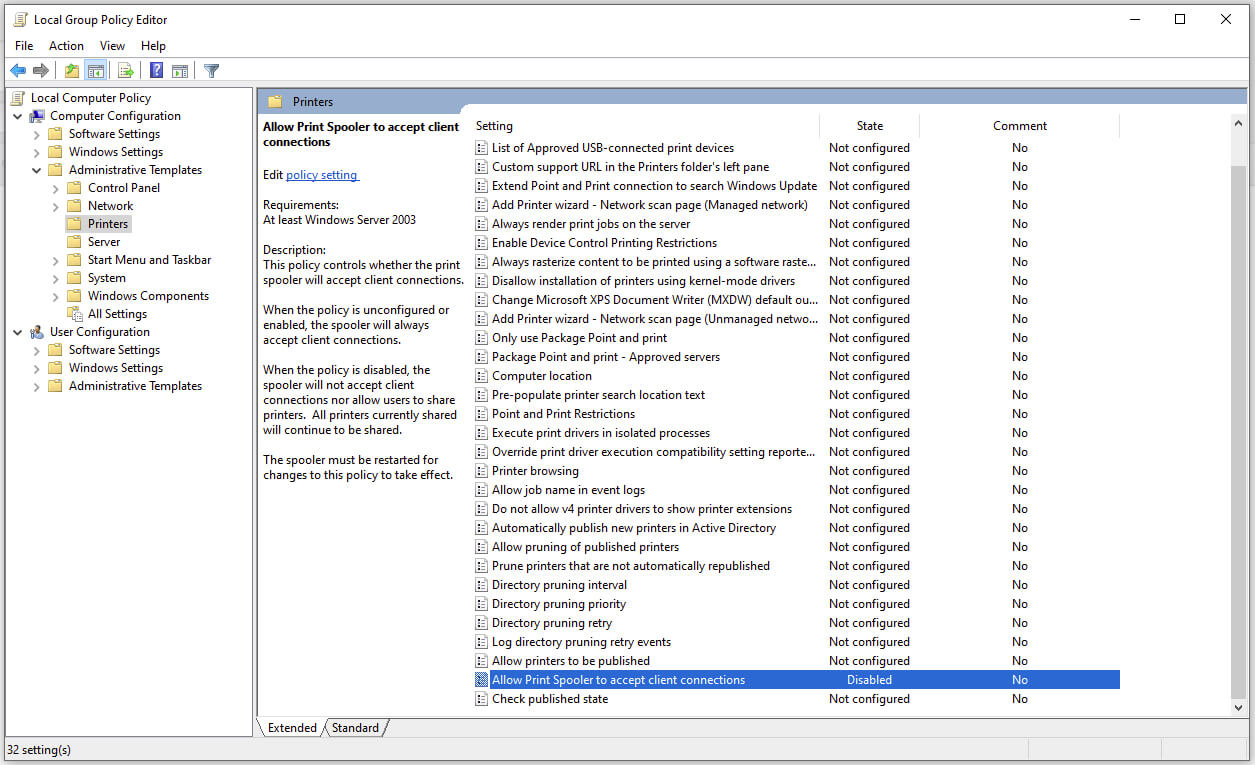
The third time is charm saying goes but not when we are talking about Microsoft. Print spooler is again in focus, in a bad way.
This is the third print spooler vulnerability to emerge in just five weeks. While a critical flaw was originally identified and patched in June, a similar flaw came to light shortly after and was subsequently patched (with mixed success).
Microsoft is once again advising its customers to disable Windows print spooler after a new vulnerability that allows hackers to execute malicious code on machines has emerged. While a patch fixing the flaw will be released in due course, the most effective workaround currently on the table is to stop and disable the print spooler service entirely.
"An elevation of privilege vulnerability exists when the Windows Print Spooler service improperly performs privileged file operations. An attacker who successfully exploited this vulnerability could run arbitrary code with SYSTEM privileges. An attacker could then install programs; view, change, or delete data; or create new accounts with full user rights."
Stop this service right away or you are risking a potential attack.
Press ⊞ WINDOWS + X to open the hidden menu
Click on Power Shell (admin)
In Power Shell type in the following command to check if spool service is running: Get-Service -Name Spooler followed by ENTER
If spooler service is running type in the next command to stop it: Stop-Service -Name Spooler –Force and press ENTER
Then follow with this command to disable it at startup: Set-Service -Name Spooler -StartupType Disabled followed with ENTER
That’s it, we hope a patch will come soon for all the people that are using network printing and indeed need this service running in order to do work.
If you encounter an error saying, “0x800f0982 – PSFX_E_MATCHING_COMPONENT_NOT_FOUND”, when you try to install a Windows 10 cumulative update, then you’ve come to the right place as this post will help you sort this problem out. According to the reports, computers with Asian language packs installed are the ones that are mostly affected by this error. In fact, the same error code was also found with two KB4493509, KB4495667 and KB4501835. These cumulative updates are released as part of Patch Tuesday. However, it appears that it brought on issues. Thus, to fix the error, you can try to uninstall and reinstall any language packs you’ve added recently. You can also try to uninstall older KB updates or delay Windows Update, as well as reset Windows 10.
Option 1 – Try to uninstall and reinstall the language packs you’ve recently added
If you have installed a language pack recently, you have to uninstall it, restart your computer, and then reinstall it.
Go to the Settings app and select Time & Language.
Next, click on the Language option and select the language you have to uninstall.
After selecting the language, it will enable two-button namely the Options and Remove buttons.
Click on the Remove button and then reboot your PC.
Once your computer has restarted, install the language pack again.
Option 2 – Try to uninstall the KB updates
Microsoft has actually offered a solution, an odd one which is to install the April 2019 cumulative update. You have to uninstall the older KB4495667 and KB4501835 update from your Windows 10 computer. And after you’ve uninstalled them, click on the Update button and then install the April 2019 cumulative update.
Go to Settings and select Update and Security > Windows Update.
From there, click on the “View update history” option and then click on the “Uninstall Updates” option.
This will open a new window that contains the list of installed Windows Updates.
Now right click on the Windows Update you wish to uninstall and click Uninstall.
Once you’ve uninstalled the update, click the Update button and install the April 2019 cumulative update.
Option 3 – Try to delay Windows Update
If you have not installed the Windows 10 cumulative update KB4493509 yet and the Asian language is a must for you, then you have to delay or pause the Windows Update for at least a couple of days.
Option 4 – Reset your computer
Tap the Win key or click on the Start button located in the Taskbar.
Then click on the Power button at the bottom right portion of the screen.
Next, press and hold the Shift key on your keyboard and then click on Restart. This will restart your Pc into the Advanced Startup options.
Note: Once you have access to the Advanced Startup options, you have to go to the setting which allows you to Reset your Windows 10 PC. All you have to do is select Troubleshoot > Reset this PC to reach the following screen
Afterward, select either the “Keep my files” option and then proceed to the next on-screen instructions that follow to reset your Windows 10 computer without losing your files.
RAM drive is basically a hard drive made of your RAM memory. Altho this kind of drive can not and is not available to save any data when the computer is shut down its advantage is lightning fast speed since the application is installed in RAM itself, it is loading from there and executing from there.
Creating this kind of drive which will use your RAM memory, well part of it can not be done natively in Windows, you will need some kind of application for this task. Luckily there is a free open source application for this kind of task.
ImDisk, you can download the application here.
ImDisk Toolkit is an application for managing virtual drives. It also includes a utility that allows the creation of RAM drives.
Download the application and install it, make sure that you select all components on the installation selection screen. After installation is finished double click on icon labeled RamDisk Configuration.
Once the application is running adjust the disk size in the box at the top of the window for your RAM drive. Click “OK” at the bottom of the window. This will create your RAM drive, which is just a virtual disk that’s assigned to your computer’s RAM. The process happens transparently, so there’s nothing you need to do. If you get a warning about shutdown settings, click on the “Shutdown Settings” button. Then unlock the settings pane with your administrator password. Finally, uncheck the checkbox next to “Turn on fast startup (recommended)” and click “Save Changes” at the bottom of the window. Your RAM drive is now ready for use.
Fast Startup speeds up the process of turning on your computer by saving a system state between completely off and hibernation to your hard drive. This happens when the computer writes the contents of your RAM to a stable hard drive. As you may guess, this could mess with your RAM drive’s ability to preserve and track its data. With Fast Startup off, boots may take slightly longer, but it’s doubtful that you’ll notice much.
Disabling a fast startup will satisfy the warning window, but let’s consider why. This will also allow ImDisk to save your RAM drive’s data to an image file when you shut down your computer. If you don’t, the contents of your RAM drive will be erased completely every time, with no saved image storage.
It would also disable the RAM drive’s ability to load the previous content. Basically, the drive would act much more like RAM and much less like a disk. Depending on your use case, that may be disappointing or unusable.
You can access and use it just like any normal hard drive. It shows up in Windows’s file explorer just like any other drive. However, a Ram drive is exponentially faster than traditional types of storage. And we mean exponentially. Whereas an SSD might offer 300 to 500 MB when reading from the disk, a RAM drive can offer more than 5000 MB, even on mediocre memory sticks.
This error code occurs when users fail to activate their Windows operating system. It is one of the more popular Windows error codes since it affects many versions of Windows including Windows 7, Windows 8.1, and Windows 10. Error code 0x8007007b has common symptoms which include the following:
Inability to activate a Windows installation
Message box highlighting error code 0x8007007b
Solution
Error Causes
Error code 0x8007007b in Windows 8.1 usually results due to one or more main clauses. Windows 8.1 users may experience this error due to the use of volume-licensed media. The error code may also arise if the activation wizard is unable to connect to Key Management Service (KMS) host computer or if corrupted system files are present on your computer.
Further Information and Manual Repair
Windows error codes such as Error code 0x8007007b can be a complicated issue, requiring the use of technical knowledge and skills. For this reason, we have listed instructions in the simplest of forms to enable even average users to successfully complete manual repair methods that will resolve error code 0x8007007b.
Below are the two main methods for correcting this issue.
Method One: Use Multiple Activation Key (MAK) to Activate Windows
This method involves the use of a Multiple Activation Key (MAK) instead of the Key Management Service (KMS) to activate the Windows operating system you intend to use on your PC. This manual repair method requires the use of Command Prompt so ensure you follow the instructions provided carefully so as to avoid the risks of causing harm to your system.
Step one: Select Windows log key + X.
Step two: Click Command Prompt, then Admin
Step three: Type in admin password if Command Prompt requests it
Step four: Type slmgr -ipk followed by the MAK product key. Note that the product key should have 25 characters with dashes between them like this xxxxx-xxxxx-xxxxx-xxxxx-xxxxx
Attempt to activate your Windows installation once you’ve completed the exact instructions above. If you are unable to complete this process, consider getting help from a Windows repair technician or simply move to the next manual repair method listed below.
Method Two: Run System File Checker
System File Checker (SFC) enables Windows users to scan and repair errors or corruption on system files. Since such errors within your system files can cause error code 0x8007007b to occur, follow the steps below to fix this error code.
Step One: Go to Start and type Command Prompt or CMD.
Step Two: Run as Administrator
Step Three: Type sfc /scannow with a space between “sfc” and “/scannow”.
The System File Checker tool will begin scanning your machine for corrupted or missing files in need of repair. If these files are found on your system, the tool will repair and replace them. Once this is done, restart your computer then check to see if you can now activate your Windows operating system.
Method Three: Use an Automated Tool
If you wish to always have at your disposal a utility tool to fix these Windows 8 and other related issues when they do arise, download and install a powerful automated tool.
Have you been feeling anxious in the digital space? Feeling like you have a million eyes on you each time you visit a website? It can definitely make you uneasy. Luckily there’s an easy fix, and it’s called a VPN.
In this article we’ll take you through the basics of what a VPN does and some of the biggest benefits you can reap from buying one.
VPN: definition and how it works
VPN stands for Virtual Private Network, so its name already says a lot about what it does.
A VPN is specialized software that keeps your browsing private and secure. Essentially it hides your identity, preventing possible cyberattacks and data theft. This is especially important in cases of public network use, where you’re highly exposed to potential threats.
To be more specific, this software encrypts your Internet Protocol (IP) address by filtering it through a server hosted by the VPN provider first. That way, it prevents your Internet service provider, third parties and lurking online thieves from tracking the actual you.
Credit: FLY:D on Unsplash
Some providers, such as Surfshark VPN with its IP Rotator feature, even make it a habit to frequently change your IP address to further protect your identity. With most VPN providers, you can also appear to be in a completely different country, adding to your disguise.
There are tons of advantages you can look forward to if you decide to use a VPN. Take a look at some of the crucial ones.
Benefits of using a VPN
When choosing a VPN, you can find both free and paid options. We recommend you go with the paid ones, since they have stronger security, encryption and data protection, as well as more advanced features. Free VPNs come with limitations and risk of malicious attacks on the software itself.
You can choose to buy a singular VPN service or opt for antivirus software that has a VPN built in, for example Bitdefender’s Ultimate Security plan. That depends on what you use your computer for and how much.
When you pick one, here’s what it can do for you.
1. Access region-specific content
When we said you could change your location, we meant it. Say you’re using a streaming service and a show you desperately want to watch isn’t available in your country. You can use your VPN to make it look like you’re browsing from a country where it’s unlocked.
This option is also convenient for gamers who want to access maps, skins and other in-game items unavailable in their location.
In addition, you can use this powerful feature when you’re traveling to a region where some of your favorite content may not be accessible.
Do keep in mind that you need to read the Terms and Conditions (yeah, we know - who does that?) of your games and services before doing this, since you could end up getting a penalty. It’s also important to remember that there are entire countries that have strict regulations or even bans on VPNs, for example Belarus, Russia and China. So make sure to be very cautious with your VPN use, friends.
2. Browse like no one’s watching
VPNs shield your browsing habits from prying eyes on the web. Those can be malicious hackers or just third-party cookies tracking your every move to later bombard you with targeted ads. For example, Surfshark VPN features a Cookie blocker that blocks all cookie-related pop-ups and lets you browse in peace (and secret). It works even when the VPN is turned off, which is also pretty neat.
In addition, their CleanWeb 2.0 technology makes sure ads and especially malware don’t stand a chance at all, since they’re blocked before they can even load.
The inability of sites to track your browsing means they can’t collect and analyze any of your data. So, your personal information - or your company’s information in case that’s what you’re using your computer for - is entirely hidden and secure.
3. Save money
It’s well-known that the prices of certain items and services vary based on your location, browsing time, age and many other factors. This most commonly goes for airline tickets and hotel stays.
You can use your VPN to avoid high prices and surcharges. Clear all cookies, turn on your VPN and visit an online shopping site to check out their prices. Then compare your findings with the offers you see when your VPN is off, when you spend a long time on the site or have an active account with the company.
Sometimes this can really help you find the best deals and avoid breaking the bank. But again, check the Terms and Conditions before you purchase something using a VPN.
4. Secure your smart home
The more smart devices you have connected to your network, the more exposed you are to potential cyberattacks. Phones and computers are generally designed to be decently secure even without a VPN or antivirus, but smart home devices leave a lot to be desired in that regard.
Protecting your home network with a VPN software means all devices connected to it are secure, be it an air purifier or Alexa.
Credit: Bence Boros on Unsplash
5. Prevent connection slowdown
Your ISP can intentionally slow down your internet speed based on how much data you’ve consumed (data throttling) or your activities online (bandwidth throttling).
But with a VPN, what kind of data you send and receive and how much is entirely hidden. Therefore, if your ISP can’t see you, they can’t control you and they can’t throttle down your speed.
The bottom line
You can never be too safe online. So definitely think about getting yourself a solid VPN to pump up your privacy and security as much as you can. And if you have any questions or need help choosing the perfect software for you, feel free to reach out to us.
Researchers have discovered 16 vulnerabilities in Bluetooth connections that could be exploited and make from minor to some serious damage to your device. The flaw can be used on chips manufactured by Intel, Qualcomm, and Texas Instruments while connecting to external devices like speakers, headphones, keyboards, mice, etc.
Who is affected?
Mentioned chips are used by many in a vast range of devices including big players with their products like Microsoft Surface laptops, Dell desktops, Samsung Phones, Google Pixel, and OnePlus handsets.
The Bluetooth bug affects a wide range of devices, including smartphones, laptops as well as smart home gadgets. In total, more than one billion devices that rely on Bluetooth are believed to be impacted.
What is the damage?
The amount of damage possible with this flaw depends on the type of device with the chipset. Some devices can only be crashed after a specially crafted packet is sent to the flawed chip. If that's the case with your gadget, it can be easily resolved with a simple restart.
With other devices, hackers can take advantage of the Bluetooth Classic flaw to remotely run malicious code. That could allow malware to be installed remotely. Researchers say vendors were informed about these issues months ago before the findings were published.
The good news is this should have given plenty of time for the relevant patches to be pushed out that remedy the flaws. However, you'll need to make sure that you're running the latest version of the operating system to be protected by the patch crafted by the manufacturers.
Android Bluetooth threat
The researchers emphasize the lack of basic tests in Bluetooth certification to validate the security of Bluetooth Low Energy (BLE) devices. The BrakTooth family of vulnerabilities revisits and reasserts this issue in the case of the older, but yet heavily used Bluetooth classic (BR/EDR) protocol implementations.
We would also advise users to disable Bluetooth on devices that do not need it. This way you can prevent attackers from sending you malformed LMP packets. Since BrakTooth is based on the Bluetooth Classic protocol, an adversary would have to be in the radio range of the target to execute the attacks. So, in a safe environment Bluetooth can be enabled.
If you recently made some changes in your Windows 10 computer using the Group Policy Editor but they were not reflected and you got errors instead, it could be that your Windows computer wasn’t able to read the Group Policy file (registry.pol). To resolve this kind of issue, you have to repair the potentially corrupted Group Policy using the options given in this post.
.As you know, Group Policy is a feature in the Microsoft Windows Active Directory which allows an admin to make changes in the features on Windows PCs that are on the network. So if the modifications you just made weren’t successfully applied, then there could be something wrong with the registry.pol file on the client or it could also be that the Group Policy folder is missing.
To fix this issue in the Group Policy, you need to refer to the given suggestions below and make sure that you have admin privileges as you execute them.
Option 1 – Try to delete or recreate the missing registry.pol file
The entire settings of the Group Policy are stored in the registry.pol file so if it went missing, all the changes you make will not be reflected. The good thing is that you can recreate it but if the file exists and is corrupted, you need to delete it first before you recreate it.
First, go to the C:/Windows/System32/GroupPolicy/Machine location.
And from there, check if the registry.pol file exists or not. If it’s there, just delete it permanently by tapping the Shift + Delete keys.
Now it’s time to recreate the file. Just open Windows PowerShell with admin privileges by tapping Win + X + A keys.
After opening PowerShell, type this command: gpupdate /force
The command you entered will recreate the registry.pol file and will refresh the Group Policy. Restart your computer.
Option 2 – Try recreating the secedit.sdb file
The security settings of Group Policy are stored in the secedit.sdb file so if you made some changes to security and they weren’t reflected, you can try to delete and recreate the secedit.sdb file instead of deleting the Group Policy file. All you have to do is navigate to the C:/WINDOWS/security/Database folder and look for the secedit.sdb file and rename it or move it to another folder. After that, restart your computer. Once your computer has restarted, the secedit.sdb file will be created again.
Option 3 – Try to reset the Group Policy to default
You can also try to reset the Group Policy back to its default state. There are several ways you can do that. You can either use the gpupdate or the secedit command in the Windows PowerShell to do that. Resetting the Group Policy will resolve any issues that could be caused by its current settings.
Option 4 – Try to perform System Restore
System Restore can also help resolve the Group Policy issue. It could be that prior to the issue, you’ve made some changes in the system that might have affected the Group Policy. To undo these changes, perform System Restore.
First, tap the Win + R keys to open the Run dialog box.
After that, type in “sysdm.cpl” in the field and tap Enter.
Next, go to the System Protection tab then click the System Restore button. This will open a new window where you have to select your preferred System Restore point.
After that, follow the on-screen instructions to finish the process and then restart your computer and check if the problem is fixed or not.
Option 5 – Use the DISM tool
You can also try running the Deployment Imaging and Servicing Management or DISM tool. This tool will repair the Windows System Image as well as the Windows Component Store in your Windows 10 computer. So if there are any missing or corrupted folders and files, the DISM tool can restore and repair them. As a result, any system consistencies and corruptions will be fixed. To run this tool, follow these steps:
Tap the Win + X keys and click on the “Command Prompt (Admin)” option.
After that, input each one of the commands listed below sequentially to execute them:
Dism /Online /Cleanup-Image /CheckHealth
Dism /Online /Cleanup-Image /ScanHealth
Dism /Online /Cleanup-Image /RestoreHealth
Once you’ve executed the commands given above, restart your computer.
Microsoft sent an email to users on the Dev build channel saying that the company intends to push some builds that don’t represent what consumers will receive with Windows 11 when it officially releases. In other words, these are going to be some rather buggy builds that won’t be too enjoyable to use.
The company recommends users switch from the Dev to the beta channel if they aren’t prepared to deal with the instability.
We’ll have to wait and see just how buggy these builds are, but if Microsoft is actually sending out a warning about them it is very likely that builds will be plagued with issues and maybe even stability problems.
Back to Windows 10
How we can expect some buggy build of Windows 11 if you prefer a stable system over new features maybe best decision would be to switch back to Windows 10 until the new OS hits official release.
Switching from dev build channel to beta channel
Another solution, if you do not want to deal with too many issues, is to switch from Dev build channel to beta where things will be more stable. Follow the guide below in order to quickly switch to the beta channel.
Following instructions only apply to Windows 11 installations that are linked up to the Windows Insider program, not clean installation of OS.
Press ⊞ WINDOWS + I to open settings
Inside settings click on Windows update
In Windows Update click on Windows Insider Program
Inside click on Choose your Insider Settings
Click on the button next to Beta Channel to select it (you can switch back to the Dev channel here if you change your mind)
The setting will be saved automatically and from now on you will only receive beta channel updates.
According to some reports, using RDP or Remote Desktop Protocol on recent versions of Windows 10 results in a black screen. One encounters this issue is when using the Remote Desktop Connection feature on Windows 10. The real causes of this black screen are either the display drivers or some misconfiguration with the Remote Desktop Connection utility.
In most cases, the Remote Desktop in Windows 10 will display a black screen and then disconnects afterward. To fix this kind of issue on your Remote Desktop, there are two suggestions you need to check out. First, you can try to disable the persistent bitmap caching, and then you can also try to update your display driver. Follow the given options below for more troubleshooting instructions.
Option 1 – Try to disable Persistent Bitmap caching
The first thing you can do to resolve the black screen issue with the remote desktop is to disable the persistent bitmap caching. All you have to do is follow these steps:
First, open the Remote Desktop Connection client.
Next, click on the Show Options button to configure the Remote Desktop Connection.
After that, go to the Experience tab and uncheck the Persistent bitmap caching option.
Once done, you should now be able to connect to the remote computer without the black screen.
Option 2 – Try to update or rollback the Graphics driver
You can try to update your Graphics card driver using the Device Manager in your computer to resolve the blank dialog boxes problem or you can also go directly to the website of your graphics card manufacturers like NVIDIA, Intel, or AMD and go to the section called Drivers then check if there’s a new available update – if there is, download and install it.
To update your Graphics driver via Device Manager, refer to these steps:
First, boot your computer into Safe Mode.
After that, tap the Win + R keys to launch Run.
Type in devmgmt.msc into the box and tap Enter or click OK to open the Device Manager.
After that, a list of device drivers will be displayed. From there, look for the Display Adapters and click on them.
After that, right-click on each entry under the Display Adapters and select the “Uninstall Device” option from the menu.
Now restart your computer.
After restarting your computer, go to the Settings app and Check for Updates in the Windows Update section.
Note: If updating the Graphics driver didn’t fix the problem, you can also try to roll back to its previous version and see if that helps or you could also try to roll back, update or reinstall the Network Adapter drivers.
Option 3 – Try performing a System Restore
You might also want to perform a System Restore that might help you in fixing the error. You can do this option either by booting into Safe Mode or in System Restore. If you are already in the Advanced Startup Options, just directly select System Restore and proceed with the next steps. And if you have just booted your PC into Safe Mode, refer to the steps below.
Tap the Win + R keys to open the Run dialog box.
After that, type in “sysdm.cpl” in the field and tap Enter.
Next, go to the System Protection tab then click the System Restore button. This will open a new window where you have to select your preferred System Restore point.
After that, follow the on-screen instructions to finish the process and then restart your computer and check if the problem is fixed or not.


 Microsoft is once again advising its customers to disable Windows print spooler after a new vulnerability that allows hackers to execute malicious code on machines has emerged. While a patch fixing the flaw will be released in due course, the most effective workaround currently on the table is to stop and disable the print spooler service entirely.


 Researchers have discovered 16 vulnerabilities in Bluetooth connections that could be exploited and make from minor to some serious damage to your device. The flaw can be used on chips manufactured by Intel, Qualcomm, and Texas Instruments while connecting to external devices like speakers, headphones, keyboards, mice, etc.
 Microsoft sent an email to users on the Dev build channel saying that the company intends to push some builds that don’t represent what consumers will receive with Windows 11 when it officially releases. In other words, these are going to be some rather buggy builds that won’t be too enjoyable to use.
The company recommends users switch from the Dev to the beta channel if they aren’t prepared to deal with the instability.
We’ll have to wait and see just how buggy these builds are, but if Microsoft is actually sending out a warning about them it is very likely that builds will be plagued with issues and maybe even stability problems.
Microsoft sent an email to users on the Dev build channel saying that the company intends to push some builds that don’t represent what consumers will receive with Windows 11 when it officially releases. In other words, these are going to be some rather buggy builds that won’t be too enjoyable to use.
The company recommends users switch from the Dev to the beta channel if they aren’t prepared to deal with the instability.
We’ll have to wait and see just how buggy these builds are, but if Microsoft is actually sending out a warning about them it is very likely that builds will be plagued with issues and maybe even stability problems.