If you were trying to install a program on your Windows 10 computer but encounter an error instead that says, “Error 1310, Error writing to file: <PATH>, Verify that you have access to that directory” then read on as this post will guide you on how you can fix it. This kind is a fairly common type of error encountered by many Windows users.
You can get this error when you try to install certain programs like Excel, AutoCAD, Adobe Photoshop, and some other Adobe products on Windows. One of the most likely causes for this error is that the required files or location is already used by some other software which means that Windows finds that you are trying to overwrite a software that is already installed. Aside from that, it could also occur if the program installer does not have access to write to that directory.
To fix Error 1310, here are some potential fixes that could help.
The error could be caused by some temporary or junk files in your computer and so you need to clear them up to fix the problem. You can achieve that using the Storage Sense feature.
You can also troubleshoot Error 1310 in a Clean Boot state. It could be that there are some third-party applications in your computer that's preventing the program from getting installed and to isolate this possibility, you need to boot your computer in a Clean Boot State and then try installing the program again. Putting your computer in this state can help you identify which program is the culprit and thus isolates the problem. In a Clean Boot state, your computer will start using only the pre-selected minimal set of drivers and startup programs. Note that you have to disable and enable one process at a time.
The next thing you can try to do is to take ownership of the particular folder as this worked for some users who experienced the same problem. But before you do that, you have to create a System Restore Point first, once that’s done, proceed to the given steps below.

In today's age of smart gadgets and complete replacement of even some simple things with their smart counterpart, it is not really a surprise to see some strange innovations that try to take advantage of modern technology.

One of these innovations is a smart book, or to be more precise smart note, a reusable notebook that could be connected to your phone.
One thing that could justify, well it should justify buying Rocketbook is the preservation of trees and the environment since it can be reused. The second argument would be its price since it is not expensive considering what it offers.
On top of all, you also have a free application for your phone in order to take full advantage of it.
Imagine this scenario, you have a notebook of 42 pages with several different page styles inside. You write in it and after it is filled you upload its content to your email or cloud service of your choice, get a cloth, erase everything and start again from zero.
So as mentioned notebook comes with 42 pages of various page styles. Most of the pages are either lined or dotted but the notebook also includes a monthly calendar, two-week detailed calendar pages, and three pages for project or idea tracking. Since everything can be erased this is enough variety to cover all basis and eliminate any need for another workbook ever.
When you feel like you want to save work or once it is filled you can easily upload and save the workbook from the scan page option in the free Rocketbook app. Once scanned pages can be uploaded to your preferred cloud service or sent to your email.
Now in order to write and be able to erase any of Rocketbook's notebooks, you will have to use Pilot's Frixion writing pens. They will dry around 15s on the page and can be of course easily wiped with a damp microfiber cloth that is included with the purchase. One pen also comes with a workbook when purchased.
Application has cool features, of course, the most important and most useful one is setting your upload scan destination so when you scan your pages they get automatically uploaded to your chosen destination.
In the application settings, you can also toggle some handwriting recognition features that will allow you to easily search your uploaded documents. For example, you can search through documents just by writing now or two words. There is also a Smart List feature as well that will take your checklist and make it into a virtual checklist.
The app also has a fun Explore section where you can find all sorts of fun hacks and different ideas on how to use your Rocketbook.
Error code 0xc004f210 is one of the many activation errors that affect Windows 10 users. Users will be able to identify error code 0xc004f210 because of the following common symptoms which occur:
 Error Causes
Error code 0xc004f210 usually occurs due to issues related to one’s product key or digital entitlement. Both the product key and digital entitlement are used by Microsoft to enable customers to activate the version of Microsoft that they have legitimate access to. If you enter the wrong product key or if you upgrade to Windows 10 but the current version of Windows to which you are attempting an activation does not match the edition of your digital entitlement, error code 0xc004f210 may occur. To correct this issue, you will need to implement one or more manual repair procedures. This will depend on the problem that caused the error to occur in the first place.
The methods below are simple procedures that Windows users lacking technical knowledge will be able to successfully complete. However, do contact a Windows repair technician if you have difficulty completing the manual repair methods listed below, or if the problem persists after completing these steps.
In order to successfully activate your Windows 10 operating system and resolve error code 0xc004f210, you will need to enter a valid product key. Ensure you enter the 25-character code in the order it is given as making a simple mistake while typing the product key can lead to the reoccurrence of the error code. Follow the instructions below to enter the product key.
You should be able to successfully activate Windows 10 once you complete the process. However, move to the next manual method suggested below if the problem persists as error code 0xc004f210 could be due to an issue with your digital entitlement.
Digital entitlement, a new form of activation that doesn’t require the use of a product key, could be the real reason you are experiencing error code 0xc004f210 on your device. To combat any issues related to your digital entitlement, ensure the version of Windows 10 installed on your system matches your digital entitlement. This will require that you reinstall your operating system as well. After reinstalling Windows 10, follow the steps below to complete the process.
If this method is successful, you will no longer see the error code 0xc004f210 pop up on your screen. However, contact a Windows repair technician to evaluate your system if the issue persists.
This method involves the use of a powerful automated tool. But why is this important you might ask? A third-party tool is often the best solution when all manual repair efforts fail. Automated tools come equipped to tackle the most serious PC problems including error codes which can cause frustration and result in reduces PC performance.
“Fatal error, Installation fails, Installation ended prematurely because of an error”.Moreover, this kind of error is a generic one that can also occur with any software reinstallation or installation. And to fix this error, there are several suggestions you must check out. You can try to install or reinstall the program in a Clean Boot State or restart the Windows Installer Service. You could also try to re-register the Windows Installer Service or re-register the VBScript.dll file.
Error Code 0x8007001 occurs during installations that take place in Windows 10. Various versions of this same error have also been present in previous editions of the software and the methods to resolve the error across these versions are the same
Common symptoms include:
Several solutions for Error Code 0x8007001 require the user to complete semi-complex tasks. If you aren’t comfortable with the processes necessary to finish the methods below, make sure that you get in touch with a certified professional who is familiar with the Windows operating system to assist you in the resolution of the error code.
Error CausesIn many cases, Error Code 0x8007001 is caused by an installation disk that is not functioning properly or installation files that have been corrupted or changed. When this is the case, the operating system will not be able to begin actually installing the files and will instead hang up as the files are unpacked from the installation set.
For Error Code 0x8007001 to be repaired properly, the missing or corrupted installation files need to be repaired or the system needs to be able to recognize the files that it is missing. This can require some advanced computing knowledge. If you don’t feel comfortable with the idea of undertaking the methods below on your own, contact a computer repair technician who can assist you in following these steps.
In some cases, the operating system simply cannot recognize the installation files that are present on the disk in question, whether it is on a hard drive, a set of downloaded files, or files from a flash drive. If this is the case on your particular machine, the simplest way to work around the problem is to load the installation files onto an alternative disk source, whether it be a flash drive, CD, DVD, or secondary hard drive. After these files have been properly loaded onto that alternative disk, attempt to run the installation from the alternative source instead.
If this method is successful, it means that the system may have had trouble recognizing the files involved in the installation from the first source, but that the files themselves were not corrupted or changed.
Make sure that you save the alternative disk source after your installation is complete in case you ever need to do a fresh installation on your machine.
If you are installing files from a DVD or CD, check to make sure that the back of the disc is free from scratches and dust. If there are no visible marks on the disc, you may need to open up your disk drive to see if there is a build-up of dust or debris inside of the drive. If this is the case, simply clean your drive and re-attempt your installation process from the included disk.
If the error code is still appearing on your machine, you can open up your Windows Update tool and run the troubleshooting wizard, which will then scan your machine to see if there are any potential problems that it can fix. Next, run the Update tool itself if there are any updates that need to be performed. Sometimes, this can resolve the error at hand. Make sure to restart your computer after any updates or changes have been made so that you can ensure that they are applied by the operating system appropriately.
 Windows 11 will bring some old applications in new looks and some will get additional features as well. One of the old apps that will get new stuff is a calculator.
The calculator was always a way to go application for quick calculations but Microsoft aims to expand on that and make the calculator a little more useful.
The first thing that you will notice is the calculator look, the calculator has now an application theme setting that allows you to change the look of the application. It comes in standard and professional mode as usual but this time calculator will come with features that will enable it to handle some programming and engineering tasks.
The new calculator features a full graphing mode that lets you visually analyze a graph to identify key features. It also packs a deep converter that can switch between more than 100 units and currencies.
Windows 11 will bring some old applications in new looks and some will get additional features as well. One of the old apps that will get new stuff is a calculator.
The calculator was always a way to go application for quick calculations but Microsoft aims to expand on that and make the calculator a little more useful.
The first thing that you will notice is the calculator look, the calculator has now an application theme setting that allows you to change the look of the application. It comes in standard and professional mode as usual but this time calculator will come with features that will enable it to handle some programming and engineering tasks.
The new calculator features a full graphing mode that lets you visually analyze a graph to identify key features. It also packs a deep converter that can switch between more than 100 units and currencies.
“A secure connection cannot be established because this site uses an unsupported protocol, Error code ERR_SSL_VERSION_OR_CIPHER_MISMATCH”To resolve the ERR_SSL_VERSION_OR_CIPHER_MISMATCH error, refer to the options given below and see which one works for you.
This error is quite common and is faced by many Microsoft Outlook users. It is advisable to fix this error immediately because besides restricting you from sending and receiving emails via Outlook, due to this error the data on your Outlook also becomes inaccessible and unreadable, and sometimes Outlook also begins to freeze unexpectedly.‘Receiving reported error (0x800ccc92): Your email server rejected your login.’
Another driver device error message you might encounter is error code 41.“The drivers for this device are not installed. (Code 28)”
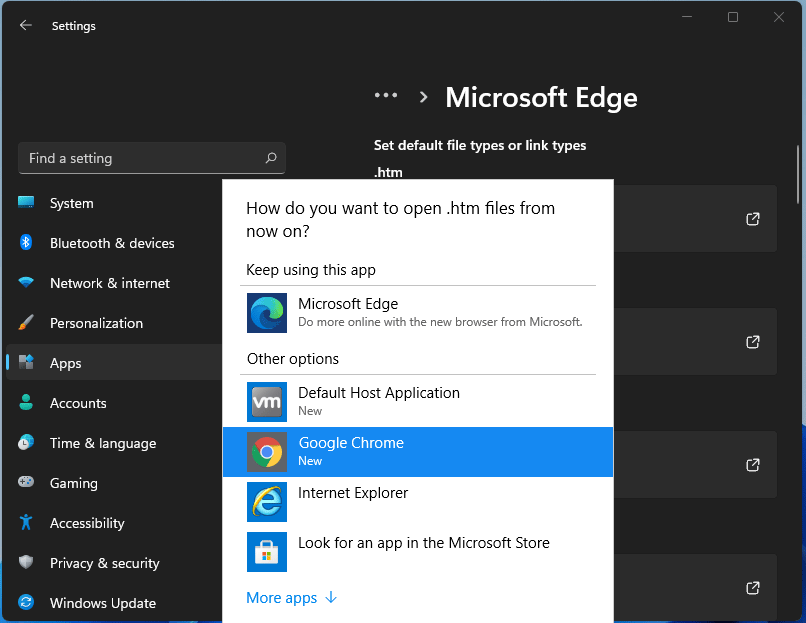 For anyone who is not aware, when Windows 11 was released if you wanted to switch to another browser you had to go into the settings app and choose the default browser for different types of file extensions like HTML, HTM, PDF for opening on the web, etc. Of course, this was completely unnecessary and it was not well received by users. So after some time, Microsoft backpedaled to standard one click, choose your default browser solution that existed in the previous version of Windows OS.
Altho sometimes Microsoft knows how to irritate its users base, it is good to know that they can also listen and fix things that are required.
For anyone who is not aware, when Windows 11 was released if you wanted to switch to another browser you had to go into the settings app and choose the default browser for different types of file extensions like HTML, HTM, PDF for opening on the web, etc. Of course, this was completely unnecessary and it was not well received by users. So after some time, Microsoft backpedaled to standard one click, choose your default browser solution that existed in the previous version of Windows OS.
Altho sometimes Microsoft knows how to irritate its users base, it is good to know that they can also listen and fix things that are required.