Error Code 0x80070422 can be found on many versions of the Windows operating system including Windows 7, Windows 8, and 8.1, and Windows 10. The reason for its occurrence may vary, however, depending on the version of the operating system that you use.
In the case of error code 0x80070422 in Windows 8, it often occurs when users attempt to update their firewall or download apps from the Windows store. When this error occurs the user is unable to complete the updates and will need to apply different solutions to correct the issue.
Solution
Error Causes
Whenever error code 0x80070422 is encountered on Windows 8 or 8.1, it might be a result of various factors. These error codes include:
Registry errors – This occurs when new programs are installed over old ones
Malicious software such as adware, spyware, and or viruses
Further Information and Manual Repair
You do not need to be a Windows expert to attempt to solve errors like the 0x80070422 Windows 8 error code. Simply try the solutions below. If however, you feel you need a professional’s help, contact a certified Windows technician.
Check for any viruses or malicious software
Viruses and other malicious software are often the cause of various issues within the PC. For this reason, be sure to check your machine for a possible virus infestation. If you are unable to use your anti-virus software or if none is present you might need to download an automated tool that offers overall repair and other solutions.
Disable third-party security apps
Another step you can take is to disable third-party security apps. When these apps are downloaded onto your device, it can lead to the disabling of your Firewall and the inability of your device to download other apps. If this is the source of the 0x80070422 error code on your machine, the issue will be resolved after you disable the third-party apps and reboot your computer.
Disable Firewall
If error code 0x80070422 in Windows 8 or 8.1 occurred while you attempted to update Windows firewall, one of the best solutions you can try is to disable the firewall. Note however that disabling your firewall should be temporary as it protects your computer from worms as well as hackers that might infect or compromise your PC. Access the firewall by swiping right on the screen then searching for “firewall”. Click “Windows firewall” then select “Turn off Windows firewall”.
Performs a clean boot
Another option is for you to perform a clean boot. This simply refers to a reboot in Windows where only a minimum set of drivers and programs are used. A clean boot can help resolve issues related to software conflict which can occur when Windows users install programs or updates or simply run a program. Note that you must log on to the computer as an administrator. Otherwise, you will not be able to perform the clean boot.
Clean registry
The source of many errors related to Windows can lie within the registry. This is because the registry is involved in every aspect of a Windows computer’s operation. If there is an issue in the files of the registry or if it has been hacked, your computer will not function. For this reason, begin by cleaning the registry regularly. To clean our registry, use a powerful tool that is both reputable and user-friendly. Research your option before you make a selection as choosing the wrong tool could lead to even more errors or computer malfunctions.
Set Windows Update to Automatic
Another important method to solve issues related to error code 0x80070422 in Windows 8 or 8.1 is your Windows Update service. Though you may have never noticed this feature before now, the Windows Update services allow PC owners to access updates to their operating system automatically. This leads to a properly functioning PC as your machine will always have the latest features and tools available. However, if the setting is not correct, your computer may end up experiencing error code 0x80070422. Check if this is the source of your problems by verifying if your Windows Update settings are automatic. Once the settings are on automatic, reboot your machine to ensure your computer responds to the changes.
Download an Automate Tool
Always be prepared for the possibility of other errors. You can do this by downloading powerful software. This enables users to regularly check for issues that may cause errors on their Windows device.
As of the time of writing this article you no longer need or are required to have a password if you plan to log in to your Microsoft account. Microsoft explored various options for account security and came to the conclusion that passwords are obsolete.
Microsoft is letting you access your account through the Microsoft Authenticator app, Windows Hello, a security key, SMS verification, or email verification code. All of these methods are way better in terms of security than passwords.
How to turn these features on?
To get rid of your Microsoft password, the process is simple. You simply need to go to your Microsoft account, click “advanced security options,” then “enable passwordless accounts” under the Additional security section.
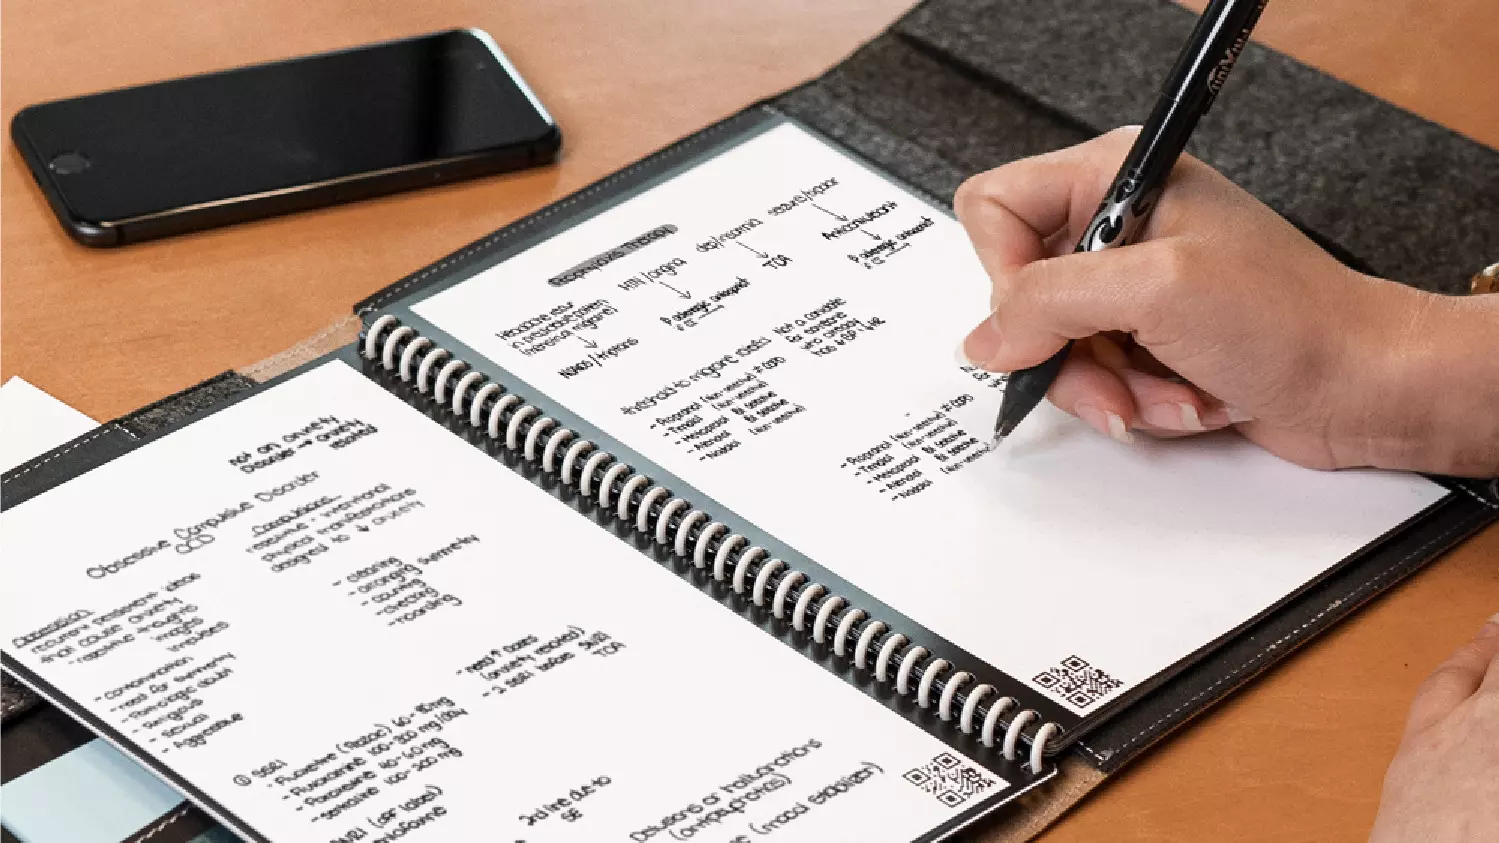
In today's age of smart gadgets and complete replacement of even some simple things with their smart counterpart, it is not really a surprise to see some strange innovations that try to take advantage of modern technology.
One of these innovations is a smart book, or to be more precise smart note, a reusable notebook that could be connected to your phone.
Why Rocketbook Fusion smartbook
One thing that could justify, well it should justify buying Rocketbook is the preservation of trees and the environment since it can be reused. The second argument would be its price since it is not expensive considering what it offers.
On top of all, you also have a free application for your phone in order to take full advantage of it.
What is a smartbook?
Imagine this scenario, you have a notebook of 42 pages with several different page styles inside. You write in it and after it is filled you upload its content to your email or cloud service of your choice, get a cloth, erase everything and start again from zero.
So as mentioned notebook comes with 42 pages of various page styles. Most of the pages are either lined or dotted but the notebook also includes a monthly calendar, two-week detailed calendar pages, and three pages for project or idea tracking. Since everything can be erased this is enough variety to cover all basis and eliminate any need for another workbook ever.
When you feel like you want to save work or once it is filled you can easily upload and save the workbook from the scan page option in the free Rocketbook app. Once scanned pages can be uploaded to your preferred cloud service or sent to your email.
Now in order to write and be able to erase any of Rocketbook's notebooks, you will have to use Pilot's Frixion writing pens. They will dry around 15s on the page and can be of course easily wiped with a damp microfiber cloth that is included with the purchase. One pen also comes with a workbook when purchased.
Application
Application has cool features, of course, the most important and most useful one is setting your upload scan destination so when you scan your pages they get automatically uploaded to your chosen destination.
In the application settings, you can also toggle some handwriting recognition features that will allow you to easily search your uploaded documents. For example, you can search through documents just by writing now or two words. There is also a Smart List feature as well that will take your checklist and make it into a virtual checklist.
The app also has a fun Explore section where you can find all sorts of fun hacks and different ideas on how to use your Rocketbook.
System restore is usually the go-to tool when something goes bad in Windows, we fire it up and roll back Windows in the state when everything was working fine. But what if Windows does not want to boot? Can we use system restore in that case?
The answer to that question would be yes, yes we can.
Boot interrupt Windows 10 by starting your PC and as soon as you see the Windows logo; press and hold the power button to force a shutdown.
Repeat this 2-4 times and Windows will open up the Advanced Startup Options menu for you.
At the Advanced Startup Options screen, select Advanced Options.
Select Troubleshoot.
Under the Advanced options screen, select System Restore.
or if you prefer, use Windows USB installation.
Boot the faulty PC using the Windows 10 installation media.
The Windows Setup dialog box will appear.
Set the Time and currency format, Keyboard or input method, and the language to install.
Click Next.
Click on Repair your computer from the lower-left corner.
From the Choose an option screen, click on Troubleshoot.
Click Advanced Options in the Troubleshoot screen.
In the Advanced Options screen, click System Restore.
Windows will take some time to prepare System Restore. It may even restart your computer or device.
When System Restore is ready, you will be prompted to choose a user account to continue.
Select an account that is set as administrator on your Windows 10 computer or device.
At the next screen, change the keyboard layout if you want and then input the password for that account.
There are instances when you open a picture or an image in the Windows Photo Viewer and instead of displaying the image, it displays nothing and you’ll see an error message instead that says, “Windows Photo Viewer can’t display this picture because there might not be enough memory available on your computer”.
Although this may look like a clear-cut issue of less storage space or low RAM in your computer, that’s not always the case. Security experts noticed that even when your computer has enough resources and disk space, this kind of problem could still occur. So if you experience the same thing, you need to check the Color Profile of your screen. For more information, refer to the detailed instructions provided below but before you proceed, make sure that you close some processes in the Task Manager or restart your computer and see if it helps in fixing the problem. You can also try using the Disk Cleanup tool. To use it, refer to these steps:
Tap the Win + R keys to open the Run dialog box and then type “cleanmgr” in the field and hit Enter to open the Disk Cleanup window.
After that, select the drive you want to clean.
Now click OK to clean the disk and restart your computer.
If the Disk Cleanup tool didn’t help in resolving the issue, refer to the instructions below.
Step 1: In the search box, type “color management” and then select the “Change advanced color management settings for display” option from the search results. Or you could simply go to Settings > System > Display, Advanced display settings, and from there, select display and click on the Display adapter properties of Display.
Step 2: Next, switch to the Color Management tab and click on the Color Management button.
Step 3: Select the monitor where you’re getting the “Windows Photo Viewer can’t display this picture because there might not be enough memory available on your computer” error in the next window. And if you have two displays, make sure that you select the primary display. You also have an option to identify the monitor.
Step 4: Once confirmed, select the “Use my settings for this device” checkbox.
Step 5: After that, select the Profile listed under the “Profiles associated with this device” option and then click on Remove.
Step 6: Next, go to the Advanced tab and make sure that all settings are set to System default which includes a device profile, perceptual images, rendering intent, Relative Colorimetric, and many more.
Step 7: Once you’re done, you have to restart your computer and then try to open the same image you were trying to open earlier and then check if you can now open it instead of seeing the error.
User32.dll is a Dynamic Link Library file. Windows stores instructions for graphical elements such as dialog boxes and Windows in this file.
This file is a crucial file, necessary to run Windows operations.
If this file is damaged, deleted, or removed from the system you may not be able to run the programs on your system that use and share the User32.dll file thereby causing you inconvenience.
The User32.dll file error is displayed in the following format:
“This application has failed to start because USER32.dll was not found. Reinstalling the application may fix this problem.”
Or
“[Program] illegal system DLL relocation”
Program here refers to the name of a program that caused the User32.dll error message.
Solution
Error Causes
User32.dll errors are triggered by the following reasons:
Missing and damaged .dll files
Viral infection
Registry corruption
User32.dll error is also referred to as C0000135 blue screen of death error. When the User32.dll error occurs it not only locks you out of your desired program but also turns your computer screen blue.
If the error is not repaired timely it may expose your PC to serious threats such as abrupt system shutdowns, system failure, and crash.
Further Information and Manual Repair
To resolve the User32.dll error on your PC, try the following solutions:
1. Reinstall Programs Causing User32.dll errors
Sometimes User32.dll error may occur due to missing DLL files. This happens when you delete a program from your PC and accidentally the DLL file also gets deleted which is shared by other programs on your system.
Therefore to resolve this first find out what programs on your system use User32.dll to load and run on your system. To do this use the Tasklist command-line tool. It displays the names of all the programs that currently use the User32.dll file.
After this, reinstall the programs that use User32.dll files on your system. This will hopefully resolve the error.
2. Install and Run Restoro
If it doesn’t, then this probably means that the damage is deep-rooted. It is related to the damaged DLL files, registry corruption, or viral infection.
To resolve all of these causes in one go, it is best to download Restoro instead of downloading 3 different software to resolve each cause for the error separately.
This is basically an advanced, innovative, and multi-functional PC repair tool embedded with multiple powerful utilities including a registry cleaner, and a system optimizer. It is a one-stop solution for all your PC-related problems including the User32.dll error.
The registry cleaner wipes the clutter and obsolete files damaging the hard disk and simultaneously repairs the DLL files and the registry. The antivirus feature removes all the viruses on your system while the system stability utility boosts the PC speed significantly.
It is safe, user-friendly, and compatible with all Windows versions including Windows Vista, XP, Windows 7, 8, 8.1, and 10.
Click here to download Total System Care to resolve the User32.dll error right away.
A lot of Windows 10 users prefer the black theme on their computers and when you see anything but black it can get quite annoying. Such as is the case of the Taskbar which, as you know, is usually dark, however, when you take a look at the Cortana search bar, instead of seeing black, you’ll see that it has turned white. To fix this issue, read on as we will provide you some options you can try to set the Cortana search bar back to black. Before you proceed, take note that the options provided below will change all white search boxes to black and that one of these options needs administrative privileges.
Option 1 – Try changing the default App mode
As you know, Windows 10 has two modes, namely the Light and the Dark. Thus, you can switch to the Dark mode so that your Cortana search bar will be black as well. However, remember that it will completely change everything into dark mode so there will be no more Light mode elsewhere.
First, you need to click on the Start button and then click on the cog icon to open the Windows 10 Settings.
Next, from the Settings Menu, select Personalization and then select Colours from the left pane.
Then scroll down until you see the “Choose your default app mode” option and select “Dark”.
After you apply the changes, it will change the Cortana search bar into black instantly. Aside from that, you will also see the User Interface changing into dark mode.
Option 2 – Try changing the Registry value
If you are well-versed in editing registry keys, then you need to try this option. But before you go over the steps below, make sure that you create a System Restore point first so that if anything goes wrong, you can always go back to how it was before the changes were applied.
Tap the Win + R keys to open the Run prompt.
Then in the field, type in “regedit” and hit Enter to open the Registry Editor. If a User Account Control prompt appears, just click Yes.
Now that you’ve opened the Registry Editor, navigate to the following key:
After that, double-click on the “Value” key located on the right pane and set the value to “0” instead of “1” and then click Ok to save the changes made. You should now see a black or grey text box color instead of white.
Option 3 – Try changing the Region
In some forums, a lot of users stated that changing the Region also worked out for them in changing the white Cortana search bar to white. Thus, you need to change the region settings of your computer temporarily. To do so, follow the steps below.
Type in “Regional Settings” in the box and then click it as soon as it appears from the search results.
Next, make sure to select a region where Cortana is not available.
Then select apply to that region. After that, it will change the Cortana search bar color to black.
Now sign out and sign back in and revert to the original settings. But the changes you made earlier in Cortana will still remain.
You have the option to choose to configure the Network to Private or Public when you set it on Windows 10 PC. On the other hand, if the option to change the Network from Public to Private goes missing in Windows Settings then this post will surely help. You can find this setting under Settings > Network and Internet > Ethernet and appears when you click on it.
If you are not able to see the option to change the network profile, then you either can’t open the settings, or the option to change it has been disabled. To resolve this issue, you can either use the Registry Editor or Windows PowerShell. Refer to the options given below for more details.
Option 1 – Change the Network Profile via Registry Editor
Changing the Network Profile can be done using the Registry Editor. But before you proceed, make sure that you create a System Restore Point first just in case. Refer to the steps below to do so.
Tap the Win + R keys to open the Run dialog box.
Then type “Regedit” in the field and hit Enter to open the Registry Editor.
After that, navigate to this key: HKEY_LOCAL_MACHINESOFTWAREMicrosoftWindows NTCurrentVersionNetworkListProfiles
Now expand the Profiles key folder located in the left pane to see one or more folders.
Next, expand each one of these folders and look for the “Description” sub-key which should match the name of your network.
After you find the Description sub-key, look for another sub-key named “Category” and double click on it to open it.
Now change its value from “0” to “1” to change the Network Profile from Public to Private.
Option 2 – Change the Network Profile via Windows PowerShell
Aside from the Windows Registry, you can also use Windows PowerShell in changing the Network Profile from Public to Private and so on. Take note that you have to use PowerShell with admin privileges. Just refer to the steps below to do so.
Tap the Win + X keys and then select the “PowerShell (Admin)” option.
Next, click on Yes if the User Account Control prompt appears.
After that, execute the commands listed below. Hit Enter right after you key in each one of them.
The dialog boxes that you see on your Windows computer exist to send you a message or to notify you. However, you can also encounter issues with them. Recently, some users reported that they’re getting empty or blank dialog boxes. It’s definitely hard to choose between Yes or No or to click OK when you don’t know the context of the dialog box. If the same thing happened to you, worry not for there are some possible solutions that can help you fix the problem.
This kind of problem usually happens when there are some issues with the graphics driver or when there is some corrupted software. Whichever the case is, here are some fixes you can check out to fix the empty or blank dialog boxes on your Windows 10 computer.
Option 1 – Run the System File Checker
System File Checker or SFC is a built-in command utility that helps in restoring corrupted files as well as missing files. It replaces bad and corrupted system files with good system files that might be the cause why you’re getting the errors 0x8024a11a and 0x8024a112. To run the SFC command, follow the steps given below.
Type “cmd” in the Start search and then right-click on the appropriate search result.
Next, select “Run as administrator” to open Command Prompt with admin privileges.
After opening Command Prompt, type in sfc /scannow
The command will start a system scan which will take a few whiles before it finishes. Once it’s done, you could get the following results:
Windows Resource Protection did not find any integrity violations.
Windows Resource Protection found corrupt files and successfully repaired them.
Windows Resource Protection found corrupt files but was unable to fix some of them.
Now restart your computer and see if the problem is fixed or not.
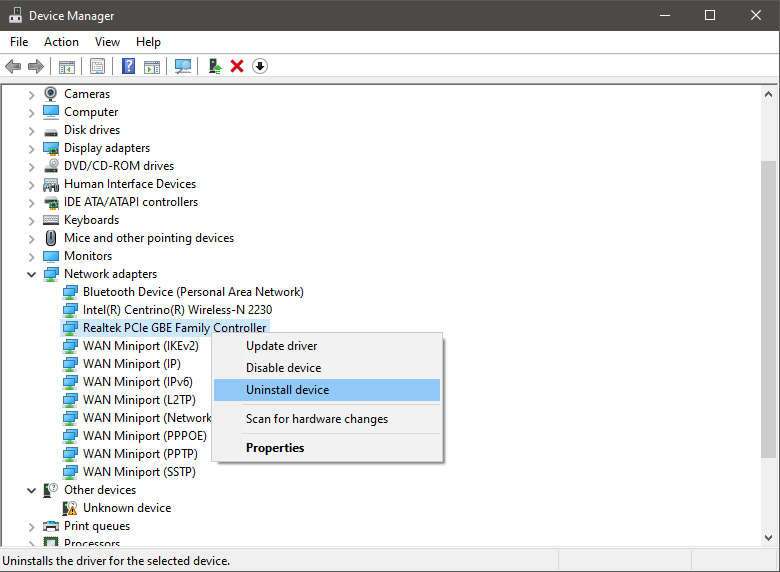
Option 2 – Try to update or rollback the Graphics driver
You can try to update your Graphics card driver using the Device Manager in your computer to resolve the blank dialog boxes problem or you can also go directly to the website of your graphics card manufacturers like NVIDIA, Intel, or AMD and go to the section called Drivers then check if there’s a new available update – if there is, download and install it.
To update your Graphics driver via Device Manager, refer to these steps:
First, boot your computer into Safe Mode.
After that, tap the Win + R keys to launch Run.
Type in devmgmt.msc into the box and tap Enter or click OK to open the Device Manager.
After that, a list of device drivers will be displayed. From there, look for the Display Adapters and click on them.
After that, right-click on each entry under the Display Adapters and select the “Uninstall Device” option from the menu.
Now restart your computer.
After restarting your computer, go to the Settings app and Check for Updates in the Windows Update section.
Note: If updating the Graphics driver didn’t fix the problem, you can also try to roll back to its previous version and see if that helps.
Option 3 – Run the DISM tool
The next thing you can do is run the DISM tool. This tool is known to repair potentially corrupted files in your system as having them could also system issues like the blank dialog boxes. To repair these corrupted system files, you can run the DISM commands:
Tap the Win + X keys and click on the “Command Prompt (Admin)” option.
After that, input each one of the commands listed below sequentially to execute them:
Dism /Online /Cleanup-Image /CheckHealth
Dism /Online /Cleanup-Image /ScanHealth
Dism /Online /Cleanup-Image /RestoreHealth
Once you’ve executed the commands given above, restart your computer and check if the problem is now fixed.
Option 4 – Try to repair or reinstall the software
If the issue with the empty dialog boxes only occurs in a specific program, you can either try to repair the program or reinstall it. You can find the Repair option in the Add/Remove program section when you select the concerned program. If repairing the program didn’t work, you might have to uninstall it and then reinstall it.
Option 5 – Try troubleshooting the problem in a Clean Boot State
You might also want to troubleshoot the problem in a Clean Boot State. Doing so will help you isolate the problem. Refer to the steps below to do so:
Log onto your PC as an administrator.
Type in MSConfig in the Start Search to open the System Configuration utility.
From there, go to the General tab and click “Selective startup”.
Clear the “Load Startup items” check box and make sure that the “Load System Services” and “Use Original boot configuration” options are checked.
Next, click the Services tab and select the “Hide All Microsoft Services” check box.
Click Disable all.
Click on Apply/OK and restart your PC. (This will put your PC into a Clean Boot State. And configure Windows to use the usual startup, just simply undo the changes.)
Virtual Reality or VR for short has come a long way from its infant stage and as 2022 is in half period we are looking at the VR market and reflecting on what has changed in one year. For starters, games have increased in quality and quantity while the hardware price has decreased making the whole VR experience a little closer to a wider audience.
Many companies have tried to get on the VR bandwagon but also many have failed. What remained are staples in VR hardware from large companies that have started with VR early and kept improving their headsets.
So with great pleasure, we are presenting the remaining best 3 virtual headsets so far of 2022 brought to you from Sony, Valve, and Meta.
SONY PLAYSTATION VR
If you want VR on consoles then there is really one option, and that is SONY VR. Premium Virtual Reality solution from SONY, sadly you can do this only on Playstation 4 and Playstation 5. Sony managed to pull off great quality hardware and packed with its exclusives on playstore at a very affordable price that is still cheaper than other products.
While waiting for the Sony PlayStation VR2 headset this one is still a great option and quality is still among the top of the game. From the time of its release until today, many AAA titles have been released for it as exclusives that you can not play any other way and some of them are really worth it.
VALVE Index
Altho there are headsets like HTC Vive Cosmos Elite that have some features that place it as a better solution than Valve Index, Index is still an overall better VR headset as a whole product but its price is something that is keeping it still way out of reach of your standard user. The price, however, is really an illusion since it applies only when buying the system first time, you see Valve has created this headset as a modular design system making it upgradable meaning that you can, for example, buy newer controllers only and they will work perfectly with rest of hardware.
The modular design will save you money when you want to upgrade your VR system but as said entry price is steep. Besides its somewhat higher price than competitors, it is also notable that Index is a positional tracking VR set which means that it relies on a base station in order to locate the user. This means that once set, it is not so easy to change its location of use.
However, its quality and steam use are unmatched, high-quality games and compatibility that no other headset with steam will even pull off probably make Index one of the 3 best headsets out there. Half-life Alyx, arguably and currently one of the best VR games ever made so far was specifically designed for Valve Index and other games are behaving also incredibly nice with this headset, so if you want a great powerhouse for PC VR gaming, you will no go wrong in purchasing Valve Index.
META QUEST 2
Cheapest of the three and coming in various iterations, Meta has established itself from the beginning as a leading player in VR technology with its oculus line of products. Quest 2 is the next product in their line and it comes with 128GB and 256GB versions.
Meta has removed the need for the Facebook account for its VR systems and now you can use them without the need to send any kind of data to meta. Priced fairly for its entry 128 models this standalone VR set improves in any way possible from its previous iteration and sets the bar for what will come in VR's future.
Offering both wired and wi-fi connection with its standalone battery Quest 2 also is packed with a large library of games and it is user friendly as your typical game console but still allows some under-the-hood tinkering if you wish so.
Also, Meta's Vr solution since it uses inside-out tracking makes it incredibly easy to just pick it up and carry it with you wherever you go.
DRIVER_IRQL_NOT_LESS_OR_EQUAL will cause your computer to go to the blue screen of death but do not worry there are solutions around this and we are here to instruct you on how to solve this.
Uninstall and install network drivers
DRIVER_IRQL_NOT_LESS_OR_EQUAL is most commonly tied to bad network drivers, whatever that be a corruption of the driver files or their incompatibility. So first thing is to check if this is the case.
Press ⊞ WINDOWS + X to open the hidden menu in Windows and click on Device Manager.
In the Device Manager expand Network adapters, choose adapter, right-click on it and choose Uninstall.
Install latest driver or reboot so Windows will install the driver automatically
Update driver
If you do not want to reinstall the driver or you are unable to for whatever reason updating the driver might do the trick. To update driver:
Press ⊞ WINDOWS + X to open the hidden menu in Windows and click on Device Manager.
In the Device Manager expand Network adapters, choose adapter, right-click on it and choose Update Driver.
Fix via Command prompt
If both of the beforementioned solutions fail, try running the command prompt and fix the issue from there.
Press ⊞ WINDOWS + X to open the hidden menu in Windows and click on Command Prompt (administrator)
In command prompt type next line and press ENTERDEL /F /S /Q /A “C:\Windows\System32\drivers\mfewfpk.sys
Reboot the system
Scan your PC for malware
Sometimes corruption in the system is caused by malware, Scan your system for malware, viruses, etc.
Check connections or other hardware issues
If all methods fail, open your PC case and check to see if connections everywhere are properly connected and tight. Clean your PC and turn it back ON
Use system restore
If anything fails, use Windows system restore and bring back computer into a state where everything was working fine.


 As of the time of writing this article you no longer need or are required to have a password if you plan to log in to your Microsoft account. Microsoft explored various options for account security and came to the conclusion that passwords are obsolete.
Microsoft is letting you access your account through the Microsoft Authenticator app, Windows Hello, a security key, SMS verification, or email verification code. All of these methods are way better in terms of security than passwords.
As of the time of writing this article you no longer need or are required to have a password if you plan to log in to your Microsoft account. Microsoft explored various options for account security and came to the conclusion that passwords are obsolete.
Microsoft is letting you access your account through the Microsoft Authenticator app, Windows Hello, a security key, SMS verification, or email verification code. All of these methods are way better in terms of security than passwords.


 In the Device Manager expand Network adapters, choose adapter, right-click on it and choose Uninstall.
 Install latest driver or reboot so Windows will install the driver automatically
 In command prompt type next line and press ENTERDEL /F /S /Q /A “C:\Windows\System32\drivers\mfewfpk.sys
Reboot the system
In command prompt type next line and press ENTERDEL /F /S /Q /A “C:\Windows\System32\drivers\mfewfpk.sys
Reboot the system