Toolbar.Dll is one of the most destructive software you will encounter on your Personal Computer.
For every report out there you read about threats to your Windows PC, a significant number speak about Toolbar.Dll. Technically, this is non-essential to the functioning of your computer yet poses great dangers to your computer's security. It can cause massive destruction if not properly resolved.
 Error Causes
As suggested below, the sources of Toolbar.Dll are many and broad:
a) Misconfigured System: Nothing causes this malfunction on your own Computer a lot more than having a misconfigured system. You ought to anticipate this malfunction and repair the situation before it gets worse.
Especially if you have Toolbar.Dll files on your computer. More often than not the situation can only get worse.
b) Broken Windows OS File: the 2nd trigger of Toolbar.Dll, and that is linked to the primary aforementioned one, is a broken Windows OS file. Fix it as soon as you realize its existence.
c) Installation Issues: If you poorly install Windows on your PC, you generate a loophole by which Toolbar.Dll malfunction might appear. You essentially provide a massive possibility to the Toolbar.dll error to affect your Computer, if you neglect to finish an install or uninstall procedure.
d) Removing Programs and Hardware Incorrectly: When you decide to remove programs and hardware, you need to exercise caution. Should you be rash with this specific procedure, you raise the odds of striking the Toolbar.Dll malfunction on your Personal Computer.
e) Incorrect Shut-Down: unless you want to strike this malfunction, ensure that you shut down your Computer procedurally. Regardless of what hurry you might be in, always power down your computer correctly.
In the event you strike the Toolbar.Dll malfunction on your Personal Computer, you shouldn't get frightened. But, prior to starting considering of ways that to fix this malfunction, you should look for the signs, to be able to recognize it.
The malfunction exists in your Computer in circumstances where software programs can't load properly.
The situation might be repaired in numerous methods, as revealed below:
Each of the measures suggested previously, are for advanced pc users. You must obtain the very best software on the web to eliminate this malfunction, in case you are a non-techie. Alternately, contact a tech to help fixing the problem.

“A secure connection cannot be established because this site uses an unsupported protocol, Error code ERR_SSL_VERSION_OR_CIPHER_MISMATCH”To resolve the ERR_SSL_VERSION_OR_CIPHER_MISMATCH error, refer to the options given below and see which one works for you.
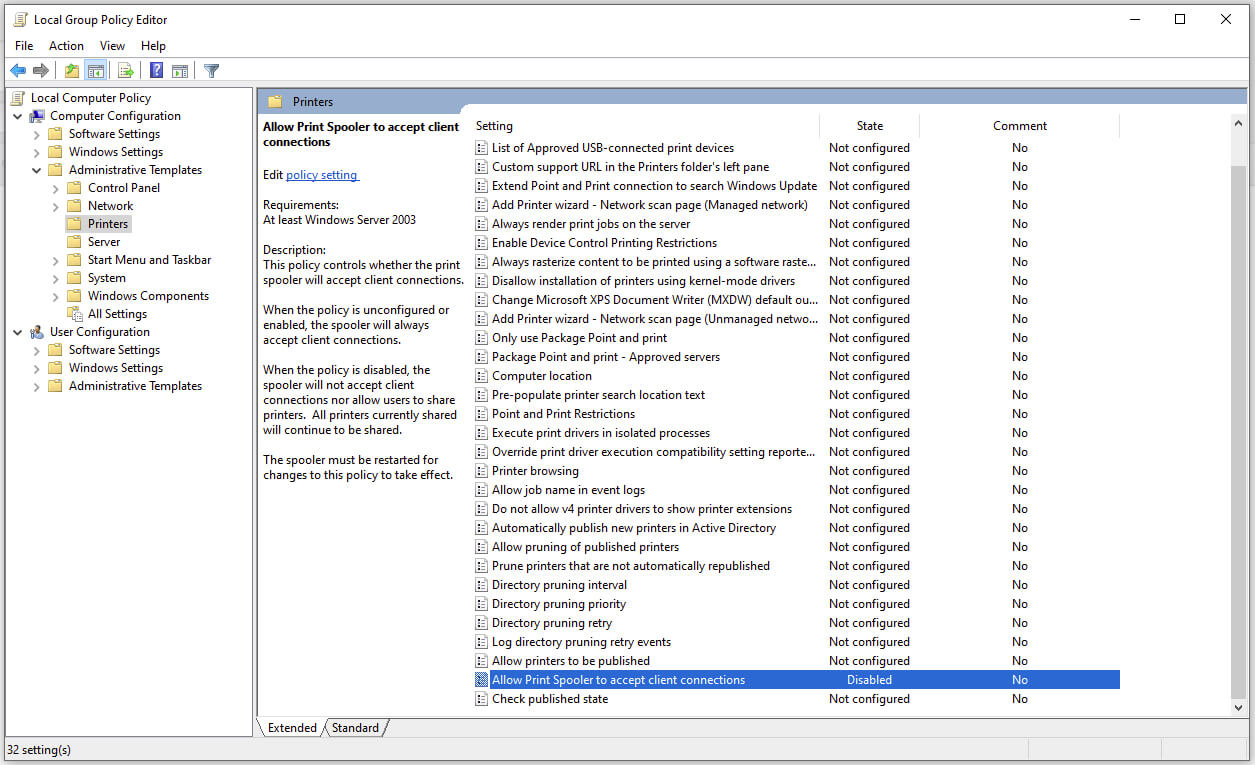 Microsoft is once again advising its customers to disable Windows print spooler after a new vulnerability that allows hackers to execute malicious code on machines has emerged. While a patch fixing the flaw will be released in due course, the most effective workaround currently on the table is to stop and disable the print spooler service entirely.
"An elevation of privilege vulnerability exists when the Windows Print Spooler service improperly performs privileged file operations. An attacker who successfully exploited this vulnerability could run arbitrary code with SYSTEM privileges. An attacker could then install programs; view, change, or delete data; or create new accounts with full user rights."
 They can encrypt files in order to make you pay for a decrypter, they can straight up delete files or even cause some hardware damage. Like mentioned before protecting yourself is important, but protecting does not mean only having antivirus software installed, information, where are common places in which they lurk and could be picked up, is also very important. That is why we are exploring in this article the most common place where you can pick viruses or other malware.