 This is a very interesting decision by Microsoft and I fully support it, this time users will be able to pay less and to choose only applications that they need instead of paying for the whole package and not using it.
 The STOP Code 0x0000008E is essentially an error code that is displayed on the STOP message. This STOP message is also commonly known as Blue Screen of Death or BSOD for short. When this error occurs, usually messages like,
“STOP: 0x0000008E” or “KERNEL_MODE_EXCEPTION_NOT_HANDLED”
are displayed to the user.
 Error Causes
These errors are commonly caused by failures of memory hardware. However, viruses, hardware failures or issues with the device drivers may also trigger them.
If this error code appears but Windows is successfully able to recover from it, then the message ‘Windows has recovered from an unexpected shutdown’ is displayed to the users.
Regardless of what causes these errors, it is of paramount importance that counteractive measures are taken as soon as the error appears.
While this error can be removed in many ways, the most effective ones are listed below as follows.
 This is a very interesting decision by Microsoft and I fully support it, this time users will be able to pay less and to choose only applications that they need instead of paying for the whole package and not using it.
 Error Code 0x80072F8F manifests in one main way. It is known to appear as early as Windows 7, and mainly deals with an error that occurs in the update process, or when the computer is trying to connect to the online activation service. It can appear when the activation fails to verify the product key. The error code will present itself when the system realizes that the PC's date and time are incorrect. Error Code 0x80072F8F will also appear if the computer has determined that the time zone settings on the computer are not accurate.
When Windows is going through the installation process and is verifying all of the information associated with the computer, Error Code 0x80072F8F will arise, indicating that the information in the computer's settings is not valid. Correct times and dates are necessary when using serial validation keys to install Windows. When these settings are outside of the tolerated window, the problem will arise.
There is only one main symptom to look out for, and it will manifest during a Windows installation. In the midst of the installation, the computer will not be able to proceed with the installation if Error Code 0x80072F8F has popped up. Because the information cannot be verified, Windows will not be able to continue the installation process when the time settings are not accurate. This interrupts the process, causing the need to edit the settings, restart the computer, and try again. It is imperative to be sure that the date and time on the computer are inside of the tolerated window for the serial key.
When experiencing Error Code 0x80072F8F, the date and time need to be corrected in the computer settings menu, and then verify the correct time zone settings. There are a few different ways to edit the time and date settings, and one may need to even edit the time zone settings. After this, restarting the computer may be needed. When booting into Windows, the validation code should be activated within 30 days of obtaining the serial number.
Check the time and date settings.
Ensure that the computer is connected to the internet.
Review the timezone.
Reboot the PC and check if that fixes the problem. This may help in the event that the network troubleshooter does not detect a problem.
After completing these steps to edit the time, date, and time zone settings, it may be necessary to restart the computer. This is to ensure that the computer will save and recognize the new settings. After restarting, continue the process as intended and enter the product key. The computer will now be able to verify the product key since the time and date will be recognizable. The Windows installation should proceed as normal and complete successfully when the time, date, and time zone are inside of the parameters for the Windows product key.
In short, if it is not, the computer will not be able to recognize the product key, thus will not be able to install the Windows product. Generally, the fix is quite simple and does not take much time at all, but it is very important.
Error Causes“There were problems installing some updates, but we’ll try again later, If you keep seeing this and want to search the web or contact support for information, this may help – 0xc1900403”The log files displayed in the error message may include, “0XC1900403 – MOSETUP_E_UA_CORRUPT_PAYLOAD_FILES”. This indicates that the payload files are corrupted which is why you’re getting the Windows Update Error 0xc1900403 and to fix it, you can try to restart your computer and install the updates again or reset the Windows Update-related folders. You could also run the Windows Update troubleshooter or use either the Standalone Installer or the Media Creation tool. For more details, refer to each one of the options provided below.
net stop wuauserv net start cryptSvc net start bits net start msiserver
net start wuauserv net start cryptSvc net start bits net start msiserver
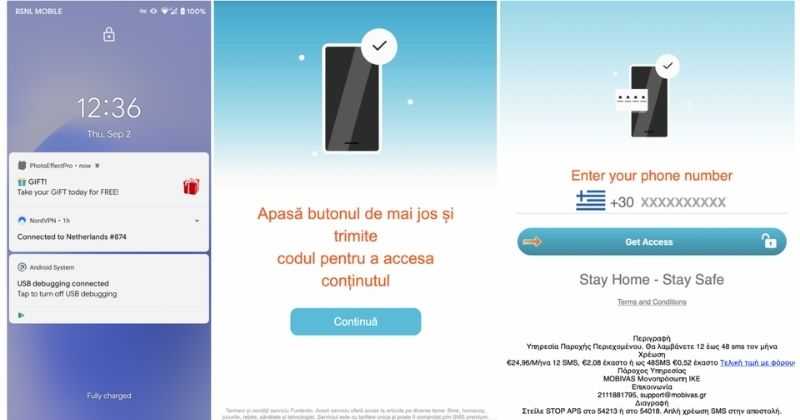 According to Zimperium zLabs, this malware that was recently detected has been doing its scams and attacks even in November of 2020 and has thus far accumulated hundreds of thousands of dollars in its scam.
On the surface it looks very harmless, asking for typical permissions like internet access, calls, and other related needed functions, and then it waits. After few months the real attack happens when users get charged with premium service they never subscribed to in the first place.
According to Zimperium zLabs, this malware that was recently detected has been doing its scams and attacks even in November of 2020 and has thus far accumulated hundreds of thousands of dollars in its scam.
On the surface it looks very harmless, asking for typical permissions like internet access, calls, and other related needed functions, and then it waits. After few months the real attack happens when users get charged with premium service they never subscribed to in the first place.
 Microsoft starting as of today will block its Office 365 users if they are using Internet Explorer or early versions of Edge browsers.
So if you are using older non Chromium Edge versions of Microsoft browsers you can no longer access Office services until you switch. Now normally I would fully support this kind of decision since Internet explorer is a slow and vulnerable browser and the edge is similar in that regard.
The new edge browser is great and it should be used but the issue I have is that Office 365 is not free, it is a premium feature and I am wondering how Microsoft plans to deal with people that have already paid for service but suddenly cannot access it anymore.
Microsoft starting as of today will block its Office 365 users if they are using Internet Explorer or early versions of Edge browsers.
So if you are using older non Chromium Edge versions of Microsoft browsers you can no longer access Office services until you switch. Now normally I would fully support this kind of decision since Internet explorer is a slow and vulnerable browser and the edge is similar in that regard.
The new edge browser is great and it should be used but the issue I have is that Office 365 is not free, it is a premium feature and I am wondering how Microsoft plans to deal with people that have already paid for service but suddenly cannot access it anymore.