It is no secret that Fortnite is one of the most played games in the world. Epic has done a great job offering it to plenty of other platforms with cross-play feature meaning that you can play with your friends no matter on what platform they are on.
But how Fortnite is a piece of software which is constantly updated and maintained it is pretty normal to have some bugs or issues from time to time.
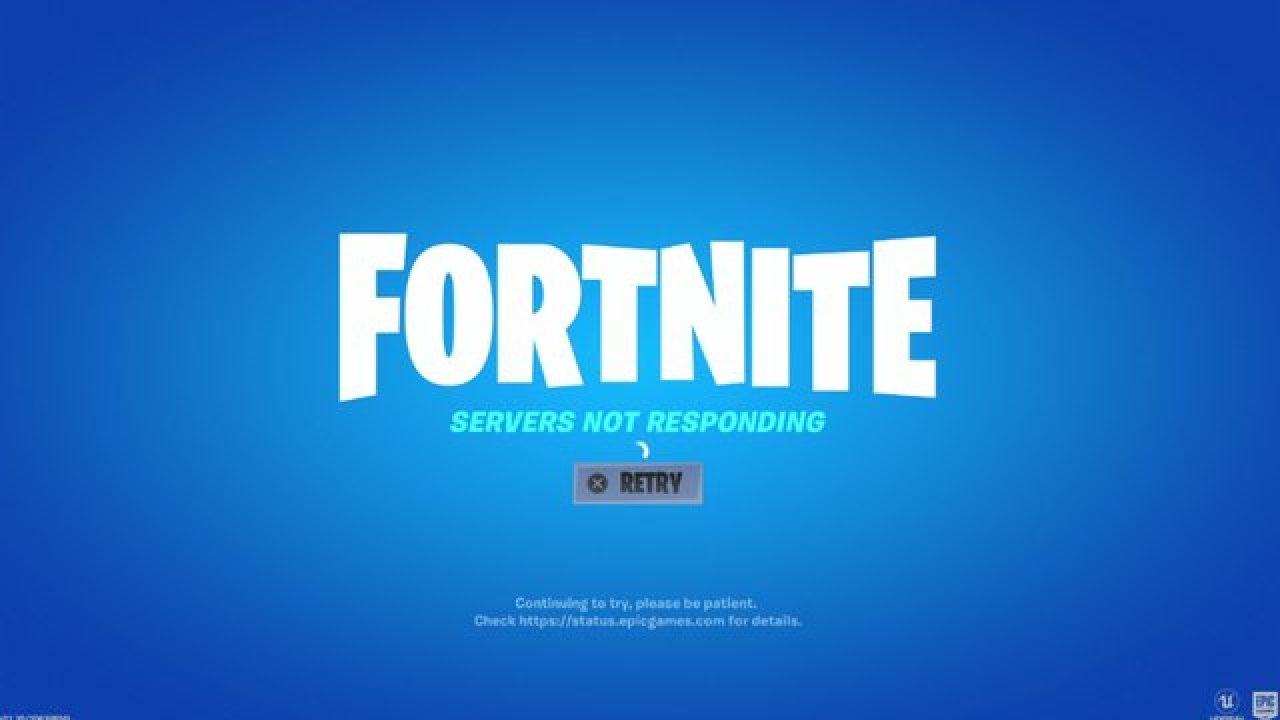
One of the before-mentioned issues is a connection issue or unable to connect to game servers.
In our article, we will go through common fixes and solutions in order to get you back in-game as fast as possible. Keep on reading.
 Check the Epic Games Status page
Check the
Epic Games Server Status page to make sure all systems are operational. If the issue you’re experiencing is related to an outage or system-wide issue, you won’t be able to connect to the Epic Games Launcher or Fortnite until it's resolved.
Use a wired connection
Wireless connections are not as stable as wired connections. This means that the signal can be unreliable and result in packet loss, connection problems, or higher latency or ping. Connect directly to your modem or router with an Ethernet cable to eliminate this possibility and have the fastest connection possible.
Disable your firewalls
Often the quickest way to fix connection problems due to firewalls is to temporarily uninstall and/or disable it.
Windows Firewall disable guide:
- Click on Start.
- Click on Control Panel.
- Click on System and Security.
- Click on Windows Firewall.
- Click on Turn Windows Firewall on or off (You might need to provide the Administrator password at this step)
- Under each Network location, select the Turn off Windows Firewall option
Uninstall any other firewalls
Using a third-party firewall may prevent you from being able to connect to the Epic Games Launcher, Fortnite, or another Epic Games product. We recommend removing any third party firewalls temporarily to see if this resolves your issue. If it does resolve the problem, make sure to add the following executables as exceptions to your firewall:
Epic Games Launcher
- C:\Program Files (x86)\Epic Games\Launcher\Engine\Binaries\Win64\EpicGamesLauncher.exe
- C:\Program Files (x86)\Epic Games\Launcher\Engine\Binaries\Win32\EpicGamesLauncher.exe
Fortnite
- C:\Program Files\Epic Games\Fortnite\FortniteGame\Binaries\Win64\FortniteClient-Win64-Shipping.exe
- C:\Program Files\Epic Games\Fortnite\FortniteGame\Binaries\Win64\FortniteClient-Win64-Shipping_BE.exe
- C:\Program Files\Epic Games\Fortnite\FortniteGame\Binaries\Win64\FortniteClient-Win64-Shipping_EAC.exe
- C:\Program Files\Epic Games\Fortnite\FortniteGame\Binaries\Win64\FortniteLauncher.exe
Contact your firewall manufacturer for instructions on how to add these as exceptions to it as this varies between them.
Unblock your network ports
Network ports allow certain types of data to be successfully sent over a network that is used by our services. If you have any of these blocked, it may result in you being unable to connect to our games or use our services properly. To unblock your ports on your router do the following:
Windows
First, you will need to get your default gateway and internal IP address:
- Click on Start.
- Type cmd and press Enter.
- Type ipconfig and press Enter.
- Take note of your Default Gateway and IPv4.
Configuring your router to unblock the ports
- Open your web browser.
- Type your Default Gateway into the address bar and press Enter. (A common Default Gateway is 192.168.1.1)
- You may be asked for a username and password. This varies for each router. Before entering anything, try just hitting OK. If that doesn't work, try the common default username and password below:
Username: admin
Password: password
If these don't work, you can check this website for a list of usernames and passwords based on your router model.
- Locate the Port Forwarding page in the administration tool and click on it.
- Make sure you have Port Forwarding selected and not Port Triggering as this is completely different.
- On this screen, you will need to enter the ports and port ranges below with the correct protocol and local IP of which you took note of above: 80 (TCP/UDP), 433 (TCP), 443 (TCP), 3478 (TCP/UDP), 3479 (TCP/UDP), 5060 (TCP/UDP), 5062 (TCP/UDP), 5222 (TCP), 6250 (TCP/UDP), and12000-65000 (TCP/UDP).
If you have any trouble doing the above on your router, make sure to check out the router manufacturer's support site for additional instructions as these will vary from router to router.
VPN and Proxy Servers
Do NOT use VPN or Proxy Servers. These cause issues that can't be resolved by us without having you disable them. Check out
this article for information on how to disable your proxy server.
Switch Domain Name Systems (DNS)
Switching your DNS can result in better connectivity and performance for your internet connection. There are two different DNS services we recommend to have you try if you are having issues with your connection. Below are the followings links with instructions on how to change your DNS:
Epic Games Launcher: Edit your Engine.ini file (Windows only)
Editing these settings can result in better download speeds using the Epic Games Launcher:
- Click on Start.
- Type %localappdata% and press Enter.
- Open the EpicGamesLauncher
- Open the Saved
- Open the Config
- Open the Windows
- Open ini and add the following lines to it:
[HTTP]
HttpTimeout=10
HttpConnectionTimeout=10
HttpReceiveTimeout=10
HttpSendTimeout=10[Portal.BuildPatch]
ChunkDownloads=3
ChunkRetries=20
RetryTime=0.5
- Save the file and open the Epic Games Launcher.


 Parallels is an application developer for MAC OS mostly known for its PC virtualization software Parallels Desktop, a PC virtualization software running on Macs enabling running Windows and Linux with respective software on your MAC.
With its latest Desktop 17 version, the software can run natively on both Intel-based and M1-based MACs. Thanks to this feature MAC users will be able to benefit from various speed improvements while running both Windows 10 or Windows 11 preview.
On both Intel and M1 setups, Parallels resumes Windows and Linux up to 38% faster, provides an up to 25% bump in 2D graphics and a six-time increase in OpenGL graphics processing. M1-centric stats include 33% faster Windows start-up times, up to 28% faster DirectX 11 performance, and up to 20% better disk performance on Windows 10 Insider Preview.
Parallels Desktop 17 delivers a set of fresh features including a new video driver that enhances video and game playback and boosts Windows UI responsiveness. An improved Coherence mode lets users run Windows apps within the Mac environment, cutting down on distracting changes in appearance during Windows sign-in, shut down, and software updates.
Drag-and-drop operations are also improved, with support for text and graphics between Mac and Windows applications. This function works well with MAC OS Monterey's Quick Note feature, which can accept content from any Windows app.
USB support, disk management, copy and paste unformatted text, and automatic virtual machine optimization also receive upgrades.
Parallels is an application developer for MAC OS mostly known for its PC virtualization software Parallels Desktop, a PC virtualization software running on Macs enabling running Windows and Linux with respective software on your MAC.
With its latest Desktop 17 version, the software can run natively on both Intel-based and M1-based MACs. Thanks to this feature MAC users will be able to benefit from various speed improvements while running both Windows 10 or Windows 11 preview.
On both Intel and M1 setups, Parallels resumes Windows and Linux up to 38% faster, provides an up to 25% bump in 2D graphics and a six-time increase in OpenGL graphics processing. M1-centric stats include 33% faster Windows start-up times, up to 28% faster DirectX 11 performance, and up to 20% better disk performance on Windows 10 Insider Preview.
Parallels Desktop 17 delivers a set of fresh features including a new video driver that enhances video and game playback and boosts Windows UI responsiveness. An improved Coherence mode lets users run Windows apps within the Mac environment, cutting down on distracting changes in appearance during Windows sign-in, shut down, and software updates.
Drag-and-drop operations are also improved, with support for text and graphics between Mac and Windows applications. This function works well with MAC OS Monterey's Quick Note feature, which can accept content from any Windows app.
USB support, disk management, copy and paste unformatted text, and automatic virtual machine optimization also receive upgrades. 
 Valve has announced the first gaming PC handheld console: Steam Deck. At its core, Stead Deck is just a portable, small PC in little casing. It uses AMD Zen 2 CPU and RDNA 2 GPU architecture, has 16GB of RAM, Wi-Fi, and Bluetooth.
It is a portable device with both a touchpad and joystick packing a seven-inch screen with a resolution of 1280x800 (16:10 aspect ratio). The screen has an ambient light sensor for automatic light adjustments same as your modern mobile device.
Stating to Valve battery will hold up from two to eight hours depending on the activity of the user and what exactly he is doing. The handheld comes also with a carrying case.
Valve has announced the first gaming PC handheld console: Steam Deck. At its core, Stead Deck is just a portable, small PC in little casing. It uses AMD Zen 2 CPU and RDNA 2 GPU architecture, has 16GB of RAM, Wi-Fi, and Bluetooth.
It is a portable device with both a touchpad and joystick packing a seven-inch screen with a resolution of 1280x800 (16:10 aspect ratio). The screen has an ambient light sensor for automatic light adjustments same as your modern mobile device.
Stating to Valve battery will hold up from two to eight hours depending on the activity of the user and what exactly he is doing. The handheld comes also with a carrying case.
 Jokes aside, I truly believe that choosing to upgrade your System to Windows 11 at this point in time is a bad decision and I will explain why I do believe it.
 You can it here: