Hal.dll error is a type of dynamic link library error that is common in Windows.
Hal.dll is the critical file in all Windows installations and the error occurs when this file cannot be correctly loaded. Hal is the abbreviation for ‘Hardware Abstraction Layer’. Communication between Windows and different PC hardware is facilitated with this file.
The error causes inconvenience and hampers your ability to use the hardware.
The error message is displayed in either one of the following formats:
"Windows could not start because the following file is missing or corrupt: C:Windowssystem32hal.dll. Please re-install a copy of the above file."
"Cannot find WindowsSystem32hal.dll"
"C:WindowsSystem32Hal.dll missing or corrupt: Please re-install a copy of the above file."
Solution
Error Causes
Hal.dll error occurs due to multiple reasons. These include:
BIOS are not configured properly
Damaged hard drive
Hal.dll file is missing, damaged, or corrupt
Viral Infection
Further Information and Manual Repair
To fix and resolve the Hal.dll error code on your system, you don’t always have to hire a professional technician for the job.
Though Hal.dll error is critical but easy to resolve, here are some solutions that you can try to fix it right away even if you don’t have any technical expertise.
1) Restart Your PC
Sometimes this can be a temporary error, so try restarting your PC. If the error is resolved then that’s great. However, if it still persists, then try other solutions.
2) Change the Boot Order
The underlying cause for the Hal.dll error is often not properly configured BIOS; if this is the cause, simply change the boot order of the bootable devices like your hard drive.
The BIOS setup utility is used to change boot order settings. This can be done by restarting your PC. Once you restart, press F2 to enter the setup. Now go to SATA operation and change RAID AHCI to RAID ATA.
Save changes and then exit. By doing so, you will be able to re-configure the BIOS and resolve the error.
3) Use BOOTMGR
Another way to resolve is to update the volume boot code to use BOOTMGR.
To do this, access advanced startup options, open the command prompt and type bootsect command and then press Enter. Run the command and then you’ll get the following message:
Bootcode was successfully updated on all targeted volumes.
After that close the command prompt. This is most likely to resolve the error.
4) Repair Registry With Restoro.
In case the error is still not fixed, then this means that the problem is bigger than you thought. It may be due to hard drive failure, viral infection, or sometimes because of hal.dll file corruption. In the event of these error causes, it is recommended to download Restoro.
Restoro is an advanced, next-generation, and multi-functional PC repair tool embedded with numerous utilities like a registry cleaner, an antivirus, and a system optimizer. The registry cleaner utility:
Scans for all registry issues
Wipes out the unnecessary files saved in the hard drive like the junk files, cookies, internet history, and temporary files
The antivirus utility scans and removes all malicious software from your PC including viruses, Trojans, malware, adware, and spyware. Simultaneously, it also boosts the speed of your system.
It is safe and efficient PC repair software. It has simple navigation and a user-friendly interface. Whether you are using Windows 7, 8 or Vista, it is compatible with all. It can also be used on Windows XP.
Click here to download Restoro and resolve the Hal.dll error today!
If you are trying to start the Microsoft Outlook application on your Windows 10 computer but you suddenly receive a message box with an error message that says, “We are unable to connect right now, Please check your network and try again later”, read on as this post will guide you on how you can fix this error.
This kind of error in Microsoft Outlook could be due to some issues with your internet connection or it could also be due to the VPN software if you’re using one. Whatever the cause is, there are several potential fixes you can check out to fix the error. You have to check your internet connection or try changing it. You could also try to disable your VPN software or restart your computer or Microsoft Outlook and try starting the app again. In addition, you can also try entering your password again or check some settings in the Windows Registry or open Microsoft Outlook in Safe Mode. Refer to the guidelines provided below to further troubleshoot the problem.
Option 1 – Try to check your internet connection
The first thing you can do to resolve the problem is to check your internet connection. You have to make sure that you are connected to the internet and that it has a stable connection.
Option 2 – Try to restart your computer or Microsoft Outlook and try again
The next thing you can do to fix the error is to restart your computer or Microsoft Outlook. This simple process can actually help you fix the problem as it could only be a glitch that can be fixed with a simple restart.
Option 3 – Try to enter your password again
You could also try entering your password again to resolve the error. Just click on the Cancel button to open a dialog box and then enter your password again and see if it helps. Note that you might have to do it for all your email IDs in Microsoft Outlook.
Option 4 – Try opening Microsoft Outlook in Safe Mode and disabling its add-ins
Putting Microsoft Outlook into Safe Mode can help you identify the problems in it. Safe Mode also helps you fix a certain issue caused by some corrupted add-in. To start your Microsoft Outlook in Safe Mode, refer to these steps:
Tap Win + R on your keyboard to open the Run dialog box.
Next, type in “Outlook /safe” and press Enter to run the command.
After that, it will ask you to select a profile that you want to use. Just simply select a profile from the drop-down menu and click on the OK button.
Now you have successfully opened Microsoft Outlook in Safe Mode. As a result, it will start with disabling the add-ins. Meaning to say, there is some corrupted add-in that’s causing the problem, and that you need to look for that add-in and either disable it or have it permanently removed.
Once you’ve identified the corrupted add-in, you can disable or remove it by going to File > Options > Add-ins. From there, select the option “COM Add-ins” from the drop-down menu and then click the Go button.
Finally, close Microsoft Outlook once you’ve covered the given steps above and then try to open it normally.
Option 5 – Try disabling the VPN
As pointed out earlier, if you are using VPN, this could be the reason why you’re getting the “We are unable to connect right now, Please check your network and try again later” error so the most obvious thing to do is for you to turn off the VPN and try to run the Windows Update once more. And if you use a VPN software that works using their software, you can just completely exit or log-off from its account. On the other hand, if you are using a built-in Windows 10 VPN, you can simply turn it off or delete all the settings you have created there.
Option 6 – Try to check the settings in the Registry
Tap the Win + R keys to open the Run utility and type “Regedit” in the field and tap Enter to open the Registry Editor.
Next, navigate to this registry path: HKEY_LOCAL_MACHINESYSTEMCurrentControlSetservicesNlaSvcParametersInternet
From there, look for the DWORD named “EnableActiveProbing” and make sure that its value is set to “1”. When the value is set to 1, it means that it is Enabled. This is the default setting and is used to identify the status of the network connectivity of your computer.
Still sitting on the fence about upgrading to Windows 11 because you don’t know what to expect? Interestingly, the new edition somehow manages to be both a total revamp and still very similar to its predecessor in many ways. It’s really something to experience for yourself.
We do want to give you a sneak peek, though. So here’s an overview of the biggest changes Windows 11 brings to the table.
What’s different in Windows 11?
1. Visual changes
The first thing anyone will notice after switching to Windows 11 is the striking visual difference. The entire interface is smoother, cleaner and more minimalistic than on Windows 10, even resembling the macOS in some instances. Perhaps the most obvious change in appearance is the Start menu and Taskbar location, which is now at the bottom center. It’s actually very neat, but if you’re someone who loves familiarity, don’t worry, you can move it back to the left.
Centralized Taskbar and Start menu
Moreover, you’ll notice that the Taskbar includes a Microsoft Teams icon by default (which you can, of course, remove) and that Live Tiles are gone. The News and Interests section has also been removed - or, shall we say, replaced. As opposed to Windows 10, news, weather forecasts and other information are now displayed as widgets.
To add to the cleanliness of the UI, Microsoft also enhanced the ‘Snap Layouts’ feature to help you better organize your windows and maximize screen real estate. It’s similar to app grouping on your smartphone. In Windows 10 this feature is slightly restricted, as it requires some manual resizing and dragging. In Windows 11, you can just hover over the minimize/maximize option on a window, select a layout and throw the windows in there.
Snap Layouts
2. New accessibility features
Microsoft has certainly paid attention to accessibility with Windows 10, but Windows 11 takes this to a whole new level.
One of the ways Windows 11 has taken things up a notch is by adding the long-awaited ‘Live Captions’ feature and advanced Narrator options.
Live Captions apply both to media played on your PC as well as your own speech when you’re using the microphone. Keep in mind that, as with almost all kinds of subtitles, you have to be prepared for a potential delay. However, it’s barely noticeable and doesn’t take away from the usefulness of this awesome new feature whatsoever.
As for the Narrator, there are three new voice packs to choose from. Microsoft has tried to put emphasis on a more natural voice than we are used to. So, now you can choose between Aria, Jenny and Guy, who will read pretty much anything off your screen out loud. Aside from this, Microsoft has also expanded the list of braille displays supported by the Narrator feature. For users with anxiety or trouble concentrating, a welcomed addition is the Focus app, which is no longer part of the Clock app. It’s now separate and called ‘Focus Sessions’, automatically triggering the Do Not Disturb mode when activated. It blocks all pop-ups and flashes and lets you work in peace until you’re ready to switch it off.
3. Android apps
Android users may rejoice! Windows 11 supports the use of your favorite applications now.
Microsoft has done this by integrating the Amazon Appstore to the Windows 11 Microsoft Store. From there, you can download your favorite Android apps and use them on your PC in a smartphone-like window.
Unfortunately not too many apps are supported at this time, but Microsoft is working on making the emulation possible for many more. Also, the option is only available in specific regions at this moment - check out if you’re one of the lucky ones.
4. Improved gaming performance
Avid gamers will be happy to hear that Microsoft has put some effort into streamlining Windows 11 for their gaming needs.
To give gamers a supreme visual experience, Windows 11 offers the ‘Auto HDR’ feature. As long as your monitor is HDR-compatible, this feature will automatically adjust the colors, brightness and contrast of games without any input from you.
Another update is DirectStorage, which we were introduced to in Windows 10 already. In Windows 11, it’s been improved to tweak loading times and overall gaming performance efficiency even better. The predisposition for it to work optimally is that your device has an NVMe SSD.
The Xbox Game Bar also helps gamers towards a smoother experience. It allows in-game screenshots, viewing processes that are running (similar to the Task Manager), monitoring the CPU and GPU performance and frame rate, integrating the Xbox App and more. There’s also a number of widgets you can now use with the Game Bar, for example the Spotify widget.
Xbox Game Bar
Another cool addition is the Xbox Game Pass, which unlocks hundreds of games to play on your Xbox App, with new additions coming in every month.
5. Smart App Control
Aside from a sleek new look and better accessibility for all users, Windows 11 also comes with a security power-up. Bear in mind that this feature is only available on clean Windows 11 installs.
Smart App Control (SAC) is an AI-powered new feature designed to protect your PC from potential threats. It blocks untrustworthy apps and adware and helps detect potentially unwanted apps, maintaining your PC’s performance and keeping your system safe.
It comes with an ‘Evaluation’ mode, which you should definitely select when running SAC for the first time. That way, the app monitors your usage and assesses whether you’re a candidate for SAC. Some users need it to be on all the time, for others it might be too distracting. Evaluation mode will turn SAC on or off based on your usage.
Don’t disable SAC again unless you’re absolutely sure you don’t need it, since reenabling it will require a fresh install. We recommend you don’t turn it off, as it is a neat feature protecting your data and files from malware at all times.
Summary
Have we piqued your interest in trying Microsoft’s latest OS? It’s a pretty exciting new iteration, but we’ll let you find out for yourself. We hope you like it!
It is common knowledge that when you open a file that contains viruses, it will automatically infect the operating system. This is why most antivirus programs like Windows Defender won’t allow the opening of a file or execution of any associated program if they detected that the file or program could potentially harm the computer. In situations like this, you may get an error stating, “Operation did not complete successfully because the file contains a virus”.
In addition, it is also possible that this error message can pop up even for known programs. To open the program or file that triggered the error, you will be given a couple of options in this post but make sure that the program or file is really safe to open and does not contain any virus. You can open the file or execute the program by disabling the Windows Defender or any antivirus program temporarily. You could also try to add an exclusion in your antivirus program or repair File Explorer or run the Disk Cleanup tool. For more details, refer to each one of the options provided below.
Option 1 – Try to temporarily disable the Windows Defender program
Although you could encounter this error with any antivirus program, it is more common in Windows Defender. Thus, you can try to disable it for a while when you open the file or execute the program. To do so, follow these steps:
First, click on the Start button and go to Settings > Update and Security > Windows Security.
Here, select the “Open Windows Security” option located in the right pane.
After that, click on the “Virus and threat protection” option.
Next, click on Manage settings under the Virus and threat protection settings.
Then turn off the switch for both Real-time protection and Cloud-delivered protection.
Now restart your computer and try to open the file or execute the program again and see if it works.
Note: Do not forget to enable the Real-time protection and Cloud-delivered protection back in Windows Defender.
Option 2 – Try adding an exclusion in the Windows Defender program
Open the Windows Defender Security Center from the system tray area.
Next, click the “Virus & threat protection” option and then open the “Virus and threat protection settings”.
After that, scroll down until you find the “Exclusions” and click on the “Add or remove exclusions” option.
Then click the plus button and select the type of exclusion you want to add and from the drop-down list, select Folder.
Next, navigate to the path where the file or program is located.
When a User Account Control or UAC prompt, just click on Yes to proceed.
Now try to run the program or file again and see if it worked. If it did, then make sure to turn on your antivirus. However, if it didn’t work, proceed to the next given options below.
Option 3 – Try to run a System File Checker scan
System File Checker or SFC is a built-in command utility that helps in restoring corrupted files as well as missing files. It replaces bad and corrupted system files with good system files that might be the cause why you’re getting the errors 0x8024a11a and 0x8024a112. To run the SFC command, follow the steps given below.
Type “cmd” in the Start search and then right-click on the appropriate search result.
Next, select “Run as administrator” to open Command Prompt with admin privileges.
After opening Command Prompt, type in sfc /scannow
The command will start a system scan which will take a few whiles before it finishes. Once it’s done, you could get the following results:
Windows Resource Protection did not find any integrity violations.
Windows Resource Protection found corrupt files and successfully repaired them.
Windows Resource Protection found corrupt files but was unable to fix some of them.
Now restart your computer and see if the problem is fixed or not.
Option 4 – Run the Disk Cleanup tool
You can also try using the Disk Cleanup tool. To use it, refer to these steps:
Tap the Win + R keys to open the Run dialog box and then type “cleanmgr” in the field and hit Enter to open the Disk Cleanup window.
After that, select the drive you want to clean.
Now click OK to clean the disk and restart your computer.
Hello and welcome to our user account notifications in Windows 10 tutorial where we will dive a little more into how you can control notification and behavior settings for your or someone else's user account in your Windows 10.
If you are annoyed with confirmation windows each time you start a new application or install one please keep reading and I am sure you will find just the right setting for you.
User account options are a little hidden and not so obvious, well at least not in Windows 10 compared to previous Windows versions. Since we will not be able to find them under typical and standard settings we will need to do few tricks in order to get to them.
Opening control panel
First thing is to press ⊞ WINDOWS + R on your keyboard so the run dialog window pops up on your desktop.
Once run dialog is shown type in it control panel as shown in the picture and press OKIf you have followed the steps precisely, you should be now in the control panel of Windows 10. Click on the top-right view and choose large icons. The Control panel will switch to a grid-like view, in the current view go to the far-right and almost bottom icon where it says User Accounts and click on it.
User account settings
Once the user account opens click on the bottom link which says Change User Account Control settings. Please note that you will need to be logged in as an administrator or have administrator privileges in order to change this setting.
Once you click on the link you will be presented with a User account control slider on the left and a brief explanation on the right
Here in the picture, we see Windows default setting and an explanation of when and how he will notify you. If you wish to turn all notifications linked to programs changing computer or you making windows changes, click on the left slider and bring it all the way to the bottom where it says never notify me. If you prefer some notifications try to find which of the remaining 3 settings best suit your needs. Once you are done and satisfied with your choice click on OK.
Rapid Media Converter is a Potentially Unwanted Program that usually comes bundled with other unwanted software. Many users reported being unaware they had installed the application. It also generates additional advertising, and for this reason, it is classified as Adware and flagged for optional removal by several AVs.
From the Author: Howard Software / Applon runs off an ad-supported platform. During general internet usage on sites where Applon Support operates, users may see advertisements in form of shopping results and new tabs. The type of ad is dependent on the content of the page as you generally browse the internet. Applon is not related to or endorsed by the underlying website. These advertisements will be identified with the Applon Name or Logo.
About Browser Hijackers
Adware is programs created to show advertisements on users’ PCs with or without their consent. A kind of malware, it comes bundled up with the software application that a person either installs or accesses. Shareware or free software programs are generally packaged with adware. When adware penetrates your computer without you knowing and transfers information about you or your PC to 3rd parties, then it happens to be spyware. Other sorts of adware might take control of your internet browser and redirects you to websites that you don’t really want to check out.
Adware is a common problem in most computer systems and these are really detrimental to your device. Adware/Spyware is usually downloaded and/or installed accidentally by users while exploring the net and people face lots of difficulties at the same time when it comes to removing adware from their computers.
Adware could be dangerous for computer users in numerous ways. It could cause advertisements (popups, ad banners, and in-text) to show up constantly when you’re online or perhaps disrupt your computer experience when not connected to the net. When infected with adware for a long time, your computer will perform at slow processing speed, take a longer time to start up and shut down, easily get frozen up while loading websites, and even get the blue screen of death (BSOD). More often than not, adware is a legitimate revenue source for many companies that offer software to customers at zero cost. But adware generated advertisements tends to be more aggressive than normal ads which can greatly impair system performance or possibly result in a total crash.
The adware will damage your PC should you allow it on your personal computer for a long period. A sensible way to block adware from corrupting your PC is to employ a reliable antimalware program such as Safebytes Anti-Malware on your computer. This software will give complete all-around protection to make sure that your laptop or computer doesn’t get infected again with spyware and adware.
Take the following measures to prevent adware from overtaking your system: Downloading software online should come from trustworthy websites and also be selective about what you install on your computer; Always read the end-user license agreement (EULA) of any application you plan to install; Beware of clickable ads particularly those that advertise special deals, coupons, or any other suspicious deals.; Avoid installing toolbars, because toolbars from less reputable websites always contain adware, which might slow your PC and in some cases infect your computer outright.
What to Do if Malware Stops You From Downloading Antivirus?
Every malware is bad and the extent of the damage will vary greatly with regards to the type of infection. Certain malware goes to great lengths to prevent you from installing anything on your computer system, especially antivirus software. So what you should do when malware prevents you from downloading or installing Anti-Malware? There are a few fixes you could try to get around with this particular obstacle.
Start Windows in Safe ModeIf any virus is set to load immediately when Windows starts, getting into Safe Mode may block the attempt. Since just the minimum programs and services launch in Safe Mode, there are hardly any reasons for conflicts to happen. Listed here are the steps you have to follow to start into the Safe Mode of your Windows XP, Vista, or 7 computers (visit Microsoft website for instructions on Windows 8 and 10 PCs).
1) At power-on/startup, tap the F8 key in one-second intervals. This should bring up the Advanced Boot Options menu.2) Use the arrow keys to select Safe Mode with Networking and hit ENTER.3) As soon as this mode loads, you should have the internet. Now, make use of your web browser normally and go to https://safebytes.com/products/anti-malware/ to download and install Safebytes Anti-Malware.4) Following installation, do a complete scan and allow the software program to delete the threats it detects.
Obtain the anti-malware software using an alternate browser
Some malware only targets specific web browsers. If this is your situation, utilize another browser as it could circumvent the computer virus. If you appear to have a trojan attached to Internet Explorer, then switch to an alternate web browser with built-in security features, such as Firefox or Chrome, to download your preferred anti-malware program – Safebytes.
Create a bootable USB anti-virus drive
Here’s another solution which is using a portable USB antivirus software that can scan your computer for malware without the need for installation. Adopt these measures to run the anti-virus on the affected computer system.
1) On a clean computer, download and install Safebytes Anti-Malware.2) Connect the USB flash drive to a USB slot on the clean computer.3) Double-click on the downloaded file to run the installation wizard.4) Choose the USB flash drive as the destination for saving the software file. Follow the on-screen instructions to finish the installation.5) Transfer the USB drive from the uninfected computer to the infected computer.6) Double-click the EXE file to open the Safebytes program from the thumb drive.7) Click on the “Scan Now” button to begin the malware scan.
SafeBytes AntiMalware Overview
Are you looking to download the best anti-malware software program for your laptop or computer? You can find many applications in the market which come in paid and free versions for Microsoft Windows systems. A few of them do a great job in eliminating malware threats while some will harm your PC by themselves. You must be careful not to choose the wrong application, especially if you buy premium software. While considering the trustworthy programs, Safebytes Anti-Malware is certainly the highly recommended one.
Safebytes is among the well-established computer solutions firms, which provide this all-inclusive anti-malware application. With its most advanced virus detection and repair technology, this software will help you protect your PC against infections brought on by different kinds of malware and similar internet threats, including adware, spyware, computer viruses, worms, trojan horses, keyloggers, ransomware, and potentially unwanted program (PUPs).
SafeBytes has fantastic features when compared with various other anti-malware programs. The following are some of the good ones:
Robust, Anti-malware Protection: Built on a highly acclaimed anti-virus engine, this malware removal application has the capacity to find and remove several stubborn malware threats like browser hijackers, PUPs, and ransomware that other common antivirus software will miss.
Live Protection: SafeBytes provides totally hands-free live protection and is set to observe, prevent and eliminate all threats at its first encounter. It’ll regularly monitor your pc for hacker activity and also provides end-users with sophisticated firewall protection.
High-Speed Malware Scanning Engine: SafeBytes Anti-Malware has a multi-thread scan algorithm that works up to 5x faster than any other anti-malware software.
Safe Web Browsing: SafeBytes checks the links present on a webpage for possible threats and informs you whether the website is safe to check out or not, through its unique safety ranking system.
Light-weight: This program is light-weight and can work quietly in the background, and that does not have an effect on your PC efficiency.
24/7 Customer Support: For any technical queries or product support, you can obtain 24/7 expert assistance through chat and email.
To sum it up, SafeBytes Anti-Malware is really great for securing your computer against all sorts of malware threats. There is no doubt that your computer will be protected in real-time as soon as you put this software program to use. For top protection and the best value for your money, you can’t get better than SafeBytes Anti-Malware.
Technical Details and Manual Removal (Advanced Users)
If you don’t want to use malware removal software and prefer to get rid of Rapid Media Converter manually, you might do so by going to the Add/Remove Programs menu in the control panel and removing the offending software; in cases of web browser extensions, you can remove it by going to the browser’s Add-on/Extension manager. You will definitely also want to reset your web browser.
To be certain of complete removal, find the following Windows registry entries on your system and delete it or reset the values appropriately. Please keep in mind that this is for advanced users only and could be difficult, with incorrect file removal causing additional system errors. Additionally, certain malicious programs have the capability to defend against its removal. Doing this in Safe Mode is advised.
Hello and welcome everyone, today we will be talking about power toys, a great, completely free, open-source, Microsoft-supported Windows project which aims to provide Windows itself with powerful features not found natively in it.
We will explore power toys completely here and explain each module and its features.
The first thing is of course to download power toys themselves. You can find themhere. After you download them, double click on the downloaded file and install. Start power toys, you will find them at the bottom of the taskbar, note that power toys need to be active in order to use their features.
When opened you will be greeted with general settings window. These are settings for power toys themselves, Here you can check for updates, change the looks of power toys, run it on system startup and run them as administrator. Set them up so they best suit your needs.
Color Picker
Moving down next tab we have is Color picker.The color picker will let you as the name suggests pick colors, it will sample colors from running applications and windows, snap their values, and place them in the clipboard. A useful application if you are working as a graphic designer, want to create some cool word document, or just want to compare the difference between colors.
After the Color Picker is activated, hover your mouse cursor over the color you would like to copy and left-click the mouse button to select a color. If you want to see the area around your cursor in more detail, scroll up to zoom in. The copied color will be stored in your clipboard in the format that is configured in the settings (HEX by default). The editor lets you see the history of picked colors (up to 20) and copy their representation in any predefined string format. You can configure what color formats are visible in the editor, along with the order that they appear. This configuration can be found in PowerToys settings. The editor also allows you to fine-tune any picked color or get a new similar color. Editor previews different shades of currently selected color - 2 lighter and 2 darker ones. Clicking on any of those alternative color shades will add the selection to the history of picked colors (appears on the top of the colors history list). Color in the middle represents your currently selected color from the history of the colors. By clicking on it, the fine-tuning configuration control will appear, which will let you change the HUE or RGB values of the current color. Pressing OK will add newly configured color into the history of the colors.
Fancy Zones
Moving down, we have fancy zones.FancyZones is a window manager utility for arranging and snapping windows into efficient layouts to improve the speed of your workflow and restore layouts quickly. FancyZones allows the user to define a set of window locations for a desktop that are drag targets for windows. When the user drags a window into a zone, the window is resized and repositioned to fill that zone. When first launched, the zones editor presents a list of layouts that can be adjusted by how many windows are on the monitor. Choosing a layout shows a preview of that layout on the monitor. The selected layout is applied automatically.
File Explorer
Next, File Explorer.Only 3 options here but maybe some are important to you. This extension lets you enable SVG file preview in File Explorer, enable Markdown preview, and enable SVG thumbnails. Turn on each one you might need.
Image Resize
Next down the line, we have Image resize.Image Resizer is a Windows shell extension for bulk image-resizing. After installing PowerToys, right-click on one or more selected image files in File Explorer, and then select Resize pictures from the menu. You can specify your own sizes if you want, you can resize when dragging files, you can overwrite files or make new copies of new sizes, and many more options. A very useful tool I am sure plenty of users can use since this eliminates the need for pictures or any other image application for common resizing tasks.
Keyboard Manager
The keyboard manager is the next tab in power toys.
The PowerToys Keyboard Manager enables you to redefine keys on your keyboard. For example, you can exchange the letter A for the letter D on your keyboard. When you select the A key, a D will display. You can also exchange shortcut key combinations. For example, the shortcut key, Ctrl+C, will copy the text in Microsoft Word. With the PowerToys Keyboard Manager utility, you can exchange that shortcut for ⊞ Win+C). Now, ⊞ Win+C) will copy text. If you do not specify a targeted application in PowerToys Keyboard Manager, the shortcut exchange will be applied globally across Windows. PowerToys Keyboard Manager must be enabled (with PowerToys running in the background) for remapped keys and shortcuts to be applied. If PowerToys is not running, key remapping will no longer be applied.
Power Rename
Nex we have a very cool and powerful Power RenamePowerRename is a bulk renaming tool that enables you to:
Modify the file names of a large number of files (without renaming all of the files with the same name).
Perform a search and replace on a targeted section of file names.
Perform a regular expression rename on multiple files.
Check expected rename results in a preview window before finalizing a bulk rename.
Undo a rename operation after it is completed.
Run Utility
Power Toys Run utility follows next.
PowerToys Run is a quick launcher for power users that contains some additional features without sacrificing performance.
PowerToys Run features include:
Search for applications, folders, or files
Search for running processes (previously known as WindowWalker)
Clickable buttons with keyboard shortcuts (such as Open as the administrator or Open containing folder)
Invoke Shell Plugin using > (for example, > Shell:startup will open the Windows startup folder)
Do a simple calculation using the calculator
Shortcut Guide
Last but not least we have a Shortcut guide.This guide uses PowerToys to display common keyboard shortcuts that use the Windows ⊞ key. Windows key keyboard shortcuts can be used while the guide is being shown and the result of those shortcuts (active window moved, arrow shortcut behavior changes, etc) will be displayed in the guide. Releasing the Windows ⊞ key will make the overlay disappear. Tapping the Windows ⊞ key will display the Windows Start menu.
Hey, you made it till the end, thank you for reading and I hope to see you soon.
There are various components that take part during a Windows Upgrade process such as the CPU, Disk, Network, and many more. This is why the process of upgrading your Windows 10 computer can be quite complex and due to its complexity, there are times when you might encounter some errors like the Windows Upgrade error 0x800701E3.
If you encounter this kind of error then it has something to do with the “disk” part of the whole upgrade process which could be due to a conflict with the storage of your Windows 10 computer. When you receive this error, you will see the following error message on your screen:
“Windows cannot install required files. Make sure all files required for installation are available and restart the installation. Error code: 0x800701e3.”
To fix this Windows Upgrade error, here are some suggestions that might help.
Option 1 – Delete Files from Software Distribution Folder & Catroot2 folders
The downloaded Windows Updates are placed in a folder called “SoftwareDistribution”. The files downloaded in this folder are automatically deleted once the installation is completed. However, if the files are not clean up or if the installation is still pending, you can delete all the files in this folder after you pause the Windows Update service. For complete instructions, refer to the steps below.
Open the WinX Menu.
From there, open Command Prompt as admin.
Then type in the following command – don’t forget to hit Enter right after typing each one of them.
net stop wuauservnet start cryptSvcnet start bitsnet start msiserver
After entering these commands, it will stop the Windows Update Service, Background Intelligent Transfer Service (BITS), Cryptographic, and the MSI Installer
Next, go to the C:/Windows/SoftwareDistribution folder and get rid of all the folders and files thereby tapping the Ctrl + A keys to select them all and then click on Delete. Note that if the files are in use, you won’t be able to delete them.
After resetting the SoftwareDistribution folder, you need to reset the Catroot2 folder to restart the services you just stopped. To do that, follow these steps:
Type each one of the following commands.
net start wuauservnet start cryptSvcnet start bitsnet start msiserver
After that, exit Command Prompt and restart your computer, and then try to run Windows Update once more.
Option 2 – Try running the DISM tool
You can try running the Deployment Imaging and Servicing Management or DISM tool to fix the Windows Upgrade problem. Using this built-in tool, you have various options such as the “/ScanHealth”, “/CheckHealth”, and “/RestoreHealth”.
Open the Command Prompt with admin privileges.
Then type in the following commands and make sure to hit Enter right after you type each one of them:
Dism /Online /Cleanup-Image /CheckHealth
Dism /Online /Cleanup-Image /ScanHealth
exe /Online /Cleanup-image /Restorehealth
Do not close the window if the process takes a while as it will probably take a few minutes to finish.
Option 3 – Run the System File Checker Scan
System File Checker or SFC is a built-in command utility that helps in restoring corrupted files as well as missing files. It replaces bad and corrupted system files with good system files. To run the SFC command, follow the steps given below.
Tap Win + R to launch Run.
Type in cmd in the field and tap Enter.
After opening Command Prompt, type in sfc /scannow
The command will start a system scan which will take a few whiles before it finishes. Once it’s done, you could get the following results:
Windows Resource Protection did not find any integrity violations.
Windows Resource Protection found corrupt files and successfully repaired them.
Windows Resource Protection found corrupt files but was unable to fix some of them.
Restart your computer.
Option 4 – Try running the ChkDsk utility
You can also run the ChkDsk utility to fix the Windows Upgrade error 0x800701E3.
First, open This PC and right-click on your operating system partition for Windows.
Next, click on Properties and navigate to the Tools tab.
Then click on Check under the Error Checking section.
After that, a new mini window will be opened and from there click on Scan drive and let it scan your disk drive partition for any errors and then restart your computer.
Option 5 – Run the Windows Update Troubleshooter
Running the built-in Windows Update troubleshooter is one of the things you can first check out as it is known to automatically resolve any Windows Update or upgrade errors like error code 0x800701E3. To run it, go to Settings and then select Troubleshoot from the options. From there, click on Windows Update and then click the “Run the troubleshooter” button. After that, follow the next on-screen instructions and you should be good to go.
Option 6 – Run Microsoft’s online troubleshooter
Running Microsoft’s online troubleshooter might also help you fix the Windows Upgrade error code 0x800701E3. This online troubleshooter is known to help in fixing Windows Update errors, it scans your computer for issues that might be causing the problem and then fixes them automatically.
Among other things and innovations, Windows 11 brings to the table is the game mode. The game mode is a system designed to release some resources and optimize your system when Windows 11 detects that you are playing games. It also turns off automatic updates while the game is active.
The game mode is active at all times and usually, everything works great but in some instances, it can sadly cause some performance issues. If you are one of these unlucky people where game mode is not working as supposed to do, don’t panic, we have a quick guide for you on how to turn it off.
Press ⊞ WINDOWS + I to open settings
Inside click on Gaming
Select Game mode
Click switch beside Game mode to turn it off
Close settings
Everything will be automatically saved and applied and you should not have any issues from now on. If for any reason you wish to turn game mode back ON, just follow the same steps and turn the switch to ON.
This is a typical Outlook Express error code. Outlook Express is email software by Microsoft. This error may pop up when sending or receiving emails on your Outlook Express.
It cancels email sending and receiving operations. In other others, the 0x800ccc17 error code hampers your email communication via Outlook Express account.
This error message is displayed in the following format:
0x800CCC17 - User cancelled operation
Solution
Error Causes
0x800ccc17 error code may appear on your PC due to multiple reasons. These include:
Issues with Pop3uid.dbx file (this file supports Outlook Express software on Windows Vista)
Viral infection
Registry corruption
No matter what the underlying reason for this error code may be, it is advisable to resolve the issue right away without any delay. This error may cause great deal of inconvenience.
It may lower your office productivity badly especially if you interact and communicate with people of other office departments via your Outlook Express account.
Further Information and Manual Repair
Here are some of the best and efficient do-it-yourself methods to resolve the 0x800ccc17 error code on your system. These methods are very easy to work around and do not require any kind of technical expertise.
Method 1 - Restart Your PC
Sometimes this might error can be resolved by simply rebooting your system. So, restart your PC and try using your Outlook Express account again. If it works, the error is resolved. However, if it persists then try other methods given below.
Method 2 - Rename pop3uid.dbx File on Your System
If the underlying cause of error 0x800ccc17 is related to pop3uid.dbx file damage, then simply rename it to resolve. This can be done by searching for the file pop3uid.dbx.
After locating it rename it to ‘pop3uid.bak’. Now reopen Outlook Express and try sending or receiving emails again. If the operations are executed successfully then the error is resolved.
Method 3 - Remove Viruses
Viruses can infect your PC without you knowing about it. These malicious programs usually enter your system through phishing emails and file downloads.
If the error 0x800ccc17 is triggered due to viral infection then it is advisable to install a powerful antivirus and remove all viruses from your PC.
Method 4 - Repair the Registry
If you don’t clean the registry frequently it fills up with unnecessary and obsolete files like junk files, cookies, internet history, and bad registry entries. These files then corrupt and damage the registry thereby generating codes like error 0x800ccc17.
To resolve this, you first need to remove all these unnecessary files and repair the registry. Though this can be done manually if you are not technically sound, it may be time-consuming and slightly tricky.
Therefore it is advisable to download Restoro. This is a powerful registry cleaner that wipes away all obsolete files instantly, cleans the registry, and repairs it in seconds.
Click here to download Restoro and fix error 0x800ccc17 on your PC today.
The System32 folder contains vital configuration and information that are essential to the operating system. It is located inside the “Windows” folder and it consists of important DLL files as well as executable files. You probably have noticed some errors that have the “System32” word in them but that does not necessarily mean that the System32 folder is the one that triggers them as these kinds of errors have only occurred when some important files are corrupted or missing. Some users recently reported that each time they start their computers, the System32 folder will automatically open up in the File Explorer. If you encounter the same problem, read on as this post will guide you on what to do to fix it.
This kind of issue is most likely caused by service or application interference – it is possible that there is a third-party application installed in your computer or a Windows service that triggers the System32 to pop up during startup. It is also possible that this is a result of system modification. Thus, you need to identify the third-party program or restore your computer to its previous state.
Option 1 – Put your computer in a Clean Boot State
As pointed out, it is possible that some third-party program or service is the one that’s behind the problem. To isolate this possibility and to identify the culprit, you have to put your computer into a Clean Boot State. To do so, follow the steps below.
Log onto your PC as an administrator.
Type in MSConfig in the Start Search to open the System Configuration utility.
From there, go to the General tab and click “Selective startup”.
Clear the “Load Startup items” check box and make sure that the “Load System Services” and “Use Original boot configuration” options are checked.
Next, click the Services tab and select the “Hide All Microsoft Services” check box.
Click Disable all.
Click on Apply/OK and restart your PC. (This will put your PC into a Clean Boot State. And configure Windows to use the usual startup, just simply undo the changes.)
After putting your PC in a Clean Boot State, try creating a system restore point and see if the problem still occurs. Clean Boot troubleshooting is designed to help you isolate the problem. For you to execute a clean boot troubleshooting, you must do a couple of actions (the steps given above) and then restart your PC after every action. You might have to disable one third-party app after the other to really isolate the issue. And once you’ve narrowed down the problem, you can either disable the third-party app that’s causing the problem or remove it. Note that you must switch your PC back into the Normal Startup mode after you’re done troubleshooting the problem. Here’s how you can do it:
From the “Start” menu, go to System Configuration.
After that, switch to the General tab and click the option for “Normal Startup”.
Next, go to the Services tab and clear the checkbox for “Hide all Microsoft services”.
Then find and click “Enable all” and if prompted, you have to confirm.
Afterward, go to the Task Manager and enable all the Startup programs and confirm the action.
Restart your PC when prompted.
Option 2 – Perform System Restore
First, press the Win + R keys to open the Run dialog box.
After that, type in “sysdm.cpl” in the field and tap Enter.
Next, go to the System Protection tab then click the System Restore button. This will open a new window where you have to select your preferred System Restore point.
After that, follow the on-screen instructions to finish the process and then restart your computer and check if the problem is fixed or not.
Option 3 – Run System File Checker scan
You might also try running the System File Checker or SFC scan to fix the issue. System File Checker is a command utility built into your computer that helps restore corrupted files and missing files. Refer to the following steps to run it:
Hit the Win + R keys to launch Run.
Type in cmd in the field and tap Enter.
After opening Command Prompt, type in sfc /scannow
The command will start a system scan which will take a few whiles before it finishes. Once it’s done, you could get the following results:
Windows Resource Protection did not find any integrity violations.
Windows Resource Protection found corrupt files and successfully repaired them.
Windows Resource Protection found corrupt files but was unable to fix some of them.
Restart your computer and see if the System32 folder still pops up at startup or not.


 Once run dialog is shown type in it control panel as shown in the picture and press OK
 If you have followed the steps precisely, you should be now in the control panel of Windows 10. Click on the top-right view and choose large icons. The Control panel will switch to a grid-like view, in the current view go to the far-right and almost bottom icon where it says User Accounts and click on it.
 User account settings
 Once you click on the link you will be presented with a User account control slider on the left and a brief explanation on the right
 Here in the picture, we see Windows default setting and an explanation of when and how he will notify you. If you wish to turn all notifications linked to programs changing computer or you making windows changes, click on the left slider and bring it all the way to the bottom where it says never notify me. If you prefer some notifications try to find which of the remaining 3 settings best suit your needs. Once you are done and satisfied with your choice click on OK.
 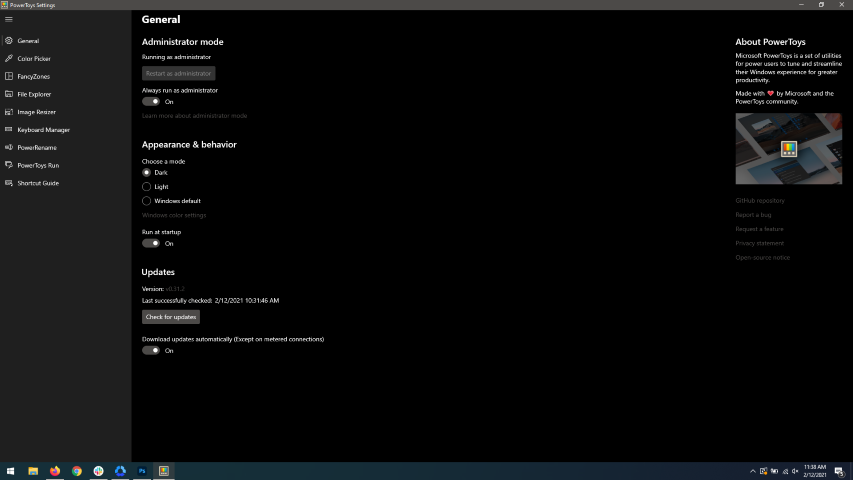 When opened you will be greeted with general settings window. These are settings for power toys themselves, Here you can check for updates, change the looks of power toys, run it on system startup and run them as administrator. Set them up so they best suit your needs.
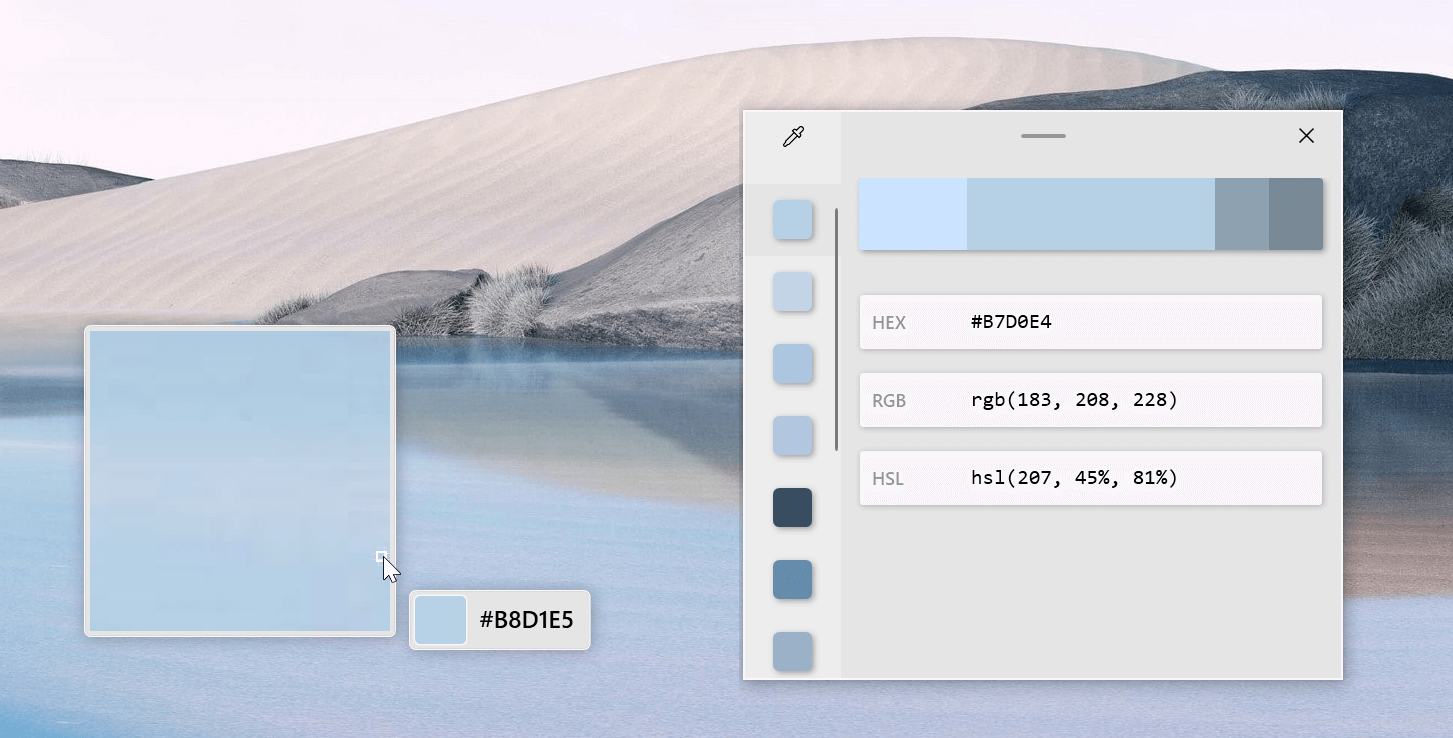 The color picker will let you as the name suggests pick colors, it will sample colors from running applications and windows, snap their values, and place them in the clipboard. A useful application if you are working as a graphic designer, want to create some cool word document, or just want to compare the difference between colors.
After the Color Picker is activated, hover your mouse cursor over the color you would like to copy and left-click the mouse button to select a color. If you want to see the area around your cursor in more detail, scroll up to zoom in. The copied color will be stored in your clipboard in the format that is configured in the settings (HEX by default). The editor lets you see the history of picked colors (up to 20) and copy their representation in any predefined string format. You can configure what color formats are visible in the editor, along with the order that they appear. This configuration can be found in PowerToys settings. The editor also allows you to fine-tune any picked color or get a new similar color. Editor previews different shades of currently selected color - 2 lighter and 2 darker ones. Clicking on any of those alternative color shades will add the selection to the history of picked colors (appears on the top of the colors history list). Color in the middle represents your currently selected color from the history of the colors. By clicking on it, the fine-tuning configuration control will appear, which will let you change the HUE or RGB values of the current color. Pressing OK will add newly configured color into the history of the colors.
The color picker will let you as the name suggests pick colors, it will sample colors from running applications and windows, snap their values, and place them in the clipboard. A useful application if you are working as a graphic designer, want to create some cool word document, or just want to compare the difference between colors.
After the Color Picker is activated, hover your mouse cursor over the color you would like to copy and left-click the mouse button to select a color. If you want to see the area around your cursor in more detail, scroll up to zoom in. The copied color will be stored in your clipboard in the format that is configured in the settings (HEX by default). The editor lets you see the history of picked colors (up to 20) and copy their representation in any predefined string format. You can configure what color formats are visible in the editor, along with the order that they appear. This configuration can be found in PowerToys settings. The editor also allows you to fine-tune any picked color or get a new similar color. Editor previews different shades of currently selected color - 2 lighter and 2 darker ones. Clicking on any of those alternative color shades will add the selection to the history of picked colors (appears on the top of the colors history list). Color in the middle represents your currently selected color from the history of the colors. By clicking on it, the fine-tuning configuration control will appear, which will let you change the HUE or RGB values of the current color. Pressing OK will add newly configured color into the history of the colors.
 FancyZones is a window manager utility for arranging and snapping windows into efficient layouts to improve the speed of your workflow and restore layouts quickly. FancyZones allows the user to define a set of window locations for a desktop that are drag targets for windows. When the user drags a window into a zone, the window is resized and repositioned to fill that zone. When first launched, the zones editor presents a list of layouts that can be adjusted by how many windows are on the monitor. Choosing a layout shows a preview of that layout on the monitor. The selected layout is applied automatically.
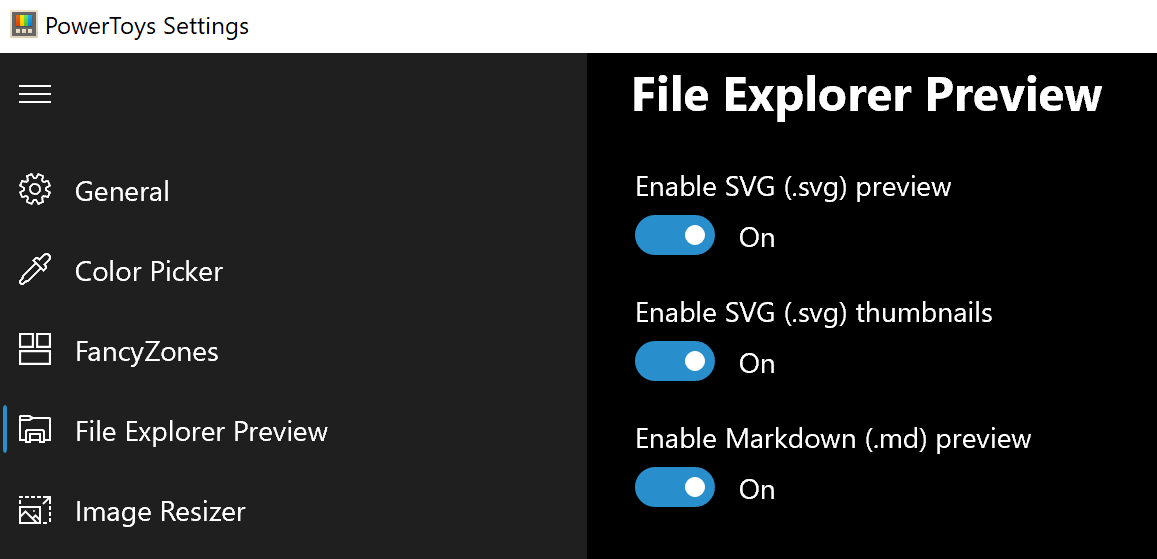 Only 3 options here but maybe some are important to you. This extension lets you enable SVG file preview in File Explorer, enable Markdown preview, and enable SVG thumbnails. Turn on each one you might need.
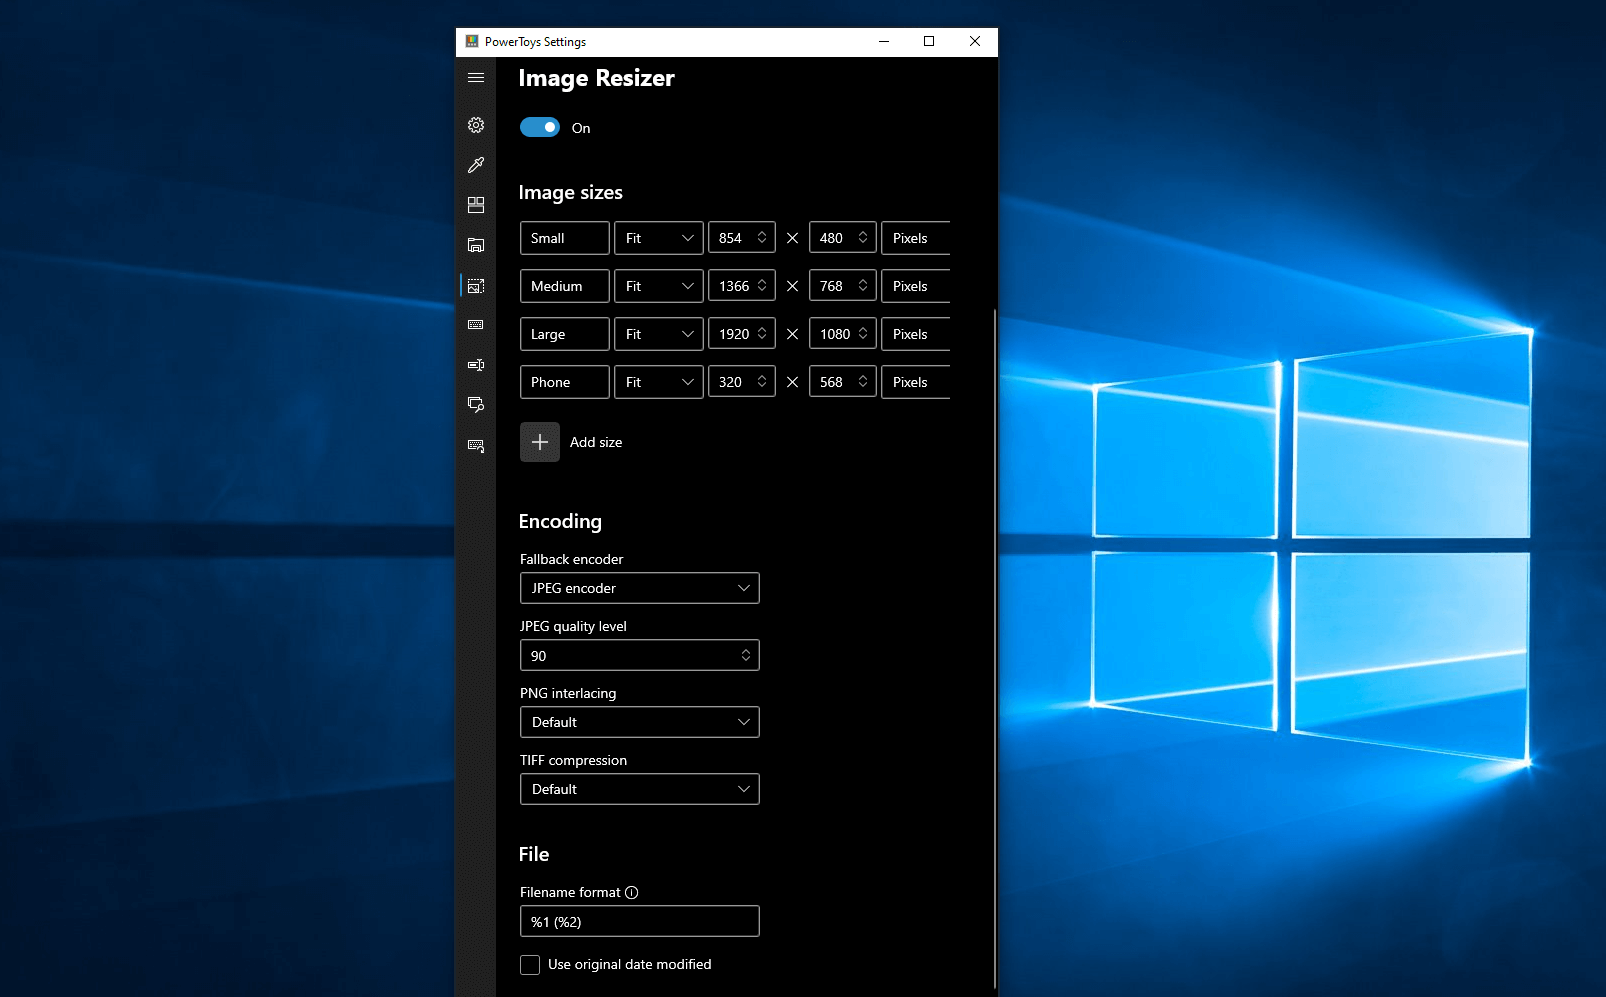 Image Resizer is a Windows shell extension for bulk image-resizing. After installing PowerToys, right-click on one or more selected image files in File Explorer, and then select Resize pictures from the menu. You can specify your own sizes if you want, you can resize when dragging files, you can overwrite files or make new copies of new sizes, and many more options. A very useful tool I am sure plenty of users can use since this eliminates the need for pictures or any other image application for common resizing tasks.
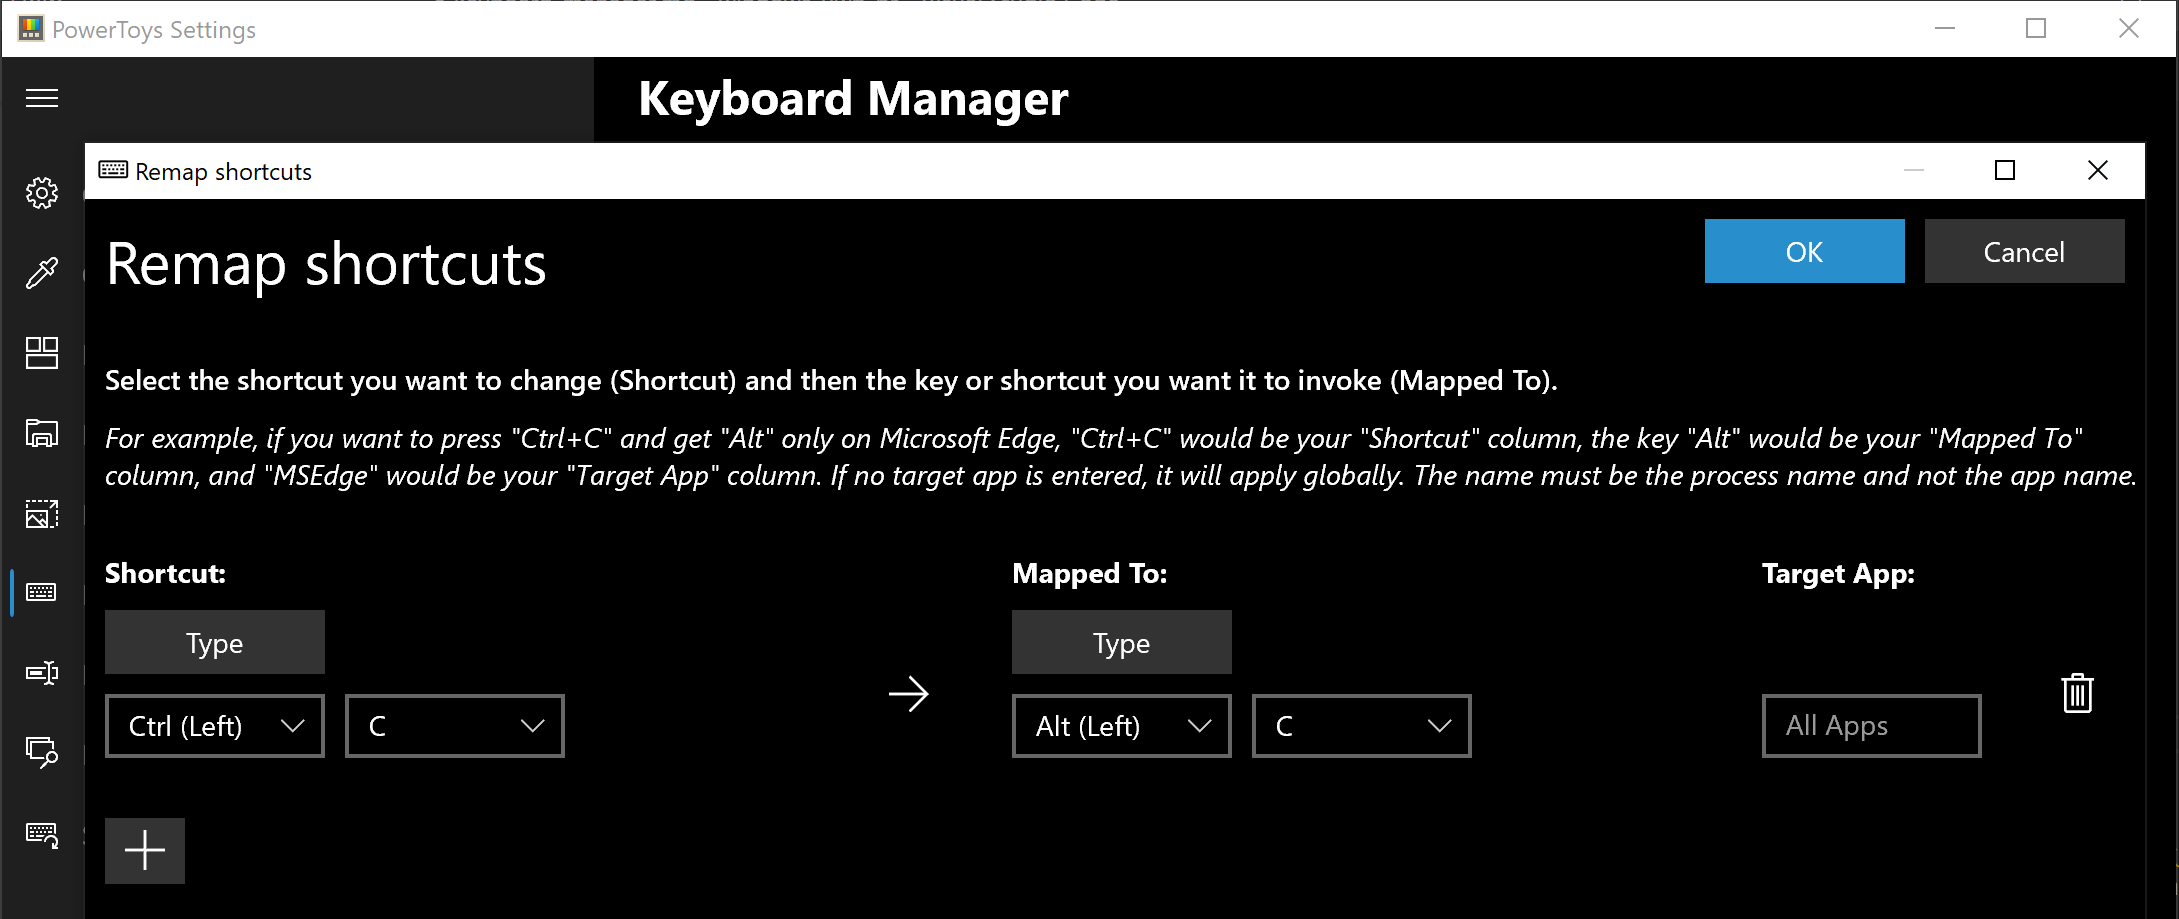 The PowerToys Keyboard Manager enables you to redefine keys on your keyboard. For example, you can exchange the letter A for the letter D on your keyboard. When you select the A key, a D will display. You can also exchange shortcut key combinations. For example, the shortcut key, Ctrl+C, will copy the text in Microsoft Word. With the PowerToys Keyboard Manager utility, you can exchange that shortcut for ⊞ Win+C). Now, ⊞ Win+C) will copy text. If you do not specify a targeted application in PowerToys Keyboard Manager, the shortcut exchange will be applied globally across Windows. PowerToys Keyboard Manager must be enabled (with PowerToys running in the background) for remapped keys and shortcuts to be applied. If PowerToys is not running, key remapping will no longer be applied.
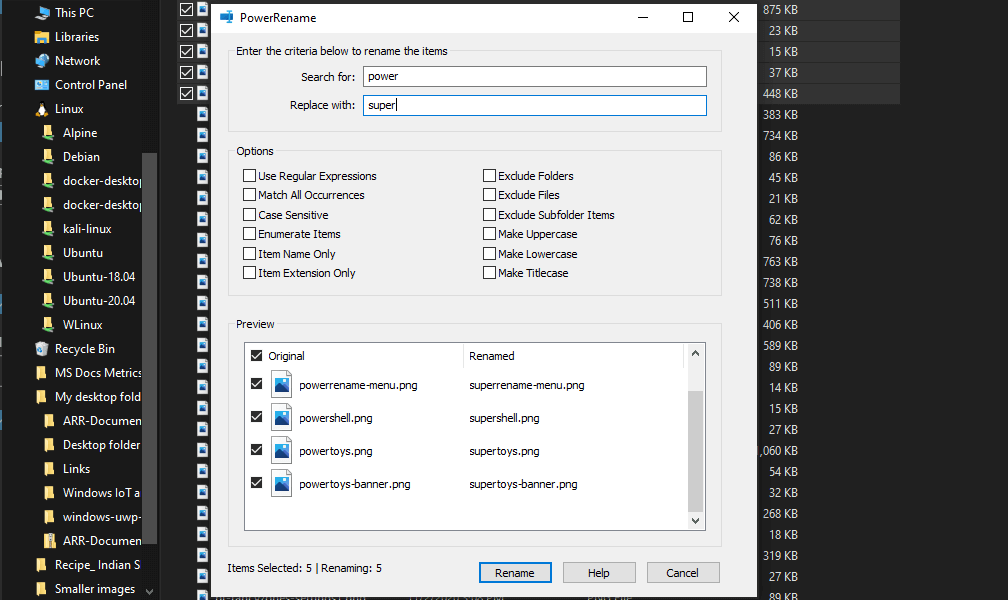 PowerRename is a bulk renaming tool that enables you to:
 PowerToys Run is a quick launcher for power users that contains some additional features without sacrificing performance.
PowerToys Run features include:
PowerToys Run is a quick launcher for power users that contains some additional features without sacrificing performance.
PowerToys Run features include:
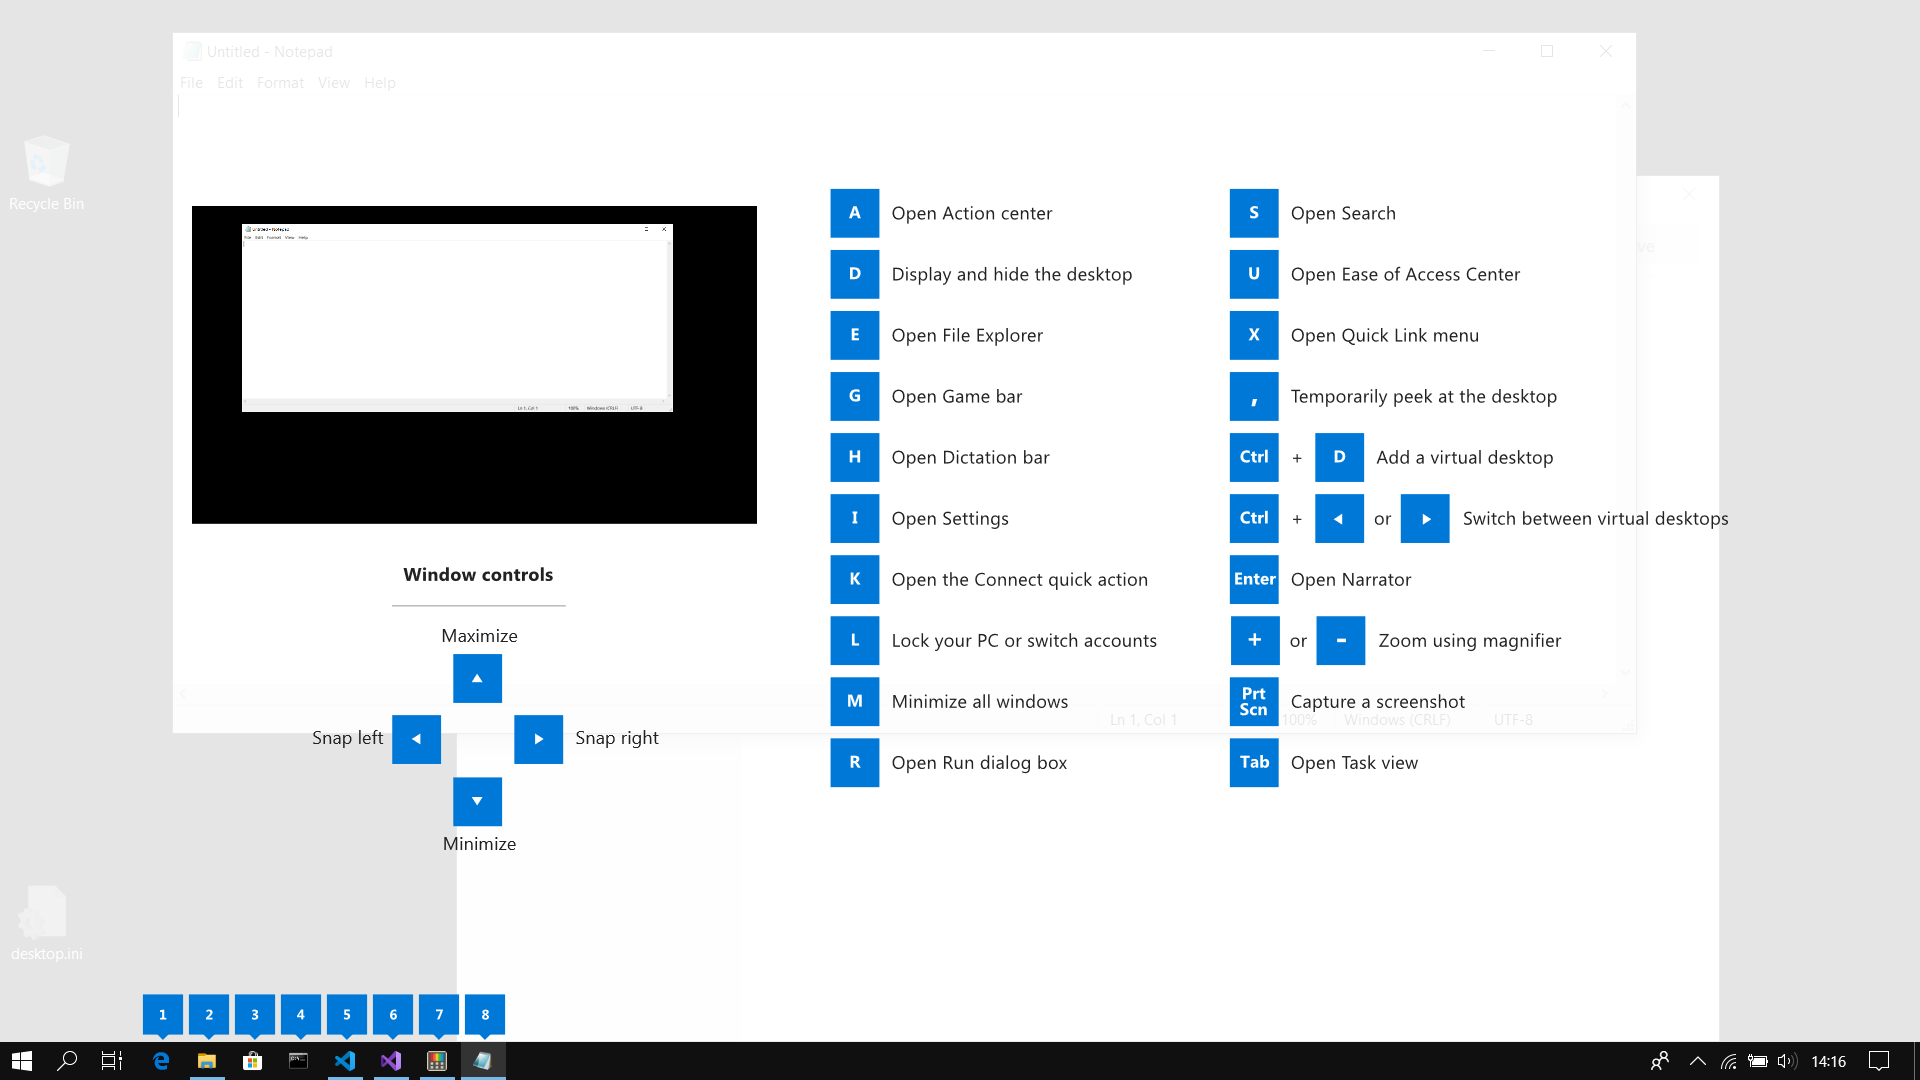 This guide uses PowerToys to display common keyboard shortcuts that use the Windows ⊞ key. Windows key keyboard shortcuts can be used while the guide is being shown and the result of those shortcuts (active window moved, arrow shortcut behavior changes, etc) will be displayed in the guide. Releasing the Windows ⊞ key will make the overlay disappear. Tapping the Windows ⊞ key will display the Windows Start menu.
Hey, you made it till the end, thank you for reading and I hope to see you soon.
This guide uses PowerToys to display common keyboard shortcuts that use the Windows ⊞ key. Windows key keyboard shortcuts can be used while the guide is being shown and the result of those shortcuts (active window moved, arrow shortcut behavior changes, etc) will be displayed in the guide. Releasing the Windows ⊞ key will make the overlay disappear. Tapping the Windows ⊞ key will display the Windows Start menu.
Hey, you made it till the end, thank you for reading and I hope to see you soon. 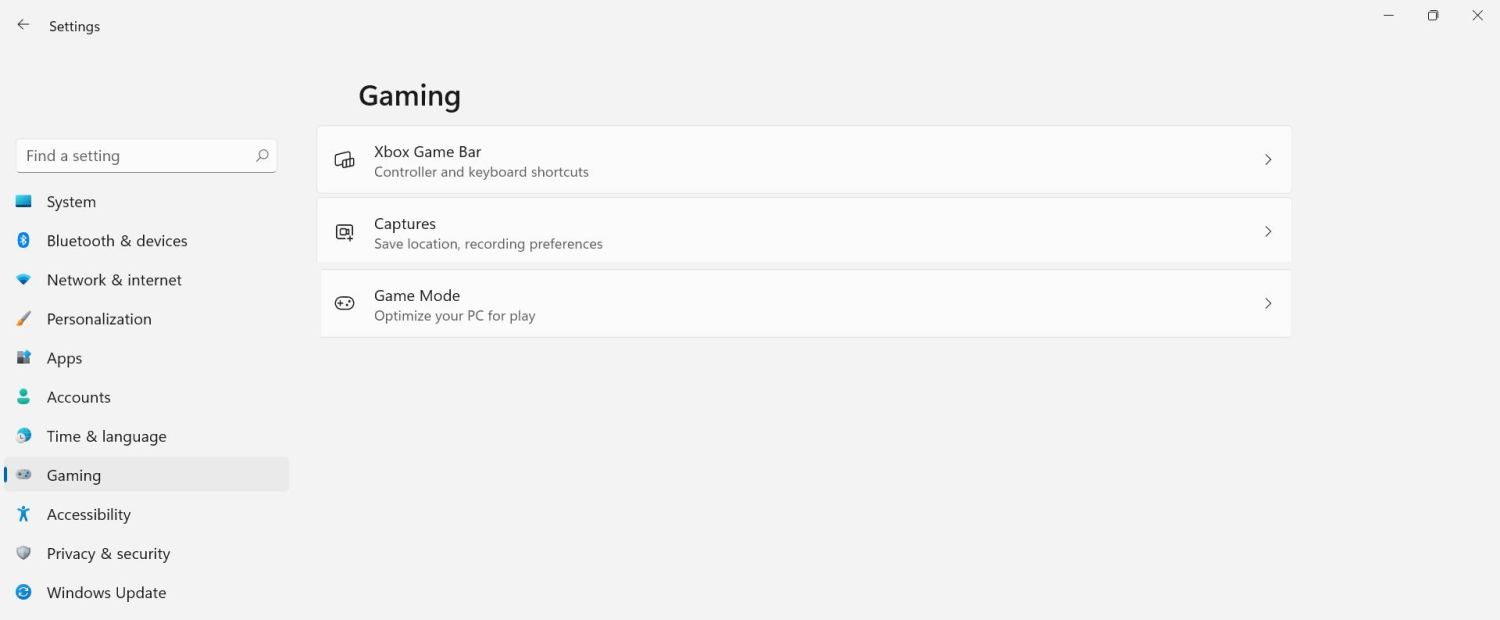 The game mode is active at all times and usually, everything works great but in some instances, it can sadly cause some performance issues. If you are one of these unlucky people where game mode is not working as supposed to do, don’t panic, we have a quick guide for you on how to turn it off.