One of the most common errors encountered by Microsoft users upgrading from Windows 7 or Windows 8/8.1 to Windows 10 is the Error Code 0xc1900106. Microsoft users experience a failure in the installation process. Either they will be notified that the installation process was ended but failed or that Windows is not able to install the update.
 Error Causes
More and more Windows users are having trouble upgrading their operating system to Windows 10. There are a lot of errors being encountered by users and one of them is the Error Code 0xc1900106. This error is normally due to the misconfigured system files. If a Windows user encounters this error, most likely their device has some registry problems.
Fixing error code-related issues could be best resolved to do manual repair methods. Applying repair methods manually can help Windows users address the root causes of the errors they encounter, as well as apply definite solutions to rectify the issue.
Most Windows users can be able to implement manual repair methods themselves but there are some cases where help from a Windows professional is needed. If you’re not a very tech-savvy person and not confident performing the manual repair methods yourself, it would be advisable to seek help from a professional Windows technician who is knowledgeable enough to address the errors or problems you are encountering. However, if you don’t want to resort to seeking help from a professional, you can also consider using a powerful automated tool.
In trying to fix Error Code 0xc1900106, here are the following manual repair methods you can take:
net stop wuauserv
net stop cryptSvc
net stop bits
net stop msiserver
ren C:WindowsSoftwareDistribution SoftwareDistribution.old
ren C:WindowsSystem32catroot2 catroot2.old
net start wuauserv
net start cryptSvc
net start bits
net start msiserver
pause

Spying via some malicious app on the target phone is not a new thing but it can be very uncomfortable and even against the law in some countries.
Infecting the target phone can be done in various ways, another person can intentionally download and install applications on it, and you can install them via some phishing attacks or by an online scam. Once installed this piece of software presents a very serious invasion of privacy since it can track text messages, track phone location in real-time, record calls in real-time, eavesdrop on calls, take control of the camera and microphone, and many other applications.

Here are some common symptoms of mobile phones infected with spyware.
Random reboots
Slow performance
Strange text messages
Overheating
Unusual high data usage
Non-familiar apps in the app list
The fast drain of the battery
Long shutdown time
Strange interference and sounds during calls
Signs of activity during standby mode
If your phone exhibits any of these symptoms you might have a spyware app installed and running on it.
There are many apps that have been designed to spy on people that can be downloaded in the app store or on Google Play today. Most of these spyware apps are aimed at parents wanting to keep an eye on and protect their children. However, these can be used by anyone in order to spy on a target person via their phone.
Below is a list of common apps that can be used to spy on you. Many spyware apps require a phone to be ‘jailbroken’ or ‘rooted’ before being installed, this is when the phone’s operating system is changed to allow the phone to become unlocked and customizable.
mSpy : An undetectable spying app for iOS devices. It can be used to read your chats, see your location, view your email, check your call history, record your keystrokes, and more.
Spyera : This app requires rooted and jail-broken iPhones to work. It can go undetected and monitors phone calls and your call history. It even allows call recording and eavesdropping on live calls.
Flexispy : Flexispy prides itself as the #1 phone monitor for parents and can monitor everything from calls to social texts.
Umobix : This powerful spyware app has a dashboard that allows users to easily monitor someone’s location, calls, texts, keystrokes, all major social media, and more. You can detect Umobix because it heats up the infected phone and greatly affects the battery life of the infected device.
Ikey Monitor : Although it requires the device to be rooted for Android or jailbroken for iPhones, this spy app captures keystrokes, passwords, and screenshots, allows for call recording and supports multiple languages.
Clevguard : Available for both iOS and Android, Clevguard allows users to track GPS and Wi-Fi locations, capture screenshots remotely, and more. Due to a recent update, the spy app drains the target phone’s battery significantly.
If any of the beforementioned apps are present on your phone you need to remove them right away.
Go to your phone settings and remove the malicious applications, then download some protection suite and scan the whole phone for any other trace of software remains or other malware apps.
Instaling and removing applications from your Windows can sometimes leave some traces that are unpleasant and can cause annoyances. One of these annoyances is the program in the startup section of the task manager.
If you ever opened task manager and went into the startup section trying to disable some of the startup items on your Windows boot there might be a chance that you have experienced and seen a program without any icon or information about it just sitting there.
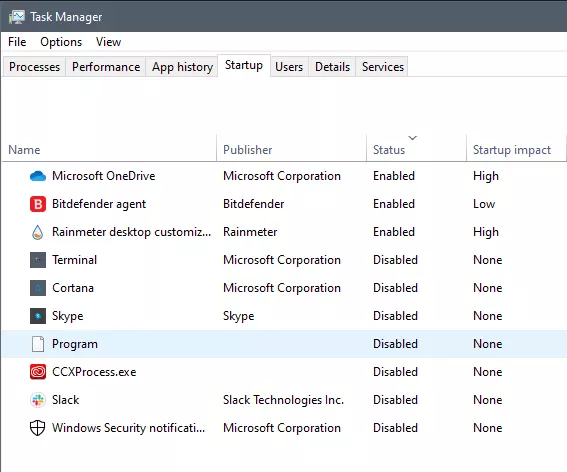
This is due to some applications being removed from the system but for some reason, it still shows itself in startup and it is quite annoying. So here we will show you how to get rid of this annoyance so your startup is clean again without junk in it.
The first thing of course is to open the task manager itself and navigate to the startup tab. Inside the startup tab right-click on the column header and tick or enable Startup type and command line. Now you will see the location of the supposed file (that is missing or you could just go there by right-clicking on the item, but here it is greyed).
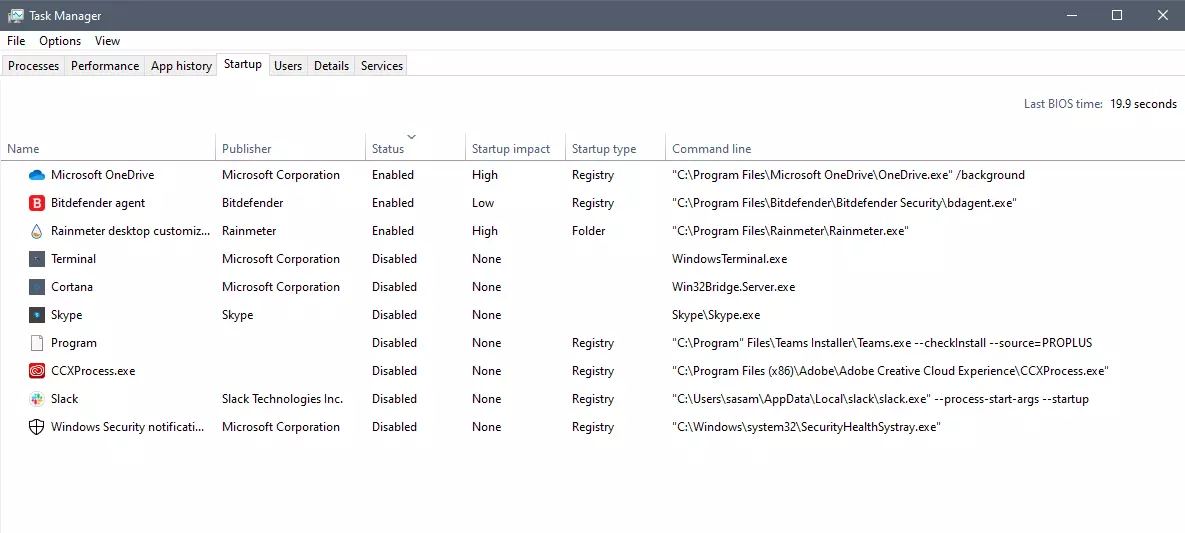
99% of the time startup type will be registry since the file is missing, if it was a file fix would be just to simply delete the file in the folder but since it was installed and not properly removed registry key is still present but the file cannot be found. After confirmation that the file is indeed missing and that the startup type is registry open the registry editor by typing Regedit in search and pressing enter.
Inside Registry editor navigate to: HKEY_CURRENT_USER\SOFTWARE\Microsoft\Windows\CurrentVersion\Run. Inside on right part, you will see all auto-start entries added by installed applications.
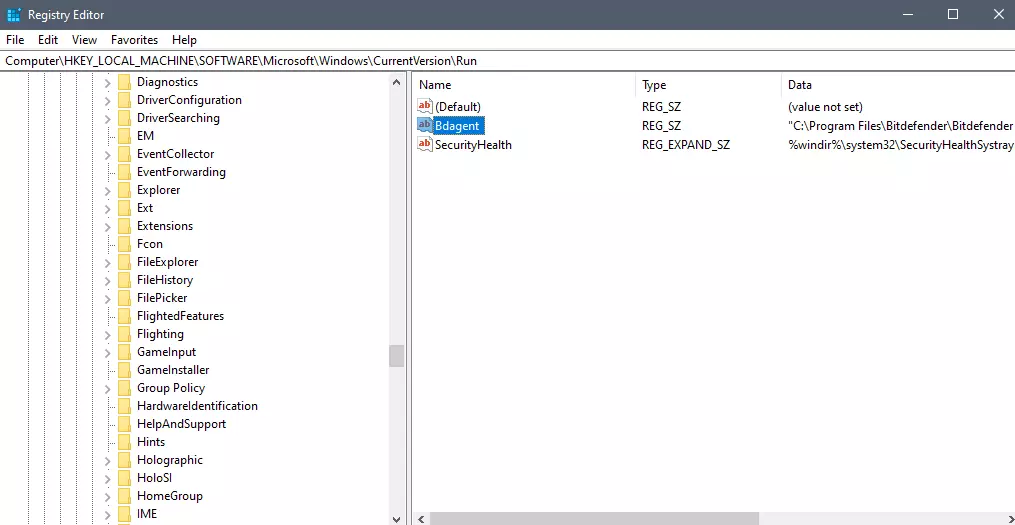
Locate one that is causing issues by comparing its path with the path inside the task manager command line and delete the key. Once the key is deleted right-click on RUN on the left part and choose HKEY_LOCAL_MACHINE to quickly jump on that key location and repeat the process of key deletion if needed. HKEY_LOCAL_MACHINE will delete startup entry for all users and sometimes entry will not be present here since the application is not installed for all users or there are no other users on the machine.
After the procedure is finished, reboot your systems in order to apply changes.
taskkill /IM "processname" /T /F processname – it is the name of the process which you can see on the Details tab of the Windows Task Manager. /IM – it is the one that specifies the image name of the process, which follows, that is to be terminated. /T – it is the one that kills not just the main process but also the child process. /F – it is the one that terminates the process forcefully.
wmic process where name='processname.exe' deleteNote: In the given command, you need to replace “processname.exe” with the name of the particular process you want to terminate which is found in the Details tab of the Windows Task Manager.
kill -id pidNote: In the given command above, “pid” is the Process ID number of the process you want to terminate. And for you to identify this number, you need to open the Details tab of the Windows Task Manager once again and take note of the number against the process you want to get rid of. Alternatively, you can also run the following command in the PowerShell prompt that you’ve pulled up to get the process ID number:
Get-ProcessFor example, “5364” is the process ID number for the DimScreen.exe process which is the process you want to terminate. In order for you to kill this process, you need to type in this command:
kill -id 5364
“The application failed to initialize properly (0xc0000005). Click on OK to close the application.”This kind of application error can occur due to several reasons which include damaged installation of the application or system files may have gotten corrupted or damaged. It could also be caused by a malware infection. There are a couple of suggestions provided in this post to help you resolve the error. You can try to run both a System File Checker scan and the DISM tool or reinstall the problematic application or repair-install Windows 10 as well as run a malware scan. Note that the options provided below do not have to be followed in sequence.
Error Causes“Something went wrong with the projection”.This kind of error is caused by some issues with the Display driver, hardware, corrupted or damaged system files, and so on. And to fix it, there are several methods you can check out. You can try to update, roll back or reinstall the Display drivers. You could also run the Network Adapter troubleshooter or the Video Playback troubleshooter as well as run System Restore to undo any recent changes that might have triggered the error or reset your Windows 10 computer without deleting any files. For more details, refer to each one of the options provided below.
“The remote computer that you are trying to connect to requires network level authentication (NLA), but your windows domain controller cannot be contacted to perform NLA. If you are an administrator on the remote computer, you can disable NLA by using the options on the Remote tab of the System Properties dialog box.”Or you could also see this error message instead:
“The remote computer requires Network Level Authentication, which your computer does not support. For assistance, contact your system administrator or technical support.”Before you proceed in troubleshooting the problem using the options provided below, you need to create a backup for your data or system restore point as well as make a copy of any registry entries you are going to modify.