Logo

How to Fix Error Code 0xC004C003 When Installing Windows 10

What is Error Code 0xC004C003?

Error code 0xC004C003 has to do with activating Windows 10 after a clean install. This problem has been a frequent nuisance to users trying to update from Windows 7 or 8.1 following the invite path they got from Microsoft.

Solution

Restoro box imageError Causes

There are several problems that may have caused error code 0xC004C003. The most common of them are:

  • The product key entered was invalid, and cannot be used to activate the new OS.
  • The user followed the proper installation procedure, but the Windows update servers were too busy to handle the activation at that moment.
  • The free upgrade invitation was followed but after the reinstallation, the copy of Windows 10 was still not activated.
  • The user tried to perform a full clean install of Windows 10 instead of upgrading from Windows to Windows 10

Further Information and Manual Repair

A lot of solving error code 0xC004C003 has to do with the method in which the user has tried to update the system. If one decided to try and update the program before being invited to do so by the update manager, he must wait. Unfortunately, if one chooses to do it on his own and download a clean install, he was never given a product code to authenticate the process.

There are two options to address error code 0xC004C003 — either restore to the previous Windows Operating System or call Microsoft (or visit their Website) and purchase a product key.

The Windows update servers are very busy. There are lots of Microsoft users around the world, and the servers are doing their best to get to each and every one of the users as fast as possible, but they can only move at a certain speed. Your best bet is to sit back and wait a while.

But what if you were invited, and properly downloaded Windows 10, then decided to do a clean install? It is advised that one do not try to enter Windows 7 or 8.1 serial code as this will not work. However, unlike the problem above, these users will NOT need to purchase a product key.

According to Microsoft Support Staff, the installation servers are also very jammed because of the high numbers of installations going on right now. No matter what posts you may read, the key IS genuine, and it is NOT blocked, broken, or invalid.

To check if Windows has been properly activated, open the Command Window. Make sure you are logged into an administrator profile; otherwise this check will not work. Type in “slmgr.vbs/ato” and click Enter and then wait. While waiting, the command will check on the status of the activation.

Windows Script Host will open and show whether or not it is activated. A lot of users have reported that the activation did not work for the first few times. However they later reported after some more attempts, no issue was found in the way the operating system updated and that the activation process went smoothly. This is most likely due to the overload on the Windows Update servers, so bear with Microsoft.

Users have reported that when trying to correct error code 0xC004C003, they have followed the upgrade path and then been told by Microsoft that the key was invalid and they had to purchase a new one. If the upgrade path provided by Windows 7 and Windows 8.1 is correctly followed then there is nothing to worry about Just wait a while and try it again. If there are prolonged issues, speak with a technician by visiting the Microsoft website and contacting the help center by calling the number provided. Give them all relevant information and they will be sure to help accordingly.

The best solution to fix error code 0xC004C003 is to wait. In essence, the user will be waiting to reenter the same product key. According to Microsoft, and many user posts found online, it is recommended to wait a while and then try to activate again. This seemed to be an answer to most users' problems, and seem to work just fine. If the problem persists, take it to a windows repair technician to have it sorted out. If that does not work, use a powerful automated tool to fix the problem.
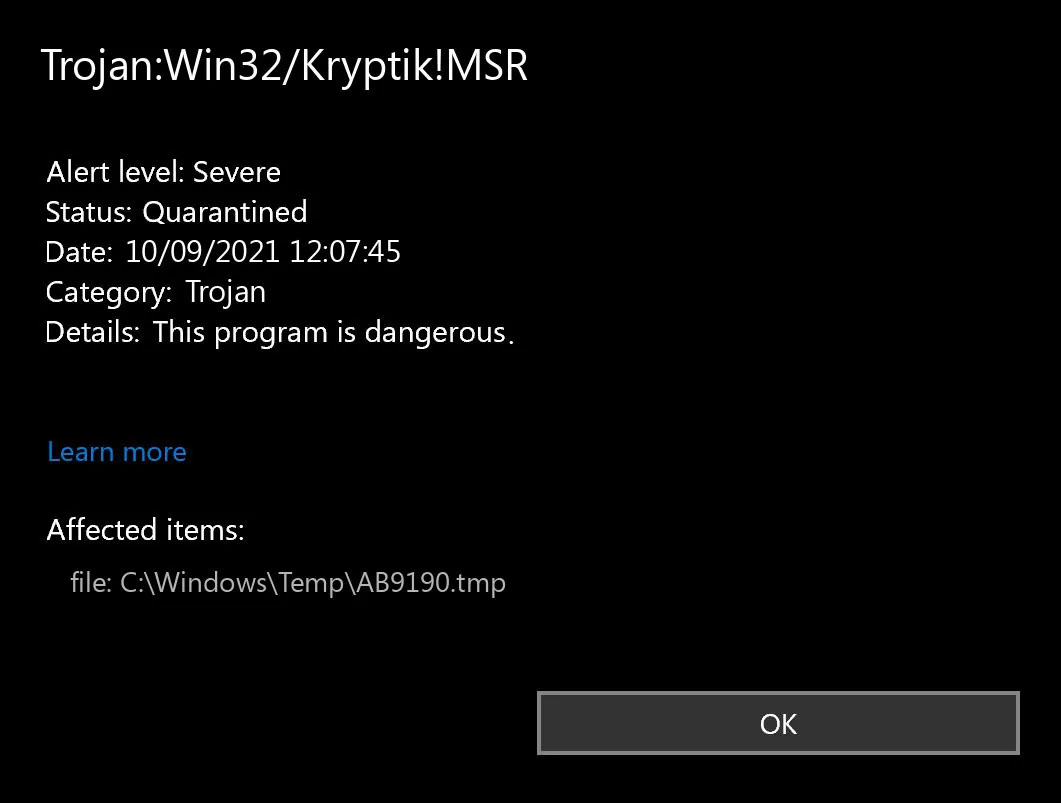
Do You Need Help with Your Device?

Our Team of Experts May Help
Troubleshoot.Tech Experts are There for You!
Replace damaged files
Restore performance
Free disk space
Remove Malware
Protects WEB browser
Remove Viruses
Stop PC freezing
GET HELP
Troubleshoot.Tech experts work with all versions of Microsoft Windows including Windows 11, with Android, Mac, and more.

Share this article:

You might also like

Windows Clock is missing, invisible or black
Although the Windows Updates do bring in new features and improvements, there are times when they also introduce issues as well. The main cause for these arising bugs is the incompatibility between the old and new software components. One of the issues brought in by such bugs is Clock is missing, invisible or black This problem was experienced by users after they recently installed a feature update. This particular bug can make the Windows clock in the taskbar appear to be black or invisible which makes it hard for users to read the time on their computers. According to experts, this bug has something to do with the Windows Themes and Aero styling. To fix this issue, here are some suggestions that could help but before you get started, you have to restart Explorer first and see if it can help in resolving the problem – if it didn’t, follow the options given below carefully.

Option 1 – Try to disable Custom Theme

It could be that the reason behind the black or invisible Windows Clock can be an old or an incompatible theme. You might have a custom theme in place and it became incompatible after an update. Thus, you can try switching to one of the default themes and then recreate your custom theme afterward. To do so, follow the steps below.
  • Right-click on your desktop and select Personalize.
  • Next, select Themes from the left menu and then select Windows 10 as your theme.
  • After that, you can delete all the other custom themes and create them again from scratch. This should fix the black or invisible Windows 10 Clock.

Option 2 – Try to edit your existing themes

If you don’t want to get rid of your existing themes, there is an alternative solution you can try to fix the missing Windows 10 Clock albeit it’s a bit of a complex one. Follow the given steps below to modify the existing themes and fix the missing or black Windows Clock.
  • First, you need to save your existing theme. Just simply right-click on your desktop and select Personalize and select Themes from the left menu.
  • Next, click on the Save Theme button below your custom theme to save it. You can name the theme anything.
  • After that, you can now modify the saved theme by going to C:/Users/UserName/AppData/Local/MicrosoftWindowsThemes.
  • From there, look for the file with the theme name you just saved, and then right-click on the file and open it with notepad or any other text editing app.
  • Now you have to look for the line that says, “Path=%SystemRoot%resourcesthemesAeroAeroLite.msstyles” and change it to “Path=%SystemRoot%resourcesthemesAeroAero.msstyles” and then save the file and rename it with some other name.
  • Afterward, go back to themes and select the new theme you’ve created. This should resolve the Windows Clock issue as well as other Themes and Taskbar issues.

Option 3 – Try disabling the small icons in Taskbar

This option should help you fix any Windows Clock cases. So if your Windows Clock is nowhere to be found, you can try to disable small taskbar icons on your Windows 10 PC.
  • Go to Settings > Personalization > Taskbar.
  • From there turn off the toggle button for the “Use small taskbar buttons” option. Note that this solution is only a temporary one and it may or may not work in some cases.
Read More
Fix CSGO Crashes in Windows 10
Counter strike has evolved from half-life mod into the full-featured game and has kept in popularity for years, even today game is wildly popular and has a huge player base. Sadly game can crash in Windows 10. Here in this article, we will address how to fix csgo crashing in Windows 10 so you can play it smoothly and crash-free as it was meant to be played.
  1. Update your display drivers

    Often in the gaming world having the latest display drivers can mean a world of difference. Counterstrike GO is no different, make sure that your drivers are updated to the latest version, if they are not, go to your manufacturer's website and download the latest version.
  2. Update Windows

    Just how much important is it to have the latest display drivers so it is to have the latest Windows update. Often problematic things are addressed in the update itself.
  3. Turn off compatibility mode

    Compatibility mode is most often the cause of crashes. Go to the game installation folder and search for csgo.exe. Once you locate it right-click on it and choose properties. Under properties, find the compatibility tab and turn off compatibility mode if it is ON. Uncheck run as administrator also
  4. Delete CSGO.EXE and add cl_disablehtmlmotd 1

    If disabling compatibility mode has not solved the issue do next: Pull up the installation directory folder, find csgo.exe, and delete it Pull up the Steam Library and locate Counter-Strike Global Offensive Right-click on it to select properties Find the local tab and click on verify integrity of game files When that is complete, go back into the Counter-Strike Global Offensive installation folder and search for cgo.exe Turn compatibility OFF like in the previous step Return to the Steam Library, right-click on Counter-Strike Global Offensive and click on properties again Go under the launch options settings In the new window, type in cl_disablehtmlmotd 1 Save the changes and restart the game
  5. Lower game settings

    If previous steps did not help and the game still crashes, try lowering game graphic settings. Crashes can happen if a game is heavy on the current system resources.
Read More
Repairing or rebuilding the WMI Repository
There are times when the WMI Repository gets corrupted which results in the Provider Load Failure. To resolve this issue, you need to repair or rebuild the WMI Repository in your Windows 10 computer. In this post, you will be guided on how exactly you can do that. In case you don’t know, the WMI which stands for Windows Management Instrumentation is a set of specifications from Microsoft to consolidate the management of devices and applications in a network. The WMI is a database that stores meta-information and definitions for WMI classes. Using only these, the conditions of the systems can be known. You can find the WMI Repository in %windir%System32WbemRepository. It provides end-users with the status of the local or remote computer system. Keep in mind that you must not use this on the Server 2012 Cluster machine. Although there are command-line tools that can fix or restore the Windows Management Instrumentation repository. However, Microsoft suggests that it’s better if you verify if there is corruption. Here are a list of errors as well as permission issues you might encounter:
  • Unable to connect to root default or rootcimv2 namespaces. It fails with the error code “0x80041002” pointing to “WBEM_E_NOT_FOUND.”
  • 0x80041010 WBEM_E_INVALID_CLASS
  • When you open Computer Management and Right Click on Computer Management (Local) and select Properties, you get the following error: “ WMI: Not Found” or it hangs trying to connect
  • Trying to use wbemtest , and it hangs
  • Schemas/Objects missing
  • Strange connection/operation errors (0x8007054e)
To verify if there is corruption, you can try running the following command in an elevated Command Prompt:
winmgmt /verifyrepository
 After you enter the command, if there is a response saying, “repository is not consistent”, then the repository has an issue. If not, then something else is causing the problem. Since you are certain that corruption exists in the WMI repository, then here are some suggestions you need to check out to repair or rebuild the WMI repository.

Option 1 – Try to reset WMI Repository

  • Type “command prompt” in the Start Search and right-click on Command Prompt from the search results and then select “Run as administrator”.
  • After opening Command Prompt with admin privileges, type and enter this command: winmmgmt /salvagerepository
The command you entered is used when the winmmgmt command performs a consistency check. So if an inconsistency is detected, it will rebuild the repository.
  • Next, execute this command to see if the WMI repository now comes back as consistent: winmgmt /verifyrepository
This command will perform a consistency check on the WMI repository.
  • If it states that the WMI repository is not consistent, then you need to type and enter this command: winmgmt /resetrepository
This command is used to reset the repository to its initial state when the operating system was first installed.

Option 2 – Try to force recover the WMI Repository

The WMI Repository comes with a built-in self-recovery process so when the WMI service restarts or detects any corruption, it will automatically trigger the self-recovery procedure. This can happen in two ways:
  • AutoRestore: This will use the backup images if the Volume Shadow copy or VSS backup is turned on.
  • AutoRecovery: The rebuilding process will generate fresh images of the WMI repository based on the registered MOFs. The MOFs are available in the registry located at HKLMSoftwareMicrosoftWBEMCIMOM: Autorecover MOFs
Note: Autorecover MOFs is a key so double click on it to check its value. On the other hand, if the self-recovery procedure does not work, you can try to use the force-recovery process instead. How? Refer to these steps:
  • First, you need to check the reg key value is empty or not under this registry path: HKLMSoftwareMicrosoftWBEMCIMOMAutorecover MOFs
  • If the reg key value is empty, you have to copy-paste the reg key value from another computer. Just make sure that it’s from the System which is equivalent to the computer in question.
  • Next, type and enter this command: Winmgmt /resetrepository
  • After you enter the command, if you get an error that says, “WMI repository reset failed. Error code:0x8007041B. Facility: Win32”, then you have to stop all the Dependency Services on the WMI service by running the following commands:
    • net stop winmgmt /y
    • Winmgmt /resetrepository
This should fix the problem.
Read More
Fix This device is currently in use, USB Error
USB storage devices, peripherals, and other devices are almost used on a daily basis. And as you know, when removing the USB storage devices, it is recommended to always use the “Safely remove the USB storage device” option in order to prevent data corruption in the USB storage device. However, there are times when you may see the following error message after you use the “Safely remove the USB storage device” option:
“Problem ejecting USB Mass Storage – This device is currently in use, close any programs or windows that might be using this device, and then try again.”
This kind of error message occurs when the device is still interacting with the operating system in the background. There are several ways you can fix this error but before you check them out below, you need to close all the open windows and programs that may be using the USB storage device and then wait for a couple of seconds and then try safely removing it again. However, if you are still getting the same error message, then here are some tips you should try:

Option 1 – Try to use the Task Manager

  • Tap the Ctrl + Shift + Esc keys on your keyboard to open the Task Manager.
  • After that, look for the running processes and programs hogging on your USB Storage device. The error could be due to a program or process that’s using the USB device. This program or process will hog onto some Disk or CPU while transferring data and interacting with the device.
  • Once you find the culprits, right-click on each one of them and select End Process or End Task. You could also try to restart the process for “Explorer.exe” and see if it fixes the problem.

Option 2 – Try using DISKPART

The next thing you can try to resolve the issue is to use DISKPART. Refer to the given steps below to do so.
  • Tap the Win + R keys to launch Run and then type “cmd” in the field and tap Enter or click OK to open an elevated Command Prompt.
  • Next, type and enter this command to execute it: diskpart
  • The command you entered will initiate the DISKPART utility. After that, type and enter this second command: list disk
  • Next, type and enter this third command: list volume
  • The commands you just executed will help you in either listing all the Disk connects or all the partitions on those disks formed and from there, you need to select one command depending on the “list” command you entered. You can execute either of the two following commands:
    • select disk #
    • select volume #
  • After that, it will select the Disk or Partition you want to select.
  • Now type either one of the following commands:
    • offline disk #offline volume #
  • The command you entered will mark the selected disk is Offline. Afterward, try to safely remove your USB Storage device. Just remember that when you plug it back in again, you have to carry out the same method except for the last given command as this time you will have to enter either of these commands in order to get your USB storage device back online:
    • online disk #
    • online volume #

Option 3– Try using the Disk Management utility

  • Tap the Win + R keys to open Run.
  • Then type “diskmgmt.msc” in the field and hit Enter to open the Disk Management utility.
  • Next, look for the entry for your USB Storage device and once you’ve found it, right-click on it and select Offline.
  • After that, try to safely remove your USB Storage device again and see if the error is fixed. Note that you need to go over the same steps again if you want to plug your USB Storage device back in but make sure to select the Online option instead of Offline to get your device back online.
Read More
Fixing TV screen resolution on PC
When you connect your TV via HDMI cable Windows will recognize it as another monitor and will control the display settings for your HDMI connection. In most cases using it as the extended desktop will work fine, issues will arise when you play video on it. Video playing applications can override Windows settings which can lead to strange results on the screen. Here in this guide, we will tackle with reasons and solutions to this particular issue. Solutions provided are not meant to be followed in the way they are presented but as a silent rule, they go from most common one to most rare so it is advisable to try them in the order presented.

FIXING RESOLUTION ISSUES

The first thing when experiencing resolution issues on your TV connected to a PC is to check TV settings. There is very likely a chance that you will need to manually adjust picture settings on the TV itself using TV controls. On older models of TV, there is an overscan option which can lead to different resolutions and screen sizes. Overscan is a technology that was used in order to help content creators to deliver consistent pictures on different screen sizes and aspect ratios but how technology has advanced and everything including aspect ratio was standardized overscan itself has become a relic of the past. If you are unable to access or see edges of your desktop on the TV screen it is very likely that overscan is the issue. In order to fix this be sure to select HDTV's aspect ratio to fit the screen setting in the picture setting. Sadly finding this option on your TV will be different from manufacturer to manufacturer and even from model to model of the same manufacturer so we can not cover all models but in most cases option is located under picture settings or advanced options. Sometimes you will face even different overscan settings instead of classic ft to screen options, in this case, experiment with the setting until you find one which will work. If you have it, find settings in the user manual of your TV. Luckily you have managed to find the proper option on your TV set and have chosen the right aspect ratio for display. If everything works ok there is no need for the next step but if you experience a different resolution than desired on your TV follow this next guide on how to change the resolution of the TV on your PC.
  1. Press the ⊞ Windows and type Change Display Settings. Click on the top result.
  2. Once the Display Settings App opens, you’ll see two screens (or more if you’ve got multiple HDMI outputs connected). Make sure you select the right display for the HDMI TV before making any changes. You can do this by clicking on Identify.
  3. You’ll see the number from the screenshot above displayed on the monitors for a brief period. Depending on which screen is set to your primary display, make sure you change the settings for the HDMI monitor.
  4. Select the HDMI monitor from the available displays.
  5. Scroll down until you see the current resolution settings for your HDMI monitor.
  6. You can change the resolution settings and test different values that match your HDMI TV’s configuration.
  7. Once you change the setting, Windows will apply the new resolution for a limited time and revert if you don’t accept the new setting.
  8. Once you’ve found the best resolution for your TV, select Keep Changes to keep the new resolution.
You are all set now, make sure that you have the latest drivers on your system and enjoy using your TV as a second monitor.
Read More
How to Fix Libcurl.dll Error Code

Libcurl.dll - What is it?

Libcurl.dll is a Dynamic Link Library file; a component of Google Earth. Google Earth is a 3D software tool. Libcurl.dll file is visible within a 3D application with the help of which software users can see satellite images, maps, and other geography-related information from their computers. The Libcurl.dll file enables users to map the earth using superimposing images received via satellite imagery and also aerial photography. However, Libcurl.dll error messages may occur while using or installing this program. The libcurl.dll error message is displayed in either of the following formats:
  • "Cannot find [PATH]libcurl.dll"
  • "The file libcurl.dll is missing."
  • "Libcurl.dll Not Found"
  • "This application failed to start because libcurl.dll was not found. Re-installing the application may fix this problem."

Solution

Restoro box imageError Causes

Libcurl.dll may occur due to several reasons. These include:
  • Bugged program
  • Viral infection may add malicious codes to Libcurl.dll file and generate error messages
  • Registry issues
  • Missing libcurl.dll file
  • Hard disk failure
  • Misconfigured system files
If you experience difficulty in using Google Earth and come across libcurl.dll error message, it is advisable to resolve the error immediately typically because this error has severe consequences. If not fixed timely, it can lead to the blue screen of death errors, system hang-ups and freezes, sluggish PC performance, PC crashes and browser crashes, slow internet speed, and other system errors.

Further Information and Manual Repair

This error is crucial but the good news is that it is easy to fix. To resolve it, you don’t have to hire a technical expert and pay hundreds of dollars. You can repair the issue with ease by yourself regardless of whether or not you are technically sound. Continue reading to find out the best solutions to fix libcurl.dll error code on your system without any hassle. Here are some of the easiest and the best methods to resolve libcurl.dll error:

1. Check your recycle bin

Since .dll files are shared by multiple programs, there is a possibility that you might have accidentally deleted libcurl.dll file when uninstalling a certain program on your system which was also sharing this file. And because of this, you may experience the missing libcurl.dll error message. To resolve it, all you have to do is to check your recycle bin. If you find the file here, restore it. Once restored, try running the program again! If the error code does not appear, then this means it is resolved. However, if it continues to persist, then try other solutions given below.

2. Scan for Malicious Software on your System

While downloading files and checking unknown emails malicious software like viruses, malware and spyware can also enter your PC. Such software can damage and corrupt dll files. This could be the underlying cause of libcurl.dll error on your PC too. So, to resolve the issue, scan and remove malicious viruses and spyware from your system by using a powerful anti-virus. However, please note, anti-viruses are notorious for slowing PC performance and also sometimes you may also have to stop all other activities on your PC.

3. Clean the Cluttered Disk, Repair dll files and Restore the Registry

Libcurl.dll file error may also occur due to hard disk failure. This triggers registry issues. If you don’t clean the registry every now and then, it overloads the hard disk with files. These include both important and unnecessary files like internet history, temporary files, cookies, junk files, invalid registry entries, and bad keys. These clutter the disk, damaged dll files, and the registry. Therefore first you need to clean the cluttered disk, repair libcurl.dll files and restore the registry. Executing it manually can take a lot of time as you may find it complex if you are not a computer programmer. However, the best, easiest, and quickest way to clean, repair, and restore the registry is to download Restoro

Why Restoro?

Restoro is an innovative, advanced, and multi-functional PC repair tool loaded with powerful and PC performance boosting utilities including an intuitive registry cleaner,  an antivirus, Active X controls, and class module, and a system optimizer. So, whether the libcurl.dll error message is triggered by a viral infection, hard disk failure, or registry issues, this tool takes care of all! The registry cleaning feature scans all registry issues, cleans the hard disk by removing unnecessary and obsolete files, repairs damaged and corrupt dll files, and restores the registry thereby resolving libcurl.dll error in seconds. Simultaneously, the antivirus utility removes viruses and malware if found. And the system optimizer feature ensures optimum PC performance. Restoro is easy to navigate and operate. It is user-friendly, safe, bug-free, and efficient. Furthermore, it is compatible with all Windows versions. Click here to download Restoro and repair your PC and resolve libcurl.dll error today!
Read More
Fix NO_USER_MODE_CONTEXT in Windows
If you have encountered the NO_USER_MODE_CONTEXT Blue Screen error when using your computer, read on as this post will walk you through a couple of suggestions you can try to resolve this Stop error. This kind of Blue Screen error can occur when a program is trying to leverage the use of a system driver but fails to do so. Some of the common causes of this BSOD error are incompatible or corrupted drivers, incorrect configuration of entries in the Registry, damaged memory locations, malware infection, and many more. In addition, this Stop error does not often occur and indicates that an attempt to enter user mode with no context was made. If this is the first time you’ve restarted your computer after you’ve installed additional hardware, you have to remove the hardware and then restart your computer once again and then check the Microsoft Hardware Compatibility List to confirm that the hardware and its drivers are compatible with your operating system. If it doesn’t help, you can check out the given suggestions below to fix the NO_USER_MODE_CONTEXT Blue Screen error in Windows 10.

Option 1 – Try to update or rollback your device drivers

The first thing you can try to fix the NO_USER_MODE_CONTEXT Blue Screen error is to either update or roll back the device drivers. It is most likely that after you updated your Windows computer that your driver also needs a refresh. On the other hand, if you have just updated your device drivers then you need to roll back the drivers to their previous versions. Whichever applies to you, refer to the steps below.
  • Open the Devices Manager from the Win X Menu.
  • Then locate the device drivers and right-click on them to open the Properties. Note that the main drivers that might be the cause behind the NO_USER_MODE_CONTEXT Blue Screen error will be listed under the “ID ATA/ATAPI controllers” section as well as the “Storage controllers” section.
  • After that, switch to the Driver tab and click on the Uninstall Device button.
  • Follow the screen option to completely uninstall it.
  • Finally, restart your computer. It will just reinstall the device drivers automatically.
Note: You can also directly download the relevant drivers of your computer from the manufacturers’ website. So if you have an SSD, the issue might be due to an old storage driver.

Option 2 – Try running System File Checker or SFC scan

System File Checker or SFC is a built-in command utility that helps in restoring corrupted files as well as missing files. It replaces bad and corrupted system files to good system files. To run the SFC command, follow the steps given below.
  • Tap Win + R to launch Run.
  • Type in cmd in the field and tap Enter.
  • After opening Command Prompt, type in sfc /scannow
The command will start a system scan which will take a few whiles before it finishes. Once it’s done, you could get the following results:
  1. Windows Resource Protection did not find any integrity violations.
  2. Windows Resource Protection found corrupt files and successfully repaired them.
  3. Windows Resource Protection found corrupt files but was unable to fix some of them.
 Reboot your PC.

Option 3 – Try running the Memory Diagnostic Tool

The Memory Diagnostic tool in windows can help resolve the NO_USER_MODE_CONTEXT Blue Screen error by checking and automatically fixing any memory-based issues. To run it, refer to these steps:
  • Tap the Win + R keys to open Run and type exe and hit Enter to open the Windows Memory Diagnostic Tool.
  • After that, it will give two options such as:
    • Restart now and check for problems (Recommended)
    • Check for problems the next time I start my computer
  • Once your computer has restarted, perform a basic scan or you could also go for the “Advanced” options such as “Test mix” or “Pass count”. Simply tap the F10 key to start the test.
Note: After you select your preferred option, your computer will restart and check for memory-based issues. If it finds any issues, it will automatically fix them.

Option 4 – Perform System Restore

  • First, tap the Win + R keys to open the Run dialog box.
  • After that, type in “sysdm.cpl” in the field and tap Enter.
  • Next, go to the System Protection tab then click the System Restore button. This will open a new window where you have to select your preferred System Restore point.
  • After that, follow the on-screen instructions to finish the process and then restart your computer and check if the problem is fixed or not.

Option 5 – Run the Blue Screen Troubleshooter

Troubleshooting Blue Screen of Death errors wouldn’t be complete without the Blue Screen troubleshooter. As you know, it is a built-in tool in Windows 10 that helps users in fixing BSOD errors like NO_USER_MODE_CONTEXT. It can be found on the Settings Troubleshooters page. To use it, refer to these steps:
  • Tap the Win + I keys to open the Settings panel.
  • Then go to Update & Security > Troubleshoot.
  • From there, look for the option called “Blue Screen” on your right-hand side and then click the “Run the troubleshooter” button to run the Blue Screen Troubleshooter and then follow the next on-screen options. Note that you might have to boot your PC into Safe Mode.
Read More
Fixing “The .NET Framework 4.7 is not supported on this operating system” Error in Windows 10
In case you don’t know, the .Net Framework is a programming infrastructure introduced by Microsoft. You will need it to run on lots of services and applications. Note that most of the applications that require the .Net Framework are packed with their installation files which is why it will be installed automatically on your computer when you install an application. However, there are instances when you’ll get an error message saying, “The .NET Framework 4.7 is not supported on this operating system” while trying to install the .NET Framework as a standalone service. The very reason why this error message appears is stated in the error message itself. Although the .Net Framework is supported on Windows 10, it is not actually compatible with some other Windows 10 versions. So it is most likely that you are seeing this error message because the .Net Framework in your computer is not compatible with the Windows 10 version you are running. Since that’s the case, you need to update Windows 10 to fix the problem. Updating your Windows 10 computer is the only solution you can try to fix this problem. Thus, it is advised that you check for Windows Updates even if you are now using the latest version of Windows 10. And since the issue is caused by an incompatible operating system version, once you install the exact version of Windows 10 required by the .Net Framework, the problem will be fixed. Simply follow the steps given below to do so.
  • Step 1: Tap the Win + R keys to open the Run dialog box.
  • Step 2: After that, type in “winver” in the field and tap Enter.
  • Step 3: Next, your Windows 10 version should be given in the new window that appears. Take note that the number after the Version which is in the second line is your version number of Windows 10. And that the number must be 1507 or 1709. The first two digits in these numbers are the year while the second two represent the month when the update was released. So if you are running a 1709 version, this means that the Windows 10 version you are using was released in September 2017.
  • Step 4: The next thing you have to do is to make sure that you have the Windows 10 version that’s compatible with the .Net Framework. To verify, you need to click here and click on the System Requirements.
After opening the link, take a look at the Supported Operating System section where it says, “Windows 10 Anniversary Update” and “Windows 10 Creators Update”. Since there are users who are not familiar with the version numbers related to both the Anniversary and Creators updates, refer to the list given below.
  • November Update (1511)
  • Anniversary Update (14393)
  • Creators Update (1703)
  • Fall Creators Update (1709)
  • Spring Creators Update (1803)
As you can see, the Creators Update has version 1703 while the Anniversary Update has version number 14393 so if you are using a version lower than the 14393 version then it’s no wonder you aren’t able to install the .Net Framework 4.7 on your Windows 10 PC. Now all that’s left to do is to update your Windows 10 version and make sure that you will be updating it to the latest version available and then try installing the .Net Framework again.
Read More
Backup all drivers in Windows 10
When Windows is installed on a clean hard drive it usually finds most of the needed drivers for our computer to run, but if we by any chance have any old unsupported hardware or some exotic one chance are very high that Windows will not be able to locate and install drivers for it. And sometimes we do not even have drivers from where to download them, let's say for example you have purchased a second-hand laptop with Windows on it, you wish to create a clean and fresh copy of new Windows installation but you do not have drivers, and let us say the model is not supported so you can not download them. In this case, this shown method will help you a ton and save you a lot of time and frustration. So, in order to back all of your drivers from your Windows follow this simple guide step by step. Note please that this method will backup drivers themselves, you will not backup installation packages of drivers or similar stuff, only drivers installed in Windows itself.

Backing up the drivers

First thing first, create a folder where you want your drivers to be backed up somewhere in your HD and give it any name. Second, press ⊞ WINDOWS + X to open the secret Windows menu. keyboard with windows and x markedFrom the menu choose Command Prompt (administrator) Windows menu command prompt adminWhen the command prompt is active type the next command in it: DISM /online /export-driver /destination:C:\DriverBackup where: C:\DriverBackup is the folder and the hard drive where you want to store your backed-up drivers. Press ENTER That's it, you have now successfully backed-up all of your installed Windows drivers. Now, save all of your drivers on USB and reinstall Windows.

In order to now return backed drivers do the following:

Press again ⊞ WINDOWS + X to open the secret Windows menu. keyboard with windows and x markedbut this time choose Device manager Windows menu device managerFrom decide, manager right-click on any device Windows has not been able to install appropriate driver and choose update driver
  • Click on the Browse my computer for driver software option.
  • Click the Browse button.
  • Select the folder with the driver backup.
  • Check the Include subfolders option.
  • Click the Next button.
  • Click the Close button.
Read More
Best graphic design software for 2022

2021 is nearing toward the end and with just a couple of days remaining in this year, we are happy to look forward to the next year. So in large anticipation of what will next year bring us, we are taking a good design look at this one and making a list for you of what graphic design software you should learn and use in the upcoming 2022.

graphic design softwareBefore we dive into it in more detail and predictions please be aware that this article is based upon my personal opinion drawn from the research of current trends and standards. That being said let's dive right into details.

Adobe Photoshop

Whether you like it or not, Adobe has cemented itself with its flagship application Photoshop and how things are looking this situation will not change any time soon. Photoshop is an extraordinary pixel manipulation software that has the ability to work with both animations and vector graphics as well making it a great single application for all-around design needs. It has been industry-standard design software for the web, print, and all other kinds of design all over the globe and this will not change in near future. With its constant updates and expansion of its abilities, this is a must-have tool in your design tool belt. If you are looking to find work as a designer you will have to know how to work with photoshop.

Adobe illustrator

Many will tell you that is photoshop for raster graphics, the illustrator is for vectors. First started as illustrator 88 on Mac right away it took first place for vector graphics from FreeHand and it continued on its path of vector dominance. After some time and more integration with photoshop Adobe managed to overthrow Corel Draw as well winning the title for best vector editing software with illustrator. Same as with photoshop, if you are planning to work in a serious industry you will need to know the illustrator.

Adobe InDesign

We are still in Adobe train and it is moving hard, InDesign is graphic design software aimed for paper publications. If you need to create and prepare any kind of professional publication for printing InDesign is the application to go to. With its specific print aimed features it is a must-have for any graphic designer.

Corel Draw Graphic Suite

Once the king of vector and print design but dethroned by Adobe Corel Draw still has some punches to stay relevant in the field. With some cool features like symmetry and long shadows, it stands out from its competitors for its ease of use. Corel was always focused on easy to learn, and difficult to master and it is still following that kind of thinking. Granted not many employers will require you to be a master of Corel Draw but some of them will request that you are familiar with the application. One of perhaps the greatest advantages of Corel over Adobe is not locking you into a subscription making Draw suit a great choice for freelancers and designers that want to own software, not rent it.

Affinity Designer

The first software from Affinity was Photo, made as a cheap version one-time purchase competitor for photoshop. Later it has released Designer, also a one-time purchase competitor for illustrators. If we are going to take a good look into a feature for feature comparison, both Adobe and Corel will win over Affinity but if we take a look at a price that is a one-time purchase Affinity will win over easily. Priced only at $54.99 it is a steal, and taking into account that many designers will not require any very advanced features found in Corel or Adobe applications Affinity is the way to go.

Inkscape & GIMP

Speaking of price, nothing beats free, and both Inkscape and GIMP are completely free. offering very decent and competitive features applications will require you to get used to their own specific UI and workflow, but once you get a grasp of them, you will be able to do most design work in them. One of the downsides of using these free open source apps is their limited export options but if all that is required from you is to deliver a typical SVG, JPG, EPS, PNG, or PDF file you are good to go.

Colorcinch

Free with basic functionality with the option to purchase more advanced features Colorcinch is a great application if you are on quickly developing and creating graphics for social media posts. Add quickly text or filters, quickly do the color adjustment and save for social apps. The application also within its basic boundaries can work directly on the website without you requiring to even install it making it one of a kind. Go try it at the official site and enjoy yourself.

Conclusion

If you have followed the graphic design scene you will notice that nothing has changed and it will not change in near future. This just speaks about how much industry is defined and how little change is there over time. I advise if you can to get and learn adobe suite since it is industry standard and is required from almost every employer today. Rest applications on the list are great alternatives and can bring you income and offer you a way to finish your project.

Read More
1 2 3 171
Logo
Copyright © 2023, ErrorTools. All Rights Reserved
Trademark: Microsoft Windows logos are registered trademarks of Microsoft. Disclaimer: ErrorTools.com is not affiliated with Microsoft, nor claims direct affiliation.
The information on this page is provided for information purposes only.
DMCA.com Protection Status