If you are one of the few users who is still burning CDs and DVDs, you might have come across an error that says, “Medium Speed Error” or “Power Calibration Error”. There are several factors that could cause this error but it’s most likely that the CD/DVD burner wasn’t able to determine the Optimum Power Calibration rate properly.
So what is Optimum Power Calibration rate? It is a test that runs before the burning process to regulate the optimal laser power needed to complete the job. And if this process malfunctions, obviously, you won’t be able to burn the content on your CD or DVD. There are also cases when the Power Calibration error pops up for some small issues that have nothing to do with the regulation of laser power.
Here are some quick fixes you can try to resolve the Power Calibration error when burning a CD or DVD.
A lot of burning issues stem down to the purchase of low CDs or DVDs to make sure that what you are using has good quality for it is not always a good idea to purchase cheap products as cheap products could also mean cheap quality.
If you’re certain the problem is not with the CD or DVD you are using then you can try burning again, this time at lower speeds. There are instances when doing things quickly can end in a disaster such as the “Medium Speed Error” or “Power Calibration Error” you’re getting. To fix the problem, you have to burn at a slower speed and just take the time to wait until the burning process is done.
It’s always a good idea to check if the burning software you’re using requires an update especially if it’s throwing up “Medium Speed Error” or “Power Calibration Error”. Thus, you need to update your burning software right away and then try to burn your CD or DVD once the update has been completed.
You might want to consider cleaning the disk drive using several tools in the market that is designed to clean the disk drive. These tools work on removing dust particles from the lens which helps a lot in the burning quality. Aside from that, it also helps in reducing errors like “Medium Speed Error” or “Power Calibration Error”. So give this option a try as it might time for a disk drive cleanup.
If none of the options given above worked, you might want to disable the IMAPI or Image Mastering Applications Programming Interface. How? Refer to the steps below.

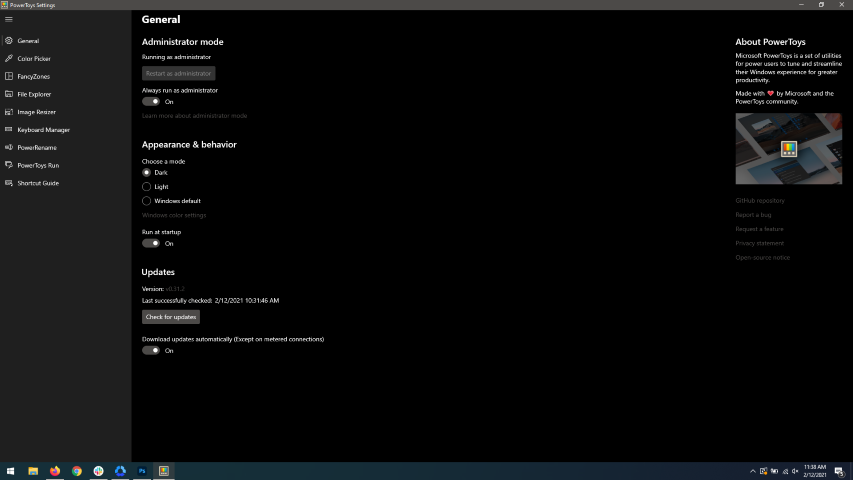 When opened you will be greeted with general settings window. These are settings for power toys themselves, Here you can check for updates, change the looks of power toys, run it on system startup and run them as administrator. Set them up so they best suit your needs.
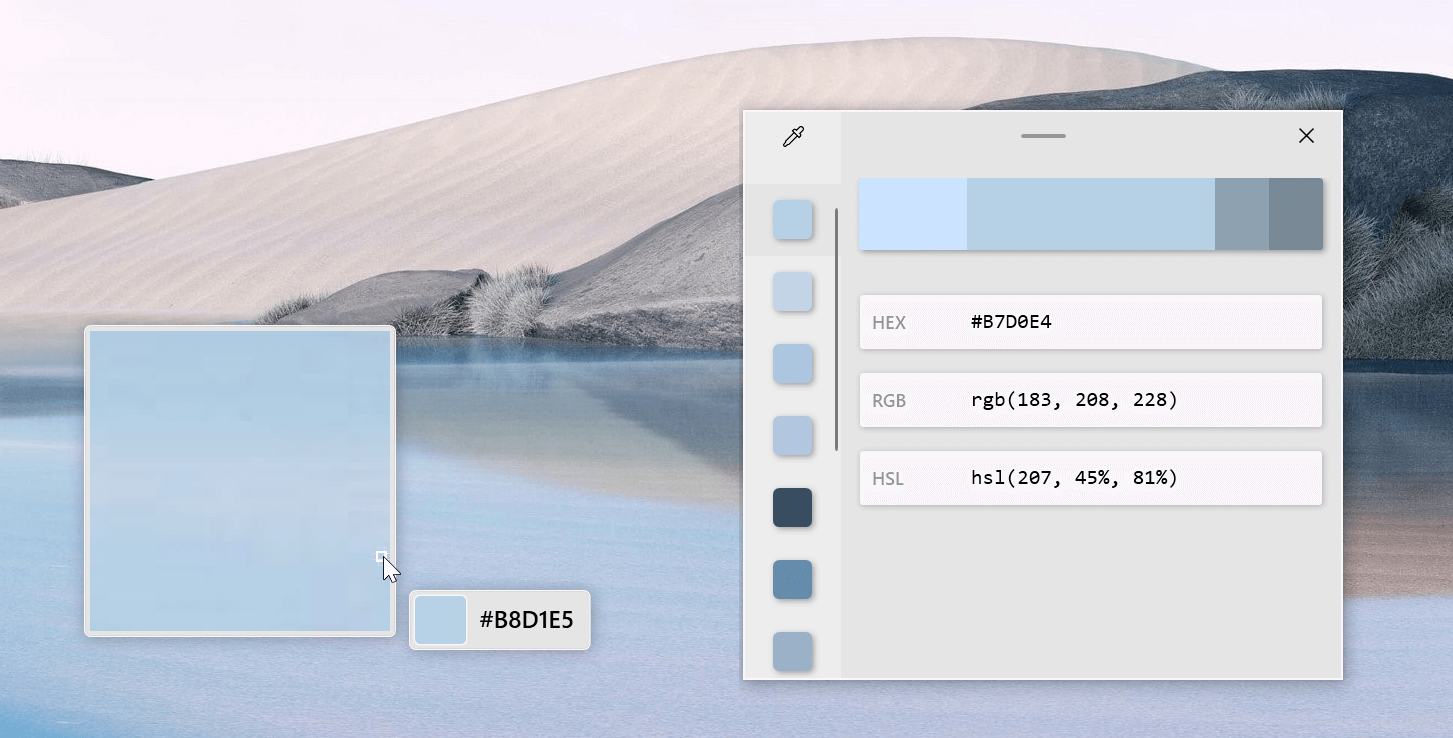 The color picker will let you as the name suggests pick colors, it will sample colors from running applications and windows, snap their values, and place them in the clipboard. A useful application if you are working as a graphic designer, want to create some cool word document, or just want to compare the difference between colors.
After the Color Picker is activated, hover your mouse cursor over the color you would like to copy and left-click the mouse button to select a color. If you want to see the area around your cursor in more detail, scroll up to zoom in. The copied color will be stored in your clipboard in the format that is configured in the settings (HEX by default). The editor lets you see the history of picked colors (up to 20) and copy their representation in any predefined string format. You can configure what color formats are visible in the editor, along with the order that they appear. This configuration can be found in PowerToys settings. The editor also allows you to fine-tune any picked color or get a new similar color. Editor previews different shades of currently selected color - 2 lighter and 2 darker ones. Clicking on any of those alternative color shades will add the selection to the history of picked colors (appears on the top of the colors history list). Color in the middle represents your currently selected color from the history of the colors. By clicking on it, the fine-tuning configuration control will appear, which will let you change the HUE or RGB values of the current color. Pressing OK will add newly configured color into the history of the colors.
The color picker will let you as the name suggests pick colors, it will sample colors from running applications and windows, snap their values, and place them in the clipboard. A useful application if you are working as a graphic designer, want to create some cool word document, or just want to compare the difference between colors.
After the Color Picker is activated, hover your mouse cursor over the color you would like to copy and left-click the mouse button to select a color. If you want to see the area around your cursor in more detail, scroll up to zoom in. The copied color will be stored in your clipboard in the format that is configured in the settings (HEX by default). The editor lets you see the history of picked colors (up to 20) and copy their representation in any predefined string format. You can configure what color formats are visible in the editor, along with the order that they appear. This configuration can be found in PowerToys settings. The editor also allows you to fine-tune any picked color or get a new similar color. Editor previews different shades of currently selected color - 2 lighter and 2 darker ones. Clicking on any of those alternative color shades will add the selection to the history of picked colors (appears on the top of the colors history list). Color in the middle represents your currently selected color from the history of the colors. By clicking on it, the fine-tuning configuration control will appear, which will let you change the HUE or RGB values of the current color. Pressing OK will add newly configured color into the history of the colors.
 FancyZones is a window manager utility for arranging and snapping windows into efficient layouts to improve the speed of your workflow and restore layouts quickly. FancyZones allows the user to define a set of window locations for a desktop that are drag targets for windows. When the user drags a window into a zone, the window is resized and repositioned to fill that zone. When first launched, the zones editor presents a list of layouts that can be adjusted by how many windows are on the monitor. Choosing a layout shows a preview of that layout on the monitor. The selected layout is applied automatically.
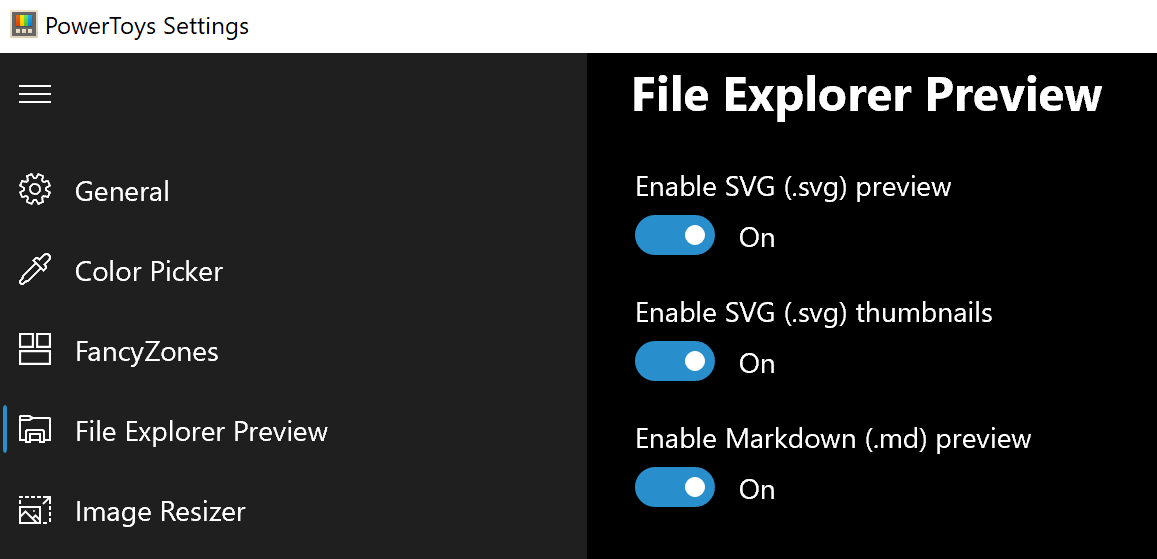 Only 3 options here but maybe some are important to you. This extension lets you enable SVG file preview in File Explorer, enable Markdown preview, and enable SVG thumbnails. Turn on each one you might need.
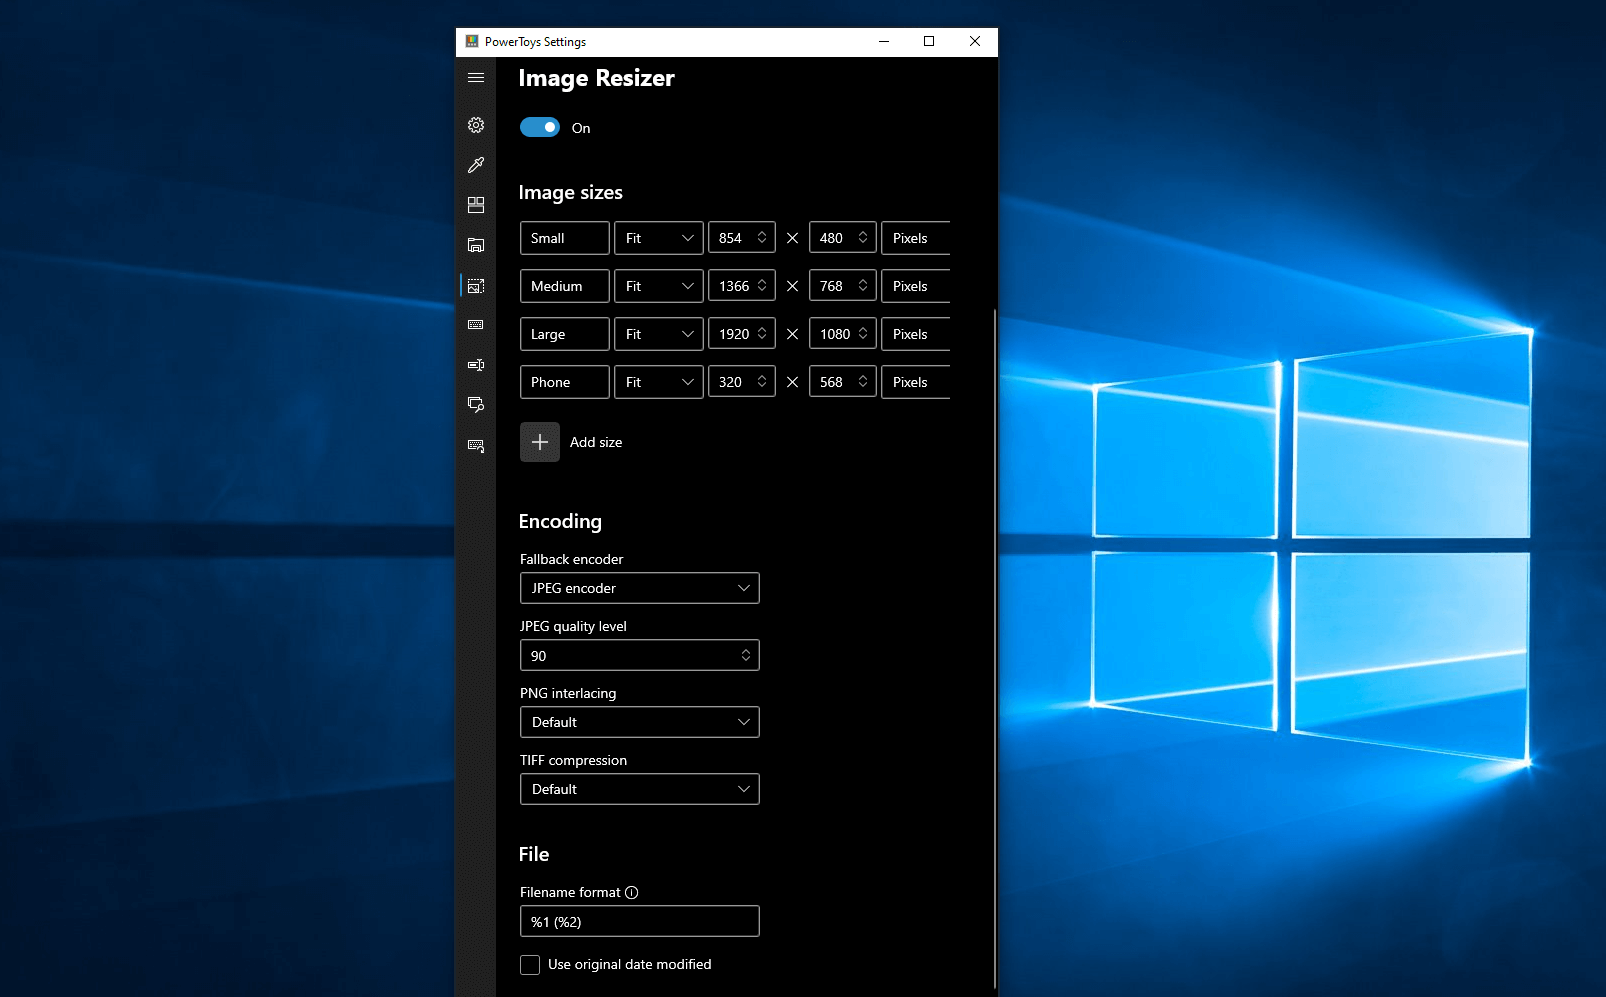 Image Resizer is a Windows shell extension for bulk image-resizing. After installing PowerToys, right-click on one or more selected image files in File Explorer, and then select Resize pictures from the menu. You can specify your own sizes if you want, you can resize when dragging files, you can overwrite files or make new copies of new sizes, and many more options. A very useful tool I am sure plenty of users can use since this eliminates the need for pictures or any other image application for common resizing tasks.
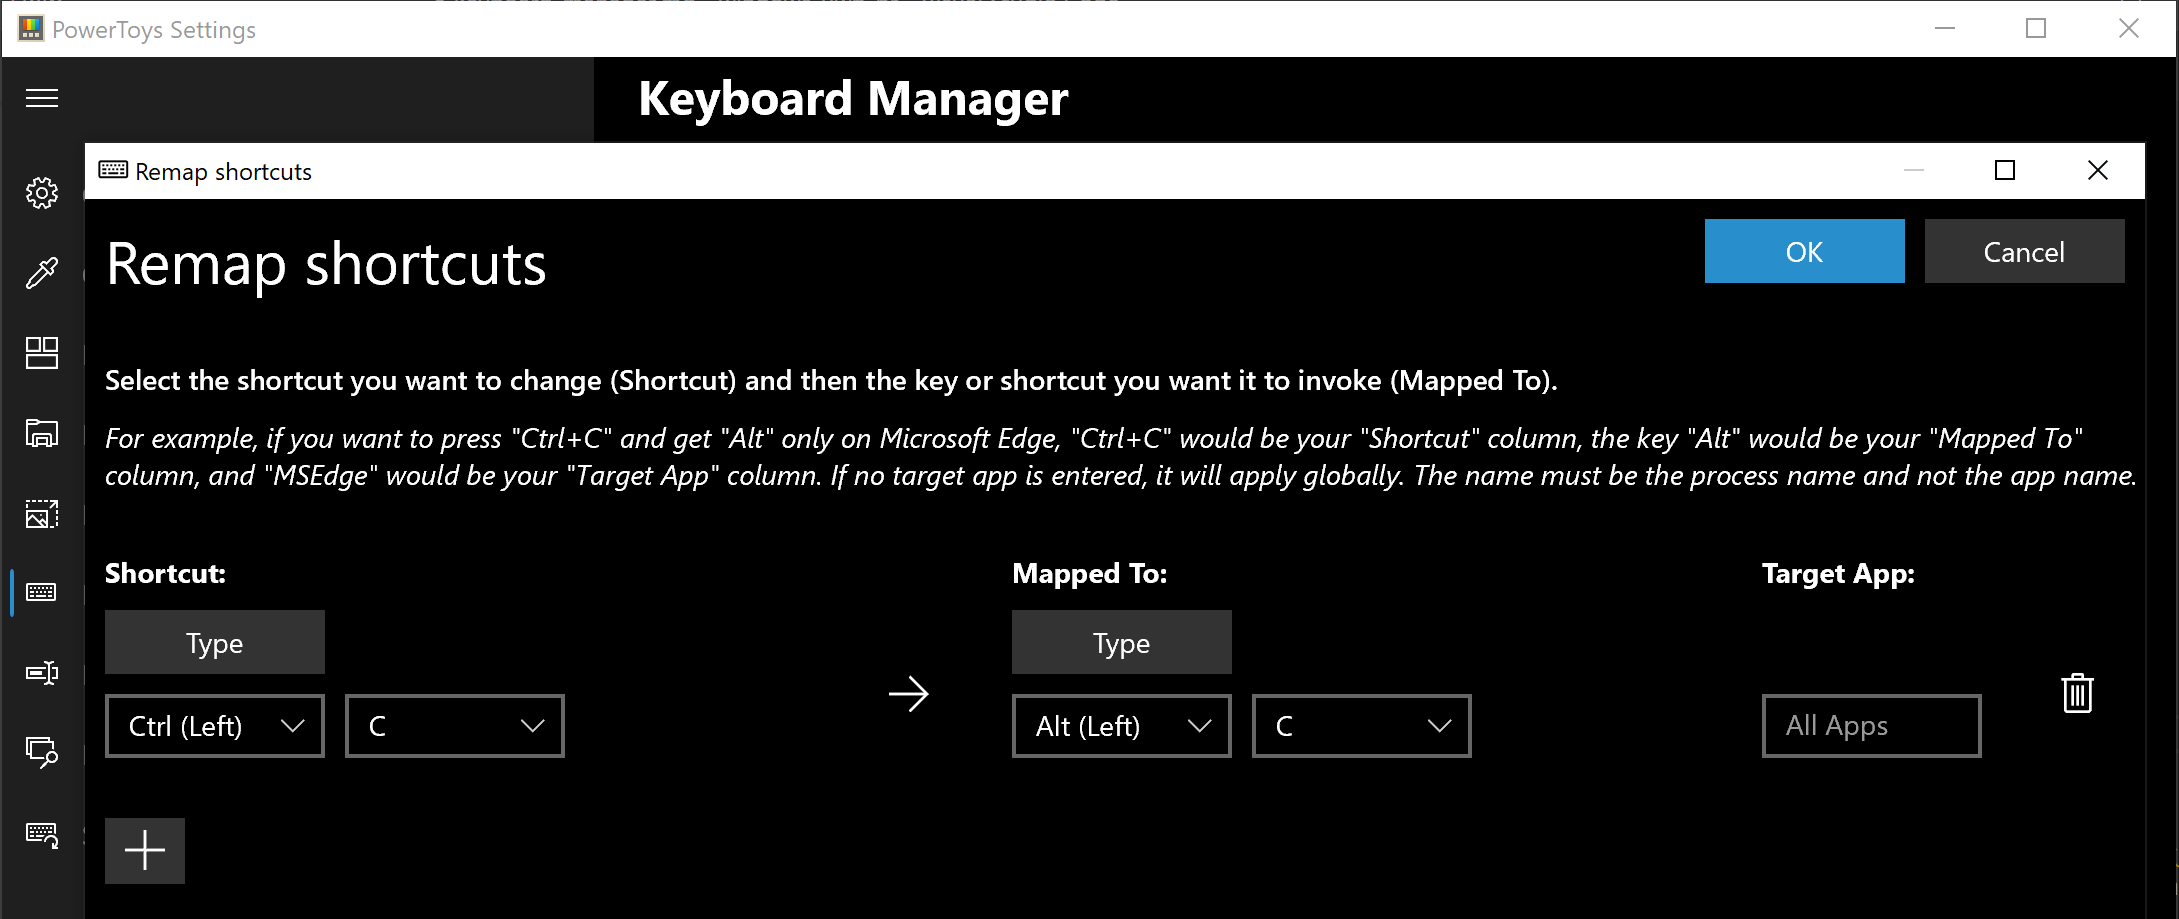 The PowerToys Keyboard Manager enables you to redefine keys on your keyboard. For example, you can exchange the letter A for the letter D on your keyboard. When you select the A key, a D will display. You can also exchange shortcut key combinations. For example, the shortcut key, Ctrl+C, will copy the text in Microsoft Word. With the PowerToys Keyboard Manager utility, you can exchange that shortcut for ⊞ Win+C). Now, ⊞ Win+C) will copy text. If you do not specify a targeted application in PowerToys Keyboard Manager, the shortcut exchange will be applied globally across Windows. PowerToys Keyboard Manager must be enabled (with PowerToys running in the background) for remapped keys and shortcuts to be applied. If PowerToys is not running, key remapping will no longer be applied.
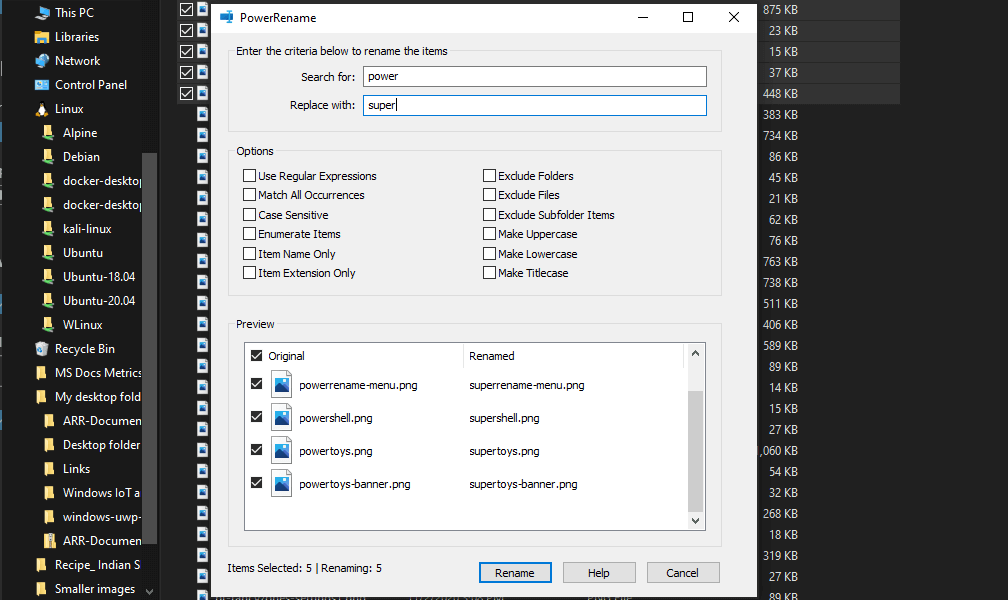 PowerRename is a bulk renaming tool that enables you to:
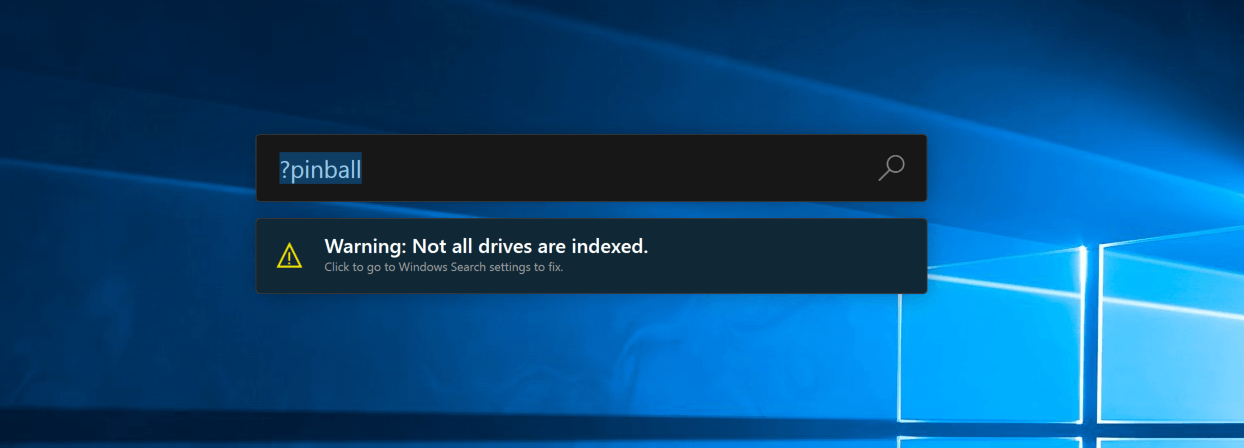 PowerToys Run is a quick launcher for power users that contains some additional features without sacrificing performance.
PowerToys Run features include:
PowerToys Run is a quick launcher for power users that contains some additional features without sacrificing performance.
PowerToys Run features include:
> (for example, > Shell:startup will open the Windows startup folder)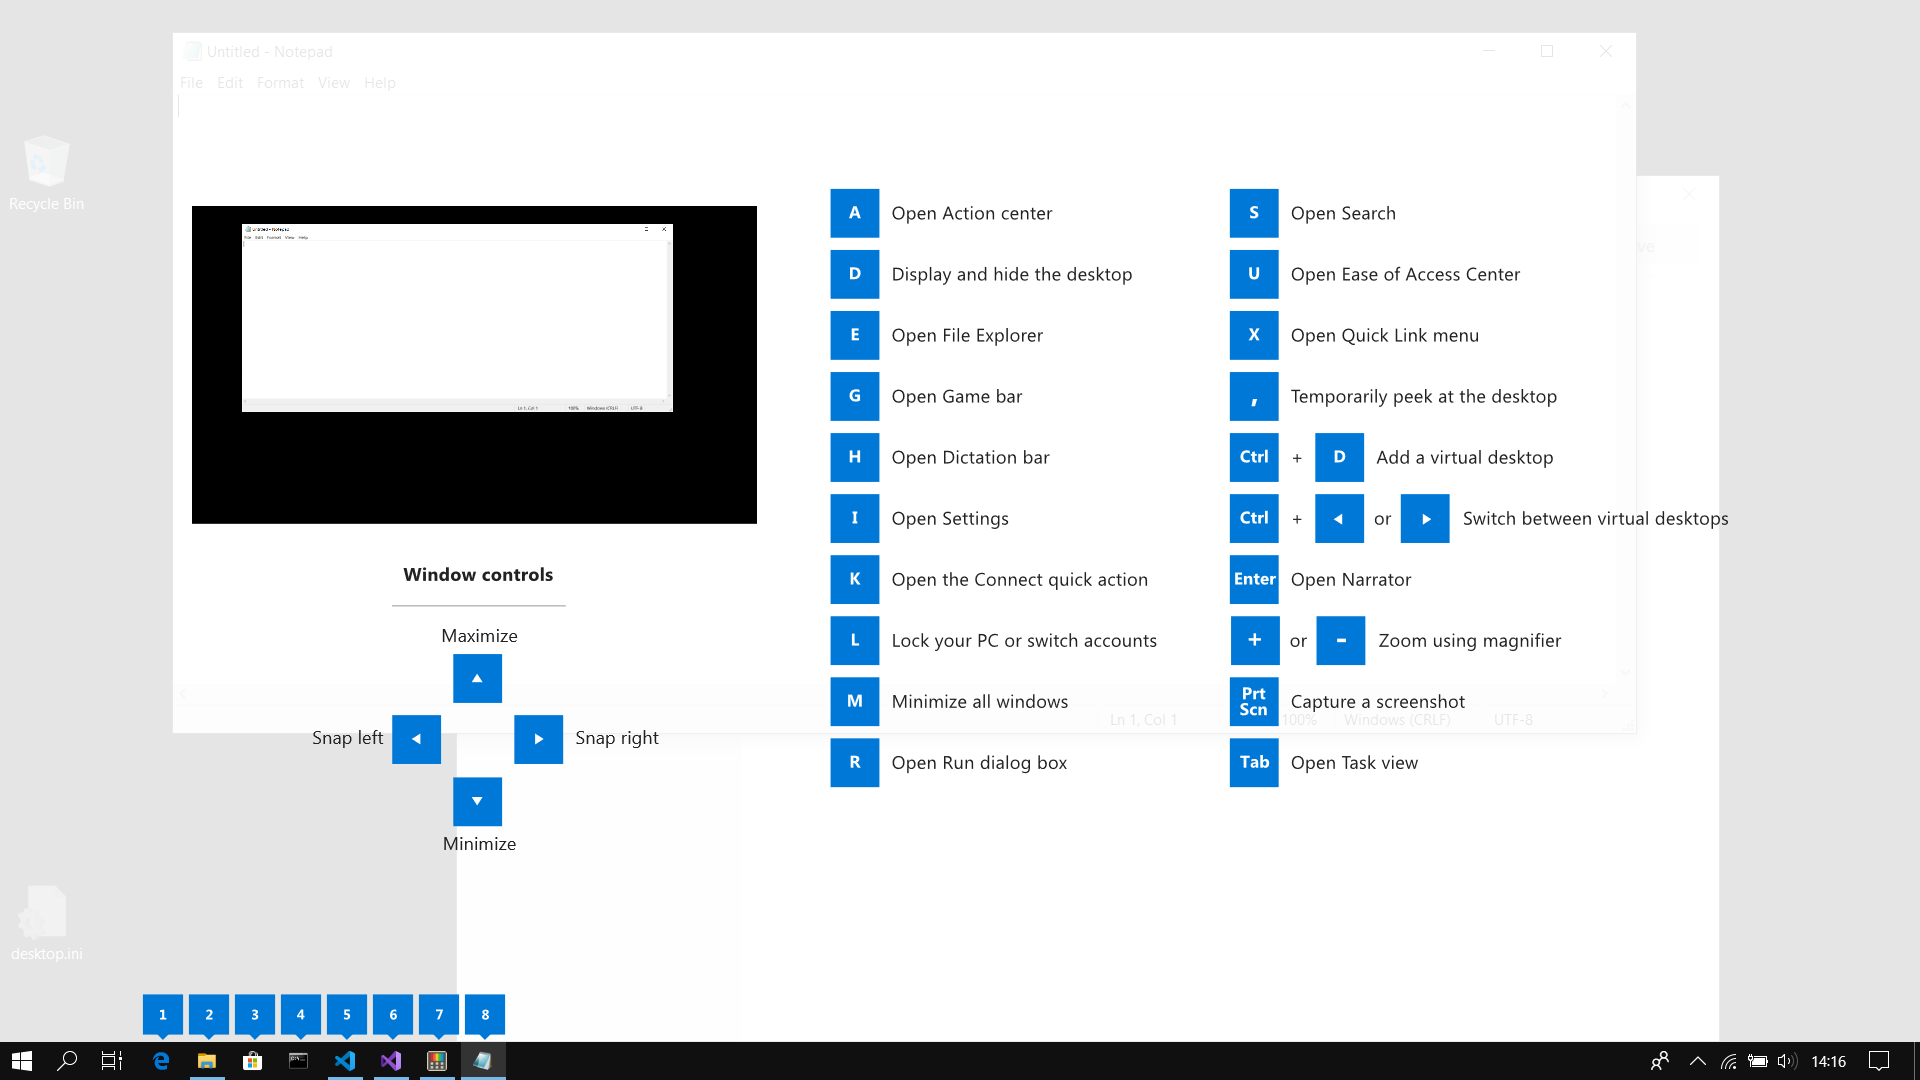 This guide uses PowerToys to display common keyboard shortcuts that use the Windows ⊞ key. Windows key keyboard shortcuts can be used while the guide is being shown and the result of those shortcuts (active window moved, arrow shortcut behavior changes, etc) will be displayed in the guide. Releasing the Windows ⊞ key will make the overlay disappear. Tapping the Windows ⊞ key will display the Windows Start menu.
Hey, you made it till the end, thank you for reading and I hope to see you soon.
This guide uses PowerToys to display common keyboard shortcuts that use the Windows ⊞ key. Windows key keyboard shortcuts can be used while the guide is being shown and the result of those shortcuts (active window moved, arrow shortcut behavior changes, etc) will be displayed in the guide. Releasing the Windows ⊞ key will make the overlay disappear. Tapping the Windows ⊞ key will display the Windows Start menu.
Hey, you made it till the end, thank you for reading and I hope to see you soon. Boost My PC is a program developed by 1.0.2.6. During setup, a scheduled task is added to Windows Task Scheduler in order to launch the program at various scheduled times (the schedule varies depending on the version). When installed, it will add a context menu handler to the Windows shell in order to provide quick access to the program.
Boost My PC presents itself as a legit PC speed-up utility, it scans your computer for problems and displays errors that need to be fixed. Upon accepting to fix these alleged errors, you are asked for a Payment in order to activate this product for a few months.
Many anti-virus scanners have marked this application as a Potentially Unwanted Program, and while Boost My PC is not so harmful on its own, it comes bundled with other Potentially Unwanted Programs that might harm your computer.
This occurs when the Windows Firewall service is missing. The service doesn’t start due to permission errors on various registry keys. It is a critical blue screen of death error code that turns the computer screen blue and causes the Windows to shut down. If this error code is not fixed it may start appearing more and more frequently resulting in total system corruption.“There was an error opening the Windows Firewall with Advanced Security snap-in. The Windows Firewall with Advanced Security snap-in failed to load. Restart the Windows Firewall service on the computer you are managing. Error code: 0x6D9”
 Error Causes
net stop wuauserv net start cryptSvc net start bits net start msiserver
net start wuauserv net start cryptSvc net start bits net start msiserver
Error code 0xc0000001 on Windows 10 has been reported by some users when attempting to install Windows 10. When you encounter this error, the setup will be in a loop and the error message will keep popping up.
Error CausesIf you encounter the error code 0xc0000001 while trying to install Windows 10, it most probably be due to corrupted installation file. However, it can also be caused by any of the following:”
Here are some methods that will help you fix the error code 0xc0000001 while trying to install Windows 10. Do not perform these methods unless you’re absolutely confident you can do it properly. Otherwise, you might make things worse.
If you’re not that confident, consider seeking advice from a technical expert. If you can’t afford one, you may want to consider getting an automated software to fix the job.
If you need to manually wipe the drive and then convert it to GPT, follow these steps:
select disk <disk number> (press enter)
clean (press enter)
convert gpt (press enter)
exit (press enter)
Note: when you’re prompted to choose the installation type, make sure to choose Custom. Then, choose unallocated space and click Next. This will automatically start the installation of Windows 10.
Automatic Repair is a Windows feature/utility that allows you to fix certain system problems preventing you from installing or starting Windows. It works by scanning your computer system for any potential problem and tries to fix it.
This will automatically run the utility.
Another possible reason why you are getting this error while installing Windows 10 is due to the connected external hard drives. To fix this, power down your computer. Afterward, unplug and remove all connected external hard drives. If you’re using USB device to install Windows 10, ensure your BIOS is set to boot your computer from the USB.
Another possible reason why you experience this error is that your copy of the Windows 10 installer is corrupted. To fix this, it’s better to create a new copy of the Windows 10 installer.
If you still encounter these errors after performing the above methods, find a trustworthy automated tool. As long as the automated tool is powerful and reliable, it will help you fix this error.
 Each time when the company is breached data is stolen and that places the company in a bad light usually because its user database has been compromised and people are concerned about their data being misused. This is very rational fear and concern but this time things are a little bit different than usual, why is that, you might ask?
Well, as before mentioned GoDaddy is a hosting company and the vector of attack was aimed at the part where it is hosting WordPress. Attackers were able to get their hands on the sFTP credentials of customers on that server meaning that all of the websites are also been relieved of their user base as well.
This potentially means that there is a high chance that all of the hosted web site's content is also compromised, meaning that your data could also be compromised even if you were not a GoDaddy customer, all you needed to do is to be a member of any site hosted on their platform.
GoDaddy has reset WordPress passwords and private keys, so it’s already taken the steps required to stock the attacker from exploiting anything with the passwords obtained. The company is in the process of generating new SSL certificates for customers.
Bad thing is that the attack used a compromised password to get into systems all the way back around September 6th, 2021, the breach was discovered on November 17th, 2021, which is more than a 2-month active time where the attacker could harvest tons of data. The outcome of this attack will be seen in the upcoming time, until then be safe, and Just in case change your passwords.
Each time when the company is breached data is stolen and that places the company in a bad light usually because its user database has been compromised and people are concerned about their data being misused. This is very rational fear and concern but this time things are a little bit different than usual, why is that, you might ask?
Well, as before mentioned GoDaddy is a hosting company and the vector of attack was aimed at the part where it is hosting WordPress. Attackers were able to get their hands on the sFTP credentials of customers on that server meaning that all of the websites are also been relieved of their user base as well.
This potentially means that there is a high chance that all of the hosted web site's content is also compromised, meaning that your data could also be compromised even if you were not a GoDaddy customer, all you needed to do is to be a member of any site hosted on their platform.
GoDaddy has reset WordPress passwords and private keys, so it’s already taken the steps required to stock the attacker from exploiting anything with the passwords obtained. The company is in the process of generating new SSL certificates for customers.
Bad thing is that the attack used a compromised password to get into systems all the way back around September 6th, 2021, the breach was discovered on November 17th, 2021, which is more than a 2-month active time where the attacker could harvest tons of data. The outcome of this attack will be seen in the upcoming time, until then be safe, and Just in case change your passwords.