When performing a Windows Backup to the NAS device (backup to a network share) that is running Samba, fails with an error message The backup failed, The version does not support this version of the file format (0xC03A0005). The problem occurs because of a conflict with the VHD file that is created by Windows Backup and is mounted during the process. There are three types of VHD files:
Fixed,
Expandable
Differencing
If the VHD file is a sparse file that is not supported by the native VHD driver, the mounting will fail, and you will get this error. An example VHD file is one that keeps expanding depending on the backup size. The problem occurs only in the case of File Level backup (file/folders in a volume) but not on the block level backup as the vhd file is never mounted. However, in the case of File Level Backup, the vhd is mounted, created by Windows Backup, which does not support the mounting of sparse files.
The solution is to use Strict Allocate: option in the smb.conf file
Login to SMB using SSH. Open the configuration file using the VI editor located at /etc/samba/smb.conf. If the option is not there, you can manually add strict allocate = yes which will make sure there are no sparse file that is created.
This post will guide you in what to do if you are trying to share the internet connection from your Android smartphone to your Windows 10 computer but USB tethering is not working. Although you can always connect your Android phone to your computer using a USB cable, you still won’t be able to access the internet. However, if you’ve already enabled the USB tethering option in your smartphone, you should be able to access the internet but if you still can’t then you can fix this issue by reading this post.
There are several potential fixes you can check out to fix the USB tethering issue. You can try running both the Internet Connections and Network Adapter troubleshooters or try installing the USB RNDIS adapter or disable any unnecessary network adapters.
Option 1 – Try to run the Internet Connections and Network Adapter troubleshooter
There are various built-in troubleshooters in Windows 10 that can help fix system issues. Since you are dealing with an internet connection problem, you can try running both the Internet Connections and the Network Adapter troubleshooters. To run them, follow these steps:
Go to Settings > Update & security > Troubleshoot.
From there, you can select the Internet Connections troubleshooter.
Click on the Run troubleshooter button to troubleshoot the problem.
Wait until the troubleshooter is done identifying and fixing the problem automatically.
Then follow the next on-screen instructions that may appear.
Once it’s done, check if the USB tethering issue is now fixed.
Note: You can also try to run the Network Adapter troubleshooter. It is also located under the Troubleshoot section. Just scroll down until you see it and then run it.
Option 2 – Try installing or updating the USB RNDIS adapter
RNDIS or Remote Network Driver Interface Specification can also help you resolve the USB tethering problem. If the pre-installed driver does not help you in connecting to the internet, then you can try installing the USB RNDIS driver that is, if it’s not installed yet. If it is already installed, you can try to update it instead.
Tap the Win + R keys to open Run and type “devmgmt.msc” in the field and hit Enter to open the Device Manager.
Next, expand the Network adapters section and look for the Remote NDIS based Internet Sharing Device. But if you are using a Samsung smartphone, you might see “Samsung” instead of under Network adapters.
Right-click on it and then select the “Update driver” option.
Then select the “Browse my computer for driver software” option.
After that, select the “Let me pick from a list of available drivers on my computer” option.
Now uncheck the checkbox for “Show compatible hardware”.
From the given list on your left-hand side, look for Microsoft and then select the Remote NDIS based Internet Sharing Device on your right-hand side.
Click on Next. A new popup will appear where you have to click on Yes. This will install the driver.
Now click on the Close button and restart your computer.
Option 3 – Try disabling any unnecessary network adapters/connections
Assuming that your Ethernet connection is showing ping loss which indicates that the internet is not stable. In such time, if you use the USB tethering functionality, you won’t be able to access the internet connection from your smartphone. The internet connection will be frequently disconnected since your computer gives priority to the Ethernet connection. Thus, you have to disable the Ethernet connection temporarily.
Right-click the network icon on your Taskbar and select the option “Network and Sharing Center”.
After that, click the network connection. And then click the Disable button from the status box that opens.
After that, check if you can now connect to the internet or not.
You might be familiar with the Encryption File System or EFS algorithm if you rather keep your files and folders encrypted. Encryption File System is a built-in feature in Windows 10 which allows users to secure their important files. Although there is an alternative way for you to secure your data on your Windows 10 computer, you can’t ignore the fact that the main advantage of an Encryption File System over BitLocker is that the former can help you encrypt a particular folder rather than encrypting the whole hard drive partition.
If you move a file inside a folder encrypted with the Encrypting File System it will automatically get encrypted. There are some users who like this feature but unsurprisingly, there are some that don’t. So if whether you want your files encrypted when you place them in an encrypted folder or if you want to keep it as it is, read on as to how you can do it either way. You can enable or disable automatic encryption of files moved to encrypted folders in Windows 10 using the Registry Editor or the Group Policy Editor.
Before you proceed, make sure to create a System Restore Point first because the modifications you’re about to make in your computer might affect its overall functioning so if anything goes wrong, you can always undo the changes. Once you have that covered, refer to the options given below to enable or disable automatic encryption in Windows 10.
Option 1 – Enable or disable automatic encryption using Registry Editor
Press the Win key + R key at the same time to open the Run dialog box.
Then type “Regedit” in the field and press Enter to open the Registry Editor and if a User Account Control or UAC prompt appears, just click Yes to proceed.
After opening the Registry Editor, navigate to this key location: HKEY_LOCAL_MACHINESOFTWAREMicrosoftWindowsCurrentVersionPoliciesExplorer
Next, right-click on Explorer and select New > DWORD (32-bit) Value and then name the newly create DWORD to “NoEncryptOnMove” and press Enter to save it.
After that, double click on the NoEncryptOnMove DWORD and set its value to the following preferences:
1 – Disable Auto Encryption of files moved to encrypted folders.
0 – Enable Auto Encryption of files moved to encrypted folders.
Now close the Registry Editor and restart your computer to successfully apply the changes made.
Option 2 – Enable or disable automatic encryption using the Group Policy Editor
Press the Win + R keys to open the Run box and type “gpedit.msc” in the field and press Enter to open the Group Policy Editor.
After that, navigate to this path: Computer ConfigurationAdministrative TemplatesSystem
Next, look for the “Do not automatically encrypt files moved to encrypted folders” option and double click on it to set the policy. From there, you will see the following description:
“This policy setting prevents File Explorer from encrypting files that are moved to an encrypted folder. If you enable this policy setting, File Explorer will not automatically encrypt files that are moved to an encrypted folder. If you disable or do not configure this policy setting, File Explorer automatically encrypts files that are moved to an encrypted folder. This setting applies only to files moved within a volume. When files are moved to other volumes, or if you create a new file in an encrypted folder, File Explorer encrypts those files automatically.”
Now select one of the radio buttons below depending on your preference:
Not Configured or Disabled: Enable Auto Encrypt of files moved to EFS Encrypted folders.
Enabled: Disable Auto Encrypt of files moved to EFS Encrypted folders.
Then click on the Apply and OK buttons to save the changes made.
Exit the Group Policy Editor and restart your computer.
Website breaches and stealing user data is nothing new in the world of the internet. Although a very unpleasant experience it still happens even on some high-quality websites. In this article, we will not focus on how can you not be the target of this kind of attack, because you really cannot. Weel you can kind of if you decide not to have your data on websites at all, but let's just say that is not something you are willing to do.
So, in this case, you have some social, forum, or gaming accounts but you heard that service has been breached and that your email or password might be stolen. Well in this case all you need to do is of course to login into the service and change your password. But, what happens if you are not aware at all that service has been compromised?
Mozilla foundation has asked themselves this same question it seems and they have decided to help us out. They have placed a free online service where you can just by typing in your email address find out if your email or data has been compromised in any way.
Go to https://monitor.firefox.com/ and check it out, if you find out that there is some website that you did not know was breached, change your password right away, and if you have used the same password for anything else (I hope not), change them as well.
If you encounter the “We couldn’t install some updates because the PC was turned off” while trying to run Windows Update on your Windows 10 computer, then read on as this post will give you a couple of suggestions you can use as a reference to fix this error. Make sure to follow the options given below carefully.
Option 1 – Perform basic computer troubleshooting
If you get the “We couldn’t install some updates because the PC was turned off” error on your laptop, then it’s recommended that you connect your laptop to a power source and then try clicking the Update button again. In addition, you also have to make sure that your computer stays awake until the Windows Update process is completed. This will ensure that your computer does not go into an idle state and interfere with the process.
Option 2 – Try deleting the files from the SoftwareDistribution folder and resetting the Catroot2 folder
The downloaded Windows Updates are placed in a folder called “SoftwareDistribution”. The files downloaded in this folder are automatically deleted once the installation is completed. However, if the files are not clean up or if the installation is still pending, you can delete all the files in this folder after you pause the Windows Update service. For complete instructions, refer to the steps below.
Open the WinX Menu.
From there, open Command Prompt as admin.
Then type in the following command – don’t forget to hit Enter right after typing each one of them.
net stop wuauservnet start cryptSvcnet start bitsnet start msiserver
After entering these commands, it will stop the Windows Update Service, Background Intelligent Transfer Service (BITS), Cryptographic and the MSI Installer
Next, go to the C:/Windows/SoftwareDistribution folder and get rid of all the folders and files thereby tapping the Ctrl + A keys to select them all and then click on Delete. Note that if the files are in use, you won’t be able to delete them.
After resetting the SoftwareDistribution folder, you need to reset the Catroot2 folder to restart the services you just stopped. To do that, follow these steps:
Type each one of the following commands.
net start wuauservnet start cryptSvcnet start bitsnet start msiserver
After that, exit Command Prompt and restart your computer and then try to run Windows Update once more.
Option 3 – Try restarting the Windows Update Services
Open the Services Manager.
From there, make sure that you set the following services and Startup types:
Background Intelligent Transfer Service: Manual
Cryptographic Service: Automatic
Windows Update Service: Manual (Triggered)
Option 4 – Try to run the Windows Update Troubleshooter
Running the built-in Windows Update troubleshooter could also help you resolve the “We couldn’t install some updates because the PC was turned off” error. To run it, go to Settings and then select Troubleshoot from the options. From there, click on Windows Update and then click the “Run the troubleshooter” button. After that, follow the next on-screen instructions and you should be good to go.
Option 5 – Try to install the Windows Updates manually
As mentioned, the error might be because Windows missed installing a particular update which is why you are not able to proceed with the current update. So to resolve the issue, you need to install the update that wasn’t installed by downloading it from the Microsoft Update Catalog website. You also have to make sure that you didn’t turn off the Windows update or have it delayed.
Option 6 – Run Microsoft’s online troubleshooter
Running Microsoft’s online troubleshooter might also help you fix the Windows update error. This online troubleshooter is known to help in fixing Windows Update errors, it scans your computer for issues that might be causing the problem and then fixes them automatically.
Odyssey Neo G9 is a successor to Odyssey G9 curved gaming monitor and it is aimed again at the gaming community with its specifications but of course, it can be used for work as well.
Gapping at a stunning $2500 USD price it is not really a cheap piece of hardware so it is normal to see what do you get for this kind of price and do features justify it, so let’s dive in.
Size and resolution
The first thing that you can notice about the screen is that it is big and curved, 49 inches big which is pretty big, and with it, I believe you can forget about using 2 or 3 screens because this single one will cover everything you need really.
Going as far as 5120 X 1440 resolution is the strange definition, basically, this is 5K which is kind of nice but I do not see the advantage. Sure it is larger than 4K, but for the price of $2500 I expected an 8K monstrosity so if the resolution is not the main price justification then what is? Let’s move on and find out.
Odyssey tech specs
The monitor comes with HDR and 240Hz refresh rate which is very nice and coupled with 1ms pixel response time, adaptive sync, and Variable Refresh Rate you get pretty good other tech specs.
All of this is very nice but the monitor's strongest selling point is Mini Led tech. Mini Led is a next-gen tech currently found only in high-end TVs. With this technology, monitors can produce truer blacks sort of speak thanks to a greater number of dimming zones.
Odyssey Neo G9 is rated at 2000 nits in the brightness values and local dimming zones go to stunning 2048. It comes also with Quantum HDR that supports 10+, Freesync, and G-Sync capability. In connection, the department monitor comes with a single display 1.4 port and two HDMI 2.1 ports. It also includes a headphone jack along with two USB 3.0 ports.
Conclusion
While the resolution of the monitor is nothing impressive for the given price, its size and the rest of the tech specs surely are. Now I will not lie, the price is still a little too high but if you could afford it easily I think you should.
Hello and welcome to our software series review. Weel this time we could say this is more of a service review since the application we are going through today is online and you can use it freely without ever needing to install it.
When we choose software that we are going to review and recommend we really try to recommend something that is worth your time and money, Cartoonize fits in both categories in my opinion.
First of all basic plan of this graphic software is completely free and as mentioned it is working online, also as one more feature basic plan does not even require you to have an account of any kind, all you need to do is go to the website of the application and you can start using it right away. There is also paid plan for extra features if you need them billed monthly or annually.
Features
First things first, this is not Photoshop or GIMP and it does not aim nor want to be. This is something else, directed and pointed at the different types of users. This application is aimed at people that want to make some quick graphics and post them on social media and it does that very well. Even without knowledge to use graphic software this one is so well designed and straightforward that even a complete newcomer can do something right away.
So as the application that wants to be used by people that want to place some cool pictures or ads on their social media what it offers. For starters simplicity and ease of use, every option that you can use is on the left side of the screen nicely packed into the vertical toolbox. Inside the toolbox, you have access to various tools, effects, and filters that you can apply to your image.
Tools explained
Image manager
The first section on the tool panel is the image manager, here you can upload your images, delete them, search stock images, and so forth. nothing more to say about this one as it is only a basic file manager.
Edit
In this tool panel, there are a lot of basic settings for your image manipulations divided into 3 sections: Basics, Enhance, and Creative. In the basic section, you can crop, resize and rotate your image. Enhance panel will let you set exposure, color, vibrance, tint, and details (sharpen). Finally, the Creative part will let you remove the background with AI in a single click, replace colors in the image, and add a vignette and round image.
Effects
In the effects panel, you will be given 4 options to choose from Cartoonizer, Digital art, Sketcher, and painting. Each option once clicked will open another set of options tied to chosen preset where you will be able to choose a different style from chosen template. Once you click on the desired template it will be applied to your image and in the upright corner, you will have edit options to tweak it to your liking. You can play around as much as you want because only once you click on the apply button, the effect will be applied to your image.
Filters
Same as in the effects tool panel here you will also get a series of different filters that you can apply to your image. As in the previous tool once clicked on the chosen filter, you will be given options for its variations and details edits. How there is really plenty of filters options and combined with its own presets I will not focus on explaining what each one is doing since picture thumbnails are pretty accurate and just one look at them will explain to you everything you need to know.
Overlays
In the overlays panel, you can as the name says overlay different kinds of effects on your image. You can add snow, fog, sun flares rain, and many more. Presets work identically to previous effects and filters.
Masks
If you want to place your image in a certain shape or in-text this is the section for you. You will be presented with sections as custom text, shapes, brushes, floral, animals, and patterns. Each section will once again lead to plenty of variations on the chosen subject where you can pick one that you like the most and tweak its options.
Text
As the name suggests, this section is to add text to your picture or design. If you are making some cool ad for Facebook, Instagram, or other social media I believe that you will spend most of your time in this section adding text and tweaking it so it looks best. You have all the tools that you will need to make a catchy title or smaller block of text and you can add multiple texts to your picture tweaking their own visual appearance, the font used, color, and some effects like a drop shadow.
Draw
In the draw section, you will be able to freely draw whatever you like with your mouse or pen if you have one. you have basic options for a brush and eraser so you can erase stuff. Pretty basic tool but it gives a nice touch to underline something, circle it, etc.
Graphics
This panel will let you place various already made graphic assets into a picture. You have hearts, hats, glasses, etc. There really are tons of premade graphics along with thematic ones like new year, st. Patric day and more.
Frames
As the name suggests this section will place a frame of your choice around your picture. You can choose the style of frame, position, color, and many more. There are various styles and each style has its own options.
Conclusion
Cartoonize is a great online application that will let you quickly and easily do cool and nice image edits. As mentioned you can also add various effects, text, and graphics and use this app to make some quick and nice ads for social media. You have the option to publish to your social media right from the app in the save dialog but you can also of course download your image or design to your local computer.
Please note that for this review we used the pro, paid version so all of the features were unlocked. We wanted to give you a full overview of the full potential of the app. In my opinion, the small monthly fee that they charge is well worth it when you see all things that you can do with it.
Go to the cartoonize website and check it out, basic option is completely free and it does not even require making an account. Have fun, be creative and take care, I hope to see you again tomorrow.
If the Sleep option is missing from the Power Menu then this could be caused by the power settings, local group policy configuration, etc. in your computer. Based on the reports of users who experience the same problem, the issue occurred after they’ve updated or upgraded their Windows 10 computers.
As you know, the sleep mode is quite useful in certain cases and is utilized by most users. If you put your computer in sleep mode, it actually minimizes the power usage of your computer while at the same time keeps your current session running. So if sleep mode is suddenly missing, then that could be a problem but worry not for this post will give you possible fixes to resolve the issue. Make sure to follow each one of them carefully to achieve good results.
Option 1 – Check the Power settings
As mentioned, one of the reasons why the Sleep option is missing could be the power settings in your computer. To check this possibility, make sure that you’ve enabled the sleep mode in the Power options setting window. How? Refer to these steps:
First, go to the Start menu, and from there open Control Panel.
Next, set the View by Large icons and select the Power Options.
After that, click on the “Choose what the power buttons do” option on the left-hand side.
Then click on the “Change settings that are currently unavailable” option and make sure that Sleep is checked under the Shutdown settings.
Afterward, click on Save changes.
Option 2 – Modify the Local Group Policy
If the Power setting isn’t the cause of the problem, then you might want to check the Local Group Policy and modify it. There is a dedicated policy for showing the sleep option in the power menu and if this policy is disabled, then it’s no wonder why you don’t see the sleep option in the power menu. To change this policy, refer to the steps below.
Tap the Win + R keys to open the Run dialog box.
Then type “gpedit.msc” in the field and hit Enter to open the Group Policy Editor.
Next, navigate to this path: Computer Configuration -> Administrative Templates -> Windows Components -> File Explorer
Look for the “Show sleep in the power options menu” option from the right-hand side pane and double click on it.
Now change it to Enabled and click on the Apply and OK buttons to save the changes made and restart your computer.
Option 3 – Try to turn on Standby
Standby, also known as InstantGo, is a feature in Windows 8 and 10 that allows users to maintain network connectivity after a computer has been put into sleep mode. Thus, if this feature is disabled, it can cause the Sleep option to disappear from the power menu. To turn it on, follow these steps:
Tap the Win + R keys to open Run.
And type “Regedit” in the field and tap Enter to open the Registry Editor.
Next, navigate to this path: HKEY_LOCAL_MACHINESYSTEMCurrentControlSetControlPower
From this path, look for the “CsEnabled” key on the right-hand side of the pane and double-click on it.
Set its value to “1” and click OK to save the changes made.
Now reboot your PC.
Note: If you were not able to find the CsEnabled key, then this indicates that your computer does not support the Standby feature. And if that’s the case, proceed to the next given option below.
Option 4 – Try to install a Video Card driver
On the other hand, some users reported that the problem was caused by the video card driver. And if your computer lacks the video adapter driver, it can also cause the same problem. Windows 10 typically install the video card driver on its own, however, there are rare cases when it doesn’t which is why you have to do it yourself manually. All you have to do is go to your manufacturer’s website and look for the video card driver, download it and then install it. Once you’ve installed the video card driver, reboot your computer and check if it has fixed the problem.
As you know, Microsoft constantly releases new updates with the main goal of fixing bugs as well as deliver users with new and exciting features. However, there are times when the latest update comes with an unwanted bug. One of these bugs is an error message saying, “Low Disk Space. You are running out of disk space on Local Disk (G:). Click here to see if you can free space on this drive.” So if you have recently installed a Windows 10 update, then you’ll most likely see a completely new drive on your computer which will appear right after the installation of the update and you’ll also start seeing the aforementioned error message.
It gets irritating as this error message keeps on popping up even if you still have a lot of free space on your other drivers. Obviously, the main reason why this error message pops up all the time is the bug brought along by the Windows Update. This bug unhides the recovery partition drive and allocates it a drive letter which is why you are seeing a new drive in your computer. Thus, you can get rid of the pesky error message by simply removing the letter of the new drive. Just remember that you must not delete anything from the recovery partition drive nor format the drive. Formatting or deleting the recovery partition drive can heavily affect the recovery of Windows since the data on the drive is used by the Windows Recovery Environment or your system’s manufacturer.
A lot of users have reported that removing the drive letter has resolved the issue. And if you worry that removing the drive letter will delete the drive, you are mistaken. This solution is basically harmless and is proven effective to make the notifications go away.
Carefully follow the instructions below to get rid of the Low Disk Space notification by removing the drive letter.
Step 1: Tap the Windows key once.
Step 2: Next. In the Windows Start Search, type in “command prompt” and right-click on Command Prompt from the search results and select the “Run as administrator” option or you could simply tap Win + R keys and then input “cmd” and hit Enter to open Command Prompt.
Step 3: After opening Command Prompt, type in “diskpart” and tap Enter.
Step 4: Next, type in “list volume” and tap Enter. After that, you will see a list of drives.
Step 5: Take note of the letter associated with the newly created drive.
Step 6: Afterwards, type in “select volume <drive letter>” and tap Enter. Take note that you must replace the <drive letter> with the drive letter you’ve found in Step 5.
Step 7: Now type in “remove letter=<drive letter>” and then tap Enter. Once again, replace the <drive letter> with the letter you took note of in Step 5.
If you got an error message saying, “Windows could not start the Windows Update service on Local Computer, Error 87. The parameter is incorrect” while you were trying to start the Windows update service on your computer, then this post could help you resolve the problem. Along with this error, you might also get any of these error codes such as 0x80240034, 0x80244019, 0x80070643, and so on. Aside from these error codes, you will also notice that the Windows Update service has been stopped.
To fix this issue, here are a couple of suggestions that might help but before you go on, you need to create a System Restore point first.
Option 1 – Try checking Services Dependencies
Dependencies of a Windows Service in Windows 10 are when windows services depend on other services. Such is the case with the Windows Update service – it also depends on three different services such as the Remote Procedure Call or RPC service, DCOM Server Process Launcher, and the RPC Endpoint Mapper. Meaning to say, if two of these services are not working as expected, then the dependant service will also be affected. This could be the reason why the Windows Update service could not start.
Tap the Win + R keys to open the Run dialog box.
Next, type “services.msc” in the field and hit Enter to open Windows Services.
From the list of Services, look for the following services:
Remote Procedure Call (RPC) Service
DCOM Server Process Launcher
RPC Endpoint Mapper
After you find these services, double click on each one of them and check whether the Startup type for all is set to Automatic and the Service status is set to Running or not.
If the service status is not running, then click the Start button. Afterward, check if you can now run the Windows Update service.
Option 2 – Check the Background Intelligent Service and the Cryptographic Service
Tap the Win + R keys to open the Run dialog box.
Next, type “services.msc” in the field and hit Enter or click OK to open Services.
From the list of Services, look for the following services and make sure that their Startup type is as follows:
Background Intelligent Transfer Service – Manual
Cryptographic Service – Automatic
After that, check if the Service status of the listed services above is set to Running. If they’re not, click on the Start button to start these services and then check if you can now enable the Windows Update service or not.
Option 3 – Reset Windows Update components
If the first two options did not work then you might want to reset the Windows Update components manually. Follow the steps below to reset them.
Open Command Prompt with admin privileges.
After that, type each one of the following commands and hit Enter after you key in one after the other.
net stop wuauserv
net stop cryptsvc
net stop bits
net stop msiserver
Note: The commands you entered will stop the Windows Update components such as Windows Update service, Cryptographic services, BITS, and MSI Installer.
After disabling WU components, you need to rename both the SoftwareDistribution and Catroot2 folders. To do that, type each one of the following commands below, and don’t forget to hit Enter after you type one command after the other.
Next, restart the services you’ve stopped by entering another series of commands. Don’t forget to hit Enter after you key in one command after the other.
net start wuauserv
net start cryptsvc
net start bits
net start msiserver
Close Command Prompt and reboot your PC.
Option 4 – Run the Windows Update Troubleshooter
If resetting the Windows Update components didn’t work, you could also try running the Windows Update Troubleshooter as it could also help in fixing any issues related to Windows Update including this one. To run it, go to Settings and then select Troubleshoot from the options. From there, click on Windows Update and then click the “Run the troubleshooter” button. After that, follow the next on-screen instructions and you should be good to go.
Option 5 – Try removing a value from the Windows Registry
If running the Windows Update troubleshooter didn’t help and you receive a message instead saying, “Service Registration is Missing or Corrupt”, you can try to remove a value from the Windows Registry.
Tap the Win + R keys to open the Run dialog box.
Then type “Regedit” in the field and hit Enter to open the Windows Registry.
Next, navigate to this path: HKEY_LOCAL_MACHINESOFTWAREMicrosoftWindowsSelfHostApplicability
From this path, look for a value named “ThresholdOptedIn” and if you find it, delete it.
Exit the Registry Editor and see if you can now enable the Windows Update service.
Keeping your system updated is a must and Windows updates are definitely a great way to do that. These updates are essential since they provide important security and various fixes for bugs in your Windows 10 computer. However, there are plenty of instances when you encounter issues with Windows Updates and one of them is when the Windows Updates turn off automatically at random times.
Some users reported that they saw a notification about Windows Updates being turned off. Note that the issue is not with the update itself since many users turned on the Windows Update and the system was properly updated. The issue is that the Windows Updates turned off all by itself.
There could be several reasons why the Windows Updates turned off by themselves. It could be due to the antivirus program installed on your computer. Antivirus programs are known to cause issues with other programs, Windows updates components included. This can occur due to false positives as well as odd compatibility issues. Aside from antivirus programs, the Windows Update service itself could also be the root cause of the problem. There could be a corrupted file in the Windows Update folder or it could be that the Windows Update service wasn’t started properly. Any of these issues can be resolved by following the troubleshooting options given below. Make sure to follow each one of them carefully for better results.
Option 1 – Try to disable your antivirus program
Disabling the antivirus program or any security software installed in your computer is always a good idea you can try when the Windows Update process does not go smoothly. So before you try updating your computer again, make sure to disable the antivirus or security program and once the Windows Update is done, don’t forget to enable the antivirus program back again.
Option 2 – Try to make some changes in the Registry
Tap the Wins key once and type in “command prompt” in the field.
From the search results, right-click on Command Prompt and select the “Run as administrator” option to run it with admin privileges.
After that, type the following command and hit Enter again:
sc config wuauserv start= auto
The command you entered will set the Windows Update to auto so you should be good to go.
Option 3 – Try to reset the Windows Update components
If by any chance that the second option didn’t work, resetting the Windows Update components could also help you resolve the problem. How? Refer to the following steps:
Open Command Prompt with admin privileges.
After that, type each one of the following commands and hit Enter after you key in one after the other.
net stop wuauserv
net stop cryptsvc
net stop bits
net stop msiserver
Note: The commands you entered will stop the Windows Update components such as Windows Update service, Cryptographic services, BITS, and MSI Installer.
After disabling WU components, you need to rename both the SoftwareDistribution and Catroot2 folders. To do that, type each one of the following commands below, and don’t forget to hit Enter after you type one command after the other.
Next, restart the services you’ve stopped by entering another series of commands. Don’t forget to hit Enter after you key in one command after the other.
net start wuauserv
net start cryptsvc
net start bits
net start msiserver
Close Command Prompt and reboot your PC.
Option 4 – Run the Windows Update Troubleshooter
Running the built-in Windows Update troubleshooter is one of the things you can first check out as it is known to automatically resolve any Windows Update errors. To run it, go to Settings and then select Troubleshoot from the options. From there, click on Windows Update and then click the “Run the troubleshooter” button. After that, follow the next on-screen instructions and you should be good to go.

 So, in this case, you have some social, forum, or gaming accounts but you heard that service has been breached and that your email or password might be stolen. Well in this case all you need to do is of course to login into the service and change your password. But, what happens if you are not aware at all that service has been compromised?
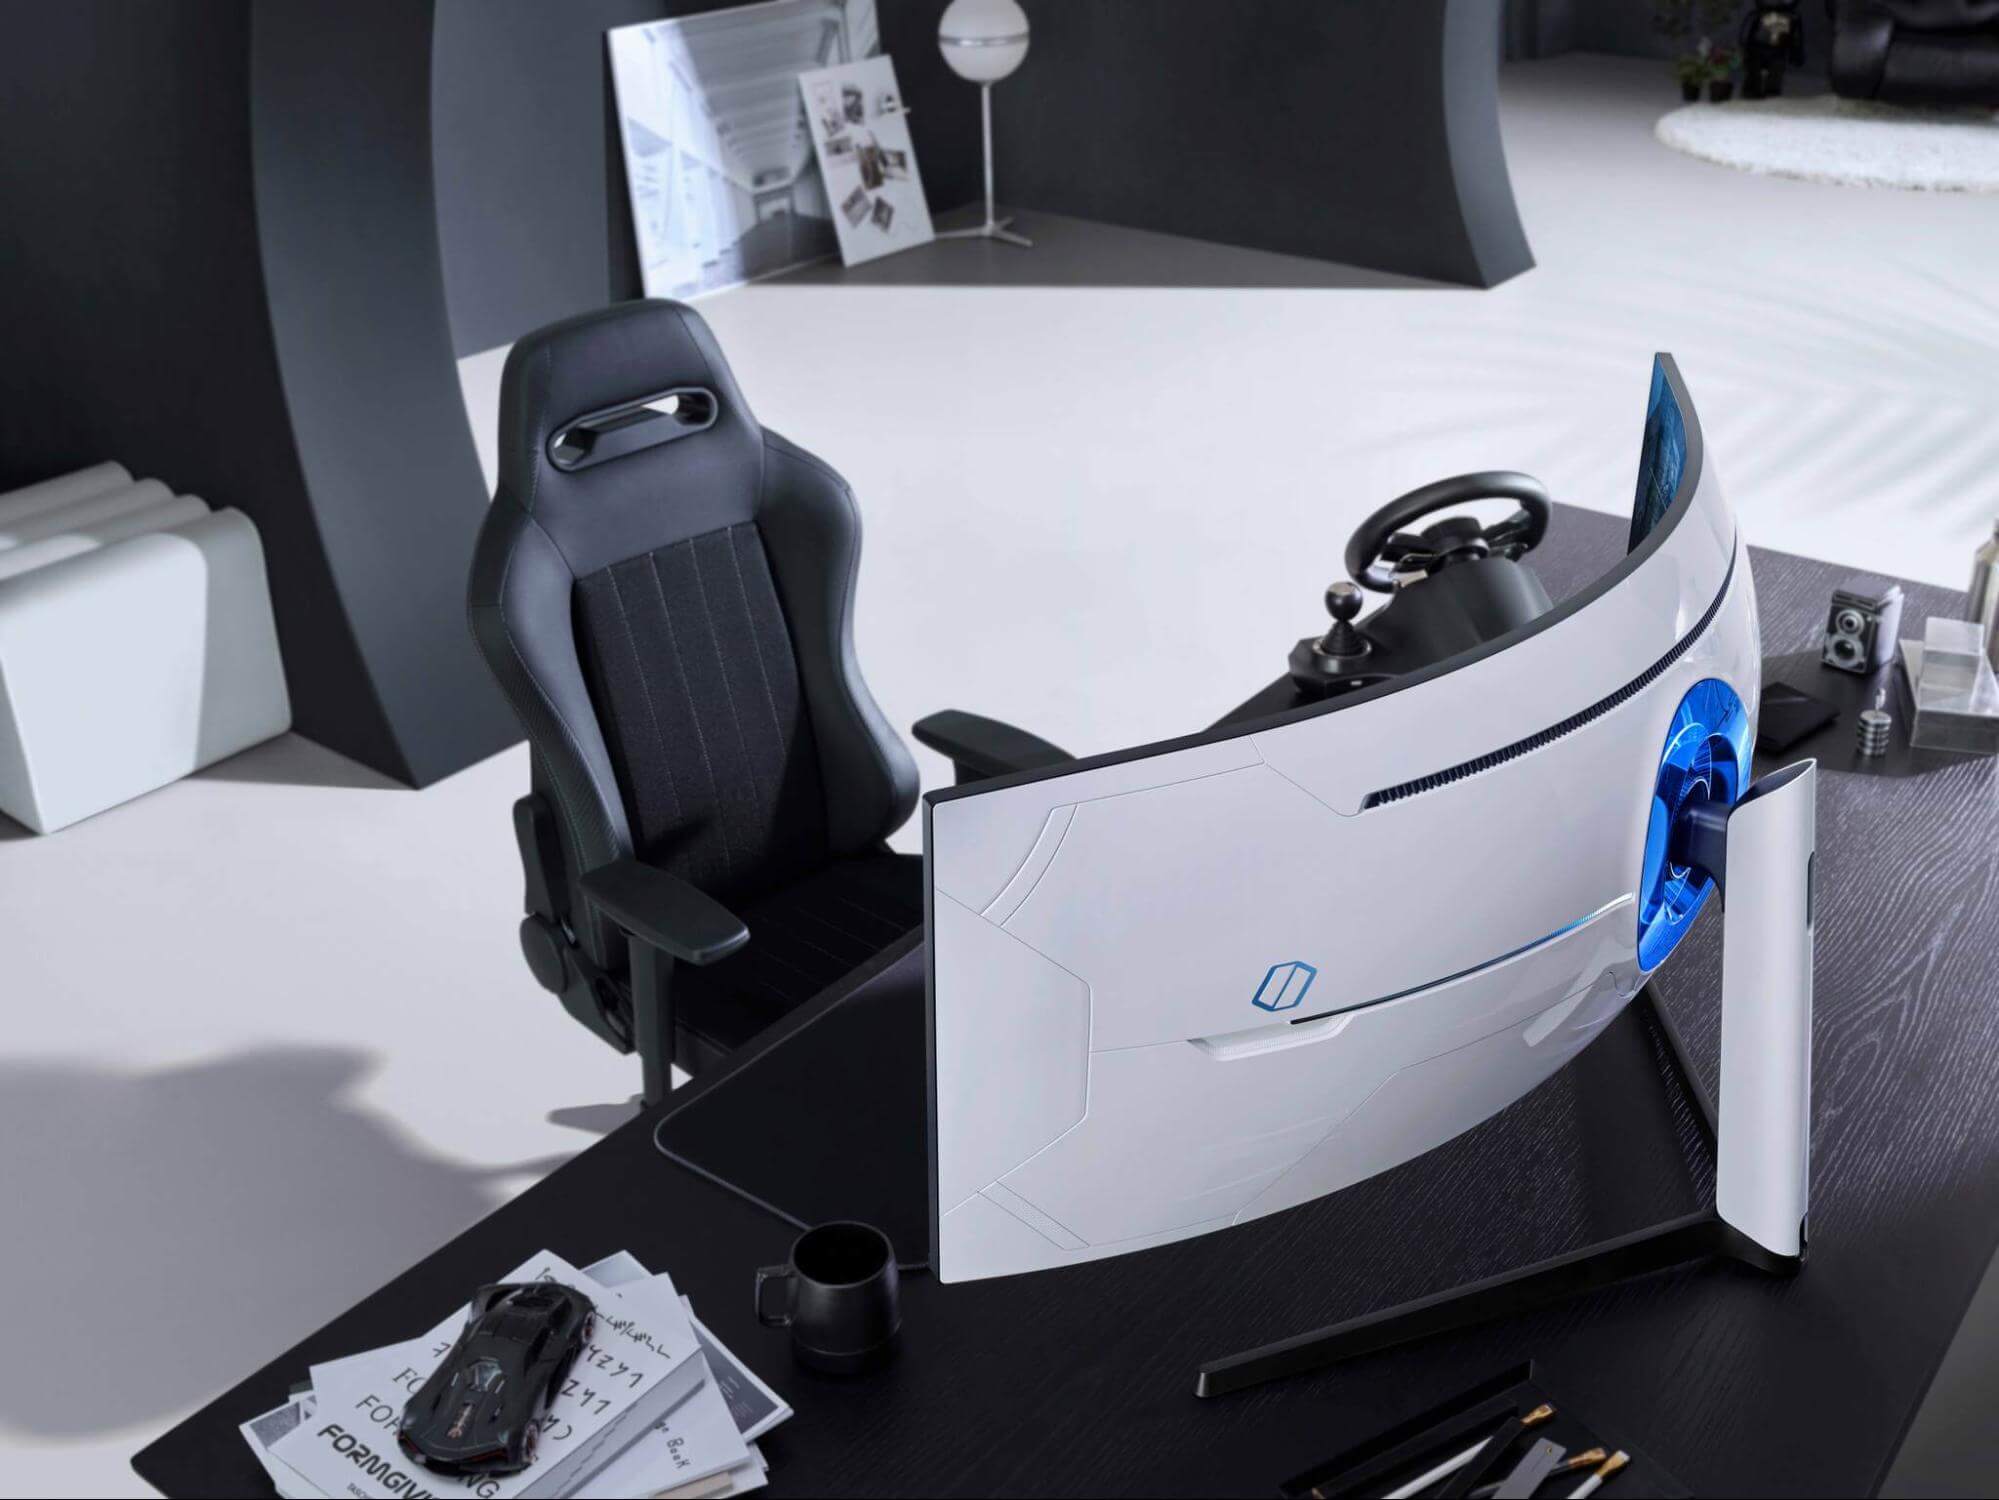 Odyssey Neo G9 is a successor to Odyssey G9 curved gaming monitor and it is aimed again at the gaming community with its specifications but of course, it can be used for work as well.
Gapping at a stunning $2500 USD price it is not really a cheap piece of hardware so it is normal to see what do you get for this kind of price and do features justify it, so let’s dive in.
Odyssey Neo G9 is a successor to Odyssey G9 curved gaming monitor and it is aimed again at the gaming community with its specifications but of course, it can be used for work as well.
Gapping at a stunning $2500 USD price it is not really a cheap piece of hardware so it is normal to see what do you get for this kind of price and do features justify it, so let’s dive in.
