If Error Code 0xc00000e9 appears on your screen, there is no cause to panic yet as there are different ways to fix this. Here, I will list down different methods to get your computer back on track:
Check peripheral connections
Check your SATA cables
Check your hard drive
Check your BIOS settings
Quick Fix 1. Check Peripheral Connections
Turn off your computer.
After the computer has been shut down, take off all the peripherals or the USB cables that are connected to your USB ports. This includes even the keyboard and the mouse. We just need to have only the monitor plugged in for this one.
Turn on your computer and see if it starts as it normally does.
If it does, try connecting back your external devices or peripherals one by one until you find the one that causes the error.
Once you trace the device that’s causing the error, you will have to change its USB cable and update its driver to support your operating system.
Quick Fix 2. Check your SATA cables
It is possible that what causes a barrier between your operating system and your hard drive from communicating is the SATA cable used. For example, if you’re using an older SATA with a SATA III port, there might not be adequate support for the transfer of data from one another. Or, the problem might be a loose SATA cable which would still require you to buy a new one to replace your loose or damaged cable. To check if your SATA cables are causing the error, simply follow these steps:
Turn off your computer.
Carefully open its case.
Check the hard drive and the SATA port where it’s connected.
Try to use a newer cable and connect it to your SATA port. (If you used a SATA II cable, you can see if a SATA III cable is more compatible.)
Replace your SATA cable with a newer one if Step 4 proves to be successful.
Quick Fix 3. Check your hard drive.
Try to use a different hard drive and see if error code 0xc00000e9 still appears.
If it works out just fine, then the problem might be physical damage to your hard drive and would need to be repaired depending on the case. Just simply take it to a technician and let him know about the issue.
Quick Fix 4. Check your BIOS settings
Restart your computer.
Once your computer starts, press and hold the ESC, F2, F12, or DEL key to go to BIOS settings.
You will then be redirected to the BIOS Setup Utility screen. From here, go to Boot options.
In the Boot Options, see if your first boot device is your hard drive. If it isn’t, press the arrow key to select the hard drive and move it to the top of the boot device list.
Save the settings.
Reboot your computer.
Note: If all the methods above do not work, the problem might be on your drivers and you might need to update them. You can update your driver in two ways: Manual driver update and Automatic driver update. You can find procedures online in updating your drivers.
If you encounter an error message saying, “ERR SSL VERSION OR CIPHER MISMATCH” while visiting a website, then it is not primarily your fault as an end-user. In fact, it can happen on any website like Chrome, Edge, Firefox, and even Internet Explorer. Getting this error means that the website you are visiting is using an SSL certificate which your browser seems to be rejected because there is some issue with the certificate. It is also possible that the certificate that’s downloaded on your computer is corrupted or that your computer configuration for TSL/SSL is misconfigured.
Here are the complete details of the error message:
“A secure connection cannot be established because this site uses an unsupported protocol, Error code ERR_SSL_VERSION_OR_CIPHER_MISMATCH”
To resolve the ERR_SSL_VERSION_OR_CIPHER_MISMATCH error, refer to the options given below and see which one works for you.
Option 1 – Try to access the website with the only HTTP
The first thing you can do is to try accessing the website using HTTP instead of HTTPS. If you can open the website using HTTP then it means that the problem is in the website itself. And if you are the website owner, you can check the following:
Check if your website’s SSL certificate name is mismatched. Here you need to ensure that the name and alias of the websites match with the actual website URL where the certificate is installed.
Second, check if your server is using the RC4 Cipher. If it is, then you need to fix that.
On the other hand, you may also check if your CDN also supports SSL since most of the CDN nowadays supports SSL. All you have to do is configure it correctly and it should be good to go.
If you were using Google Chrome when you got the ERR SSL VERSION OR CIPHER MISMATCH error, then you need to follow the protocol fixes for SSL3/TLS and QUIC which are usually some of the reasons that cause the SSL version / Cipher Mismatch. It also has a few fixes for Windows 10 computer where you can clear the certificates and make sure that your computer date and time is in sync with your time zone and so on.
If you were using Edge or Internet Explorer when you got the error, then you have to follow the steps below.
Type “Internet” in the search box of your browser. After that, you should see the Internet Options from the search results.
Next, open the Internet Properties window and switch to the Advanced tab and then scroll down to the Security section.
From there, check the “Use TLS 1.1” checkbox as well as the “Use TLS 1.2” checkbox and then click OK to save the changes made.
Restart the browser.
On the other hand, if you were using Firefox when you go the error, here’s what you have to do.
Open Firefox and in the address bar, type “about:config” and hit Enter.
If a warning appears, just click on the “I accept the risk!” button to proceed.
Next, type in “TLS” in the search field and hit Enter.
Then look for “security.tls.version.min” and double click on it and set its integer value to 3 to force the protocol of TLS 1.3.
Now click OK and restart Firefox and do the same thing with SSL.
A lot of users prefer to use Microsoft OneDrive when it comes down to cloud storage as it does not only come with the seal of approval from Microsoft but it’s also primarily good and better compared to other cloud storage services. However, that doesn’t mean that OneDrive isn’t without any issues. For one, you might encounter an issue where the OneDrive thumbnails do not show in File Explorer in Windows 10. If you are currently experiencing this problem, read on as this post will help you fix it.
As you know, you can add OneDrive to your Windows 10 computer and have all the files locally synchronize to the cloud and so on. This means that whatever is available in the cloud will be seen on your computer. It is smooth and definitely saves you a lot of time which is why a lot of users prefer to use it. So if you suddenly not see any thumbnails in OneDrive, then that would be a problem.
You are actually not the only one having this problem as there are other users who reported getting the same issue recently about the picture thumbnails that no longer show up in the OneDrive folders in the File Explorer. At the time of writing, it isn’t clear yet what the cause of the issue really is. Even so, there are still potential fixes you can check out to resolve it, and the sooner you do it, the better as this can be a major problem. To get started, refer to the instructions given below.
Option 1 – Try to disable Files on Demand
The first thing you can do to fix the problem is to disable the Files on Demand. This is what you have to do to get things under control.
First, right-click on the OneDrive icon located in the taskbar and go-to of OneDrive.
After that, click on More and Settings. This will open a new window where you have to click on the Settings tab and uncheck the “Files on Demand” service.
Once done, restart your computer and check if you can now see the thumbnails in the OneDrive folder. However, if it didn’t work, then proceed to the next given option below.
Option 2 – Try to change the icon view
The next thing you can do to fix the problem is to change the icon view. It is possible that the problem might have something to do with the size of the icons than anything else. So you have to change the icon view and to do that, follow these steps:
First, open Control Panel in Windows 10.
Next, in the search box, type “folder” and then click on the File Explorer Options.
From there, click on the View tab and uncheck the “Always show icons” option, and make sure that showing thumbnails is active.
Now go back to Control Panel and type “system” in the search box. This will open a new window where you have to select the “View advanced system settings” option.
Then under the Performance section, click on Settings and click on the option that allows you to show the thumbnails instead of icons.
Wondering if upgrading to Windows 11 will boost your gaming experience? We can’t give you a straightforward answer, sadly. But we can take you through the tweaks you can expect if you have all the right requirements and help you make a final decision.
Is Windows 11 good for gaming?
Essentially, the answer to this question is yes. Microsoft has definitely added a bunch of enhancements and features to its latest OS to give gamers the best possible experience. However, you have to keep in mind that this may not work out smoothly for every single user.
Whether you’ll be able to fully take advantage of the Windows 11 gaming features really depends on your setup. As expected, Windows 11 has more demanding system requirements than its predecessor.
Credit: Florian Olivo on Unsplash
So, unless your hardware can run the new OS comfortably, you might not be able to make the most of all these gaming perks. In that case, we recommend you first upgrade your hardware and then make the switch. Be prepared to be a little surprised by a few other interesting changes in comparison to Windows 10, though!
For some of the new gaming features to work, it’ll also be necessary for you to have an NVMe SSD and an HDR-compatible monitor. So let’s take a look at 4 big improvements you can expect if your setup is compatible.
Gaming enhancements on Windows 11
1. Enjoy faster loading speed with DirectStorage
For this powerful feature to work, you need a compatible graphics card and, as stated before, an NVMe SSD. It’s also important for your GPU to support the DirectX 12 graphics API at least. And since we’re on that subject, you’ll be happy to know that Windows 11 has also introduced a new version of the API called DirectX 12 Ultimate.
Now, what does DirectStorage do? It’s a new feature designed to make full use of the speedy storage of NVMe SSDs. It also transfers game data directly onto the graphics card, lightening the load on your CPU. Normally the CPU would have to decompress the data first, but DirectStorage helps bypass this. That’s how loading times are reduced and games run more smoothly.
2. Fully immerse yourself through Game Mode
Windows 11’s Game Mode is certainly a welcomed addition. When you turn on Game Mode, usage of background apps that aren’t essential to your game is reduced. This results in the game you’re running becoming a priority process. This way, it uses your hardware and system resources to the max. Ultimately, the Game Mode means less lag and higher frame rates so you can play undisturbed and fully enjoy your gaming session.
3. Vibrant visual experience thanks to AutoHDR
For this one you’ll absolutely need an HDR-compatible monitor. Basically, HDR (High Dynamic Range) means a wider range of contrasts and colors that can be displayed on a monitor.
Windows 10 has an HDR feature, but you have to turn it on and off manually (“Use HDR”). Plus, users have reported that, if left on, it results in an unappealing appearance of content other than movies and games.
Windows 11 fixes that problem with its AutoHDR feature. Toggling it results in the system automatically adjusting the color contrast, balance and brightness based on what you’re currently looking at. For gamers, this means vivid imagery in every single game, resulting in a supreme visual experience. You can check out Microsoft’s own video showcasing the power of AutoHDR.
Aside from AutoHDR, another way Windows 11 improves the visual aspect is through its support for refresh rates of up to 360Hz.
4. Xbox Game Pass & Game Bar
It’s no secret that Microsoft wants to integrate Windows and Xbox. We’ve seen some attempts with Windows 10, but they’re pretty wonky compared to the new OS.
Windows 11’s built-in Xbox Game Bar enables quite a few options all gamers desire. You can take screenshots and videos of your game and send them, for starters. Furthermore, you can use it to see audio settings and monitor your PC’s performance without having to leave the game or open the Task Manager.
Widgets are also a really cool part of the Game Bar. You can choose from a wide variety of widgets, such as Xbox Achievements, Spotify, Gallery, Xbox Social and more.
Moreover, the Xbox Game Pass has been streamlined on Windows 11. Game Pass is a subscription service that unlocks hundreds of awesome games and supports cloud streaming. Do keep in mind that the games are only unlocked for a certain period of time, as the selection rotates once in a while.
What can you do for a better gaming experience?
Windows 11 does offer tweaks that require zero input from you. However, there are a few things you can do manually to get even more out of your new OS while gaming.
Turn off enhanced pointer precision. Most games enhance precision by default, so having this feature on might interfere with that.
Make sure to select your high performance graphics card for each game. Go to Settings > Gaming > Game Mode and tap ‘Graphics’ from the ‘Related settings’ menu. Find the game you want to adjust, click on ‘Options’ and choose your high performance graphics card to be the default setting. While there, you can also turn on ‘Hardware-accelerated GPU scheduling’ at the top.
Disable unnecessary apps and programs. As long as they aren’t essential to running your game, they might take up valuable system resources, so disable them to make space for your gaming requirements.
Check for pending updates and install them. It’s well-known that out-of-date software causes bugs, latency and crashes. The same goes for your GPU drivers.
Use the High-performance power plan (Control Panel > Power Options > Additional plans) to maximize the use of resources for the best possible performance.
Summary
Windows 11 has done quite a bit for avid gamers. We hope your setup is compatible with all these new features and you can experience these enhancements ASAP!
C00002lA Fatal System Error is a blue screen of death error that may occur when you start your Windows NT 4.0 based computer. This error causes the screen to turn blue and the system also shuts down.
The stop C000021A error message is displayed in the following format:
Stop c000021a {Fatal System Error} The session manager initialization system process terminated unexpectedly with a status of 0xc0000017 (0x00000000, 0x0000000) The system has been shut down.
Error Causes
The stop C000021A error occurs when either Crsrss.exe or Winlogon.exe fails. When the Windows NT kernel identifies that either of these processes has failed, it stops and the error code stop C000021A appears on the computer screen.
Here are some of the underlying causes for the stop C0000021A error:
The incompatible third-party program
Hard disk issues
Service pack installation has failed
Mismatched system files have been installed
Bad and invalid registry keys
Further Information and Manual Repair
To resolve the stop C000021A Fatal System Error on your PC try the following solutions:
Remove Incompatible Third Party Programs
If the error occurred after you recently installed a new program, then it is advisable to remove that program. The error occurs due to the incompatibility of the program.
To remove the program go to the start menu and click on the control panel. Now click on Add/Remove Program tab and double click on the program name that you recently installed and remove it from the list.
Once removed, not reboot your PC. Reinstall a compatible program and run it. It is most likely to resolve the issue. However, if the stop C000021A error still occurs, then it means the problem is critical. It is related to the registry.
Repair and Restore the Registry
This procedure is slightly long and tricky.
To try it, you need to be technically sound. Here’s what you have to do: first create a parallel installation of Windows NT.
Start your PC to the parallel installation and then open the Registry Editor. On the Registry Editor’s Windows menu click HKEY_LOCAL_MACHINE on Local Machine and then click Load Hive.
Now type the path %systemroot%system32configsystem into the System hive of the prior installation. Then click open. Here you will be prompted to enter the name of the key, type TEST.
Note the setting for the current DWord value in the preceding registry key. This is 0x1 and is denoted by CURRENT:Reg_Dword: 0x1.
This value indicated that the Current Control Set for your original Windows NT installation corresponds to ControlSet001 in this window. Now if the value is 2, it indicated that the Current Control Set corresponds to ControlSet002.
Now locate the following registry key:
HKEY_LOCAL_MACHINETESTControlSetXXXControlSession Manager. XXX is the Current Control Set Value. And delete any pending file rename operation entries. Then click TEST hive and then click Unload Hive. After that again repeat the process, open the registry menu and click load hive, here type the path %systemroot%system32configSoftware to the Software hive of the prior installation and then click open.
Now you type TEST 2 when you are prompted for the name of the key. Remove any pending file rename operations entries in the following registry keys:
HKEY_LOCAL_MACHINETEST2MicrosoftWindowsCurrentVersionRunOnceHKEY_LOCAL_MACHINETEST2MicrosoftWindowsCurrentVersionRunOnceEx
Now click TEST2 hive and then click unload hive. Quit the Registry Editor and then restart your original installation.
This will resolve the stop C000021A error.
Hello and welcome to our Reasons to Defrag Hard Drive. You ought to defrag your hard drive, in case your PC is slow. This could enhance the efficiency and pace of your PC too as its hardware longevity.
It places them where there is space, whenever your PC saves files. Often files are separated into bits. For example, whenever you remember a file and focus on it, it frequently doesn't fit back in exactly the same physical place. Where it can your PC divides up the file, occasionally into several parts, and saves it.
Why defrag?
Fragmentation causes difficulties that doing a defrag can correct. Fragmented files because it requires more resources and time to locate and remember these files slow down your pc. Applications may also take longer to load. Defragging can prolong the life span of the components. A defragged hard disk too can raise your likelihood of recovering lost information.
Once fragmentation starts, it can propagate fast -- demanding defragging.
It's like the pages of a publication are divided and hidden in several locations around a house, if a file is fragmented. It's like the pages of the book being brought back together, should you defrag. Defragging discovers all the bits of the file and places them in contiguous, actual places.
How will you defrag?
To defrag your hard drive, you must utilize software or utility. There are lots of defragging tools available. SpeedyPC Pro, a whole package of cleaning and optimization tools, can defragment your PC.
Before you defrag, it's best to assess your hard drive. This evaluation finds if a defrag is needed and how much of the disc is fragmented. You simply allow the application do the work if it's determined that you must defrag your PC to enhance performance.
To be able to defrag a drive, free disk space will be required by your PC.
Defragging can take a while. How long depends on several variables, such as the system resources accessible, the disc volume, the number of files, and how fragmented the files are. It's a great idea to defrag when you don't have to use your pc or it isn't doing other jobs. For example, the night could become a great time to defrag. Be certain to close out of resource-intensive applications, like your antivirus scanner, before you defrag.
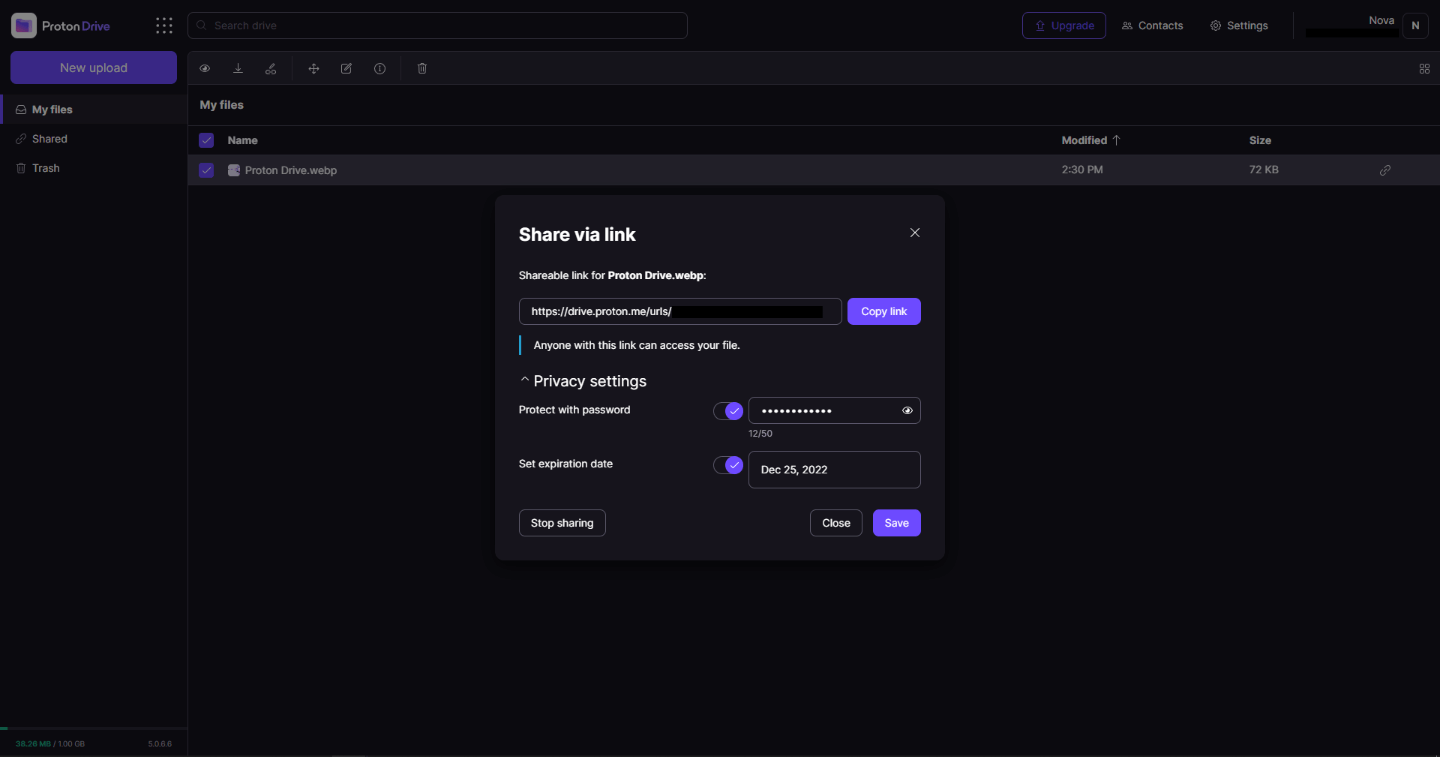
In 2014 Proton mail started as an end-to-end encrypted email service offering secure and private email services. Proton mail is still live and going with the same dedication to privacy and security but the company has expanded its offering into cloud storage drive services.
Starting as a public beta at the end of 2020, Proton Drive is keeping its privacy and security policy philosophy with the new service. Proton Drive is the newest service besides Proton Calendar, Proton VPN, and Proton Mail.
Drive has end-to-end encryption for everything on it including files themselves, filenames, folder structure, folder names, extensions, and file sizes. This means that you and only you can access your files. Servers are located in Geneva, Switzerland and they are under Swiss privacy laws making sure that your files are protected. Proton services in general are all open source so anyone can take a look at them to be sure that nothing is lurking under the hood. For now, sync is done either via the android app or web interface but the desktop client will come soon since currently, it is under development.
Sadly free plan of Proton Drive will give you only 1GB of storage which is much less than other services and sadly payments plans are also not so jaw-dropping going for $4 USD per month for a 200GB plan or with Proton ultimate subscription that will set you $10 behind but you will get 500GB of drive storage. Of course, if you value privacy for your files these options are good but if you do not mind that part other services have much better options.
All in all Proton Drive is a great cloud storage solution if you need privacy and well worth the investment. With the ultimate subscription, you will get enough space for most people and company needs with other services and guaranteed privacy and security, on the other hand, if you just need a large amount of cloud storage not caring too much about privacy other options are better.
Do you come across this error message “Receiving’ reported error (0x800ccc92): “Your e-mail server rejected your login”? Verify your user name and password in your account properties. The server responded: - ERR invalid user names and password” when you try to send or open emails using your Outlook account?
If yes, then this article is a must-read for you as we explain why this error occurs and how you can resolve it.
To begin with, 0x800ccc92 is a common Microsoft Outlook error.
This error restricts your ability to send and receive emails on your Outlook email address. In other words, it locks you out and hampers your ability to use your account successfully causing a great deal of inconvenience especially if you use your Outlook account for communication in and across your office.
Solution
Error Causes
The 0x800ccc92 error message may occur due to numerous reasons so narrowing it down to one particular reason for occurrence is not easy. However, here we have listed down some of the most common causes of this error code:
Incorrect Outlook configuration settings
Invalid password or username
PST file crosses its fixed file size limit
Failure of POP3 and Protocol STMP in database server connection
Improper synchronization between Outlook and the server
Virus Infection
Invalid registry entries
Further Information and Manual Repair?
To fix the error code 0x800ccc92 on your system, here are some quick, effective, and easy DIY solutions that you can try:
Solution 1:
Sometimes the error code may occur due to an invalid password and usernames entry. Therefore, first, cross-check user ID and password. If you’ve entered the wrong password, try inserting the correct password to access your account.
Solution 2:
If the error still persists, then try installing the latest available Server Service Pack for Exchange. This solution works best if compatibility is the issue and the underlying reason for the error is improper synchronization between Outlook and the server.
Solution 3:
The presence of malware and viruses can also lead to such errors. Therefore, it is advisable to scan your entire PC for malware and viruses using a powerful antivirus.
Solution 4:
If the issue occurs due to bad and invalid registry entries, then it is important that you remove them right away. Due to such entries, you may experience the 0x800ccc92 error on your PC. To remove them, you need to download a registry cleaner.
Downloading two programs an antivirus and a registry cleaner separately may slow down the speed of your PC. Therefore, to ensure this does not happen it is recommended you install Restoro
Restoro is an advanced and multi-functional PC Fixer. This software is deployed with an intuitive algorithm and multiple powerful PC repair utilities including a registry cleaner, anti-virus, and a system optimizer. It is a one-stop solution for all PC-related issues.
Using this tool, you can scan your entire PC and remove all types of malicious software including malware, viruses, spyware, and Trojans corrupting your PC in seconds. Simultaneously, it also removes all bad registry keys and entries and files the damaged system file, thereby restoring the registry back to normal.
The system optimizer utility ensures your PC speed is not compromised due to the repair process.
This software is safe, bug-free, efficient, and user-friendly. It is compatible with all Windows versions.
Click here to download Restoro on your PC to instantly remove viruses and invalid registry entries to resolve the 0x800ccc92 error message on your system now!
If you encounter an error message saying, “The connection was denied because the user account is not authorized for remote login” when you try to establish a remote connection, read on as this post will help you resolve the problem. This kind of error occurs when the targeted host does not allow you to access that system remotely. Based on the error, you are not authorized to log in remotely which means that you need to obtain the correct permission.
There are several potential fixes you can try for this error. You can try to check the Remote Desktop Users group or add users to the Security group or check the Remote Desktop Service itself.
Refer to the options provided below for more detailed instructions to fix the “The connection was denied because the user account is not authorized for remote login” error.
Option 1 – Try checking the Remote Desktop Users group
You can encounter this error when the Remote Desktop Users group does not have any permission for your user account that you are using to establish a remote connection. Thus, you need to make sure that your user account is a member of the Remote Desktop Users group. How? Refer to these steps:
Tap the Win + R keys on your keyboard and then type “cmd” in the field and tap Enter or click OK to open Command Prompt.
After opening Command Prompt, type the “lusrmgr.msc” command and tap Enter to execute it.
Alternatively, you can also search for “lusrmgr.msc” in the Start Search and once you’ve opened it, select Users and then double click on your user name to open its Properties.
From there, switch from the “General” tab to the “Member Of” tab.
Next, if you can’t see any Remote Desktop Users group under the Administrator, you have to add it. To do that, just click on the Add button.
After that, on the newly opened window, click on the Advanced and Find Now buttons, respectively.
And in the Search results box, double click on Remote Desktop Users.
Now click on the OK button to save the changes made and check if you can now connect to a remote host or not.
Option 2 – Try to add a user to the Security group
You can actually block or allow a user from logging on through the Remote Desktop Services. However, if you do not have the right setting, you won’t be able to use this functionality. Thus, you need to confirm this setting. To do that, follow the steps below.
In the Start Search, type “secpol.msc” in the field and tap Enter to open the Local Security Policy panel.
From there, go to User Rights Assignment.
Next, look for a policy named “Allow log on through Remote Desktop Services” located on your right-hand side and then double click on it to open its Properties.
If you were not able to find the Remote Desktop Users under Administrator, then you have to add it by simply clicking on the Add User or Group button.
After that, enter “Remote Desktop Users” in the blank field and click the OK button to save the changes made.
Now restart your computer and try connecting again to the remote host.
Option 3 – Try checking the Remote Desktop Users group
There is a service that’s supposed to be running and needs to be set up correctly for you to connect to the remote host. And so you need to ensure that this service is up and running. To do so, follow these steps:
Tap the Win + R keys to launch the Run utility.
Then type “services.msc” in the field and hit Enter or click OK to open the Services Manager.
Next, look for the Remote Desktop Services and double click on it to open its Properties.
After that, go to the “Log On” tab and select the “This account” option and then click on the Browse button.
On the next screen that appears, look for the Advanced button and click on it and use the Find Now button to search.
You will see “NETWORK SERVICE”. Double click on it and then save the changes you’ve made to the settings.
Finally, restart your PC and see if the problem is now fixed.
System image backup error 0x807800A1 & 0x800423F3 appears when you are trying to create a system image backup and the operation fails to do so.
If you’re faced with any of these error codes, try our recommended solutions in the order presented below and resolve the issue.
To restart the Volume Shadow Copy Service (VSS) on Windows 10, do the following:
Press ⊞ Windows + X to bring up the Windows menu.
Click on command prompt (admin)
In the command prompt window, type the commands below and hit Enter after each line:
net stop vssnet start vss
Once the commands execute successfully, try the system image backup again. The operation should complete successfully.
You need to also check if the Software Protection Service is disabled. If it is, then Start it and ensure that it is set to default which is Automatic (Delayed Started).
Create System Image using PowerShell
Command lines are less prone to errors provided the syntax is correct, unlike GUIs that can suffer a glitch every now and then.
To create a system image with PowerShell do the following:
Open the Windows PowerShell as administrator. To create a System Image in Windows 10 using PowerShell, you will have to run the Wbadmin command.
Inside the Powershell window type, then press Enter: wbadmin start backup-backup target: E:-include: C:-quiet-allCriticalE: is the target drive where you’re going to save the system image, and C: is the system root drive where Windows is currently installed
To extract the created system image, starting over from Windows 10 USB installation media, select advanced startup or open run and type: C: \ Windows \ System32 \ Shutdown.exe / r / o
Use third-party imaging software
If the previous two solutions have not managed to solve the issue there is always an option to use a third-party imaging solution. There are free open source and buying options offering various advantages each. Find out which one works best for you and use it.
As you know, every Windows Update is essential for every Windows operating system. They have to be regularly installed, especially since they include various security updates that are important to the system. However, there are times when Windows Update fails to execute properly and you get errors like the error code 0x80070BC9. When you encounter this particular Windows Update error, you will get the following error message on your screen:
“0x80070BC9 – ERROR_FAIL_REBOOT_REQUIRED. The requested operation failed. A system reboot is required to roll back changes made.”
This kind of Windows Update error is most likely caused by a newly installed problematic software, corrupted Windows Update files, or policies that restrict the behavior of the Windows Module Installer. The Windows Module Installer, also known as “WMIW” or “TiWorker.exe”, is the one that checks for new updates from the Windows server and installs them on your computer. This is why you need to make sure that you do not have any policies that control the start behavior of the Windows Module Installer since this service must not be hardened to any start value and should be managed by the operating system.
To resolve the Windows Update error code 0x80070BC9, you can check out the options provided below.
Option 1 – Try checking the status of the Windows Modules Installer Worker Service
Since the Windows Update error code 0x80070BC9 has something to do with the Windows Module Installer Worker service, you need to check its status in the Service Manager. Refer to the following steps to do so.
In the Cortana search box, type “services” and click on the Services icon to open the Services Manager. Alternatively, you can also tap the Win + R keys to launch the Run prompt and then type “MSC” in the field and hit Enter to open the Services Manager.
After opening the Services Manager, look for the Windows Modules Installer Worker Service.
Once you found it, check its status and make sure that its Startup type is set to Manual.
Now click on the Start button and see if it fixes the Windows Update error.
Option 2 – Run the Windows Update Troubleshooter
You might want to run a built-in Windows Update troubleshooter to resolve the Windows Update error. It is one of the things you can check out as it is known to automatically resolve any Windows Update errors like error code 0x80072EE2. To run this troubleshooter, go to Settings and then select Troubleshoot from the options. From there, click on Windows Update and then click the “Run the troubleshooter” button. After that, follow the next on-screen instructions and you should be good to go.
Option 3 – Try contacting the IT administrator to modify the group policies
You could also try to contact the IT administrator to have the group policies modified. This option is applicable for company-managed systems. As mentioned, one of the possible causes of the Windows Update error 0x80072EE2 is the policies that control the start behavior of the Windows Module Installer. Thus, you need to have them removed so that the Windows Module Installer Worker service is managed by the operating system itself. And since there could be many policies, it is highly advised that you contact your company’s IT administrator to get the job done for you.
Option 4 – Try to install the Windows Updates in a Clean Boot State
There are some instances that some conflicting programs installed in your computer might be the one that’s causing Windows Update error code 0x80070BC9. To identify which program is causing the problem, you need to put your computer in a Clean Boot State. To do so, follow the steps below.
Log onto your PC as an administrator.
Type in MSConfig in the Start Search to open the System Configuration utility.
From there, go to the General tab and click “Selective startup”.
Clear the “Load Startup items” check box and make sure that the “Load System Services” and “Use Original boot configuration” options are checked.
Next, click the Services tab and select the “Hide All Microsoft Services” check box.
Click Disable all.
Click on Apply/OK and restart your PC. (This will put your PC into a Clean Boot State. And configure Windows to use the usual startup, just simply undo the changes.)
From there, start to isolate the problem by checking which one of the programs you installed recently is the root cause of the problem.