DirectX function GetDeviceRemovedReason error is a DirectX error that comes up during playing games on Windows 11 operating system. Usually, the error occurs in gaming systems powered by AMD and very rarely if any times at all on Nvidia or intel platforms.
 If you are one of the gamers affected by this error, fear not because we have a solution for you. Follow provided fix guide in order to correct this error and get back to gaming asap.
The first thing of course is to update your graphic card driver, you can do this with your graphic cards panel software or directly in Windows itself but the best practice and one that I would recommend is to go to your graphic card manufacturer’s website and download the latest driver there, and then install it inside Windows 11.
Changing power mode inside Windows 11 can solve this issue since sometimes Windows power manager if it is set to anything except best performance can interfere with the proper functioning of the graphic adapter, and because of this error. To change the power setting do the following:
Corrupted system files can also cause this error and if previous steps have not resolved it we will use Windows built-in tool SFC scan to find and repair all bad files in windows.
Sometimes game files can get corrupt and maybe even overwritten, try with game reinstallation if the problem still persists.

Error Code 0x80060100 is an error that relates to the Windows Update process. It most commonly occurs when the Update process runs and cannot be completed, as the system appears to have necessary files corrupted or absent.
Common symptoms include:
While it can be frustrating when users are not able to complete their necessary updates for Windows 10, there are several solutions that are available to fix the problem at hand. Some of the methods that can be used are simple and accessible, even for beginners, while advanced methods of resolution are also available for users who are more confident in their abilities.
Error Code 0x80060100 appears on Windows 10 and earlier versions of the Windows operating systems. In most cases, the steps to resolve the problem remain the same, regardless of the system on which the error appears. This error code is also related to Error Code 0x800b0100, which appears in similar circumstances.
If the solutions below are not successful in resolving Error Code 0x80060100 on your machine, you may need to get in touch with a qualified repair technician who can assist you in the resolution of the issue at hand. Any repair technician used should be familiar with the needs of the Windows 10 update process.
 Error Causes
The primary cause for the appearance of Error Code 0x80060100 on a Windows machine is that the Update files have had damage to them or are found to have elements missing that are necessary for the completion of the Update process.
If Error Code 0x80060100 has appeared on your Windows operating system as you are attempting to download, install, or run Windows Update, there are several steps that you can take to attempt to resolve the error. Some of these methods require advanced knowledge or skills, so if you are not confident in your ability to undertake the steps below, contact a qualified Windows repair technician to assist you in the process.
Here are the best ways to resolve Error Code 0x80060100:
As you attempt to run the Windows Update process and experience difficulty, there is a tool that will usually appear on the screen called the Windows Update Troubleshooter. This process can scan the files being used for the update process and attempt to fix the errors on its own, retrieving or repairing any damaged files as it comes across them.
In most cases, this step on its own will resolve Error Code 0x80060100 on a computer. However, if you are still unable to run Windows Update after using the Troubleshooter, you may need to run a disk repair tool before proceeding.
In some cases, Error Code 0x80060100 can be resolved simply by restarting the computer that is affected by the error. Even if this step is not successful on its own, restarting after each of the other methods can allow necessary changes to take place and refresh the progress of the Windows Update process.
This method requires some skill and knowledge of your operating system. To use this tool, follow the steps below:
If the methods above are not successful in the resolution of Error Code 0x80060100, a qualified Windows repair technician may be able to assist you.
If you wish to always have at your disposal a utility tool to fix these Windows 10 and other related issues when they do arise, download and install a powerful automated tool.
Code 33 is a typical Device Manager error. This error code occurs when Windows is unable to start a device that you are trying to use on your PC. The error code 33 is usually displayed in the following format:
“Windows cannot determine which resources are required for this device. Code 33”
 Error Causes
Error code 33 may be triggered due to two reasons. One reason can be the translator's failure to find the correct resource for the device driver.
And since this error code is associated with the Device Manager, another reason can be an outdated or corrupted device driver. In most cases, the underlying problem for Device Manager error code is outdated/corrupted drivers.
The good news is that Device Manager error code 33 is not detrimental. However, if the error is not resolved timely, it can lower the functionality and the performance of your PC. You may not be able to use the hardware device.
To resolve code 33, you don’t need to be technically sound or hire a professional computer programmer. Just like any other Device Manager error code, code 33 is also easy to repair.
To help you fix this issue on your system, below are some of the best, easy, and effective DIY solutions.
Properly configure the problematic hardware device to fix error code 33. It is important to understand that when you install a device that is not plug-and-play, the resource settings are not configured automatically.
This means for such devices you will have to perform device configuration manually.
For device configuration, here’s what you should do:
Code 33 can also be generated due to driver problems. In such a scenario, it is recommended to update the outdated or corrupted drivers.
Identifying all problematic drivers and updating them individually can be frustrating and time-consuming. Therefore to save time and avoid the hassle involved in updating drivers manually, it is advisable to download DriverFIX.
DriverFIX is a next-generation and user-friendly program compatible with all Windows versions.
This software is exclusively designed to repair and resolve device driver-related problems and error codes.
Once installed, its intelligent and intuitive programming system detects all outdated, corrupted, and misconfigured device drivers on your PC. It automatically updates all the problematic drivers in a few seconds. It makes sure that the driver versions are the latest and compatible with your operating system.
Furthermore, it also ensures that drivers are continuously updated whenever new versions are available. So, you don’t have to worry about keeping device drivers up to date.
Click here to download DriverFIX to resolve Device Manager error code 33 today!
 BigTech platforms Google and Facebook were hit with a series of antitrust lawsuits by the US federal government and states on charges they are operating monopolies and abusing their power.
Below is the status of the cases, as well as government probes of Apple and Amazon in their current states
BigTech platforms Google and Facebook were hit with a series of antitrust lawsuits by the US federal government and states on charges they are operating monopolies and abusing their power.
Below is the status of the cases, as well as government probes of Apple and Amazon in their current states
Each time when you press WINDOWS + PrtScn key on your keyboard a screenshot is taken and saved on your Hard drive, to be more precise, it is saved in a specific folder which is in c:\Users\Your user name\Pictures\Screenshots. Now, this specific location is not anything that's bad but it is a little deep and not so user-friendly for quick access.
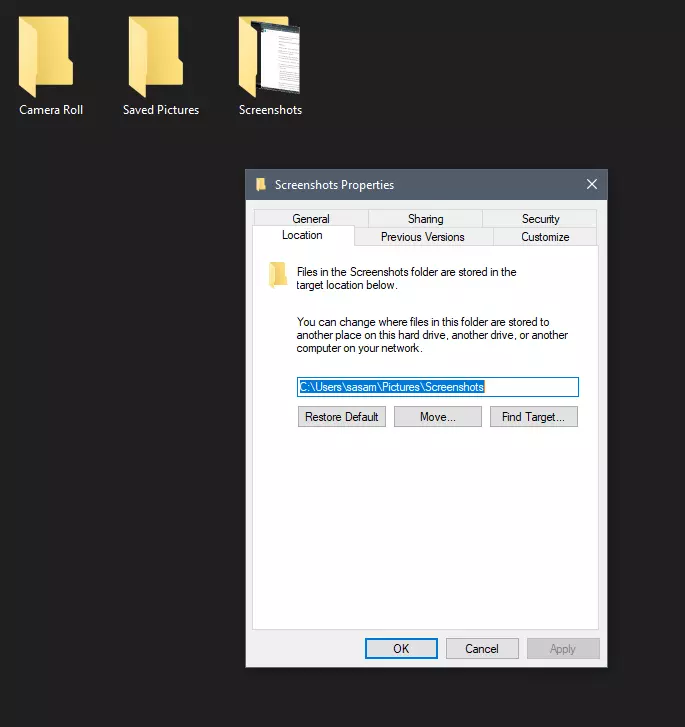
Luckily this default location can be changed into any folder that you like.
First thing is to open File Explorer and then navigate to your PC. Once you go to your PC, go to Pictures, and inside right-click on the Screenshots folder. If there is no screenshots folder inside, this means that since Windows was installed no screenshots were taken with WINDOWS + PrtScn key combination. Please note that just by pressing PrtScn you will create a screenshot but you will place it inside the clipboard ready to be pasted somewhere, with WINDOWS + PrtScn you are saving the screenshot directly in a file on your hard drive.
So once you clicked on the Screenshots folder, go to the bottom and click on properties. Inside properties go to the Location tab. In the location, tab clicks on MOVE and browse to your new location where you would like screenshots to be saved. Once you select the folder for screenshots, click on the Select Folder button and confirm with OK. After this, Windows will ask you would you like to move existing screenshots into the chosen folder. Click YES or NO, depending on your preference.
After this easy setup, all of your new screenshots will be placed now inside the chosen folder.
Thank you for reading and I hope to see you tomorrow. Take care.
 Bad or good news, depending on your view comes from RIOT for their game Valorant. It seems that Riot has decided to enforce Windows 11 TPM 2.0 feature into Valorant running on Windows 11 and there is a rumor that it will be de facto standard and that it will move to Valorant in general no matter on which system it runs.
Furthermore, there is a rumor circling around that other developers are also talking about implementing TPM 2.0 requirements so they can harvest advanced security features of Windows 11 in order to prevent hacks and other cheats in their games.
This is an interesting point to stand on, on one side, sure, advanced features that will prevent cheating and hacking is a great thing. On other hand denying access to many computers that do not support TPM 2.0 and removing them from the game can be a permanent loss of customers and therefore loss of money. It is a risk to be sure and I am not really sure that alienating gamers is a good choice for long-term income, especially when you will be able to install Windows 11 on an unsupported PC as stated by Microsoft.
We will all see how this Riot decision will reflect on their business, as not a big Valorant player myself I am not impacted too much with this decision, but it will be interesting to see if others will indeed go with this trend or they will decide to wait a while until much more PC’s are upgraded.
Bad or good news, depending on your view comes from RIOT for their game Valorant. It seems that Riot has decided to enforce Windows 11 TPM 2.0 feature into Valorant running on Windows 11 and there is a rumor that it will be de facto standard and that it will move to Valorant in general no matter on which system it runs.
Furthermore, there is a rumor circling around that other developers are also talking about implementing TPM 2.0 requirements so they can harvest advanced security features of Windows 11 in order to prevent hacks and other cheats in their games.
This is an interesting point to stand on, on one side, sure, advanced features that will prevent cheating and hacking is a great thing. On other hand denying access to many computers that do not support TPM 2.0 and removing them from the game can be a permanent loss of customers and therefore loss of money. It is a risk to be sure and I am not really sure that alienating gamers is a good choice for long-term income, especially when you will be able to install Windows 11 on an unsupported PC as stated by Microsoft.
We will all see how this Riot decision will reflect on their business, as not a big Valorant player myself I am not impacted too much with this decision, but it will be interesting to see if others will indeed go with this trend or they will decide to wait a while until much more PC’s are upgraded. This error is quite common and is faced by many Microsoft Outlook users. It is advisable to fix this error immediately because besides restricting you from sending and receiving emails via Outlook, due to this error the data on your Outlook also becomes inaccessible and unreadable, and sometimes Outlook also begins to freeze unexpectedly.‘Receiving reported error (0x800ccc92): Your email server rejected your login.’
 Like in Windows 10, Windows 11 will also support God mode to be enabled and used. For those readers that do know what God mode is, let me explain it in simple terms. God mode is the icon on the desktop that once clicked will open and let you adjust every option in the control panel and some hidden features for Windows inside one application.
There are a lot of advantages to having this one-click fast access to features, especially if you are a power user. Luckily creating such an awesome icon and enabling God mode is very easy to accomplish, all you have to do is:
Like in Windows 10, Windows 11 will also support God mode to be enabled and used. For those readers that do know what God mode is, let me explain it in simple terms. God mode is the icon on the desktop that once clicked will open and let you adjust every option in the control panel and some hidden features for Windows inside one application.
There are a lot of advantages to having this one-click fast access to features, especially if you are a power user. Luckily creating such an awesome icon and enabling God mode is very easy to accomplish, all you have to do is: