Changing Taskbar location in your Windows 10 is an easy task but lately, Microsoft has removed the option to just drag it to one side of the screen and place it there, now in order to change location we need to do a little more work but do not worry it is not difficult at all.
Right-click on the taskbar to open its properties menu
 in the menu, on the bottom choose taskbar settings. Once the settings dialog opens, on the right side locate the taskbar location on screen.
 Click on the dropdown menu and choose the desired location for the taskbar.

“Windows can’t stop your ‘Generic volume’ device because a program is still using it. Close any programs that might be using the device, and then try again later.”It is possible that the system is still using the external device – for instance, a copy operation might still be in progress, or Windows is still indexing the contents of the drive in the background or it could also be that the drive is not configured to be quickly removed. To fix this error, there are a couple of suggestions you can try. You can try to close all the open programs and file explorer windows, or you could also configure the Device Removal Policy or change its file system to FAT32. In addition, you can also try to change its drive letter or use the DISKPART utility to get the drive to be offline or simply manage the hogging process that prevents it from being safely removed. Follow each one of the given potential fixes below to resolve the error when using the Safely Remove Hardware feature.
net stop wuauserv net start cryptSvc net start bits net start msiserver
net start wuauserv net start cryptSvc net start bits net start msiserver
 From the menu choose command prompt (admin)
 In command prompt type sfc /scannow and press ENTER
Leave the computer for the operation to be completed and Reboot your computerFrom the menu choose command prompt (admin)
in command prompt type: DISM.exe /Online /Cleanup-image /Restorehealth and press ENTER
wait for the process to be finished and Reboot your computer
In command prompt type sfc /scannow and press ENTER
Leave the computer for the operation to be completed and Reboot your computerFrom the menu choose command prompt (admin)
in command prompt type: DISM.exe /Online /Cleanup-image /Restorehealth and press ENTER
wait for the process to be finished and Reboot your computerHKEY_LOCAL_MACHINESOFTWAREMicrosoftWindowsCurrentVersionWindowsUpdateOSUpgradeNote: If the above-given registry key does not exist, you can simply create it. All you have to do is right-click on the WindowsUpdate key and then select the New Key option and type “OSUpgrade” as its name. Afterward, create a new DWORD (32-bit) Value and name it “AllowOSUpgrade” and set its value to 0x00000001. Step 3: Restart your computer and check if the error is now fixed. And then try to update your Windows 10 computer again and while you’re at it, make sure that you’re around your computer to interact with the prompts needed to complete the installation process.
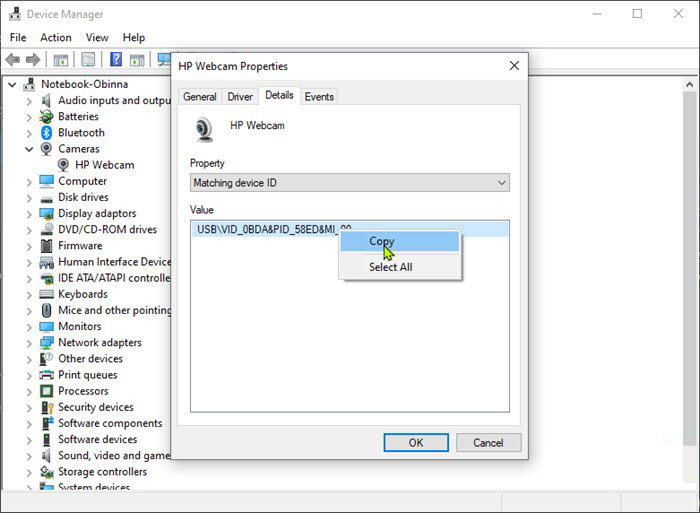
In the menu choose device manager and click on it.
 When the device manager opens, expand the Imaging devices or Cameras section.
Right-click Integrated Camera or the primary webcam, and click Properties.
Go to the Details tab.
Under the Property section, click to select Matching device ID from the drop-down.
Right-click the value and select Copy
When the device manager opens, expand the Imaging devices or Cameras section.
Right-click Integrated Camera or the primary webcam, and click Properties.
Go to the Details tab.
Under the Property section, click to select Matching device ID from the drop-down.
Right-click the value and select Copy
 The next step is to download and install Windows Driver Kit (WDK)
$id = (Get-CimInstance Win32_PnPEntity |

where caption -match '<PRIMARY CAMERA>').pnpDeviceID

$ppid = "{0}{1}" -f '@',$id

Set-Location c:\<FOLDER>

Devcon status $ppid

Devcon disable $ppid

Devcon status $ppid
To enable the camera device, run the command below in PowerShell:
devcon enable $ppid