Iminent Emoticons is a browser plugin developed by IMinent. This extension offers users a whole new way to chat by adding new emojis, memes, and other interesting features to social media chats. However, upon further investigation, we did not manage to get this extension work or show up in any chat.
While installing this extension may display additional ads throughout your browsing sessions depending if it has an affiliate link for the desired search terms. It may also change your default search engine and home page to search.iminent.com (depending on the extension version).
Malware has been detected in this extension by several anti-virus programs and is therefore not recommended to keep on your computer.
About Browser Hijackers
Browser hijacking means a malicious code has power over and modified the settings of your internet browser, without your consent. Nearly all browser hijackers are created for advertising or marketing purposes. Generally, hijackers are programmed for the benefit of internet hackers usually through revenue generation that comes from forced advert mouse clicks and website visits. Most people think that these websites are legitimate and harmless but that is not the case. Nearly every browser hijacker poses an actual threat to your online safety and it’s necessary to categorize them under privacy risks. Some browser hijackers are programmed to make certain modifications beyond the browsers, like changing entries in the computer registry and letting other types of malware further damage your PC.
Browser hijacking signs and symptoms
There are various symptoms that indicate the internet browser is hijacked: the browser’s home-page is modified; you get re-directed to internet sites you never meant to visit; The default search page of your web browser is altered; unwanted new toolbars are added to your browser; your browser displays constant pop-up ads; websites load very slowly and sometimes incomplete; you have prohibited entry to specific web pages, including the website of an anti-malware software manufacturer like SafeBytes.
Exactly how browser hijacker infects PCs
Browser hijackers can get into a computer by some means or other, for instance via downloads, file sharing, and e-mail too. They can also be deployed through the installation of a web browser toolbar, add-on, or extension. A browser hijacker may also come bundled up with some freeware which you unintentionally download and install, compromising your PC security. Some of the well-known hijackers are Iminent Emoticons, Babylon Toolbar, Conduit Search, OneWebSearch, Sweet Page, and CoolWebSearch.
The existence of any browser hijacker on your computer might drastically diminish the browsing experience, track your online activities that result in serious privacy concerns, diminish overall system performance and cause application instability also.
The best ways to get rid of a browser hijacker
Certain browser hijacking can be easily reversed by discovering and eliminating the corresponding malware application through your control panel. But, most browser hijackers are hard to get rid of manually. Irrespective of how much you try to remove it, it may keep coming back again and again. Rookie computer users shouldn’t ever attempt the manual form of removal methods, as it needs in-depth system knowledge to carry out fixes on the computer registry and HOSTS file.
Installing and running antivirus applications on the affected computer could automatically delete browser hijackers and also other malicious applications. One of the greatest tools for fixing browser hijacker malware is SafeBytes Anti-Malware. It will help you get rid of any pre-existing malware in your system and gives you real-time monitoring and protection from new threats. Employ a system optimiser along with your anti-malware software to fix various registry problems, eliminate computer vulnerabilities, and enhance your computer's overall performance.
Learn How to Eliminate Malware that is Blocking Websites or Preventing Downloads
Malware could cause all sorts of damage if they invade your computer, ranging from stealing your personal information to erasing files on your PC. Certain malware variants alter internet browser settings by including a proxy server or change the PC’s DNS settings. In these cases, you’ll be unable to visit some or all internet sites, and thus not able to download or install the necessary security software to clear out the infection. So what should you do if malicious software prevents you from downloading or installing Anti-Malware? There are some solutions you can attempt to get around with this particular obstacle.
Boot your computer in Safe Mode
The Windows OS comes with a special mode known as “Safe Mode” in which just the minimum required applications and services are loaded. In the event, the virus is set to load automatically when PC boots, shifting into this mode may prevent it from doing so. To start the computer into Safe Mode, hit the “F8” key on the keyboard right before the Windows boot screen appears; Or right after normal Windows boot up, run MSConfig, look over “Safe Boot” under Boot tab, and click Apply. As soon as you restart into Safe Mode with Networking, you can download, install, and update the anti-malware program from there. Now, you can actually run the antivirus scan to get rid of computer viruses and malware without interference from another application.
Switch to an alternate browser
Certain viruses might target vulnerabilities of a specific web browser that obstruct the downloading process. The most effective solution to avoid this issue is to choose an internet browser that is known for its security features. Firefox contains built-in Malware and Phishing Protection to help keep you safe online.
Run antivirus from a pen drive
Here’s yet another solution which is using a portable USB anti-virus software package that can check your system for malicious software without needing installation. Adopt these measures to employ a USB flash drive to clean your infected computer system.
1) Download the anti-malware on a virus-free PC.
2) Plug in the USB drive to a USB port on the clean computer.
3) Run the setup program by double-clicking the executable file of the downloaded application, with a .exe file format.
4) Select the drive letter of the USB drive as the place when the wizard asks you where you want to install the anti-virus. Follow the on-screen instructions to finish the installation.
5) Now, transfer the pen drive to the infected PC.
6) Double-click the EXE file to run the Safebytes tool right from the pen drive.
7) Run Full System Scan to identify and get rid of all sorts of malware.
Highlights of SafeBytes Anti-Malware
To help protect your computer or laptop from many different internet-based threats, it’s important to install an anti-malware application on your personal computer. However, with so many anti-malware companies in the market, nowadays it is difficult to decide which one you should buy for your computer. A few are worth your money, but many aren’t. You should pick a company that creates industry-best antimalware and has gained a reputation as reliable. Among few good programs, SafeBytes Anti-Malware is the highly recommended software for the security-conscious user.
SafeBytes anti-malware is a highly effective and easy-to-use protection tool that is designed for users of all levels of computer literacy. With its outstanding protection system, this tool will instantly detect and get rid of most of the security threats, including browser hijackers, viruses, adware, ransomware, PUPs, and trojans.
SafeBytes has excellent features when compared with various other anti-malware programs. Here are some of the best ones:
Robust, Anti-malware Protection: This deep-cleaning anti-malware software program goes much deeper than most anti-virus tools to clean your PC. Its critically acclaimed virus engine locates and disables hard to remove malware that hides deep within your PC.
Active Protection: SafeBytes provides complete and real-time security for your PC. They’re extremely effective in screening and getting rid of different threats since they’re constantly improved with new updates and safety measures.
Web Security: SafeBytes provides an instant safety rating to the web pages you are about to visit, automatically blocking unsafe sites and ensuring that you are certain of your online safety while browsing the web.
Faster Scanning: SafeBytes Anti-Malware has a multi-thread scan algorithm that works up to five times faster than any other protection software.
Minimal CPU and RAM Usage: This application is not “heavy” on the computer’s resources, so you’ll not see any performance issues when SafeBytes is working in the background.
24/7 Online Tech Support: For any technical problems or product support, you can get 24/7 expert assistance via chat and e-mail.
SafeBytes will keep your computer protected from the latest malware threats automatically, thereby keeping your web experience safe and secure. You now may realize that this particular tool does more than just scan and eliminate threats from your PC. So if you’re trying to find a comprehensive antivirus program that’s still easy to use, SafeBytes Anti-Malware is exactly what you will need!
Technical Details and Manual Removal (Advanced Users)
If you don’t wish to use malware removal software and like to eliminate Imminent Emoticons manually, you could do so by going to the Add/Remove Programs menu in the Control Panel and deleting the offending program; in cases of web browser plug-ins, you could remove it by visiting the browsers Add-on/Extension manager. You may also want to reset your home page and search engine providers, and also delete temporary files, browsing history, and internet cookies.
If you choose to manually remove the system files and Windows registry entries, utilize the following checklist to make sure you know exactly what files to remove before executing any actions. Please keep in mind that only experienced computer users should try to manually edit the system files because deleting any single vital registry entry results in a major problem or even a PC crash. In addition to that, some malware is capable of replicating or preventing deletion. You are urged to do this procedure in Safe Mode.
Files:
%PROGRAMFILES%\IMinent Toolbar\TbHelper2.exe
%PROGRAMFILES%\IMinent Toolbar\tbhelper.dll
%PROGRAMFILES(x86)%\IMinent Toolbar\uninstall.exe
%COMMONPROGRAMFILES%\IMGUpdater\IMGUpdater.exe
%TEMP%\RarSFX0\Binaries\IMinentToolbarInstallerCHR.exe
%LOCALAPPDATA%\Microsoft\Windows\Temporary Internet Files\Content.IE5\X7WAGUH3\IminentSetup.exe
%PROGRAMFILES%\IminentToolbar.8.21.26\bh\iminent.dll
%PROGRAMFILES%\IminentToolbar.8.25.0\iminentsrv.exe
%TEMP%\Setup.exe1b7d2cac9747d1a847e0a25b76eaa0\HKEY_LOCAL_MACHINE\Software\IminentSetup.exe
%COMMONPROGRAMFILES%\Umbrella\Umbrella.exe
%COMMONPROGRAMFILES%\Hydrup\hydrup.exe
%TEMP%\Iminent\iminenttoolbar.exe
%TEMP%\Iminent\IMinentToolbarFF.exe
%TEMP%\Iminent\IminentToolbarChrome.exe
C:\Program Files\iminent toolbar\access connections.resources.dll
C:\Program Files\iminent toolbar\acwizres.dll
C:\Program Files\iminent toolbar\diagres.dll
C:\Program Files\iminent toolbar\f5res.dll
C:\Program Files\iminent toolbar\guihlprres.dll
C:\Program Files\iminent toolbar\iconres.dll
C:\Program Files\iminent toolbar\iminent_toolbar.dll
C:\Program Files\iminent toolbar\mainguires.dll
C:\Program Files\iminent toolbar\p2pres.dll
C:\Program Files\iminent toolbar\svchlprres.dll
C:\Program Files\iminent toolbar\tbcommonutils.dll
C:\Program Files\iminent toolbar\tbcore3.dll
C:\Program Files\iminent toolbar\trayres.dll
C:\Program Files\iminent toolbar\update.exe
Registry:
HKEY_LOCAL_MACHINE\Software\Iminent
HKEY_LOCAL_MACHINE\Software\Classes\iminent
HKEY_LOCAL_MACHINE\Software\Wow6432Node\Iminent
HKEY_LOCAL_MACHINE\Software\Wow6432Node\Loader, value: Iminent
HKEY_LOCAL_MACHINE\Software\Classes\AppID\Iminent.WebBooster.InternetExplorer.DLL
HKEY_LOCAL_MACHINE\Software\Classes\IminentWebBooster.ActiveContentHandler
HKEY_LOCAL_MACHINE\Software\Classes\IminentWebBooster.ActiveContentHandle.1
HKEY_LOCAL_MACHINE\Software\Classes\IminentWebBooster.BrowserHelperObject
HKEY_LOCAL_MACHINE\Software\Classes\IminentWebBooster.BrowserHelperObject.1
HKEY_LOCAL_MACHINE\Software\Classes\IminentWebBooster.ScriptExtender
HKEY_LOCAL_MACHINE\Software\Classes\IminentWebBooster.TinyUrlHandler.1
HKEY_LOCAL_MACHINE\Software\Wow6432Node\Microsoft\Internet Explorer\Low Rights\ElevationPolicy\68B81CCD-A80C-4060-8947-5AE69ED01199
HKEY_LOCAL_MACHINE\Software\Microsoft\Internet Explorer\Low Rights\ElevationPolicy\68B81CCD-A80C-4060-8947-5AE69ED01199
HKEY_LOCAL_MACHINE\Software\Wow6432Node\Microsoft\Internet Explorer\Low Rights\ElevationPolicy\E6B969FB-6D33-48d2-9061-8BBD4899EB08
HKEY_LOCAL_MACHINE\Software\Microsoft\Internet Explorer\Low Rights\ElevationPolicy\E6B969FB-6D33-48d2-9061-8BBD4899EB08
HKEY_LOCAL_MACHINE\Software\Wow6432Node\Microsoft\Windows\CurrentVersion\explorer\Browser Helper Objects\A09AB6EB-31B5-454C-97EC-9B294D92EE2A
HKEY_LOCAL_MACHINE\Software\Microsoft\Windows\CurrentVersion\explorer\Browser Helper Objects\A09AB6EB-31B5-454C-97EC-9B294D92EE2A
HKEY_LOCAL_MACHINE\Software\Microsoft\Internet Explorer\SearchScopes\BFFED5CA-8BDF-47CC-AED0-23F4E6D77732
HKEY_LOCAL_MACHINE\Software\Classes\iminent.iminentappCore
HKEY_LOCAL_MACHINE\Software\Classes\iminent.iminentappCore.1
HKEY_LOCAL_MACHINE\Software\Classes\iminent.iminentHlpr.1
HKEY_LOCAL_MACHINE\Software\Classes\esrv.iminentESrvc
HKEY_LOCAL_MACHINE\Software\Classes\esrv.iminentESrvc.1
HKEY_LOCAL_MACHINE\Software\Iminent.com
HKEY_LOCAL_MACHINE\Software\SIEN SA\iminent\iestrg
HKEY_LOCAL_MACHINE\Software\Wow6432Node\Microsoft\Windows\CurrentVersion\explorer\Browser Helper Objects\112BA211-334C-4A90-90EC-2AD1CDAB287C
HKEY_LOCAL_MACHINE\Software\Microsoft\Internet Explorer\Toolbar, value: 1FAFD711-ABF9-4F6A-8130-5166C7371427
HKEY_LOCAL_MACHINE\Software\Microsoft\Windows\CurrentVersion\Policies\Ext\CLSID, value: 58124A0B-DC32-4180-9BFF-E0E21AE34026
HKEY_LOCAL_MACHINE\Software\Microsoft\Windows\CurrentVersion\Policies\Ext\CLSID, value: 977AE9CC-AF83-45E8-9E03-E2798216E2D5
HKEY_LOCAL_MACHINE\Software\Microsoft\Windows\CurrentVersion\Policies\Ext\CLSID, value: A09AB6EB-31B5-454C-97EC-9B294D92EE2A
HKEY_LOCAL_MACHINE\Software\Wow6432Node\Microsoft\Windows\CurrentVersion\Policies\Ext\CLSID, value: 58124A0B-DC32-4180-9BFF-E0E21AE34026
HKEY_LOCAL_MACHINE\Software\Wow6432Node\Microsoft\Windows\CurrentVersion\Policies\Ext\CLSID, value: 977AE9CC-AF83-45E8-9E03-E2798216E2D5
HKEY_LOCAL_MACHINE\Software\Wow6432Node\Microsoft\Windows\CurrentVersion\Policies\Ext\CLSID, value: A09AB6EB-31B5-454C-97EC-9B294D92EE2A
HKEY_LOCAL_MACHINE\Software\Wow6432Node\Google\Chrome\Extensions\pkhojieggfgllhllcegoffdcnmdeojgb
HKEY_LOCAL_MACHINE\Software\Google\Chrome\Extensions\pkhojieggfgllhllcegoffdcnmdeojgb
HKEY_LOCAL_MACHINE\Software\SIEN SA\iminent
HKEY_LOCAL_MACHINE\Software\Microsoft\Windows\CurrentVersion\Installer\UpgradeCodes\F1057DD419AED0B468AD8888429E139A
HKEY_LOCAL_MACHINE\Software\Classes\Installer\ProductsDA786FCDC08E1345AF052DDF8C9693C
HKEY_LOCAL_MACHINE\Software\Classes\Installer\FeaturesDA786FCDC08E1345AF052DDF8C9693C
HKEY_LOCAL_MACHINE\Software\Wow6432Node\SIEN SA\iminent
HKEY_LOCAL_MACHINE\Software\IminentToolbar
HKEY_LOCAL_MACHINE\Software\Wow6432Node\IminentToolbar
HKEY_LOCAL_MACHINE\Software\Microsoft\Windows\CurrentVersion\Ext\Settings\112BA211-334C-4A90-90EC-2AD1CDAB287C
HKEY_LOCAL_MACHINE\Software\Microsoft\Windows\CurrentVersion\Ext\Settings\1FAFD711-ABF9-4F6A-8130-5166C7371427
HKEY_LOCAL_MACHINE\Software\Microsoft\Windows\CurrentVersion\Ext\Stats\1FAFD711-ABF9-4F6A-8130-5166C7371427
HKEY_LOCAL_MACHINE\Software\Microsoft\Windows\CurrentVersion\Ext\Stats\A09AB6EB-31B5-454C-97EC-9B294D92EE2A
HKEY_LOCAL_MACHINE\Software\Wow6432Node\Microsoft\Windows\CurrentVersion\Uninstall\0C3DD791-1026-4B03-8085-34EFB8CE1BBF
HKEY_LOCAL_MACHINE\Software\Wow6432Node\Microsoft\Windows\CurrentVersion\Uninstall\A76AA284-E52D-47E6-9E4F-B85DBF8E35C3
HKEY_LOCAL_MACHINE\Software\Microsoft\Internet Explorer\DOMStorage\iminent.com
HKEY_LOCAL_MACHINE\Software\Microsoft\Internet Explorer\Approved Extensions, value: 112BA211-334C-4A90-90EC-2AD1CDAB287C
HKEY_LOCAL_MACHINE\Software\Microsoft\Internet Explorer\Approved Extensions, value: 1FAFD711-ABF9-4F6A-8130-5166C7371427
HKEY_LOCAL_MACHINE\Software\Microsoft\Windows NT\CurrentVersion\Schedule\TaskCache\Tree\FinishInstall igdhbblpcellaljokkpfhcjlagemhgjl
HKEY_LOCAL_MACHINE\Software\Classes\Installer\Products\E396BA1A8EBEBBB43A064AB3ED340563
HKEY_LOCAL_MACHINE\Software\Classes\Installer\Features\E396BA1A8EBEBBB43A064AB3ED340563
SYSTEM\CurrentControlSet\services\SharedAccess\Parameters\FirewallPolicy\FirewallRules, value: CC8D0DB8-9F7A-4ADA-8076-7B117B2ED858
SYSTEM\CurrentControlSet\services\SharedAccess\Parameters\FirewallPolicy\FirewallRules, value: F59D208C-5E1B-4F8C-9A78-8223FBD4063A
SYSTEM\ControlSet002\services\SharedAccess\Parameters\FirewallPolicy\FirewallRules, value: CC8D0DB8-9F7A-4ADA-8076-7B117B2ED858
SYSTEM\ControlSet002\services\SharedAccess\Parameters\FirewallPolicy\FirewallRules, value: F59D208C-5E1B-4F8C-9A78-8223FBD4063A
SYSTEM\ControlSet001\services\SharedAccess\Parameters\FirewallPolicy\FirewallRules, value: F59D208C-5E1B-4F8C-9A78-8223FBD4063A
SYSTEM\ControlSet001\services\SharedAccess\Parameters\FirewallPolicy\FirewallRules, value: CC8D0DB8-9F7A-4ADA-8076-7B117B2ED858
HKEY_LOCAL_MACHINE\Software\Google\Chrome\Extensions\igdhbblpcellaljokkpfhcjlagemhgjl
HKEY_LOCAL_MACHINE\Software\Wow6432Node\Google\Chrome\Extensions\igdhbblpcellaljokkpfhcjlagemhgjl
HKEY_LOCAL_MACHINE\Software\Wow6432Node\Microsoft\Internet Explorer\SearchScopes\BFFED5CA-8BDF-47CC-AED0-23F4E6D77732
HKEY_LOCAL_MACHINE\Software\Classes\Installer\Features449B1EE14291541B3C4CDDE93B252A
HKEY_LOCAL_MACHINE\Software\Classes\Installer\Products586FB55F67A9248BBFDC2D8B1D2398
HKEY_LOCAL_MACHINE\Software\Classes\Installer\Products449B1EE14291541B3C4CDDE93B252A
HKEY_LOCAL_MACHINE\Software\Classes\Installer\UpgradeCodesEAE1F36DDB49FE49B1371401AAC7E1B
HKEY_LOCAL_MACHINE\Software\Classes\Installer\UpgradeCodes\FAD0B0799202FD24D9B96C24C2BD169E
HKEY_LOCAL_MACHINE\Software\Microsoft\Windows\CurrentVersion\Installer\UpgradeCodesEAE1F36DDB49FE49B1371401AAC7E1B
HKEY_LOCAL_MACHINE\Software\Microsoft\Windows\CurrentVersion\Installer\UpgradeCodes\FAD0B0799202FD24D9B96C24C2BD169E
HKEY_LOCAL_MACHINE\Software\Microsoft\Internet Explorer\Approved Extensions, value: 0F417468-BE40-472B-8CB9-A2CDA9A071D6
HKEY_LOCAL_MACHINE\Software\Microsoft\Internet Explorer\Approved Extensions, value: A6E9BAAF-53CD-4575-967B-2AF710A7D21F
HKEY_LOCAL_MACHINE\Software\Microsoft\Windows\CurrentVersion\Ext\Settings\0F417468-BE40-472B-8CB9-A2CDA9A071D6
HKEY_LOCAL_MACHINE\Software\Microsoft\Windows\CurrentVersion\Ext\Settings\84FF7BD6-B47F-46F8-9130-01B2696B36CB
HKEY_LOCAL_MACHINE\Software\Microsoft\Windows\CurrentVersion\Ext\Settings\A6E9BAAF-53CD-4575-967B-2AF710A7D21F
HKEY_LOCAL_MACHINE\Software\Microsoft\Windows\CurrentVersion\Ext\Stats\0F417468-BE40-472B-8CB9-A2CDA9A071D6
HKEY_LOCAL_MACHINE\Software\Microsoft\Windows\CurrentVersion\Ext\Stats\84FF7BD6-B47F-46F8-9130-01B2696B36CB
HKEY_LOCAL_MACHINE\Software\Microsoft\Windows\CurrentVersion\Ext\Stats\A6E9BAAF-53CD-4575-967B-2AF710A7D21F
HKEY_LOCAL_MACHINE\Software\Microsoft\Windows\CurrentVersion\explorer\Browser Helper Objects\A6E9BAAF-53CD-4575-967B-2AF710A7D21F
HKEY_LOCAL_MACHINE\Software\America Online\AIM\Plugins\696E3174-4F6C-4777-7834-654C4A705677
HKEY_LOCAL_MACHINE\Software\Wow6432Node\Microsoft\Windows\CurrentVersion\explorer\Browser Helper Objects\A6E9BAAF-53CD-4575-967B-2AF710A7D21F
HKEY_LOCAL_MACHINE\Software\Wow6432Node\Microsoft\Windows\CurrentVersion\Ext\PreApproved\c6137682-faae-4ea5-a6ab-88acb29d3667
HKEY_LOCAL_MACHINE\Software\Wow6432Node\Microsoft\Windows\CurrentVersion\Run, value: Iminent.Notifier
HKEY_LOCAL_MACHINE\Software\Wow6432Node\America Online\AIM\Plugins\696E3174-4F6C-4777-7834-654C4A705677
HKEY_LOCAL_MACHINE\Software\Classes\AppID\Iminent.MMServer.EXE
HKEY_LOCAL_MACHINE\Software\Classes\AppID\Iminent.WinCore.Aim.Plugin.DLL
HKEY_LOCAL_MACHINE\Software\Classes\AppID\13C8734A-1AD2-4500-9F65-10D99AD80F54
HKEY_LOCAL_MACHINE\Software\Classes\AppID\C2A66189-05A0-4D30-8DD2-CF4C86E38863
HKEY_LOCAL_MACHINE\Software\Classes\AppID\CE187331-35C5-4917-A79B-25342D466651
HKEY_LOCAL_MACHINE\Software\Classes\AppID\F90A8B2A-0EE0-4C04-8DFB-91A3381E5A71
HKEY_LOCAL_MACHINE\Software\Classes\IminentBHONavigationError.CHelperBHO
HKEY_LOCAL_MACHINE\Software\Classes\IminentMMServer.ACPlayer
HKEY_LOCAL_MACHINE\Software\Classes\IminentMMServer.ACPlayer.1
HKEY_LOCAL_MACHINE\Software\Classes\Wow6432Node\AppID\Iminent.BHO.NavigationError.DLL
HKEY_LOCAL_MACHINE\Software\Classes\Wow6432Node\AppID\Iminent.LinkToContent.DLL
HKEY_LOCAL_MACHINE\Software\Classes\Wow6432Node\AppID\Iminent.MMServer.EXE
HKEY_LOCAL_MACHINE\Software\Classes\Wow6432Node\AppID\Iminent.WinCore.Aim.Plugin.DLL
HKEY_LOCAL_MACHINE\Software\Classes\Wow6432Node\AppID\13C8734A-1AD2-4500-9F65-10D99AD80F54
HKEY_LOCAL_MACHINE\Software\Wow6432Node\Classes\AppID\Iminent.BHO.NavigationError.DLL
HKEY_LOCAL_MACHINE\Software\Wow6432Node\Classes\AppID\Iminent.LinkToContent.DLL
HKEY_LOCAL_MACHINE\Software\Wow6432Node\Classes\AppID\Iminent.MMServer.EXE
HKEY_LOCAL_MACHINE\Software\Wow6432Node\Classes\AppID\Iminent.WinCore.Aim.Plugin.DLL
HKEY_LOCAL_MACHINE\Software\Wow6432Node\Classes\AppID\13C8734A-1AD2-4500-9F65-10D99AD80F54
HKEY_LOCAL_MACHINE\Software\Wow6432Node\Classes\AppID\C2A66189-05A0-4D30-8DD2-CF4C86E38863
HKEY_LOCAL_MACHINE\Software\Wow6432Node\Classes\AppID\CE187331-35C5-4917-A79B-25342D466651
HKEY_LOCAL_MACHINE\Software\Classes\Installer\Features\C73660D04266C3348A703CD454AD1B48
HKEY_LOCAL_MACHINE\Software\Classes\Installer\Products\C73660D04266C3348A703CD454AD1B48
HKEY_LOCAL_MACHINE\Software\Classes\Installer\Products86028EAE6ABEC44BE58148A174F21E
HKEY_LOCAL_MACHINE\Software\Wow6432Node\Google\Chrome\Extensions\ehhlaekjfiiojlddgndcnefflngfmhen
HKEY_LOCAL_MACHINE\Software\Wow6432Node\Google\Chrome\Extensions\nbljechdpodpbchbmjcoamidppmpnmlc
HKEY_LOCAL_MACHINE\Software\Google\Chrome\Extensions\ehhlaekjfiiojlddgndcnefflngfmhen
HKEY_LOCAL_MACHINE\Software\Google\Chrome\Extensions\nbljechdpodpbchbmjcoamidppmpnmlc
HKEY_LOCAL_MACHINE\Software\Microsoft\Internet Explorer\DOMStorage\start.iminent.com
HKEY_LOCAL_MACHINE\Software\Microsoft\Internet Explorer\DOMStorage\adserver.iminent.com
HKEY_LOCAL_MACHINE\Software\Wow6432Node\Google\Chrome\Extensions\adpeheiliennogfclcgmchdfdmafjegc
HKEY_LOCAL_MACHINE\Software\Google\Chrome\Extensions\adpeheiliennogfclcgmchdfdmafjegc
HKEY_LOCAL_MACHINE\Software\Wow6432Node\Google\chrome\Extensions\olghjjajidfdflkafeekiojnfmiolccp
HKEY_LOCAL_MACHINE\Software\Google\chrome\Extensions\olghjjajidfdflkafeekiojnfmiolccp
HKEY_LOCAL_MACHINE\Software\Microsoft\Internet Explorer\LowRegistry\DOMStorage\setup3.iminent.com
HKEY_LOCAL_MACHINE\Software\Microsoft\Internet Explorer\LowRegistry\DOMStorage\setup2.iminent.com
HKEY_LOCAL_MACHINE\Software\Microsoft\Internet Explorer\DOMStorage\setup3.iminent.com


 Error Causes
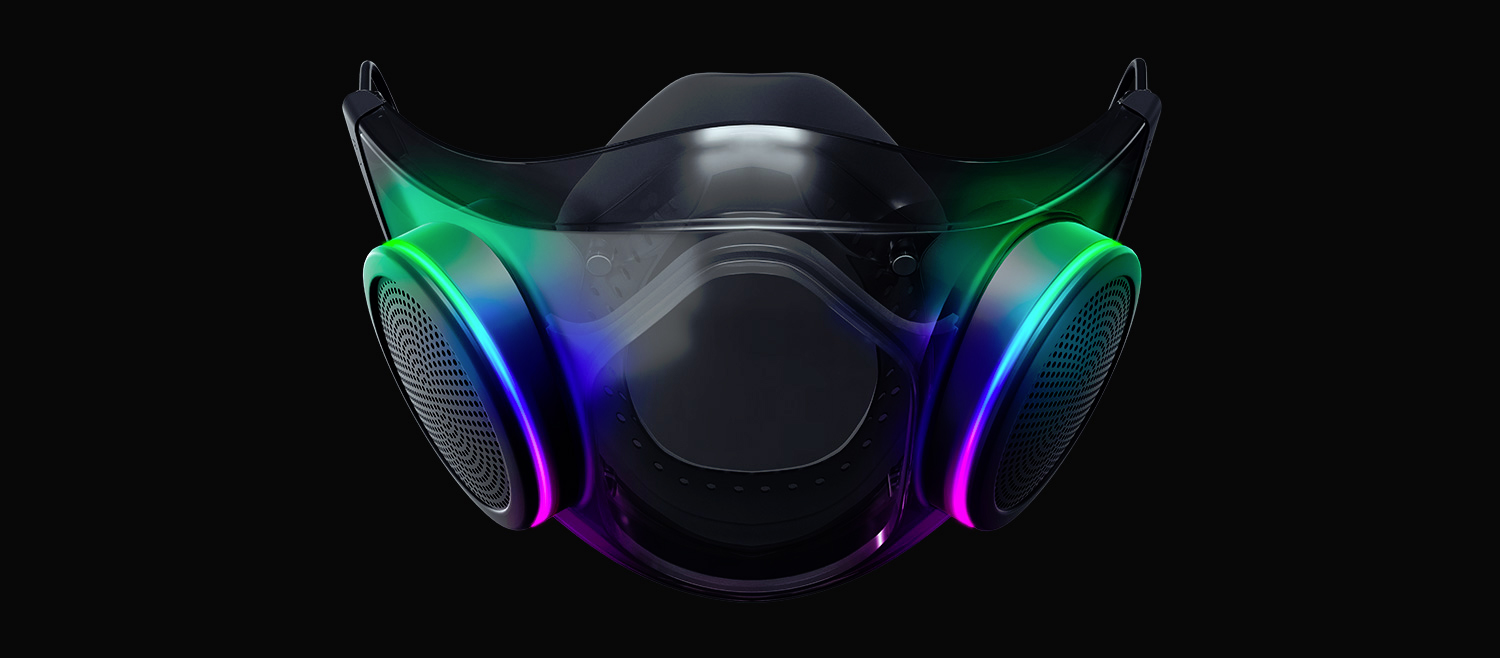 The world today is still sadly under pandemic and by the looks of it, COVID-19 is here to stay, well at least for some time in the near future. Razer seems to think so as well since their upcoming gear is not really what you would expect.
Enter Hazel, a new and upcoming Razer smart mask.
The world today is still sadly under pandemic and by the looks of it, COVID-19 is here to stay, well at least for some time in the near future. Razer seems to think so as well since their upcoming gear is not really what you would expect.
Enter Hazel, a new and upcoming Razer smart mask.
 Over time Applications change, some for the better some for worse. Some of them even stop receiving updates and are old and vulnerable. Sometimes standards change and some file types are not used anymore. Software evolves along with technology and that is good.
Keeping old and useless applications inside your Windows is not so good. From various exploits to simply taking up space, maybe even slowing down OS it is always wise and good to clean your Windows from unwanted old applications.
In this article, we will be mentioning some relics of old and providing you with an explanation of why you should remove them from your system if by any chance you still have them on it.
Over time Applications change, some for the better some for worse. Some of them even stop receiving updates and are old and vulnerable. Sometimes standards change and some file types are not used anymore. Software evolves along with technology and that is good.
Keeping old and useless applications inside your Windows is not so good. From various exploits to simply taking up space, maybe even slowing down OS it is always wise and good to clean your Windows from unwanted old applications.
In this article, we will be mentioning some relics of old and providing you with an explanation of why you should remove them from your system if by any chance you still have them on it.